

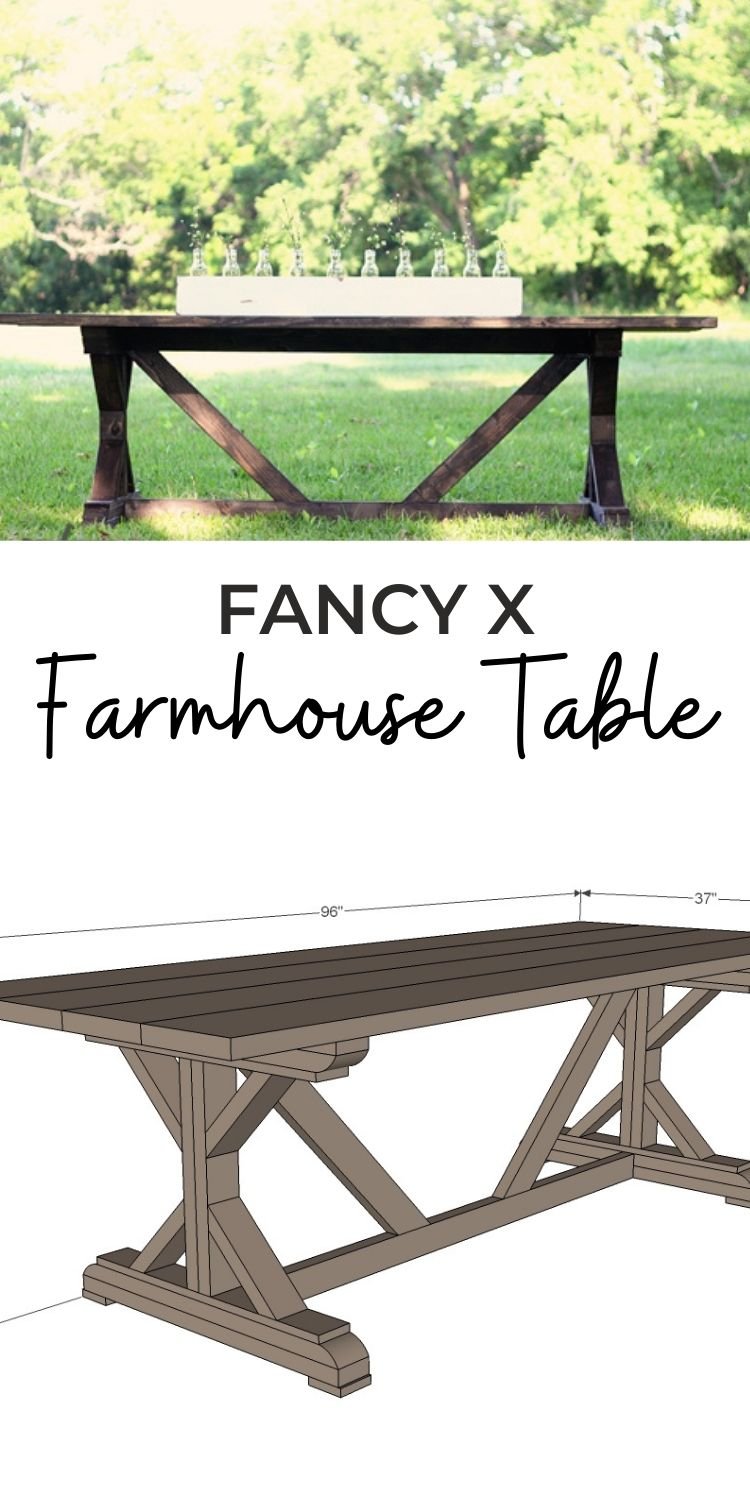
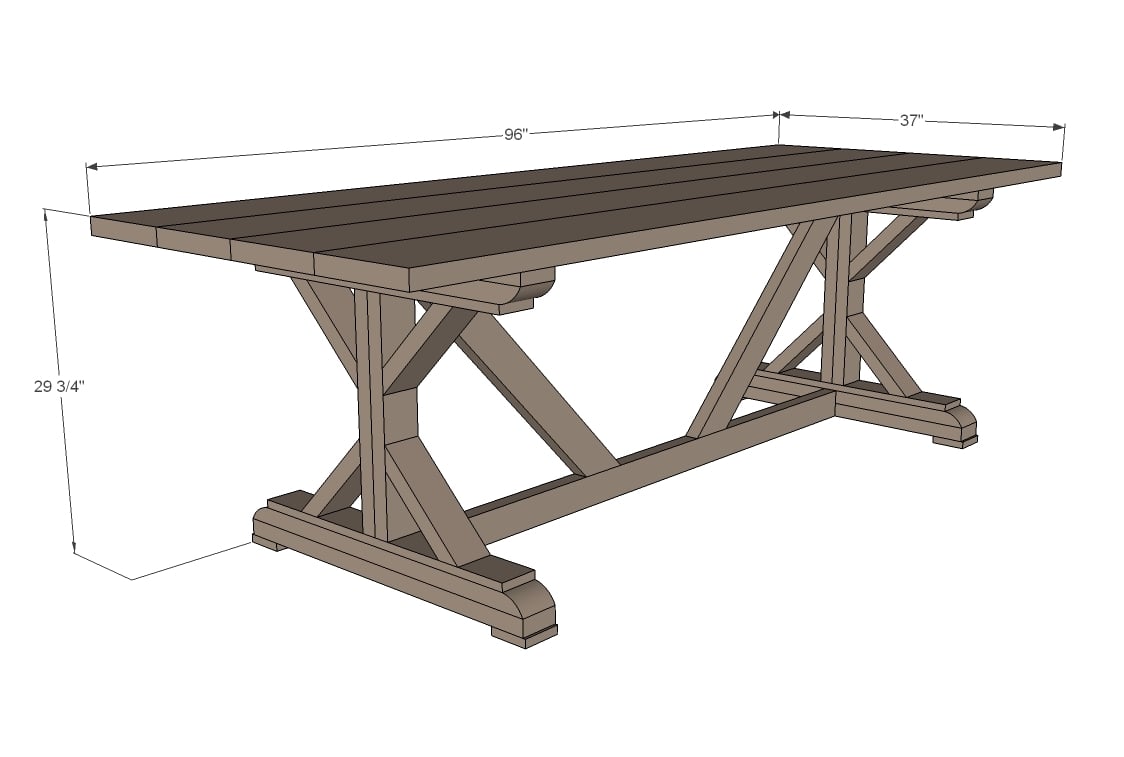
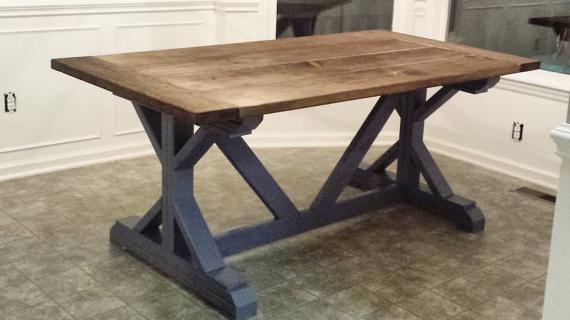
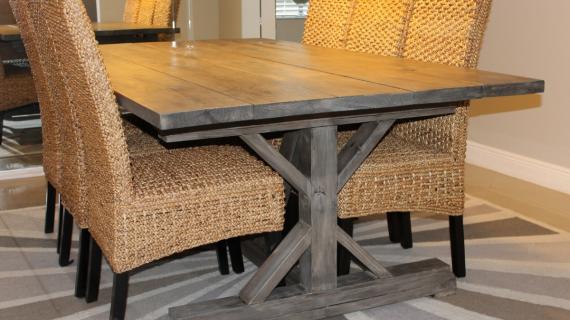
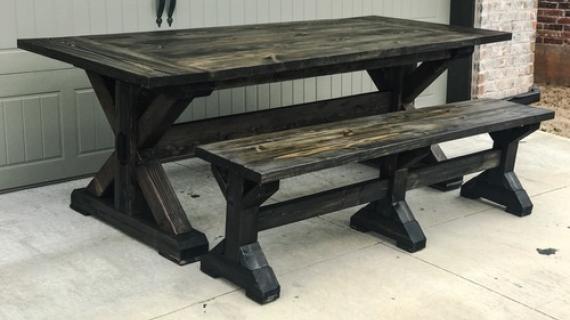
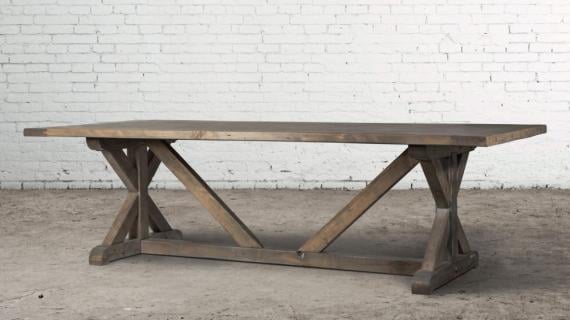
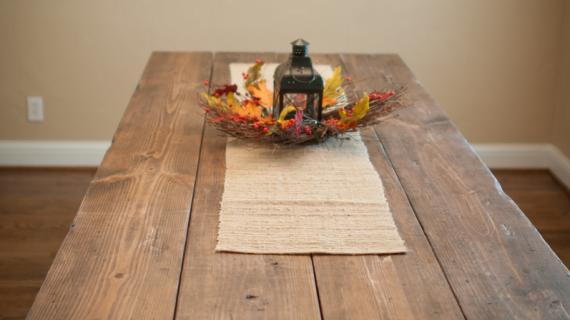
Build the Fancy X Farmhouse Table from 2x4s and lumber for $65. A reader favorite, this table has been built thousands of times!
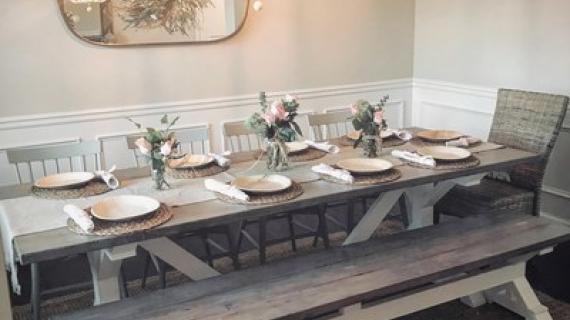
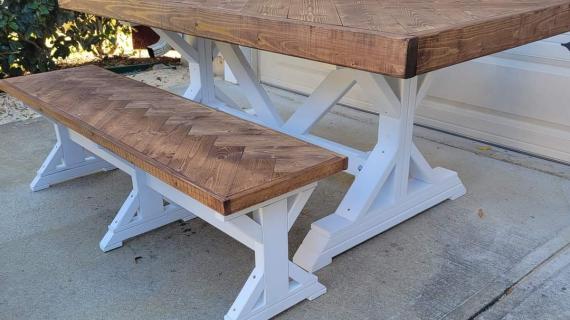
We also have plans for a matching bench and lots more farmhouse furniture plans.

Video - Watch this Table Being Built!
See More Photos and Build Post
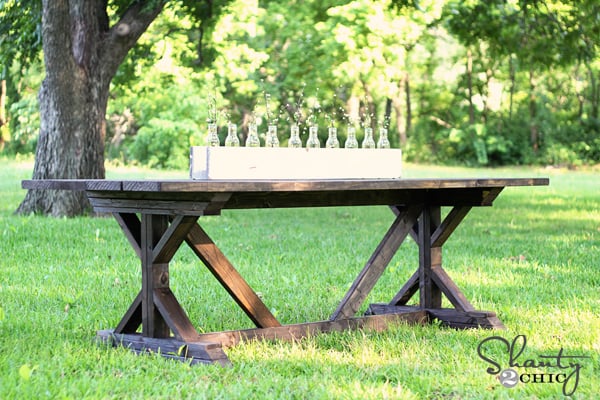
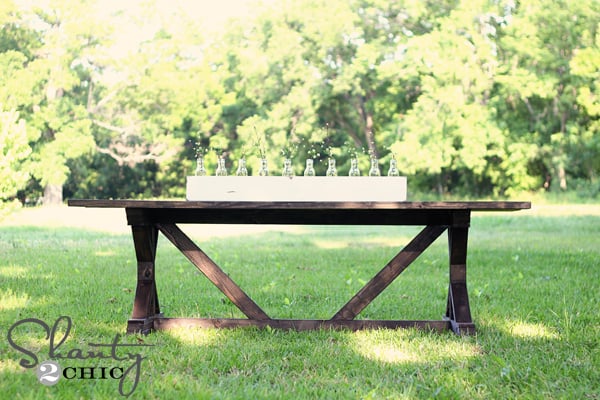
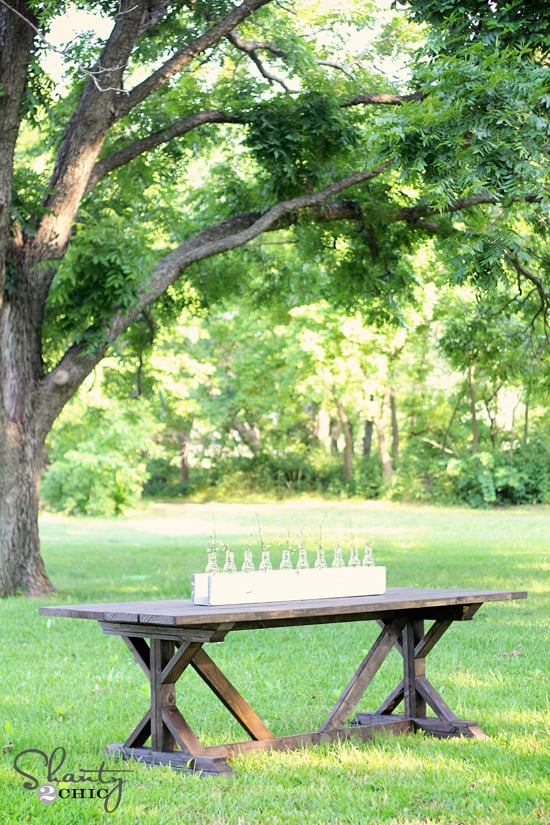
This table was built in collaboration with my friend Whitney from Shanty2Chic. Whitney has a family of seven, and wanted to build a sturdy and strong farmhouse table with a little bit of fancy to it to dine on outdoors this summer.
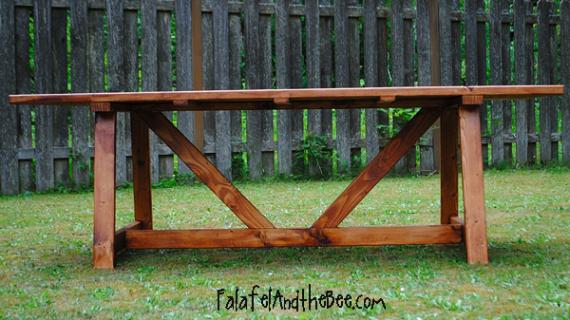
This is my very favorite build yet! I have been in serious need for an outdoor table to seat my family of 7. When we stumbled upon a beautiful, long farmhouse table from Anthropologie, I knew it was love at first sight. Everything was perfect about it... Except that $2,000 price tag... Ouch. That hurts to even write. But... I knew who to call to help me make my own at a very small fraction of that cost! This baby only cost me $65!
Head over to visit Whitney at Shanty2Chic to get all the details, lots more photos, and a peek at her construction process!
Thanks Whitney!!!
Pin For Later!
Preparation
4 – 2x10 @ 8 feet long
7 – 2x4 @ 8 feet long
1 – 1x4 @ 12 feet long
3” self tapping wood screws
2 ½” pocket hole screws
2” finish nails
ENDS
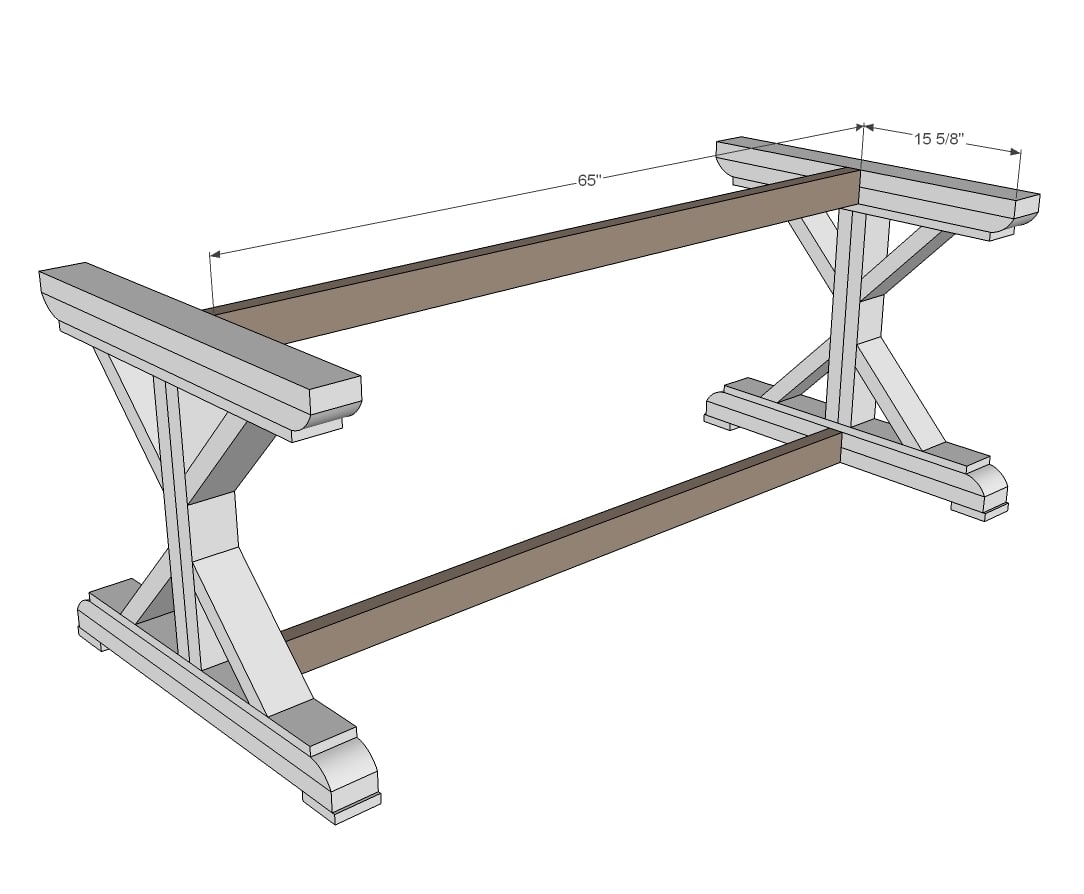
- 8 – 2x4 @ 11 3/8” (ends cut at 45 degrees off square, longest point measurement, NOT parallel)
- 4 – 2x4 @ 20”
- 4 – 1x4 @ 28 3/8” **
- 8 – 2x4 @ 32 5/8” CUT TO FIT **
- 4 – 1x4 @ 3 ½”
MAIN TABLE
- 2 – 2x4 @ 65”
- 2 – 2x4 @ 30 3/8” (both ends cut parallel at 45 degrees off square)
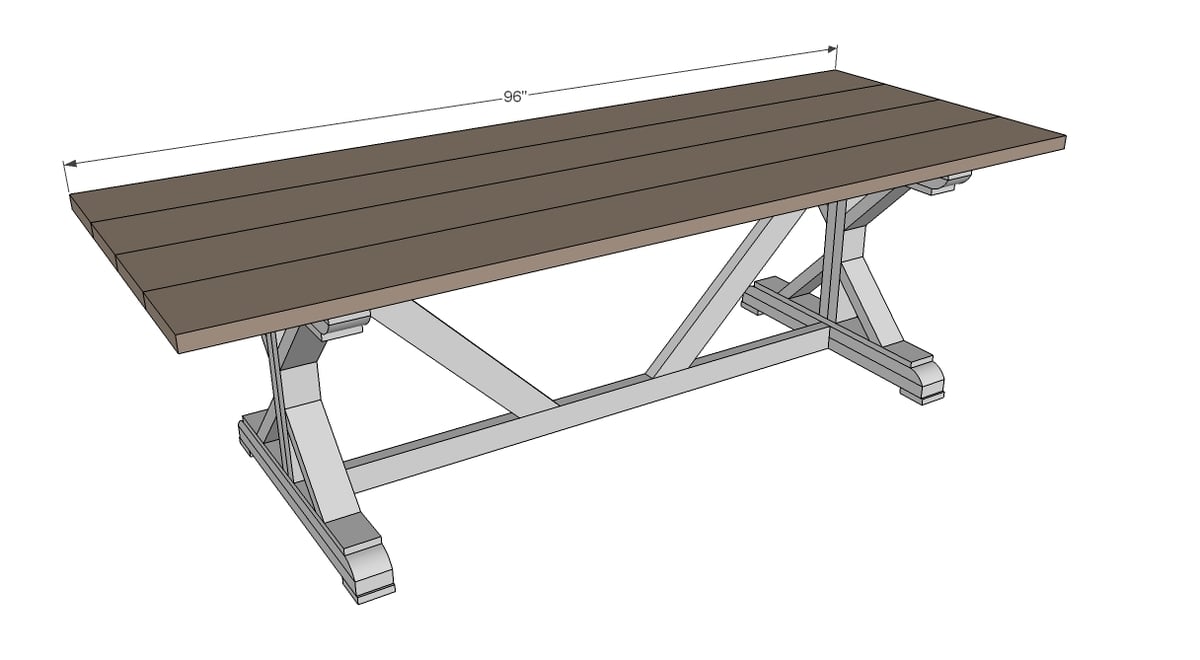
- 4 – 2x10 @ 96”
** For 45 degree cut tops and bottoms (easier) on the legs top and bottom (see steps 3-5 and step 10), replace these cuts with:
- 4 - 2x4 @ 31" (both ends cut at 45 degrees off square NOT parallel long point measurement)
- 4 - 2x4 @ 34" (both ends cut at 45 degrees off square NOT parallel long point measurement)
Please read through the entire plan and all comments before beginning this project. It is also advisable to review the Getting Started Section. Take all necessary precautions to build safely and smartly. Work on a clean level surface, free of imperfections or debris. Always use straight boards. Check for square after each step. Always predrill holes before attaching with screws. Use glue with finish nails for a stronger hold. Wipe excess glue off bare wood for stained projects, as dried glue will not take stain. Be safe, have fun, and ask for help if you need it. Good luck!
Instructions
Step 1
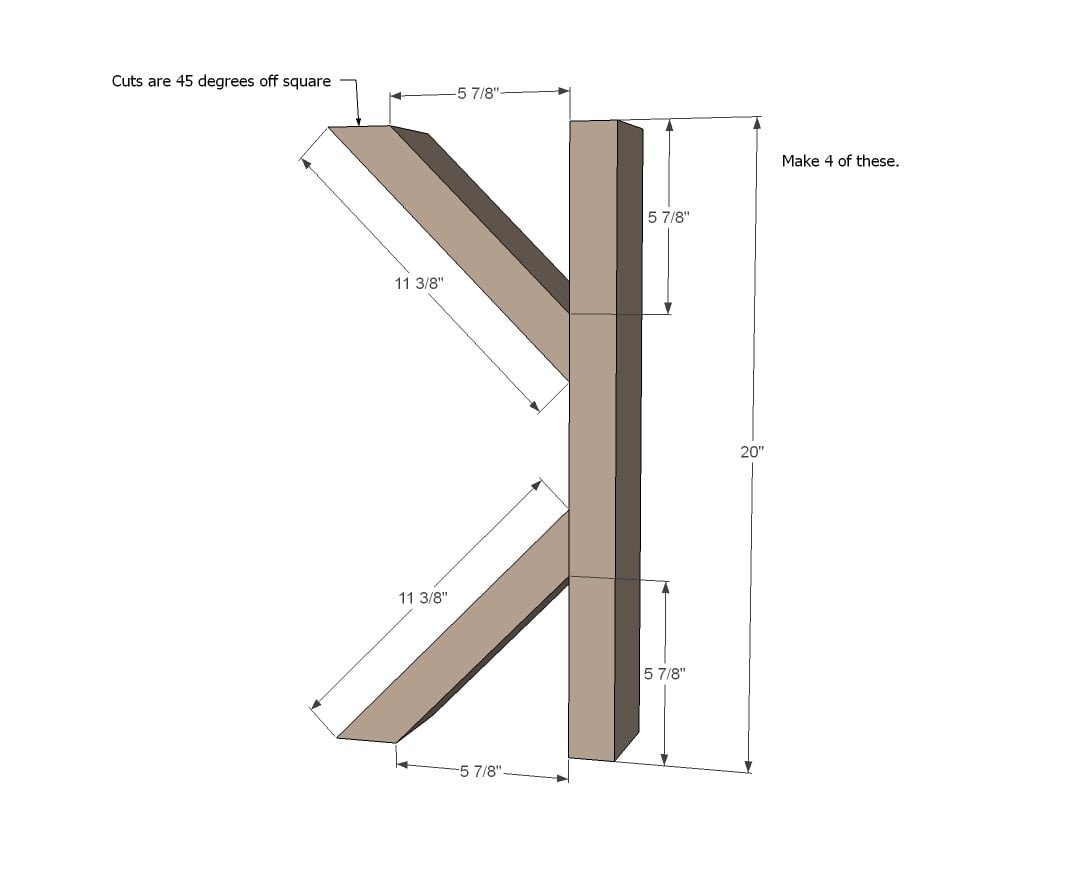
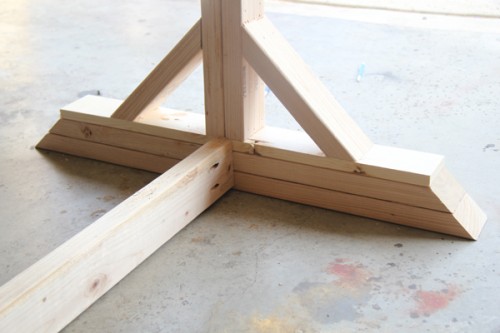
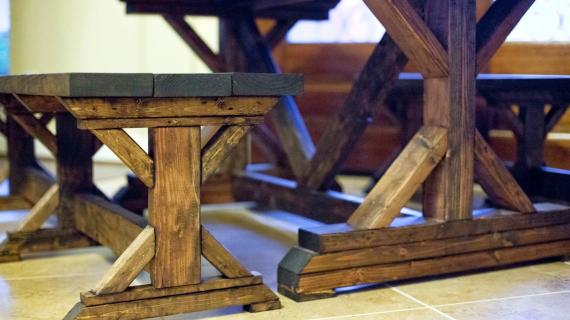
Build four of these. I’d simply countersink screws from the backs into the ends of the cross braces using 2-1/2" self tapping wood screws
Step 2
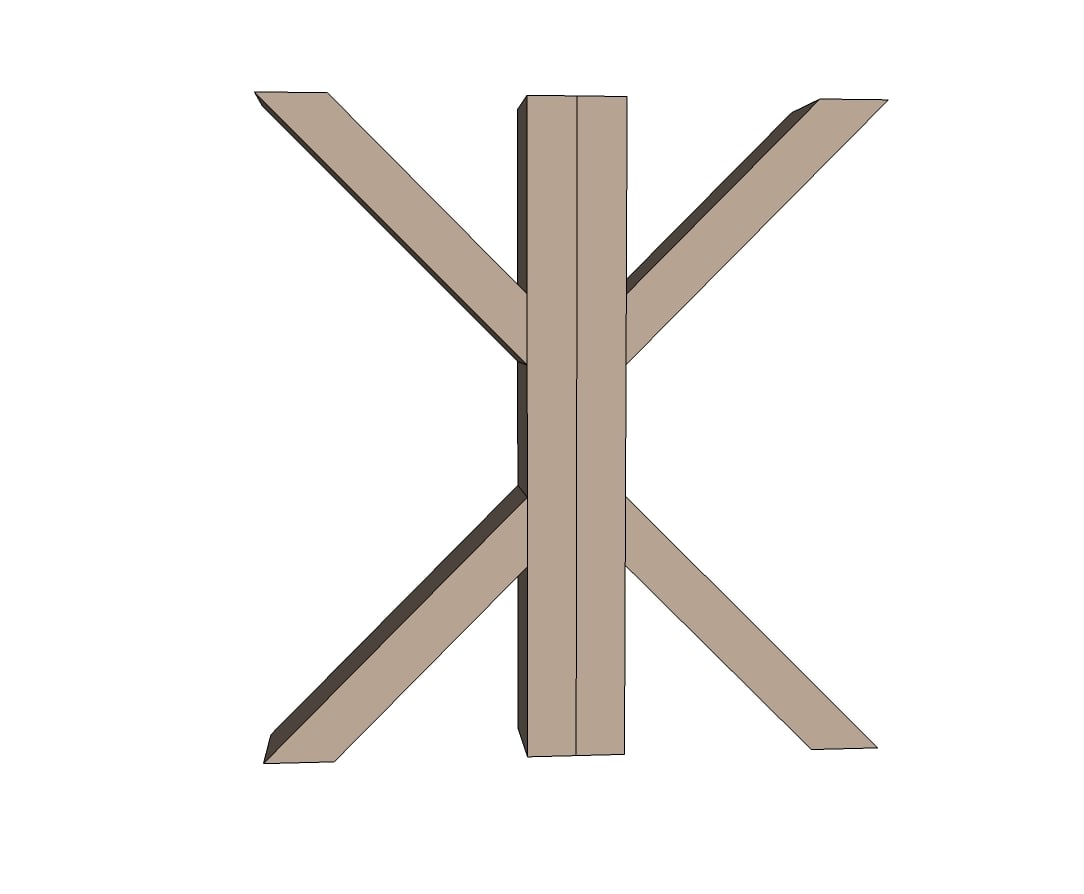
Then just attach two of the leg pieces together with glue and 2” finish nails from each side
Step 3
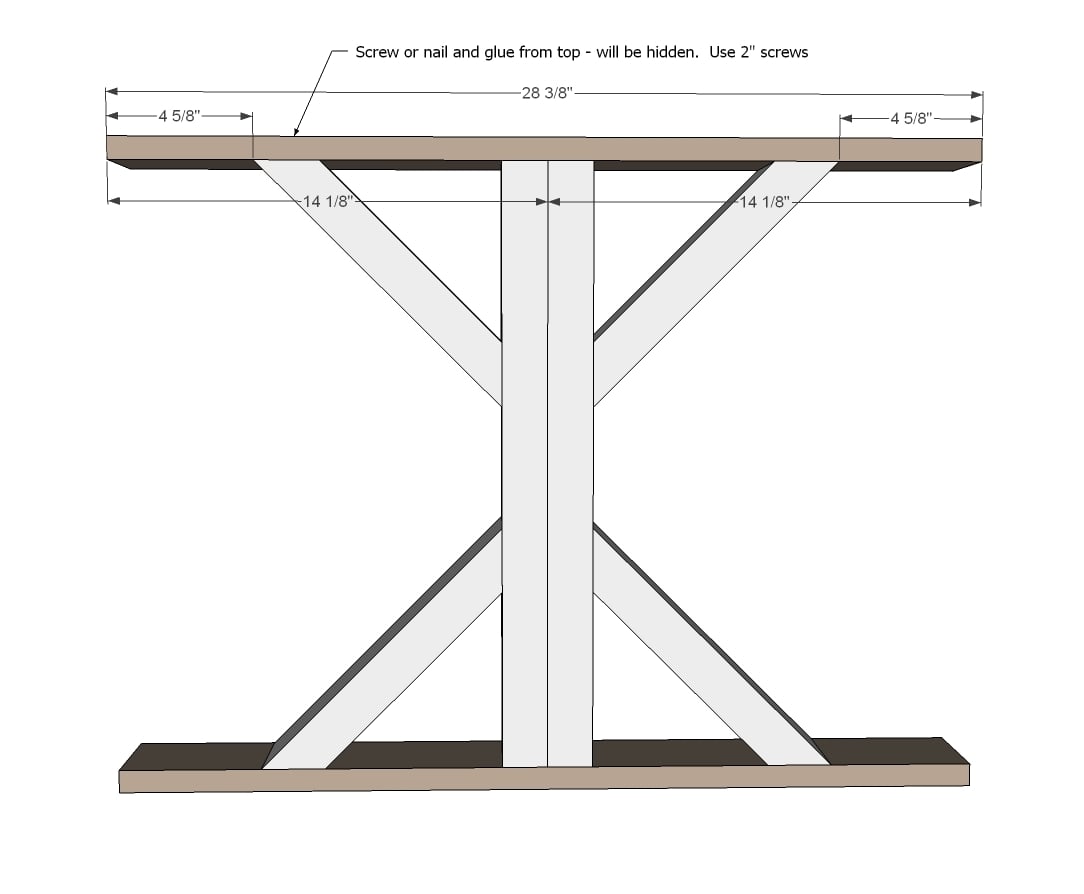
And add the top/bottom. You can use 2” screws or nails here and glue.
Step 4

And then add the curved pieces. The ends may be a challenge – what I do is first cut a 2x4 32 5/8” long with both ends cut at 30 degrees off square, ends not parallel. Then make a second cut at 45 (or more if your saw cuts higher degree bevels) degrees off square and cut that same board 28 3/8” short point to short point.
Step 5

Repeat for the next layer of 2xs to build up your leg ends
Step 6

Followed by the little feet ...
Step 7
I'd recommend 1 1/2" PHs and 2 1/2" PH screws here ... hide on top and bottom edges
Step 8

The easiest way to attach cross braces is with pocket holes. But you will have to fill later with wood filler.
An alternative is to glue and screw through the cross brace into the top and bottom 2x4s with longer screws.
Step 9
And finally the top! I recommend building the tabletop first with pocket holes and then attaching.
If you are using the table outdoors, leave a little space between the boards for water drainage.
Step 10

And for the alternate ends like Whitney did - just use 45 degrees off square cuts.
Step 11
For more photos and construction details, please stop over and visit Whitney at Shanty2Chic!
It is always recommended to apply a test coat on a hidden area or scrap piece to ensure color evenness and adhesion. Use primer or wood conditioner as needed.

Comments
ferbit
Mon, 06/04/2012 - 10:35
DROOL!!!!!!!!!
DROOL!!!!!!!! This is absolutely gorgeous! I have got to find an excuse to build this! Whitney, your table turned out beautiful!!! LOVE the finish!
RHgaijin2
Tue, 04/23/2019 - 19:45
Video of Farmhouse Table
These are videos of the table I built part 1&2
https://youtu.be/h3J68cDOvmI
https://youtu.be/oUgMXG2NOJo
Crissy (not verified)
Mon, 06/04/2012 - 10:50
http://thriftychicky28.blogspot.com/
Oh my Gosh!!!! I absolutely LOVE this table, and $65 really??? That is the best part about it I think, or maybe its the look, I love it all!!!
claydowling
Mon, 06/04/2012 - 18:07
Awesome Table
I took a look at the original too. I like this version better.
If you wanted to simplify your build you could use 4x4 anyplace that the doubled 2x4s appear. That assumes, of course, that you can lay hands on good quality 4x4s, and you have the tools to work easily with 4x4s.
Elizabeth Rutkowski (not verified)
Mon, 06/04/2012 - 18:53
So awesome
I am so going to see if my dad would help me make this (he's teaching me how to woodwork)!
Rhea (not verified)
Tue, 06/05/2012 - 05:28
45 degree angle off square, NOT parallel
LOVVVEEEEEE the table and have wanted a farmhouse table! Headed to buy lumber this morning, just need clarification on "45 degree angle off square, NOT parallel". I googled it and can only find it on AnaWhite.
Thanks so much! Can't wait to have my table:)
In reply to 45 degree angle off square, NOT parallel by Rhea (not verified)
Lady Goats
Tue, 06/05/2012 - 08:51
It's just an angled cut
You're just making two 45 degree cuts (on a miter saw), that are not parallel. With parallel cuts, you can just slide the board down and continue cutting, but in this case, you'll either have to adjust your miter saw to go to 45 degrees on the other side, or pick up the board, turn it, and make another cut (it'll look like /________\ instead of
/___________/ ). Hope I didn't confuse you more!
In reply to It's just an angled cut by Lady Goats
whitney_smith
Wed, 06/06/2012 - 04:46
lol
Love your drawing!
Rhea (not verified)
Mon, 06/18/2012 - 21:41
Makes perfect sense! Thank
Makes perfect sense! Thank you soon much! Can't wait til my next build!
Rhea (not verified)
Mon, 06/18/2012 - 21:46
Makes perfect sense! Thank
Makes perfect sense! Thank you soon much! Can't wait til my next build!
Beth Kline (not verified)
Tue, 06/05/2012 - 05:35
I love this table but are
I love this table but are there benches to go with it?
Stefan (not verified)
Thu, 08/30/2012 - 19:45
Benches
It looks like you could just halve all the width dimensions (instead of 4 - 2"x10" boards, use 2), and then the length and height can be done to your specifications. For length, instead of 8 feet long, I would go with 5 1/2 feet long (allowing enough room for the bench to slide under the table - somewhere around the length (65") of the bottom cross beam of the table - 2/3 of the length seems adequate). For the height, leave yourself enough leg room. Considering the table height is 30", I would get the bench height around 20" (use 2/3 - two-thirds - measurements).
I plan on making benches to these dimensions to match the table. I may tweak these numbers as I go, but they are somewhere in the ballpark.
Kimsims (not verified)
Tue, 06/05/2012 - 10:46
If someone makes this, can
If someone makes this, can you please make a video of some of the more difficult steps? For instance, some of the diagrams don't specify where to put screws and it is confusing.
Heather Davis (not verified)
Tue, 06/05/2012 - 11:07
Benches
I LOVE this table, and I've been dreaming of an table like this for my patio. Do you have plans for benches that look similar to this? I found others on your website, but they don't "match". Which would be fine with me, just thought it would be cool to have similar benches too. Thanks!!!!
Milca (not verified)
Tue, 06/05/2012 - 15:37
Love the X ends on this table
Thinking of making it a little narrower and putting the brace to the back more so I can use this in my crafts room against a wall. Thank you Ana for the plans! We are renovating our whole house and a lot of my finishing touches ideas in the woodwork come from this site, and everyone loves the house :)
1916home.net (not verified)
Tue, 06/05/2012 - 23:33
How to Age Pine Wood
You can also use bleach (household or pool) to accelerate the decomposition of the softer wood fibers. Apply the bleach, wrap the wood in Saran Wrap, and let the bleach do the work. After a day or so of soaking, unwrap and rinse the board; use a wire brush to remove the softened wood.
Soak a bat of 0000 (extra fine) steel wool in a 500-750ml jar full of vinegar (regular works fine, but "pickling vinegar" works better due to the higher acid content) overnight (8-12 hours). Pour through a coffee filter and then brush on your wood. Leave for 15 minutes and you'll see the wood grey. If it's not dark enough just repeat, but one application is generally plenty) Note: The liquid will still appear clear in the jar, that's OK....this process works through oxidization rather than pigments).
whitney_smith
Wed, 06/06/2012 - 04:48
You've got me thinking!!!!!
I've got mods going on in my head! Should be pretty simple to use this as the basics for my dream table. :)
Jen Cunningham (not verified)
Thu, 06/07/2012 - 17:06
LOVE this table and couldn't wait to show my husband!!!
I have ALWAYS wanted a farmhouse table since there are 5 of us in the house and we do love to entertain at holidays too. I was excited to find this posted on Pinterest and even MORE excited when I showed my husband and he's game for building one. Someone had posted and asked about there being possible instructions for benches. Do any instructions like that exist (yet)?? Thanks so much!!
Micole (not verified)
Fri, 06/15/2012 - 08:27
Could you tell me what you
Could you tell me what you would suggest changing to make this a 6ft table? I was planning to take the difference out of the 2x4s that join the ends, but then the cross braces wouldn't fit. Sorry if this is Something obvious, I am new to this kind of thing!
Thanks :)
Melissa R. (not verified)
Mon, 06/18/2012 - 14:02
I was thinking the same thing
I was thinking the same thing to put this in my dining room, but figured I could adjust the angle of the cross braces so that there is 12" between them on the bottom brace and it should work. The original table shows the cross braces with a lot more room between them so I think it would work fine.
I Rub (not verified)
Thu, 06/28/2012 - 00:02
Hey great build! How did
Hey great build!
How did attach the table top ? Countersink screws from above ?
ewhite7380
Thu, 05/22/2014 - 12:41
Table Top
Did you ever figure out how to attach the table top?
bef0016
Tue, 04/21/2015 - 19:41
Table top
My current dining table was a vintage door that I attached brackets to it so that it is not physically screwed to it but sits on the frame and the weight and brackets holds it in place and keeps the top from moving. I am building this table for a friend and plan to do the same since the joined 2x10s will be very heavy once connected. I was going to use kreg jig to join the boards together with 2 1/2 screws
McBrayer (not verified)
Fri, 06/29/2012 - 08:28
Seating
LOVE this table! My husband and I are building one for our dining room this weekend.
We are going to put a bench on one side and chairs on the other.
I was wondering how many people you could fit on each side comfortably. I may need to adjust the measurements a little to accommodate everyone.
Thanks!!
I Rub (not verified)
Mon, 07/02/2012 - 03:33
Help with screw locations
Can anyone please specify screw locations for the build? For example, from where do you screw the curved pieces ?
I Rub
Tue, 07/03/2012 - 01:44
HELP WITH SCREW LOCATIONS
Can anyone please specify screw locations for the build? For example, from where do you screw the curved pieces ? What about the Tabletop ?
Barbara burns (not verified)
Mon, 07/23/2012 - 15:27
Help with specs on options for screw locations
I also am new to wood working, but am in LOVE with this table. The only other projects I have tackled where very specific about each step. I have cut all the end pieces,and will also be adjusting the length by a foot, so will cut those later, but would love a little more info on screw placement, size, how best to hide them. I will be counter sinking and purchased a Kreg jig. Any help would be greatly appreciated. Thanx and keep creating, you inspire us all!
AmyTamy (not verified)
Mon, 07/30/2012 - 07:49
Hey, love it and plan on
Hey, love it and plan on making it this weekend but im new at this and need some help understanding the cuts. when you say:
4 – 1x4 @ 28 3/8” **
8 – 2x4 @ 32 5/8” CUT TO FIT **
.....
** For straight cut legs replace these cuts with:
4 - 2x4 @ 31" (both ends cut at 45 degrees off square NOT parallel LP)
4 - 2x4 @ 34" (both ends cut at 45 degrees off square NOT parallel LP)
what does that mean? do i replace those cuts or they are not related at all? sorry, it just really confused me and if anyone could help, that would be great!
Amber Todd (not verified)
Mon, 09/10/2012 - 08:08
Beautiful Table!
Thanks so much for the free plan! My hubby built this table one afternoon. It looks wonderful on our back covered porch! We made ours 6ft long so it wouldn't be so crunchy for walking area. I paired it with wicker/metal patio chairs from Sears. I can't wait to stain and distress it! :)
CarrieJ (not verified)
Tue, 09/11/2012 - 13:47
Cost
Are people really building this at $65???
ckp (not verified)
Sun, 09/23/2012 - 13:51
Cost
My husband built this table and the two smaller benches (we want to put captains chairs at the ends) this weekend. He bought all of the lumber, a $100 Kreg Jig, stain, and screws for $300. The ENTIRE project $300!
Pearidge Concrete (not verified)
Sat, 10/06/2012 - 21:20
Yes you can build this table on the cheap
I recently built this table and I managed the build this table for around $45.
According to the cut list you need 7 -2x4 but I needed 8 somehow.
At my local lumber yard this is what it cost me.
4-2x10@8foot =$19.36
8-2x4@8foot = $19.04
1-1x4@12foot =$3.12
1- box of 3" screws =$2.37
Kregg Jig= borrowed. (I will be buying one)
Wood Glue= Had on hand
Stain=had on hand
Total =$43.89 before tax
Even if you didnt use the Kregg Jig and had to buy wood glue and stain you can still get by at around $60.
Totally doable.
peoniespinkandpearls
Tue, 10/15/2019 - 19:15
Just did it for $72 with…
Just did it for $72 with good wood and it's 7yrs later than your comment.
Chris from Mordy (not verified)
Sat, 09/29/2012 - 04:31
Dimension Shopping List v Cuts List
Hi there Whitney, this is my first time on the Ana White site but I am so impressed with these super designs, you are very clever. I am converting it to metrics and please excuse me if this is a silly question, but in the cut list when I add up the 2x4 (5 cuts), I get 52 feet. But the shopping list says buy 56 feet, luckily for me my timber merchant is cutting it all for so I wanted to double check that that I am not missing something with the missing 4 feet? I have read the designs and can't find it. Could you confirm? Many thanks, Chris
Dina M. (not verified)
Fri, 10/12/2012 - 05:56
Farmhouse table
I was wondering if you used a better quality wood, like cedar or redwood, if you could go with 1 x 4's instead of the 2 x 4's. I'm concerned about the strength but know that the better quality wood is stronger than the cheap stuff...any thoughts? Thanks!
Ashley Rush (not verified)
Fri, 10/12/2012 - 10:51
PH Screws
Forgive my ignorance, but what are PH screws? And how many do you need for the table?
Sunny Espanet (not verified)
Thu, 10/18/2012 - 17:20
PH means pocket hole
Ashley, PH means Pocket Hole screws. Used with the Kreg Jig which produces pocket holes. Go to Whitney's site to see a pic with an example of pocket holes (in the stretcher going between the two "legs" of the table)
David Milligan (not verified)
Fri, 10/26/2012 - 00:23
20" uprights??
Step 1 places the 20" upright. I'm struggling with the math here... the table is meant to be 29 3/4" tall in total, but if the thickness of all the horizontals and the top total 13" (1" for the feet, 2" + 2" + 1" for both the bottom and top of the end pieces, plus another 2" for the table top), this leaves only 16 3/4" for the uprights. I can't get my head around how they're supposed to be 20" and still produce a table 29 3/4" tall. And where does the fraction of an inch come from?? Help please...
johannajanelle
Sat, 02/02/2013 - 07:02
height
david did you figure out this height measurement? we are struggling with the same thing right now.
Rtm316
Sun, 10/18/2015 - 12:21
2x4s are actually 1.5x3.5 and
2x4s are actually 1.5x3.5 and 1x4s are .75x3.5.
Guest Brian (not verified)
Tue, 10/30/2012 - 06:19
No one I ask is familiar with PH screws
Im trying to do this project at home, no one at the hardware store is familiar with the term PH screws. I was wondering if theres an alternate name to ask for them by?
In reply to No one I ask is familiar with PH screws by Guest Brian (not verified)
Lissa311
Sun, 01/04/2015 - 21:03
PH= Pocket hole screws
PH= Pocket hole screws
JoanneS
Tue, 10/30/2012 - 07:22
Pocket Hole Screws
Hi Guest Brian, these might be called pocket hole screws, Kreg screws, washer head pocket screws. In our local Lowes there are 2 brands available, the Kreg brand screws (here's a link)
http://www.lowes.com/pd_71600-39450-SML-C250+-+50_0__?productId=3043293…
and the Hillman brand (works exactly like kreg brand), here's a link
http://www.lowes.com/pd_12513-37672-42171_4294710855__?productId=330582…
I've only seen the Kreg brand of pocket hole jigs and drill bits at our local Lowes. These links both have a picture you can show the salesperson.
Hope this helps?
Joanne
Mandy Thompson (not verified)
Sun, 11/04/2012 - 17:32
LOVE IT!!!
This table is so simple to build! Love the farm look. Looking for matching benches to build to go with it! Thanks for sharing all these amazing plans! I have. Family of 8 and we needed a bigger dining room table, this is perfect and definitely way more durable than any of that "cheap stuff" you find in a furniture store! Looking forward to many many years of meal time memories at my new table!
Amber Heller (not verified)
Thu, 11/15/2012 - 09:50
X farmhouse table
I just found this site the other from Pinterest and I must say I have fallen in love. I love the video section and the great instruction on how to build your own furniture. I must say you have inspired me.
I was wanting to know if you had a kid version of the x farmhouse table. I would love to attempt to build one for my three little boys. :)
grant (not verified)
Thu, 11/15/2012 - 22:19
how to stack two 2x4's for mitered boards on ends?
I want to stack two 2x4s (join them together with glue, nails and wood filler) to make the mitered boards for the table ends look thicker like 4x4s. Perhaps even turn the board so the seam is facing floor/ceiling. Any suggestions on how to get the dimensions/angles right for that?
Anonymous Coward (not verified)
Fri, 11/16/2012 - 00:44
Glue, clam and cut
Grant - Stack the 8-foot boards, glue them and clamp them every foot or so. After they have dried, make the cuts through the stack ... you will need a 10" miter saw to cut a doubled 2x4
The cut at the longest dimension will be the same: 11 3/8" with the finished board looking like this: /___ \
Guest Leala (not verified)
Mon, 11/19/2012 - 16:08
Benches and Square Plan?
Hi,
Love this table and am wanting to make this for a Christmas party this year. I am wondering how the plans could be modified to suit a square table to seat 12 people?
Also are their bench seat plans to go with this plan?
I have seen the other comments above bu thought perhaps you may be emailing them to people.
Thanks
Can't wait to make this table it is gorgeous
Peyton Sherwood (not verified)
Sun, 12/09/2012 - 16:32
benches
i need to know how to make benches if i could get demention that would be great. im am building this for a chirtmas present for my wife.
WandaR (not verified)
Sat, 12/22/2012 - 11:35
Attaching the table top?
I think i have it figured on how to screw everything together except for the table top. How do you attach the 4 2x10s together and then to the tables base?