
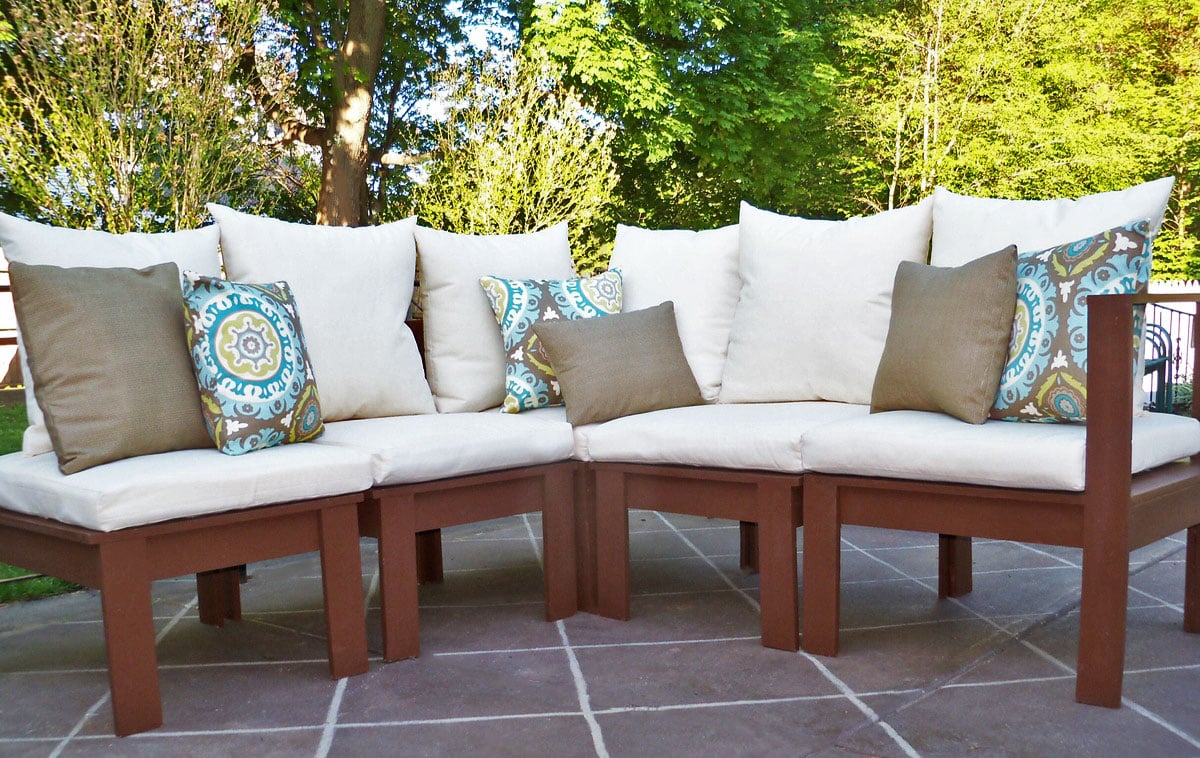

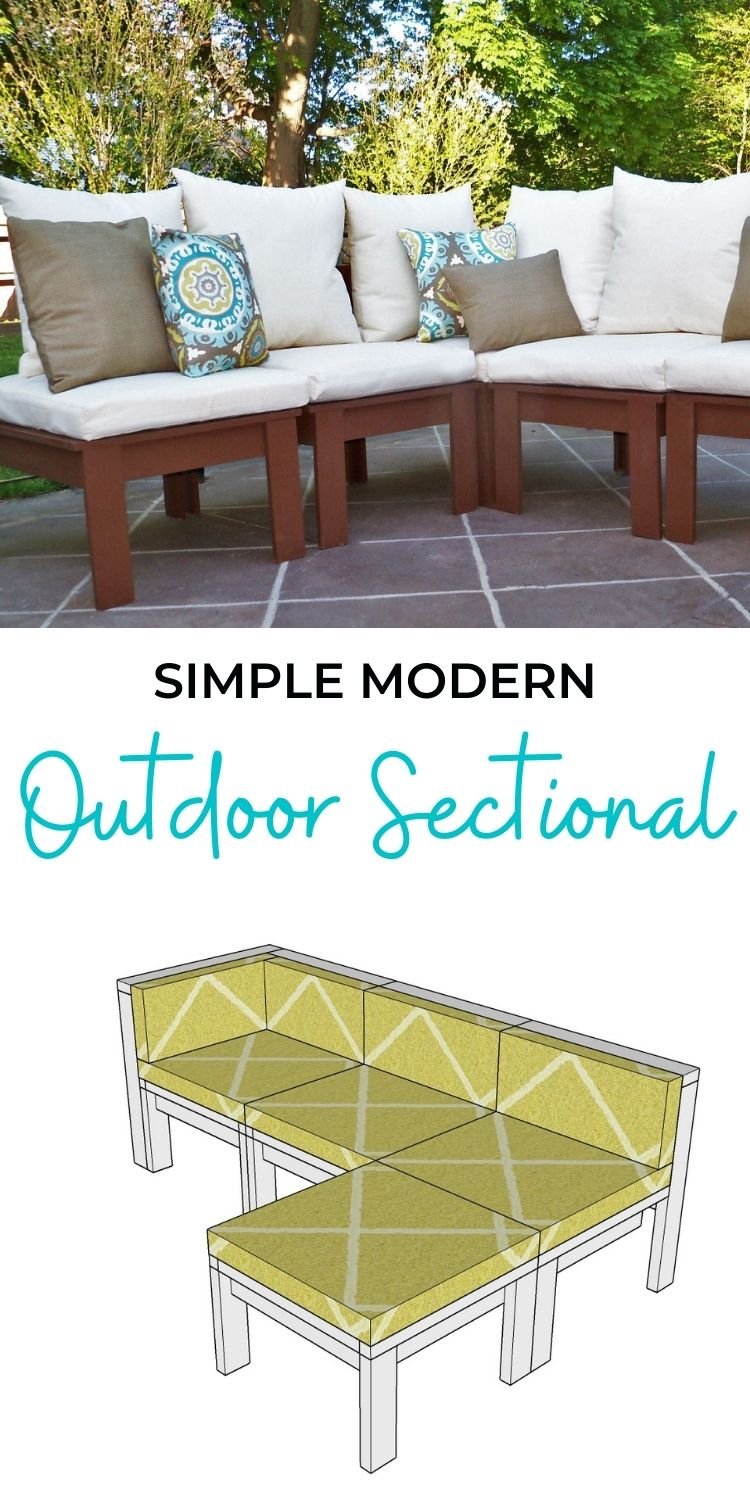
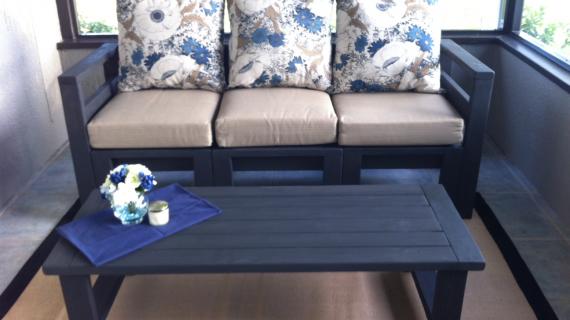
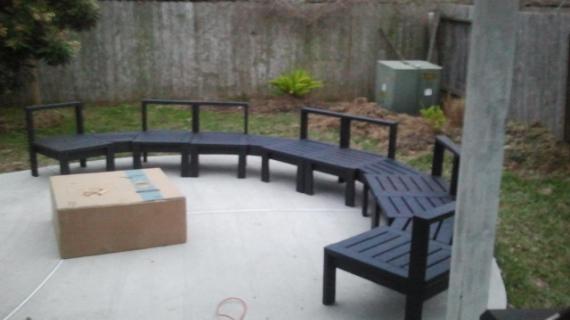
Build your own outdoor sectional with 2x4s and customize your outdoor space. These free plans are easy to follow and you won't need any special tools - just a drill and a saw!
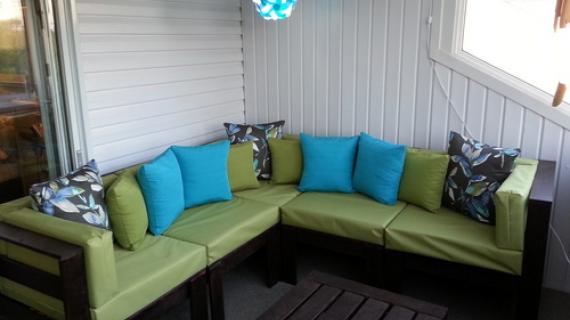
Reader submitted photo by TammyLinskey
Start small... go big! With this simple outdoor sectional piece plan, you can make an outdoor sectional as big (or small) as you need, as your budget or schedule allows. Build a couple sectional pieces this year, add on next year - the options are endless.
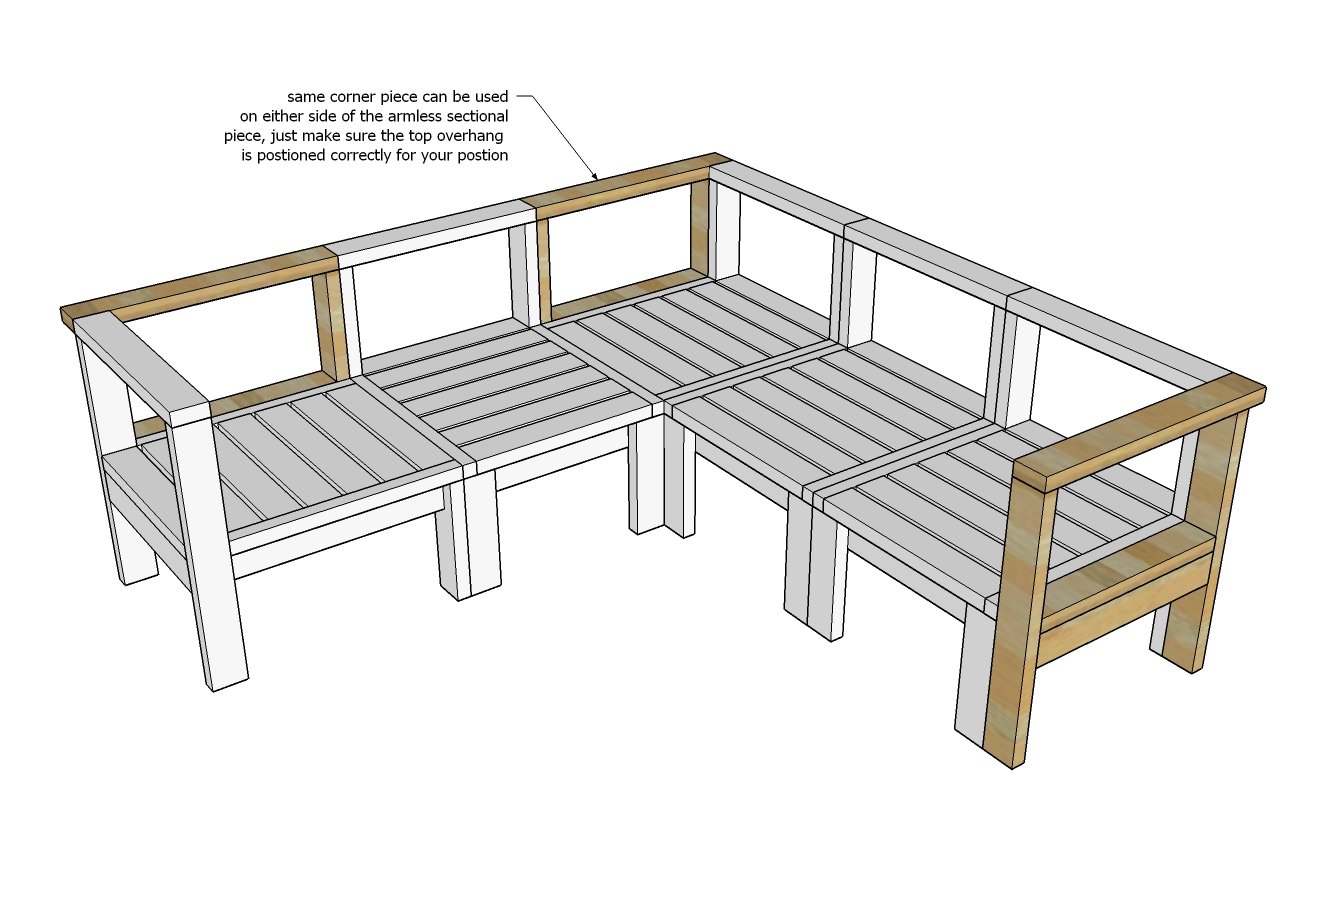
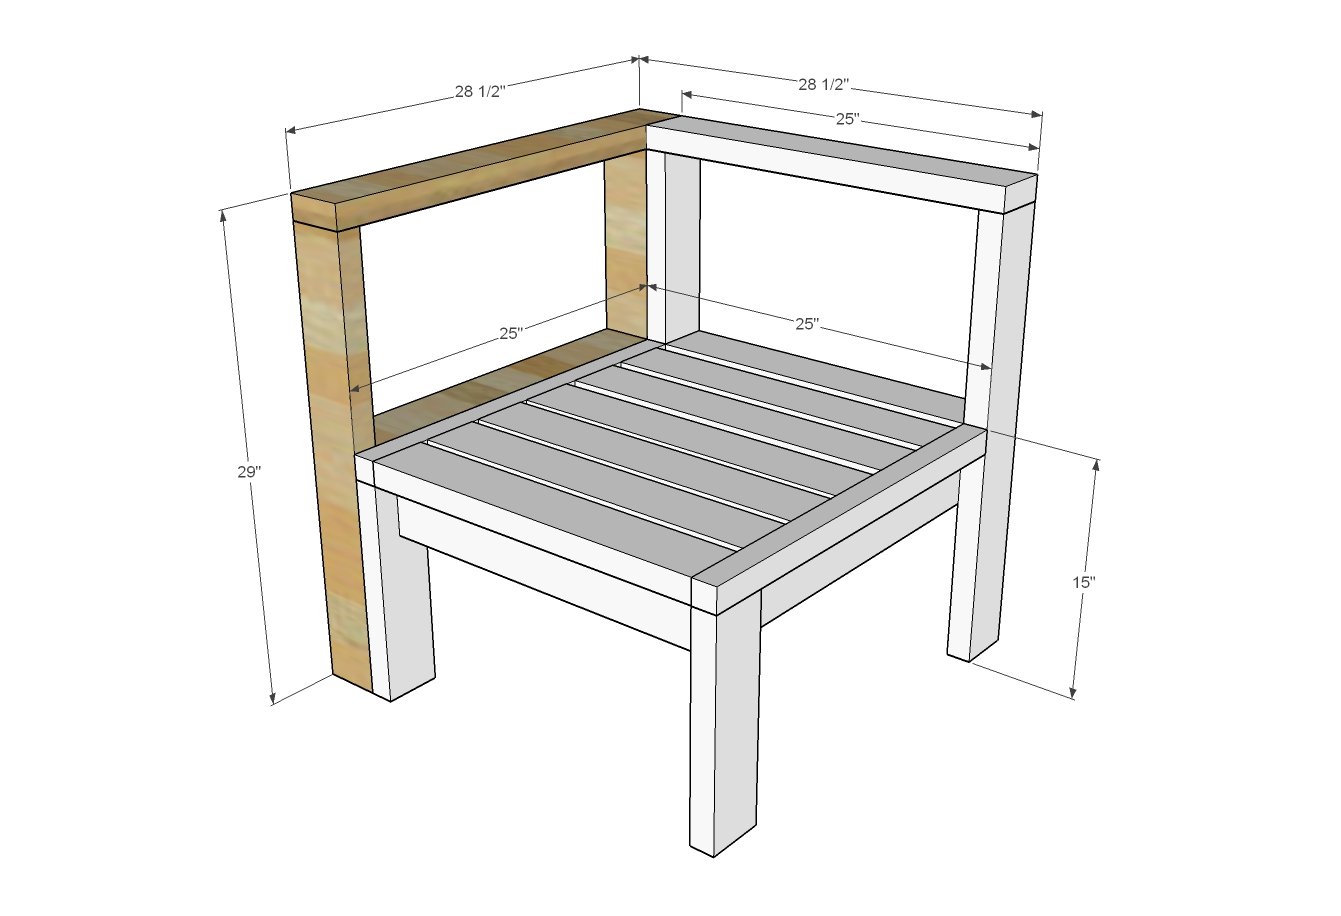
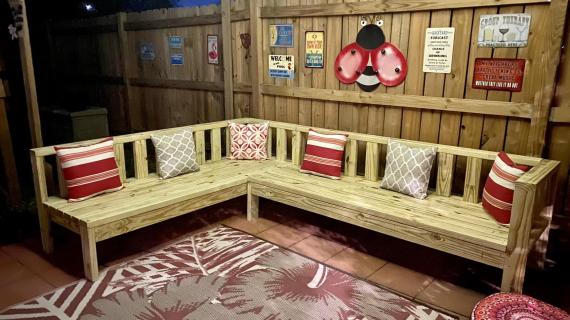
Easy to Build Corner Piece
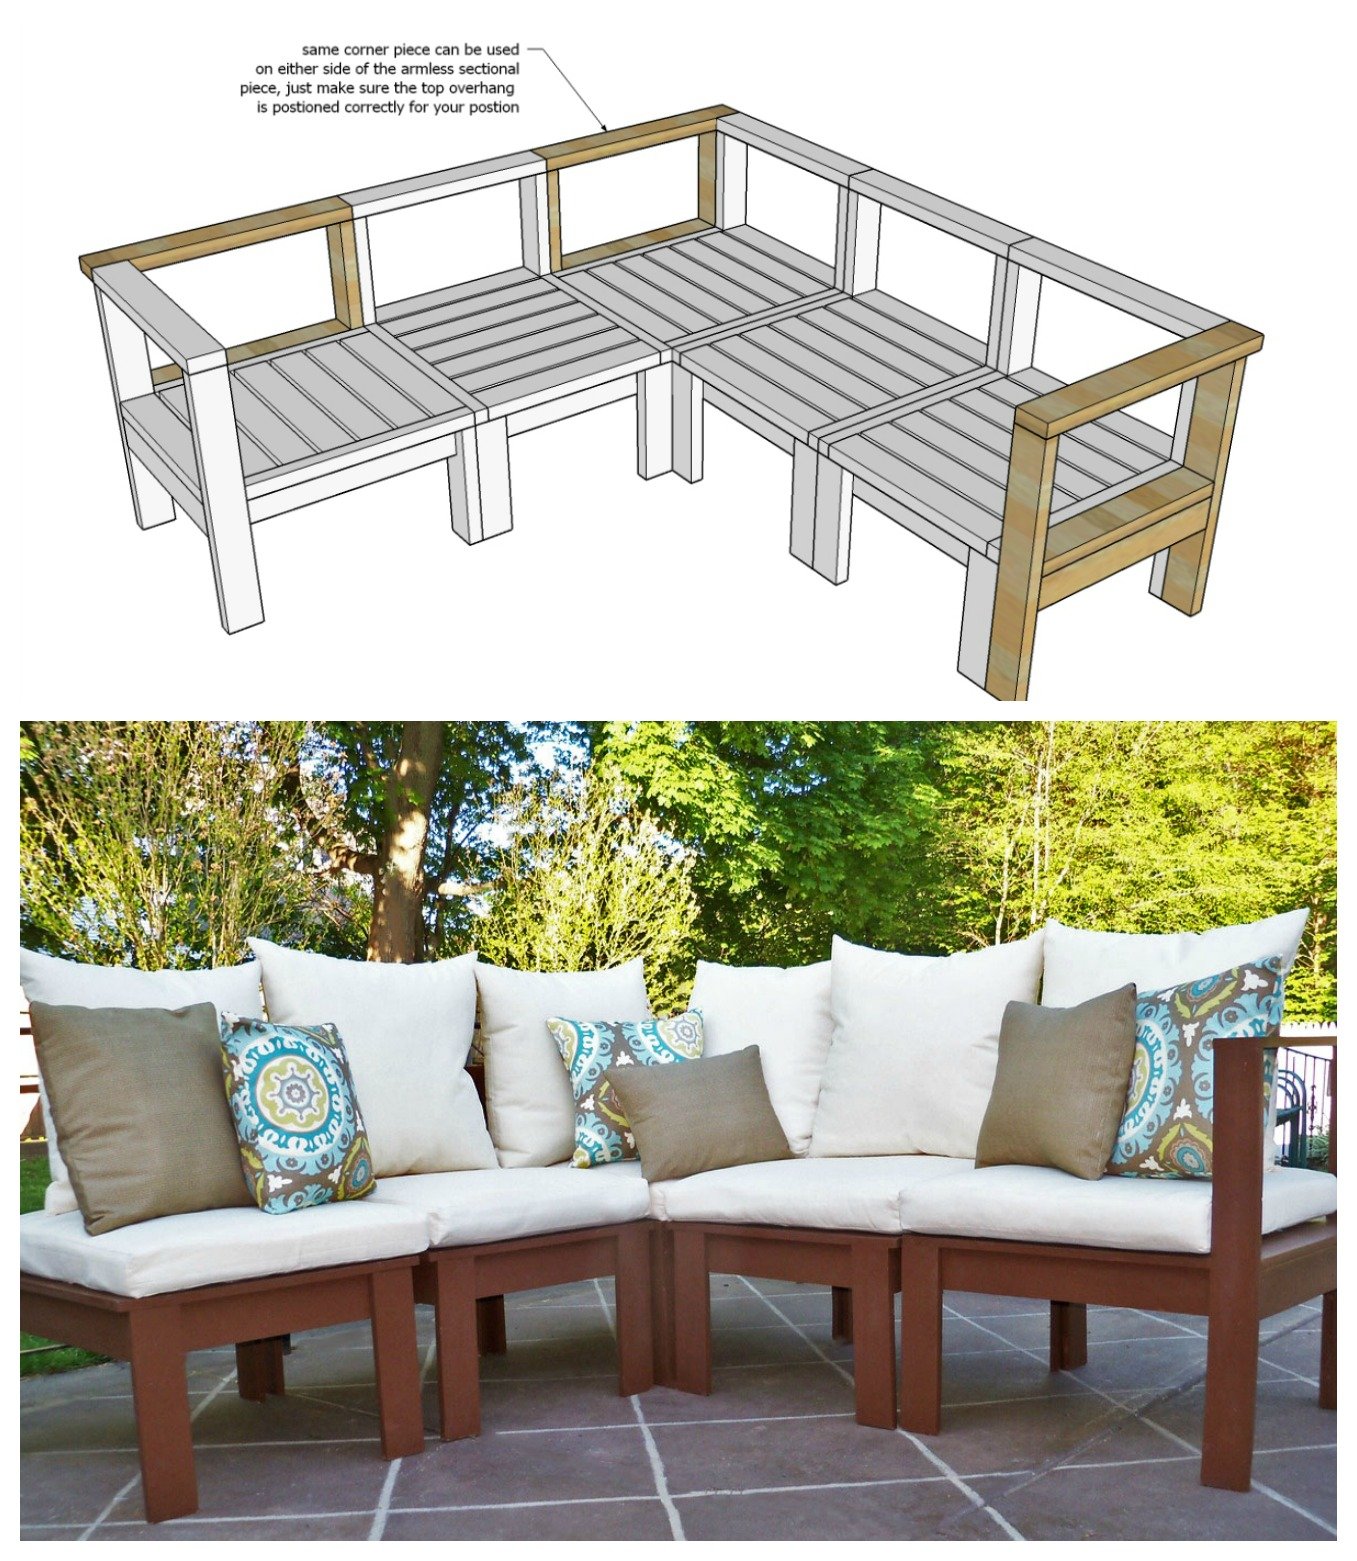
It's easier than ever to turn corners! We've updated the plans so all you have to do is add an arm piece to the basic sectional piece to create corners for your sectional.
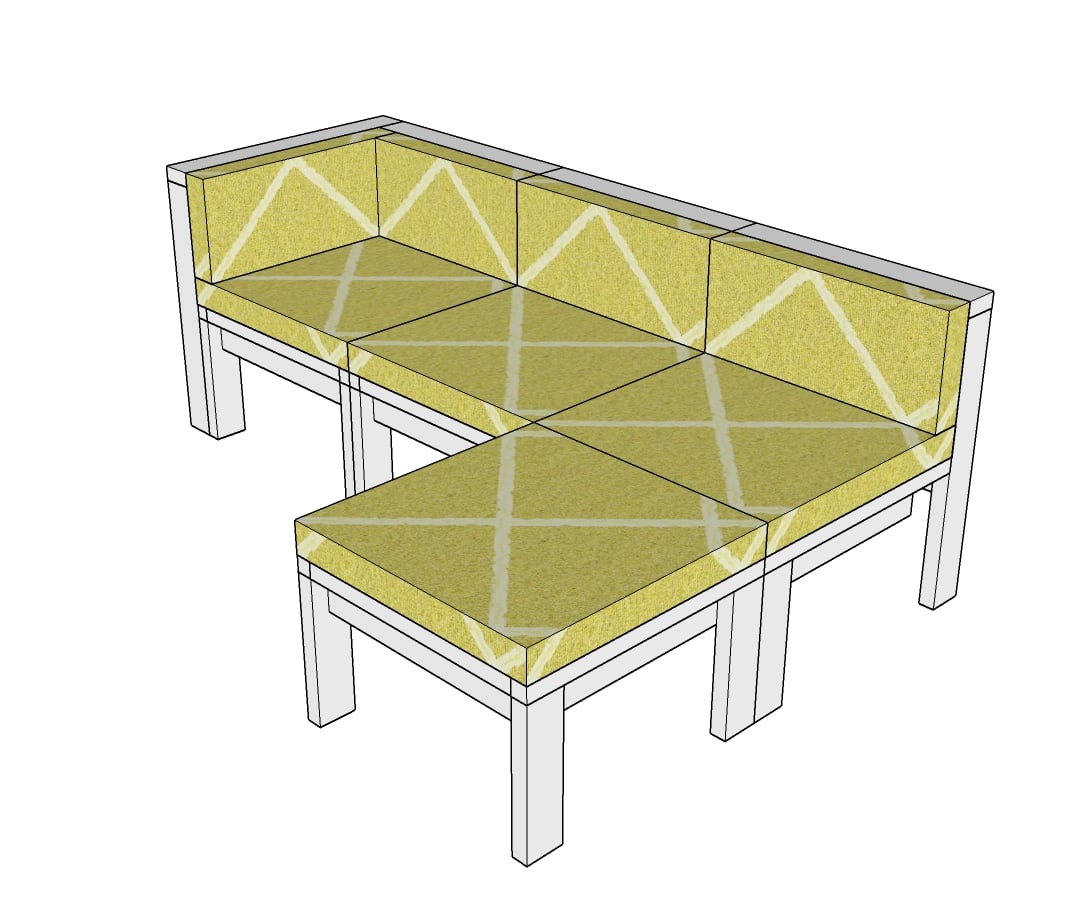
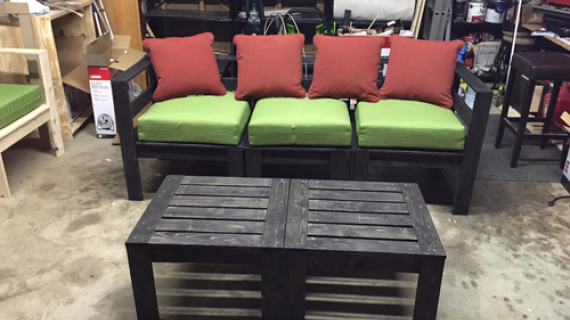
Standard Outdoor Cushions
Each sectional piece (including the corner) fits a standard 25" x 25" deep seat cushion, up to 5" thick. For corners, you may need two back pillows.
If you purchase the cushions in sets with both backs and seats, consider purchasing another set, and using the spare seat cushion on an ottoman.
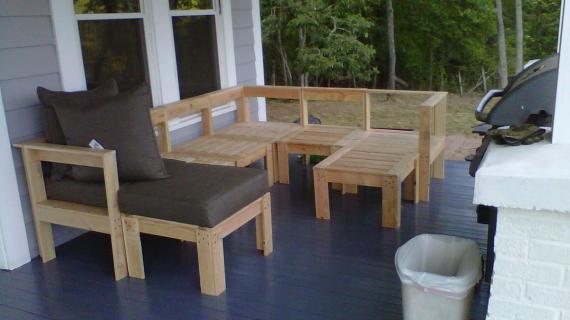
The plans for this matching ottoman (can also be used as a coffee table) are here.
Updated Plans
This plan has been updated to include all 2x materials and a simplified design. If you need the old plans you can find them here:
The new, updated plans are below.
Pin For Later!
Preparation
We recommend exterior suitable wood
SHOPPING LIST FOR ONE SECTIONAL PIECE
- 3 - 2x4 @ 8 feet long
- 1 - 2x2 @ 50" long
- ~65 - 2-1/2" long exterior self tapping wood screws
SHOPPING LIST FOR ONE CORNER LEG PIECE
- 1 - 2x4 @ 8 feet long
- 1 - 2x4 @ 4 feet long
- ~15 - 2-1/2" long exterior self tapping wood screws
CUT LIST FOR SECTIONAL PIECE
- 2 - 2x4 @ 24" - seat frame
- 2 - 2x4 @ 22" - seat frame
- 2 - 2x4 @ 13-1/2" - front legs
- 2 - 2x4 @ 27-1/2" - back legs
- 1 - 2x4 @ 25" - top
- 7 - 2x4 @ 22" - seat slats
- 2 - 2x2 @ 25" - seat trim
CUT LIST FOR CORNER LEG
- 2 - 2x4 @ 27-1/2" - legs
- 1 - 2x4 @ 28-1/2" - top
- 2 - 2x4 @ 23-1/2" - seat and seat apron


Make sure you are working on a clean level surface. Predrill and countersink you screws. Take a square after each step. Be safe and have fun. And use glue.
Instructions
Step 1
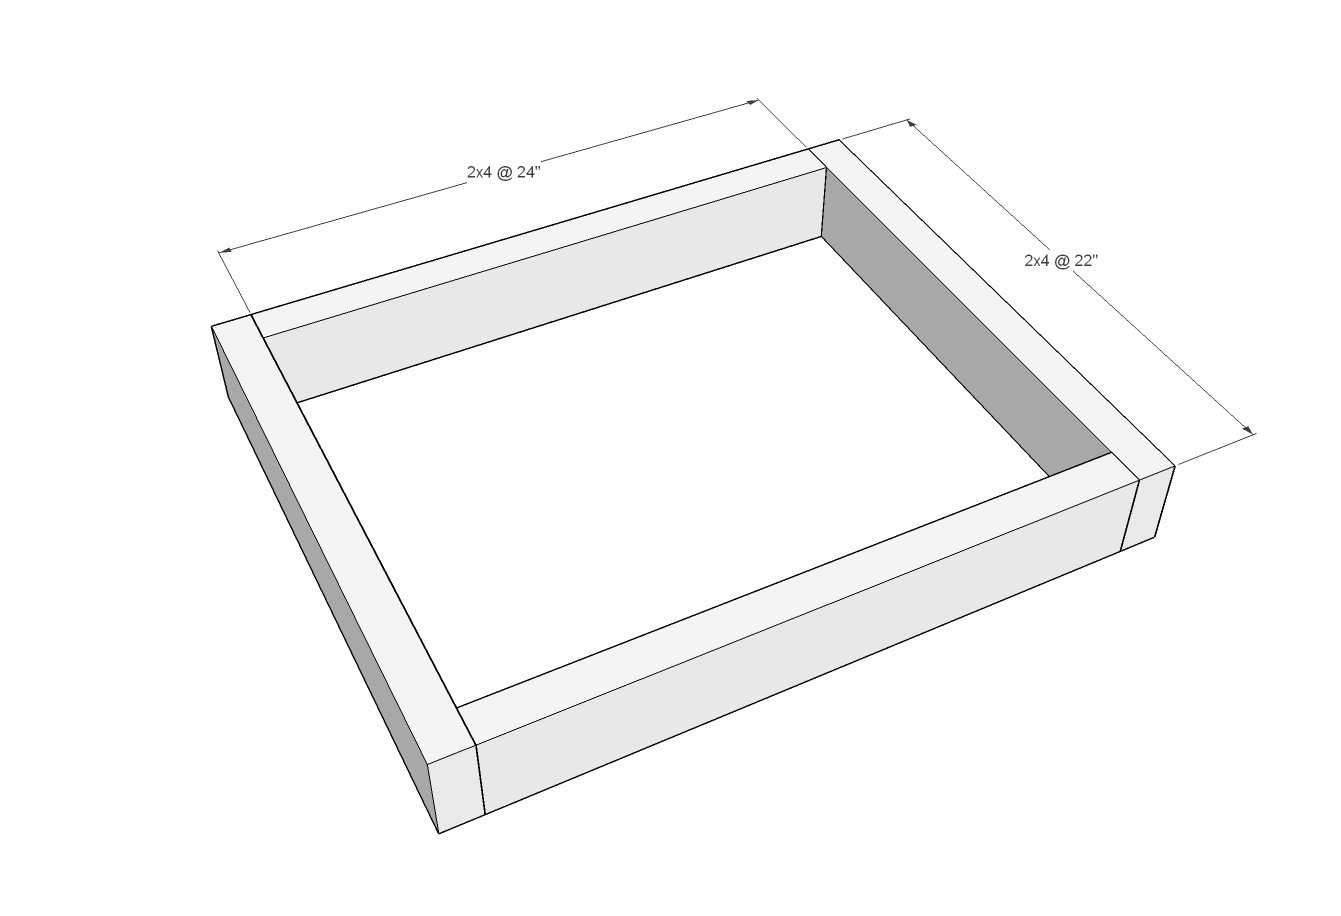
Use 2-1/2" self tapping wood screws to assemble the seat frame, two per joint. Exterior wood glue is recommended.
Step 2
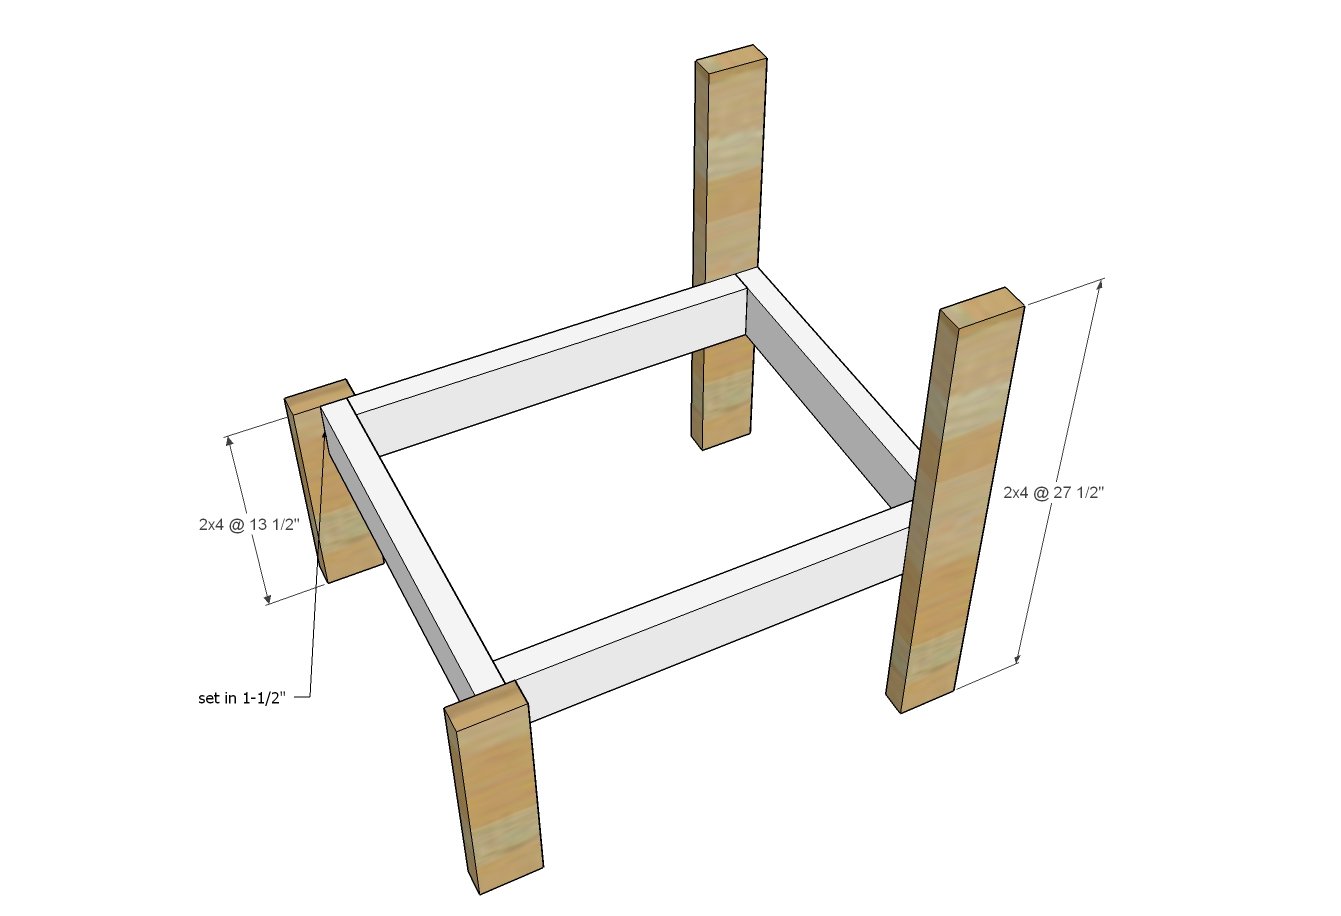
Attach legs to the frame from the inside, two screws per joint and glue.
Step 3
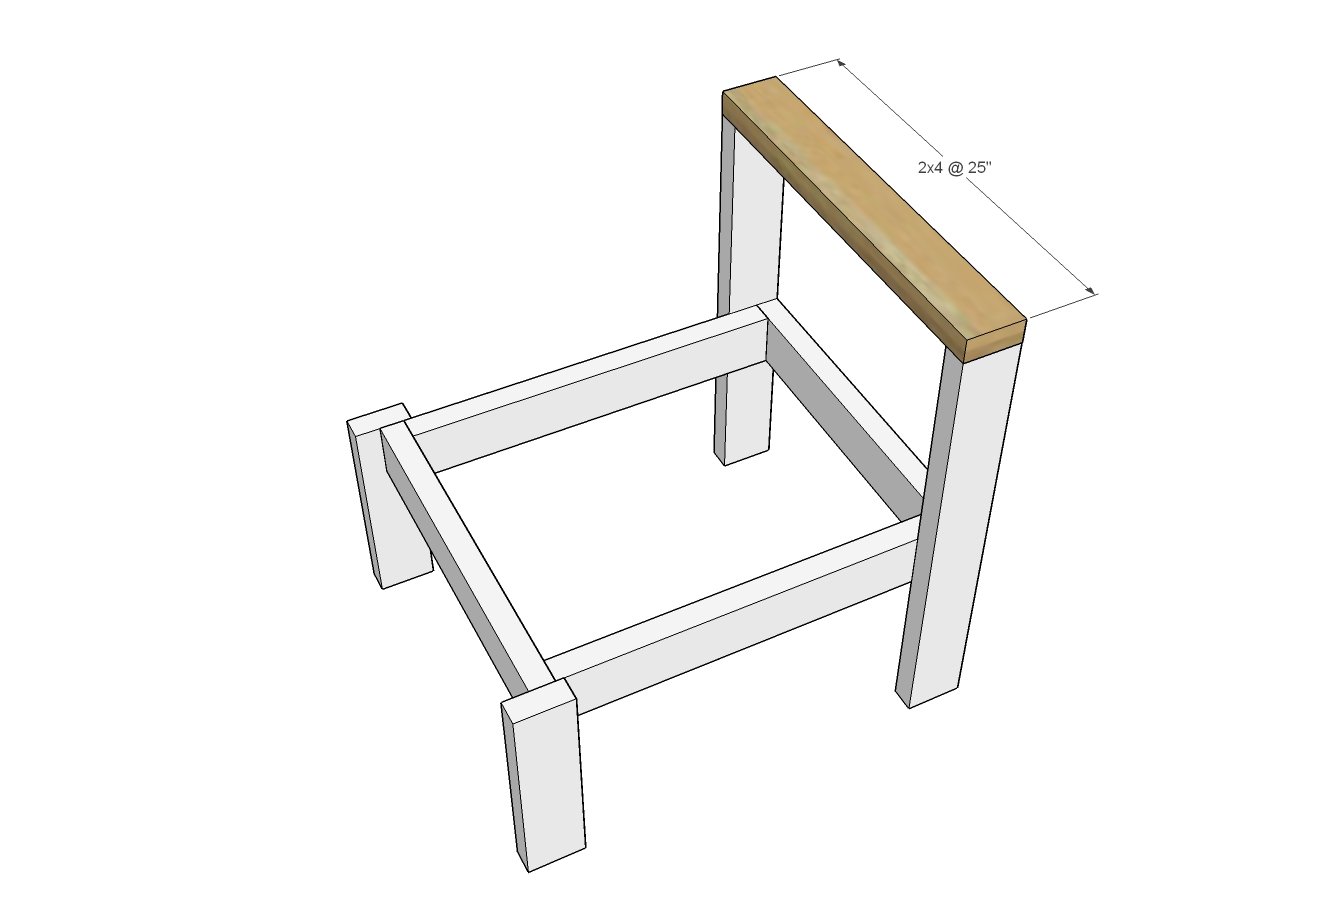
Attach top to sectional piece with 2-1/2" screws.
Step 4
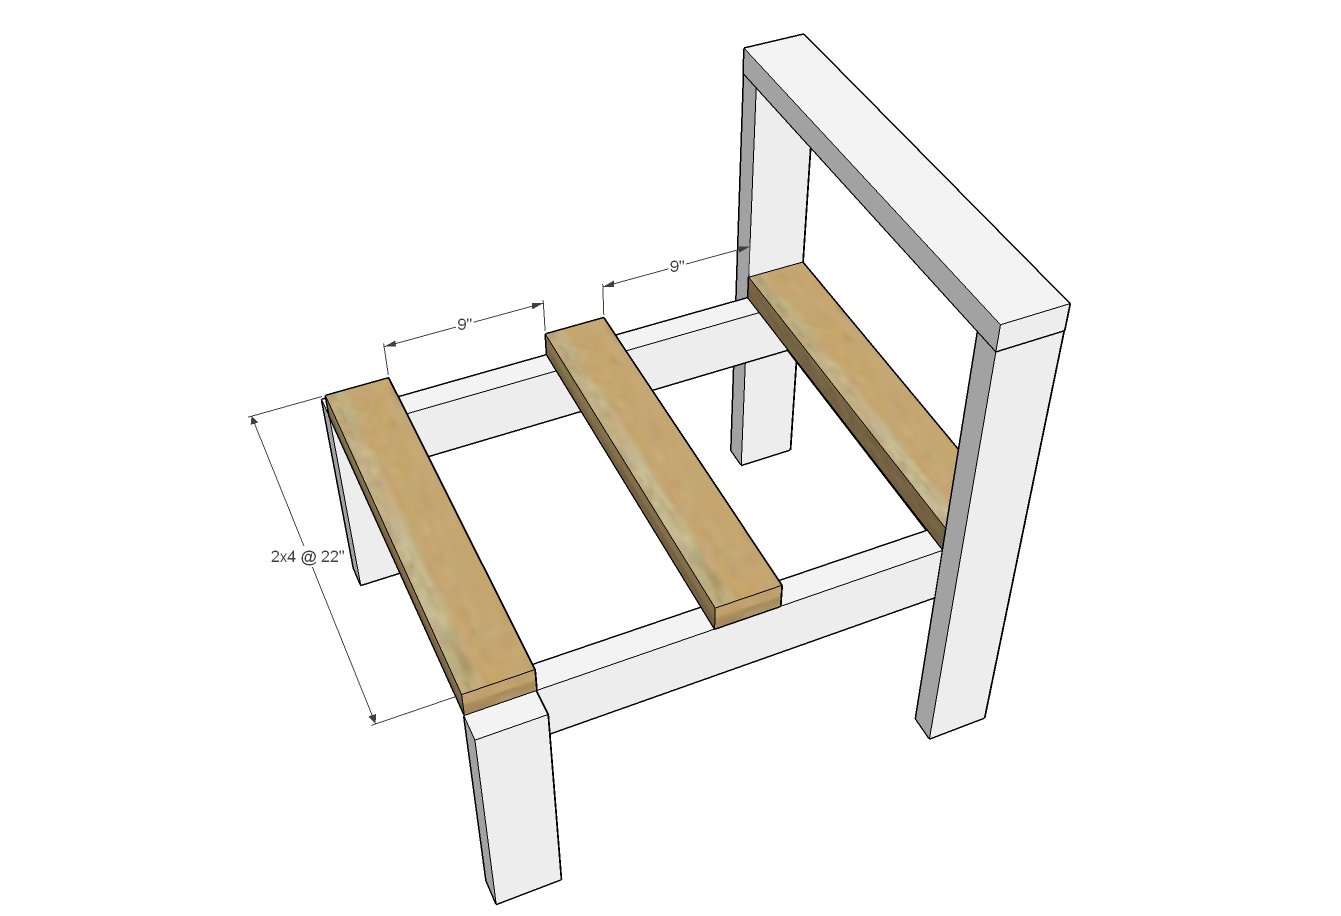
Lay outside and center seat slats down and screw down, two screws per joint, with 2-1/2" screws.
Step 5
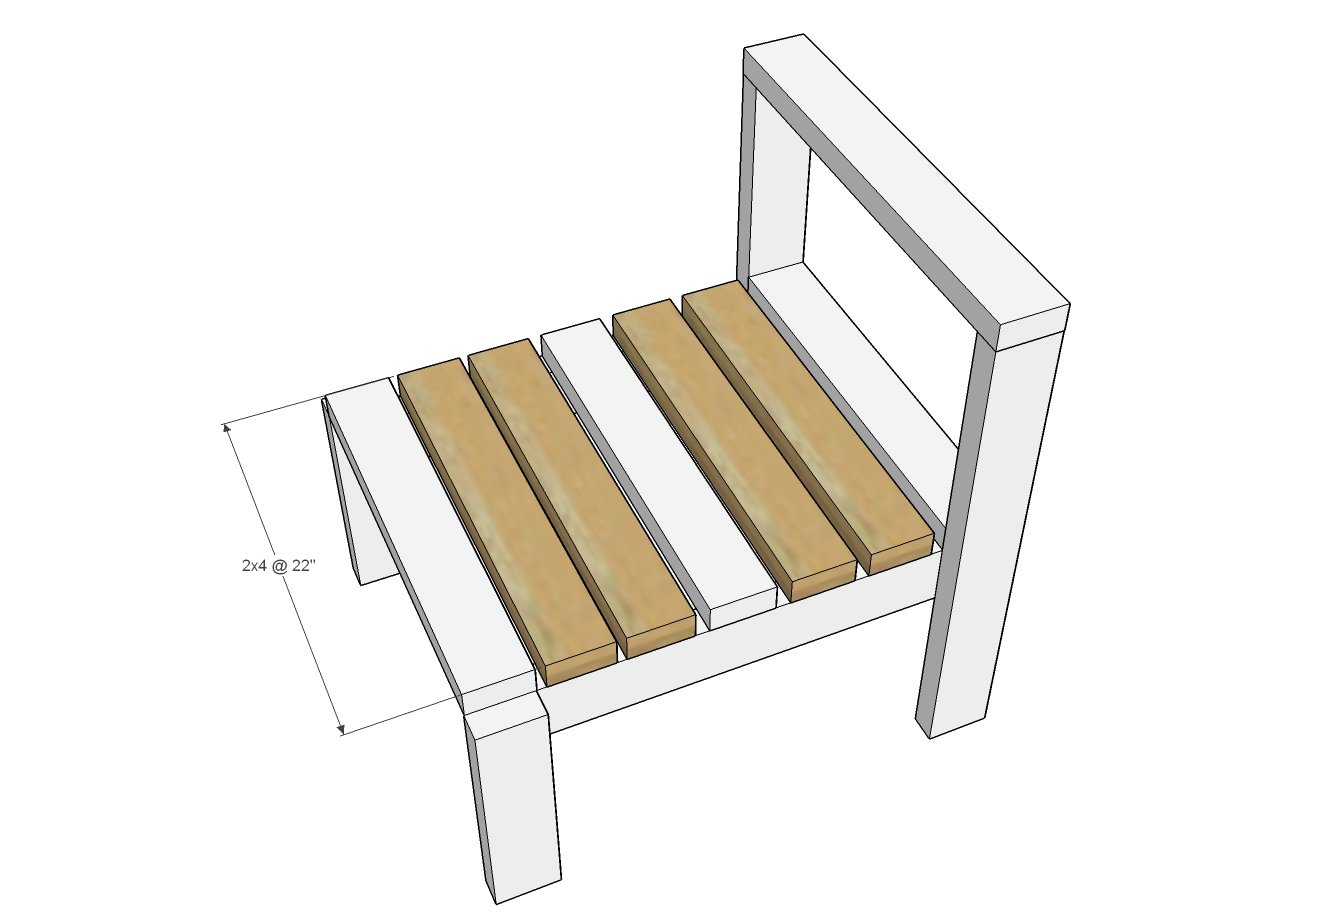
Evenly space remaining seat slats and screw down.
Step 6
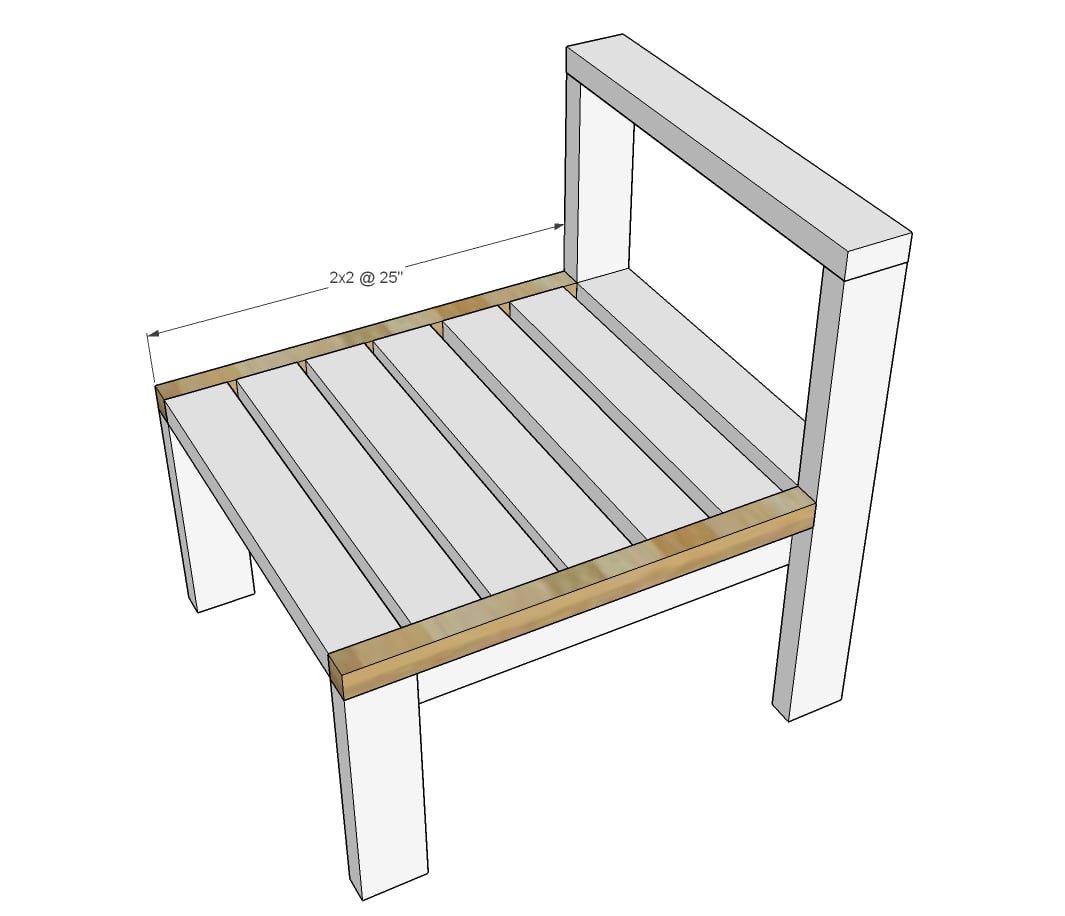
Attach 2x2 trim to the seat slats and legs (where possible) to finish off end of seat.
Step 7
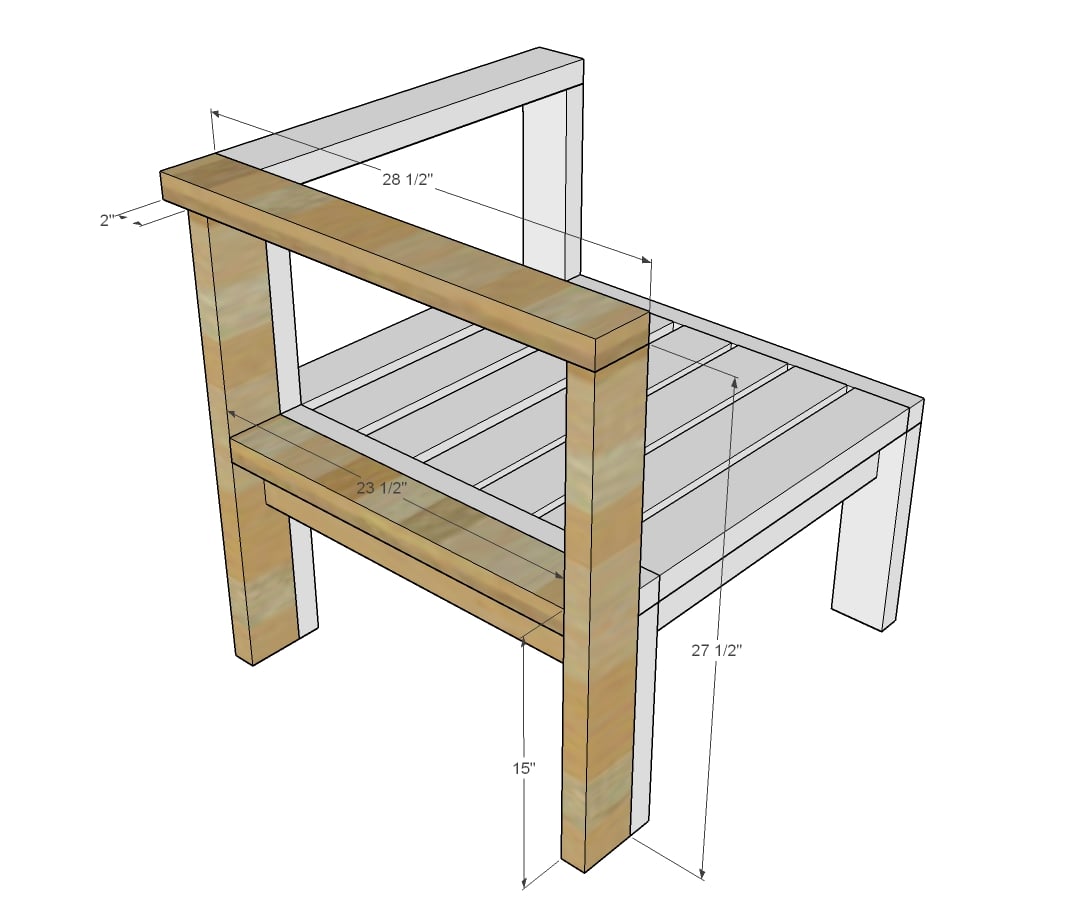
The corner can be used on either side (pay attention to the seat apron board being placed on the inside or outside).
Build the corner, then attach to the sectional legs with 2-1/2" screws.


Comments
In reply to Corner Seat by Fundy
JoanneS
Sat, 04/06/2013 - 06:10
Link to corner seat plan
Here's the link to the plan for the corner seat (step by step and plan) you can use for corners and ends:
http://ana-white.com/2010/05/plans/corner-and-ends-outdoor-sectional
jdub82fla
Fri, 03/29/2013 - 05:51
Outdoor Sectional
Amazing piece and very strong . I enjoyed the build as well. Pictures to come
HotMexHandyMan
Fri, 04/12/2013 - 12:25
I'm Also Confused About the Overhang
A post above posed a question regarding the 3/4" front overhang. I had the same question: How can the 1" legs be flush with a 3/4"overhang?
We are looking to start building this, but I would like to get all my ducks in a row first. Thanks! BTW, great wkend project.
In reply to I'm Also Confused About the Overhang by HotMexHandyMan
Lady Goats
Fri, 04/12/2013 - 12:38
Overhang
The front leg is a "1x" (spoken as a "one by" - I think it's a 1x4, but that doesn't matter right now). 1x's aren't actually 1 inch by [fill in the blank], but are 3/4 inches by [fill in the blank].
Example:
A 1x2 actually measures 3/4" x 1 1/2" (approximately, some may vary).
A 1x3 actually measures 3/4" x 2 1/2" (approx)
2x's (or "two by's" are 1 1/2" think, not 2" thick.
So, the 3/4" overhang will allow the 1x front leg to sit flush :-)
I really hope this helped instead of confusing you more!
rgp.asl
Sun, 04/21/2013 - 15:07
Shopping List
For the shopping list (Shopping List: 5 – 1×4 Boards, 8′ Long), would this be for one seat, correct?
I plan on starting this project this week and would like to how much materials i would need or if i should reconsider re-thinking the seating amount.
thank you!
In reply to Shopping List by rgp.asl
Lady Goats
Sun, 04/21/2013 - 19:47
Correct
The shopping list is for one seat.
Mattr777
Wed, 05/29/2013 - 08:43
Composite Decking
Thanks for the great plans. I plan on starting this project soon for my screened in porch. I was wondering if anyone as used or considered using composite decking as the material? I figured it would last just about forever and would eliminate having to paint it. Any thoughts on this?
Mattr777
Wed, 05/29/2013 - 09:32
Composite Decking
Thanks for the great plans. I plan on starting this project soon for my screened in porch. I was wondering if anyone as used or considered using composite decking as the material? I figured it would last just about forever and would eliminate having to paint it. Any thoughts on this? What other types of wood are people using?
Phil O'Connell…
Wed, 07/10/2013 - 18:27
A mum's day present this
A mum's day present this year, with our four (almost five) year old helping out with measuring, cutting, drilling, and screwing. Took a bit longer, but he had a great time doing it, and mum really appreciated it.
Still need to stain or paint it, but otherwise great!
Again, thanks for great, easy to follow plans!
jessb6698
Tue, 04/22/2014 - 11:39
questions questions
My husband and I are pretty new here, and we are attempting to build this sectional. We went to lowes and home depot and ended up buying 5 common boards 1x4x8 for around $6 each. we have a kreg jig but neither store sold 2 inch screwes so we got 1 1/2. After cutting all the pieces for the first chair and assembling, i went to barely move it out of the way in the garage so that we could start looking at the next one and the back boards just cracked and split. I was so discouraged and hate wasting money. My first question is are these not the right 1/4 boards to use because all the others cost so much more. Second, my husband worried that even if we had used 2 inch kreg screws that they would have been too long and poked through the boards. what can we do differently so that we don't have this problem before we waste anymore time and money :(
jkihano
Tue, 04/29/2014 - 12:57
Has any of the other kreg
Has any of the other kreg joints cracked? Did you use glue? Hard to say if none of the others cracked, it could be the wood. $6 is alot for one board. We paid $1.29 for one 1x4x8 at HD and they are basic pine boards. Be sure to pick through the pile carefully and get the best boards possible. It took me about 30 minutes to find 20 good boards that didn't have frayed or cracked edges and not warped. It was so bad I waited 20 minutes for them to bring down a new stack of wood! We didn't use a kreg but countersank all our screws. We used the 2 inch screws for the frames and 1 1/2 for the 14" seat boards. We also added a few more screws to hold the front two legs to the chair base and in the back to connect the back frame to the base frame. Once you stain and add seat covers no one can see all the screws. My coworker also told me to add triangle pieces in the backside to shore up any spots you think may need more reinforcement. I hope that helps.
jkihano
Tue, 04/29/2014 - 12:58
questions to your questions questions
Has any of the other kreg joints cracked? Did you use glue? Hard to say if none of the others cracked, it could be the wood. $6 is alot for one board. We paid $1.29 for one 1x4x8 at HD and they are basic pine boards. Be sure to pick through the pile carefully and get the best boards possible. It took me about 30 minutes to find 20 good boards that didn't have frayed or cracked edges and not warped. It was so bad I waited 20 minutes for them to bring down a new stack of wood! We didn't use a kreg but countersank all our screws. We used the 2 inch screws for the frames and 1 1/2 for the 14" seat boards. We also added a few more screws to hold the front two legs to the chair base and in the back to connect the back frame to the base frame. Once you stain and add seat covers no one can see all the screws. My coworker also told me to add triangle pieces in the backside to shore up any spots you think may need more reinforcement. I hope that helps.
jkihano
Tue, 04/29/2014 - 12:40
Did you read the instructions??
I was turned on to Ana-White by my coworker. I loved the easy idea of this sectional, printed off the plans and had all intention of building until I had my hubby run by HD to pick up the supplies. As I figured, he took it upon himself with the neighbor, to start building the chairs. I did help build 2 and they are pretty easy once you get the hang of it. Note, the corner and ottoman pieces are on a different set of plans, which I printed because my neighbor mentioned it wasn't on the chair plans. Herein lies the funny story about reading the instructions. Last night the menfolk started building the corner piece. They had the first stage U Shape for the back frame built when both told me the plans were wrong because the top 27 and change board made the frame much larger for the 24 and change board to fit in the middle. (I can't remember the exact lengths of boards). Thinking they had something wrong I quickly glanced at the plans and remembered in my head what the end result looked like and immediately knew what they did wrong. I flipped to the front page of the plans and pointed out the error. The top board overhangs a bit to accommodate the other back frame, making the corner.....a CORNER piece!! (Note, my husband insisted I was wrong until I showed him the end result picture, wherein he blamed his assistant - the neighbor for not reading the plans right!!) I was then asked to email/blog someone so they can update the plans to say....overhang the 27 board by this much.....I think they were trying to save face for not using some common sense and reading/looking at the instructions. Or....they were just mad for being shown up by a girl!! I did hear two thank you's as I walked off and shook my head.
brucereeloy
Thu, 05/15/2014 - 06:57
Kreg Jig screw size?
If using the Kreg Jig to join the pieces would you still use 2" screws? Seems like it would go right through the other side.
haydenhancock
Wed, 01/21/2015 - 14:11
I don't think so...
I am using the Kreg Jig on some scrap wood and you can't use 2" screws with it because the depth of the board isn't big enough. It will always go right through the other side.
MrsA_42212
Sat, 05/31/2014 - 08:44
Modern Sectional
What type of wood do you recommend? Pine boards or just regular treated lumber?
MrsA_42212
Sat, 05/31/2014 - 08:51
Kreg Jig
Which one do you use? On their site there are 5
jordasha
Mon, 06/15/2015 - 08:17
Looking forward to trying
Looking forward to trying this. My only question is how do I make the corner piece? I can follow directions but maybe you can show a diagram for that one. Or send me one. LOL I am a DIY virgin and I need all the help I can get.
In reply to Looking forward to trying by jordasha
Ana White
Mon, 06/15/2015 - 11:00
http://ana-white.com/2010/05
http://ana-white.com/2010/05/plans/corner-and-ends-outdoor-sectional
ann maher
Thu, 01/25/2018 - 15:28
Corners
What step in this plan addresses corners? TIA
Mrs.F
Thu, 05/07/2020 - 15:47
Protection of feet
Do you use anything to protect the feet of your furniture? We just built this project and we were wondering.
laurenann19
Thu, 05/21/2020 - 12:42
What cushion size?
Hello! I am sorry if I missed this, but what size cushions fit each section?
alenfest
Thu, 05/28/2020 - 05:53
this required the use of 4 -…
this required the use of 4 - 2x4s, not 3.
353" of total cuts is 29.4 feet. Divide that by 8-ft (length of each 2x4) = 3.67 2x4x8s.
ashleyread
Sun, 05/31/2020 - 05:00
Little help
I was wondering where do we put the drill holes? That’s the only thing I really can’t figure out thanks!
Jeremy68
Mon, 06/08/2020 - 07:49
Love our new patio furniture
My Boys and I just built this project from start to finish in under 10 hours. our sectional is 9' long by 5' wide. We have limited consumer grade tools and couldn't be happier with the results. None of us are trained carpenters and I'll admit was a little worried about the pieces lining up but as long as you ensure the frame is true the pieces match up quite well.
The best part is the look of accomplishment on my boys faces. Thank you for this.
Amnershae1
Thu, 08/12/2021 - 15:10
We built this!
I got my husband to build these and I love them so much! We bought a foam mattress second hand and we are going to cut it to fit the sectional pieces and cover it with fabric. I’m so excited! I wish I could share a photo!