Pergola Outdoor Room

free pergola plans
Difficulty
Intermediate
| Print this plan

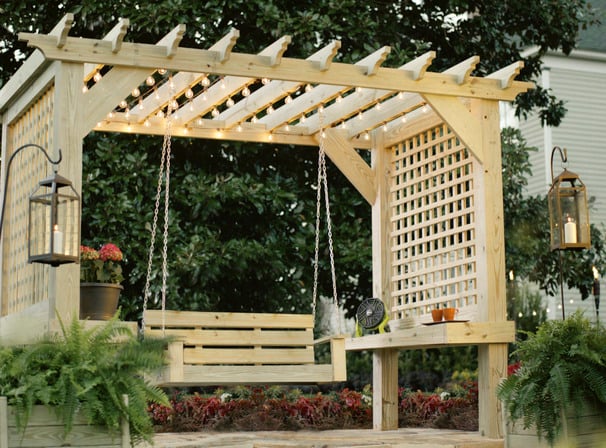
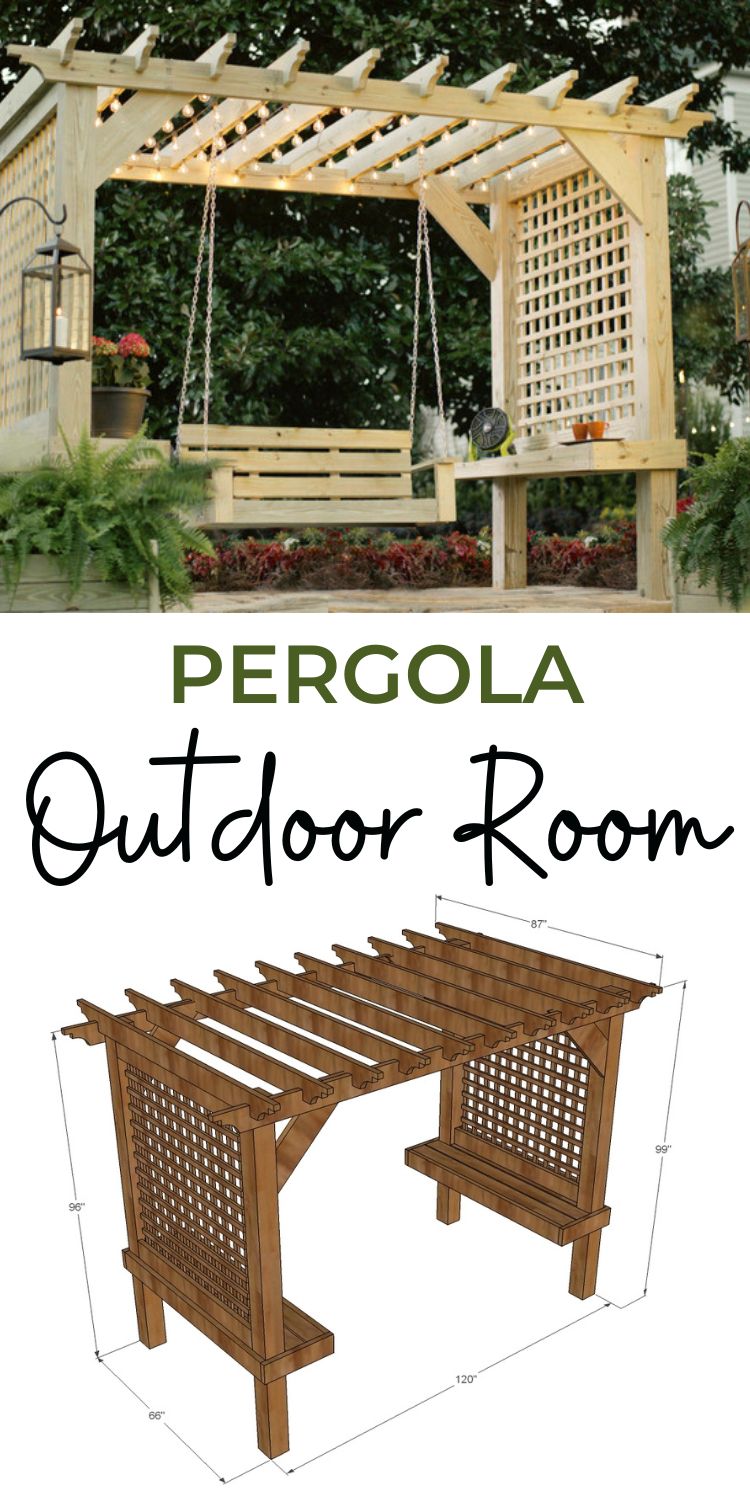
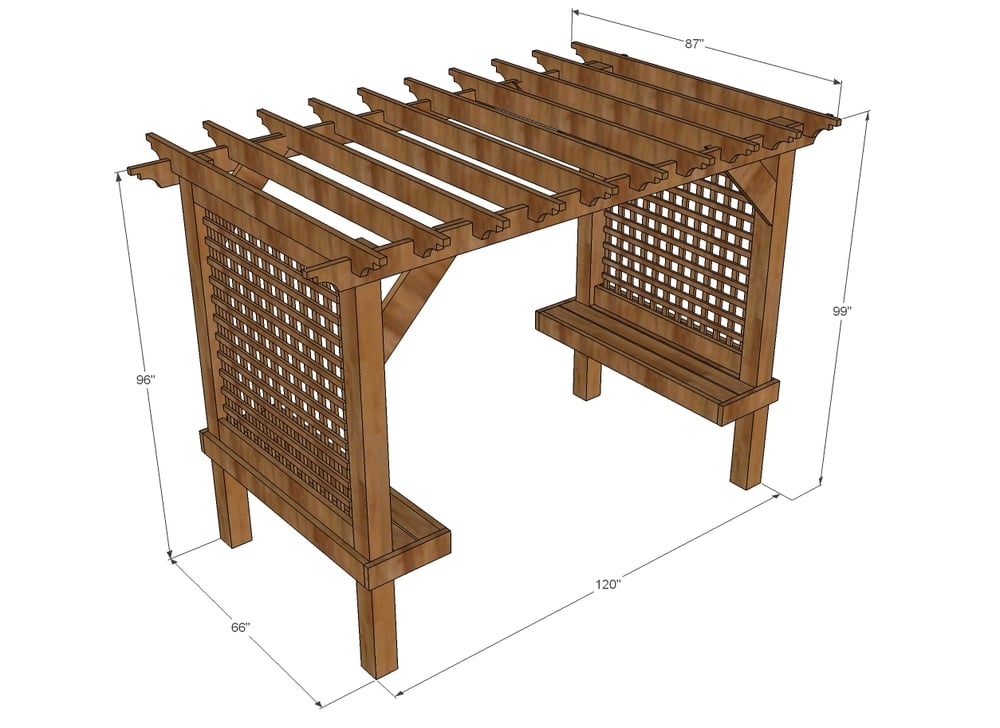
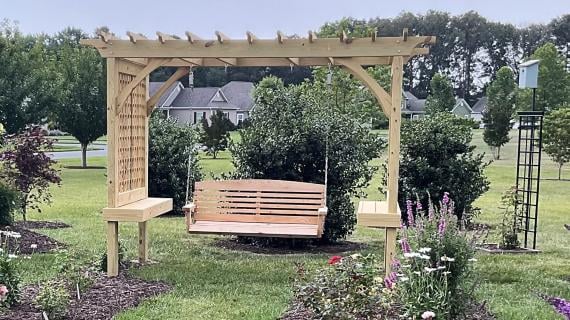
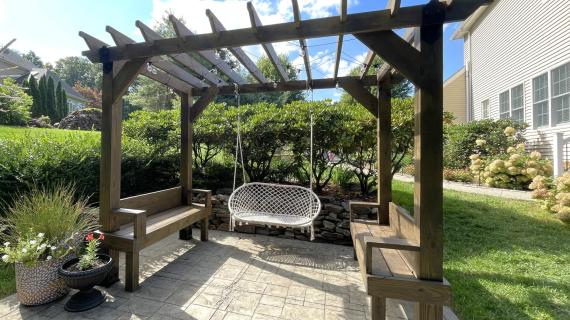
This free pergola plan features enclosed sides with built in side tables.  It's designed to become a backyard retreat, perfect with a swing, lounge chairs or a conversation set.  Free step by step pergola plans from Ana-White.com

Pin For Later!

Pergola Outdoor Room

Dimensions
dimensions for pergola

Preparation

Shopping List
  • 2-1/2”, 3 -1/2” EXTERIOR DECKING SCREWS
  • 1-1/4” AND 2” 18 GAUGE STAPLES
  • 4 - 6X6 POSTS, 8 FEET LONG
  • 2 - 2X6 BOARDS, 12 FEET LONG
  • 10 - 2X6 BOARDS, 8 FEET OR STUD LENGTH (CUT UPPER RAFTERS FROM THESE BOARDS)
  • 10 - 2X6 BOARDS, 12 FEET LONG
  • 1 - 2X8 BOARD, 8 FEET LONG
  • 1 - 2X4 BOARD, 10 FEET LONG
  • 24 - 1X2 BOARDS, 10 FEET LONG
Cut List

cut list in steps

Instructions

Step 1

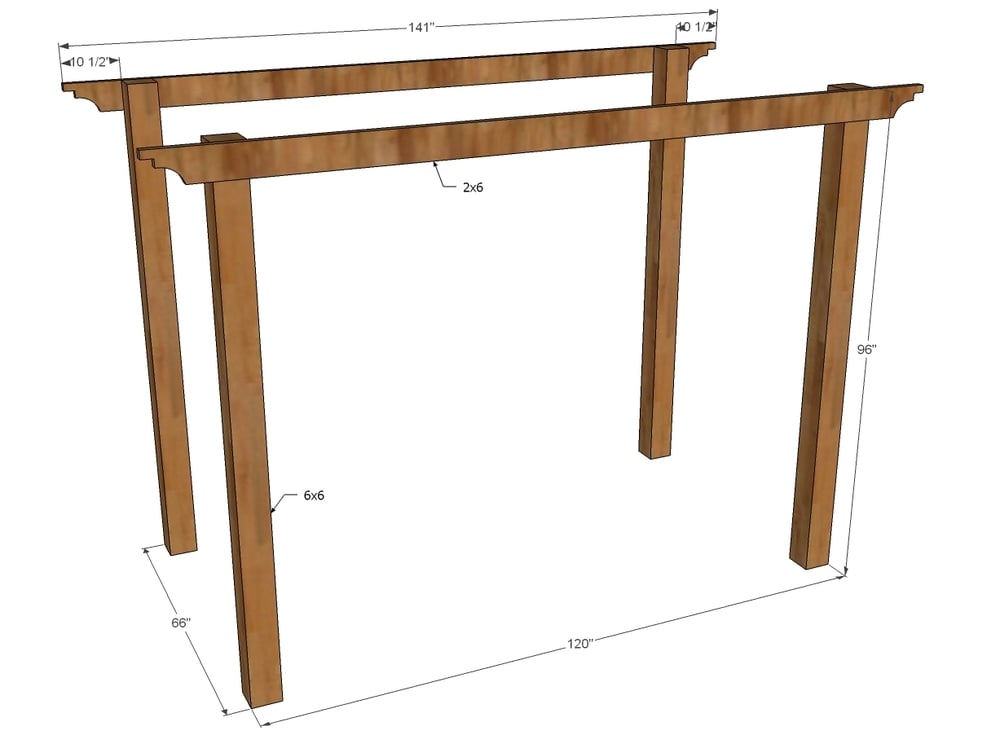
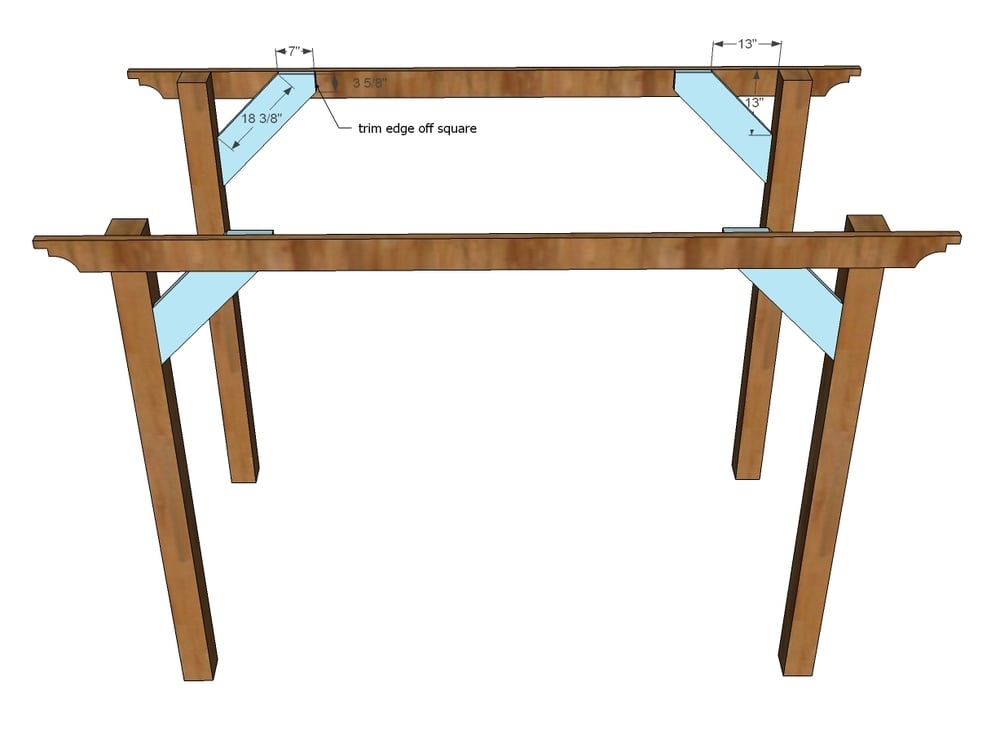
Carefully space 6x6 posts out on a level surface, 120” apart from outside to outside. Mark 141” long rafters, 10-1/2” in from ends on each end. Predrill four holes and attach two posts with 3-1/2” long exterior decking screws. Make sure the two posts are parallel at top and bottom when you attach rafters. NOTE: If cutting decorative tails on rafters (see step 3) do this on sawhorses on the ground before attaching to pergola.

Step 2

Check to make sure your posts are parallel to each other. Then attach cross supports to posts and rafters. To attach to rafters, use 2-1/2” exterior deck screws. To attach to posts, either drill 1-1/2” pocket holes and use 2-1/2” pocket hole screws, or attach using metal brackets.

Step 3

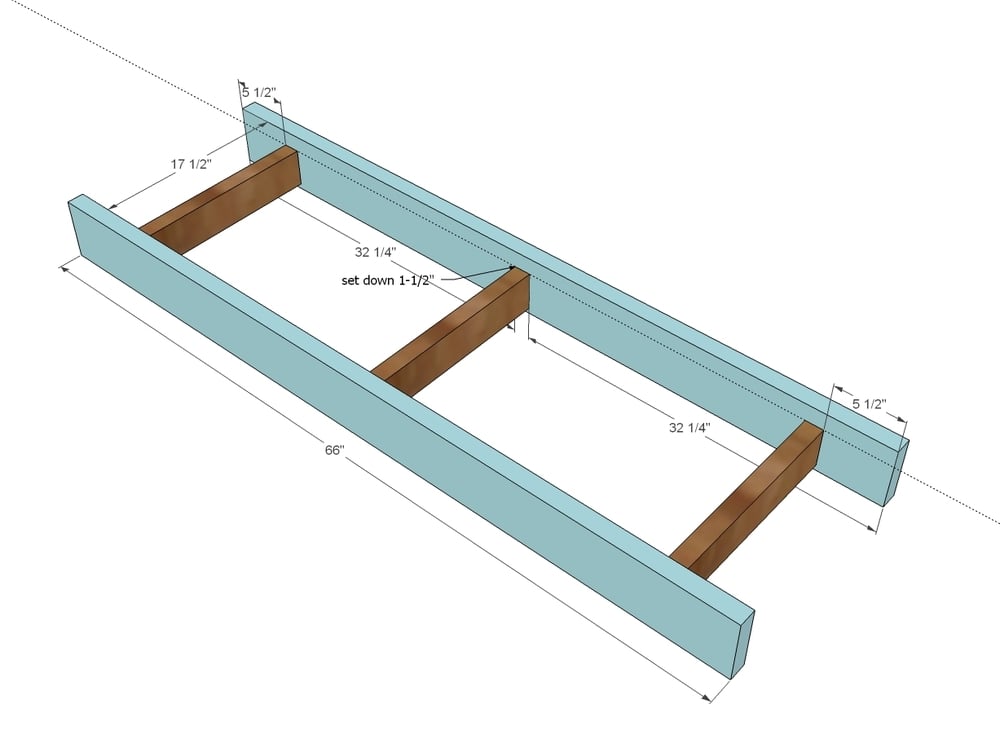
Begin building shelves by attaching 17-1/2” 2x4s to 66” 2x6s with 2-1/2” exterior deck screws, predrilling holes, with 2 screws per joint.

Step 4

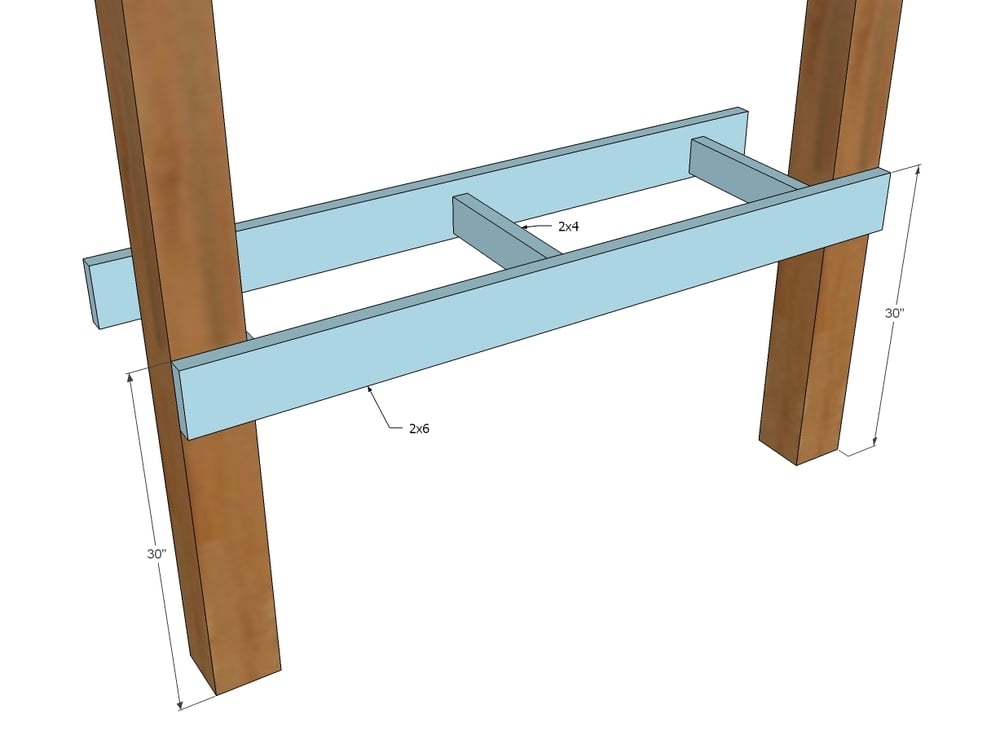
Use 3-1/2” exterior deck screws to attach shelves to posts. Predrill holes and attach through both 2x4s and 2x6s.

Step 5

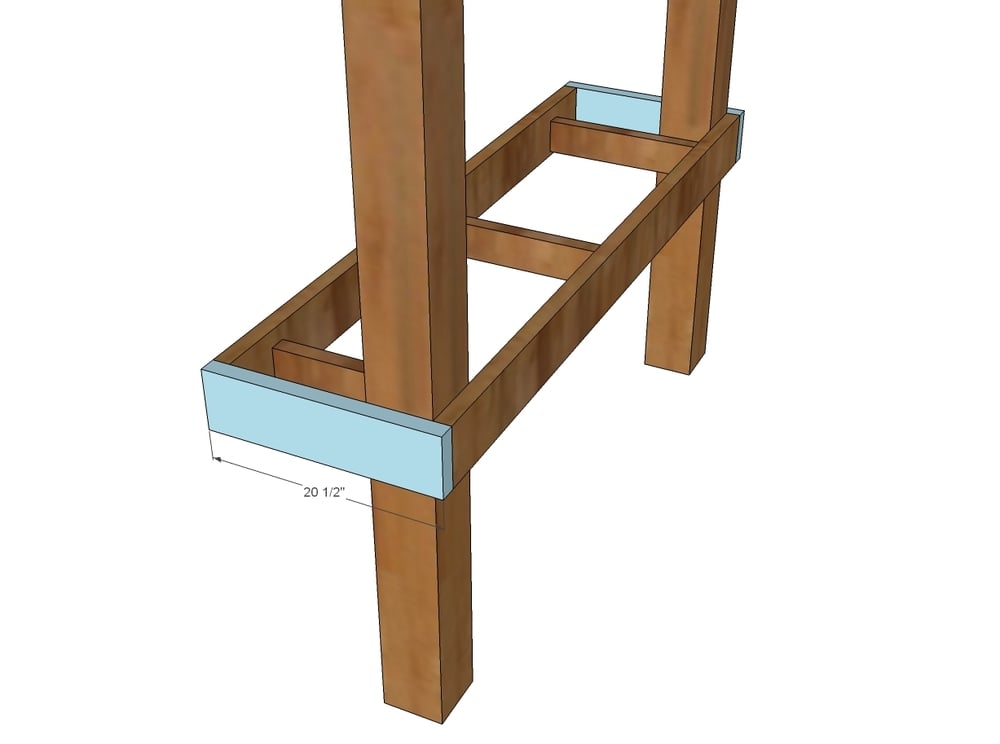
Predrill holes and attach 20-1/2” long 2x6 to ends of shelf 2x6 boards with 2-1/2” exterior wood screws.

Step 6

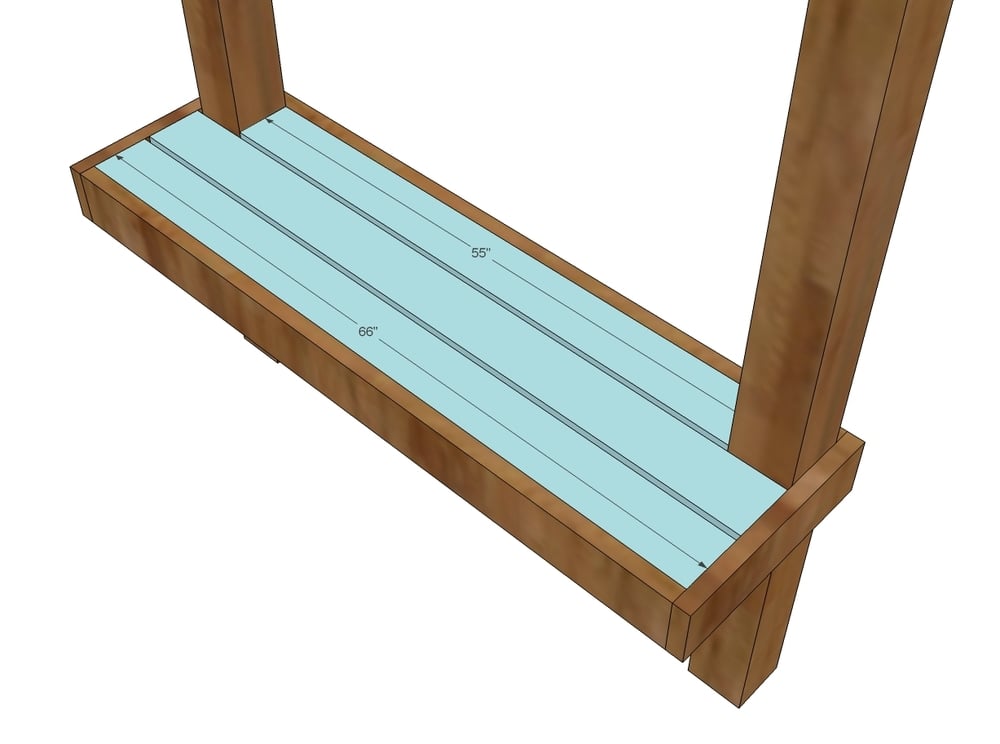
Lay seat boards in place. Attach to 2x4 framing with 2-1/2” exterior deck screws through predrilled holes.

Step 7

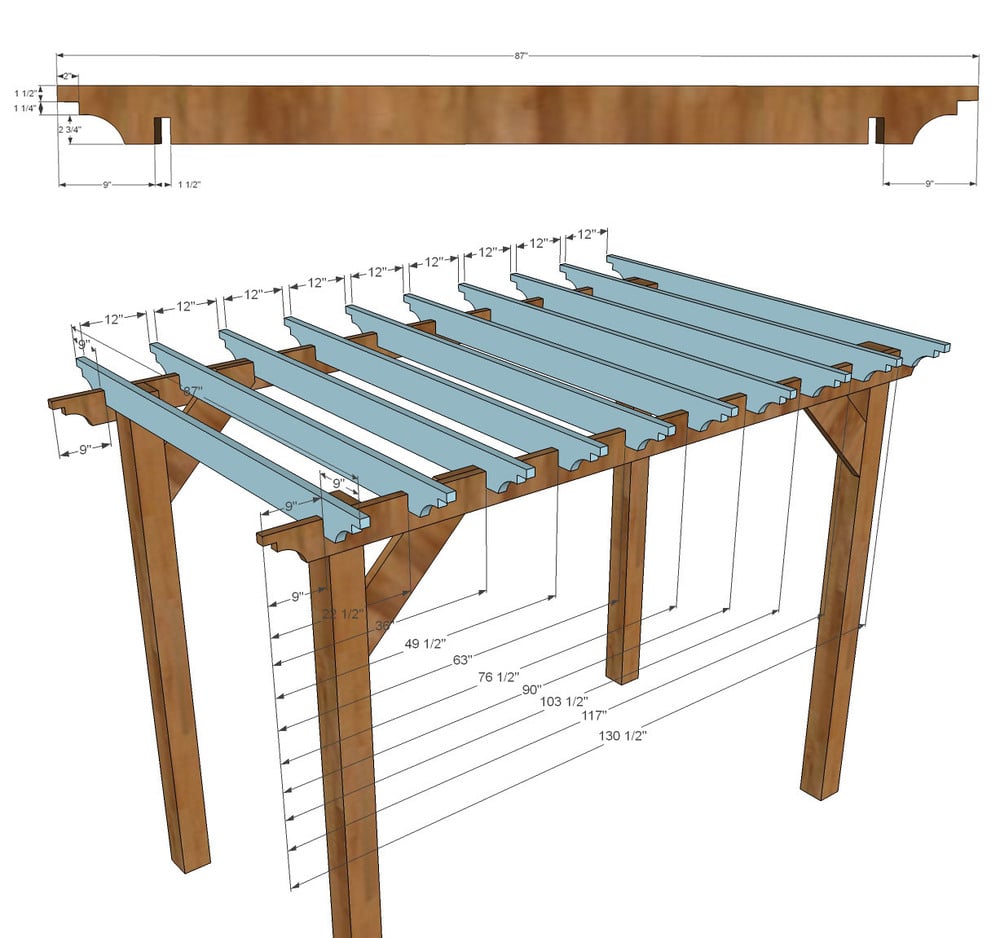
Cut tails of rafters if desired I decorative pattern with jigsaw. Notch out rafters by setting saw blade depth of circular saw to 2-3/4”, and make cuts every 1/4” in the wood to be removed. Use a chisel to remove wood. TIP: Notch multiple rafters at the same time by clamping together and cutting. Mark rafters attached to top of posts for upper layer of rafters. Attach upper rafters to lower rafters with 3-1/2” screws through top. TIP: Cut a 12” scrap wood piece and use it as a spacer when attaching rafters.

Step 8

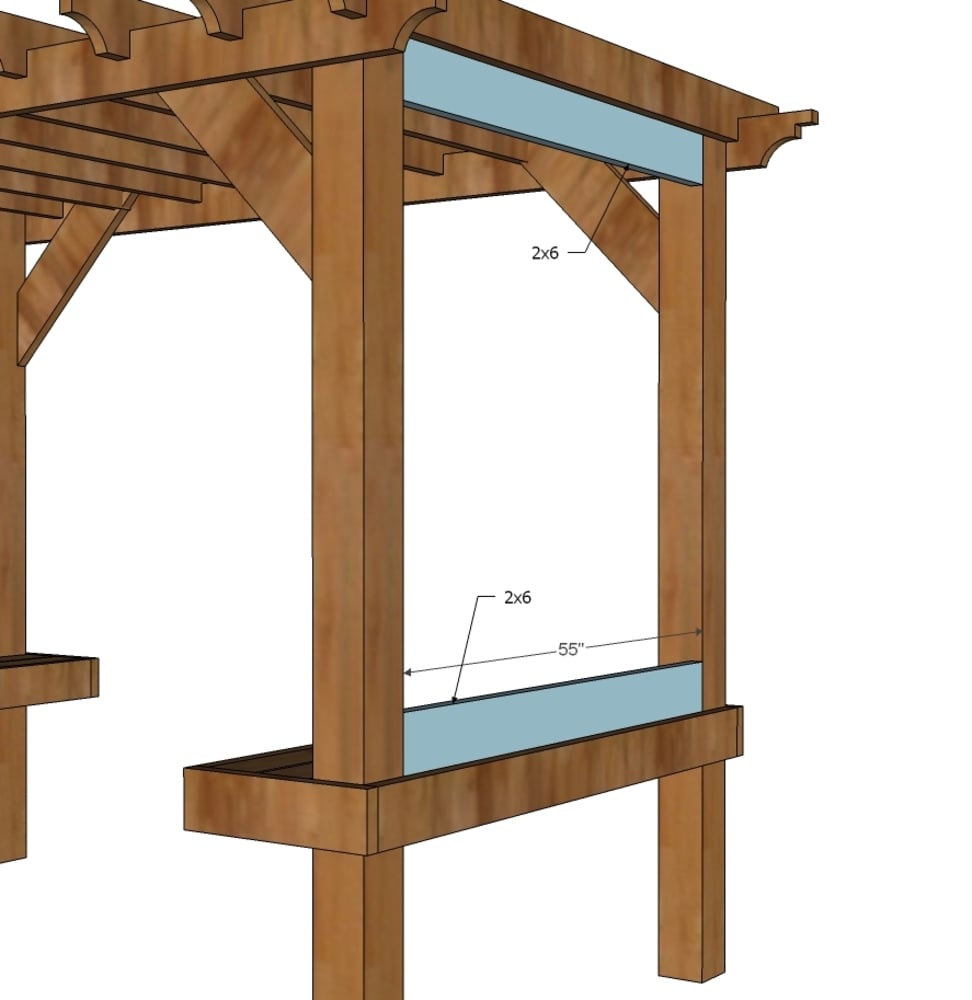
Drill (2) 1-1/2” pocket holes on each end of 2x6 boards that are 55” long. Attach to posts with 2-1/2” pocket hole screws.

Step 9

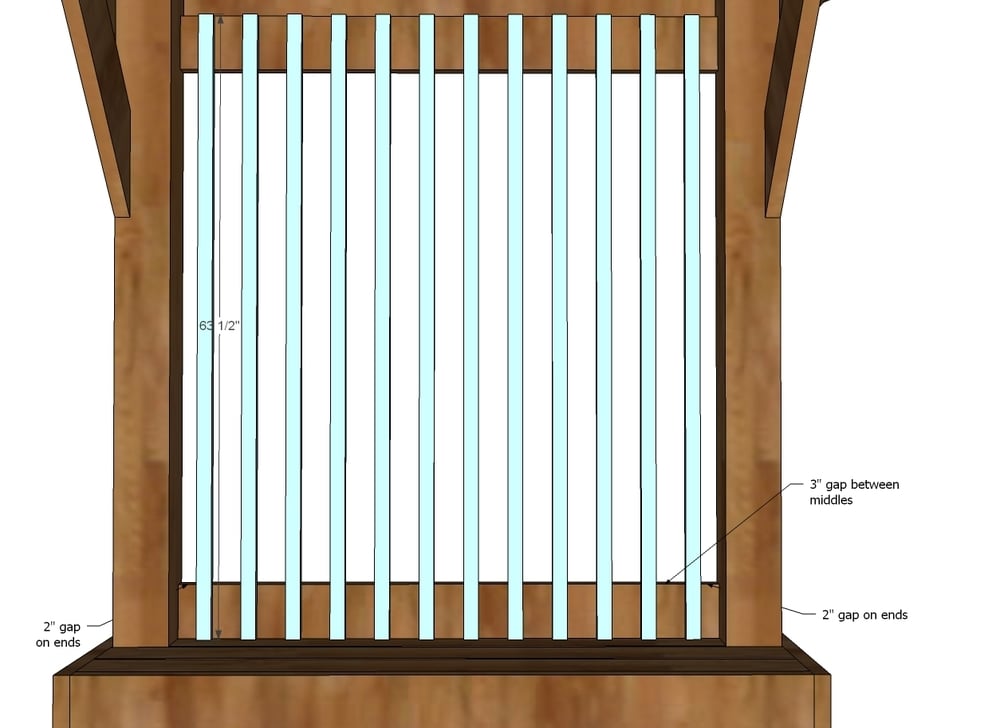
Use 2” staplers to attach vertical lattice boards to 2x6s from previous step. Start 1-1/2” offset from center and work outward. TIP: Use (2) 3” wood scrap blocks as spacers.

Step 10

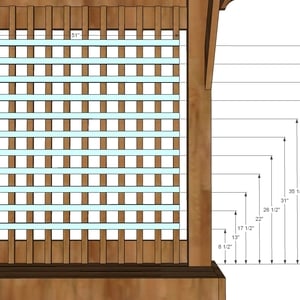
Attach horizontal lattice boards to the vertical lattice boards with 1-1/4” staples. Spacing between boards is 3”.

Step 11

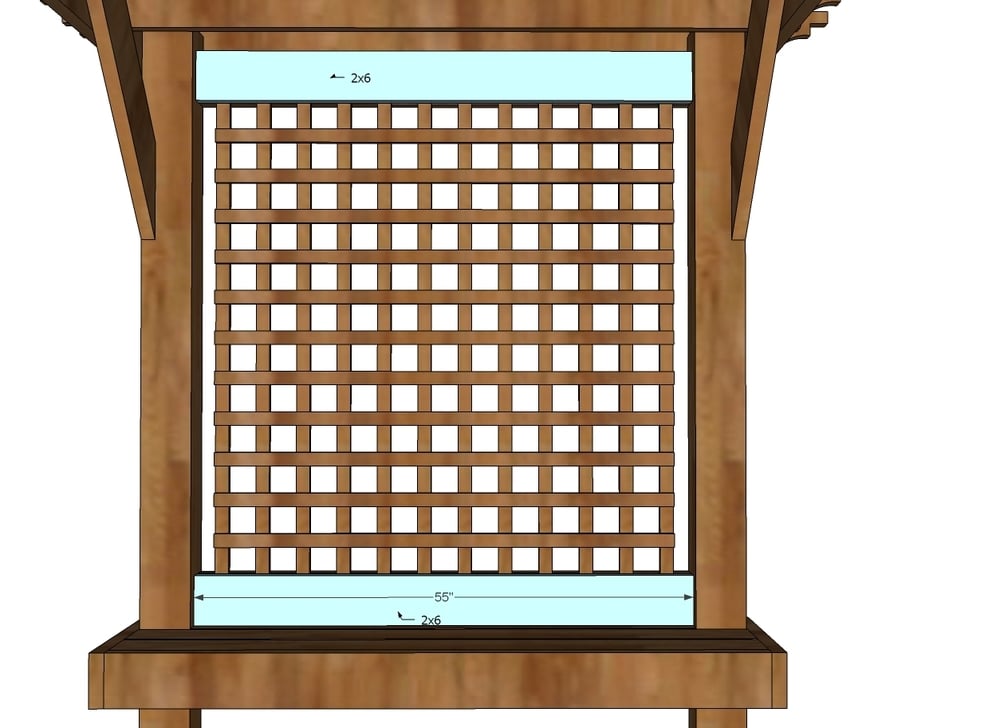
Trim inside edges of lattice with 2x6 boards. Attach to posts with 1-1/2” pocket holes and 2-1/2” pocket hole screws.

Project Type
Room

Comments

Ana White

Thu, 05/08/2014 - 10:28

Hi Tracy, thank you so much for using the plans on my site. Ryobi just went through a pretty massive site redesign this last couple of weeks, and I do apologize if you encountered any bugs. Are you still having issues? I have received word that website issues have been fixed from Ryobi.

I'm glad you like the pergola! It would have been impossible for me to work on a plan this big without help (until kids grow up!) from Ryobi, but of course, I'll continue to provide as many plans as I can here locally.

Thanks so much! XO Ana

ashwise

Thu, 05/08/2014 - 17:07

Working on this now.

I redesigned the Trellis and did a simple 45 degree angle cut for pergola ends to make it more my style, but overall it is an amazing project.

Issues Encountered:

1. Hard to get to the plans on Ryobi...have to search projects and find it rather than it just bring in the contest tab...

2. Nothing prints but the images. ..rather than the cut list and written directions that come when I print plans from ana-white.com directly...also none of the hardware is shown on the picture plans either...I figured it all out and stabilized with metal brackets after pergola was assembled. :-) def. Recommend brackets for extra stability.

3. The 87 inch length for the rafters was hidden (might have been.my printer or my slightly comatose state due to allergies)..I didnt see it until we went to build pergola. I had cut all 10 trusses at just 8 feet... had to go back and shorten up and re notch one of the sides.

4. Placement of the hardware to hang the swing wasnt shown either. I used 4 eye bolts (one per chain with bolts that each hold 320 pounds) to disburse the weight on the board as I wasnt sure how much weight a 2x6 could handle in the center...I built the modern swing (6 foot long) instead of what was shown so whole family could sit and swing together.

I am finishing up trellis tomorrow and staining/sealing it with Restore stain in Timberline color to match the deck platform we built it on. Will post pictures after that is complete and we finish installing the flagstone patio in front of pergola. :-)

Frequently Asked Questions

Wood Questions

What kind of wood should I use?
Most of our plans use standard construction lumber like pine or fir. It's affordable, easy to work with, and easy to find. It's also rapidly renewing and biodegradable, so a great eco friendly choice!

Can I use hardwoods instead?
Yes—just keep in mind they're heavier, cost more, and can be tougher on tools and harder to join together and finish. I recommend not tackling a hardwood project until after you have built several softwood projects.

What if my boards are warped?
Choose the straightest boards at the store. You can often work around slight warps by cutting them into shorter pieces.

What wood should I use for outdoor furniture?
Use red-toned or pressure-treated 2x lumber for framing, and cedar or cedar fence pickets for the decking. Outdoor furniture should be built like a deck—your local home center can help recommend the right wood for your climate.

Will my wood move or warp after I build?
Potentially, especially in humid climates. Let your wood acclimate indoors before building. Once acclimated and kept in a stable environment, movement should be minimal. Remember, most houses are built using framing lumber - it's all about keeping moisture down indoors.

Cutting Questions

Do I need a miter saw?
A miter saw is great, creating fast, safe, and precise cuts, even for beginners. But most plans can be built with a circular saw and a straight edge. If using a circular saw to cut, take time to practice, and get good at making cuts, before cutting your project boards.

How do I get clean cuts with a circular saw?
Clamp your board, measure twice, cut slow, and use a sharp blade. This takes practice, so spend some time making cuts. I go through becoming proficient at freehand cutting in my course, it is worth taking if you want to master this skill.

Will the store cut my wood?
Yes—most stores will do rough cuts to help you transport your materials home. But from store to store, the quality of cuts could greatly vary.

Joinery Questions

What screws should I use?
We recommend star-head self tapping screws for framing, most common sizes are 2-1/2", 1-3/4". Pre-drill if close to the edge or you find your wood is splitting.

Do I have to use pocket holes?
Pocket holes are the cheapest, easiest and fastest way to do some joints - like edge to edge or a hidden fastener joint. There are other methods, but these can be time consuming and expensive. We recommend using pocket holes as indicated in plans for best results.

How do I keep things square?
Use a speed square and measure diagonals after each step. Always clamp joints before screwing to keep them tight and flush.

Finishing Questions

Stain or paint before or after building?
A quick sand before and a full finish after gives the best results. Pre-finish if you're doing two-tone or detailed finishes.

What type of finish?
Use oil-based or water-based stain. For paint, cabinet-grade latex or enamel works great. High use surfaces on indoor projects should get a coat of polyurethane, I recommend a Helsman or Spar or other flexible poly that won't crack or peel with wood movement. For exterior projects, use a finish suitable for exterior fences.

How to get a smooth finish?
Start with a well sanded project. Sand between coats (220 grit), wipe clean, and apply light coats with a foam brush or roller.

Plan Questions

Can I change the size?
Many people do, and that's the great thing about building your own furniture! But do keep in mind going bigger might mean more supports are required, and often plans are optimized for minimal material waste.

Are these beginner-friendly?
Yes—plans are written with simple tools and clear steps in mind, with every effort to make plans as simple as possible.

Can I sell what I build?
Absolutely! Just don’t resell or repost the plans themselves.

General Questions

What tools do I really need?
A drill, circular saw, tape measure, square, and a few clamps will get you through most projects.

Do I need a workshop?
Nope! A driveway or small patio is plenty to get started, just make sure you have a level place to work. If you find you are building several projects a year, creating a small workbench is a great way to store tools and have a dedicated workspace.

What if I mess up?
Wood filler, sanding, or flipping boards goes a long way. Mistakes are part of the process!

What can I do to make my projects look more professional?
Start with straight boards, make accurate cuts, clamp all joints, and line up everything neatly. Sand thoroughly, use a neutral finish, and apply it in light coats for a clean look.

I've never built anything before. Where should I start?
Start with a few smaller softwood projects to get hands-on experience. Or if you're tackling a big project, buy a little extra lumber and practice your cuts and joints first. If possible, work with someone who has a bit of experience.

Care & Maintenance

How long will my furniture last?
With good joinery and regular care, your DIY furniture can last for decades. I have pieces in my own home that are over 20 years old and still going strong! One of the best parts about DIY furniture is that it’s easy to repaint, refinish, or repair—so your projects can grow and adapt with you.

How should I care for outdoor furniture?
Lightly pressure wash or hose it down once or twice a year. Tighten screws and reapply finish as needed to protect it—just like a deck or fence. A little upkeep goes a long way in extending the life of your furniture.

How about indoor furniture?
Regularly dust or wipe with a damp cloth. If it starts to look worn, a light sanding and touch-up paint or stain can refresh it in no time. DIY pieces are meant to be durable and fixable—so don’t be afraid to give them some love now and then.

Want to Build with Confidence?

Check out my ebook: 12 Skills to Build Your Own Furniture
It walks you through the core skills every builder needs—measuring, cutting, joinery, and finishing—so you can build beautiful furniture that lasts.

Still Have Questions?

Email us anytime at [email protected] and we’ll be happy to help!