
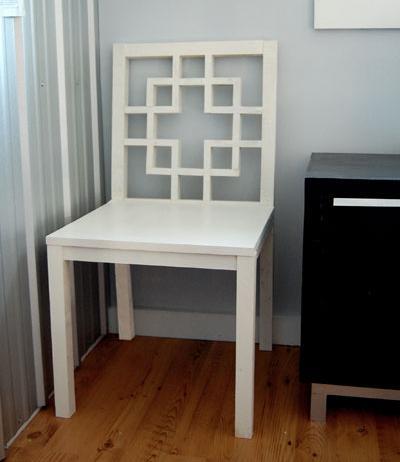

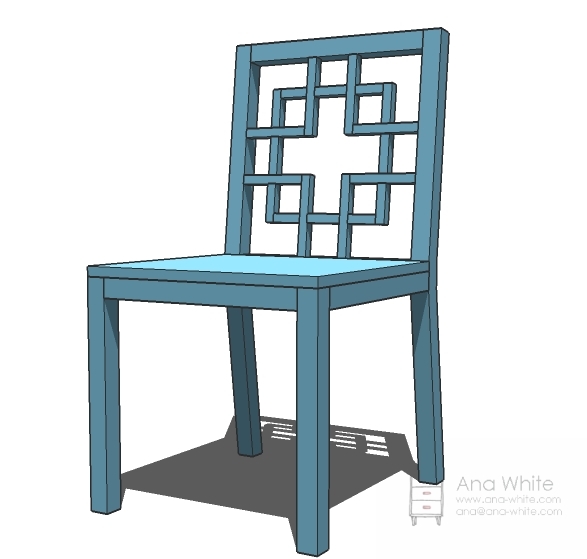
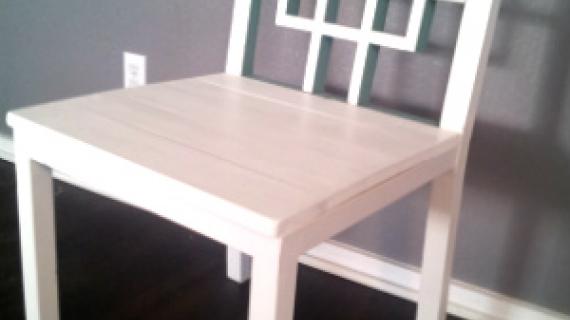
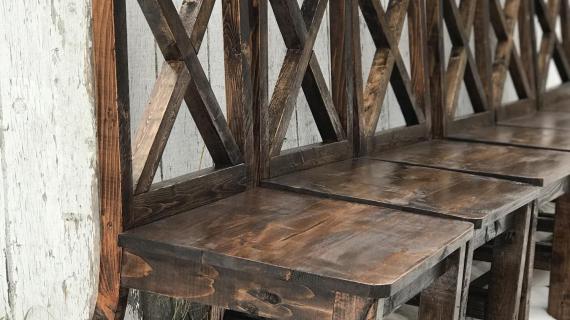
A stylish modern chair. Large seat, low back.
So what happens when you build one as a proof of concept . . . and you fall in love and want three more?

But in the fast paced world of building and blogging daily that I live in (intended for a giggle at my expense, being that I am still wearing the same comfy sweats I swore I would change out of at 4:34PM, exactly 10 minutes before the Ram gets home) how can I possibly build three more?

Or should this lone beauty be destined for my somewhat modern office? As perhaps a guest chair for my most frequent visitor (who prefers a pink high chair) or as the coolest printer stand I could ever imagine?

What do you think? A perfect fit in the printer's spot? Or enlist the Ram's help to build 3 more?

In orange?

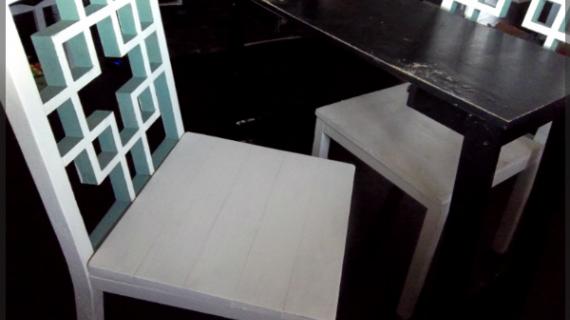
Or in blue?
Now I have a confession. I made a great mistake of bookmarking PBSkids.org (pronounced peebee eskids dotorg in my household) a while back. Sometime while I was out in the garage building this chair, my daughter hopped on my computer and started playing peebee eskids dotorg and crashed all my windows. So you'll have to bear with me - there are a few modifications I would suggest to make your chair both easier to build and stronger.
Warning: As much as I know you are capable, chairs are so easy to mess up. Two major issues - chairs need to be stronger and chairs are easy to get "off" square. Don't build this chair (or any chair for the matter) as your first project.
Preparation
1 – 2×2 Board, 8′ Long
1 – 1×2 Board, 8′ Long
1 – 1×4 Board, 10′ Long OR 19″x19″x3/4″ Plywood Panel for seat
1 – 2×4, stud length or 8′ long ( pick one that is straight with minimal knots and lightweight – means it’s drier)
2″ Pocket hole screws
1 1/4″ Pocket hole screws
2 – 2×4@36″ (Back Legs)
6 – 2×2 @ 16″ (Seat Back and Aprons)
2 – 2×2 @ 17 1/4″ (Front Legs)
1 – 1×2 @ 16″ (Seat Back Seat Top)
2 – 1×2 @ 6 1/2″
4 – 1×2 @ 5 3/4″
2 – 1×2 @ 6 7/8″
6 – 1×2 @ 3 1/4″
2 – 1×2 @ 3″
4 – 1×2 @ 2 1/2″
5 – 1×4 @ 19″ OR 19″x19″ Plywood seat top


Instructions
Step 1
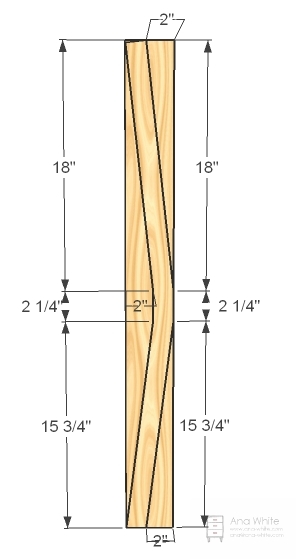
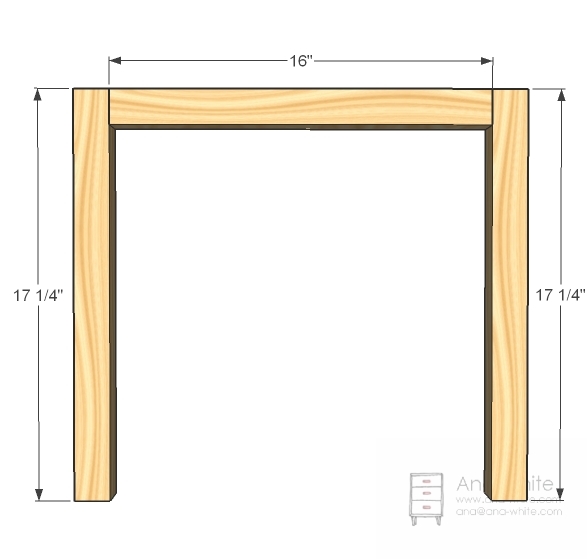
Back Legs
CAREFULLY cut out your chair legs as shown above. Use either a circular saw or a jigsaw. Sand the legs so that they match each other. Transfer the middle markings around the leg so you know where the seat goes.
Step 2
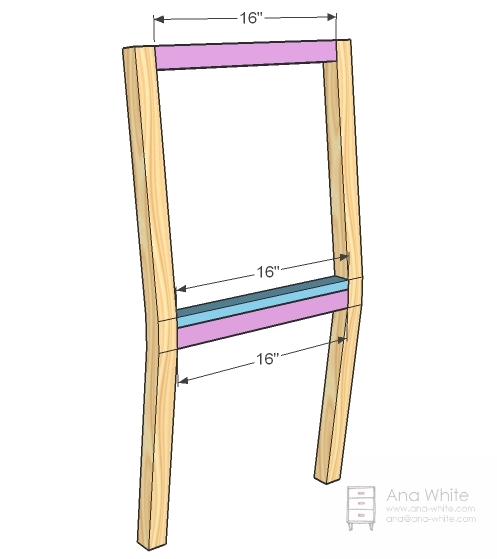
Build the Seat Back Frame
Build the seat back frame as shown above. Use 2″ pocket hole screws when joining 2x2s and 1 1/4″ pocket hole screws when joining 1x2s. Make sure you set your jig accordingly. Use glue.
Step 3
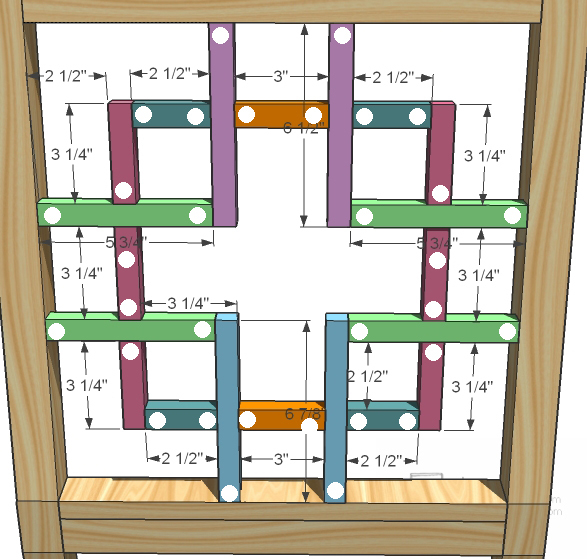
Squares
Okay, this part isn’t hard so much that it is tedious and super easy to get off square. A trick that I used was to drill all my pocket holes on the back so filling pocket holes (and sanding) as super easy. If you are staining, you may consider using wood dowels. Anyway, cut out all the pieces and arrange. Drill all the pocket holes and arrange again. Start by screwing together the longer 90s first. Then build all the smaller 90s. Then arrange, mark, and attach the smaller 90s to the inside of the larger 90s. Then add the joining pieces to connect all the square. I promise, this step is quiet easy. Use glue. And yes, the chair back is super strong and looks fine with a 1×2. Looks so good, I must also put plans up for the headboard and more! Oh, yes, CHECK FOR SQUARE before the glue dries! Finally, screw the squares into the back of the chair. Set the back aside.
Step 4
Chair Front
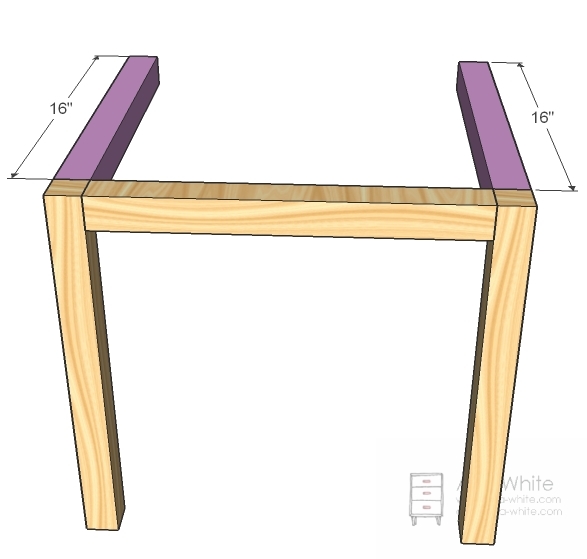
Attach chair front legs to the front apron. Use glue and 2″ pocket hole screws.
Step 5
Step 6
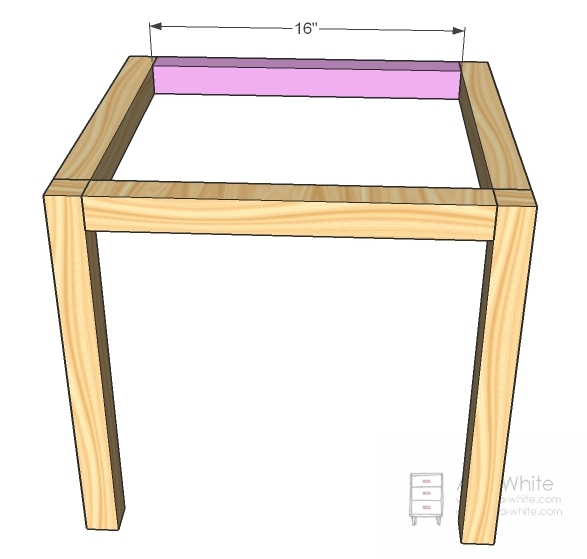
Back Apron
Now the back apron. Keep using 2″ pocket hole screws and glue.
Step 7
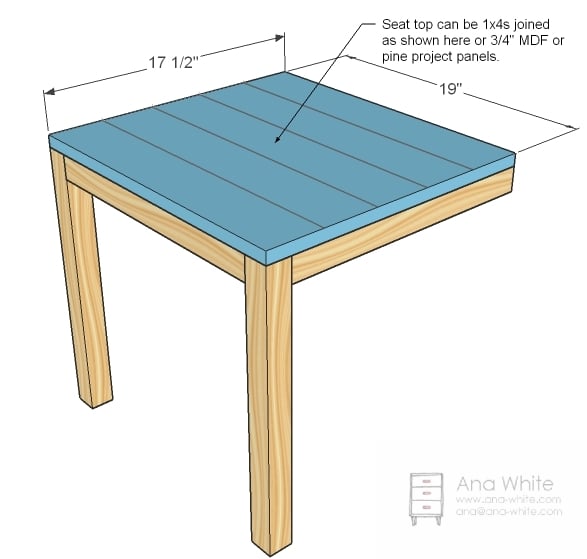
Top
If you choose to go the 1×4 route, join all the 1x4s together as shown above with 1 1/4″ pocket holes screws. Then screw the top to the aprons and front legs.
Step 8
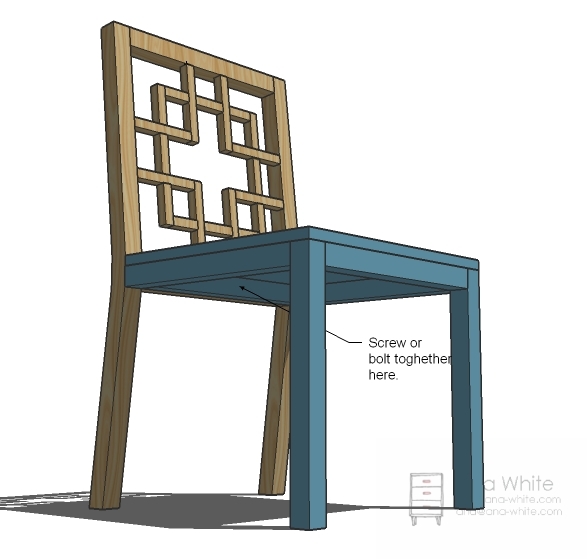
Assembly
Attach the seat to the chair back as shown above. I suggest using bolts, but screws would work too – especially pocket hole screws – but be warned, screws may loosen up over time. Bolts will too, but you can just tighten again.

Comments
pinksuedeshoe (not verified)
Tue, 10/19/2010 - 19:55
Beautiful! I love it, it's
Beautiful! I love it, it's just so pretty! I'd love to have a whole set to perk my dining room right up.
FlowerChickinTX (not verified)
Tue, 10/19/2010 - 20:26
LOVE it, can't wait for me
LOVE it, can't wait for me and my hubby to build some!
fishdimple (not verified)
Tue, 10/19/2010 - 23:58
Oh my, I love this chair, we
Oh my, I love this chair, we (fiance) and I are going to have to get a move on and start building!
Gwenevere (not verified)
Wed, 10/20/2010 - 00:35
"don't build a chair as a
"don't build a chair as a first project" does that rule apply for the step stool and benches too? I'm so worried that I won't square them up right and finished I'll have a "rocking" stool and a "rocking" bench. :)
K (not verified)
Wed, 10/20/2010 - 02:27
hehe... never follows
hehe... never follows directions that sound like "don't build this for your first project" :)
jill w (not verified)
Wed, 10/20/2010 - 02:52
This is a really cool chair.
This is a really cool chair. Love what you are doing!! Keep it up!! Thanks Ana
orangesugar (not verified)
Wed, 10/20/2010 - 03:06
Very pretty
Very pretty
Michelle (not verified)
Wed, 10/20/2010 - 03:26
Gorgeous!!!
Gorgeous!!!
Bethany (not verified)
Wed, 10/20/2010 - 03:46
I'm so excited! I have been
I'm so excited! I have been wanting to do this for quite some time now - I just need to quit my job so I can find TIME to satiate my buildies! Thanks for this great plan - it looks amazing, and expensive ;)
Kristen (not verified)
Wed, 10/20/2010 - 04:51
I wondered how you would work
I wondered how you would work around the "back slant" that chairs have when people began requesting chair plans. As usual, you solved the problem--no problem for Ana!
Can I put in a pre-order for your book now???
Heather C (not verified)
Wed, 10/20/2010 - 05:38
that is really beautiful.
that is really beautiful.
Hillary (not verified)
Wed, 10/20/2010 - 05:52
I love that chair! It's going
I love that chair! It's going in my daughter's room with her desk. Perfect. Except I'll probably add a 1x2 between the legs in front as a foot rest for her...?
Ana White (not verified)
Wed, 10/20/2010 - 06:13
Gwenevere, benches and step
Gwenevere, benches and step stools are different because they are lower and boxed in. A chair is easy to get off square because 1) if you slightly mess up cutting your back legs, it will be very difficult to keep the chair square and 2) when you build the seat frame, it's a 3 dimensional object and could get off square so easy ending up with a dreaded wobble. This chair was easy to build and took me only a few hours. Don't be intimidated by chairs, it's just that I'm suggesting you start with something you are more likely to have success with. In other words, it's hard to hide a mistake on a chair. The comment above was not meant to intimidate.
cindy (not verified)
Sat, 03/19/2011 - 02:59
I saw the headboard you have
I saw the headboard you have in this style can you tell me how I would cut the queen size bed headboard down to make a full size bed.
HammerTime (not verified)
Wed, 10/20/2010 - 10:41
Wow. This is perfect. I'm
Wow. This is perfect. I'm going to have to work my way up to this one!
jenny lisk (not verified)
Wed, 10/20/2010 - 11:18
wow Ana, this is
wow Ana, this is AWESOME!!!
I just searched west elm's site and see they have a discontinued metal outdoor table with a glass top...thinking maybe I could copy that idea, in wood...make 6 or 8 chairs to go with...wow!!!
Thanks so much for all you do. It's really inspiring, and helpful!
Erin (not verified)
Wed, 10/20/2010 - 11:25
Absolutely amazing! I'm in
Absolutely amazing! I'm in awe! Great work...
Loni (not verified)
Wed, 10/20/2010 - 16:43
SO SO SO SO SO SO
SO SO SO SO SO SO BEAUTIFUL!!! Thank you thank you thank you thank you!
Can we do these as bar stools?! (ever since you posted the picture a fellow reader did of a daybed with the floating squares, I've been obsessed with that look!)
Kathy (not verified)
Wed, 10/20/2010 - 19:06
Amazing...I am almost
Amazing...I am almost finished building a full sized headboard in this style! Great minds think alike! I'm just pouting b/c I'm building it for my boyfriend who wants boring black! ;)
I did do 1 thing differently and wondered if it would compromise the strength of the chair...I mitered the corners if the interior "L" pieces. Would that cause it to be less "strong"?
I can't wait to make 4 of these chairs!
cindy (not verified)
Sat, 03/19/2011 - 03:00
s
Charlotte Haines (not verified)
Thu, 10/21/2010 - 03:41
LOVE!!!Could we pad it before
LOVE!!!Could we pad it before putting seat on???
Brooke (not verified)
Sun, 10/24/2010 - 18:41
Ana you did it again. Thanks
Ana you did it again. Thanks for all your time and plans. They are wonderful.
How comfortable is the chair? Would it be possible to modify it to look like the Aaron chairs at Pottery Barn? http://www.potterybarn.com/products/aaron-chair/
Kathy (not verified)
Tue, 10/26/2010 - 18:57
Ana, would the cushions on
Ana, would the cushions on the West Elm site fit these chairs?
Lisa Canning (not verified)
Tue, 11/16/2010 - 04:46
Ana, you are a genius. I am
Ana, you are a genius. I am so impressed with your skills!
Anna (not verified)
Tue, 01/25/2011 - 12:00
Gosh, this is beautiful. It
Gosh, this is beautiful. It would look amazing in my loungeroom or my bedroom. unfortunately, i really don't have any space at all to make furniture (not even a garage....). I'll have to keep my ear out for someone in my community who'd be up for making it for me!
marlaandwilliam
Fri, 03/18/2011 - 19:27
Tried... failed :(
I tried to build this chair - I failed miserably, and I'm not a beginner builder... It's just.... BAD. I am going to rip it apart and build the other chair you have that is simpler back - just 2 pieces of wood with 1 inch spacer between them. Gosh, is my chair bad. I just can't express how hard this chair is to build.
cindy (not verified)
Sat, 03/19/2011 - 03:02
squared2 headboard measurments
Can someone tell me what the measurements for a full size bed is in this design?
calli (not verified)
Thu, 10/06/2011 - 07:29
Conversion??
How cool would this chair back design be to make into a table top for a glass-top coffee table???!!! I understand that the squares are quite difficult to keep in check, but by the looks of the finished product, I'm sure it's so worth it!! If you ever run out of fun planning ideas (which I'm sure you won't), I'd love to see a plan for this design on a table Ana!! :)
MikeB
Wed, 11/30/2011 - 08:39
Anyone make this chair???
I am really wanting to build this chair for my daughter's bedroom along with a twin headboard with the same pattern. I was able to use sketch-up to create the headboard without any issues, but I am struggling with the chair back. I will try to explain the issue, hope it makes sense.... After ripping the back legs and chair back from 2x4s, the top and bottom of the of legs are parallel with the ground(as expected). The issue is that the angle of the back is at approximately 6.5 degrees leaning back from the seat bottom, so I don't see a way to use square 1x2s at the top and the bottom of the design. I would think that top and bottom pieces (6 1/2 and 6 7/8 in step 3) would need to be mitered on the ends to match the slop of the chair back. If anyone has built this chair and can offer their experiences, I would greatly appreciate it. If someone has a sketch-up rendering of the chair, that would be great. email to [email protected]
Thanks,
MikeB
Matty J (not verified)
Mon, 04/09/2012 - 08:00
Wife loves it
Just made this chair over the weekend and my wife already requested four more (wow). It really does look great and after a few minor adjustments to strengthen it it feels very sturdy. We're planning on upholstering a cushioned seat for it. I'll post a few pics when it's sanded/painted.
Just a side note, I don't think the shopping list coincides with the cut list. You'll end up needing more 2x2 and 1x2 when it's all said and done.
Lawless
Fri, 09/07/2012 - 17:09
The measurements for the inset squares are wrong.
The detail of the squares adds up to :
6 4/8 + 3 2/8 + 6 7/8 = 15 13/8 = 16 5/8 High
But there's only 14 7/8 high of space to put it in.
The horizontal dimensions are given as
5 3/4 + 1 + 3 + 1 + 5 3/4 = 15 6/4 = 16 1/2 wide.
But there's only 16" of width to fit it in.
Also the gap on the left is given as 2 1/2 but is would be 2 1/4 but even then it wouldn't fit.
I drew parts of it, as seen here : www.steponnopets.net/furniture/ana_white/Overlapping_Squares_Chair_-_Or…
Here's a revised version with a much easier Squares Motif.
http://www.steponnopets.net/furniture/ana_white/Squares_Motif.pdf
SjFel
Thu, 01/29/2015 - 11:43
Made two
I built this chair twice. I made it for my sister for Christmas one year, then she asked for a matched set. It's time consuming but not overly difficult. I made a square out of scrap lumber and screwed it to my work bench. Making sure The measurements were right and making sure it was perfectly square. Then placed the small pieces of the back of the chair together inside, glued and screwed them together. Left it to dry. It worked out quite well. Thought the tip might help others.
ciode
Mon, 01/30/2023 - 01:22
nice post
nice post