
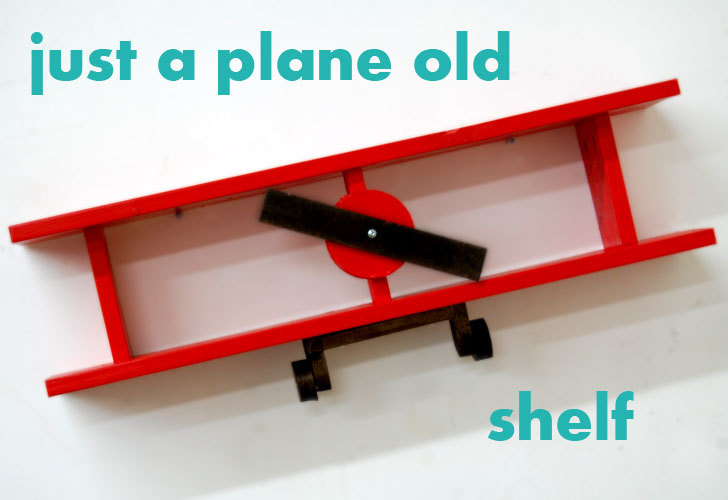

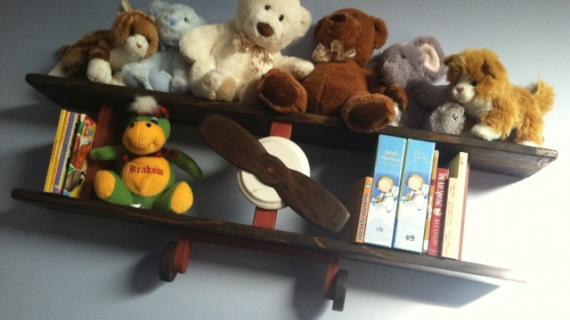
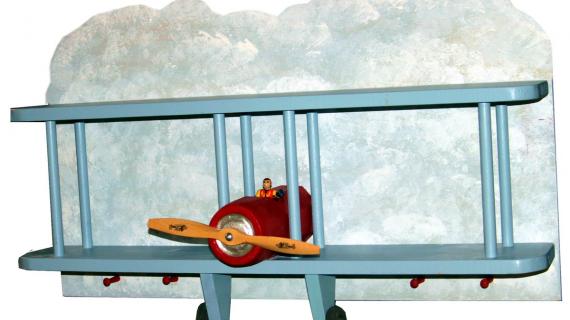
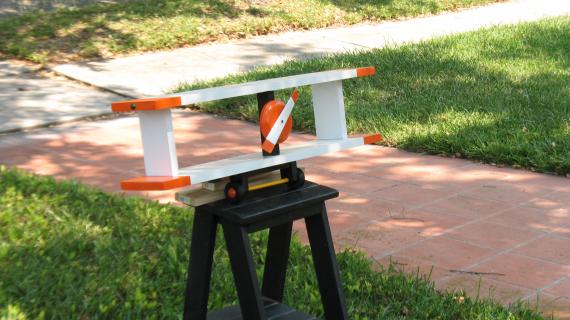
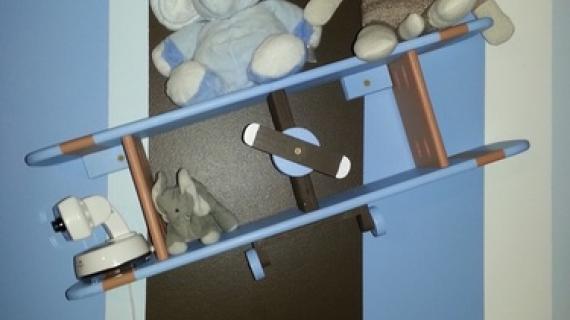
A fun shelf to build and creative at the same time.

Nothing fancy. Just a plane old shelf, made from plane old boards.

Screwed together in a rather unfancy way, with a simple coat of paint.

I don't have a son to build this for, but I can imagine Grace's pink walls covered in white plane shelves, manned with Barbie pilots in evening gowns. Where would you put your plane shelf? What would you put in it? Or who would you give one too?
Preparation
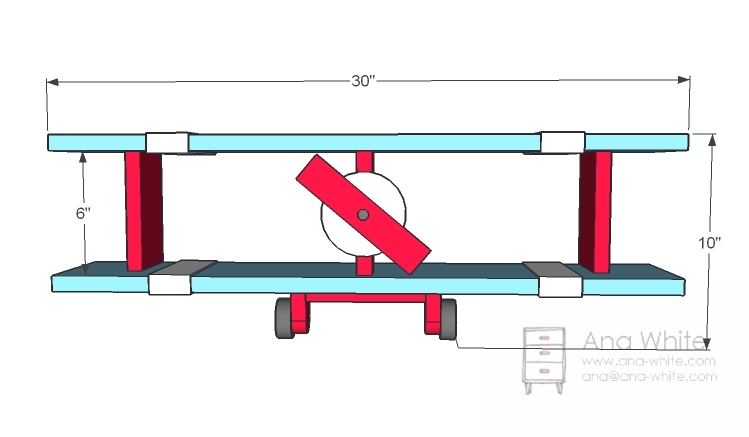
1 – 6 foot long 1×6
20″ of 1x2s
12″ of 1x4s
2″ screws
1 1/4″ screws
wood glue
finishing supplies
2 – 1×6 @ 30″
2 – 1×2 @ 6″
2 – 1×4 @ 6″
1 – 4″ diameter circle (cut from 1×6 scraps)
2 – 2″ diameter circles (cut from 1×6 scraps)
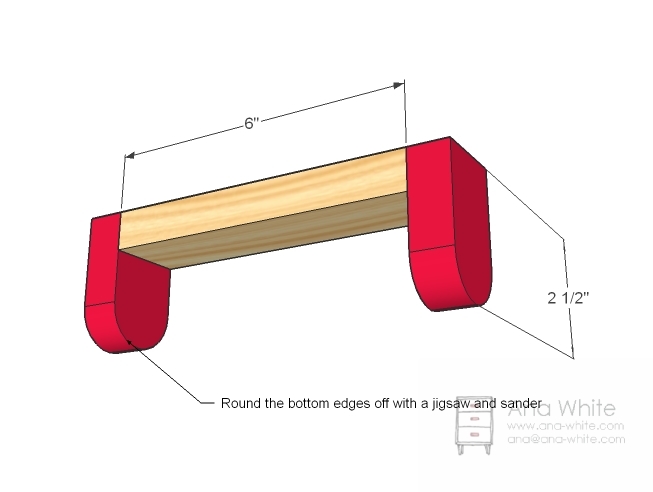
2 – 1×2 @ 2 1/2″


Instructions
Step 1
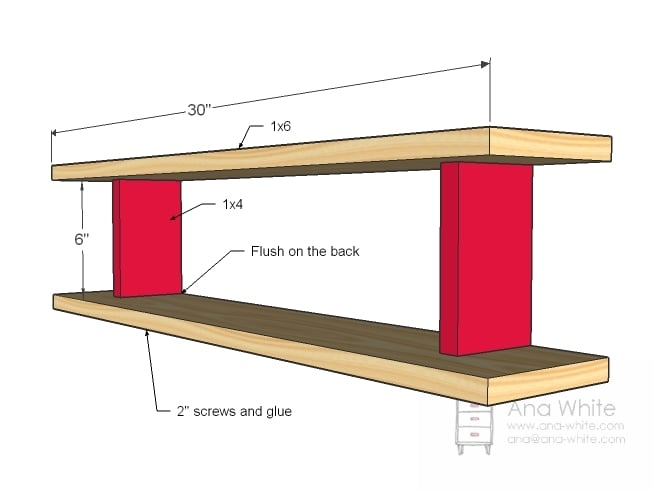
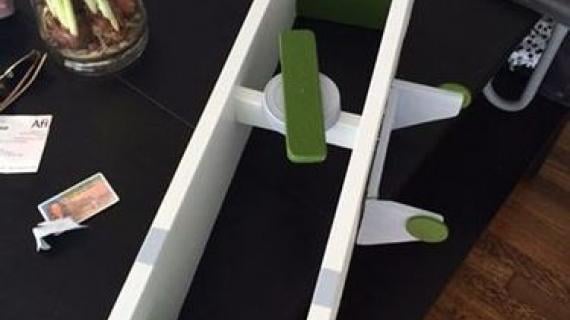
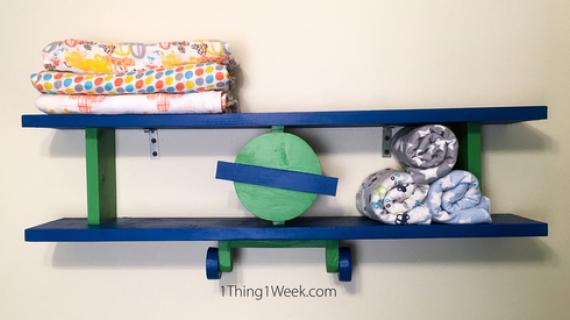
Shelves
Attach the 1x4s flush to the back between the shelves. Predrill screw holes and use glue. The shelves are set in from the outsides 3″.
Step 2
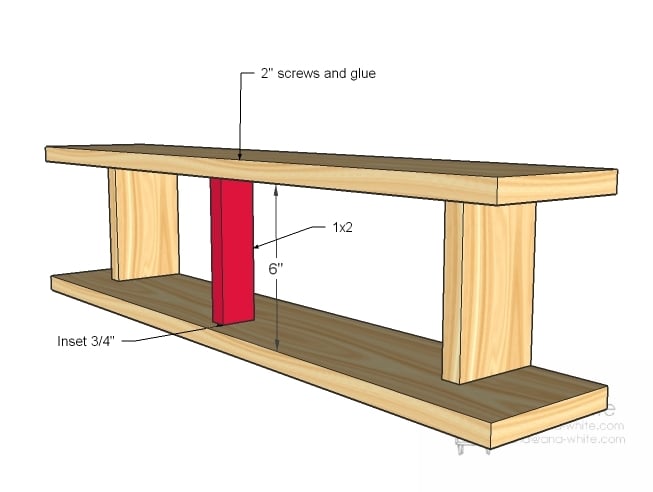
Front
Now attach the front, centered on the shelves, inset 3/4″. Use glue, 2″ screws and predrill your holes.
Step 3
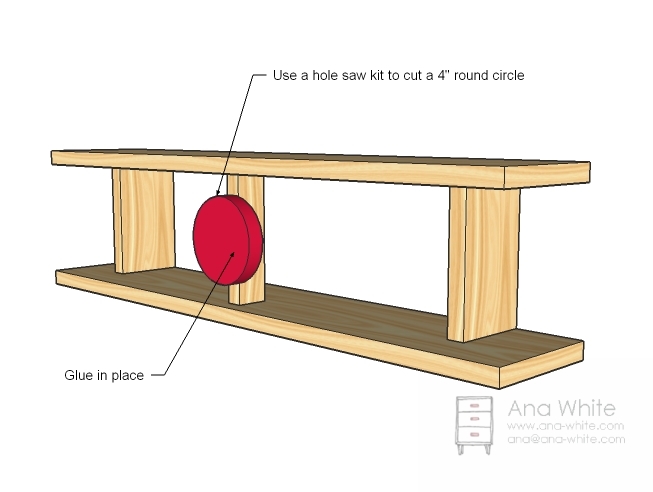
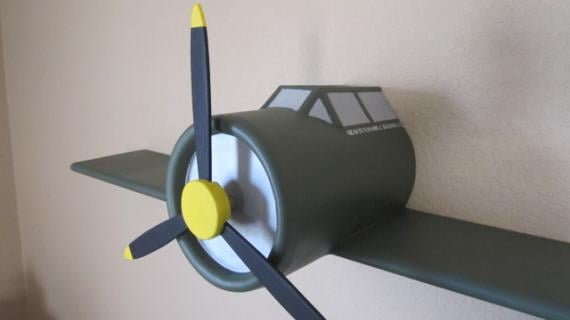
Face
Now cut your face out with a 4″ holes saw and line up on the front. The hole saw kit should have drilled a hole in the center already.
Step 4
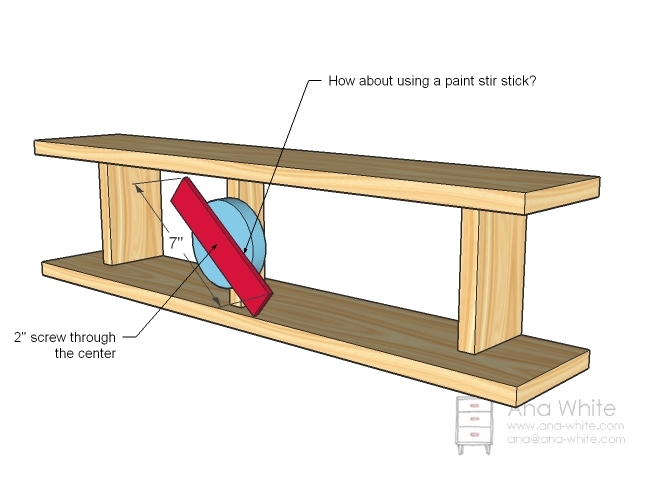
Propeller
Now attach the propeller to the face and screw down, through the center, through the face, into the front.
Step 5
Step 6
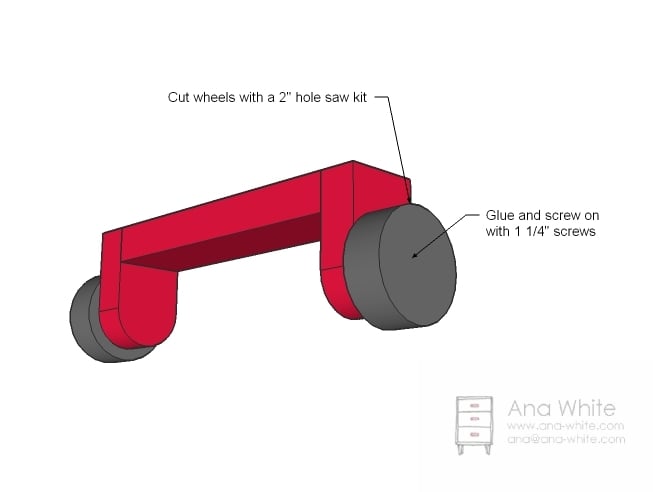
Wheels
Now simply attach the wheels to the wheel base. I cut my wheels with a 2″ hole saw kit. You can also buy 2″ round wheels at hobby and craft stores – and probably 4″ round wood craft circles too – if you don’t have a hole saw kit.
Step 7
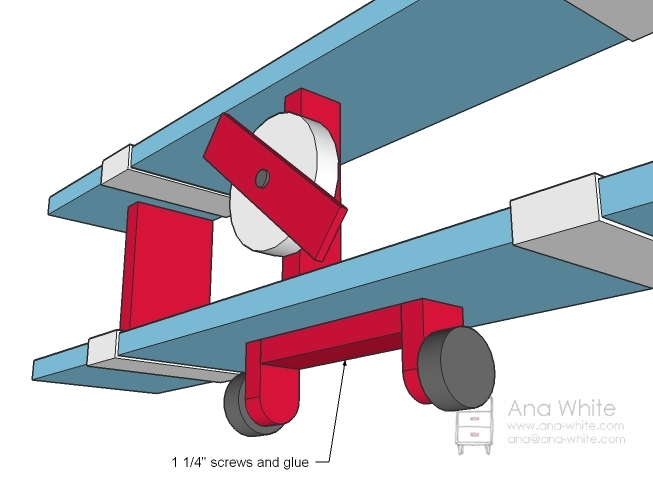
Attaching the Wheels
The wheels are inset 2″ from the front. Simply screw to the bottom with 1 1/4″ screws and glue.
Step 8
Finishing
Fill holes with wood filler and finish as desired.
Times gonna fly when you are building this one!


Comments
Okay (not verified)
Thu, 12/16/2010 - 23:10
Thanks Ana, My son will love
Thanks Ana, My son will love it.
Meg (not verified)
Fri, 12/17/2010 - 04:11
This is why your site is the
This is why your site is the first thing I check every morning.
So cute. I have two boys, 3 & 4, that would LOVE these!
I (with the help of my boys-who now love building) just finished a modified smaller version of the tool box for each of them- i think these are next!
I can't wait for my baby girl to get bigger so I can make all the girl projects!
Sara (not verified)
Fri, 12/17/2010 - 04:56
So cute! My son's nursery
So cute! My son's nursery was in airplanes (5 years ago). This would have been so cute! Keep the boy stuff coming!
A (not verified)
Fri, 12/17/2010 - 05:07
This couldn't have come at a
This couldn't have come at a more perfect time!!! I am 37 weeks pregnant with my son,a nd we're doing an airplanes and trains room for him! Thank you!!!!
Leslie (not verified)
Fri, 12/17/2010 - 05:15
This is adorable Ana. I'm
This is adorable Ana. I'm moving my little boy into a new room soon and I may have to build one of these for him.
Rachelle (not verified)
Fri, 12/17/2010 - 05:17
Oh MY! I have to make this
Oh MY! I have to make this for my boys as soon as we get home after Christmas! One already has an airplane quilt.
Lindsey (not verified)
Fri, 12/17/2010 - 05:19
love these! I think my 4 boys
love these! I think my 4 boys will have these when we finally buy our new house!
kerry davis (not verified)
Fri, 12/17/2010 - 06:15
I, too, check your site EVERY
I, too, check your site EVERY morning! I love these - I have all boys, so get excited when I see boy projects! You're amazing as always!
XoXoXo
Sunny (not verified)
Fri, 12/17/2010 - 06:44
I would put it in my 2 year
I would put it in my 2 year old's "Airplane fly in the sky" room. It would fit in perfectly with the RC piper cup hanging from the ceiling and the border of framed airplane prints all around the room. And the airplane rocking horse.
What would I put on it? umm...his ever growing collection of airplanes and pilots. perhaps. but that might be excessive
Kimie (not verified)
Fri, 12/17/2010 - 07:37
My boys room is all
My boys room is all airplanes! This is perfect. Thanks!
Pam the Goatherd (not verified)
Fri, 12/17/2010 - 07:44
That is adorable! My boys
That is adorable! My boys are all grown up and I don't have grandchildren yet, but these plans are going in the "build that for the grandkids" file!
Kim (not verified)
Fri, 12/17/2010 - 09:10
Apparently 11:00 am is still
Apparently 11:00 am is still too early for me, because it took me a while to connect "plane" with "PLANE shelf" I'm sitting here thinking "Hmm..That's an interesting shelf" lol
But seriously, absolutely brilliant idea! I wish I had a boy but I think I may make it for a friend of mine!
Ana White (not verified)
Fri, 12/17/2010 - 09:38
Kerry thank you! I'll try to
Kerry thank you! I'll try to post more boy projects for you (and everyone else). Really appreciate your support.
Ana White (not verified)
Fri, 12/17/2010 - 09:41
Meg Thank you! For your
Meg Thank you! For your support. I'm trying to do more boy stuff, as we do tons of girls stuff already. Really appreciate you reading! Can't wait to see your shelves! Such a fun project!
Ana White (not verified)
Fri, 12/17/2010 - 09:46
Thank you everyone! Just to
Thank you everyone! Just to let you know, I hung mine with screws under the bottom shelf (not advisable but visible for photographing in a bright location) and I would not hang the shelf permanently that way. I suggest buying Angle Braces (really small ones) to hang or a picture hook hanging kit. Can't wait to see yours!
Yolanda (not verified)
Fri, 12/17/2010 - 10:39
So incredible adorable. Love
So incredible adorable. Love it.
Lisa W (not verified)
Fri, 12/17/2010 - 10:57
I truly look forward to
I truly look forward to seeing what you post every day. :) This one made me smile. I have 3 boys and my youngest is in love with airplanes. I will have to make him this one soon. Thank you so much for the hard work that you do. I have hit my limit for this month's spending at Home Depot, but am looking forward to my gift cards at Christmas. My work's not perfect, but I know with practice it will get better. And in the meantime, I can create furniture that we need (laundry dresser, tryde console table, art clip rails....). Thank you, thank you, thank you, Ana.
Jennifer (not verified)
Fri, 12/17/2010 - 12:21
Ana.. I only have girls in my
Ana.. I only have girls in my house too, but we are in hopes of a boy soon. I'm pretty sure you just inspired his nursery!! I absolutely love this!
Erica (not verified)
Fri, 12/17/2010 - 12:25
This is brilliant! Saw one of
This is brilliant! Saw one of these by PB about a year and have wanted one for my son's room since! I will definitely b making a few of these!
Rebecca (not verified)
Fri, 12/17/2010 - 17:26
I'm always so indecisive when
I'm always so indecisive when it comes to decorating bedrooms but my soon to be baby boy and 6yr old will be sharing a room soon and this seems like the perfect theme! Thank you Ana!
Sunny (not verified)
Fri, 12/17/2010 - 22:05
It's finished. Tomorrow I
It's finished. Tomorrow I will paint. Since I'm not very good at sticking to directions I did modify your plans some. Oh, and my husband taught me how to use the router to round the edges of the shelf. I love that man.

Joyce (not verified)
Sun, 12/19/2010 - 10:57
Thank you thankyou
Thank you thankyou thankyou!
I looked at this in a magazine the other day while looking for nursey ideas, and was going to send you the page!
Now to find out if its a girl or boy so we know ow to decorate!
Daniel (not verified)
Tue, 12/21/2010 - 11:58
Building this right after the
Building this right after the holidays. Ordered a airplane prop from ebay ($5) and wood wheels ($3.50 http://www.woodworkingparts.com/categories/Toy-Making-Supply/) for a little extra authenticity. I'll end up building two, so the set of 4 wheels will come in handy.
lauren (not verified)
Sun, 01/23/2011 - 16:27
cool! just found this
cool! just found this design... and perfect timing. I'm redecorating my 2 year olds room with an airplane theme. I think I'll build it (well, with the help of my handy husband) a bit bigger and put it above the crib/bed. I'm actually just thinking of it as a design element..and not really using it as "shelving" per se. Thanks for the idea!
jknewberry
Sun, 04/17/2011 - 10:28
Thanks Ana!
This is such a cute project, I plan to build 2 more for my boys after I paint the one I made for my nephew! Thanks!
Jake
Fri, 06/08/2012 - 20:28
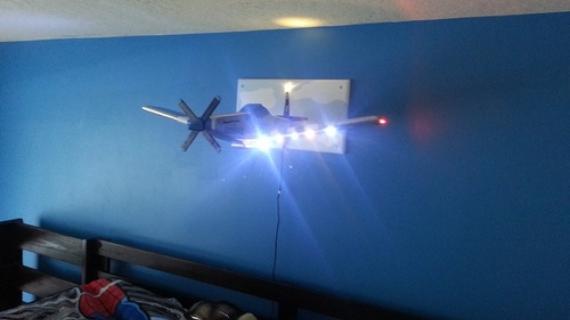
Wall Attachment
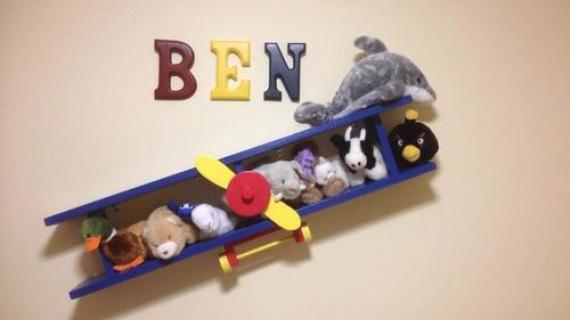
I am building one for a friend that will give birth to a boy this week. I am making a couple of minor changes to the design but the design as it is looks great. I live in Corpus Christi, Texas where new Navy pilots receive their first training. They fly prop planes with bright orange wing tips, tails and engine cowling. The rest of the plane is white. I plan to use the same color scheme. Will send a pic when it is done.
My question is how do you attach to the wall without taking away from the fun of the shelf?
kongk
Tue, 05/21/2013 - 04:42
Thanks for your insight for
Thanks for your insight for your fantastic posting. I’m glad I have taken the time to see this.
Bowflex 1090