
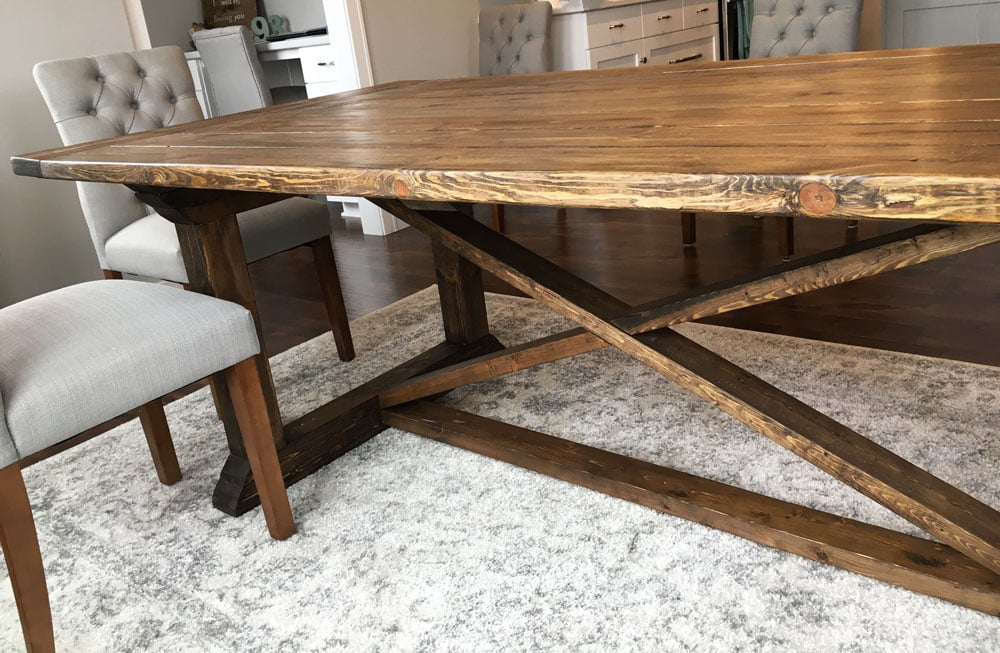

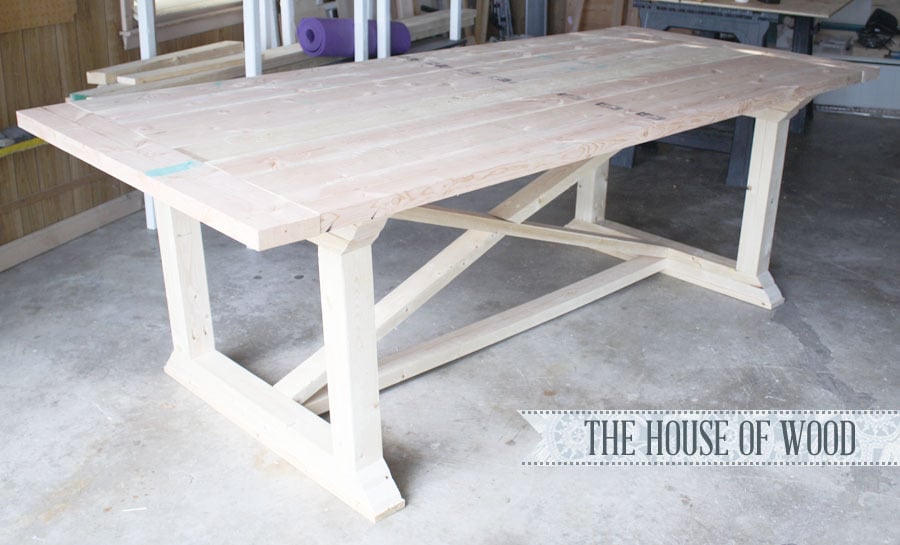
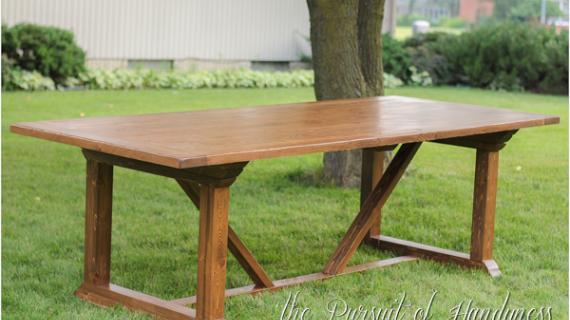
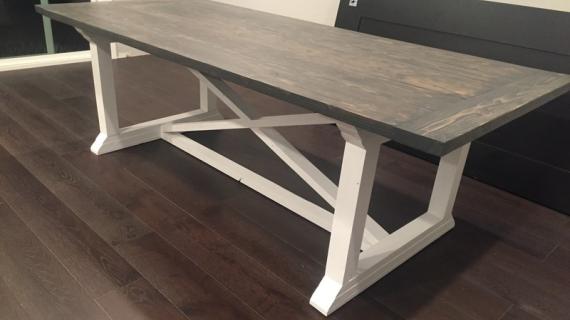
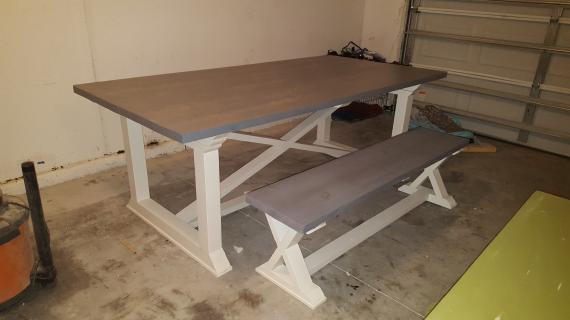
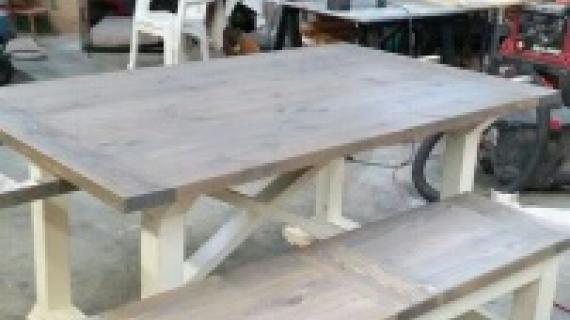
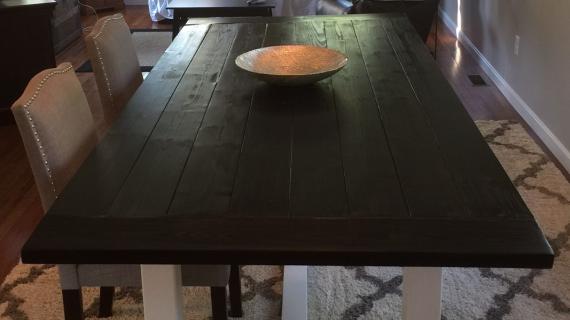
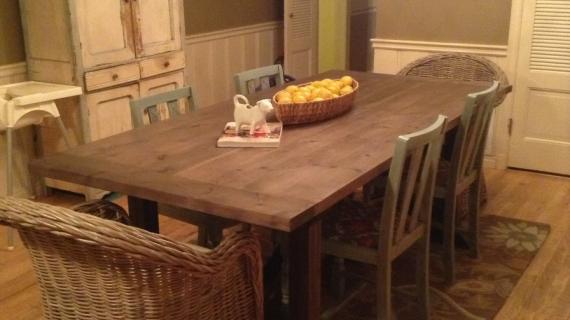
Build your own farmhouse table! We love this slightly more formal version with the curved leg pedestals, and the X base. Our free plans include step by step diagrams, shopping list and cut list.
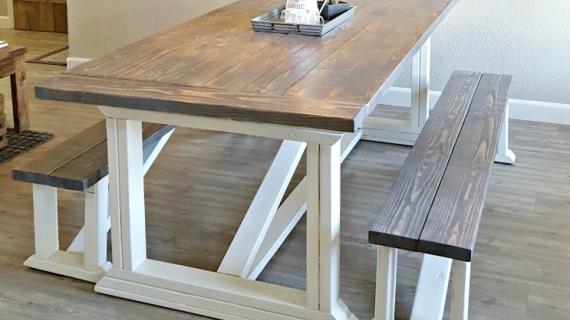
We recommend this bench plan (adjust length to suit) with this table.

Preparation
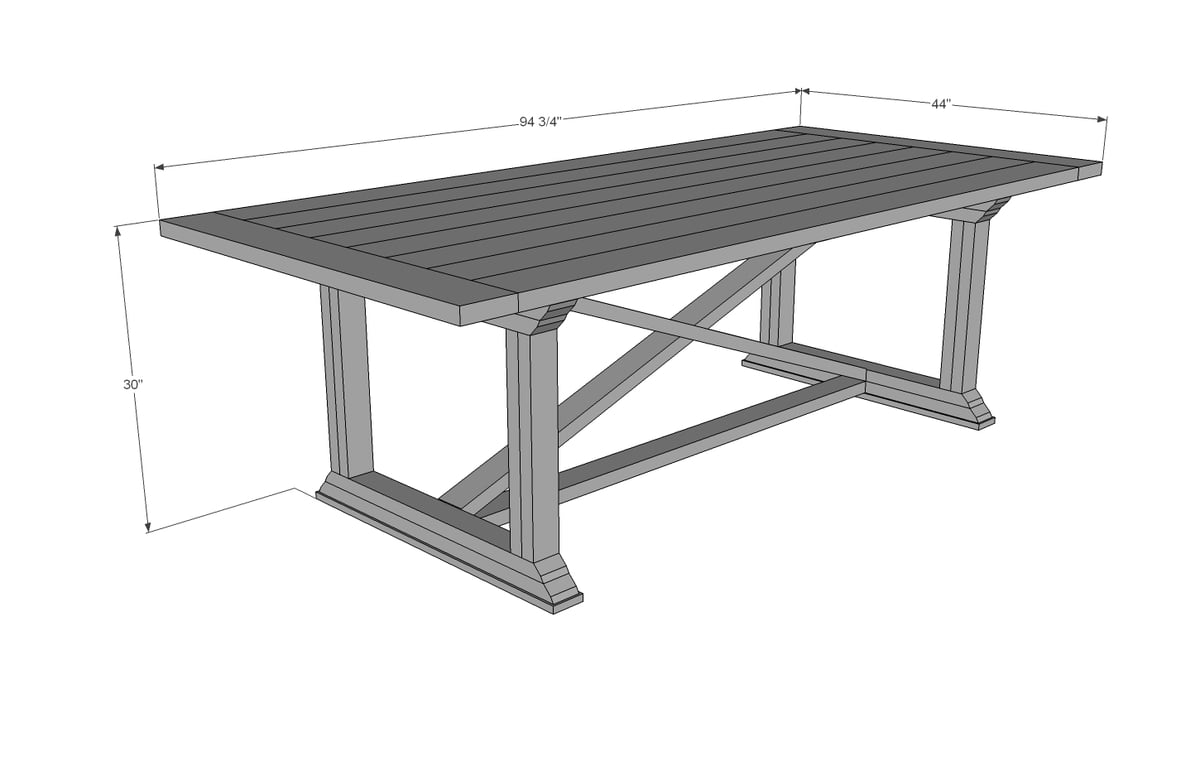
9 - 2 x 6 x 8'
9 - 2 x 4 x 8'
1 - 1 x 4 x 8'
- 8 - 2x6 @ 83 1/2" (tabletop boards) - use this measurement, not the measurement in the diagram
- 2 - 2x6 @ 44" (breadboard ends) - CUT TO FIT!!!
- 3 - 2x4 @ 38" (long point to long point, ends cut at 30 degrees off square, ends are NOT parallel)
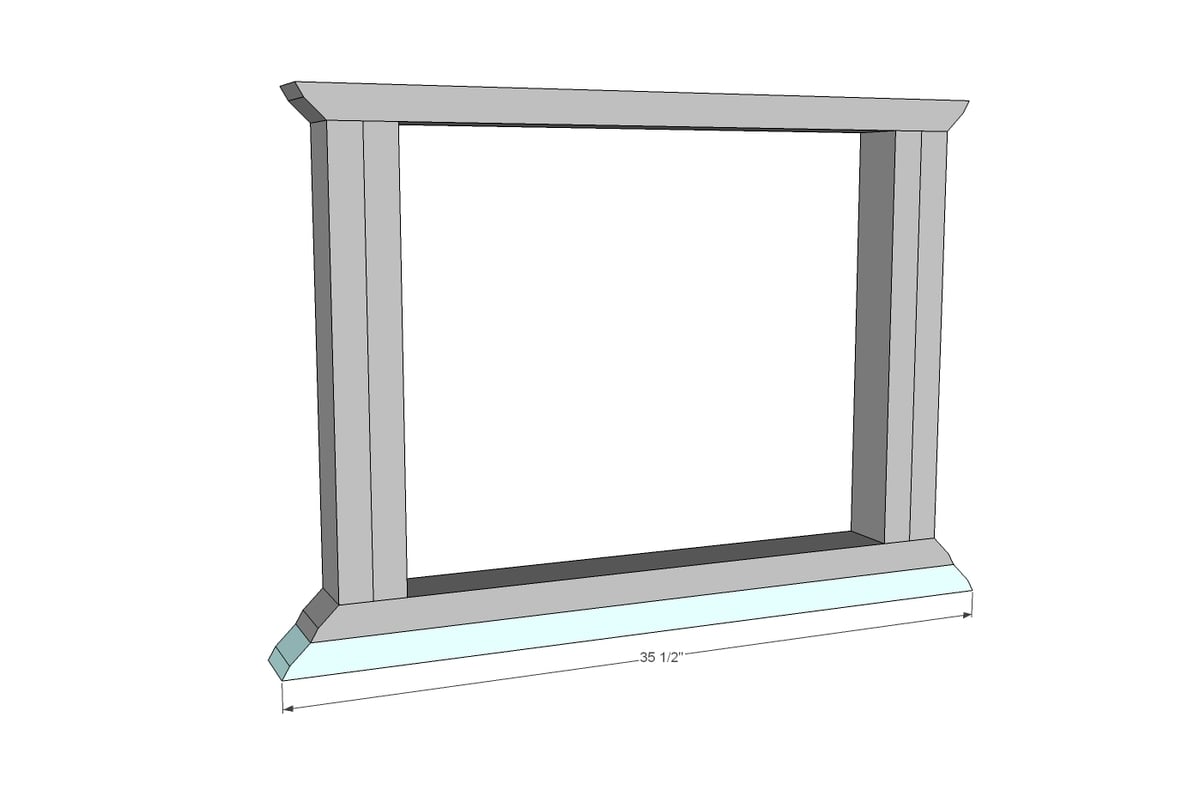
- 4 - 2x4 @ 35 1/2" (long point to long point, ends cut at 30 degrees off square, ends are NOT parallel)
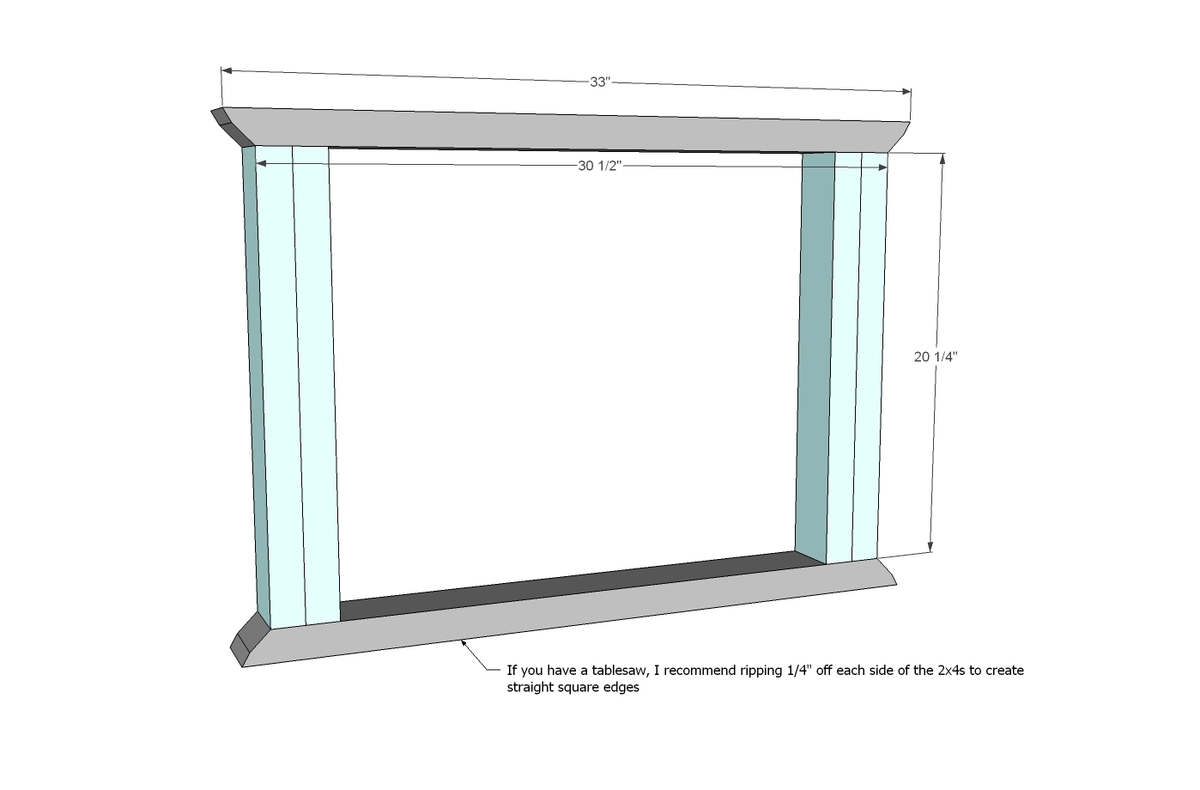
- 4 - 2x4 @ 33" (long point to long point, ends cut at 30 degrees off square, ends are NOT parallel)
- 8 - 2x4 @ 20 1/4"
- 2 - 1x4 @ 36"
- 1 - 2x4 @ 64"
- 1 - 2x4 or 2x2 @ 68 5/8" (long point to short point, both ends cut PARALLEL at 20 degrees off square)
- 2 - 2x4 or 2x2 @ 34" (longest point measurement, both ends cut INWARD from measurement, one at 50 degrees off square and one at 20 degrees off square)


Please read through the entire plan and all comments before beginning this project. It is also advisable to review the Getting Started Section. Take all necessary precautions to build safely and smartly. Work on a clean level surface, free of imperfections or debris. Always use straight boards. Check for square after each step. Always predrill holes before attaching with screws. Use glue with finish nails for a stronger hold. Wipe excess glue off bare wood for stained projects, as dried glue will not take stain. Be safe, have fun, and ask for help if you need it. Good luck!
Instructions
Step 1
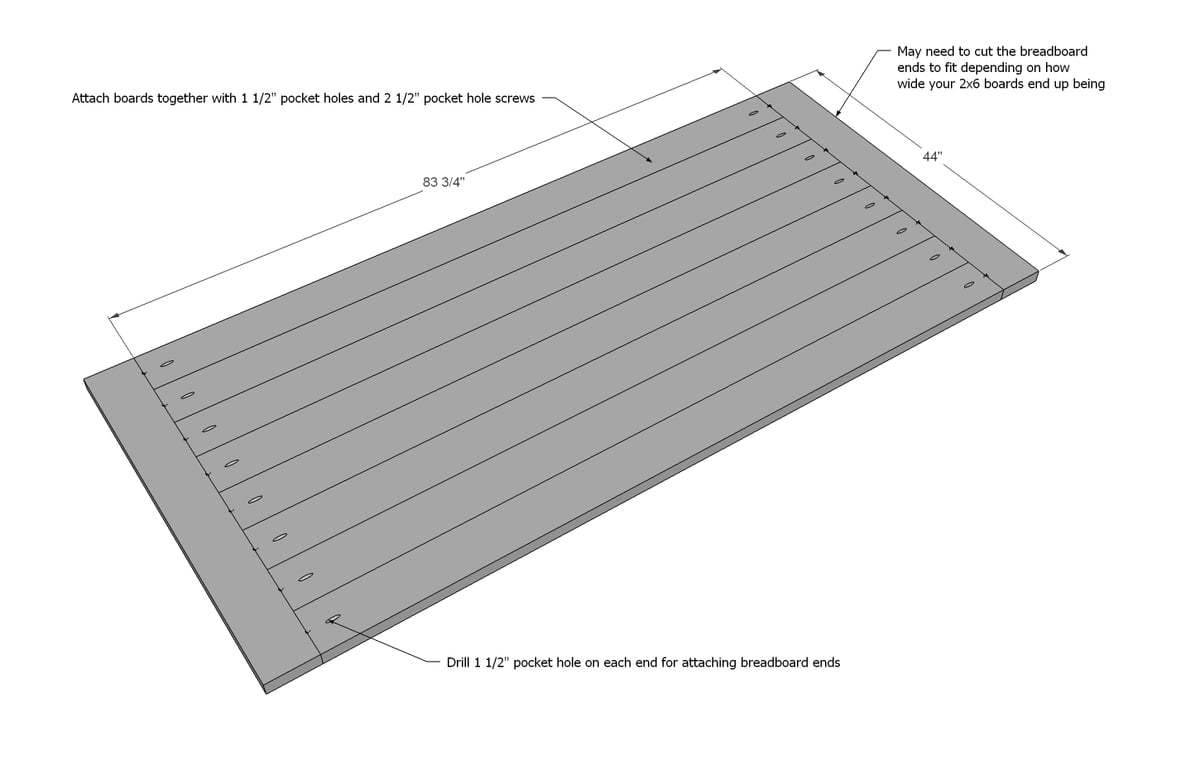
Build your tabletop first with 1 1/2" pocket holes and 2 1/2" pocket hole screws. A trick I do is build the tabletop without breadboard ends first. Then I take a circular saw (using a clamped board as a guide) and run it down the end edges to make sure all my boards are exactly the same length. Then I measure and cut the breadboard end to fit and attach it.
For a smoother tabletop, try using tongue and groove for the tabletop boards.
Step 2

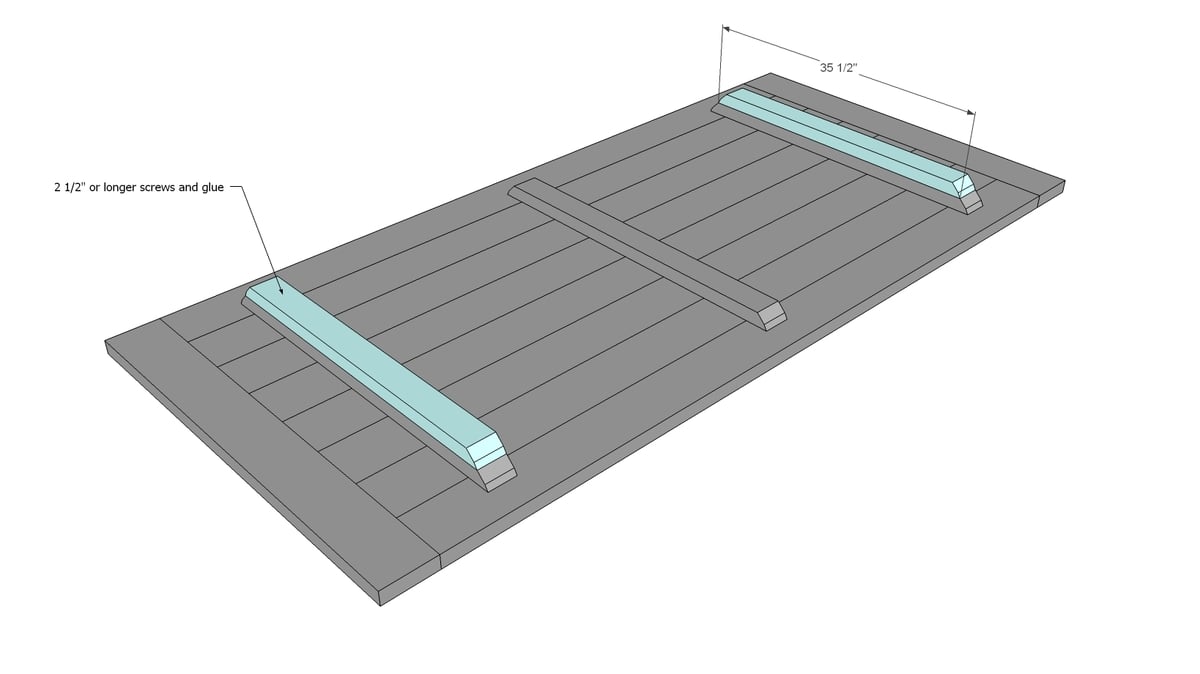
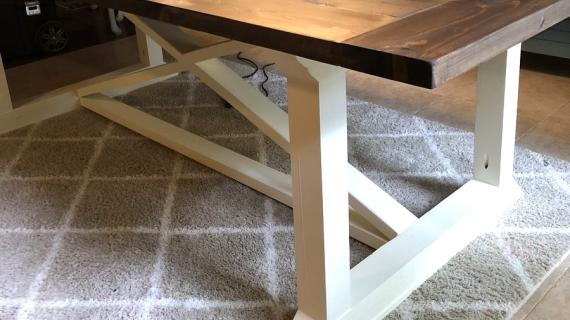
This is the pattern for cutting the curved edge boards. Once you get one end cut right, use it as a pattern for cutting the rest.
Step 3
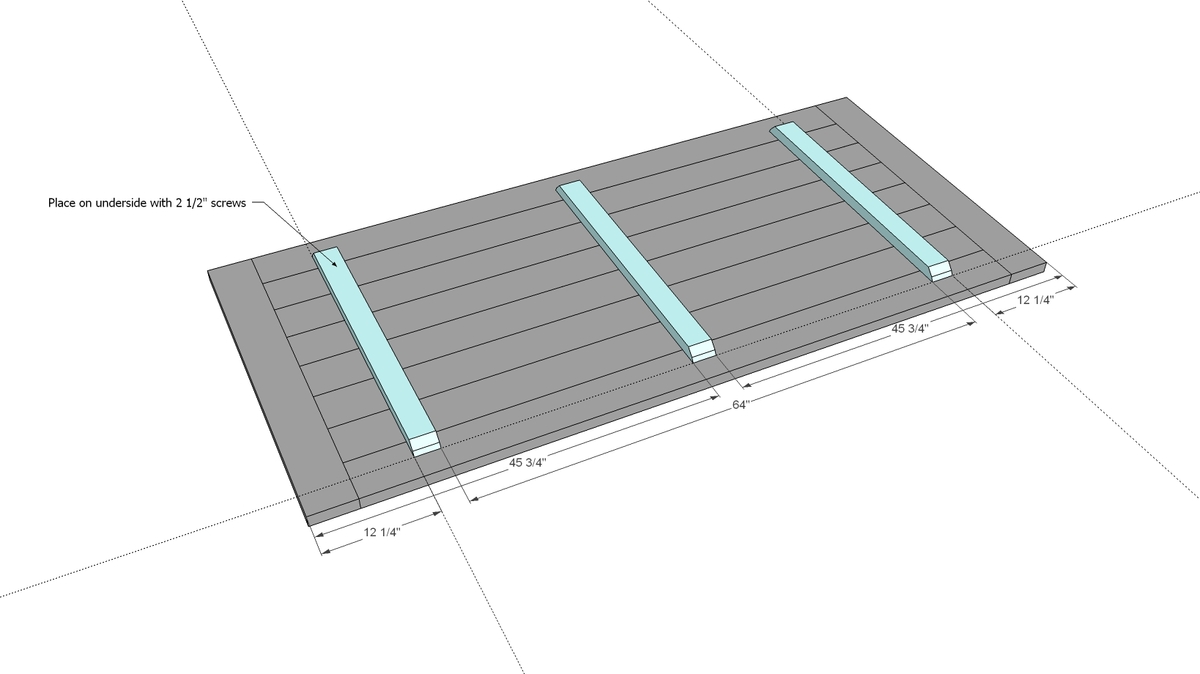
Attach the three longest curved end boards to underside of tabletop.
Step 4
Then stack the next row on top. You can hide screws here if you are using screws, just make sure they are countersunk.
Step 5
Step 6
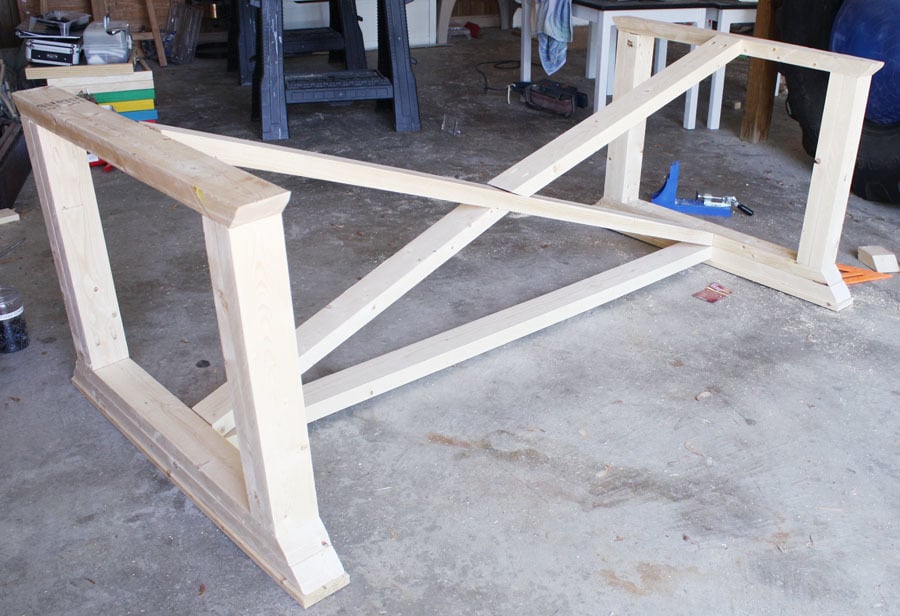
Add the second base to the leg set.
Step 7

And then the foot.
Step 8

And then attach the leg sets to the underside of the table.
Step 9
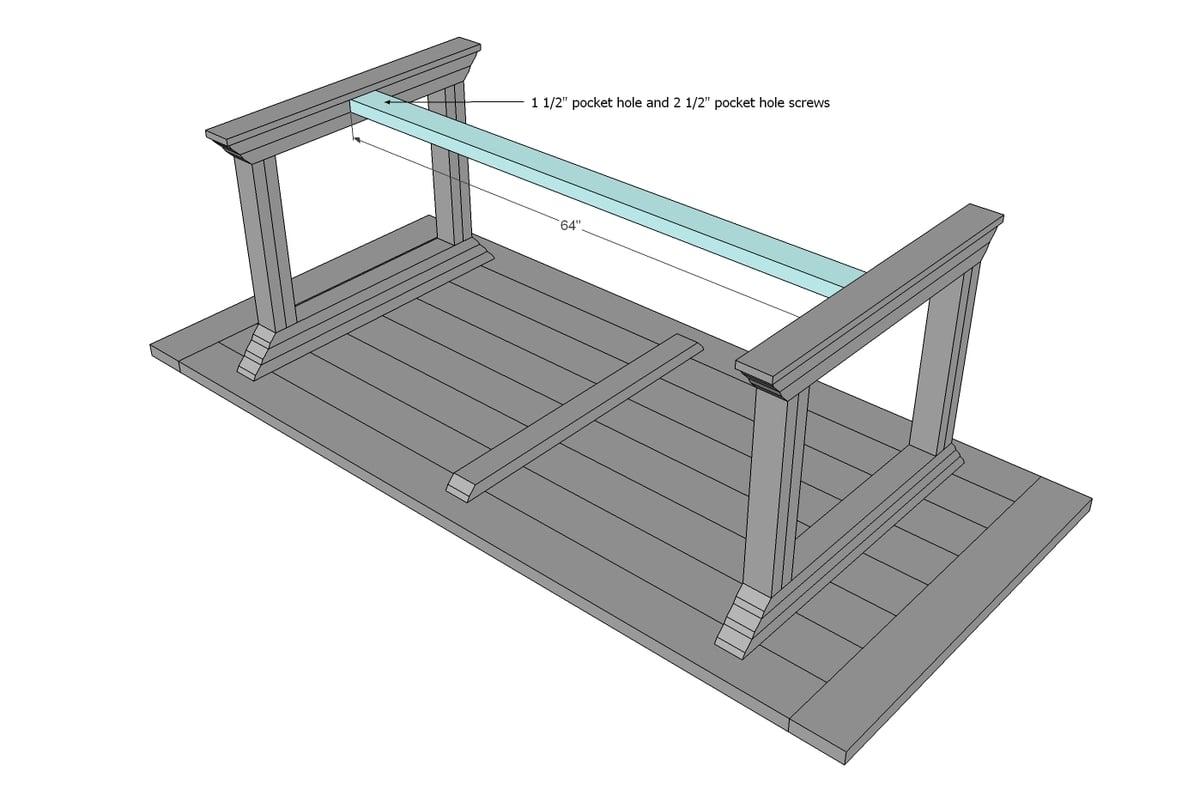
Add the stretcher with pocket holes to the underside. You'll probably want to measure and cut this guy to fit depending on your 2x4 widths - just make sure it's the same distance apart as the legs sets are at the tops.
Step 10

If your saw doesn't do 50 degree miters, what you can do is just use 2x2s at an angle cut (you can make angle cuts with a circular saw to just about any degree), cutting two 2x2s the full length and overlappping them, crossing in the middle. Then you can go back and fill in the spaces with 2x2s if you want.
Step 11
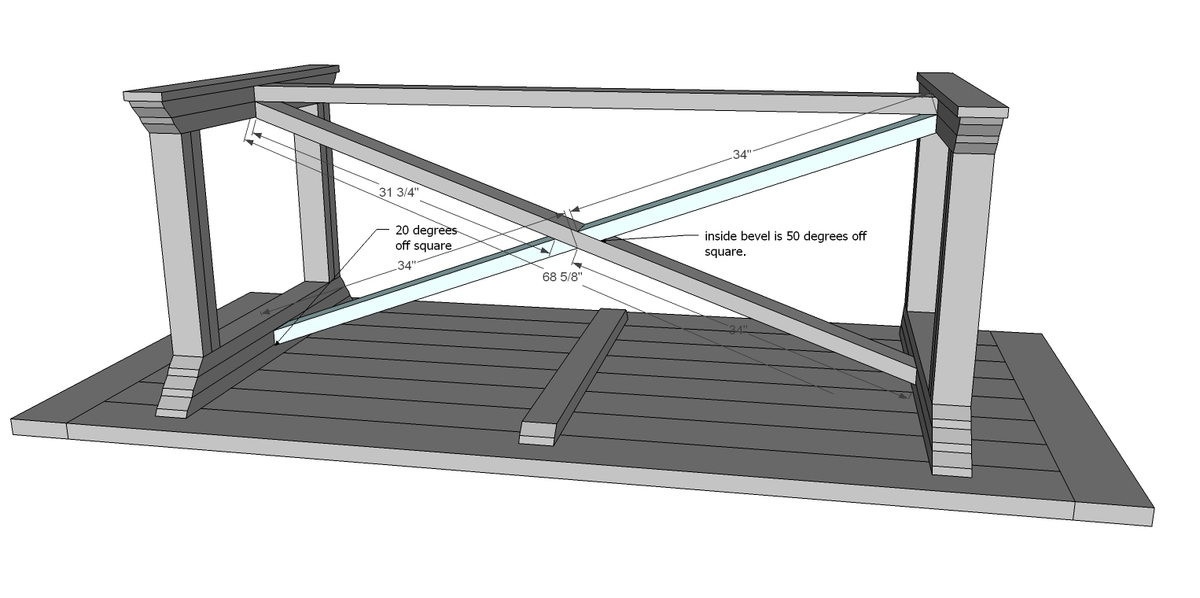
For the 2x4s, add the second part to the center X.
Step 12

We also came up with a second variation with aprons just in case you planned to use the table for extra heavy loads -the aprons will add a TON of support but Jen felt that she didn't need them. If you do the aprons, you'll omit the center 2x4.
It is always recommended to apply a test coat on a hidden area or scrap piece to ensure color evenness and adhesion. Use primer or wood conditioner as needed.


Comments
Pursuit of Handyness
Sun, 06/16/2013 - 21:55
Making this table for outdoor use
Hello, I'm in the middle of making this table now. I've cut all my boards and squared all of the lumber. Im making this table for outdoor use. As far as the table top goes, Should I not use pocket holes to assemble the top? Don't I need space between the boards to allow water to drain?
rhonit
Tue, 06/25/2013 - 10:21
spacers for table top
you can use just about anything for spacers, 16 penny nails, washers and even quarters. it all depends on the width of the space you want.
Jacob
Fri, 07/19/2013 - 06:15
What type of species of wood was used here?
This table almost looks like it was done with a softwood (SPF)? If that is the case, will you be painting it?
In reply to What type of species of wood was used here? by Jacob
JenWoodhouse.com
Thu, 07/25/2013 - 06:03
2x4s and 2x6s
Hi Jacob,
Yes, the wood is a softwood species. The 2x6s are douglas fir and the 2x4s are spruce. I'll be posting the full finishing tutorial soon... it was a 10-step process to get that beautiful Restoration Hardware-inspired look! Stay tuned...
mollanma
Thu, 07/25/2013 - 13:05
Matching Bench
Amazing table and detailed instructions! Any details or similar instructions on making matching benches for the table?
jthommarson
Wed, 03/12/2014 - 06:51
Smaller size?
I would love to make this table, but I need it smaller. Could I just take a foot or so off of all the table top dimensions and cross supports?
joelt
Sun, 05/18/2014 - 21:12
Step 1 and Step 3
Hi,
Thanks for posting this. Working on doing something similar here. Two questions: On step one, roughly how many pocket screws are needed to attach the table top boards to each other (as opposed to the breadboards)?
On step 3, how is the curved edge board attached to the underside of the table top? Via counter-sunk screws coming down from table top?
Thanks!
KatieN
Mon, 07/21/2014 - 20:03
.pdf plans
I love all the tables for this site! I finally chose this one but have noticed that every single one ive looked at have .pdf links that are not working. Did they possibly get moved?
KatieN
Tue, 07/22/2014 - 09:50
and after digging on the FB
and after digging on the FB page, I've just read you're in the middle of a site upgrade. My apologies!
KatieN
Tue, 07/22/2014 - 09:50
and after digging on the FB
and after digging on the FB page, I've just read you're in the middle of a site upgrade. My apologies!
Jarrett Darrah
Mon, 01/12/2015 - 11:11
Breaking it down
I love the table, but I need to be able to disassemble the top from the legs/frame (I move a lot.) I'm thinking of adding threaded inserts to the 2x4's on the underside of the table top, then running bolts through the top horizontal 2x4 of the leg frame, into the threaded insert. I think this way, the table could be separated into two pieces with just an Alan wrench. Am I right in thinking this, or can you think of a better way to accomplish it?
Thank,
ENS Jarrett Darrah, USN
cstephens3
Sat, 02/14/2015 - 19:43
X Part
Is putting the X on the table required? Or would I be able to skip that step? Thank you!!
Ana White Admin
Sun, 02/15/2015 - 12:22
Concerning the "X"
The "x" will definitely help but tables of this size are normally fine without the additional support
joemagrino
Fri, 03/06/2015 - 14:04
Lip After Angle Cuts For Center X
So I miter cut the wood for the center X. The 2x4s are 1.5" thick, but after the angle cut, the face of that cut is larger. How do you properly attach it to the leg 2x4s without having a bit of a lip. I have run into this on other projects here as well and it never seems to be mentioned.
janetp4
Fri, 07/31/2015 - 18:45
Same plan but smaller size
Hi, I love this table, but am looking for a size no larger than 32" wide by 54" long. Can these plans be made smaller, and if so, how can I request them. Thank you.
Sincerely,
Janet P.
stephaniesmith1214
Mon, 08/10/2015 - 08:31
Wood Type?
Hello! What kind of wood did you use to make this table? Looks awesome! :)
Ana White Admin
Mon, 08/10/2015 - 08:45
Wood?
http://jenwoodhouse.com/diy-dining-table/
She mentions poplar in this post in the comments section. Hope this helps!
brittwheeler
Wed, 09/30/2015 - 14:08
Can I make this table smaller???
I am hoping to take a foot off of each side. Can I just shorten the sides or would that mess up the plans??
Mary Lembo
Thu, 04/28/2016 - 14:04
How difficult would this be
How difficult would this be to make to a slightly smaller scale??
jkvols7
Tue, 03/13/2018 - 09:22
Table legs
Love the table and getting ready to build!
Couple of questions...For the legs...Is there a reason you went with 2 2x4s glued/screwed together as opposed to a 4x4 for the vertical supports? Think it should work either way but want to make sure I'm not mising something!
mooyacooya
Tue, 01/21/2020 - 10:49
longer table
How difficult would this be to make longer? Would like it to accommodate 3 chairs on each side as opposed to two.
desteele
Sat, 07/11/2020 - 08:04
Downloads?
I realize I'm a dense male, but I can't find a link for a .pdf for this planset. I can save the page by printing to .pdf, but figured your downloadable would be a bit more slimmed-down. Am I missing something? I did try to read pages I thought would give me an answer. Thanks much, I appreciate the free plans regardless.
Des
bchild87
Fri, 07/17/2020 - 22:46
6 Foot Please!!!!!!!
This table is beautifully done and I cant wait to built one for my family. Unfortunately the measurements are a bit, too long. Do you happen to measurements for this as a 6 Foot table? Thank you!!!