

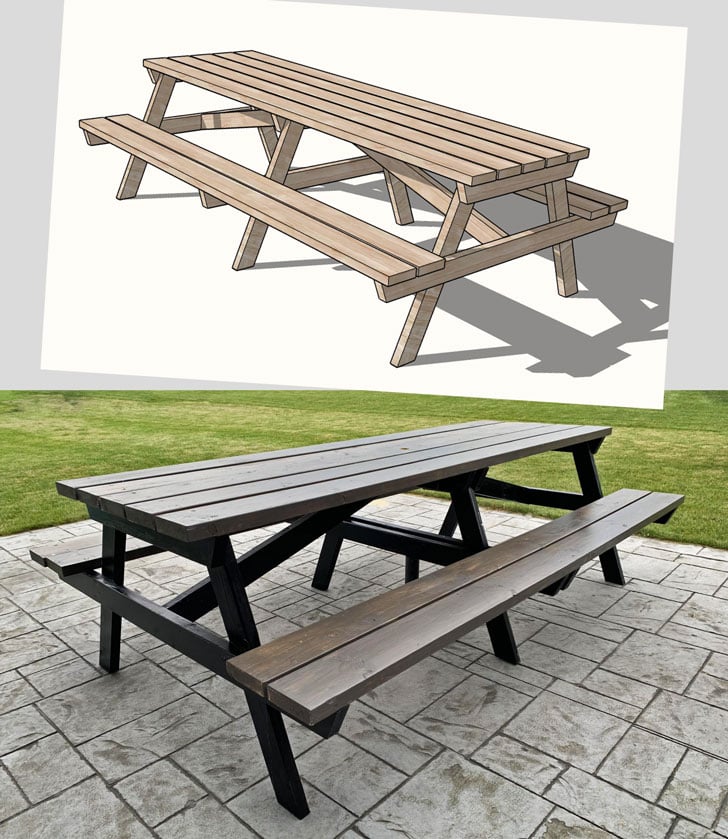
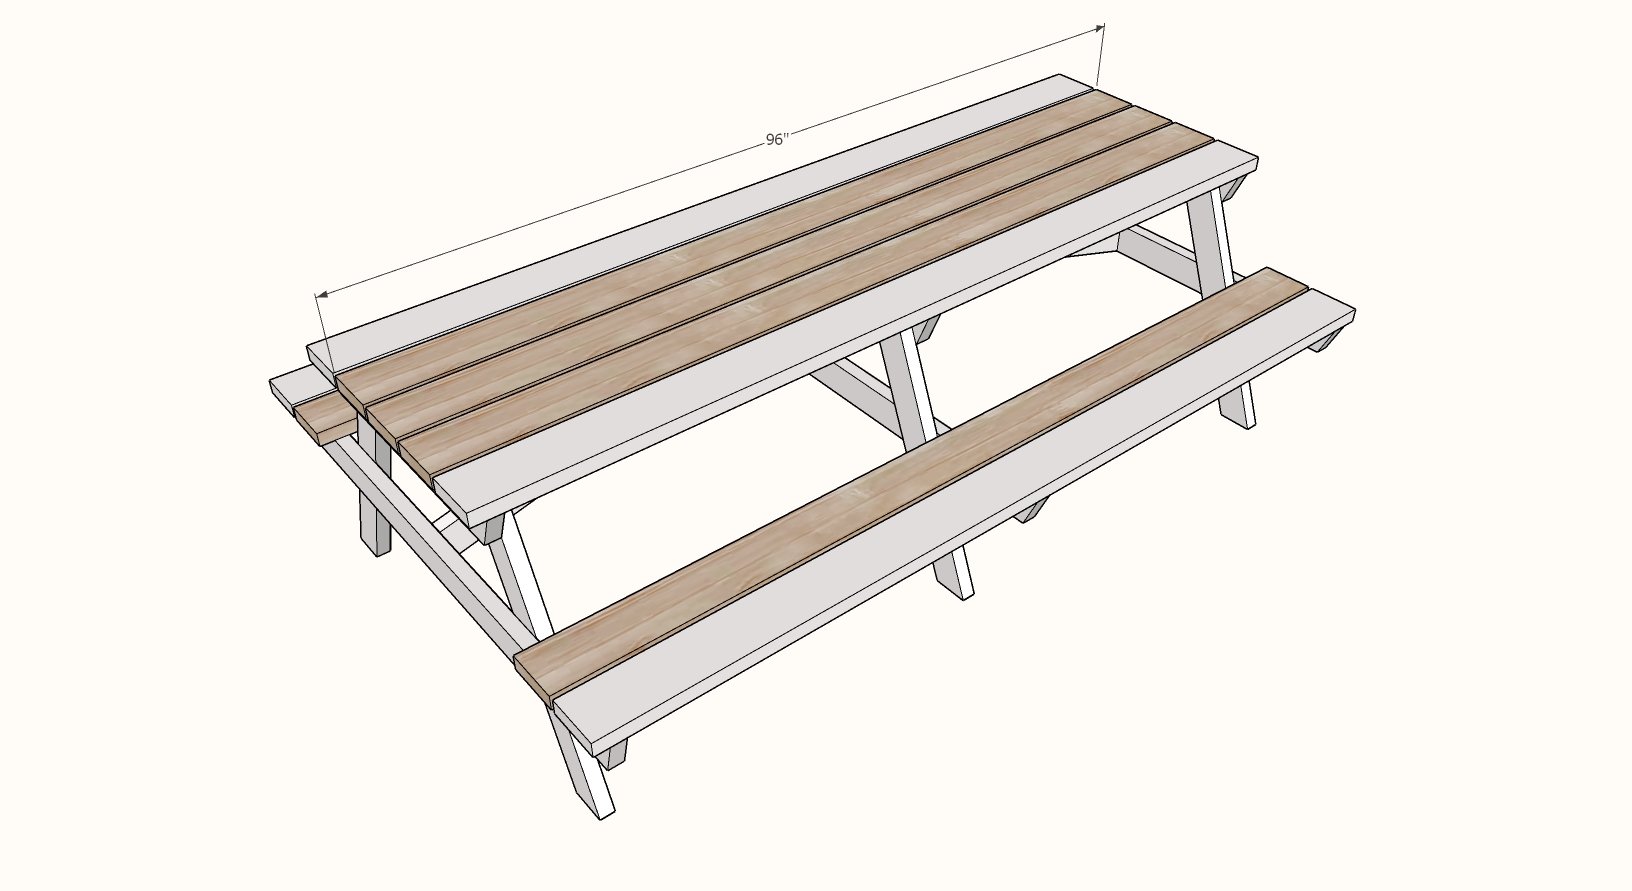
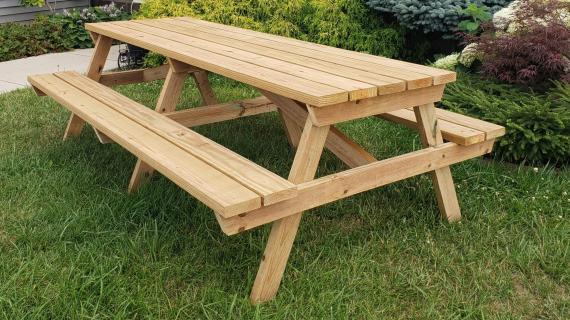
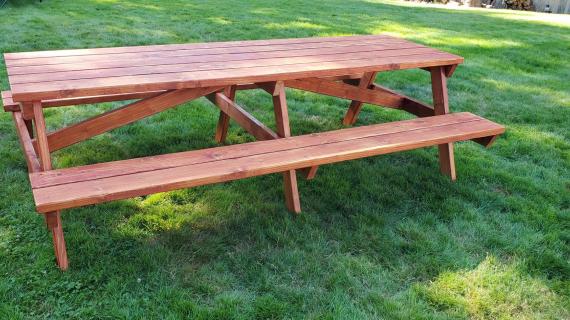
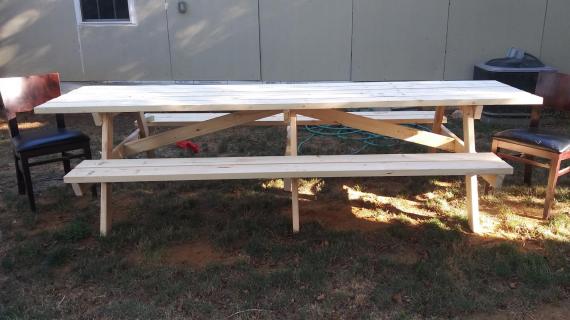
Easy to build 8 foot long picnic table - seats more people, and more substantial (so won't blow away in the wind or easily be stolen). Step by step plans from Ana-White.com
RELATED: 6 foot picnic table plans with PDF
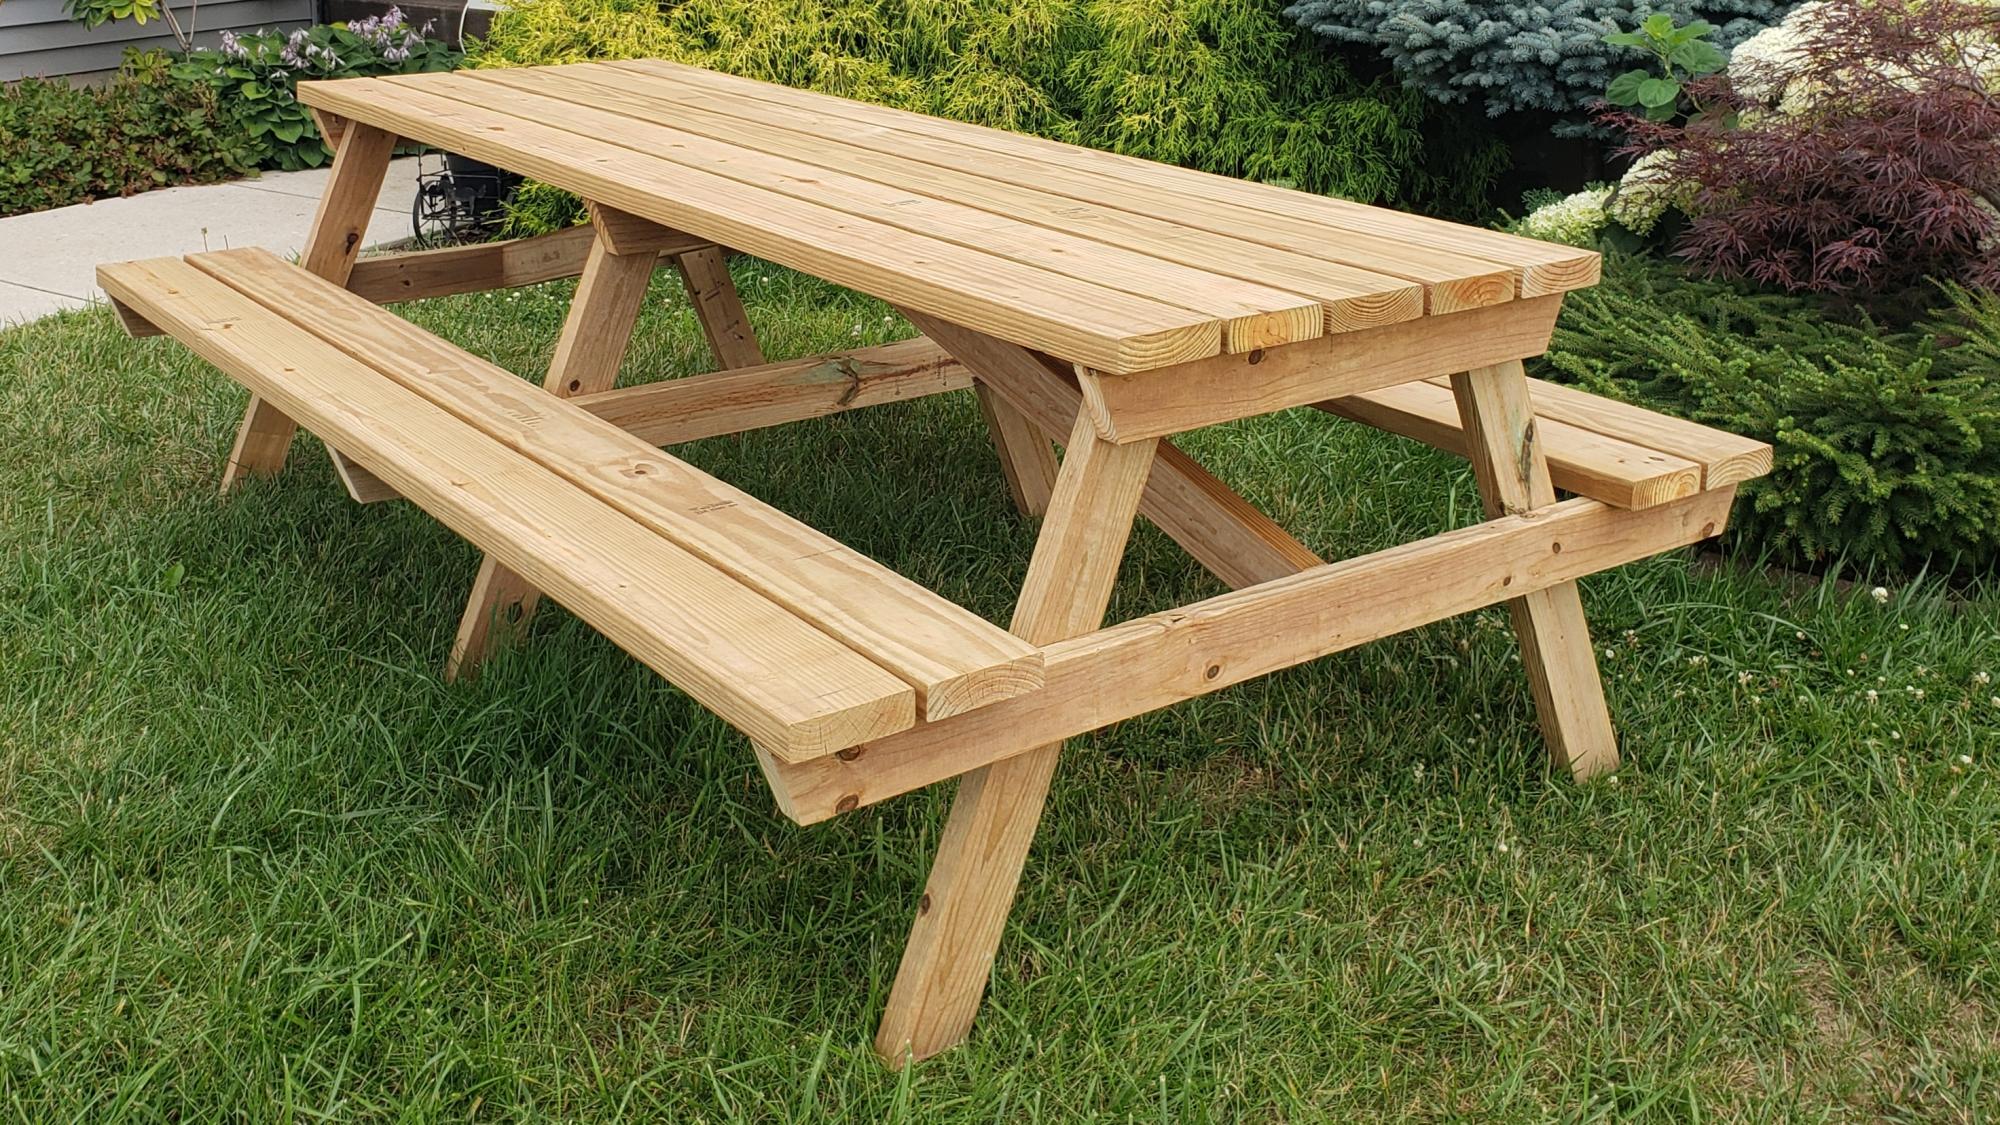
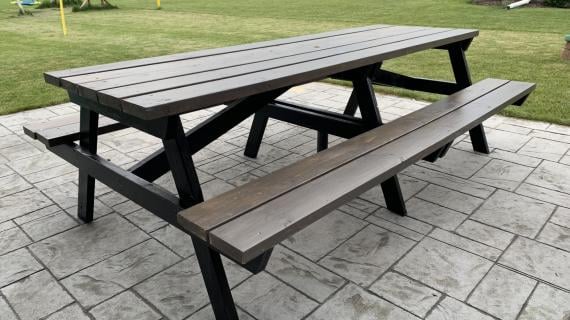
Reader submitted photo by MILLEALL
Why We Love This Picnic Table
- 8 foot long size perfect for multiple families
- Efficient plans minimize cutting and scrap wood
- Shorter lumber is easy to transport in most vehicles
- Easy build requires minimal tools and woodworking knowledge
- Can be customized to suit your needs and space - paint or stain your choice of colors
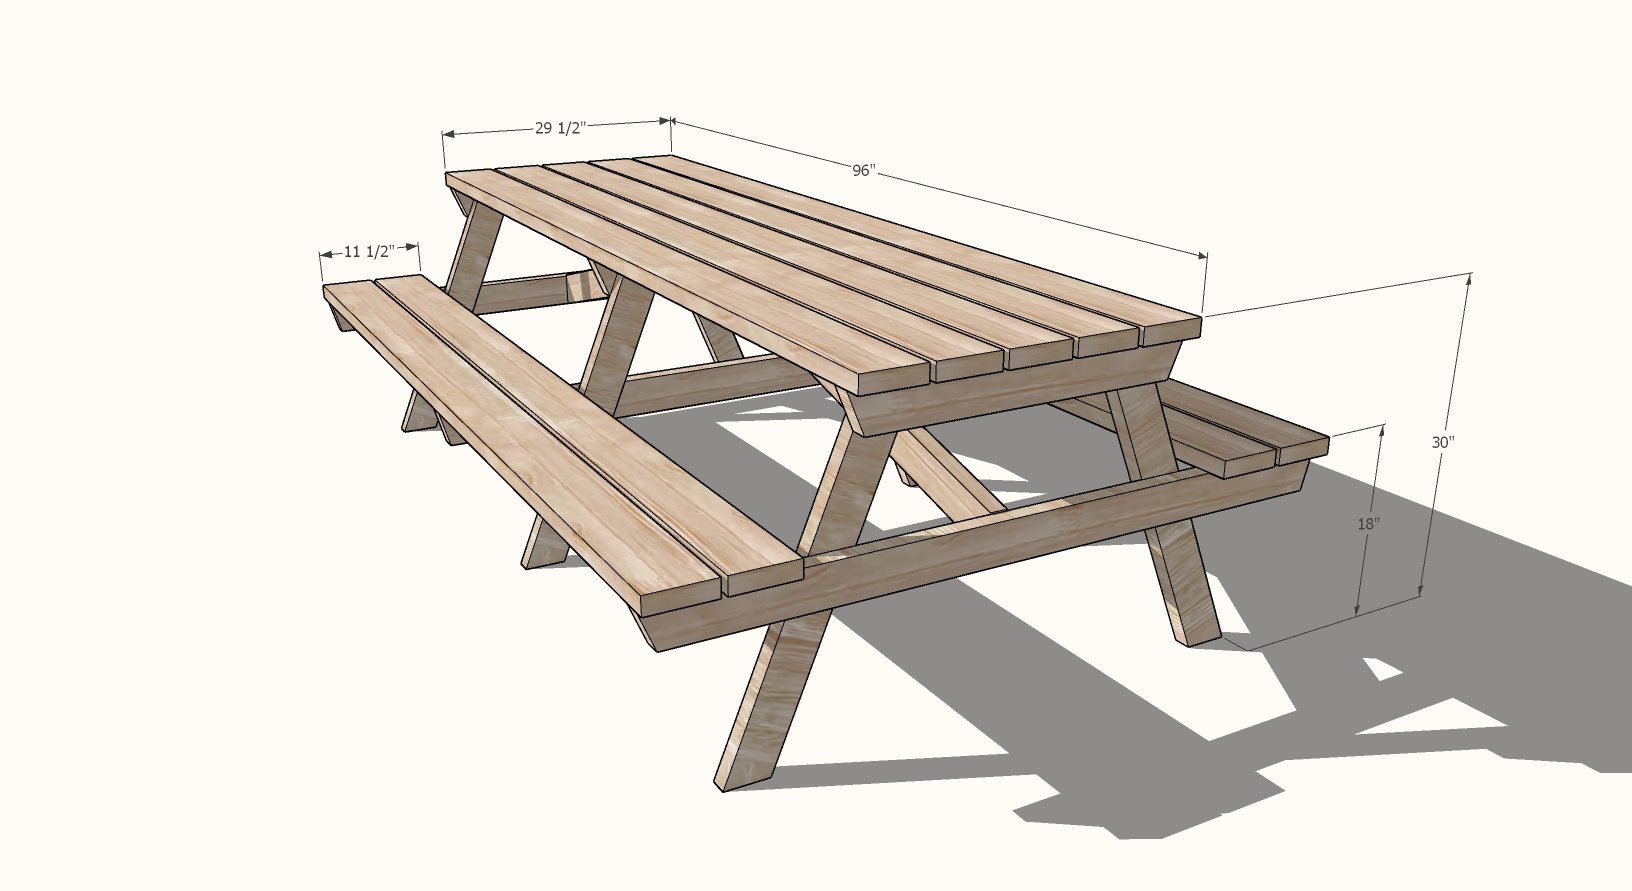
Free 8' Picnic Table Plans with PDF Printable
The free plans follow. You can also download the free PDF printable by clicking here.
Preparation
- 6 - 2x4 @ 8 feet long
- 9 - 2x6 @ 8 feet long
- 100 exterior screws, between 2-1/2" and 3" long (recommend star bit construction or deck screws, #9)
- Finish - recommend a penetrating stain, can be semi transparent or opaque for a paint like finish
TIP: Apply finish to the boards before making cuts. After assembly, add a coat to the tops of the table and seat, and cut ends
- 6 - 2x4 @ 30-7/8" long - both ends cut PARALLEL to each other at 22-1/2 degree angle cut, long point to short point measurement - LEGS
- 3 - 2x4 @ 60-1/2" long - both ends cut NOT PARALLEL to each other, 22-1/2" degree angle cut, long point to long point measurement - SEAT SUPPORT
- 3 - 2x4 @ 29-1/2" long - both ends cut NOT PARALLEL to each other, 22-1/2" degree angle cut, long point to long point measurement - TABLE SUPPORT
- 2 - 2x4 @ 45-3/4" long - both ends cut PARALLEL to each other at 15 degree angle cut, long point to short point measurement - CROSS BRACE
- 9 - 2x6 @ 8 feet long (do not need to cut)
To fit all cuts on the 2x4s, start at the top of the cut list, and work down, only cut from a new 2x4 if you cannot fit the cut on scraps from earlier cuts. Recommended cuts are as shown below:
- First 2x4: / 30-7/8" / 30-7/8" / 30-7/8" /
- Second 2x4: / 30-7/8" / 30-7/8" / 30-7/8" /
- Third 2x4: / 60-1/2" \ 29-1/2" /
- Fourth 2x4: / 60-1/2" \ 29-1/2" /
- Fifth 2x4: / 60-1/2" \ 29-1/2" /
- Sixth 2x4: / 45-3/4" / 45-3/4" /


Instructions
Step 1
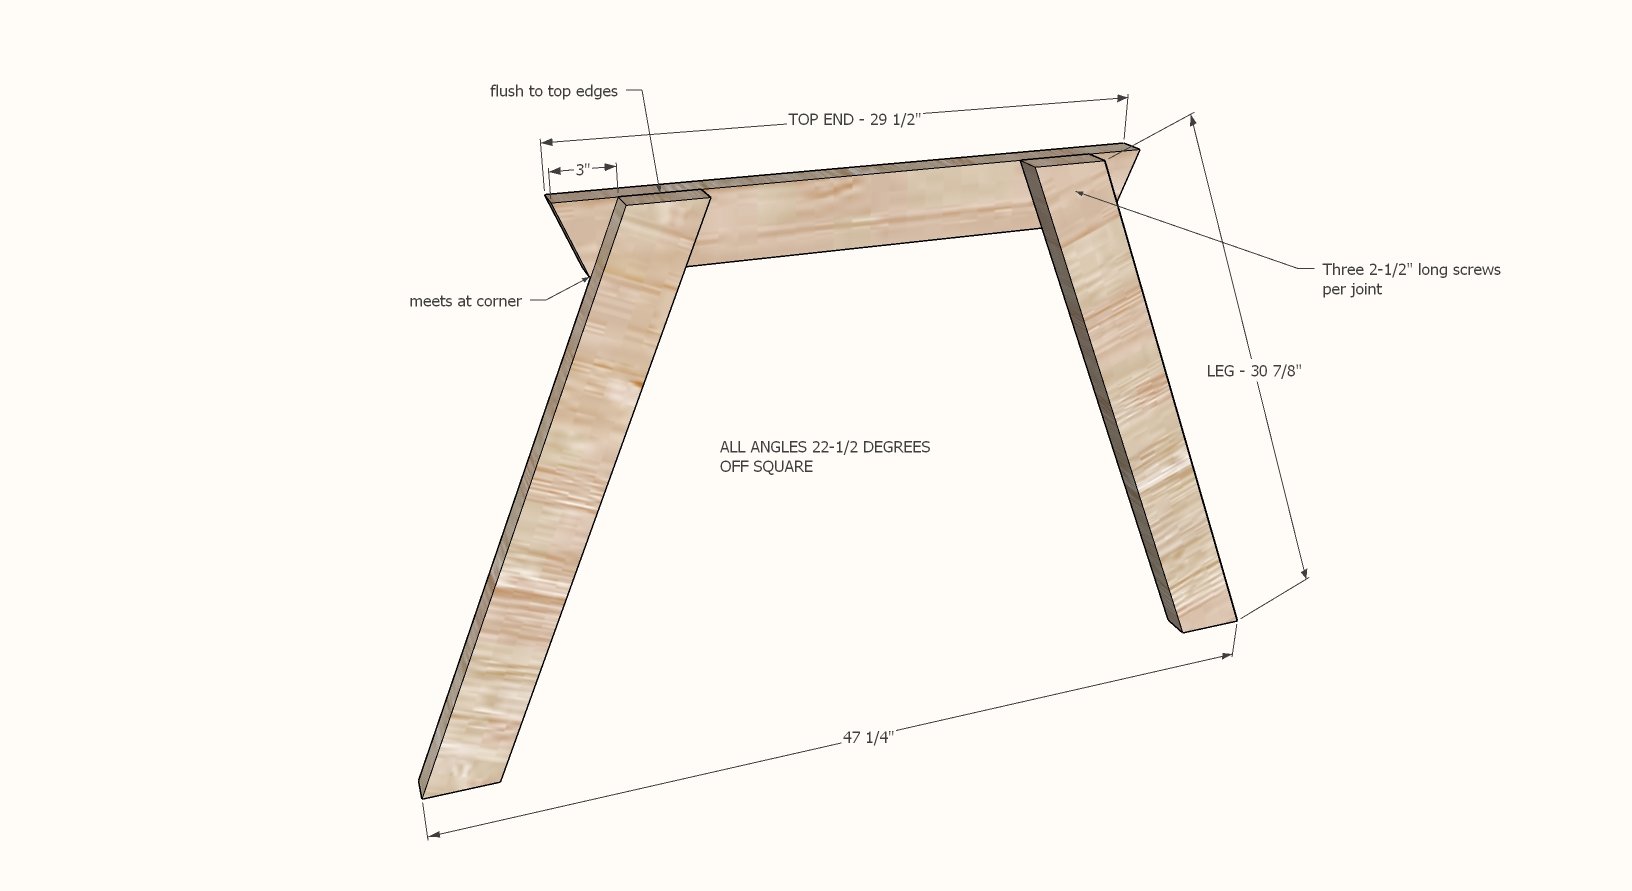
Lay out two legs and one table support and line up carefully so top edges are flush, and bottom of legs are correct distance apart. Screw together with three screws and wood glue.
TIP: Scrap wood pieces of 2x4s can be used to elevate the bottom of the legs so they sit flat while you work.
Step 2
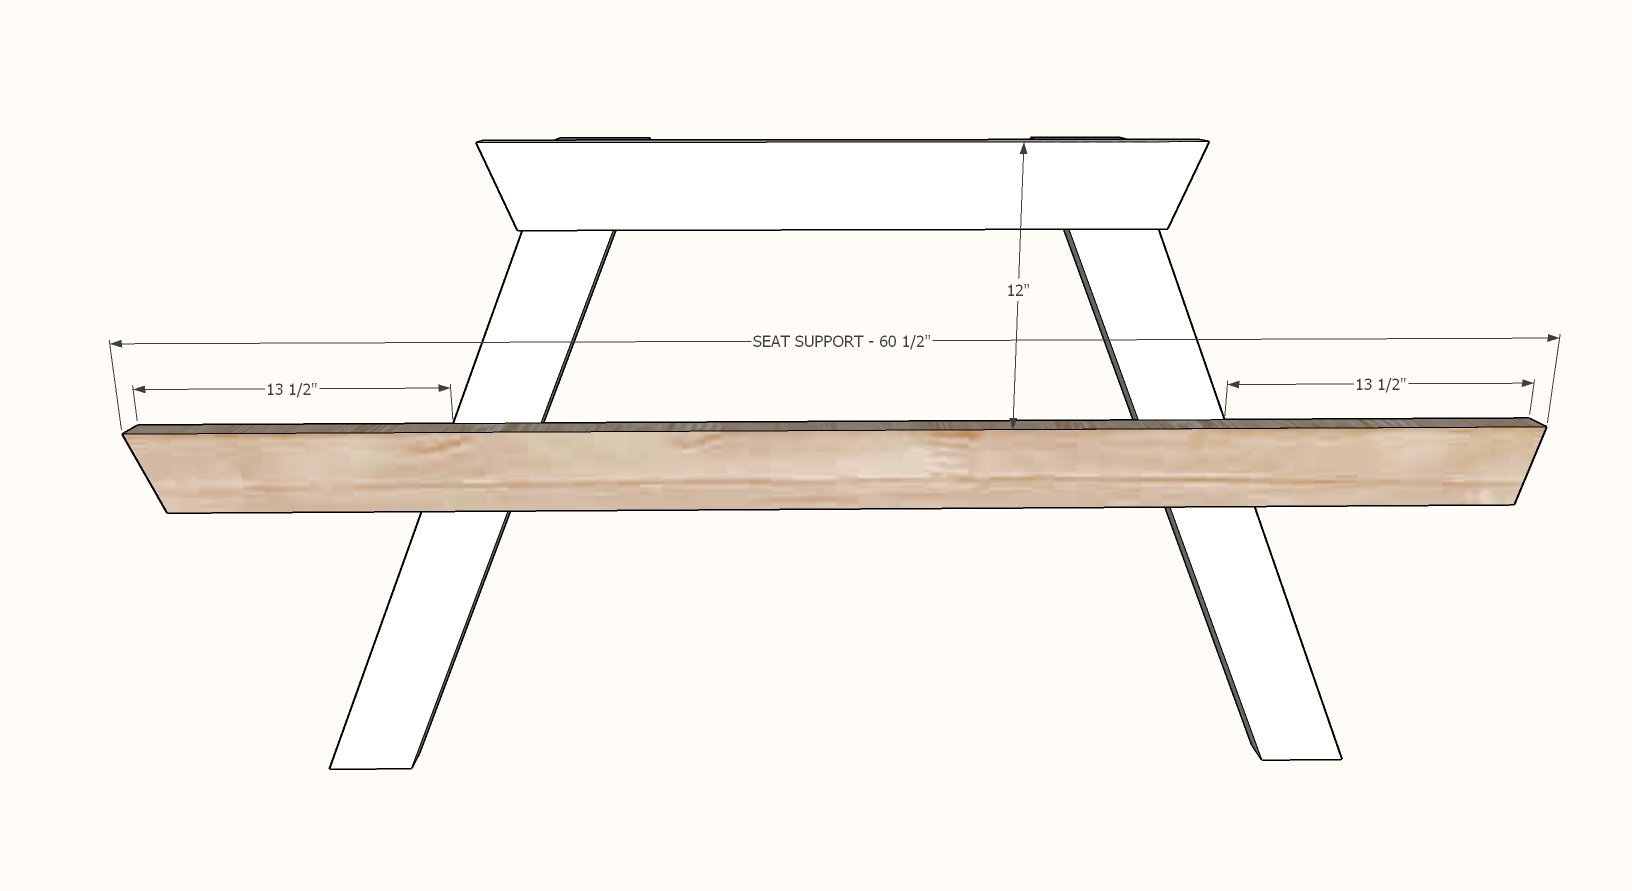
Flip over and lay out the seat support.
Attach to the legs with three screws per joint and glue.
Build three leg sets identical.
Step 3
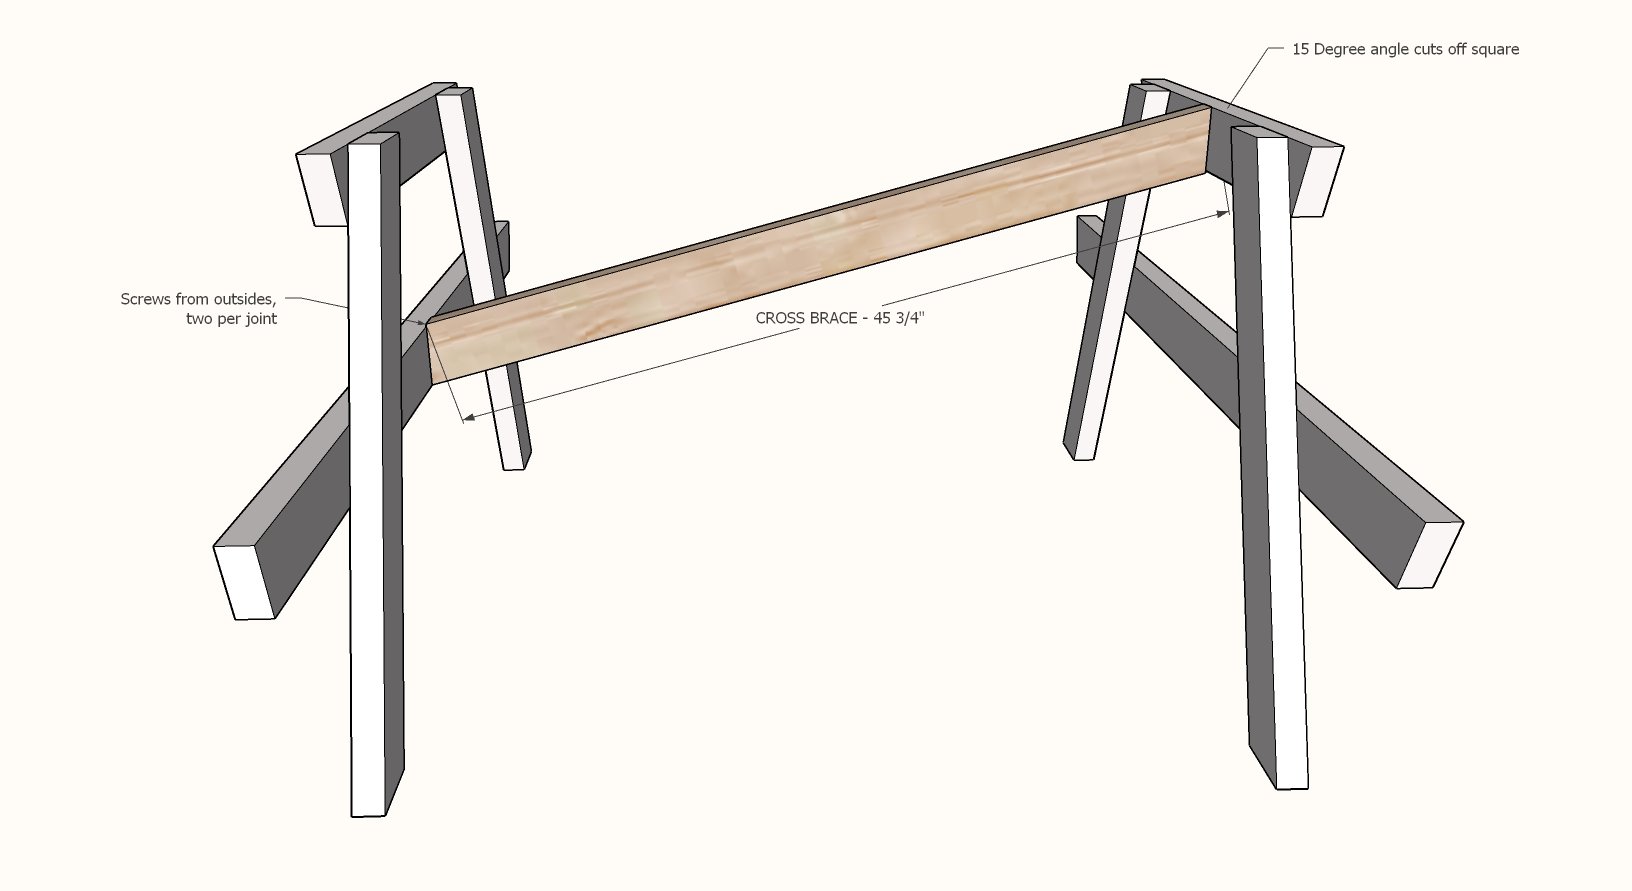
Mark the center of the seat supports and the table support.
Attach one cross brace in between, centered, top edges flush.
Step 4
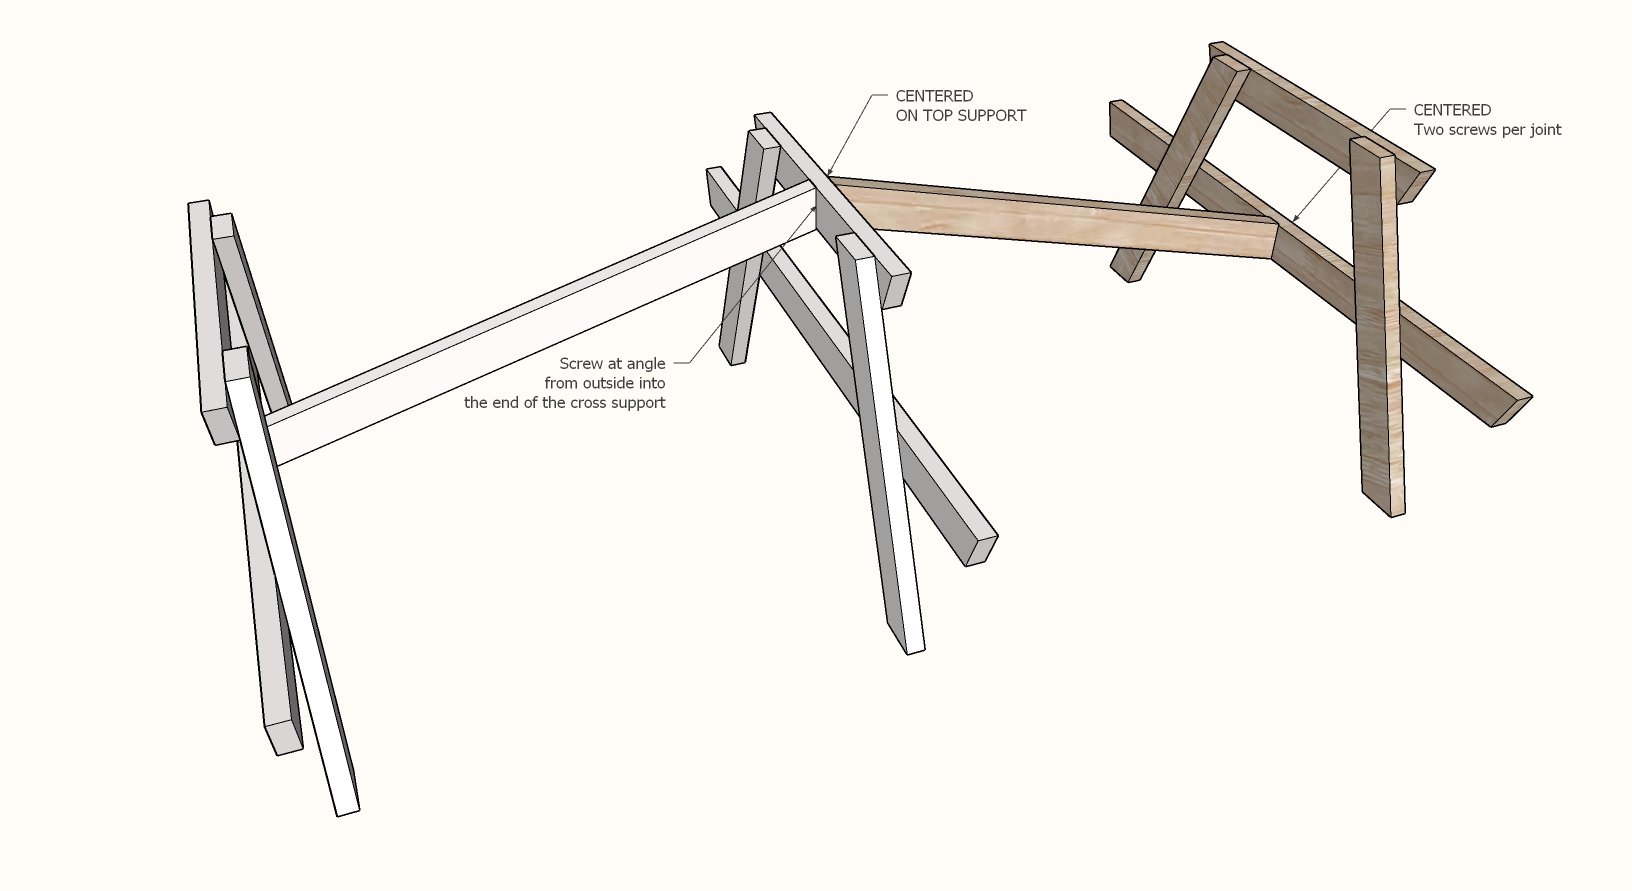
Mark center of remaining leg set seat support. Attach with the cross brace centered on the legs as shown.
Step 5
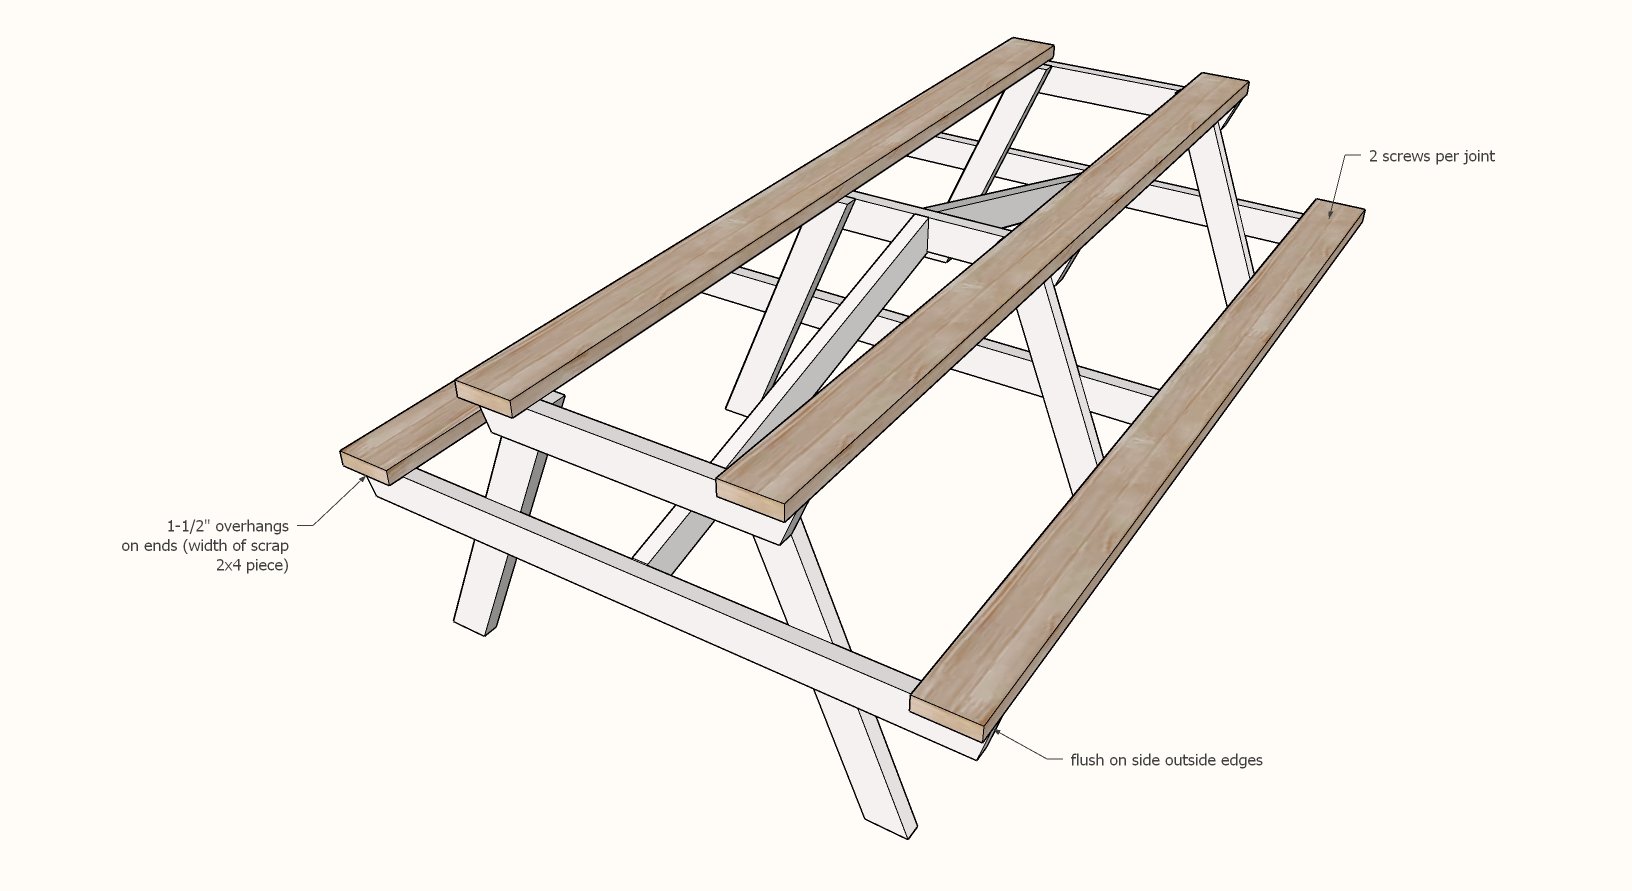
Lay the 2x6 boards down on top of the table and adjust. Side edges are flush, ends overhang 1-1/2" or the width of a 2x4 scrap.
Screw down with two screws per joint.
Step 6
Layout remaining 2x6 boards with even spacing in between.
Screw down with two screws per joint.

Comments
hoppier
Mon, 07/06/2020 - 10:59
Nice plans and possible modification for umbrella pole
I've been wanting to make a picnic table for my deck, and I think I'll go with this one.
I have a patio umbrella and I am thinking about modifying this plan slightly to provide for an umbrella pole hole in the center of table top. I'll add a second center support so that there will be a 1.5" gap (the width of the legs) between the two center supports which should be wide enough for a standard 1.5" diameter umbrella pole to fit between. With the second center support, that basically means that when you look at the pic in Step 4, the left side of the table will be the mirror image of the right side, except only the right side will have the lower seat brace attached to the center legs. To further anchor the umbrella pole, I might also attach a galvanized 2-hole clamp to the center seat support although that might not be necessary since I'll also have a umbrella base. I may need to shorten one or both of the diagonal cross braces that go under the table since then left brace will join to the center support 3" "sooner" with this modification.
This may be over engineering but I'm also considering dado (?) joints for the two outer seat seat supports. I would cut a horizontal dado around 3/8" or 1/2" deep into the legs and the fit the lower seat supports into the dado. Maybe do the same for the center too although I'd need to make sure I account for where the umbrella pole is positioned, so that might not work for the center seat support.
I'm also considering bigger bolts for the three seat supports where they fasten to the 6 legs, as well as for the 3 (or 4) upper support bars. I usually see pretty big bolts on picnic tables as opposed to ordinary deck screws.
alextt88
Mon, 07/13/2020 - 18:37
Nice
Nice