
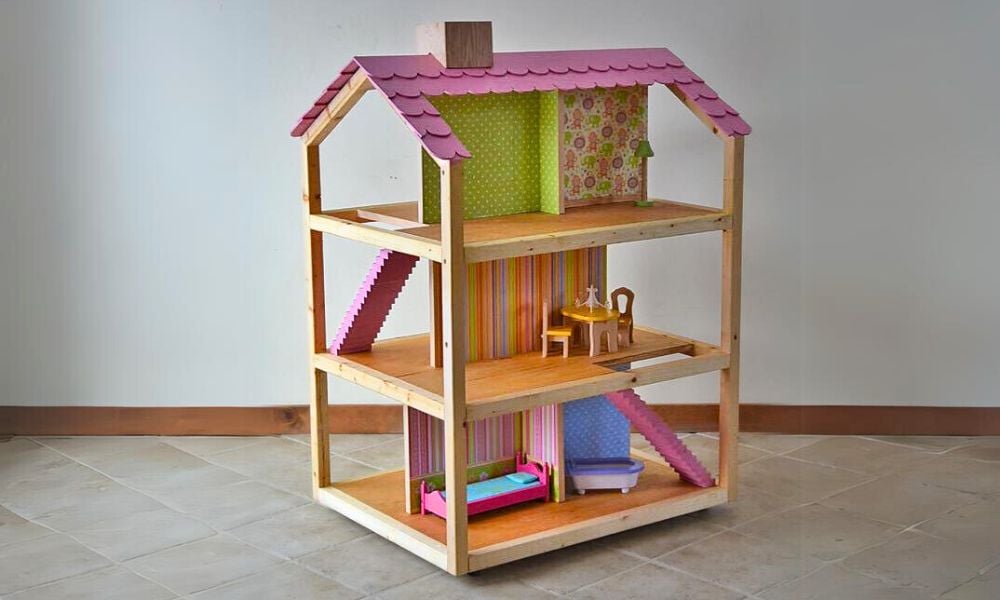

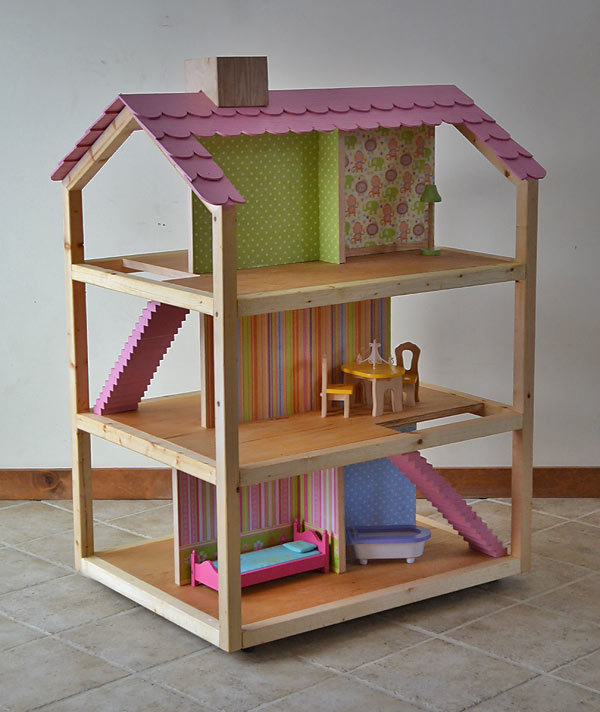
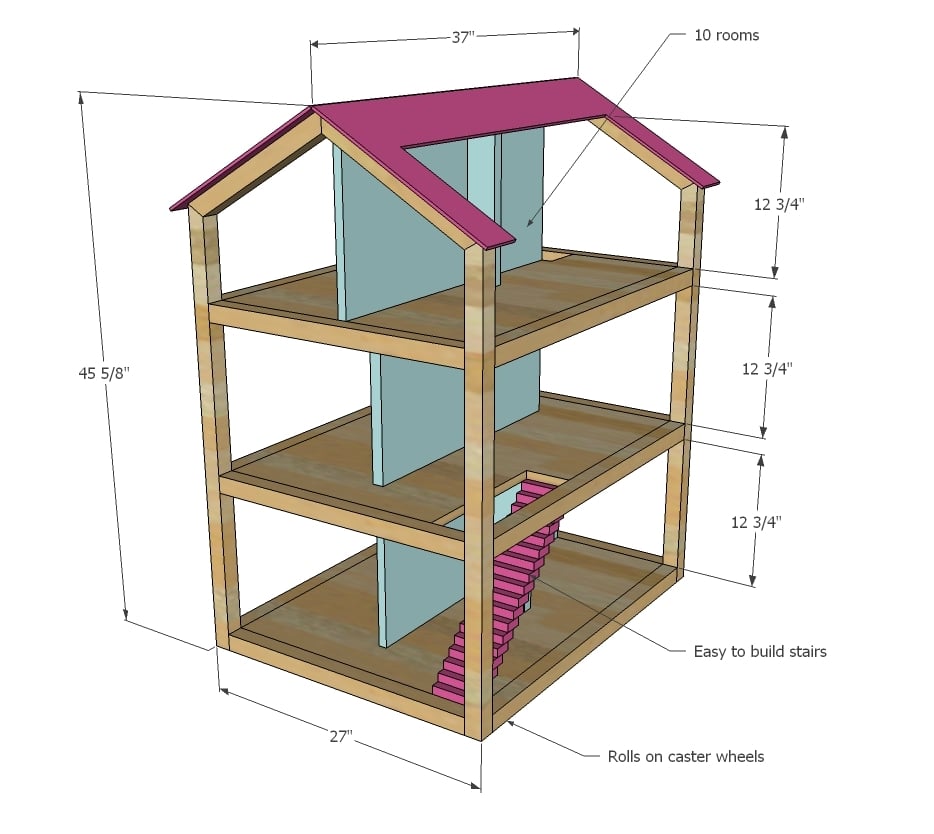
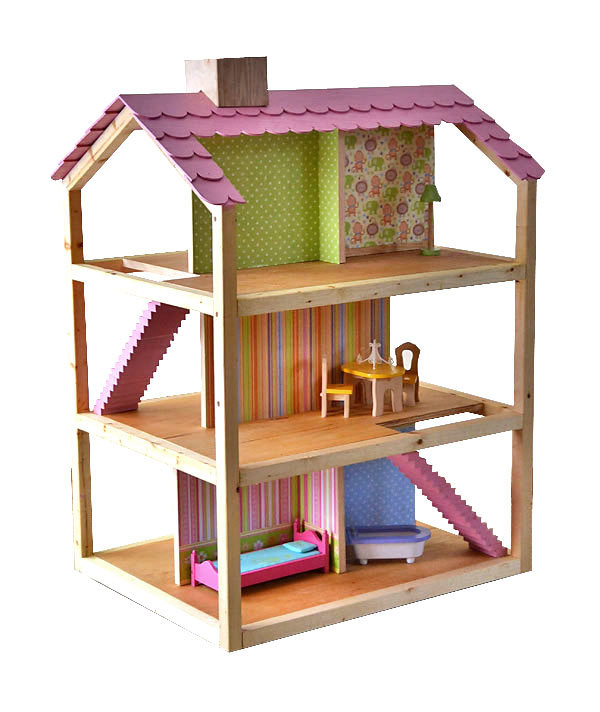
Build a three story open frame dollhouse perfect for 12" dolls with these free easy step by step do it yourself dollhouse plans! Hours of play from all sides makes this a dream gift!
Free step by step plans with detailed diagrams, shopping and cut list from Ana-White.com


Okay, you know that feeling, right before you go to bed on Christmas Eve, all the gifts wrapped, everything is perfect, and you are exhausted ... but you still can't sleep. Because you are just so excited to wake up and see the happy faces of your family enjoying Christmas morning.


Preparation
- 1 - sheet 3/4" PureBond Plywood
- 7 - 2x2 @ 8 feet long
- 1/4" plywood scraps for roof
- 2 - 1x2 @ 8 feet long for stairs
- 4 - 2" caster wheels and screws for 3/4" stock
- use either 3" self tapping star bit screws or 2 1/2" pocket hole screws, depending on your joinery technique
- 7 - 2x2 @ 32"
- 6 - 2x2 @ 24"
- 4 - 2x2 @ (Both ends cut at 30 degrees off square, ends are NOT parallel, long point measurement)
- 4 - 2x2 @ 37 5/8" (One end cut at 30 degrees off square, long point measurement)
- Plywood cut to diagram


Please read through the entire plan and all comments before beginning this project. It is also advisable to review the Getting Started Section. Take all necessary precautions to build safely and smartly. Work on a clean level surface, free of imperfections or debris. Always use straight boards. Check for square after each step. Always predrill holes before attaching with screws. Use glue with finish nails for a stronger hold. Wipe excess glue off bare wood for stained projects, as dried glue will not take stain. Be safe, have fun, and ask for help if you need it. Good luck!
Instructions
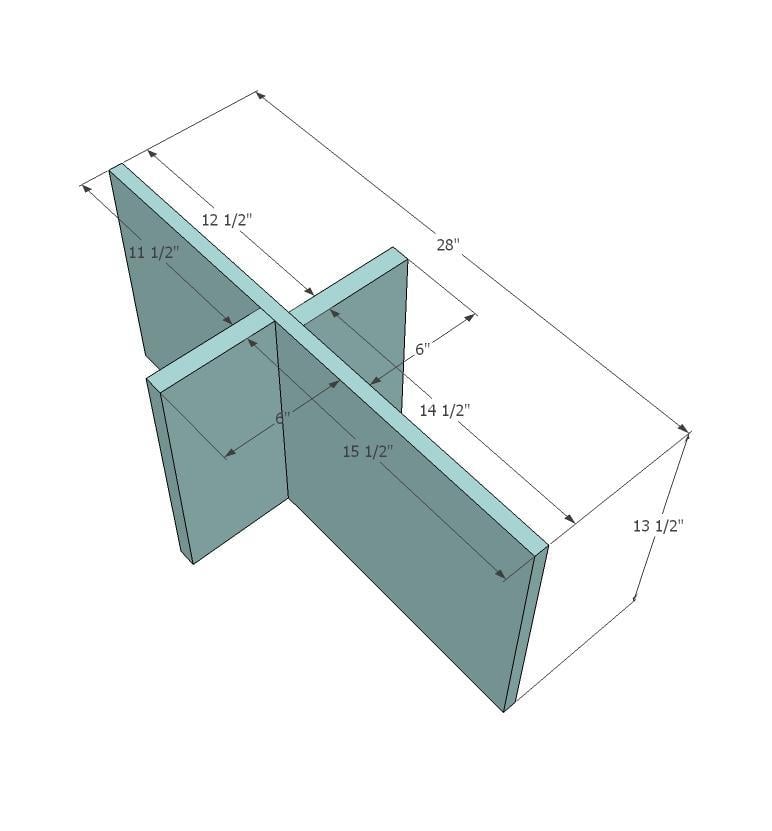
Step 1
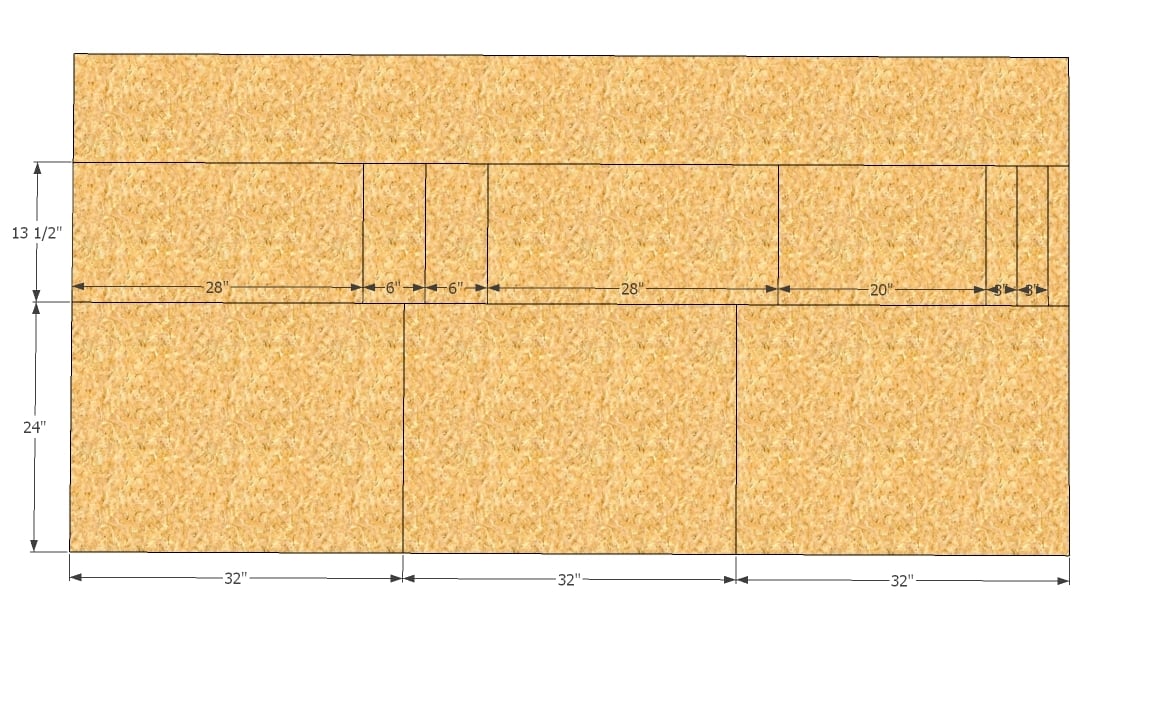
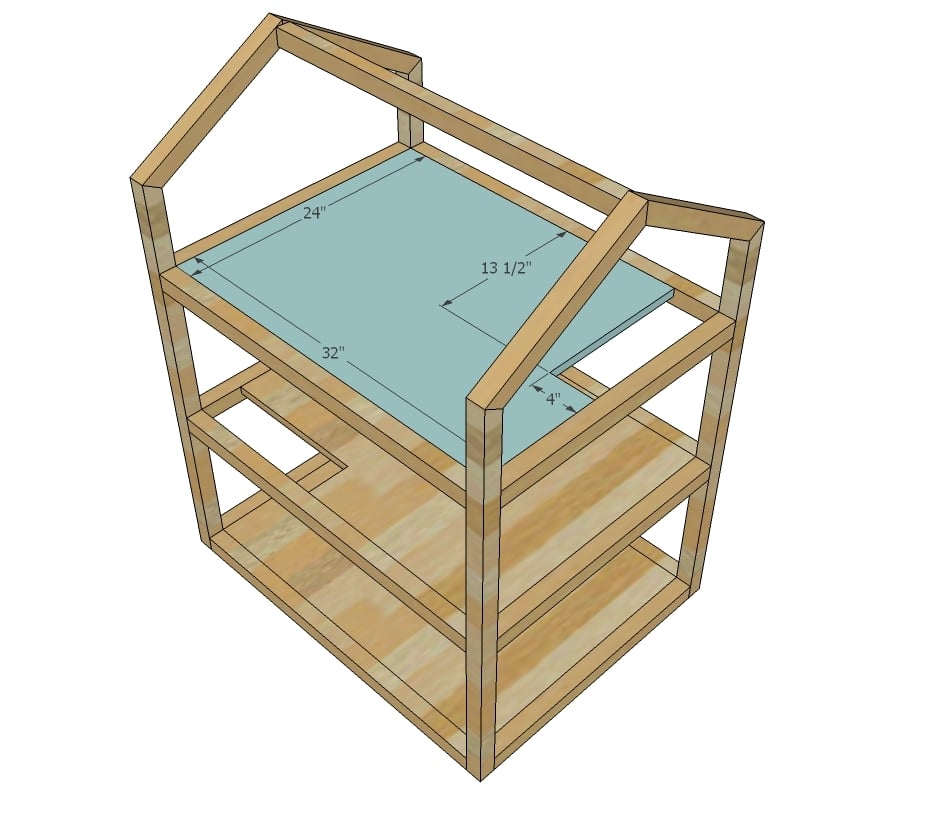
Have your home improvement center rip your plywood into a strip 24" wide and a strip 13 1/2" wide as shown in diagram. Then all you have to do is make the crosscuts.
NOTE: I really considered using 1/4" plywood for the floors, but wanted to create a dollhouse that would last and last - and could even be used as a bookshelf later on. The 1/4" plywood is just too flimsy for that. Then I considered 1/2", but the price difference between 1/2" and 3/4" is only a few bucks, and 3/4" is just so much easier to work with because you have a wider area to work with. Of course you can modify this plan - if you made this dollhouse with 1/4" plywood, it would be CHEAP to make ... like $30 cheap.
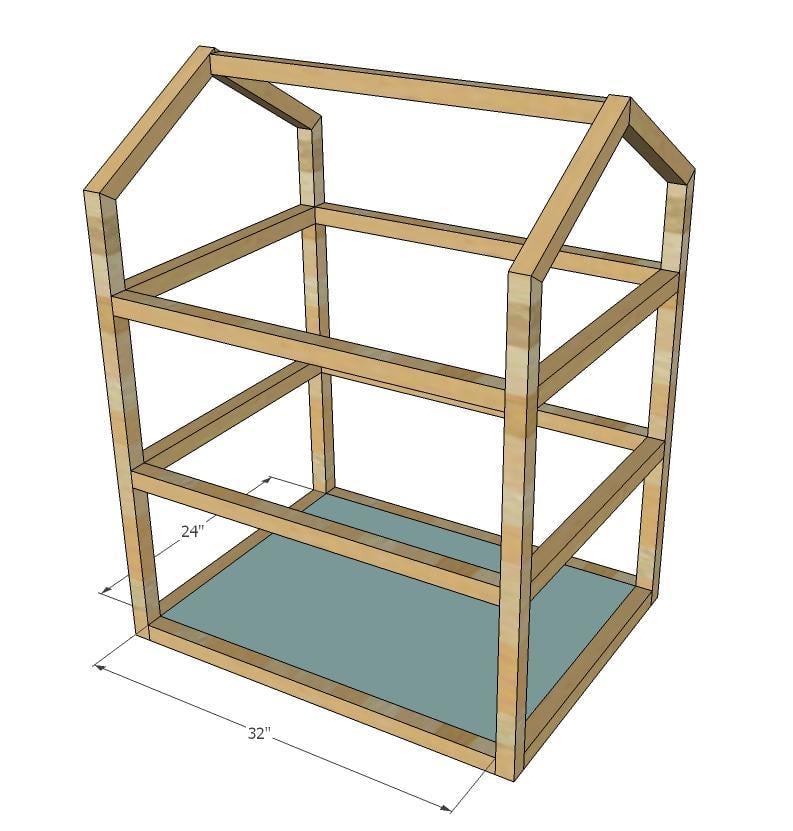
Step 2
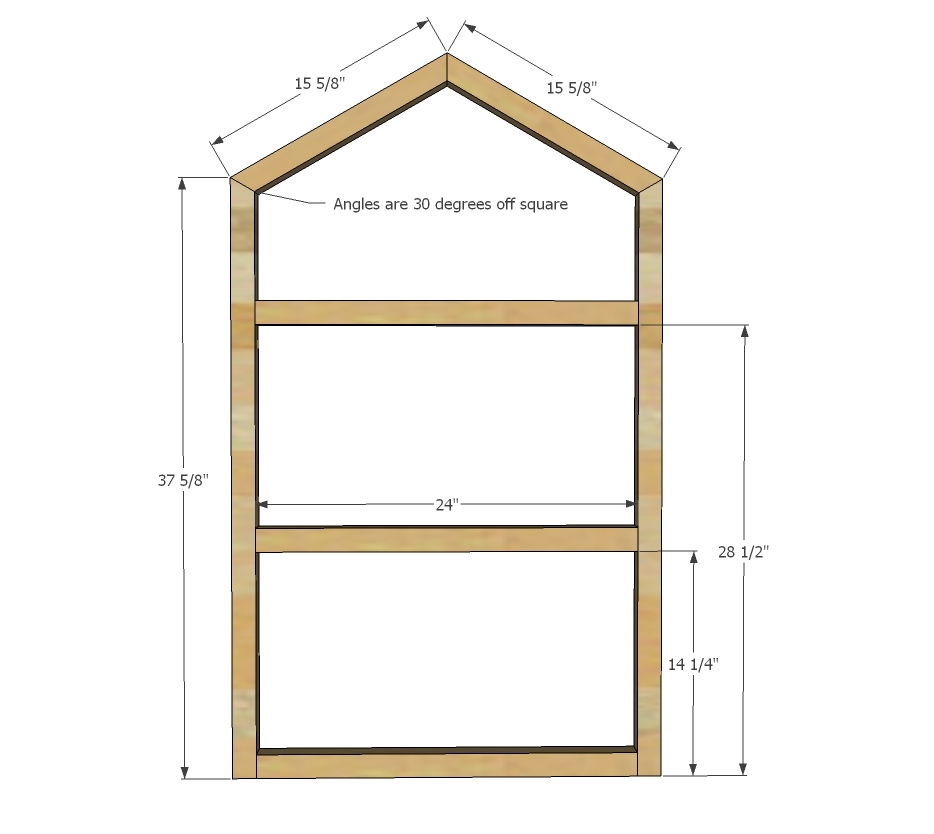
Build the ends as shown above. You can use a countersink bit and 3" screws or the Kreg Jig and 1 1/2" pocket holes and 2 1/2 pocket hole screws. For the angled joints, just clamp, glue and predrill holes with a countersink bit. I only used one screw (and alot of glue) for each joint to avoid splitting the wood.
Step 3
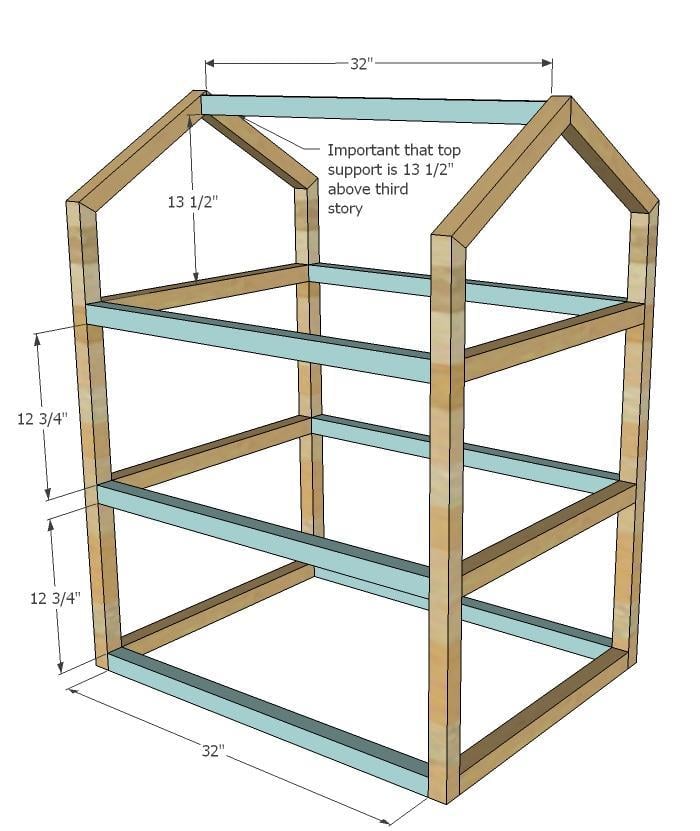
Now just join the two sides with the longer 2x2s. This is easy stuff. Just make sure that the top 2x2 is exactly 13 1/2" above the top story 2x2 - this does matter.
Step 4
I used pocket holes set for 3/4" stock and 1 1/4" pocket hole screws drilled on all sides of the plywood to secure to the frame. If you do not have a pocket hole jig, you can cut corner braces out of scrap 1x2s and fasten, or countersink (very carefully) long screws into the edges of the plywood.
Step 5
Step 6
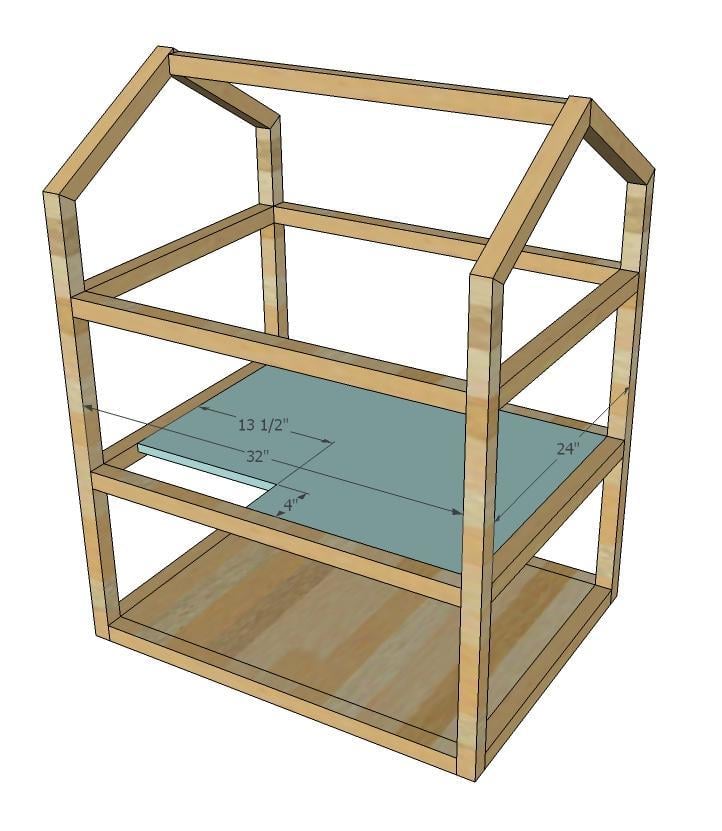
Cut stair openings out as shown in diagram and place 2nd story shelf as you did bottom story shelf.
Step 7
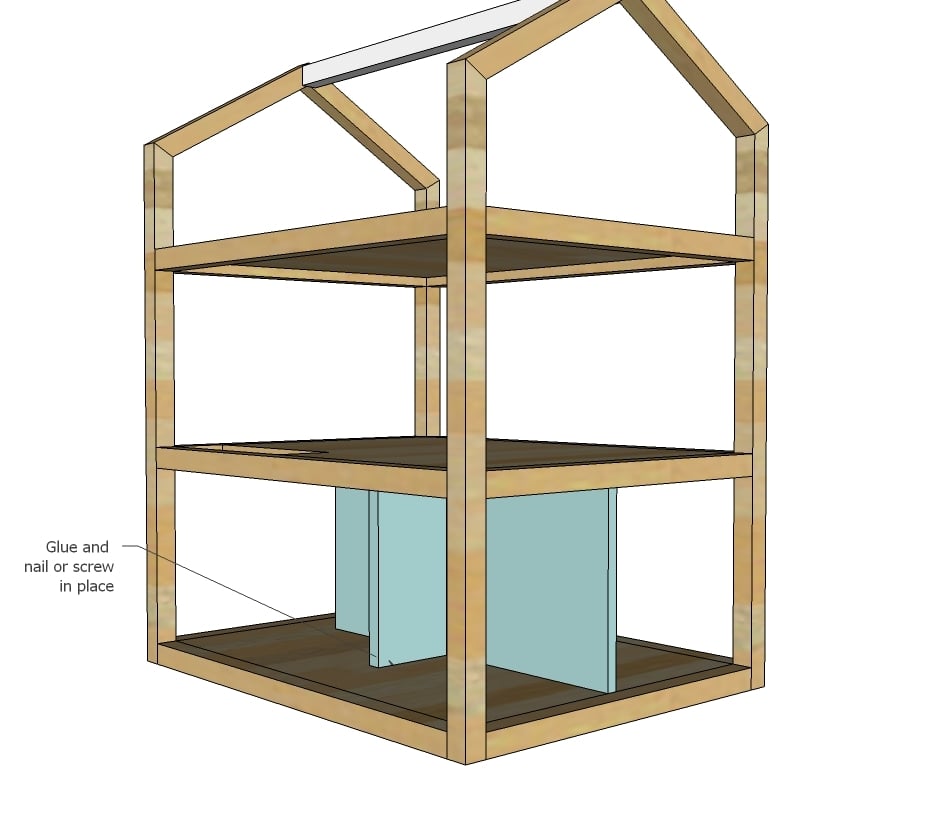
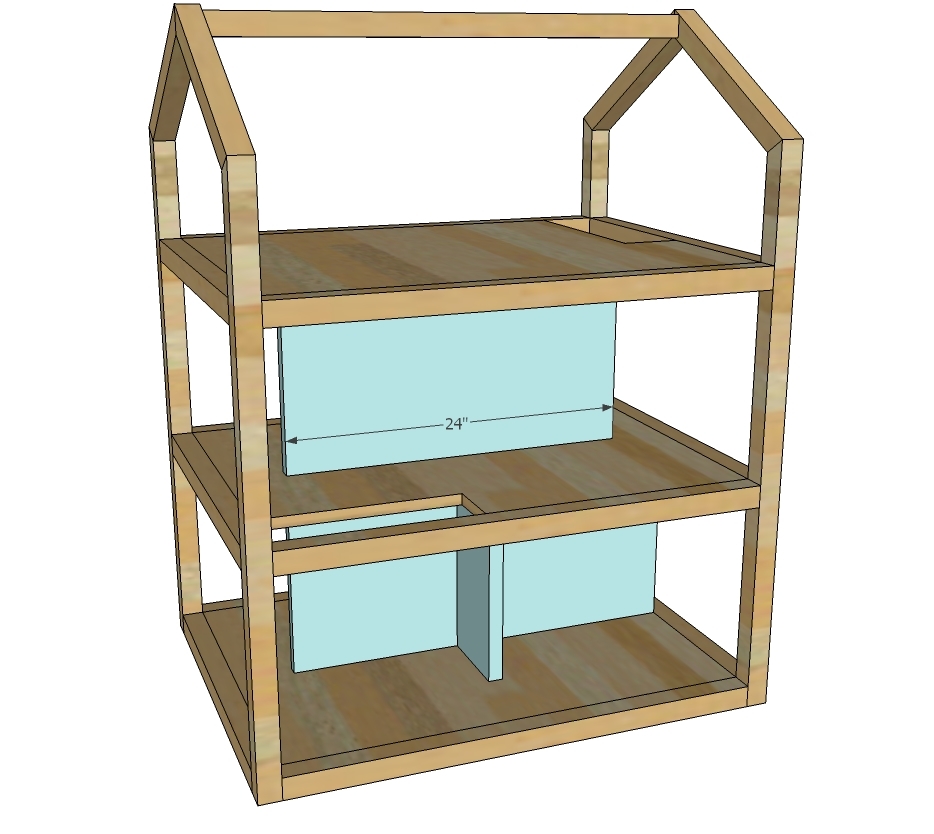
Add the bottom story walls. I used pocket holes, but you can also use nails here. TIP: Offset the walls between stories a tad so you have a spot to nail if you are using nails.
Step 8
Add the top story as you did the lower two stories.
Step 9
Followed by the middle story interior wall.
Step 10
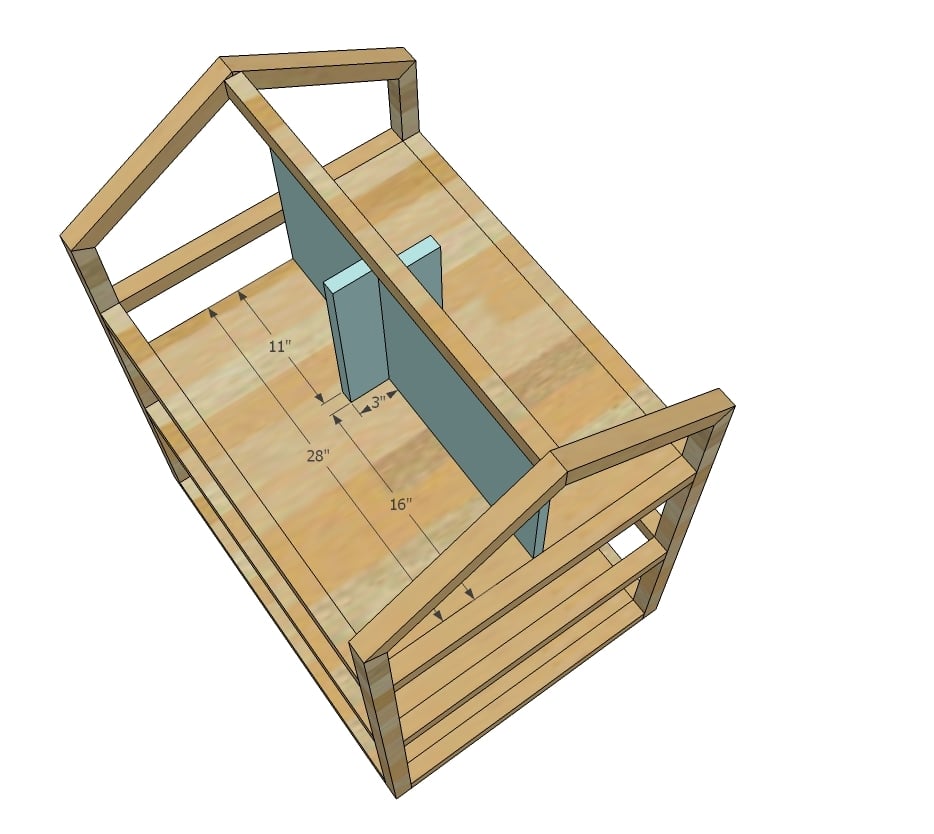
Finally, add the top story interior walls system.
Step 11
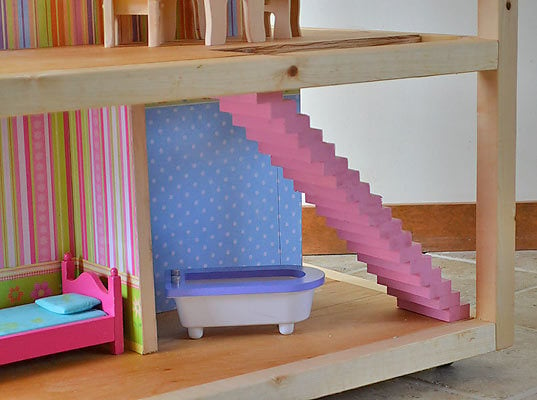
Stairs are built by stacking 1x2 boards staggered as shown above. Be very careful when nailing and use lots of glue.
Step 12
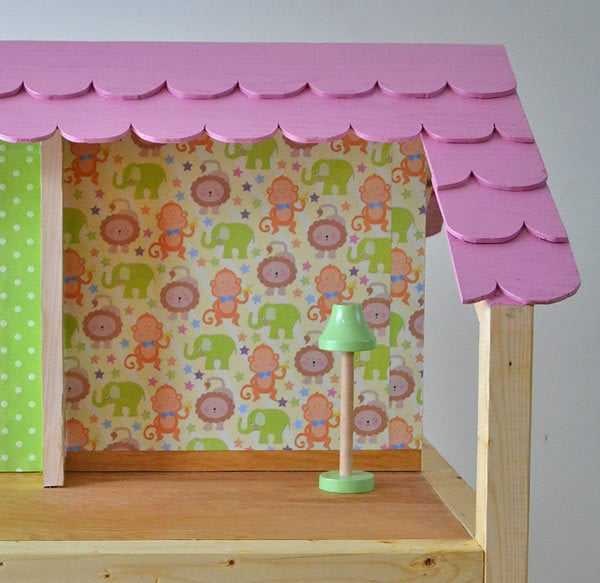
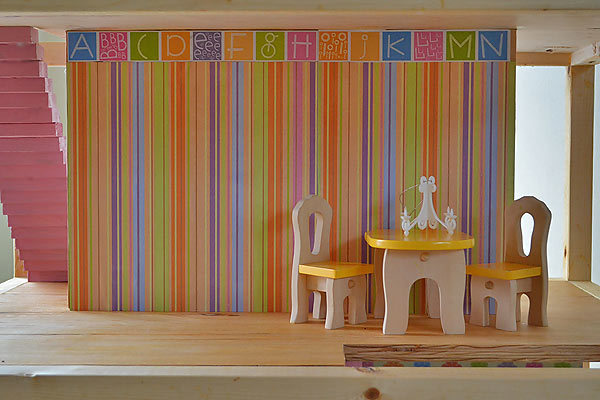
I then simply decoupaged the interior walls with contrasting scrapbooking paper. The roof is simply strips of 1/4" plywood - you could use 1/4" hobby stock as well - cut with a scalloped shape, lapped and nailed down.
Step 13
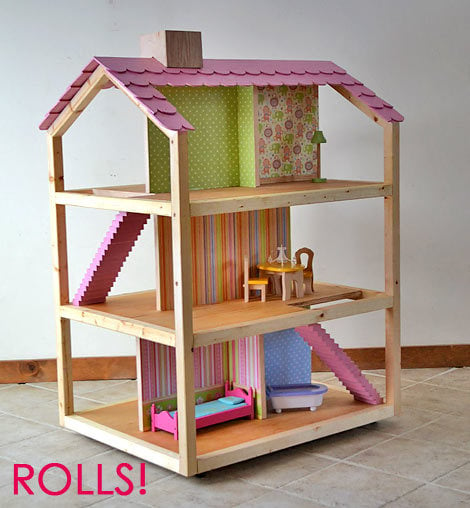
Attach 2" caster wheels to the 3/4" plywood base so wheels can swivel easily.
It is always recommended to apply a test coat on a hidden area or scrap piece to ensure color evenness and adhesion. Use primer or wood conditioner as needed.

Comments
moonhopping
Fri, 01/13/2012 - 19:55
Cost
$40 for the wood, screws and glue. Alot more on a new sawblade, sandpaper disks, claps, kreg jr, modge podg, scrapbook paper and paint.
But hey now my workshop is stocked.
I think i could mave dne it for close to $50 but i decided if i was gonna spend the time I should do it nice.
Tim Gary (not verified)
Sun, 11/18/2012 - 07:46
I spent about $70 on lumber,
I spent about $70 on lumber, went ahead and bought the cheaper pocket jib for $20, and then my wife spent $10-$20 on decorating materials and paint.
KeishaP (not verified)
Tue, 12/06/2011 - 12:16
Awesome Plan, but two questions.
This plan is wonderful, I am about to start building this for my daughter and I can't wait until she sees it. Two questions though, I am a first time Kreg Jig user and if I use the 1/2" plywood instead of the 3/4" do I need different sized screws? Please help, I don't want to screw this up (pun kind of intended). Also, can I use 1X2s or 1X1s for the supports instead of 2x2s - they seem so bulky. Please help!
KeishaP (not verified)
Thu, 12/08/2011 - 09:58
Found an answer
I was thinking I needed 2x2 Pine boards, which are pretty heavy but I just realized they are furring strips which are much lighter. Now, I just need to find some decent ones that are straight and smoother. And I think I have the Kreg Jig situation under control.
cb (not verified)
Sun, 12/11/2011 - 10:01
Missing Measurement
It looks like you didn't give the measurement for the 2x2s used to create the roof:
4 - 2x2 @ (Both ends cut at 30 degrees off square, ends are NOT parallel, long point measurement)
cb (not verified)
Sun, 12/11/2011 - 10:26
Disregard. I found them in
Disregard. I found them in the diagram on step 2.
bhoppy
Mon, 12/19/2011 - 07:33
32 by 24 boards
So I went to get all the wood for making the dollhouse yesterday. I got Orange to rip the plywood so all I would have to do is make the crosscuts. The problem I had was when I got ready to make the crosscuts with the diagram and realized the measurements for the 32 x24 inch pieces didn't take into account the width of the saw blade. So I had to change the measurements for all the 32 inch 2 by 2s to match the width of the floors. Mine are 31 7/8. I’m surprised no one has come across this issue. Am I missing something? And thanks Christine to all for mentioning the missed measurement for the roof.
Emily W. (not verified)
Mon, 12/19/2011 - 16:43
Another Option for Staircase
For anyone else dreading cutting/nailing/gluing all of those stairs: http://www.sweet-juniper.com/2007/06/mies-van-der-rohe-dollhouse.html
It looks like a much easier way to make stairs, and I really like the cleaner look (even if it is a bit less realistic).
Sherry (not verified)
Sun, 12/25/2011 - 04:53
Barbie doll house
My husband built our little Anna the hugest doll house ever. She loves it!
Guest (not verified)
Fri, 12/30/2011 - 21:11
dollhouse you can sit in?
I love these plans and hope to be able to make one for my kids, but when I saw the picture of the Voila house, it reminded me of one I used to see in the backs of comic books (I grew up in the 70s but also had some of my mom's older comics so I don't know exactly which ones they were in). It was a fairly large dollhouse also, but it was two sides that met in the middle, and there was a space open in the middle that a child could sit in and close the house around herself (or himself, I guess). I always thought it would be wonderful to get in it and shut myself away from my brother. ;-) Now I just wonder if anyone else has ever seen this dollhouse or know of plans for one like it? I've thought about sketching out plans for it myself, but have never gotten around to it. For now I'd be happy knowing I wasn't imagining things back then. Thanks!
Justyna (not verified)
Tue, 01/03/2012 - 15:42
Link to the plans
I was wondering if you could provide the link to accessing the plans for all the components for this dollhouse? thank you sooo much!
Guest (not verified)
Tue, 01/24/2012 - 05:29
I spent $40 on plywood (but
I spent $40 on plywood (but only needed half, so used the other half for something else). Probably $10 on 2x2. About $20 on paint and craft paper. And another $10 on wood to make furniture. Not too bad!!!!!
But I thought I just read That boiled linseed oil is dangerous for kids, and you should only use raw linseed oil. Boiled has petroleum products in it.
claydowling
Tue, 01/24/2012 - 06:18
Finish safety
Boiled linseed oil is indeed very dangerous for kids, so don't put it in their sippy cup. And that's the quantities you'd have to consume to make it dangerous. I'm not aware of petroleum products in BLO, but it does contain metal salts, and metal salts are unhealthy to have build up in your blood (think lead poisoning).
Once the finish is dry to the touch, the metals are trapped in the oil, and can't get free. Usually 24 to 48 hours is sufficient. Once the metals can't get out, it's about as dangerous as metal eating utensils.
The bigger risk is fire. The rag used to apply BLO generates heat during the cure process, and if the heat can't escape you'll get a fire. Spread the rags out to dry a single layer deep, and don't chuck them in the trash until they've had a day or so.
Just for future reference, none of the finishes available at a woodworking store or home center are dangerous for kids once they're cured. All of them are bad for adults when consumed in their uncured form. Some of them, such as shellac, are common food ingredients. If you ever see shiny candy or pills, that's a layer of dewaxed shellac making it shiny.
Guest (not verified)
Sat, 04/14/2012 - 23:15
foldable doll house
I live in Singapore where the apartments are rather small I love this doll house but due to the large size wish it was foldable into one box which can fit under the bed so that my girls can play when they want and put it away when not in use. Hope some one comes with a plan to use for me. Thanks
mzprfkt (not verified)
Tue, 10/16/2012 - 05:41
Amazing
You are so amazing. You make these projects simple enough for anyone. I cannoe=t wait to start this dollhouse for my granddaughter. Thank you so much for all you do!
Annetta Boyd (not verified)
Tue, 10/16/2012 - 22:49
Dream dollhouse
Thank you so much Ana! this is my first project and I so hope it comes out ok... my 4 year old is going to have an amazing Christmas! :)
Indiana Novice (not verified)
Thu, 10/25/2012 - 18:57
30 degree off square angle question
High, in the directions it says to cut one end of the 37 5/8 inch 2x2's 30 degrees off square. It also says to cut the 15 5/8 inch 2x2's at 30 degrees off square. My miter chop saw has the marking at 22.5 for that cut. However, when I line the long boards up with the shorter ones, they don't meet to make straight walls for the house. What am i missing here? I know i'm a novice and terrible with angle math, so I'm thankful for any "Angles for Dummies" advice. please help.
ashleyam (not verified)
Fri, 10/26/2012 - 13:16
angled cuts not working?
When you cut the roof frame 2x2's and long wall pieces ALL 30 degrees off square, it is NOT working for me. Can someone explain these angles cuts in layman terms? Any help is greatly appreciated!
Tim Gary (not verified)
Sun, 11/18/2012 - 07:20
It is basically 60 degrees,
It is basically 60 degrees, since square is 90. I made all my cuts at 60 degrees (set it on my table saw) and they all worked out.
Adrian Caruana (not verified)
Mon, 11/12/2012 - 07:56
furniture
what scale can the furniture be for this doll house.i am making one for my daughter for christmas
Tim Gary (not verified)
Sun, 11/18/2012 - 07:57
Stronger Stairs
My daughter would have been fine with the stairs, but her 3 boys would have probably broken them over time :(.
So, I thought about the stairs out of a single 2x4, but I was afraid it would look half baked, plus I don't have a miter saw.
So, what I did instead was keep the 4 inch width, cut my stairs 3 inches width, and found some half inch strips of plywood for the sides. Basically I made rails. I glued all the stairs first, put the one at the top pointing up instead of out (to attach to structure), and then cut/glued the rails on the side. They go all the way down, and are 2 inches wide so it makes a good size rail. Once I glued those one and used my nail gun to solidify, it was strong as ever, and it looks very nice. I used small nails and put one on each stair, both sides, all the way down. Very sturdy. Took a little more time, but looks nicer, is stronger, and best of all my wife and daughter love it! What else matters? :)
kyleb (not verified)
Sun, 01/20/2013 - 18:57
Would you mind sharing a
Would you mind sharing a picture? Thanks.
Amber from WI (not verified)
Mon, 12/10/2012 - 21:13
Furniture
Hi,
My husband is currently building this adorable dollhouse for our 2 girls. Ana, what furniture is pictured in yours? Did you make that? Would the Fisher Price Loving Family dollhouse furniture fit? Just want to make sure that the furniture wouldn't be dwarfed, since this dollhouse is HUGE!
Thanks!
jkeenan2929
Fri, 09/13/2013 - 17:50
Furniture
Hi! I want to make this dollhouse for my munchkin for Christmas and I'd like to get started on furniture for it soon. Did there end up ever being any plans for furniture?
Tanya Hunter
Mon, 11/11/2013 - 21:00
Bigger version
I am desperately trying to find a cost effective way to build an American Girl doll house. This would work great if it didn't have the center walls and the floors were further apart. I need about 20" between shelves and between 18"-24" for each floor. Does anyone have another plan for a fairly beginner?
kpjohn
Sat, 08/30/2014 - 12:53
placement of pocketholes
I am have trouble with placement of the pocketholes. On the two sides I did pocketholes at the bottom and attached to the vertical pieces with no problem. How do you place the screws so they don't hit each other when connecting the front pieces? All the pieces are 2 x 2's. Also, I'm using 1/2" plywood for the 3 levels and it seems like pocketholes would be too big for that size thickness. I am beginner and would appreciate any advice on this. Thanks.
Svettsvett
Tue, 11/04/2014 - 11:00
Help with dream doll house
Hi everyone! i'm trying to build the dream doll house for my daughter but the only part i'm haveing trouble with is makeing the outside part before you put the floors i don't understand what 2x2 means how wide and thick do i make each of them can somebody who already made this doll house Please help me!! i really need it Thanks.
blazingcakes
Mon, 05/18/2015 - 09:50
Step 3
Hello everyone! Complete Newbie here!!! And I need some SERIOUS help!! Hahaha. My daughter and myself are ready to be done with it. I am trying to get passed Step 3 and as I am sitting here typing this I can't help but laugh. Step 3 seriously?! But I saw a couple comments with the same issue, just no responses or how they fixed it for the rest of us to know.
Ana White you've once again, understated the price for a project. Way under!!! Tools excluded I'm close to $200 because I had Home Depot cut the wood. Never again. Tim Gray I believe was the name I kept coming across about repetitive trips BACK to the store. Feeling for ya buddy.
How did everyone attach the frames together--prior to installing the plywood flooring? Thankfully I didn't countersink all my pieces first like some were successfully able to do. I countersink'd my two identical frames, however....how in the world do I attach the 32 inch pieces at the bottom, there is a three inch top to a screw there? Hubby has helped a bit however, this IS NOT his forte, he's all done, so I am hoping someone who has built this can help me. I even bought a small nail gun to attach the plywood so I could avoid splitting it with the countersink bit. Hahahaha. Thanks in advance!!
Hasan Hiaz
Sun, 07/17/2016 - 05:37
Thank you so much
This is a super design. Thank you so much for this. My daughter will love this.