
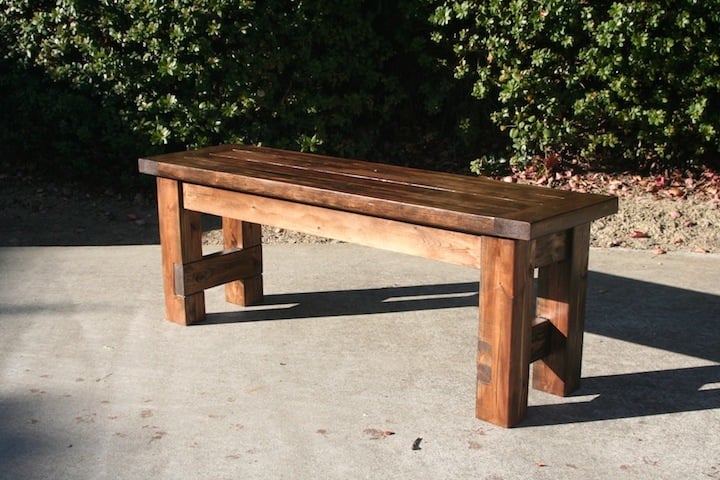

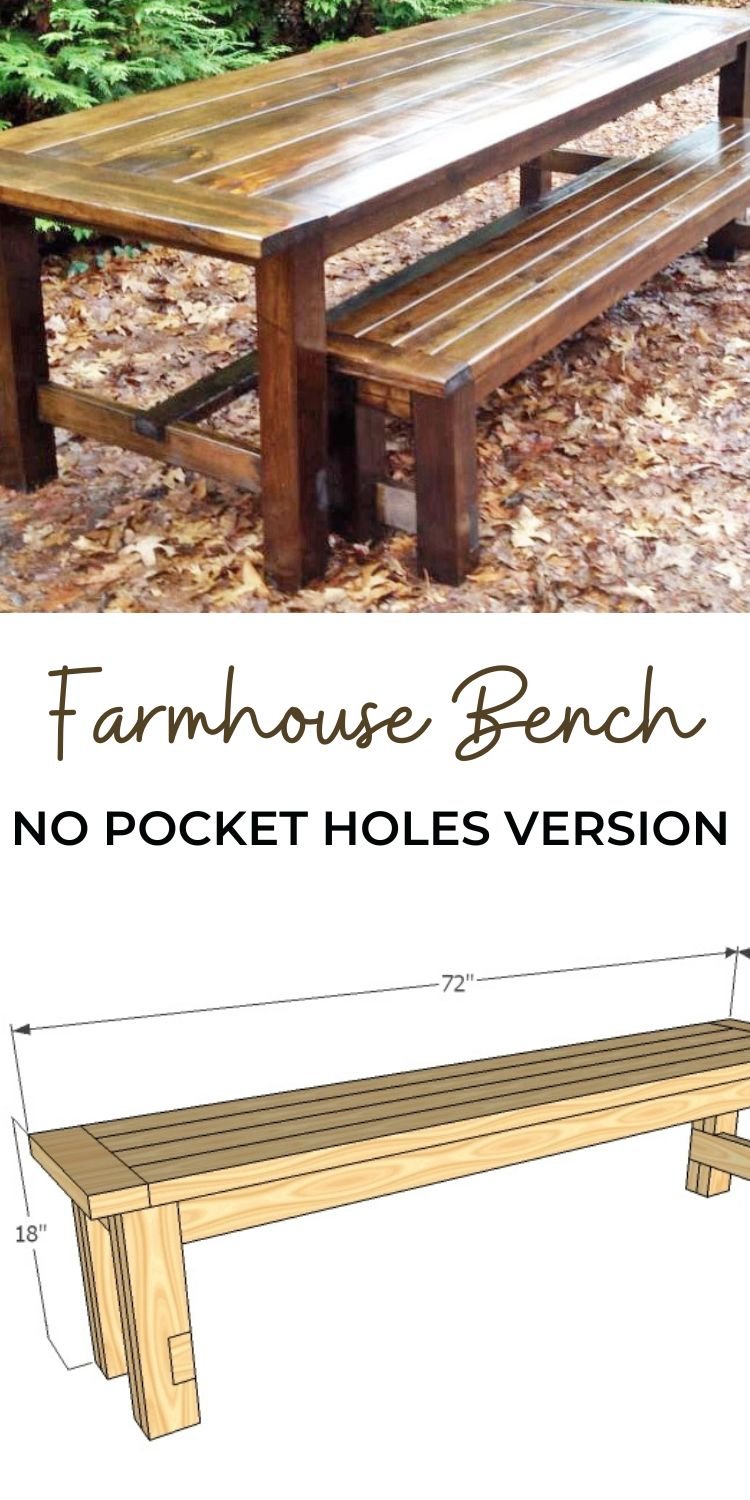
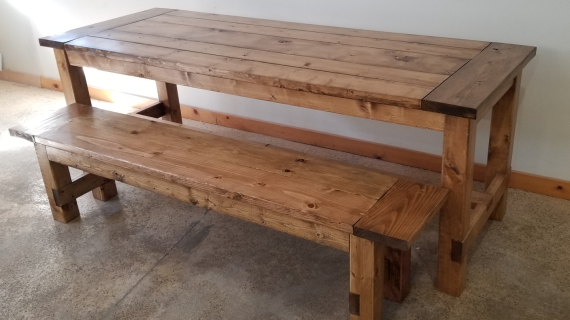
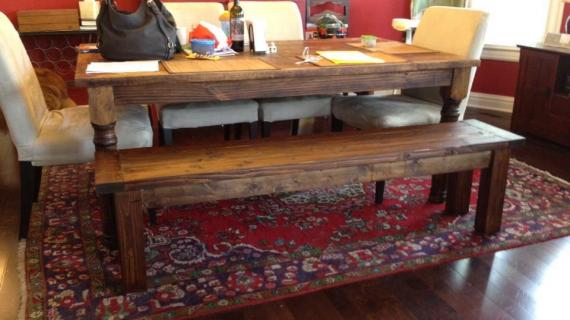
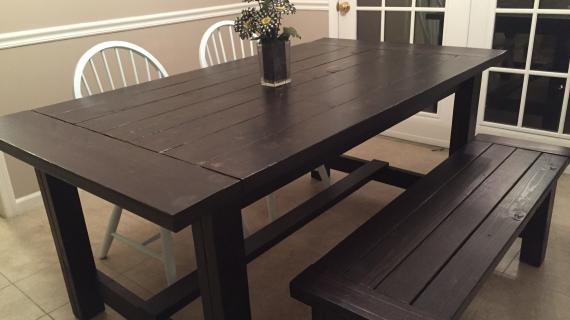
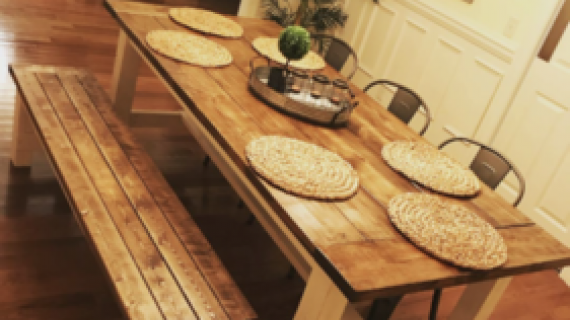
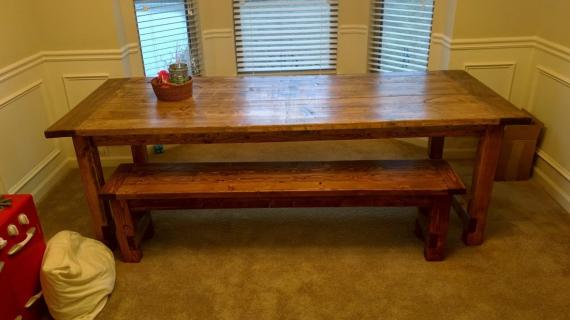
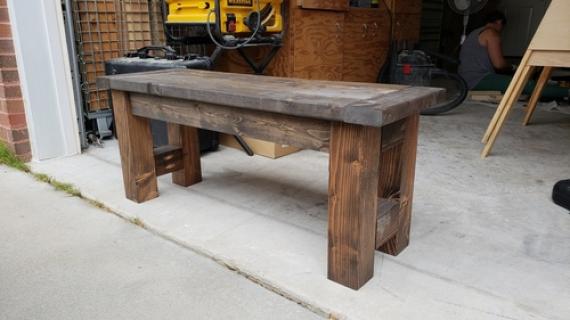
This farmhouse bench is easy to build and is rustic and substantial. It is designed to match our Farmhouse Table Plans.
Pin For Later!
Preparation
4 – 2x4s, stud length or 8 foot length
2 – 1x4s, 8 foot length
1 – 1×2, 8 foot length
2 1/2″ screws
2″ screws
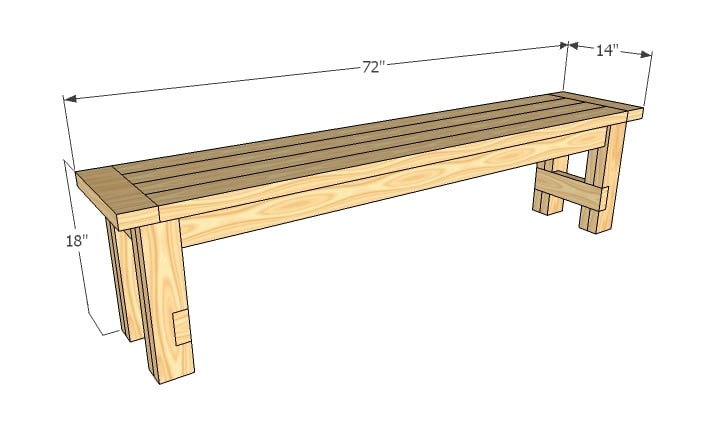
8 – 2x4s @ 16 1/2″ (Legs)
2 – 1×4 @ 2 1/4″ (Spacers)
2 – 1×4 @ 6″ (End Aprons)
2 – 2×4 @ 12″ (Stretchers)
2 – 1×4 @ 61″ (Side Aprons)
2 – 1×4 @ 9 1/2″ (Inner Aprons)
5 – 1×2 @ 9 1/2″ (Supports)
4 – 2×4 @ 65″ (Bench Seat Boards)
2 – 1×4 @ 14″ (Breadboard Ends)


The Farmhouse Bench is designed to work with this Farmhouse Table, but there is no reason you could not modify the dimensions or use it as a coffee table or outdoor bench. If you plan to build the Farmhouse Table, starting with the bench will give you a chance to test out your skills on a smaller version. For those of you who have a pocket hole system, you can use the pocket holes to build your bench seat separate. You can also fasten your aprons directly to the legs without spacers.
Instructions
Step 1
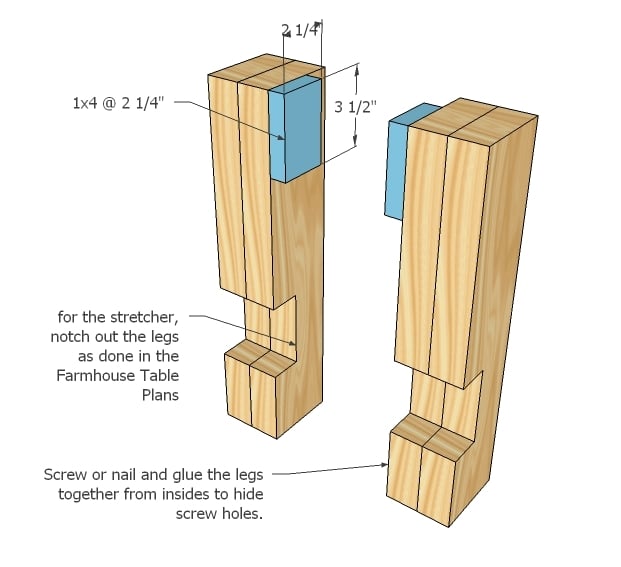
Legs The notches and stretchers on the legs is optional. Notch out your legs (for full instructions see the Farmhouse Table post) and laminate your legs together in pairs of 2 with glue and 2 1/2″ screws. Then take note of the placement of the spacers and attach to the insides of the legs. This will differ depending on the leg. Attach with 2″ screws and glue.
Step 2
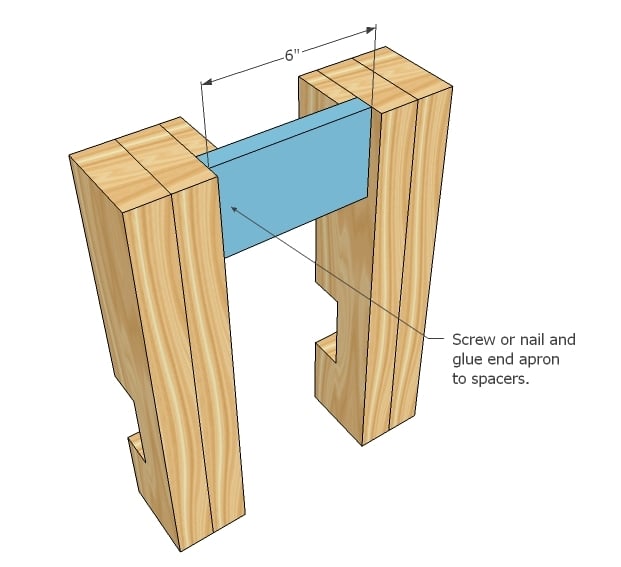
End Aprons Attach end aprons to the spacers as shown above. Use glue and 2″ screws.
Step 3
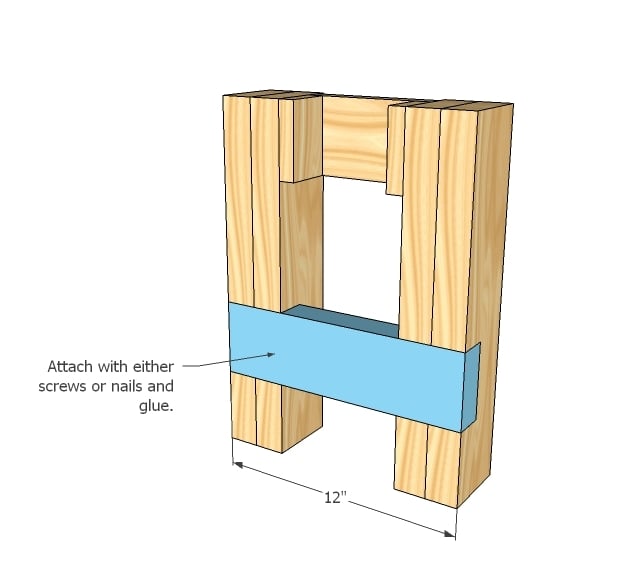
Stretcher The stretcher gets attached in the same method. Screws and glue.
Step 4
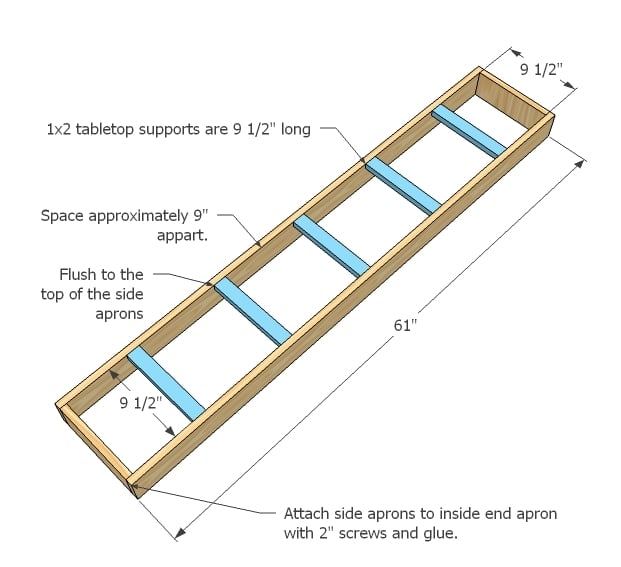
Bench Frame Build the bench frame, keeping the 1×2 supports flush to the top. Easy method is to flip it all over and keep the supports flush to the bottom :)
Step 5
Step 6
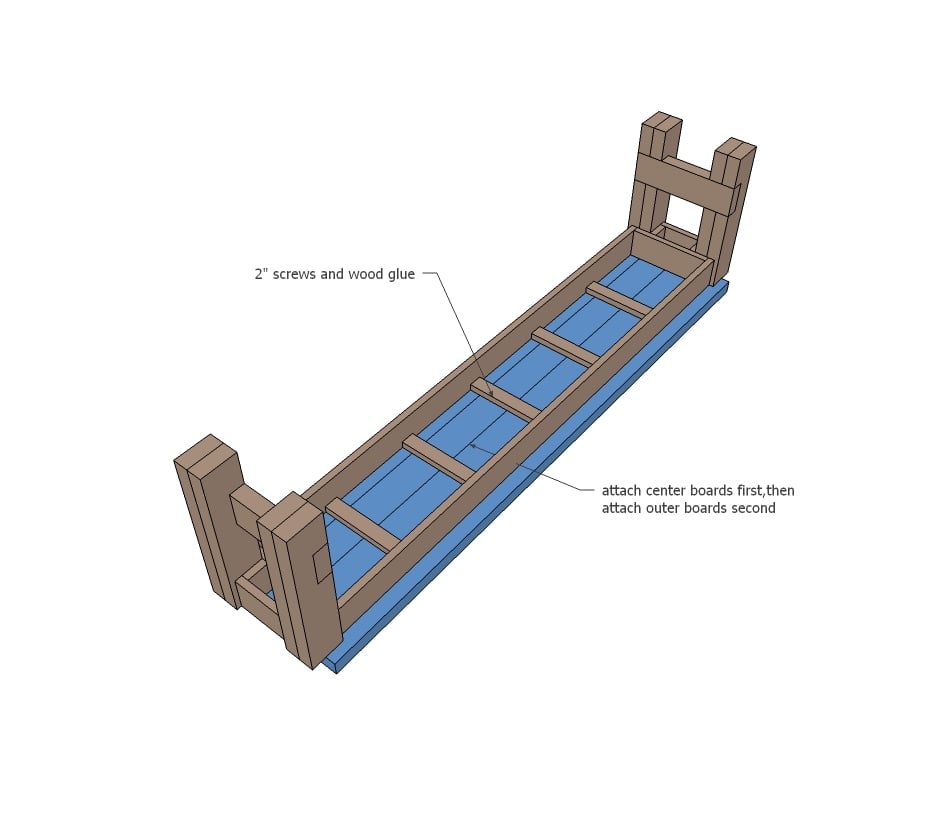
Seat Boards Find the center of the supports and begin attaching seat boards from the underside. Work with the boards to minimize gaps as you go. Attach all seat boards. If you have a pocket hole system, you would build your bench seat separate, and then attach.
Step 7

Breadboard Ends If you have a pocket hole system, you would attach the breadboard ends directly to the seat boards in step 6. Otherwise, attach to leg bases.
Step 8
Finishing If you are staining, be very careful to not let glue dry on the project, as these areas will not take stain. Fill holes with wood filler, sand and paint or stain as desired.


Comments
Whitney_Smith (not verified)
Wed, 01/05/2011 - 02:53
AH... This just got pushed
AH... This just got pushed way up! I must go scrounge around for a few more 2x4's! I can't wait to do this!!!
Kim (not verified)
Wed, 01/05/2011 - 03:28
I have been anxiously
I have been anxiously awaiting for this. I love it! Can't wait to get started on it.....I have some spare time tonight. :) Awesome.
Heather (not verified)
Wed, 01/05/2011 - 04:11
perfect! now i know what is
perfect! now i know what is going to replace these chairs that have taken years of (ab)use and are falling apart! love this, thanks again!
Julie (not verified)
Wed, 01/05/2011 - 06:35
I'm confused how you would
I'm confused how you would build the bench seat seperate and then attach with a pocket hole system. Would you attach the supports to the seat boards ahead of time with pocketholes? Then how do you attach to the frame?
It might be too early in the morning for me to be looking at furniture plans...
Jason (not verified)
Wed, 01/05/2011 - 07:10
I don't think that you can
I don't think that you can use the 'stud' length 2x4s for this project. They are 92 5/8" long and you require 65" for the bench top, 16 1/2" for the legs (4 of each) and 2 pieces @ 12" for the stretchers. That totals 93 1/2" without any allowance for the saw blade or squaring the ends. You will either need to use 96" lengths or add a extra 'stud'.
Also, the link for notching out the legs is gone. The table instructions state to go to the 'how-to' section, but that no longer exists on your new site layout (that I could find).
Love the projects ... the bench is less than $15 to make!
Gary (not verified)
Thu, 11/17/2011 - 16:17
@Jason >Love the projects
@Jason
>Love the projects ... the bench is less than $15 to make!
Hi, interesting comment, is there anyway you can justify that it is less than $15 to make? i.e. links, cost breakdowns, etc.
If it's true that you can buy all of that timber for under $15 then there is something seriously wrong with the hardware and timber trade where I live and I would love to take some evidence of price gouging (i.e. a comparison to your BOM) to the ombudsman.
If any one else has a comment regarding the costing of this project I would appreciate it.
The best I can come up with (just for the wood) is:
Qty dimension dimension cost total
imperial metric plm cost
4 2"x4"x8' 45x90x2400 2.92 $28.03
2 1"x4"x8' 35x90x2400 2.5 $12.00
1 1"x2"x8' 35x45x2400 2.9 $6.97
$47.00
(source: http://buybuildingsupplies.com.au/timber-general-pine-radiata-c-70_2825…)
Great project BTW!
Cheers,
Gary
Darren (not verified)
Wed, 01/05/2011 - 07:19
Both tables look amazing!
Both tables look amazing! Great job Kristen & Jackie....what an inspiration!
Jackie Solomon (not verified)
Wed, 01/05/2011 - 09:03
I look forward to checking
I look forward to checking your blog everyday! To find my bench and table featured seriously made my day! Thanks Ana!!
Jason (not verified)
Thu, 01/06/2011 - 05:40
It also looks like the
It also looks like the Breadboard ends are listed on the cut list as being from the wrong dimensional lumber - they should be from 2x4 stock, not the 1x4.
Jason (not verified)
Thu, 01/06/2011 - 06:51
I don't think there are
I don't think there are enough legs listed on the cut list - it should be 8 pieces @ 16 1/2"
Brandi (not verified)
Mon, 11/21/2011 - 08:26
Bench Legs
Yeah, there aren't enough bench legs. I just got done notching legs for 2 benches and realized I only have enough for 1 bench...
Claudia (not verified)
Thu, 01/06/2011 - 07:45
I was wondering if this bench
I was wondering if this bench can be made with storage space for placemats?
hippynelli84 (not verified)
Fri, 01/07/2011 - 04:37
i really want to start this
i really want to start this project, but i live in a smaller house that will not fit this size table in my home, so im going to have to improvise a little to make it smaller! i will probably do this in a few weeks!
Katie (not verified)
Sat, 01/15/2011 - 17:40
If you google "how to notch
If you google "how to notch boards" you will find her how to video.
Jody (not verified)
Sun, 01/23/2011 - 18:08
That whole room is gorgeous
That whole room is gorgeous from ceiling to floor and everything in between!
Whitney Smith (not verified)
Tue, 01/25/2011 - 04:39
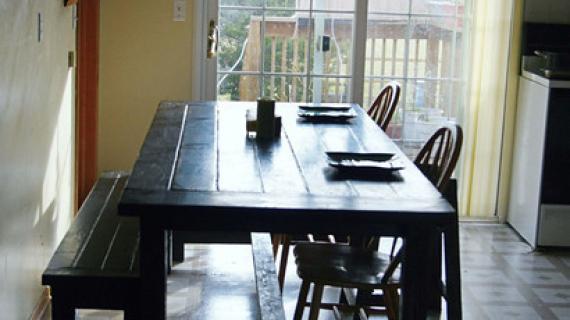
Finished! I sized mine down
Finished! I sized mine down to 4 foot. Thanks Ana!
http://3.bp.blogspot.com/_Zu7wg8wgXEI/TT7eNX8iWGI/AAAAAAAAACo/FR8iUYb-A…Whitney Smith (not verified)
Tue, 01/25/2011 - 04:42
Hum... the photo didn't
Hum... the photo didn't work... lets try again.
http://i160.photobucket.com/albums/t190/bwsmith03/ef578c18.jpgWhitney Smith (not verified)
Tue, 01/25/2011 - 04:44
Oh whatever, you get the
Oh whatever, you get the idea. Click on the link! LOL
Craig (not verified)
Sat, 01/29/2011 - 11:59
Ana and all, What type of
Ana and all,
What type of wood is everyone making these benches and farmhouse tables out of? Any recommendations? I'm not sure I'll have much more than pine at my disposal but I thought I would at least ask.
thanks
Don (not verified)
Wed, 02/02/2011 - 05:19
I just finished the build of
I just finished the build of my bench last night. I still need to sand and finish it. It's awesome. Really nice and sturdy, and it was only an evening project to get it built.
Jason already noted a couple of the corrections, but I thought I'd compile them into a single note here based on my experience last night.
* First of all, you're going to need another 8' 2x4. There are a couple of errors in the cut list requiring additional 2x4 stock.
* The first two cut list items (Legs & Spacers) need doubled. As shown it only gets you two legs since each leg is actually made of two piece glued together.
* The Breadboard Ends should actually be 2x4 not 1x4 so that they match up with the Bench Seat Board thickness.
* The notch video is here - http://ana-white.com/2009/11/how-to-notch-out-boards.html
The is a great and easy project and easy to modify to fit your particular space. Have fun. Hope these tips help.
http://a5.sphotos.ak.fbcdn.net/hphotos-ak-snc6/hs068.snc6/167894_491619…In reply to I just finished the build of by Don (not verified)
kyo
Tue, 03/22/2011 - 14:14
Thank you so much, Don! We
Thank you so much, Don! We were scratching our heads wondering when it came to the table legs. Good job on the bench, btw.
FurryMoses
Sat, 01/31/2015 - 14:41
Thanks for the corrections,
Thanks for the corrections, though I think they ought to state the final numbers... ie not just "double this/that". Because we now don't know whether the cutting list has been updated/corrected and your corrections are now wrong
ChristyIreland (not verified)
Fri, 02/11/2011 - 10:26
Whitney, I'm so glad you
Whitney, I'm so glad you up-loaded your photo. I really like the way you finished it. I think I want mine the same. Thanks for the picture.
Stevi (not verified)
Wed, 02/16/2011 - 08:00
What stain did you use? I
What stain did you use? I keep getting drawn back to the color! Looks great!
britcollins (not verified)
Wed, 02/23/2011 - 09:26
Is there any way to find out
Is there any way to find out what stain Kristen used on her bench and table? I love the color!
Jaimi (not verified)
Tue, 03/01/2011 - 06:56
On Kristen's blog she said
On Kristen's blog she said she used a "gel stain by Varathane called Early American and two coats of wipe on high gloss polyurethane on the rest of the table and bench (not the top). "
jenny dunne (not verified)
Wed, 03/02/2011 - 13:05
Can you tell me where you got
Can you tell me where you got the black and white chairs? They're beautiful!
Kristen (not verified)
Sun, 03/06/2011 - 14:35
I used minwax gel stain in
I used minwax gel stain in Hickory. The chairs were clearance from Pier1 last summer.
britcollins (not verified)
Mon, 03/07/2011 - 09:57
Thanks for the help!
Thanks for the help!
britcollins (not verified)
Mon, 03/07/2011 - 09:58
Thanks! Your table and chairs
Thanks! Your table and chairs look great!
Jaimi (not verified)
Wed, 03/09/2011 - 08:34
My husband finished building
My husband finished building this bench the other night fairly quickly. This was our first project of this sort and it took him about 2 hours and we followed the changes to the plans that Don listed above.
Another change that we made was that we built the top of the bench out of all 1x4's and the frame and supports out of all 2x4's therefore eliminating the need for the 1x2's.
This change made the frame more sturdy, but required a couple more 1x4's to cover the top. We also made our bench about 4 feet instead of the full size like Ana's.
https://lh3.googleusercontent.com/-PCAG6ujD9-g/TXe_rPV3Y7I/AAAAAAAAArU/…Guest (not verified)
Tue, 04/05/2011 - 19:00
photo
Super cute :) I've got all the materials to do 2 for my table, now to get to work on them :)
shay (not verified)
Thu, 03/10/2011 - 16:21
What about those gorgeous
What about those gorgeous lights?
Kristen umansky (not verified)
Wed, 12/26/2012 - 13:04
Over a year later...
Sorry I was just looking for plans and came to see my bench :)
The lights are from Pottery Barn.
emmarosemc
Mon, 04/18/2011 - 13:57
I started!
Ive had the lumber for a while, just cut all of it - first time using a miter saw - still got all my fingers lol.
cannelle9
Thu, 04/21/2011 - 21:09
Finally a table I can make and be proud of!!
Received a second hand table when we got married almost seven years ago. It *finally* fell apart. Started shopping for a new table but just couldn't spend many hundreds of dollars for fake wood laminate. Hubby bought a cheap table for 175$ second-hand. I hate it, its so ugly lol. I think I'm going to attempt this one, with a bench, then attempt to make 2-4 chairs using this site's plan (parson or the simple chair? not sure yet). Can't wait to have a little time off work and some sunshine :)
Thanks Ana for all your work! Much appreciated!
tashacordel
Thu, 01/05/2012 - 07:43
Would love to add a back?!?!
Hey all...I love the simple Farmhouse bench...but would really like to see plans for one with a slightly slanted back to it. Anyone out there have some suggestions?
Guest (not verified)
Fri, 03/30/2012 - 20:16
farmhouse table - plans?
hello,
i am soo inspired by the bench and would love to build the table and bench together but can't seem to find the plans for this specific table? can you please help ?!
JlWhall (not verified)
Tue, 05/01/2012 - 11:11
farmhouse table
Here is the link to the Farmhouse table. :)
http://ana-white.com/2009/12/plans-farmhouse-table-knock-off-of.html
Tabatha (not verified)
Sat, 04/28/2012 - 05:54
Hi. Does anyone have any
Hi. Does anyone have any ideas to keep food and crumbs from eventually packing down in between the boards on top?
Jenny Klein (not verified)
Sun, 05/13/2012 - 20:30
Can anyone help?
I made the farmbench and LOVE it!! But when I attach the top seat to the base (which is sturdy alone) One leg comes up and the bench rocks back and forth...any ideas of how to fix it???
In reply to Can anyone help? by Jenny Klein (not verified)
4U2C
Wed, 08/22/2012 - 09:28
You may need to add a spacer
You may need to add a spacer between one set of legs (on one of the (2)2x4's that are 16.5" long. I've used paint stirrers to gap boards, when in a pinch.
Matt
John, mcleight21 (not verified)
Fri, 06/22/2012 - 22:32
FarmHouse Bench
I don't get it, If the Bench Seat Boards are 2"X4" and the Breadboard ends are 1"X4" then after you got it all together won't the 2'X4"s (Bench Seat Boards) be sitting higher than the 1"X4" (Bread Board ends)? Can Someone please explain this for me?
In reply to FarmHouse Bench by John, mcleight21 (not verified)
Lady Goats
Sat, 06/23/2012 - 12:29
You are correct
I think that must've been a typo. From the looks of it, the breadboard ends in the sketchup and in the photo are 2x4s.
John, mcleight21 (not verified)
Sat, 06/23/2012 - 22:18
FarmHouse Bench
I thought so, Thanks Lady Goats.
Chad (not verified)
Wed, 08/29/2012 - 17:53
The bread boards are wrong.
The bread boards are wrong. You have to use 2 x 4's not 1 x 4's. The cut list is also wrong. For the legs you need to double that. I also bought 6 2 x 4's.
Becky Cornwall (not verified)
Tue, 09/11/2012 - 10:42
Farmhouse Bench
I made a Farmhouse table but counterheight, do you think I could make this bench counterheight as well?
Thank You
BeckyC (not verified)
Tue, 09/11/2012 - 10:44
Farmhouse Bench
I made a Farmhouse table but counterheight, do you think I could make this bench counterheight as well?
Thank You
ShaunB (not verified)
Sat, 10/13/2012 - 22:58
Thank you Ana!!
I just finished building this bench, but I made a few modifications to the plans. For the breadboard ends I used 2x8s instead of the 2x4s. I also left off the spacers and end aprons between the legs and added another 2x4 stretcher on the top of the legs to give the breadboard ends more support. I had to adjust the length of the seat boards in order to keep the length the same. I used 2x4s for the end aprons on the bench frame, and 2x2s for the seat supports. I used a table saw to notch out the legs for the stretchers and they turned out great after using a chisel smooth the grooves. I also used a round-over bit and routed the entire outside edge and around the feet to avoid splintering. A few passes with 80 and 220 grit, and a couple coats of stain and polyurethane and it looks great. Thank you Ana for such a great plan. I really like your work and look forward to using more of your plans in the future.
Guest13 (not verified)
Sat, 10/27/2012 - 05:29
8' bench to match
I was wondering if anyone had any ideas on how to make this into an 8' bench. Would this need more center support if made that long? Any suggestions would be really appreciated.