
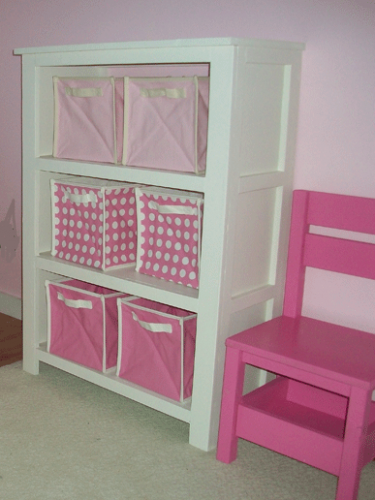

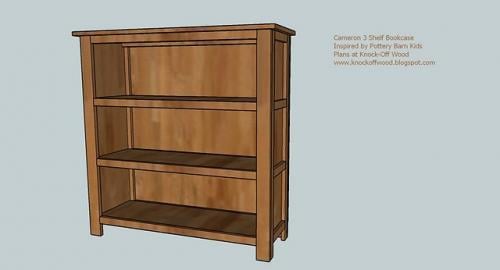
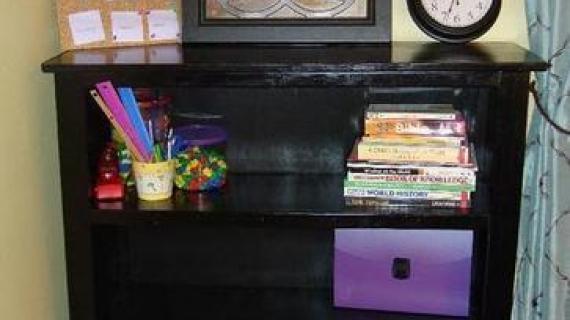
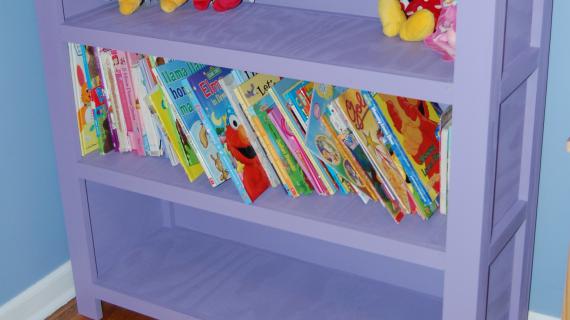
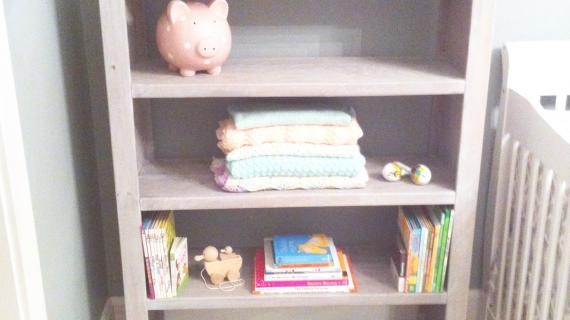
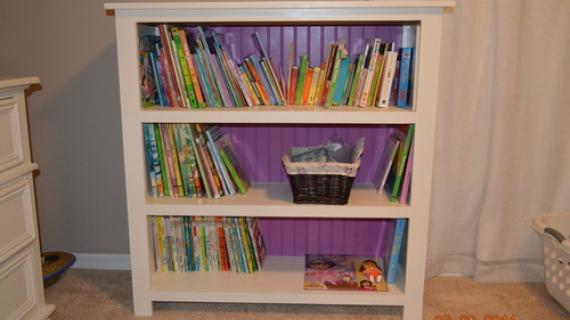
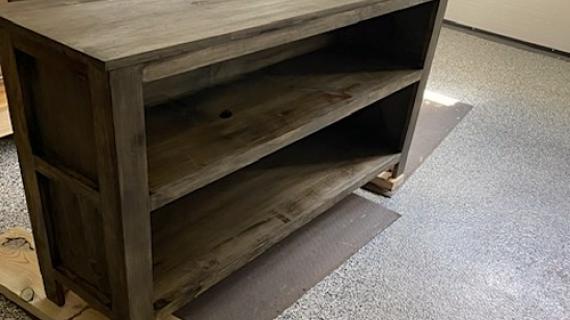
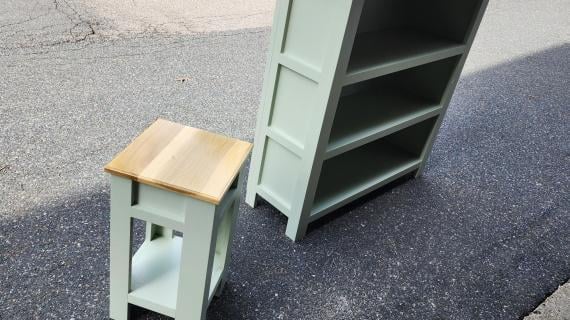
I love this bookshelf because of it’s simple sturdy design, the exposed legs (exposed legs make a room look bigger), and the perfect sizing. It's plenty big and fits lots of books, bins, blankets and more. Build out of plywood or 1x12s. Free plans from Ana White.
Preparation
- 3 - 1x12 @ 8 feet long OR 1 sheet of 3/4" plywood ripped into four strips, each 11-1/4" wide x 8 feet long
- 6 – 8′ length 1x2s (I use the $1 pine furing strips, but you could use maple, poplar, MDF, oak and others)
- 2 – 8′ length 1x3s (matching the 1x2s above)
- 1 – 1/4″ Sheet plywood, mdf, or other backer material
- 2″ Nails
- 1 1/4″ Nails
- 12′ Iron On Edge Banding (About $6 for 25 foot roll, very effective and easy to use)
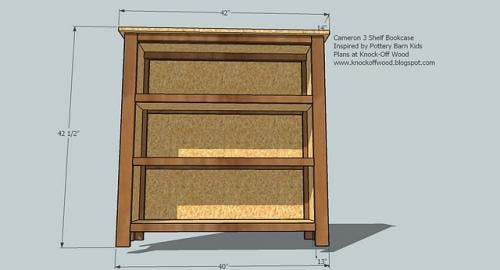
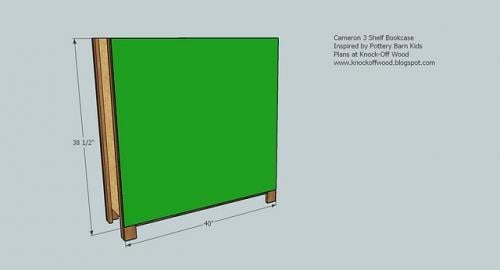
- A) 2 – 1×12 @ 38 1/4″ OR 3/4″ MDF or Plywood @ 11 1/4″ x 38 1/4″ (Sides)
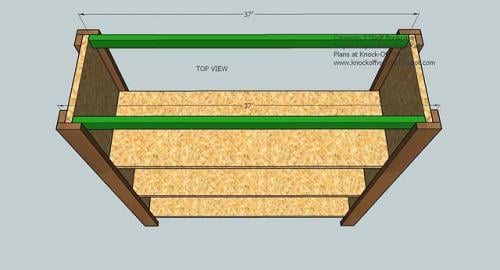
- B) 3 – 1×12 @ 37″ OR 3/4″ MDF or Plywood @ 11 1/4″ x 37″ (Shelves)
- C) 4 – 1×2 @ 41 3/4″ (Sides of the Legs)
- D) 4 – 1×3 @ 41 3/4″ (Fronts and Backs of the Legs)
- E) 2 – 1×2 @ 37″ (Inside Top Trim)
- F) 8 – 1×2 @ 35″ (Outside Top Trim and Shelf Trim)
- G) 1 – 1/4″ Plywood @ 38 1/2″ x 40″ (you can use beadboard, 1/2 plywood, paneling, etc)
- H) 8 – 1×2 @ 8 1/4″ (Side Shelf Trim) - measure and cut for best fit
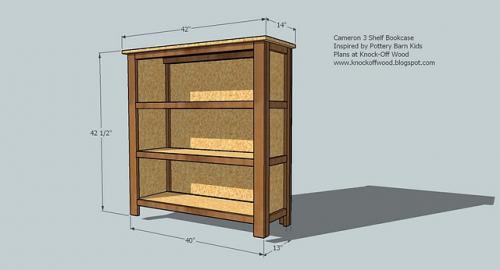
- I) 1 – 1×12 @ 42″ and 1×3 @ 42″ OR 3/4″ MDF or Plywood @ 14″ x 42″ (Top)


Instructions
Step 1
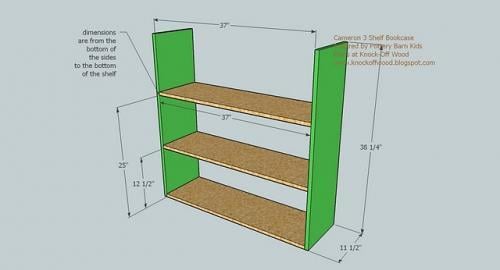
Build the Box. Start by nailing through the sides, A (green) into the shelves, B (wood), as shown above. Use the measurements in the above diagram to guide you.
You can also use screws or 3/4" pocket holes and 1-1/4" pocket hole screws.
Step 2
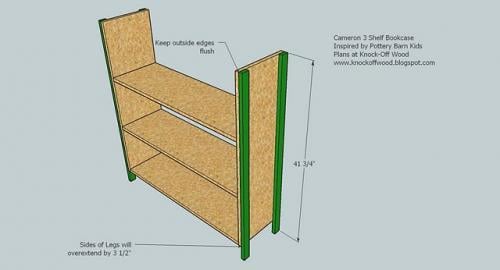
Side Legs. Use the 1 1/4″ nails to nail the sides of the legs, C (Green), to the sides, A, of the bookcase, as shown above. Keep outside edges flush. The legs, C, will over-extend the sides,A, by 3 1/2″.
Step 3

Front and Back Legs. In the same manner as the side legs, but with 2″ nails, fasten the front and back legs, D (green), to the side legs, C, shelves, B, and sides A.
Step 4
Attach the top trim with 1-1/4" brad nails and glue.
Step 5
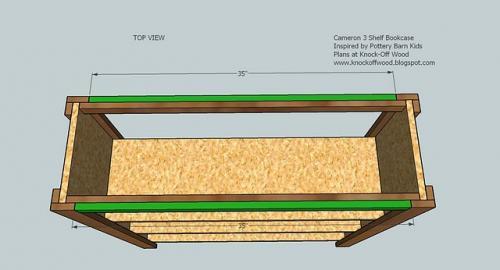
Top Outer Trim. Using 2 of the boards F (shown in green above), fasten as shown above. Use glue and 1 1/4″ nails. Keep the top edges flush.
Step 6
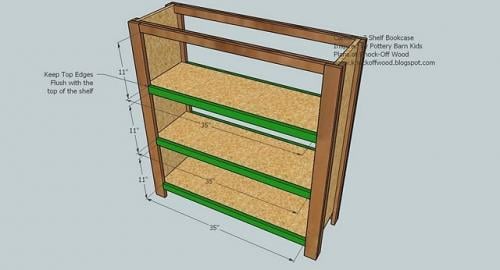
Trimming out the Shelves. Using the remaining 6 boards F, (shown in green above), trim out the edges of all the shelves. Keep all top edges flush with the shelves. Use the 2″ nails and glue.
Step 7
Covering the back. Attach the back plywood, G, as shown above in green. Use the 1 1/4″ nails and glue. Make sure you mark and nail into all the shelves.
Step 8

Side Trim Pieces. Using te 1 1/4″ nails, nail the side trim pieces in place as shown above. The measurements shown are from the top to the top of the trim.
Step 9
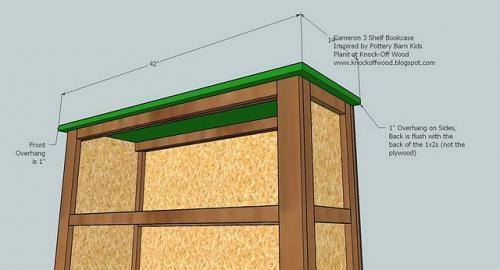
Attach the top as shown above. If you are using plywood or MDF, simply position the plywood so it overextends 1″ on the front and side edges and glue and nail in place. You will also need to add edge banding to finish out the plywood edges if you are using plywood.
Step 10
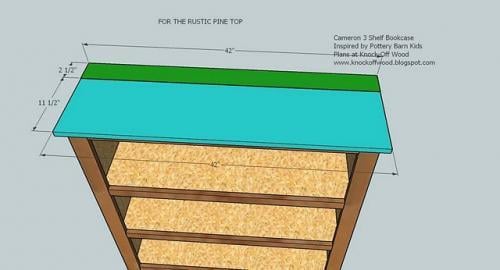
Attaching the planked pine top. If you are using the pine boards, first attach the 1×3 as shown above in green. Keep back edge flush with the back of the 1×2 (not the plywood). Overhang each side 1″. Nail in place. Then add the 1×12 to the front in the same manner.
Step 11
Finishing. Fill nail holes with putty. Sand. Attach the edge banding to the plywood if you used 3/4″ plywood for the top. Stain or paint if desired.


Comments
brett and stacey (not verified)
Sat, 01/09/2010 - 08:27
i haven't made this yet, but
i haven't made this yet, but i am SO EXCITED! thanks for the plans.
west's (not verified)
Mon, 01/11/2010 - 11:34
LOVE it!! & just what I need
LOVE it!! & just what I need for my playroom. Is the shopping list what you need for ONE shelf?
Maggie (not verified)
Wed, 01/13/2010 - 11:43
I'm thinking about making
I'm thinking about making this over the weekend and wondering if there is a way to modify it so it includes a set of doors on the bottom...
hmmmm
Brown Sugar Babies (not verified)
Thu, 01/21/2010 - 10:32
Thank you for posting this!!!
Thank you for posting this!!! I have tons of books and I think I can do this myself - no help from hubby.
Cookie (not verified)
Mon, 02/08/2010 - 11:08
I have not yet built this
I have not yet built this bookshelf, but would love to know if you think I can make it so that there is not a back. That way I can use it as a dividing piece in a very long room?
Cookie
Ana White (not verified)
Tue, 02/09/2010 - 07:38
Cookie, on this piece you can
Cookie, on this piece you can skip the back because both the back and front are framed, reinforcing all the joints, and making both the front and back look finished.
Good Luck! Ana
MeckMom (not verified)
Thu, 02/11/2010 - 11:07
What a fantastic site!! I
What a fantastic site!! I can't believe how much time and effort you put into your brilliant posts. Your creations are gorgeous. I can't wait to share this with my readers. Thanks for all you do!
Anonymous (not verified)
Tue, 02/16/2010 - 04:40
Hi Ana,I am printing out
Hi Ana,
I am printing out everything for the bookcase but I am wondering...is the diagram for the plywood/mdf cuts correct? Or is it missing a 37" shelf? Just want to make sure I give Home depot all the right cuts because I dont own a saw!
Ana White (not verified)
Tue, 02/16/2010 - 10:40
It looks correct to me, 3
It looks correct to me, 3 shelves, and then I is the top. I haven't had any comments from other readers about any typos.
Anonymous (not verified)
Wed, 03/03/2010 - 12:50
Great plans! and wonderful
Great plans! and wonderful instructions! However I think the above commenter was right... the diagram for cutting the sheet goods doesn't look quite right. There are the 2 sides (lime green), the top (purple) but there are only 2 shelves (teal green). Am I also seeing this wrong?
Anonymous (not verified)
Sun, 03/07/2010 - 05:50
I'm having trouble printing
I'm having trouble printing the plans. Any recommendations?
Tanner (not verified)
Sat, 03/20/2010 - 19:08
Hey Ana!Thank you so much for
Hey Ana!
Thank you so much for this tutorial! My hubby and I made it this weekend and we are in love with it! It is going to go into our 5 month olds room. We decided to stain with Minwax "English Chestnut" and it looks awesome!! We will for sure be making more of your projects!
twilightmom (not verified)
Fri, 06/18/2010 - 20:20
I was wondering about how
I was wondering about how much it cost to make this bookcase.
Sarah (not verified)
Tue, 06/29/2010 - 08:31
We just made this - with all
We just made this - with all our supplies - including varnish and paint and brushes etc... it was around 130-140 dollars. We did use the more expensive wood option instead of MDF, so I am sure you could save there. We bought our supplies at Home Depot in Maryland. Will send pics soon!
Sarah (not verified)
Tue, 06/29/2010 - 08:32
PS it is indeed missing a
PS it is indeed missing a piece, we just had an additional piece cut when we had the others done...
Cameron (not verified)
Thu, 07/15/2010 - 11:19
Just made a two shelf version
Just made a two shelf version of this:
http://bit.ly/aQERiz
Thanks!!!
Guest (not verified)
Mon, 05/16/2011 - 16:11
front and side leg measurements
Hi there! I am hoping to build this cubby bookshelf, only to make mine a full height, 5 shelf one. However, instead of making the front and side legs 3" wide, can they be just 2" to just cover the side boards of the box and the side legs? I'd rather have all the widths of the shelf the same. Also, are the shelves sturdy enough to be completely filled with books without using extra supports from say L-brackets? And lastly, do you have other "foot" options for shelves or cases, like ones that taper in at the bottom?
Kate (not verified)
Sat, 07/23/2011 - 07:51
Making this higher?
I'd LOVE to turn this plan into a variation on Ikea's Hemnes glass-door cabinet with drawers, except that I'd put doors on the bottom instead of drawers. Basically, I want to take this bookshelf design, add a some additional height, and then add doors (solid on bottom, glass on top). Does anyone know if this plan is strong enough to support the additional weight of the height and doors? This would be perfect in my dining area, and would fit in my budget much better than the Ikea one (and the wider width would be better as well)!
mcmillen0326
Sat, 07/23/2011 - 17:50
RE: Making this Higher
Hi! I just built this bookshelf today and I added about 8 inches to height of mine. It it still built strong as can be and could probably go even a little taller.
Guest (not verified)
Sat, 08/06/2011 - 09:28
totes
Hey Ana!
Wondered where you purchase the cloth bins that you have in all your photos. I'm looking to purchase some prior to building to verifiy they fit.
Thanks,
Heidi : )
Carin (not verified)
Sat, 08/06/2011 - 12:28
addings doors?
Hi Ana, I tried to post a week or so ago, but I don't see the post here. I'm hoping you might have some advice on how to add doors to this. I've seen some of your other directions for doors, but wondered if you had a moment to speak specifically to this. Thanks!
Shannon :) (not verified)
Tue, 12/27/2011 - 16:15
I love this bookcase! But it
I love this bookcase! But it isn't big enough for all my kids books. I have been looking for the 4 shelf version but can't find it. Have I missed it?
tanner517
Mon, 07/22/2013 - 09:49
Looking for the 4 shelf version of this plan
I have been searching and digging through your plans and links to try to find the 4 shelf version of this plan. I LOVE this plan and would be so happy to find the version that has one extra shelf!
Sandra52
Fri, 07/26/2013 - 07:20
Nails in this project
Are the nails used in this project finish nails? Most of your plans that I have looked at refer to them as finish nails and this one doesn't. I just wanted to make sure, I'm a newbie and I love your plans!
Thanks
Jenna Johnson
Mon, 11/18/2013 - 07:56
4 Shelf Plans
Have you posted the 4-shelf plans?
nicholaix
Thu, 01/09/2014 - 08:41
adding doors
It would depend how fancy you wanted to do your doors but for a simple one you could cut 3/4" hardwood plywood to fit and edge-band it, then attach with simple hinges. ( I personally would just rout the edges and paint for a playroom piece.) You can buy a small magnetic set that you can attach to the doors to keep them from opening on you in the fastener section of your local hardware store.The piece already has a face frame to attach it too.
Hope that helps!