

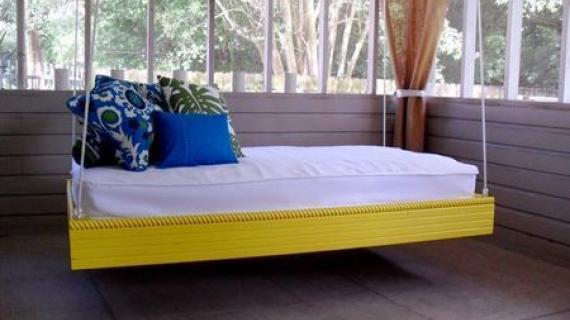
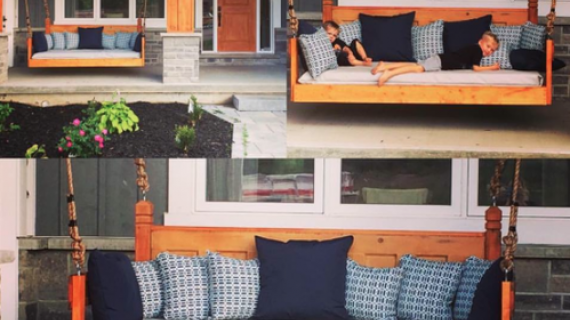
Simple hanging beds designed for outdoor . . . or indoor use. Sturdy and strong, made from 2x4s. Photos from Marion at The Bumper Crop.
 When the sun is shining and the birds are chirping, you'll probably find me digging or nailing or painting, and my family often jokes that they are going to duck tape me to the camp chair to get me to go camping. But after designing this bed, I'm thinking relaxing in the sun sounds, well, quite relaxing!

I love working with a twin sized mattress because they are easy to come by. And you don't even need a special mattress, any mix matched sale mattress will do! I would recommend using a waterproof mattress cover and then a twin sheet or daybed cover (or you can sew your own) as your bedding if your bed is not covered.
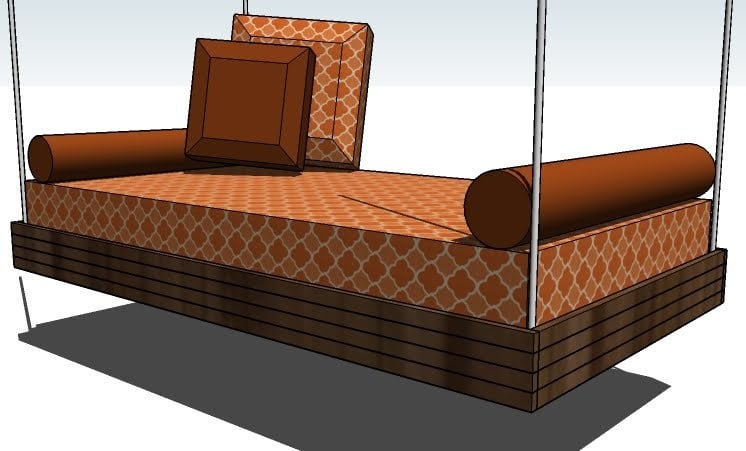
I loved the style of the sold out Pottery Barn Chesapeake Hanging Lounger, looking a little more refined than a simple 2x4 structure (which of course you could just build a hanging 2x4 structure). I also used a slatted design under the mattress so that if the bed did get wet, you don't have water pooling under the mattress and rotting plywood. That is the one problem I did have with this design from Lowes, the plywood bottom doesn't let the mattress breathe. But I highly recommend you reading this article from Lowes because there are lots of tips on hanging the daybed and it's always good to read more than one source!

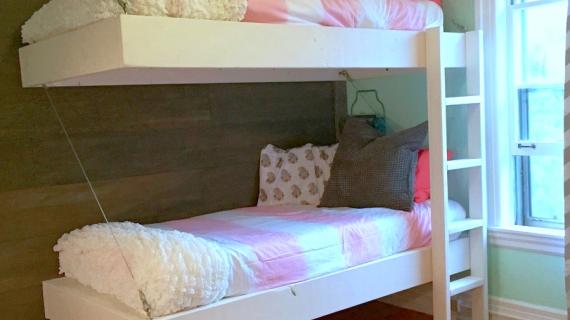
I could nap on this, gently swaying in the breeze! I also love this as a simple platform bed. You could even add some legs to make a beautiful bed frame.
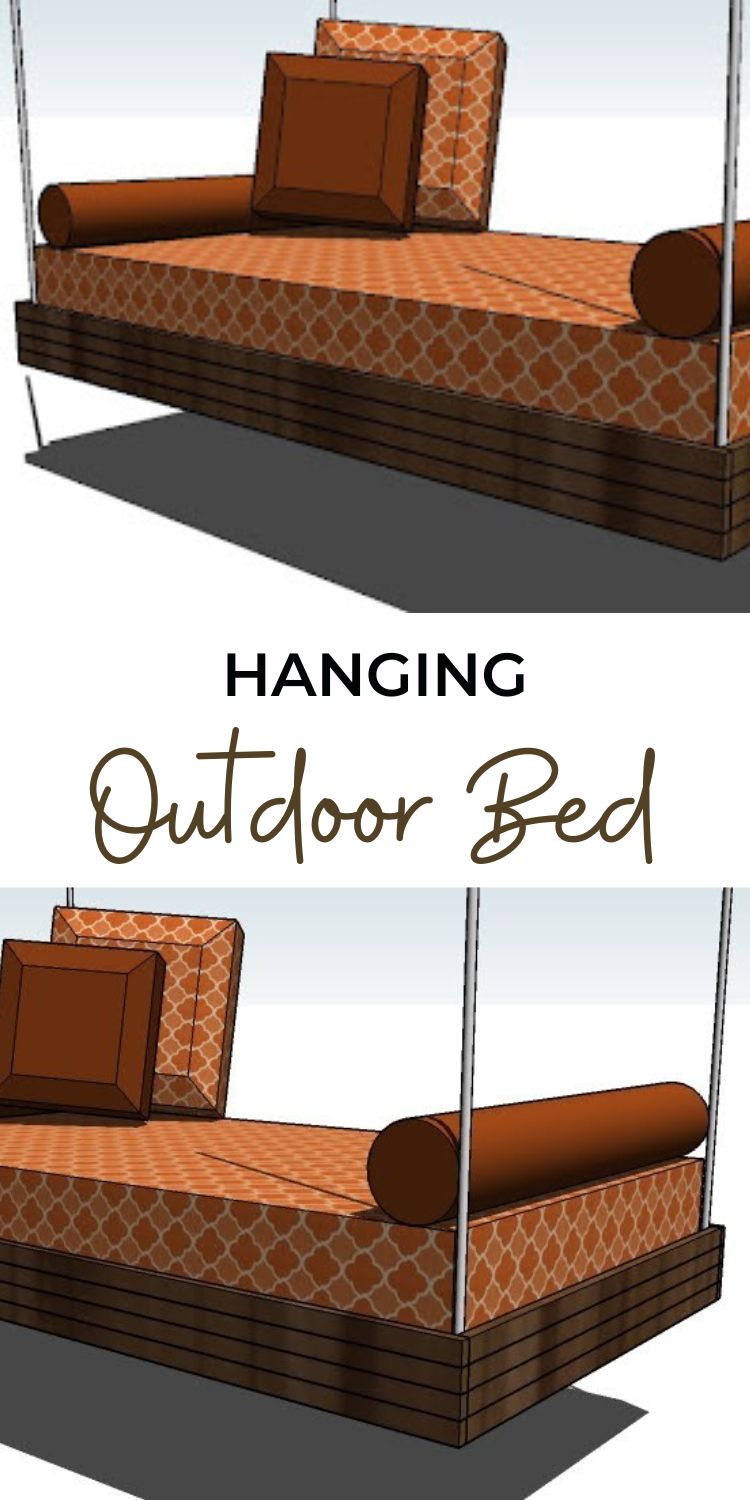
Pin For Later!
Preparation
8 Eyebolts (4 for the bed and 4 for the ceiling) Approximately 24′ of chain (for a standard 8′ ceiling) 3 – 2×6 boards (8′ or stud length) 2 - 2×4 boards (8′ or stud length) 12 – 1×2 Furring Strips, 8′ Length 6 – 1×3 Furring Strips, 8′ Length 2 1/2″ Screws* 1 1/4″ Nails* Wood Glue Finishing Supplies Twin Mattress *Choose exterior fasteners for exterior applications
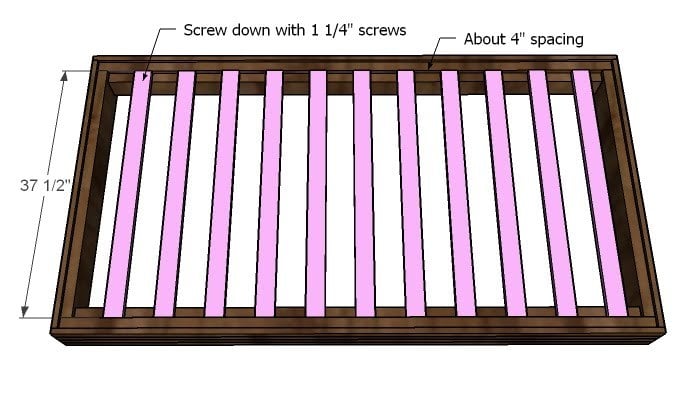
2 – 2×6 @ 76 1/2″ (Support Frame Sides) 2 – 2×6 @ 37 1/2″ (Support Frame Ends) 2 – 2×4 @ 73 1/2″ (Cleat Supports) 12 – 1×3@ 37 1/2″ (Slats) 8 – 1×2 @ 40 1/2″ (End Trim) 8 – 1×2 @ 78″ (Side Trim)


On this one, the easy part is going to be building it, and the tough part is going to be hanging it! But you would have to hang it even if you bought it for $1200. Make sure you work on a clean level surface and be safe. Predrill and countersink your screw holes. Check for square after each step. And use glue on any joints that you know are going to be permanent. Have fun!
Instructions
Step 1
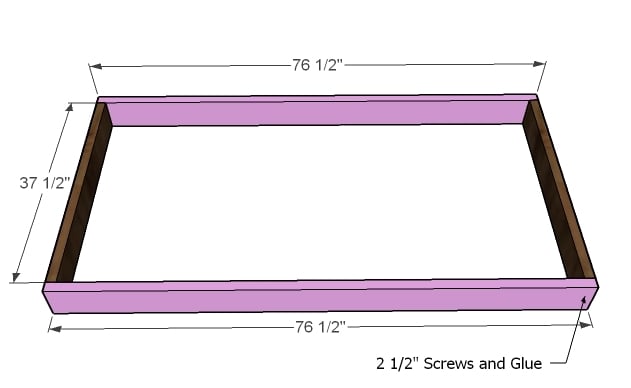
SUPPORT FRAME
Use 2 1/2″ screws and glue to build your support frame. I would use 3 screws per corner. Check for square.
Step 2
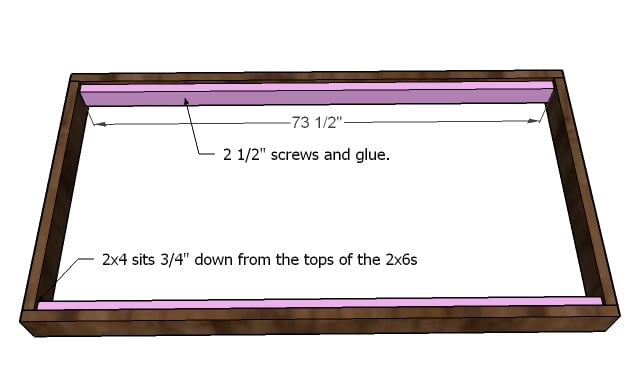
CLEATS FOR SLATS
Attach your cleats 3/4″ from the top edge of the 2x6s with the 2 1/2″ screws and glue. By doubling up the 2×6 and the 2×4, we’ve created a super strong support system for the slats. Also use 2 1/2″ screws from the outside of the frame support ends into the end edges of the cleats.
Step 3
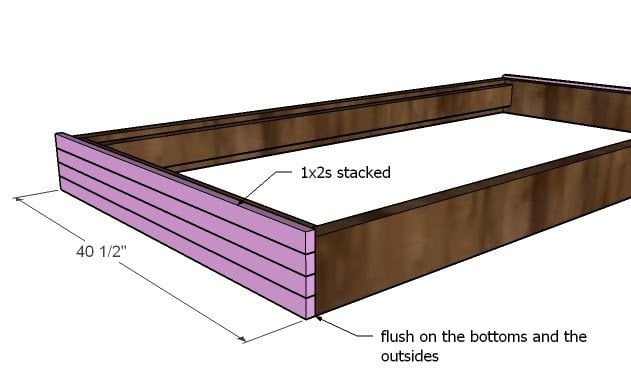
END TRIM
The frame is plenty strong enough without this step, but for just a couple of dollars, you can dress up the outsides of your lounger bed. You can use nails and glue to fasten in place as nails are easier to hide. You can also use a more expensive wood here (and keep the stud grade frame) to make the lounger bed even more refined looking. Bottom and end edges are flush, top will create a lip for you bed to keep it from sliding off the platform.
Step 4
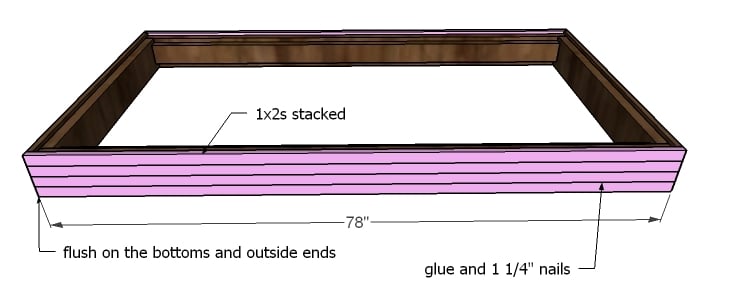
SIDE TRIM
Add your side trim just like you did your end trim.
Step 5
Step 6
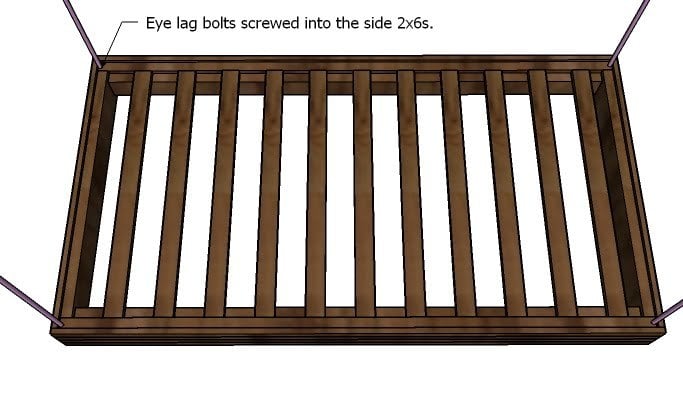
HANGING
Predrill and install the eye bolts in the corners as shown above. It is very important that the eye bolts are attached to the longer 2×6, as the weight of the bed will be transferred from the slats to to the cleats to the side 2x6s and then to the eye bolts.
Step 7

I like this eye bolt from Lowes.
Rest the bed on sawhorses or a table under where you want to hang it. You will also need to purchase eye bolts and attach the eye bolts to rafters in the ceiling and hang the bed with a chain. from all four corners. The type of bolt you should use will vary depending on your rafters.

Comments
JJ_West (not verified)
Thu, 06/10/2010 - 03:13
oooooo! I love it!!!! This
oooooo! I love it!!!! This might actually be my first build! I have a list of about ten things ... we just have to move first. Thanks!
Heather (not verified)
Thu, 06/10/2010 - 03:13
this is beautiful Ana! For
this is beautiful Ana! For me, it seems the daybed pillows would be always on the ground/floor, because of my 4 small children! I have been wanting a porch swing for so long!
Would it be possible to get a plan for this:
http://www.kaboodle.com/reviews/chesapeake-hanging-swing-4
Isn't that swing a beauty?
Marti (not verified)
Thu, 06/10/2010 - 04:40
I can't wait to show this to
I can't wait to show this to dh. I've talked about a rocking bed for years! Little mosquito netting over this and I could really get some z's.
Tanjia (not verified)
Thu, 06/10/2010 - 05:17
Very nice! I love how
Very nice! I love how versatile this piece can be. Now if only I had a porch!
1 Funky Woman (not verified)
Thu, 06/10/2010 - 06:57
This is seriously too cool!
This is seriously too cool! How great this would be on the deck and lounging reading a book, love it!
Andrette Duncan (not verified)
Thu, 06/10/2010 - 09:26
I am in <3 with this plan! I
I am in <3 with this plan! I will be done with graduate school at the end of the month and I plan to make this my second build from your collection. I can't wait to see this one of the brag board.
DH (not verified)
Fri, 06/11/2010 - 08:31
How fabulous is this?!? I
How fabulous is this?!? I love it.
I've also got a list of about 5 things that I need to build - first of which being either the floating table or the very rustic table (although I'd like it to be a bit more substantial in the legs and top like the Big Sur table at Crate and Barrel - I think I can actually modify the Rustic Table to make it more substantial - I'll send pictures if I figure it out :) ) to be followed by the armoire that I'd love to paint turquoise as well.
If I had a place to hang this from on our deck this would be at the top of my list.
I recommend this site to everyone I know... Thanks Ana so much for posting these plans!!
Dana in Texas
merideth (not verified)
Sat, 06/12/2010 - 04:42
ana, i am in love with this
ana, i am in love with this one! love! hate to sound ungrateful, but . . . do you plan to make a plan for a frame for this? (my porch would tumble down on my ears, lol!)
thank you so much for all you do for us!
Evan (not verified)
Mon, 06/14/2010 - 06:42
Cool idea!I love your blog--
Cool idea!
I love your blog-- I have one more month before my girlfriend and I move into our first home and I can't wait to put this up on our back porch.
I'm planning on coupling this with ideas from backyardtheater.com to make a really neat movie viewing setup.
Thanks again. :)
Katie (not verified)
Tue, 06/15/2010 - 12:30
oh my gosh i have been dying
oh my gosh i have been dying for one of these!!! now i can build one. :)
thank you, thank you, thank you for posting this!
Adam Freakin Rossow (not verified)
Tue, 08/03/2010 - 13:59
everywhere i look a twin
everywhere i look a twin messures 39 wide 75 long...
yours is 37 wide 76 long...
Please help
T (not verified)
Sun, 04/15/2012 - 19:55
This one isn't 37 wide, just
This one isn't 37 wide, just that piece of wood is. When you add on the 4 inches from the 2 x 6 on each side, it's actually 41 inches wide.
Hanging Outdoo… (not verified)
Fri, 11/12/2010 - 13:31
[...] Full reference
[...] Full reference (Copyright acknowledge) This entry was posted in Wood Furniture Plans. Bookmark the permalink. ← platform bed | Build-A-Bed Plans – FREE Loft Bed Plans, Bunk Bed … Review: Secrets to Dog Training (aka SitStayFetch) | Outdoor … → [...]
Debbie Perkins (not verified)
Mon, 12/27/2010 - 07:02
We have a duplex on Dauphin
We have a duplex on Dauphin Island, Alabama that is on pilings. I have been after my husband to build me one since I found two hanging in Seaside, Florida. NOW I have the plans and a sturdy mattress under a bed. Once I get this, forget the swing. I plan on putting a back on this so the pillows won't blow off. Once I have it made, I will post the results. Women rule.... Thanks. These plans were in more detail that any that I have seen. debi
Ruby Lane Farm (not verified)
Wed, 06/01/2011 - 10:03
Mattress
Ana, this is absolutely wonderful! Have you got it built? We'd love to see "now" pics!!
Question: What type of mattress could be used? Here in Texas it's awful humid, and I can't help but think an outdoor mattress would mold....
Thanks!
Anna Rebecca
T (not verified)
Sun, 04/15/2012 - 20:00
I was planning on using a
I was planning on using a twin air mattress actually, and making a cover for it with outdoor fabric. I figured it would be easy to remove and bring inside during the winter!
ValerieW (not verified)
Wed, 07/13/2011 - 08:30
Wow, Antrho has a similar one for $3000!
Look at this for comparison. We should all make these and get rich!
http://www.anthropologie.com/anthro/catalog/productdetail.jsp?id=211673…
TH (not verified)
Mon, 04/16/2012 - 11:31
I love this plan! Does anyone
I love this plan! Does anyone have any suggestions for how/where to add an arm or two and a back to this to lean against? I can't seem to find any plans for hanging daybeds with a back, just pictures of some others built, but I just know I would fall of of this one :)
Jerry Warnock (not verified)
Sun, 04/29/2012 - 13:26
Hanging Day Bed
My wife Loved so much she was on my back until built her one. However the day bed calls for a Twin size matress which was to small for her and me and two grand Kids.
So I chaned the Dimentions to fit a Queen size bed. SHE loves it and No longer Sleeps inside except on special occansions. She says it;s the best gift I ever gave her.
Photo to come soon.
Philip (not verified)
Wed, 10/17/2012 - 10:35
Queen Dimensions
Jerry,
My wife really wants one of these beds as well, but she wants a queen size. Do you still have the dimension changes that you made? Could you post them, please?
Also, if you have any pictures that would be great.
Thanks!
danthemanwa
Thu, 02/22/2018 - 19:05
Good design...
I utilized this basic design and used an air mattress. I suspended it completely outside along a stream. The air mattress is of the camping type and can easily be removed plus it is essentially weather proof. I thoroughly enjoy it and can easily view the local birds and wildlife. Thanks