
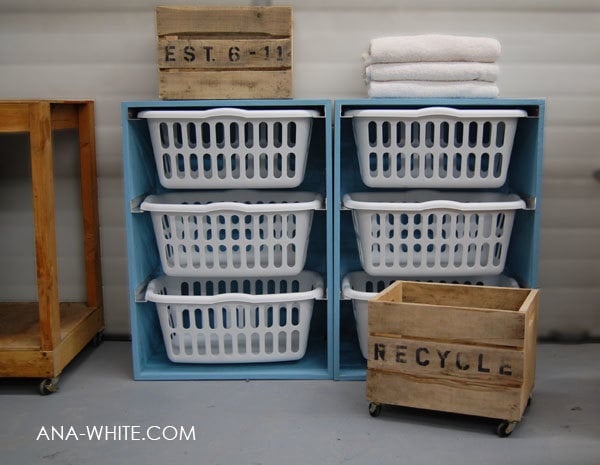

The Laundry Basket Dresser has taken my laundry room from the messiest room in my home to the tidiest. It's so easy to pull laundry out and put it directly into baskets. I then can take each basket to it's respective room and fold and put laundry away. For any busy home, these are a must.
This really wasn't my idea. I have some smart sisters. They looked at the piles of laundry in my tiny laundry room, and said, Ana, what if . . . 
All your laundry baskets could be like drawers in a dresser . . .

And we didn't have to see your dirty - and clean - laundry every time we visit.
In my defense, most of the piles of laundry in my home are clean. They just rarely make it to the dresser.
But this is one dresser that I can work with.
I can deal with stacks of laundry with this system! Do you have a laundry problem?

PS - If you are interested in a slightly different size/configuration, check out these plans as well!
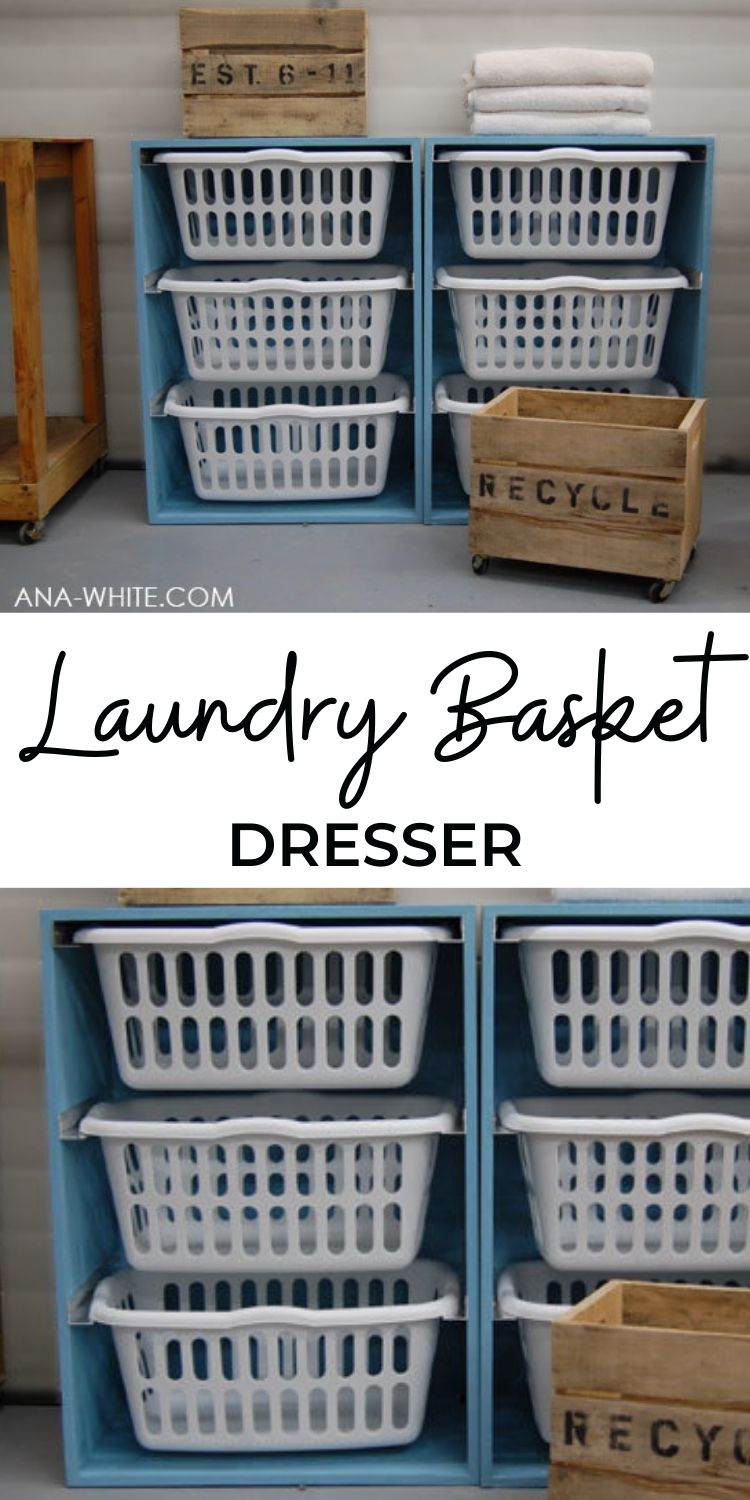
Pin For Later!
Preparation
3/4″ Plywood cut into 15 1/2″ wide x 8 feet long strips (referred to as 1x16s)
1/4″ Plywood for the backs
1 1/2″ x 1 1/2″ metal angle (ask for it at Blue or Orange)
2″ wood screws or 1 1/4″ pocket hole screws 3/4″ wood screws (to screw the metal angle to the insides of the boxes)
1 1/4″ wood screws
wood glue
wood filler finishing supplies
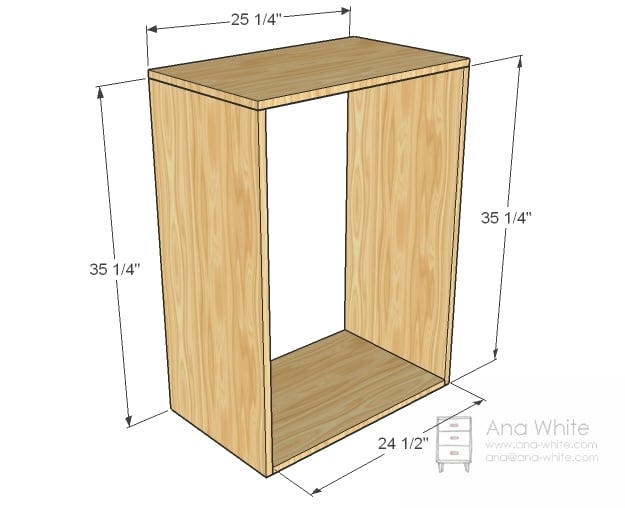
2 – 1×16 @ 35 1/4″ (Sides)
1 – 1×16 @ 24 1/2″ (Bottom)
1 – 1×16 @ 26″ (Top)
1 – 1/4″ Plywood @ 36″ x 25 3/4″ (Back)
6 – 1 1/2″ x 1 1/2″ Metal Angle 15 1/2″ long (ask hardware store to cut or cut with a hack saw)


Instructions
Step 1

Build the Box
I used pocket holes, but you can also use 2″ wood screws countersunk and screwed together to build the box.
NOTE: Top Measurement should be 26″
Step 2
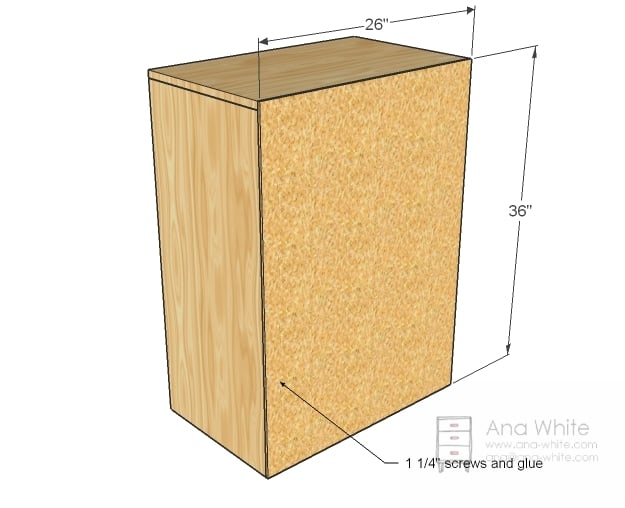
Back
Adjust for square then screw the back on with 1 1/4″ screws and glue. I finished mine at this stage by filling all holes with wood filler, all plywood edges, and any imperfections in the plywood. I then sanded with coarse sandpaper because the plywood was builder grade cheapo stuff, the finished with medium sandpaper. Finally, I primed and painted with ooops paint in semigloss from Valspar.
Step 3
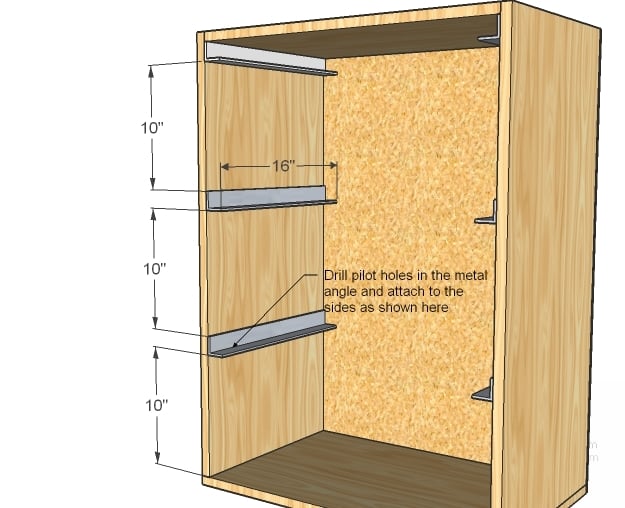
Metal Angle
If you are intimidated by metal angle, you can always use 2x2s glued and screwed here. Cut the metal angle with a hack saw and predrill holes (three per slide). Mark locations with a square and screw metal angle to the sides. TIP: Screw at a very slight downward angle to keep the baskets to the back of the box instead of sliding forward.
If you choose to stack, make sure you secure the top laundry basket dress to a stud in the wall.

Comments
Kimberley (not verified)
Mon, 12/26/2011 - 06:38
Such a great idea, I have to
Such a great idea, I have to show this to my mom!
48park
Mon, 01/09/2012 - 18:23
Side Splitting
I've tried screwing the sides together with 2" wood screws as suggested, but the screws split the plywood or cause the ply to spread. What am I doing wrong?
Rick (not verified)
Fri, 01/13/2012 - 11:17
Aluminum Angle
I was looking for aluminum angle for a project recently and I found that at the big box stores it is crazy expensive. I couldn't find an "aluminum" distributor locally but I did find an iron supply business. It just so happens that the "iron" supplier deals in all sorts of metals. I got 3 pieces 1.5" x 1.5" x 72", 1/8 thick aluminum angle for $10 each. I couldn't even find pieces that long at the big box stores and their longest pieces were around $30 each!
claydowling
Fri, 01/13/2012 - 13:59
Alro Steel
Alro Steel distributes quite a few different extruded products, including aluminum and acrylic, and they sell to the public. I never would have thought of them, but they have a warehouse in Ann Arbor near my favorite hardwood dealer.
Guest (not verified)
Tue, 01/17/2012 - 20:08
I was wondering if the cut
I was wondering if the cut list is enough materials for one or two laundry dressers? I am going to head out tomorrow hopefully and buy the materials and have the wood cut for me..I don't have the tools... and need to know if I should double it or not.
Thanks for this idea, it is great
In reply to I was wondering if the cut by Guest (not verified)
claydowling
Wed, 01/18/2012 - 06:18
Cut it yourself
Don't let the lumber dealer do your cuts for you. They can't make cuts suitable for cabinets. All you'll be doing is making scrap wood.
You can buy an inexpensive circular saw at most home centers (I even found one last night at Meijer, a regional chain that looks like what a Super Walmart wants to be when it grows up). It will cost more than just the plywood, but it won't cost more than two sheets of plywood, which is what you'll be buying if you have the store cut it.
You'll also need to do a bit of research on a plywood cutting jig and build one of those. You should be able to find plans and videos online. I built something called a track saw, and I love it. Unfortunately it requires some tools you don't have, and I see I don't have pictures anywhere.
If you absolutely will never build anything else, I recommend finding a friend with a circular saw and a cutting jig.
But don't let the hacks at a home center touch your plywood. They may be well intentioned, but that does not mean they will be capable of doing the right thing.
Guest (not verified)
Thu, 01/19/2012 - 03:15
crates
I would like to have the crates too. My husband made the storage bin, but I modified it to fit out needs. I need the crates as shelves to put the detergent on. Do you know where I can get these? I love all of the ideas you have, but I am not sure my husband does. His honey-do list gets longer by the minute.
Christina M (not verified)
Thu, 01/19/2012 - 21:04
Hi there...I built one of
Hi there...I built one of these following your measurements...but I used MDF. It is a little wobbly. Do you have any suggestions as to what I did wrong? Or maybe how I could reinforce it so it does not wiggle?
Thanks so much!
Christina
KathyinFL (not verified)
Tue, 05/08/2012 - 21:03
I know Im a little late but
I know Im a little late but here are a couple of suggestions... get a pack or two of L brackers and put two on each side of upper left and right. Make sure is it square first.Second get a piece of luan cut to fit and nail to the back side of piece. Hope this helps.
Guest (not verified)
Sun, 01/22/2012 - 06:39
MANY THANKS!
What a fantastic idea. Many thanks for the awesome tutorial.!
guest (not verified)
Wed, 02/15/2012 - 10:35
Advice Needed
Hi, new to building. Just curious what type of plywood you used for this. Our places here have cheaper stuff and then expensive stuff. Just wondering which way to go.
KathyinFL (not verified)
Tue, 05/08/2012 - 21:06
when faced with this dilemma
when faced with this dilemma go middle of the road or what your wallet can afford.
kimskitchensink (not verified)
Thu, 02/16/2012 - 16:15
Genius!
I have officially added this to my "get on it, Kim" to-do list! We have one of those 3-compartment laundry sorters (in addition to a separate bin for delicates and stinky hockey gear), and transfer one load at a time into a plastic hamper like this to carry downstairs to our basement laundry room. This would pre-sort into removable baskets that I could carry down when full...and look a lot nicer, too!
Guest (not verified)
Wed, 02/22/2012 - 08:12
You should change the
You should change the dimensions to be correct. I built this and the width of the unit is not big enough to have the tracks be 16". The width should be 16 1/2" not 15 1/2".
Becky S. (not verified)
Mon, 02/27/2012 - 13:02
This is awesome! My husband
This is awesome! My husband just helped me make it but we are using it for toy storage in my 4 year old daughter's playroom. She was so excited to pick the color to paint it with. I can't wait to make more of these and try more of your plans. Thank you so much for doing such incredible work with all of your plans!! You are truly amazing.
Ryan (not verified)
Mon, 03/05/2012 - 09:40
Awesome Idea
This idea is great! It can be used for so many other things besides laundry! Awesome.
Shoshannah May (not verified)
Fri, 03/16/2012 - 05:50
laundry dresser
My mom made an adapted version of the laundry dresser for me. She made it for my round baskets, but it also holds square ones. She put a door on it and used chalkboard paint on the front since we have it in our school room. I love it. Here's a link to a couple of pictures I took after my mom made it for me. http://shospace.blogspot.com/2011/03/look-what-my-mom-made-me.html
Shoshannah May (not verified)
Fri, 03/16/2012 - 05:52
laundry dresser
My mom made an adapted version of the laundry dresser for me. She made it for my round baskets, but it also holds square ones. She put a door on it and used chalkboard paint on the front since we have it in our school room. I love it. Here's a link to a couple of pictures I took after my mom made it for me. http://shospace.blogspot.com/2011/03/look-what-my-mom-made-me.html
Guest (not verified)
Wed, 03/21/2012 - 12:20
How much did this project cost you?
Just wondering what you ended up paying for this project?
Whysaywhat (not verified)
Sat, 04/07/2012 - 19:28
I love this idea! I was
I love this idea! I was looking for Nursery ideas today and stumbled across this project page. There is no way this would ever fit in my laundry room, but I can see a few of these in our nursery playing double/triple duty to hold clothes, diapers, essentials, and later on toys! All while playing double duty as the "changing station" with a nice, smooth board on top! I may give these plans to my FIL and ask for his help in making them though, just to make sure they turn out straight and all (I can't cut a straight line to save my life).
Meme (not verified)
Tue, 04/17/2012 - 08:59
Hampers are meant to hold
Hampers are meant to hold heavy loads by the handles :) and if it does break after a year or more of using it, well, it's only a couple bucks to replace it for new :) this is an awesome idea! Mostly I'm just happy that everyone else battles the laundry monster hah.
Richelle (not verified)
Tue, 04/24/2012 - 00:25
Keeping spare basket
Great idea! I will add this to the next Honey-do list. I'm also thinking to have a laundry basket for each family member, so I can just swap out the baskets.
annemarie (not verified)
Sun, 05/06/2012 - 06:54
dresser
this is an awesome idea, thank you
Rachel@FoodFix (not verified)
Thu, 05/10/2012 - 07:42
These will allow me to see the floor of my daughter's bedroom!
Wow. What a concept! I have putting away laundry and this may be the solution I've been waiting for! I've been battling with my daughter for years to get her to put her laundry away. I'm thinking of replacing her overstuffed and underused dresser with two of these and skipping the hassle of having to transfer everything to drawers. Brilliant!!
Patrick Anglim (not verified)
Sat, 05/19/2012 - 17:22
Your measurements are WRONG!
The bottom piece is not supposed to be 24 1/2". It should be 23 3/4". I should have noticed this but too late now. So if you build it with the measurements shown above your unit with be out of square by 3/4". Simple math. The top piece @ 25 1/4" works good for the baskets. I wouldn't add length to it - take 3/4" off the bottom.
Nick G (not verified)
Thu, 05/31/2012 - 13:20
Poor Laundry Design
On the laundry design, I have never seen anything with more mistakes. Look at Step 1 and step 3. You have the top piece on the outside in Step 1, but on the inside in step 3. Also, you have the length of the top piece wrong in step 1, but only correct it in a footnote. Is the width 15 1/2 inches as specified in the material list or 16" as in the cut list? The metal angle iron is very expensive (~$5 per foot) and impossible to cut at home. Aluminum is more expensive but easier to cut. And what to coat the steel or aluminum with (they both rust). Wow!!!
Brandi C. (not verified)
Thu, 05/31/2012 - 16:03
Not So poor laundry design...
The laundry basket dresser is a very popular plan, just look at all of the brag post/pics!
With as many free plans as Ana puts on her website, there are bound to be errors that she corrects as soon as she becomes aware of the situation.
As with most lumber, its not exactly true to size, ie; a 1x4 is often 1x3.5 and in this case the 1x16 is actually a 1x15.5.
The metal angle iron is expensive and hard to cut which is why we are given the 2x2 as another option. Much easier to cut, much, much cheaper and no rust:)
I am sure that with as many plans that she has on here you may find one or two (or a hundred) that better suit your needs. Happy Building:)
stillwdownlto (not verified)
Wed, 06/27/2012 - 04:12
I have found this article
I have found this article very exciting. Do you have any others on this topic? I am also sending it to my friend to enjoy your writing style. Thanks
http://www.seo-paslaugos.org/
DTeague
Fri, 07/27/2012 - 07:43
Bottom basket
Does the bottom basket touch the bottom of the box? If not how much of a gap is there? I would like to make one but I would like it to be part of a folding table. Just seeing if I might be able to cut off 1/2 to an 1in at the bottom?
Thanks so much!
Christine Ramey (not verified)
Mon, 07/30/2012 - 20:45
Laundry Baskets Idea
I love this idea. It wouldn't cost to much to make or pick up used ones at a garage sale as well. Sometimes some of these odds and ends pieces of old dressers would work as well. I love it. :)
AshleyB8 (not verified)
Sun, 10/28/2012 - 19:31
Problem with baskets!!
We recently made this project following all measurements EXACTLY!
However, the baskets measure 25 1/4 inches but the width of the inside of the shelf is only 24 1/2.
Anyone else have this problem? We purchased the exact baskets that are shown. I'm guessing Sterilite no longer makes these baskets. I'm just looking for a little help!!
Help or a little forewarning for others that make this project and can't find baskets.
Diana Clyne (not verified)
Wed, 10/31/2012 - 09:43
Your site
I cannot say anything better than the others above me, but I love this project and I am just about to surf your site, so I am sure I will be pinning. Thanks so much for the inspiration!
KristiL (not verified)
Sun, 12/30/2012 - 13:45
Different size basket?
I couldn't find the same baskets Ana used, I could only find the Sterilite Ultra which measures at 25 3/4 L x 18 W x 10 3/4 H Could someone please help me figure out a new cut list? This is my first project and I'm not really sure what I'm doing or what I'm looking for.
Ashley H. (not verified)
Mon, 12/31/2012 - 07:43
I love this idea! It is going
I love this idea! It is going to simplify my life so much! Thanks for this :)
Katie B (not verified)
Sun, 01/06/2013 - 10:21
I've been eyeing this project
I've been eyeing this project up for a while now. My husband and I are thinking of doing this (or something similar) for our recycling in the basement. We may do full shelves instead of something for the lip to rest on. Can anyone share the dimensions of the baskets? I'm curious how much we'd have to deviate from the plan for the baskets we currently have. I'm also thinking of making this for my son's bedroom that won't fit a dresser along with his other stuff, but this in his closet would work brilliantly I think.
Barb from Winn… (not verified)
Sat, 01/12/2013 - 09:06
These are a great idea! The
These are a great idea! The only thing I would change is that I would put some short feet or a tiny platform below the shelves. It only takes one flood in the utility room to ruin anything that is standing flat on the floor.
logbookloans4uk
Fri, 09/13/2013 - 05:21
wonderfully Post
I have already been using nearly the real way for almost a variety of yrs right now, and also this works wonderfully! All of us experienced a variety of shelves position in our cleaning washing laundry area right within the holding bar. http://www.logbookloans4uk.co.uk
spacesculpt
Sun, 06/08/2014 - 18:28
Project
Ana,
Great plan! I have seen this idea on Pinterest and it is great to finally have the plans to make it! This will be so great in my house! Thanks for sharing!
hapuheno3
Fri, 05/08/2015 - 18:07
Thanks for providing complete
Thanks for providing complete steps on making a drawer. I was looking for it and finally my search comes to an end. http://enlargebreastpermanently.com/
MandK1998
Sun, 08/16/2015 - 22:59
PDF wont work
Hello Ana,
My name is Kimberly and I was trying to use PDF for printing. This particular one will not work.
Thank you.
In reply to PDF wont work by MandK1998
Ana White
Mon, 08/17/2015 - 09:30
Hi, I'm sorry, thanks for
Hi, I'm sorry, thanks for your patience with the site! Here is the printer
friendly version http://ana-white.com/print/530
WindowsGuy
Wed, 02/10/2016 - 10:12
Great Idea!
This is a great idea. My laundry baskets lay in my closet and get in the way. This would be perfect to organize a little bit. Thanks for sharings.
alissonm
Thu, 04/21/2016 - 13:28
Doors
Hi,
Does anyone have the plans for adding doors to this?
Alisson
bridgetbfarrell
Tue, 12/22/2020 - 06:09
Laundry basket size/link please
Hi there! Do you have a link to the laundry baskets you used in this project? Or at least the dimensions? Thanks!