


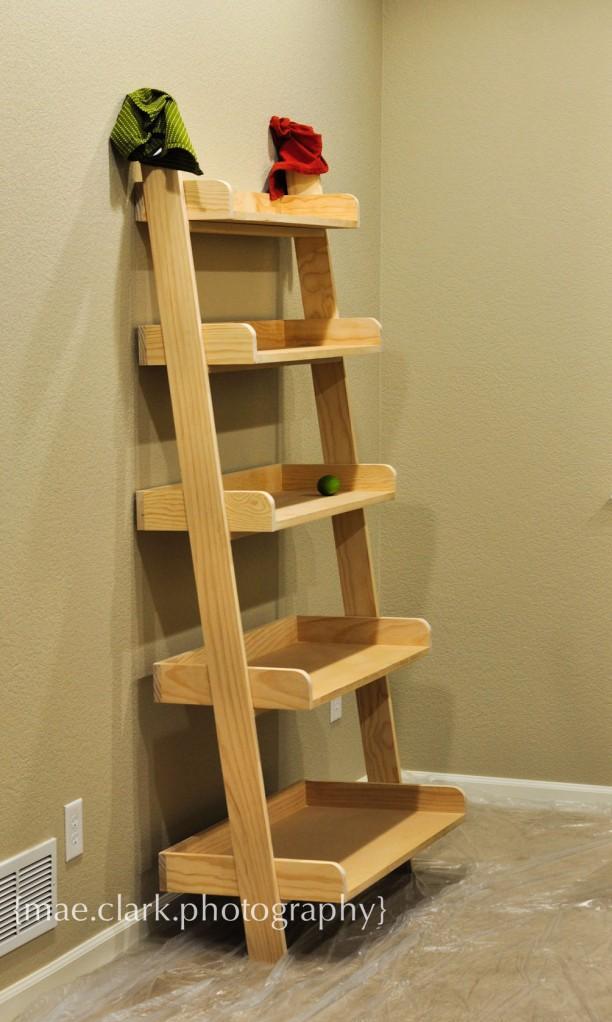
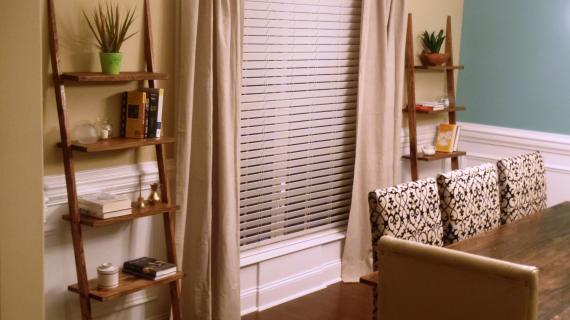
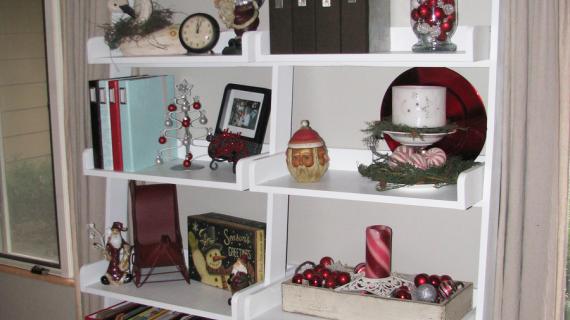
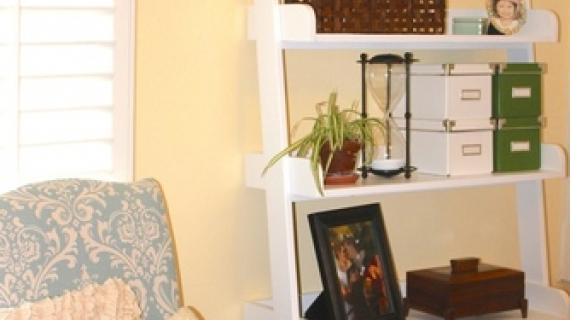
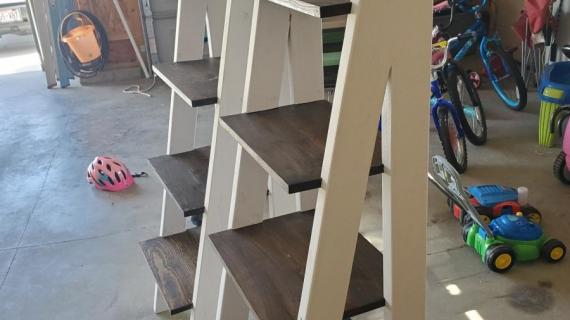
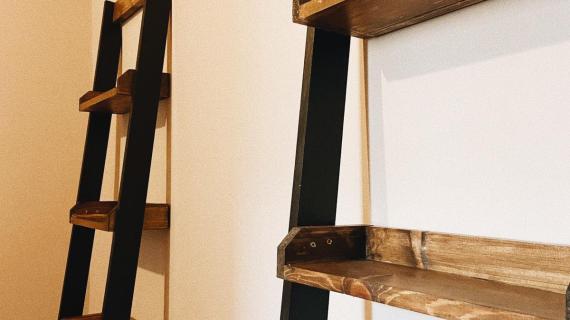
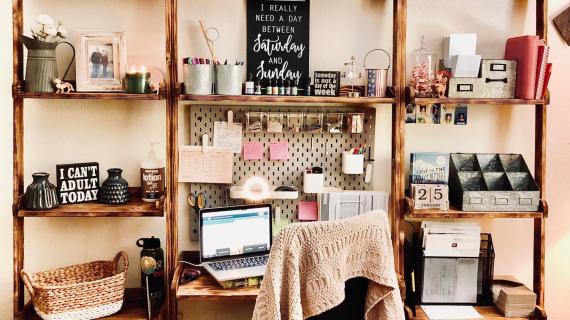
Large leaning shelves. Featuring five shelves, ranging in size from large to small, this leaning shelf will store and stylize any space.


And while this plan only calls for one leaning wall shelf, you will have enough scrap plywood or MDF leftover to build a second one.
Other ways that you can save? 2x4s are cheaper than 1x4s, so try adding strength and saving several dollars by using 2x4s for the legs. 1x3s are about 1/2 the cost of 1x4s, so try using 1x3s for the shelf trim instead of the 1x4 shelf trim.

Preparation
6 - 1x4 @ 8 feet long
1 - sheet 3/4" Hardwood Playood or MDF 3/4" Thick, cut as shown in cutting layout
60 - 1 1/4" Pocket Hole Screws
35 1 1/4" Wood Screws
2 Heavy Duty Picture hanging Kits
Wood Glue
120 Grit Sandpaper
Wood Filler
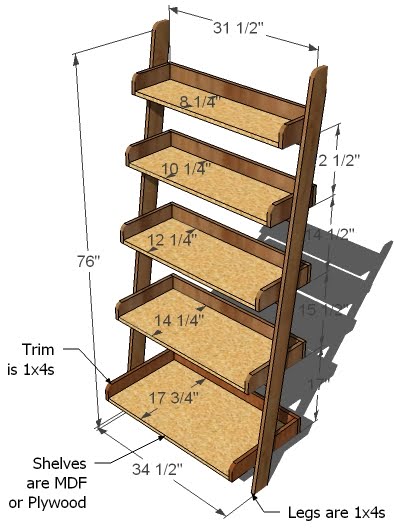
2 - 1x4 @ 77 4/8" (Shelf Sides, cut and mark in step 1)
5 - 1x4 @ 33" (Shelf Supports)
1 - 3/4" Plywood @ 17 1/4" x 31 1/2" (Bottom Shelf)
1 - 3/4" Plywood @ 14 1/4" x 31 1/2" (2nd Shelf)
1 - 3/4" Plywood @ 12 1/4" x 31 1/2" (3rd Shelf)
1 - 3/4" Plywood @ 10 1/4" x 31 1/2" (4th Shelf)
1 - 3/4" Plywood @ 8 1/4" x 31 1/2" (5th Shelf)
2 - 1x4 @ 17 1/4" (Bottom Shelf Trim)
2 - 1x4 @ 14 1/4" (2nd Shelf Trim)
2 - 1x4 @ 12 1/4" (3rd Shelf Trim)
2 - 1x4 @ 10 1/4" (4th Shelf Trim)
2 - 1x4 @ 8 1/4" (Top Shelf Trim
5 - 1x4 @ 33" (Shelf Back Trim)
See PDF
NOTE: MAKE SURE YOU CUT THE SHELF SUPPORTS @ 33″ and NOT 31 1/2″ (See Comments)
Instructions
Step 1
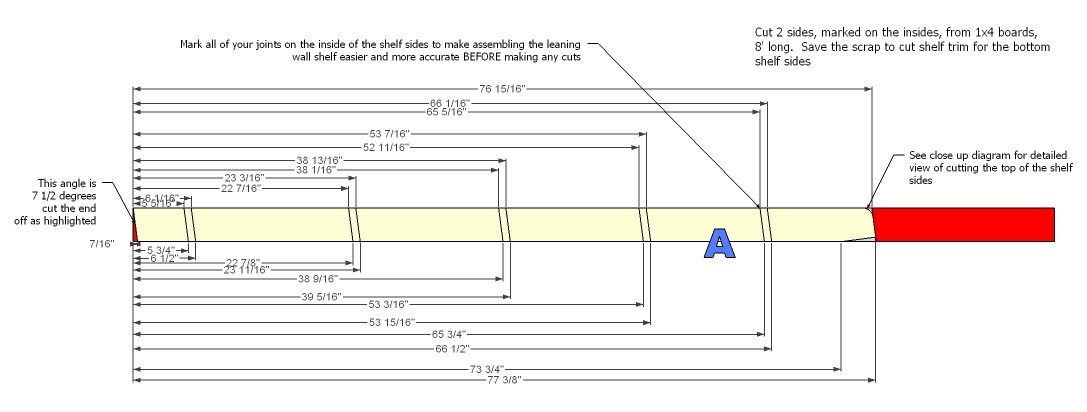
And just in case one of those diagrams is a little teeny to read, here’s an expandable view. You can click the diagram for a larger view.


Comments
Miss Amanda (not verified)
Sun, 07/11/2010 - 18:58
This looks great and is going
This looks great and is going in the list of things to build... you are making my plan to build everything for my new house possible!
DANIELLE (not verified)
Sun, 07/11/2010 - 19:17
Oh I'm so excited -- I love
Oh I'm so excited -- I love these shelves!! Now I just need to find a spot for them....
agoodbuild (not verified)
Mon, 07/12/2010 - 02:48
so very excited for these. I
so very excited for these. I was hoping you would make these plans! Yeah!!!
Tracie (not verified)
Mon, 07/12/2010 - 03:30
Oh they look so great! I have
Oh they look so great! I have been contemplating building one to match my current one that I bought on Craigslist.
Leslie (not verified)
Mon, 07/12/2010 - 04:34
Holy Cow! I love it! I'm
Holy Cow! I love it! I'm looking around my house as we speak, trying to figure out where it will go. I'm thinking my bedroom, painted a nice hydrangea blue. Thanks for sharing this very awesome plan. I bet it's gonna be popular!
casicola (not verified)
Mon, 07/12/2010 - 06:17
YaY!!!! I cant wait to try
YaY!!!! I cant wait to try these....and maybe put a wine rack in them..they are yummy plans..Thanks for all you do!!
The Trees (not verified)
Mon, 07/12/2010 - 18:47
I almost bought some similar
I almost bought some similar shelves for much more than double the cost. And these, much prettier... Thanks!
Kara (not verified)
Tue, 07/13/2010 - 02:47
I'm so excited that you
I'm so excited that you posted these!! This is the LAST thing to build to make my living room complete, so now I can put it on my to-do list!! Thank you so much!!
Connie Nobbe (not verified)
Wed, 07/14/2010 - 09:06
I've always admired those
I've always admired those pottery barn shelves but could not bring myself to pay the price. Thanks so much for these plans! You are awesome! Also, just wondering, how did you make your plans into such a nice PDF file?
slcortez (not verified)
Wed, 07/21/2010 - 04:59
These are great. I wonder
These are great. I wonder how I would need to reinforce a wider center shelf to hold a 40" flatscreen.
Hollyn (not verified)
Wed, 07/28/2010 - 09:17
Love the leaning shelves!
Love the leaning shelves! Just built them as my 1st KOW project...just a little sanding and painting left to do and they'll be complete. (I wouldn't say it's truly a beginner's project though.....doable, but more on the intermediate level!!!) Can't wait to post pictures!
Jake (not verified)
Sat, 08/07/2010 - 09:27
There is an error in the cut
There is an error in the cut list for this plan. The shelf supports are too short to accommodate the shelves with the side trim attached. Either increase the shelf supports to 33" or cut the plywood to a width of 30" for a functional build. I got half-way through before realizing the error. Gonna have to make another trip to the store now!
Mike (not verified)
Mon, 08/30/2010 - 12:17
@Jake, good catch it appears
@Jake, good catch it appears that on page 4 of the PDF it has an illustration of the supports measuring 33", but the cut list says 31.5", thanks for the headsup, I was at Lowes today pricing the materials.
ana (not verified)
Mon, 08/30/2010 - 12:53
Thanks for making note of
Thanks for making note of this. I will add this error to the post too.
Kelly (not verified)
Mon, 08/30/2010 - 19:28
Hi Anna, I can't wait to
Hi Anna,
I can't wait to build this, but I have a problem. I have 2 little ones that climb anything. Do you have any suggestions for securing this to the wall?
ana (not verified)
Mon, 08/30/2010 - 21:35
My little one would be
My little one would be climbing on this too! If you were to purchase some inexpensive 90 metal brackets, you could secure it well to the wall. Also, securing the feet to the floor would be a good idea :)
Meredith (not verified)
Sun, 10/31/2010 - 07:58
I would absolutely love to
I would absolutely love to make these! But would it be structurally sound to take out the second to highest shelf so that I can put a TV on it? I'd hate to mess up a project that promises to be so awesome.
heather (not verified)
Wed, 11/03/2010 - 08:08
Hiya, I am in the middle of
Hiya,
I am in the middle of building this shelf. I decided to try the *economical* route and use 2x4s (for legs), 1x3s (for trim), and 1x4s (for shelf supports). I did catch the shelf support measurement error as I was going along but I am coming up short with my lumber.
I figured that since the original plan called for six 8' pieces of wood then it wouldn't matter if I was changing the width, I should still need 6 8' pieces. So... I bought two 8' 2x4s for the legs, two 8' 1x4s which worked for four (of my five) 33" cuts for the shelf supports and then two 1x3s for my shelf trim (which will only give me my shelf sides and two shelf backs). So I am going to use some scrap wood for my last shelf support (i'm just going to use some 2x4 and use it for my bottom shelf) and I'm going to have to go out and buy two more 6' 1x3s to finish my back trim.
I'm just wondering, how did you get all those cuts out of the wood listed. Would this somehow have worked if I had just bought all 1x4s? I tried adding up the cut list and it seems to work out to 609.25" and six 8' boards is 576". I am many ????? question marks confused.
Sorry for this long post, this is my first project and I'm just worried I am reading the plan wrong and don't want to develop a bad habit of continuing to do so. I want to keep building, it is so much fun!!
Thanks everyone ( Ana especially!),
Heather
Leaning Wall S… (not verified)
Tue, 11/23/2010 - 04:06
[...] I saw Ana’s leaning
[...] I saw Ana’s leaning shelves, I knew that would work for this space in a scaled-down version. The problem with [...]
Leaning Wall S… (not verified)
Fri, 11/26/2010 - 05:49
[...] shelf legs so that they
[...] shelf legs so that they fit 3 shelves instead of what the plan called for. I decided to go with Ana’s plans at this point, which meant that I marked my boards from the bottom up, for 3 shelves, using her [...]
Janine (not verified)
Thu, 01/06/2011 - 08:13
Can you get plans for this
Can you get plans for this for 9 feet tall. Thanks!
Hello, Again! … (not verified)
Tue, 01/11/2011 - 17:55
[...] plans for building
[...] plans for building Pottery Barn furniture for cheap! I would like hubby to build two of these leaning bookcases for our dining room so that we can get rid of our cheap buffet that we bought 12 years ago. [...]
KyleesDad (not verified)
Wed, 02/02/2011 - 06:57
Ana, Were the plans edited
Ana,
Were the plans edited to accommodate Jake's error submission above?
Thanks.
Jodie Lynch (not verified)
Wed, 02/02/2011 - 15:46
Love, love, love this. I
Love, love, love this. I don't have a lot of experience but I'm going to try it.
K (not verified)
Tue, 02/08/2011 - 06:20
I read the comments a little
I read the comments a little too late.. Now I have to cut my shelves to fit properly on the supports on both shelves :( Not good..
Please fix this error !
Still love your plans ! :)
Kari (not verified)
Wed, 02/09/2011 - 08:27
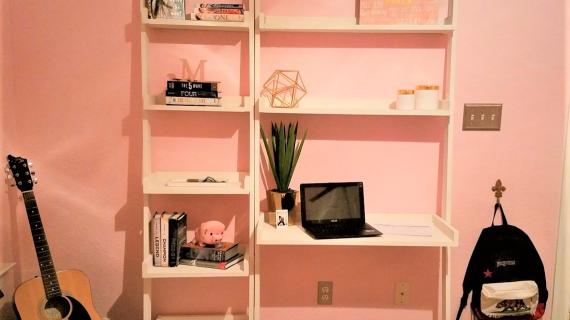
I'm planning on making three
I'm planning on making three of these, but using two for desks. So, for the two that are desks, should I just have 3 shelves per and make the "desk" shelf the same size as the bottom shelf in the plans?
This is what I'm wanting to make: http://www.crateandbarrel.com/furniture/bookcases-cabinets/sloane-grey-…
Advice is definitely appreciated!!!
manygoats (not verified)
Wed, 02/16/2011 - 11:25
@Kari - that's exactly what I
@Kari - that's exactly what I would do.
Living Room Ma… (not verified)
Fri, 02/18/2011 - 05:13
[...] more light in. –I’m
[...] more light in. –I’m building an office system similar to this one using these plans or these plans. I haven’t decided which one I want to do although I’m leaning more toward the first [...]
_chloeaustin_
Mon, 05/02/2011 - 10:04
Awesome!
LOVE this! I was just looking to buy some of these for my new office & thought they were ridiculously priced. I even love the design of this even better! Off to the store I go! :)
Donna Gelineau (not verified)
Mon, 08/15/2011 - 15:42
Just made one using your design.
Ana, I just made one using your design, or picture of your design, but adjusting for our measurements.
It turned out great! I am just learning to use power tools and build and all that, so this was a fun project.
http://renoandreorginization.blogspot.com/2011/08/finishing-up-few-thin…
Guest (not verified)
Tue, 11/29/2011 - 19:14
can't open pdf!
every time I try to open the pdf it just comes up as jibberish! we really want to make this soon and the instructions would be nice :) so any help would be appreciated!
Sarah Kirchner (not verified)
Thu, 12/15/2011 - 21:10
PDF Fixed
Give the PDF another try... I was having the same problem and tweeted Ana about it last night, and she got it fixed right away! Thanks Ana!
Ryan (not verified)
Sat, 12/03/2011 - 10:55
Very helpful
Thank you so much for sharing these plans. I just got done building it and it's a great addition to my living room!
cooper (not verified)
Wed, 02/15/2012 - 18:48
Do I just take out the bottom
Do I just take out the bottom 2 shelves to make a desk?
mjgreenwood (not verified)
Sun, 03/18/2012 - 18:50
Built two - made a desk for the second
Built one standard from the plans, great plans thanks!!!!
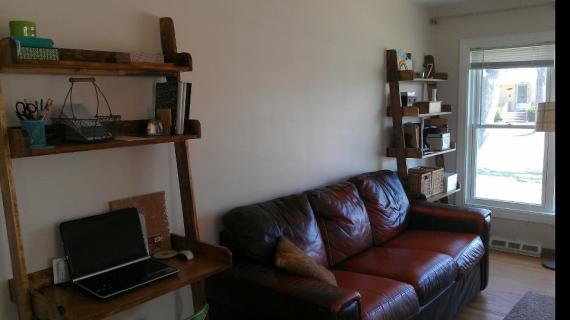
Built the desk version getting rid of the bottom three shelves and then using the bottom shelf dimensions for the desk at around 31" for the height.
I added a cross brace to the desk/shelf support due the amount of leverage a person is going to put on it. The cross brace also hides the power strip and laptop cables.
I also secured the desk to the frame with screws from the inside for the same reason.
With the desk configuration I found that I needed a stronger attachment to the wall, again because of elbow leverage. So just screwed it through the second shelf with a painted fender washer and screw. We love it.
Sheri
Sun, 04/15/2012 - 16:12
I just finished building two
I just finished building two of these shelves with the help of my husband and father-in-law. We suggest making the shelf base (approximately) 1/16" shorter than the plan calls for. We had to do a ton of sanding to get the shelves to fit without being too snug.
We also bought six 8' 1x4 boards per the plan and had to go out and purchase another in order to finish the trim.
Thanks for the plans, Ana! We saved so much money vs. buying them in the store! We couldn't be happier and can't wait to start our next project!
Sheri
Keonsday (not verified)
Fri, 07/20/2012 - 12:18
Question about trim
I honestly like the structure of the shelves; however, I have a question regarding the trim of each shelf. Is it possible to remove the trims without jeopardizing the integrity of the structure. I think that it looks better without the trim.
maineiac
Tue, 10/09/2012 - 12:52
not enough 1x4
I'm almost done building it, but as others already mentioned, I'm one 1x4 board short. the shopping list should call for 7 of the 8' 1x4 boards.
other than that a great plan and I'm excited to finish it!
Frankh (not verified)
Sun, 12/09/2012 - 09:24
I finished this yesterday.
I finished this yesterday. Overall whereas this wasn't a super difficult project, the "Beginner" level is misleading. With the angles, this is AT LEAST an intermediate level project. You can't just throw a square on the side supports and screw in your shelves. This week I also built a "Fancy hall tree," it was easier to build than this (Though it took longer) and it is considered "advanced."
Michelle MO (not verified)
Wed, 12/26/2012 - 17:32
Can I make the bottom shelf less deep?
I am thinking of putting this shelf in an awkward spot in my kitchen. It would work best if I could make the deepest shelf 14 1/4 (vs the 17 1/2 shown). Would I be able to make the bottom TWO shelves that depth and the legs are just attaching farther toward the front of the last shelf, or would the angle of the legs prohibit this? Aside from not being sure if this change would take away from the beauty of the piece, I want o make sure the structure would even work! Thanks -this is to be my first Ana White build (with at least 4more on my wish list) -appreciate any help, I can't wait to gt started!
Tony (not verified)
Mon, 01/21/2013 - 18:21
Thanks
I'm still building my first Ana project. These shelves! Plans are great and easy to follow. I bought the Kreg jig for this project (and because its a tool I did not own LoL) and I like how the PH work. The only thing I think you left off that I added was the font edge of the shelves need some trim to hide the plywood layered look. I bought some 3/4 trim at my local big box store and glued them tot he front edges of all shelves! Very pleased so far!
thompske44
Thu, 11/06/2014 - 09:18
Great Instructions
We have finally built our Leaning Shelf, now it is just on to finishing it!!! It turned out great with the instructions you have provided!! Thank you so much. I do agree w/ Tony, I think we might add a front edge as well. Not sure how great it would look stained w/ just the plywood front.
Thanks!!!
Lmascolo
Thu, 10/08/2015 - 07:54
Leaning Wall Shelf
Hi Ana,
Do I really need the Heavy Duty Picture hanging kits for this wall shelf ? I'm making it for my basement and since the walls are painted cement walls, there's no possibility of drilling into the walls.
I wasn't sure if the picture hanging kits were even necessary if it just leans against the wall.
Thanks
Linda
Ana White Admin
Thu, 10/08/2015 - 11:51
Lean it
We do need to recommend using the proper hardware for safety purposes. You will find that these lean fine on their own too.