
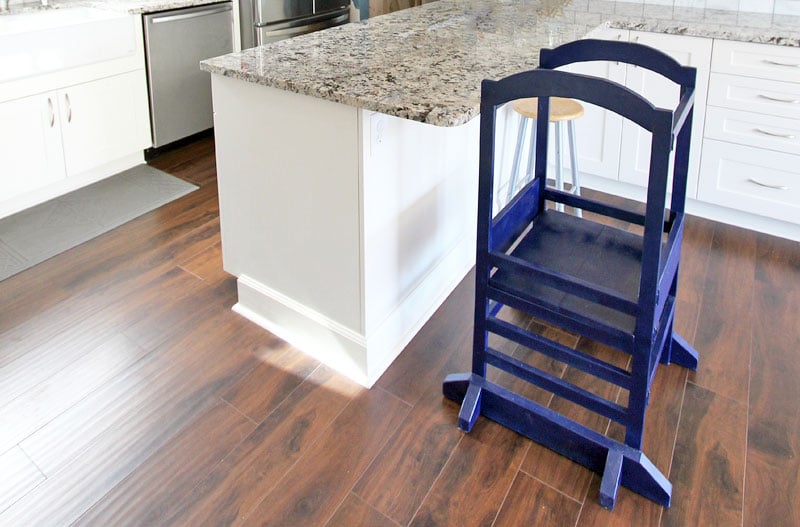

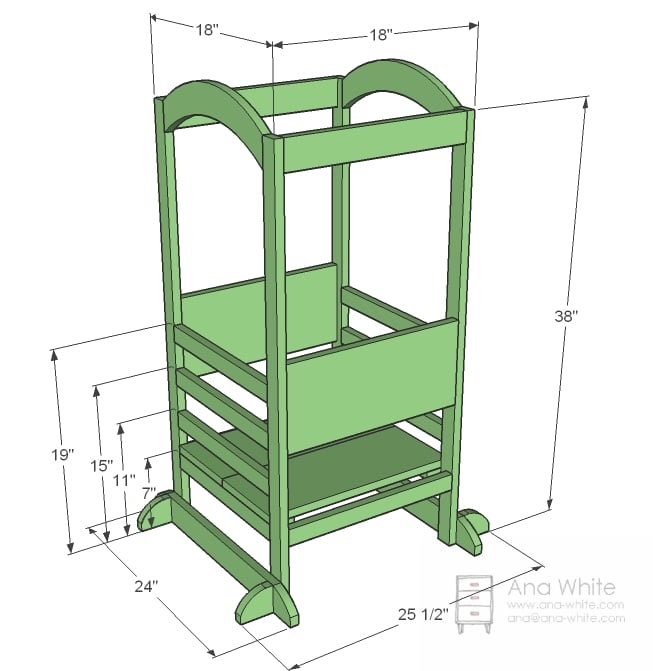
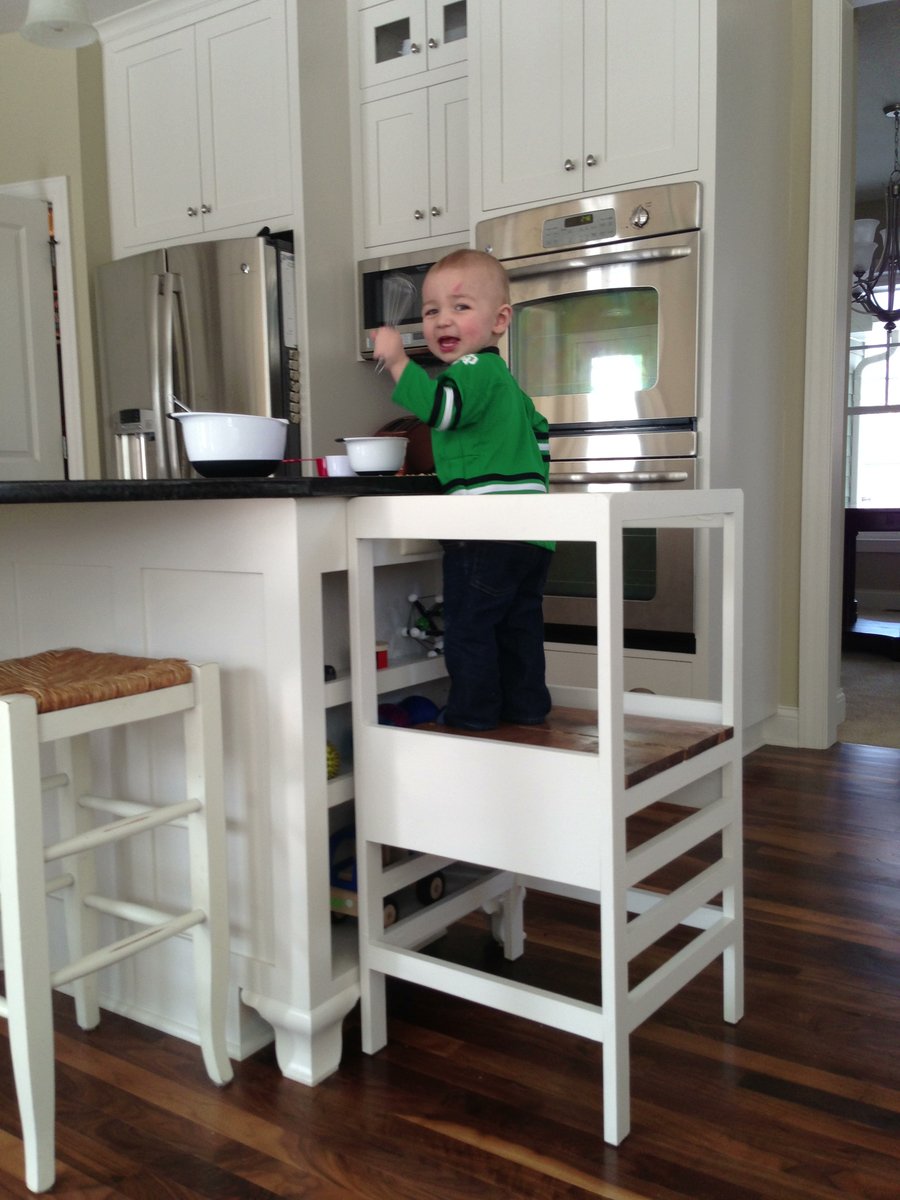
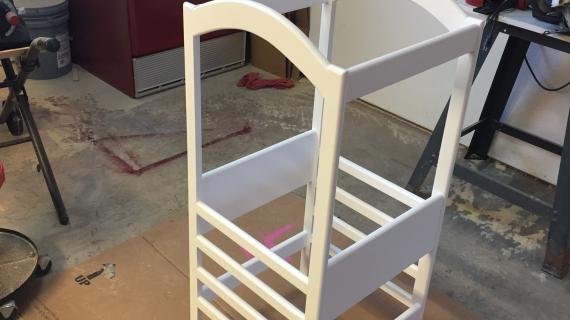
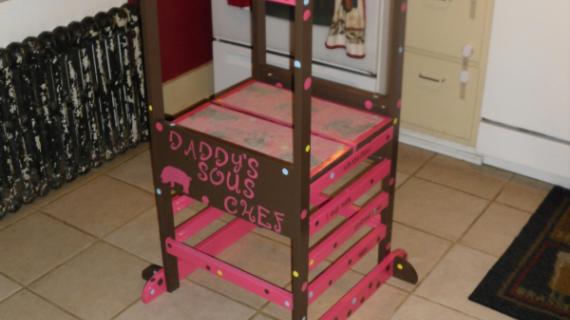
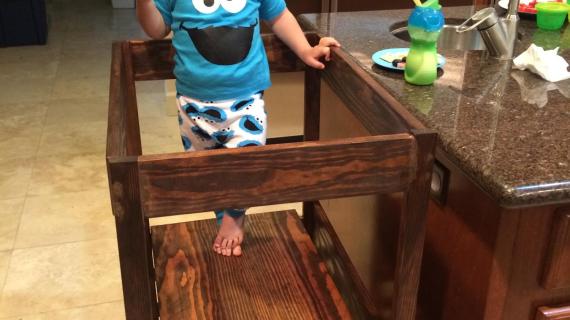
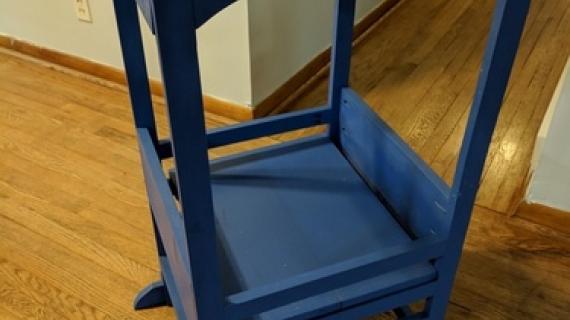
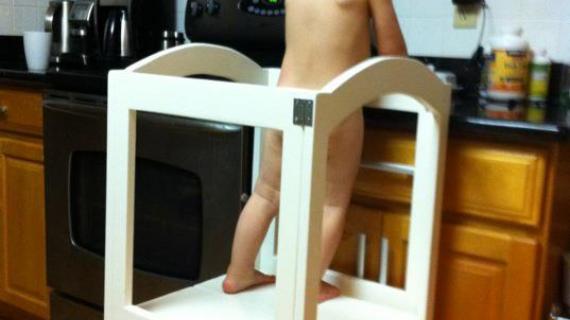
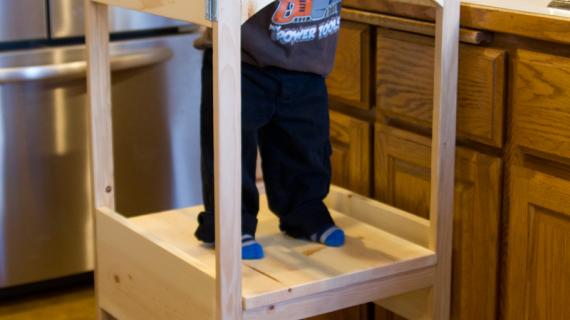
Build your own toddler step stool and bring your child to counter height. Features adjustable height platform, removable tip resistant kit, and optional fold flat modification.
Preparation
1 – 1×8, 8 feet long
4 – 1×2, 8 feet long
1 – 1×3, 8 feet long
4 – 1×2 @ 38″ (Legs)
8 – 1×2 @ 15″ (Ladder rungs)
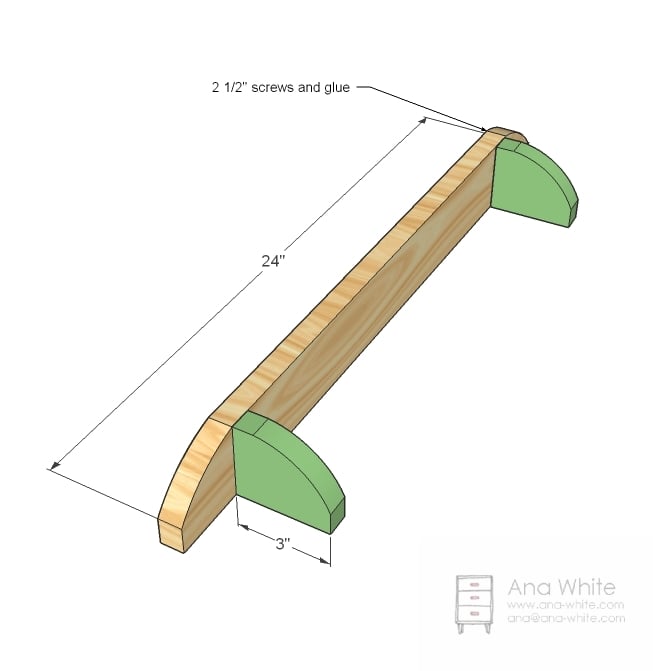
1 – 1×8 @ 15″ (Arches) OR 2 - 1x3 @ 15" (Substitute for arches)
2 – 1×8 @ 16 1/2″ (Front and Back Sides)
2 – 1×8 @ 18″ (Platform)
2 – 1×2 @ 15″ (Platform Supports)
2 – 1×2 @ 16 1/2″ (Bottom Supports)
2 – 1×3 @ 16 1/2″ (Top Supports)
2 – 1×3 @ 24″ (Tip Resistors)
4 – 1×3 @ 3″ (Tip Resistors)


Instructions
Step 1
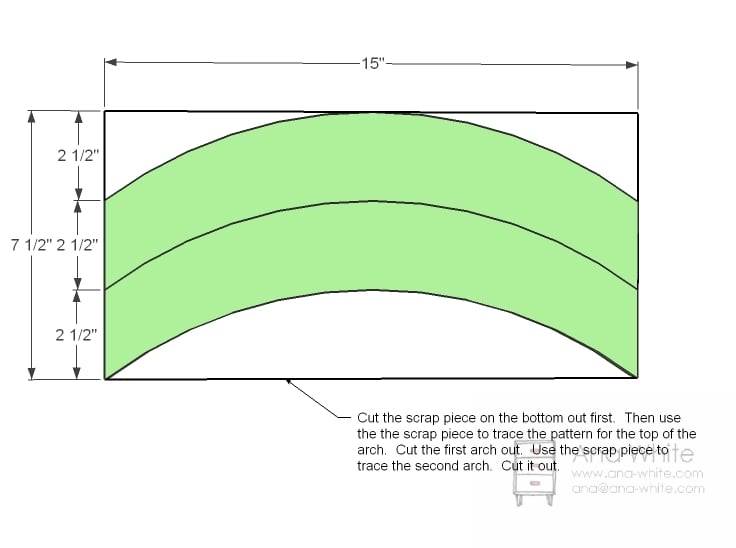
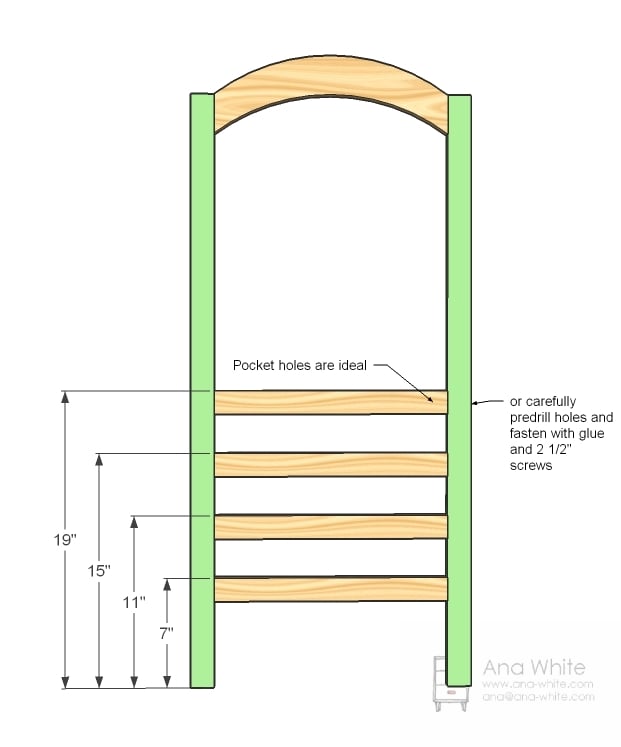
Cut Arches From the 1×8 that is 15″ long, cut arches as shown in diagram with a jigsaw. Adjust so you can get both arches on the 1x8.
NOTE: Some people just opt for straight boards across as done in this reader submitted photo.
You can substitute for 1x3 instead. This will simplify the building process.
Step 2
Ladder Rungs
Measure and mark legs for ladder rung positions. Drill 3/4" pocket holes and apply glue to ends of ladder rungs. Attach with 1-1/4" pocket hole screws.
Build two identical.
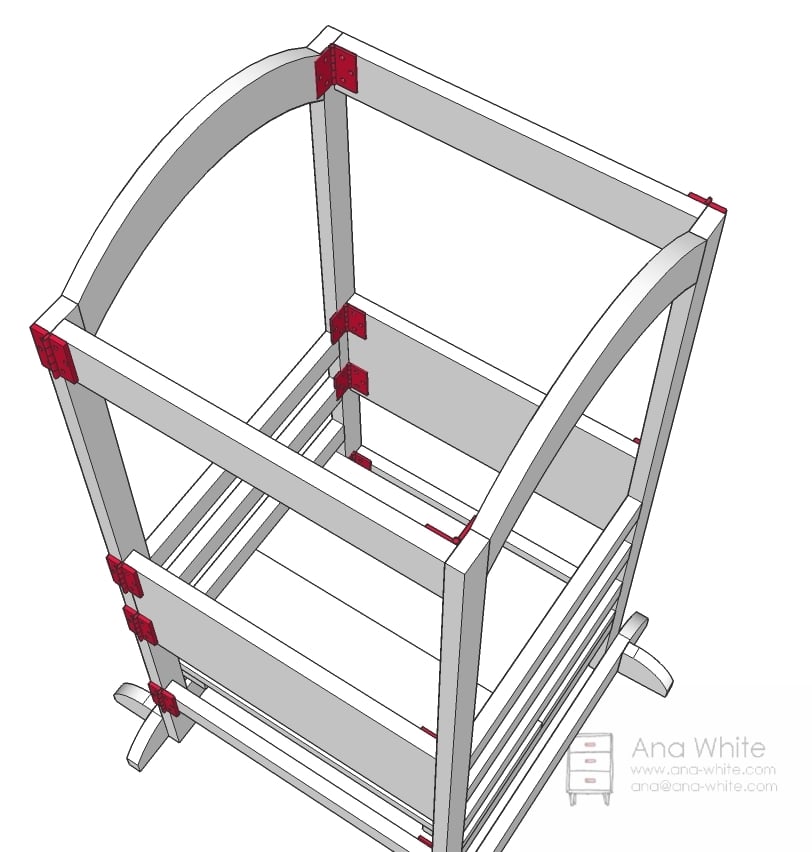
Step 3
Assembly
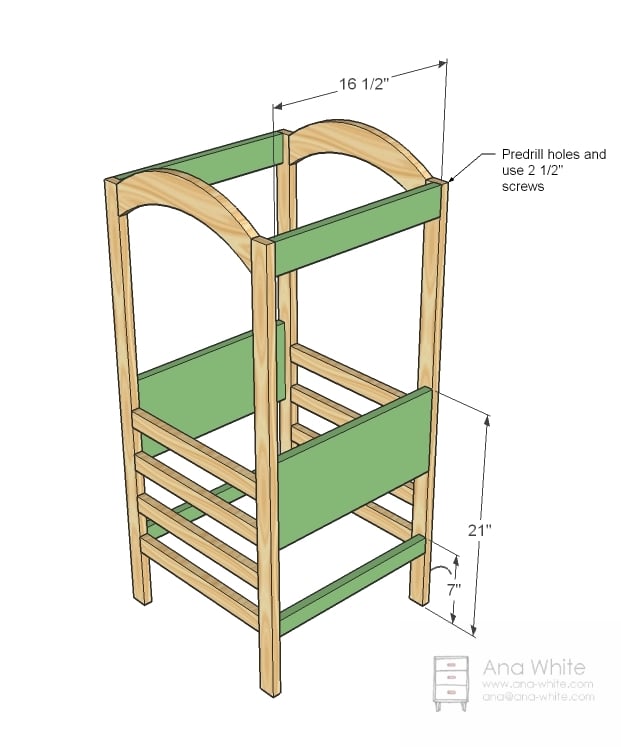
Mark the location of the end pieces and predrill holes. Apply glue and screw in place with pocket hole screws. Adjust for square. You can add additional rails to the front and back as you see fit, but keep the sides open so your youngster can crawl in and out of the helping tower.
Step 4
Platform
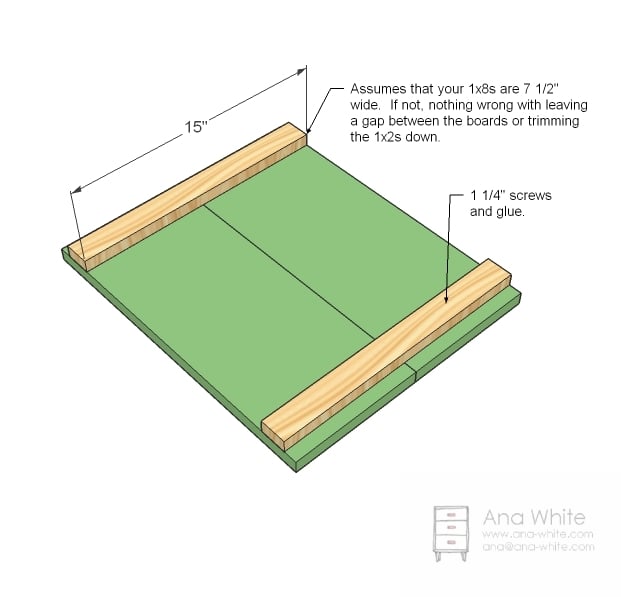
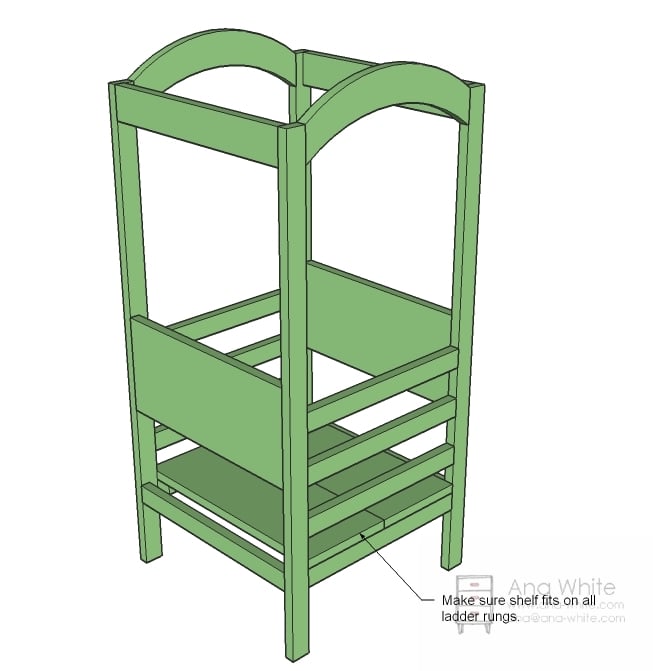
Next, build your platform by marking the 1x8s that are 18″ long 1″ from the outsides. Attach with glue and 1 1/4″ screws the platform supports. These platform supports not only join the 1x8s, but they also keep the platform in place inside the helping tower.
Step 5
Step 6
Tip Resistant Foot
Round the corners on the tip resistors as shown above. Screw together. You can optionally exclude the smaller tip resistors, as side to side tipping is less likely than backward tipping. You know your child better than anyone. Build to suit your child’s needs
Step 7

Attach Tip Resistant Footer
Simply screw the tip resistant footer to the legs as shown above.
Step 8
Folding Mod
By placing hinges instead of screwing the front and back pieces to the side pieces, you can make the Little Helper Tower fold easily. Just make sure you use plenty of strong hinges, make the platform fit very tight (adjust the inset on the ends to 3/4″ instead of 1″ in step 4, and regularly check to make sure your hinges are not loose. I personally prefer simplicity, and any time you add hinges, it increases the complexity. But for those of you who require storage for the Little Helper Tower (would slide under a bed easily) this mod if done with care can be the solution.


Comments
VandalsMom (not verified)
Thu, 10/04/2012 - 08:44
How much paint?
I've never been good at guesstimating, if you were buying paint for this project how much would you buy? Thanks!
chloesmom16 (not verified)
Wed, 01/23/2013 - 07:18
I the pdf link for the
I the pdf link for the toddler tower project is not working. Would it be possible to send to me via e-mail?
Thanks - Kari
kongk
Tue, 05/21/2013 - 04:25
I would like to thank you for
I would like to thank you for the efforts you have made in writing this article. I am hoping the same best work from you in the future as well..
Learn More About Sea Navi
FLfireman
Thu, 09/05/2013 - 19:03
Arches
How do you draw out the arches? My board were 7.25 and I adjusted like suggested but had to free hand them and they look like....well...I free-handed them.
The Pierces
Sat, 10/05/2013 - 09:28
Weight
How much does this weigh? I scored a used learning tower but honestly I would like to replace it with this one if it weighs significantly less. The original is killer on the back to move anywhere so it is basically going unused at this point since it is too big to keep in our main kitchen area all the time.
rhowells
Wed, 12/31/2014 - 11:54
Helping Towers - FANTASTIC
I built two of these towers for my grandson (18 mo) - one for my home and one for Henry and his parents to use in their house. Henry LOVES climbing on this. He feels like he's really a part of what's happening when he's standing on the platform. This morning he ate his breakfast at the counter in the kitchen - he enjoyed standing and dancing to some music while he ate his pancakes.
The instructions were straight forward and worked well. Though it was a little tricky to use hinges (i used eight for each of my towers), we're delighted that we can fold the tower and put into the closet when Henry is not here.
BTW - I found some excellent non-toxic paint - actually a wood stain - Brand is OSMO Wood Wax Finish.
Thank you so much.
I wish I could show you my towers, but I can't figure out how to insert a picture.
njbarnette
Mon, 02/23/2015 - 20:21
Length of Scews
Anna says, "Attach with either pocket holes or 2″ screws. Pocket holes are ideal, but my wood kept splitting, so I switched to countersunk 2 1/2″ screws and had really good luck that way." I don't understand her meaning. Could someone answer what size screws are needed. Is it 2" or 2 1/2"
picxie
Fri, 05/08/2015 - 00:16
Arches
Thanks for this pattern! Looks fantastic and I can't wait to try making it. Just one query - I could be missing something but how do you add the arches, and what size screws? Thanks!
Nicorae_24
Mon, 05/11/2015 - 09:19
Loving it!
I am already planning how I can build this and put my own little twist on it! But, 100% building this!
EmH-C
Tue, 07/28/2015 - 12:28
Anyone in the UK made this?
I really need one of these for my little helper. I'm in the UK though and can only buy materials in the restricted metric measurements that are available here. Has anyone else from the UK made this wonderful project? Could anyone suggest sizes of timber to use? Thanks
suzichadwick10
Tue, 09/29/2015 - 11:45
HINGES
Hi!
I am gathering materials for this project and because I live in an apartment, I need it to be the hinged-option and collapse for storage. What kind of hinges did you/should I use? Are there 16? Do the interior hinges stick up where the ladder rungs are or is that just the way the picture shows them?
Please tell me more about the hinges.
In reply to HINGES by suzichadwick10
Ana White
Tue, 09/29/2015 - 12:30
Take a look at this post
Take a look at this post too
http://www.hometalk.com/5642507/ana-whites-little-helper-tower
wjb1108
Sat, 02/06/2016 - 03:48
Modification
I would really love to make this Kitchen Helper but instead of fixed or hinged I would love to be able to just slide off the sides and store the pieces away. I don't have the depth necessary to store it hinged. Do you have any suggestions for doing this?
benahomefixer
Fri, 05/06/2016 - 00:10
Little Helper Tower
I built many of these, no safety concerns. I did, however, modify the climbing side to have the sides turned to mimic more a ladder than the original design from the plans. This did make it more rectangled than square. I believed that this modification made it easier for a small child to grip when climbing...so basically the rungs are now on the outside and the outside supports are where the rungs are. I also tried pocket screws for the rungs, they failed and split. Using 2,1/2 screw through and countersunk and wood glue proved to be the solid choice. My daughter is now 7 and has had hers since she was 4 and it is still as safe as it was the day we built it. Oh yeah, almost forgot, was built with reclaimed wood from crates!
Rbond7489
Wed, 02/15/2017 - 18:28
Built for daughter's 2nd bday!
Thank you for the easy diy even for a total n00b like me! My daughter loves this tower so much!
GMBC
Sat, 12/23/2017 - 16:57
Built this
I built this unit in a folding model for my grand daughter for Christmas. Hard sourcing hinges. Made hinges from piano hinges . My grand daugher and her mom loves it. I will try to send picture in. Thanks Ana
Woodworkermaybe
Mon, 05/17/2021 - 16:51
Safety improvement
My 2 year old granddaughter uses this tower every weekday. After 8 months of use, she was standing and in a tantrum moment forced herself into a sitting position, and her momentum carried her right onto the tile floor with a hard hit to the back of the head. I added an extra cross piece so that can’t happen again. Very scary!