
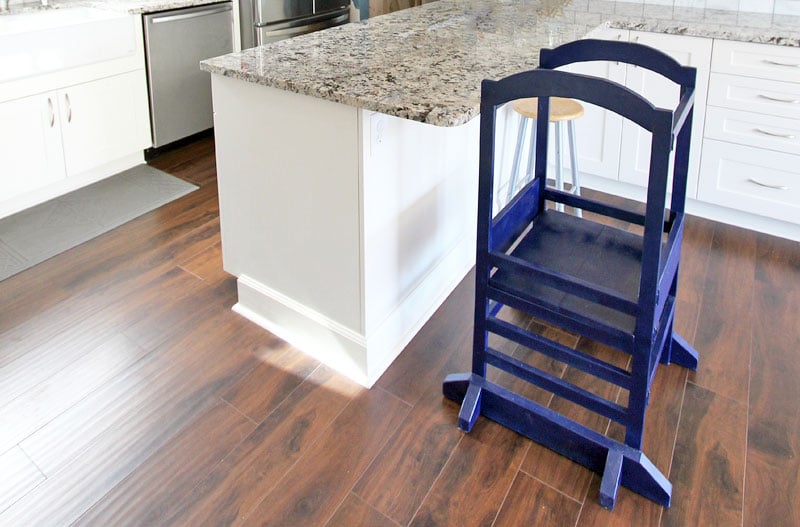

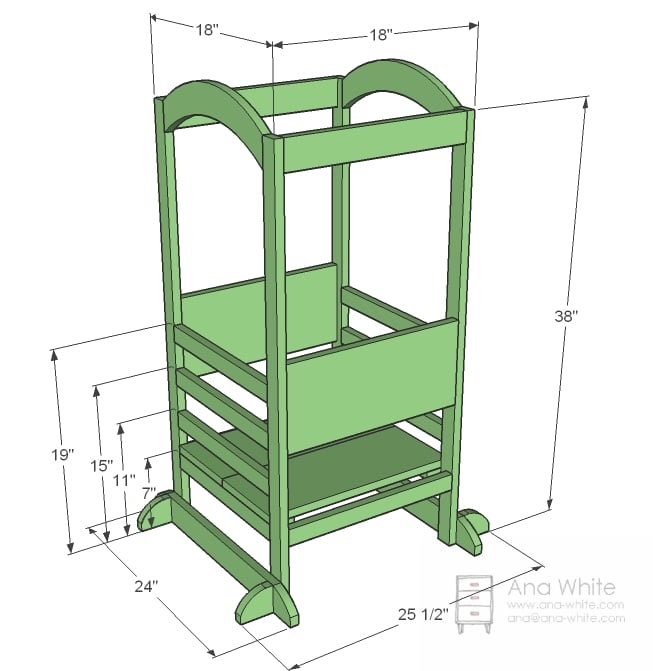
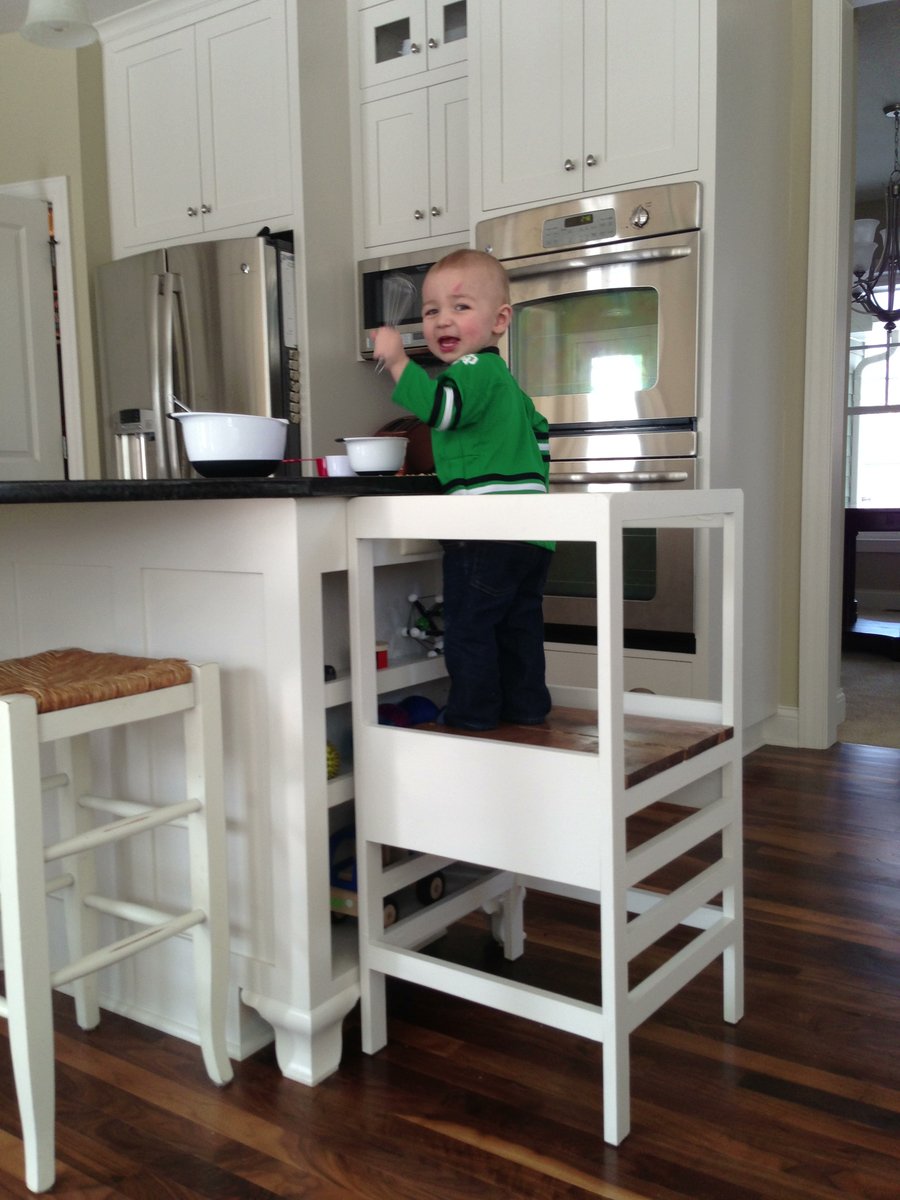
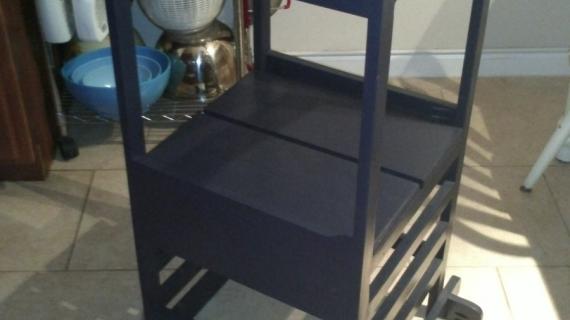
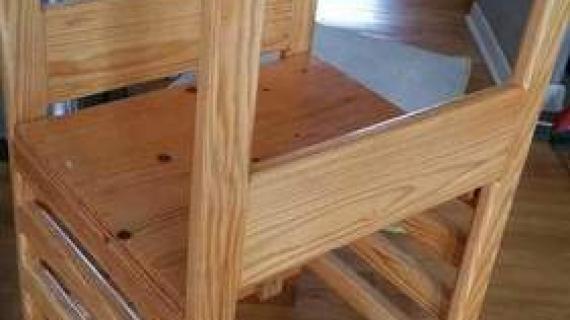
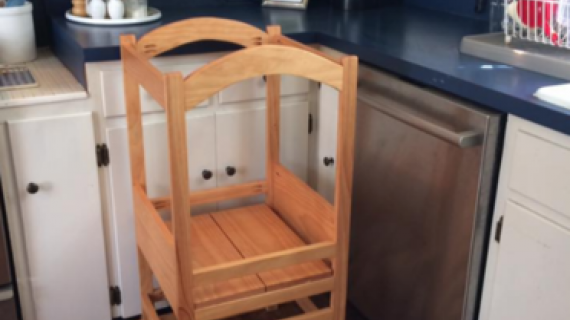
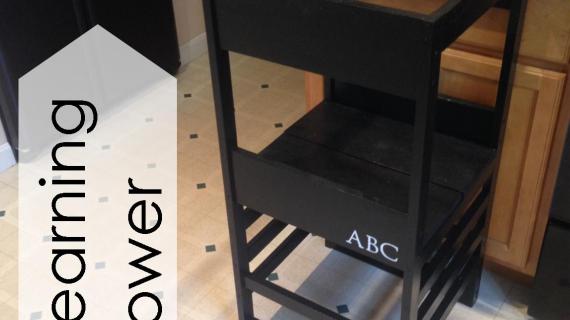
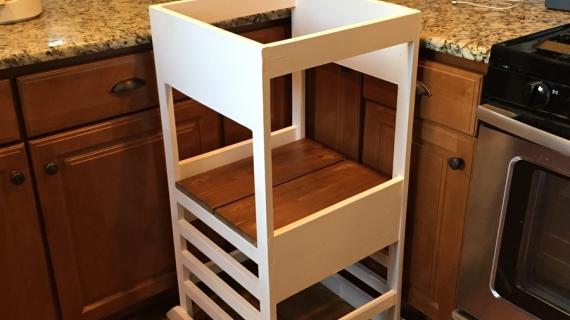
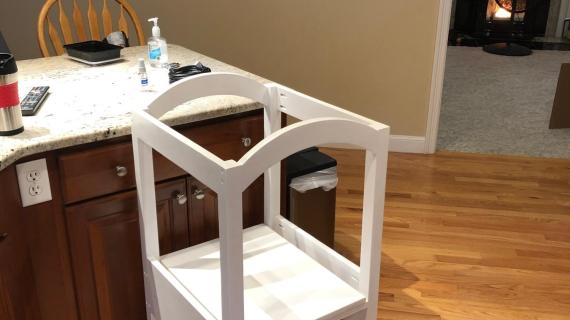
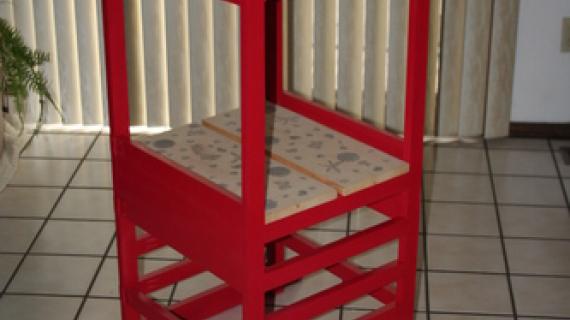
Build your own toddler step stool and bring your child to counter height. Features adjustable height platform, removable tip resistant kit, and optional fold flat modification.
Preparation
1 – 1×8, 8 feet long
4 – 1×2, 8 feet long
1 – 1×3, 8 feet long
4 – 1×2 @ 38″ (Legs)
8 – 1×2 @ 15″ (Ladder rungs)
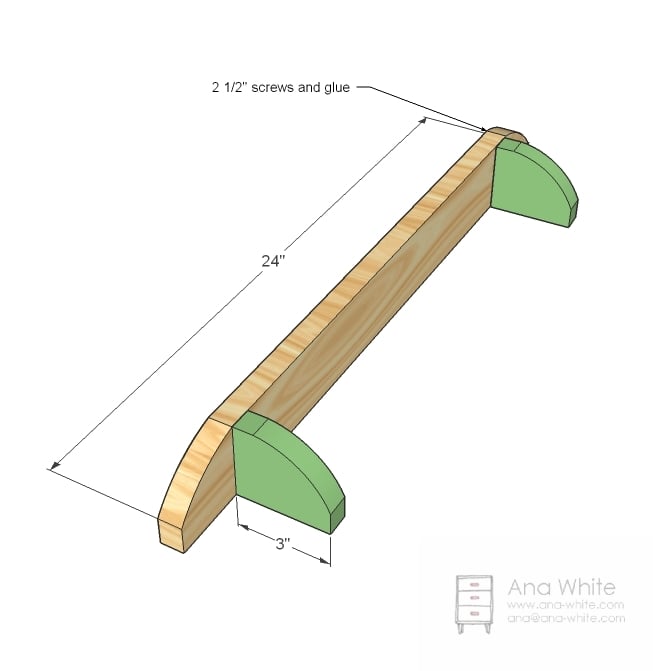
1 – 1×8 @ 15″ (Arches) OR 2 - 1x3 @ 15" (Substitute for arches)
2 – 1×8 @ 16 1/2″ (Front and Back Sides)
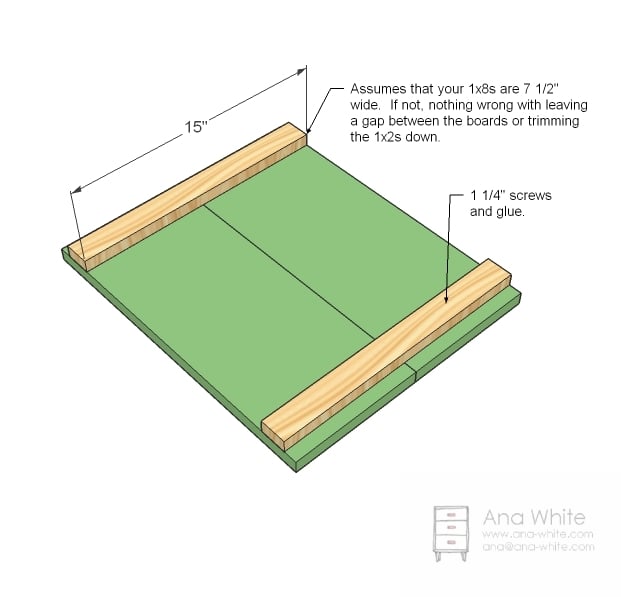
2 – 1×8 @ 18″ (Platform)
2 – 1×2 @ 15″ (Platform Supports)
2 – 1×2 @ 16 1/2″ (Bottom Supports)
2 – 1×3 @ 16 1/2″ (Top Supports)
2 – 1×3 @ 24″ (Tip Resistors)
4 – 1×3 @ 3″ (Tip Resistors)


Instructions
Step 1
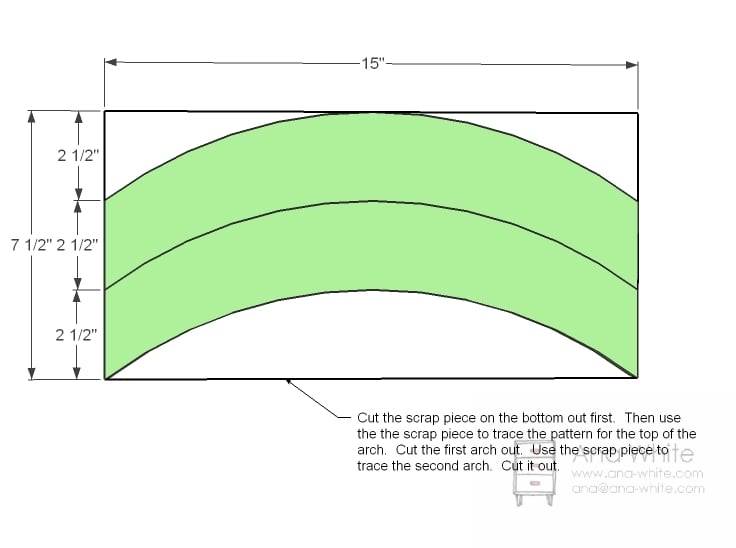
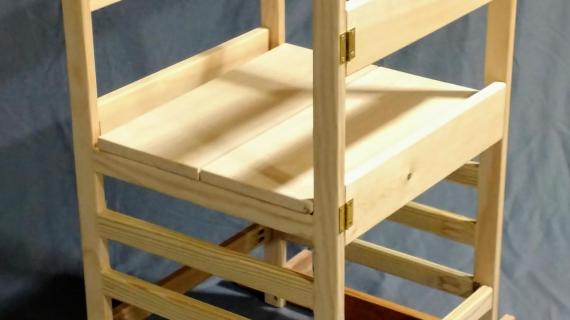
Cut Arches From the 1×8 that is 15″ long, cut arches as shown in diagram with a jigsaw. Adjust so you can get both arches on the 1x8.
NOTE: Some people just opt for straight boards across as done in this reader submitted photo.
You can substitute for 1x3 instead. This will simplify the building process.
Step 2
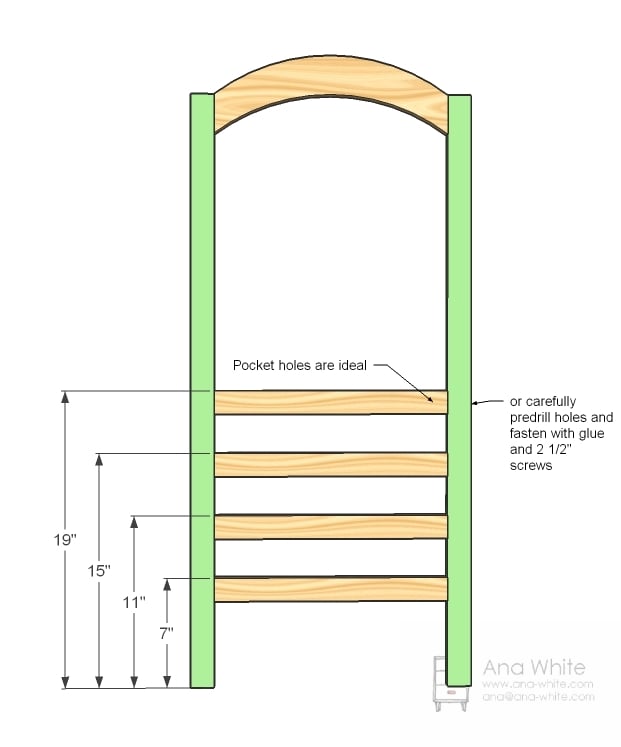
Ladder Rungs
Measure and mark legs for ladder rung positions. Drill 3/4" pocket holes and apply glue to ends of ladder rungs. Attach with 1-1/4" pocket hole screws.
Build two identical.
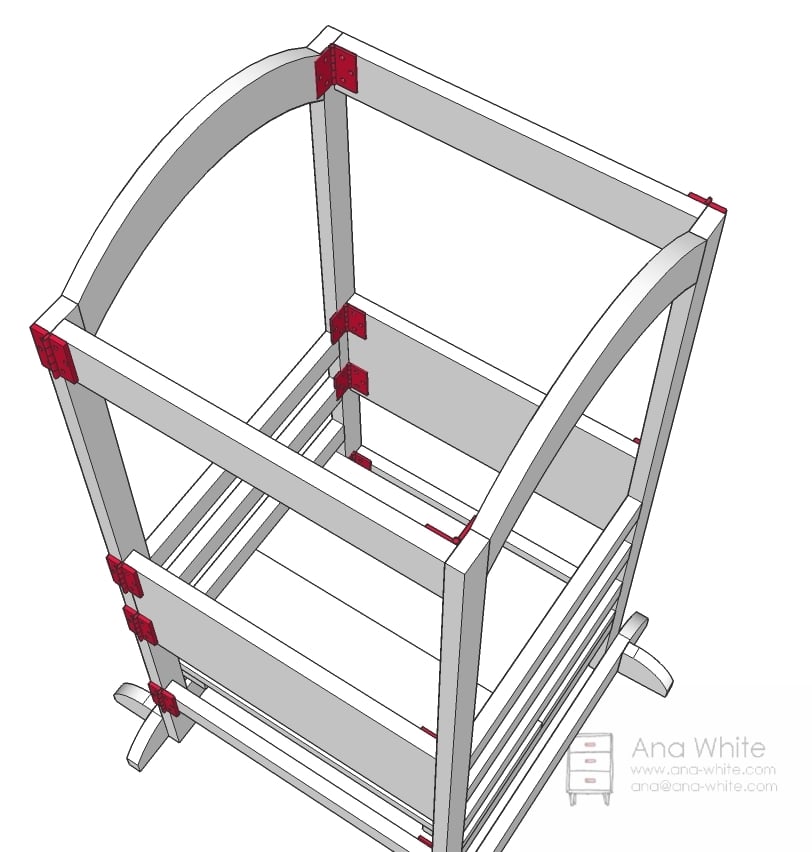
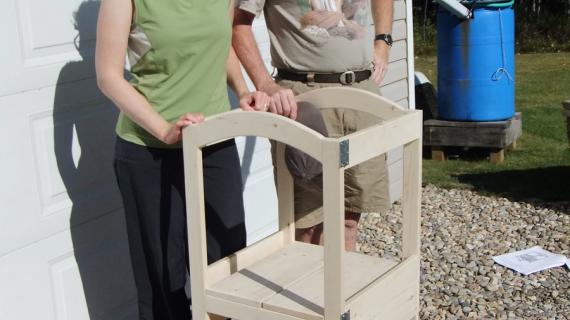
Step 3
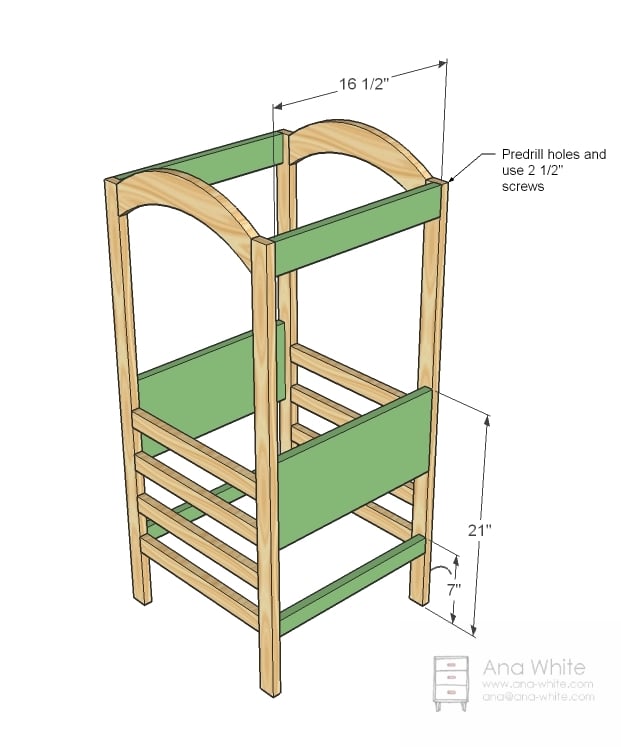
Assembly
Mark the location of the end pieces and predrill holes. Apply glue and screw in place with pocket hole screws. Adjust for square. You can add additional rails to the front and back as you see fit, but keep the sides open so your youngster can crawl in and out of the helping tower.
Step 4
Platform
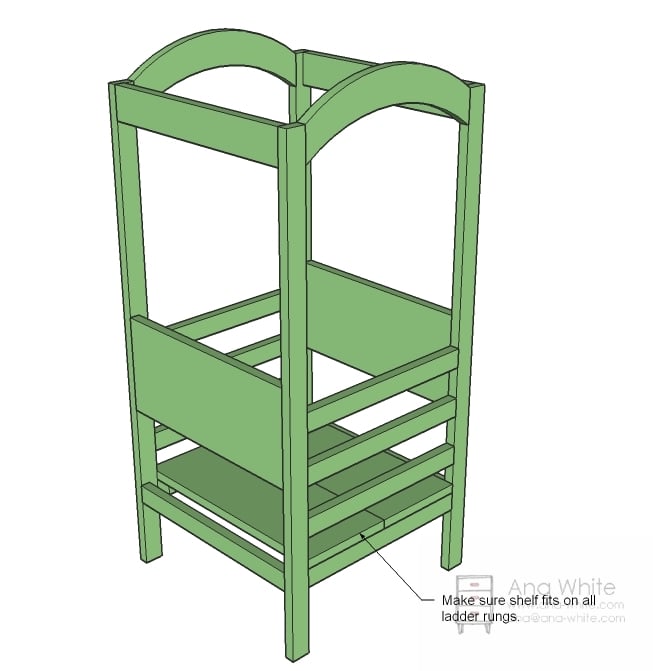
Next, build your platform by marking the 1x8s that are 18″ long 1″ from the outsides. Attach with glue and 1 1/4″ screws the platform supports. These platform supports not only join the 1x8s, but they also keep the platform in place inside the helping tower.
Step 5
Step 6
Tip Resistant Foot
Round the corners on the tip resistors as shown above. Screw together. You can optionally exclude the smaller tip resistors, as side to side tipping is less likely than backward tipping. You know your child better than anyone. Build to suit your child’s needs
Step 7

Attach Tip Resistant Footer
Simply screw the tip resistant footer to the legs as shown above.
Step 8
Folding Mod
By placing hinges instead of screwing the front and back pieces to the side pieces, you can make the Little Helper Tower fold easily. Just make sure you use plenty of strong hinges, make the platform fit very tight (adjust the inset on the ends to 3/4″ instead of 1″ in step 4, and regularly check to make sure your hinges are not loose. I personally prefer simplicity, and any time you add hinges, it increases the complexity. But for those of you who require storage for the Little Helper Tower (would slide under a bed easily) this mod if done with care can be the solution.


Comments
iluvsawdusting (not verified)
Thu, 12/30/2010 - 23:11
AWESOME..TOO bad my kids are
AWESOME..TOO bad my kids are to big now..they're taller than me.
chris (not verified)
Fri, 12/31/2010 - 00:46
its looks nice,but just seems
its looks nice,but just seems like an accident waiting to happen.
In reply to its looks nice,but just seems by chris (not verified)
Trishdish
Wed, 03/16/2011 - 21:29
Might help
I thought so too at first...and then I realized that right now my kids stand on a step stool when they help bake and they fall off that all the time! I think having the railing around them would help especially since mine are old enough to grab the rail if they started to loose their balance. I'm gonna try it!
Momma Cunningham
Mon, 05/06/2013 - 08:45
Really? With all the safety
Really? With all the safety features? That's odd you would say that.
Danielle (not verified)
Fri, 12/31/2010 - 02:52
Yay! We have a 3-year-old
Yay! We have a 3-year-old who loves to help with *everything* and this is perfect! I've been eyeing the $200 models and they just are NOT in our budget -- can't wait to get this made for our girl -- thanks SO much!!
Jenna (not verified)
Fri, 12/31/2010 - 02:54
I can't wait to build this!
I can't wait to build this! Thanks Ana--you are the best!
Concretin Nik (not verified)
Fri, 12/31/2010 - 03:25
So glad you did this one!
So glad you did this one! I've been meaning to do this myself ever since I saw a learning tower... and the $250+ price tags... Now I can move on directly to building rather than design. My 3 year old is gonna dig it! Now he can start doin' dishes! HA!
lee (not verified)
Fri, 12/31/2010 - 03:36
just thought you should
just thought you should remind readers that this tower is not only great for getting the kids to counter height for kitchen helping, but with the addition of a blanket it becomes a play house or puppet theatre.
Jess Shevlin (not verified)
Wed, 09/12/2012 - 11:25
Help AND Play!
I love the comment about tossing a blanket over the tower to make it ready for play time! This is such an awesome project! Thank you so much for posting it!
Erin (not verified)
Fri, 12/31/2010 - 03:46
Doing this one TODAY! with a
Doing this one TODAY! with a 1 year old and 3 year old, I have all the "help" I can get!
Corky King (not verified)
Fri, 12/31/2010 - 04:02
Ana, I'm sending these
Ana,
I'm sending these plans to friends who have a very active toddler. BUT, when I saw this, I immediately thought of how cool it would be to add removable curtain rods - pressure fitted rods - to make this into a PUPPET THEATER! You would need four of them, so the sides and back would be closed. The front rod should be positioned about half-way back to create the "stage" and the front curtains should be split in the middle. How cute would that be?
Donna (not verified)
Fri, 12/31/2010 - 04:03
Wow Ana, another project for
Wow Ana, another project for me! I love this. Thanks!
Jala (not verified)
Fri, 12/31/2010 - 04:28
Thank you Ana!
Thank you Ana!
Rebecca (not verified)
Fri, 12/31/2010 - 04:35
Awesome. Mine will be green
Awesome. Mine will be green or orange. Or teal. We'll see.
Tracey (not verified)
Fri, 12/31/2010 - 05:01
I. Need. One. My 2-year old
I. Need. One. My 2-year old drags chairs all around the house so he can "help" me. Or so he can help himself get that toy that's out of his reach (usually with good reason...)
Kassie (not verified)
Fri, 12/31/2010 - 05:05
Anna, for you to do what you
Anna, for you to do what you do and for free, you are amazing. Thank you so much. I have been looking at your website for a couple of weeks now trying to decide what my first project will be and waiting for my husband to get his project car out of the garage. The helping tower is going to be my first project and I couldnt be more excited. I have a two year old that pushes chairs all around my house to help me. My four year old is handicapped and wants to help me so bad but she cant stand on a chair. so this will be perfect for her and save me from having to search my house for my chairs. Thank you so much
Kerrie (not verified)
Fri, 12/31/2010 - 05:27
I wish my kitchen was bigger!
I wish my kitchen was bigger! My kitchen is smaller than most apartments! Under $20 is a steal too! These sell for $150 online!
Maybe one day when I get a bigger house! (a family of 5 in a house that's just over 1000 sq. ft.! We're a little cramped.)
Kim (not verified)
Fri, 12/31/2010 - 05:37
So excited for this one! I
So excited for this one! I already forwarded it to my dad (aka the one with the tools). We have had too many slips off stools and chairs at our house.
Thanks Ana!
megnstuff (not verified)
Fri, 12/31/2010 - 05:44
I love you Ana. I told my
I love you Ana. I told my husband that I have another lover and her name is Ana. ;)
I will be making these for each of my 3 little helpers and my nephew!
Cassandra (not verified)
Fri, 12/31/2010 - 05:56
Perfect timing!!! I was just
Perfect timing!!! I was just trying to think up plans for something like this over the holiday! My 20 month-old likes to "help" me in the kitchen. I let her sit on her knees on a tall chair but it makes me SO nervous. Can't wait to build this.
kimber (not verified)
Fri, 12/31/2010 - 06:00
This is super cute. AND a
This is super cute. AND a (nother) great idea.
Margaret V (not verified)
Fri, 12/31/2010 - 06:14
I'm considering making this
I'm considering making this my first ever building project *yikes!* and wondered if you could provide a tool list for the novices. I'm sure it's probably obvious, but I'd like to make sure I have everything I need before I start.
Thanks! Your blog is lovely and so empowering!
NichyB (not verified)
Fri, 12/31/2010 - 06:29
This is AMAZING! I have the
This is AMAZING! I have the Learning Tower and I spent $$$ on it- I wish I would have had this plan before dropping all that money!! I've shared this plan with all my friends who wanted the Tower but couldn't afford it. Thanks Ana for making some little kiddos happy helpers! :)
Teri (not verified)
Fri, 12/31/2010 - 07:13
Thanks so much Ana ... I've
Thanks so much Ana ... I've been admiring these in catalogs for years with the plan of always making my own for my granddaughter. We are snowed in, so I'm thinking it is a good project for us to work on. And I may make a few others for gifts. I can't think of a better gift for a small child.
laree (not verified)
Fri, 12/31/2010 - 07:15
Brilliant! I love this! If
Brilliant! I love this! If only I had a place in my house I could actually keep it . . . .
Ana White (not verified)
Fri, 12/31/2010 - 10:06
Kerrie, that is tight (we've
Kerrie, that is tight (we've got three plus two dogs in 1200 square feet and that's tight) but this Helping Tower is not as big as it looks. It's still big, but they just look giant in photos.
jengd (not verified)
Fri, 12/31/2010 - 11:14
It'll be stained or it'll be
It'll be stained or it'll be painted navy and white, likely with a PSU lion head logo on it.
Jacqie (not verified)
Fri, 12/31/2010 - 12:11
What kind of paint do you use
What kind of paint do you use on this? I'm looking for something kid safe, since my toddler might chew on it as he's standing there. I'm hoping not, but you never know.
In reply to What kind of paint do you use by Jacqie (not verified)
cowenmama09
Mon, 05/23/2011 - 23:26
safe paint
Have you looked into milk paint? It's a little more expensive but it would be safer than traditional paint (and give it a more antique feel) =)
In reply to What kind of paint do you use by Jacqie (not verified)
claydowling
Tue, 05/24/2011 - 07:11
Any paint is safe
if it's dried. Only a few, that you're unlikely to find at a home improvement store, are dangerous before they're dried, and they're specialized products with a price tag to match.
Bob Flexner wrote an article about this a few years back, basically that if it would work on wood, once a finish has cured it's safe to store food and eat off of, which is more sensitive than chewing because of the ability to leach chemicals. A transcript of the article is here: http://www.mail-archive.com/[email protected]/msg17636.html
Sabrina (not verified)
Fri, 12/31/2010 - 12:29
Super cute! I've ben tempted
Super cute! I've ben tempted by the retail version (which does coops, btw, for the non-builders who are good organizers) but still put off by the $100+ price and the space it takes up.
For this price, I might justify the space!
shorty (not verified)
Fri, 12/31/2010 - 20:59
I just wanted to thank you
I just wanted to thank you for this WONDERFUL blog!!! I have yet to make anything but when the times comes I know I will be able to do it with all the wonderful help you have given us! My friend has made so much furniture from this site I think her house has had a complete make over this year!!! I hope you have a WONDERFUL new year and that next will be even better for you!
Homebirth Mama (not verified)
Fri, 12/31/2010 - 22:16
brilliant Ana! thank you so,
brilliant Ana! thank you so, so much for this one!
i was just thinking last week that it would be simply awesome if you hacked the learning tower. when i stopped by to finalize my choices of projects for january, to my delight, i saw that you did hack them.
you totally, completely, utterly, MEGA rock!
Homebirth Mama (not verified)
Fri, 12/31/2010 - 22:17
there are many brands of
there are many brands of non-toxic paint out there. bio-shield, afm safecoat. milk paint would be a fantastic choice too.
Heather Fox (not verified)
Sat, 01/01/2011 - 13:19
Have you thought about a
Have you thought about a second life for this project. I was thinking that we'd make this for our girls and when they get too tall, it can be quickly modified to a puppet theater or playhouse.
Lavina D. (not verified)
Sat, 01/01/2011 - 18:09
I am SUPER excited about this
I am SUPER excited about this one! I think I have all the lumber in the garage to make it! Do you think the tower would maintain its' stability if I widened it to fit two children? I was thinking 24 inches. Thanks.
Al Benton (not verified)
Sun, 01/02/2011 - 06:22
Ana, great design! We have
Ana, great design! We have twin granddaughters that just turned 3. My first thought was one wider stand but ruled it out. They're very competitive so one each may be safer. They love helping mom in the kitchen.
Cheryl (not verified)
Sun, 01/02/2011 - 18:17
We have a family of five in
We have a family of five in just over 1000 sq. ft. as well and I actually have a learning tower that someone gave me (otherwise I'd be building this right now). The LT has actually made more room for me in the kitchen, because both my boys (3 and 1) can stand on it together versus each on a chair. My one year-old loves to hang out on it while I do lots of other stuff, too. In my case it was worth the space it takes up and Anna is right, it's not as big as it looks.
farm-marm (not verified)
Sun, 01/02/2011 - 20:42
Kerrie! I have 5kids and me
Kerrie! I have 5kids and me and hubby in 1200 sf. If we can do it anyone can! Its tight to be sure but with creativity you can make it work! Thanks to Ana I have so many ideas just waiting to build! I too thought this would be great for my 2 toddlers as a great climber. They could use it in the kitchen too. LOVE it Ana! Thanks for your site it's pure genius!
Ana White (not verified)
Mon, 01/03/2011 - 08:10
Heather, my daughter is four,
Heather, my daughter is four, so she really is on the upper end of needing this. But she is fascinated with using it as a "tower" and playing Rapunzel and is constantly draping blankets over it and making forts. It is her favorite thing right now! I would like to add a chalkboard/easel as well . . . and I did make a folding mod, so check back for that post.
I would not buy this(retails for $150-$200) with an only child because of the cost/space considerations, but if you can make it for $20, that changes everything. So when your child outgrows it in a few years, there will be little guilt about repurposing or donating or handing it down.
rachel@mypinkf… (not verified)
Mon, 01/03/2011 - 09:15
amazing! I wanted one of
amazing! I wanted one of these, but really can't afford one right now! $20!?!?! I'm amazed!
Ana White (not verified)
Mon, 01/03/2011 - 14:46
Lavina, if you were to just
Lavina, if you were to just add 6" to all the cuts that run parallel to the platform-so all the boards except the legs, ladder rungs and arches and platform supports-that should do the trick. Ana
Lavina D. (not verified)
Mon, 01/03/2011 - 19:28
Thanks!
Thanks!
Annie (not verified)
Tue, 01/04/2011 - 06:02
I have so many "ohhhh this is
I have so many "ohhhh this is gonna be my first project! " but now seeing this, I think this just might be it! I'm scared to death to try it but after seeing my small 4 year old son stand, sit, stand, kneel on one of our kitchen chairs to do his "mixings", I knew that he needs to have one of these! Thanks Ana!
Jacqie (not verified)
Tue, 01/04/2011 - 09:32
I don't think I can get any
I don't think I can get any of these locally. Guess I'll broaden my searches online. Thanks.
Homebirth Mama (not verified)
Tue, 01/04/2011 - 10:50
oh! most home depots carry
oh! most home depots carry yolo colorhouse paint now. i haven't researched that one as much as the others i suggested, but i do believe it is no-voc, no poly's, and pretty safe. :)
Al Benton (not verified)
Tue, 01/04/2011 - 11:16
Well, after consulting with
Well, after consulting with the twins Mom, we're going to widen the Tower by 6" as you suggest, so both can use it together.
April K (not verified)
Tue, 01/04/2011 - 15:42
I bought the materials for
I bought the materials for this today at Home Depot and was fortunate to get a guy nice enough to make all my cuts! But I am still sooooo nervous about getting started!
My husband gave me the go ahead about 2 weeks ago to purchase the $150 kitchen helper online but I just wasn't ready to pay that much. The following week these plans were posted here! We really need it because our 4 year old daughter has spina bifida and it's just not safe for her to kneel on a chair since she doesn't have good balance. I used to let her sit on our island to help me until she fell head first onto the ceramic tile floor and had to rush her to the ER. I guess $150 for the kitchen tower would have been cheaper than that, huh?!? Wish me luck!!!
Anna (not verified)
Wed, 01/05/2011 - 07:39
I have been on vacation from
I have been on vacation from your blog for too many days!!! I have literally been trying to figure out something just like your design. My daughter wants me to hold her constantly when I am in the kitchen or working at a table or whatever. Now she can see what I am doing but not be on my hip while I am doing dishes and painting the play kitchen i just built from YOUR PLANS!!! I don't think I can thank you enough for all of your inspiration
Dawn (not verified)
Wed, 01/05/2011 - 11:20
Oh, thank you, thank you!
Oh, thank you, thank you! I've had my eye on the Learning Tower and it's $200 price tag for a year now...this is a totally do-able project and will make me, my husband and our son so very happy. $20 in materials, really?! I am so excited. Thanks for sharing your plans with us.