


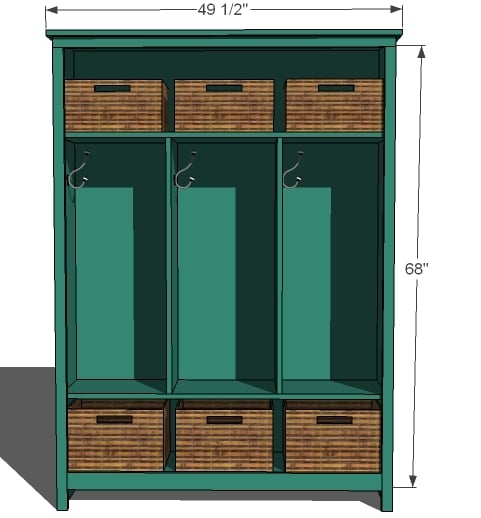
Need better organization in your entryway or hall, but it's too narrow for a hall tree or bench, and don't want to drill holes in your wall?
Build your own locker unit! It's the size of a bookshelf, and is freestanding - so you can move into your home without drilling holes in the wall. You can build it with basic tools and our free step by step plans with full diagrams, shopping and cut lists.
Need a smaller size? We have plans for a smaller locker bookshelf here.
Preparation
- 44 – 1 1/4″ Pocket Hole Screws
- 2″ brad nails
- 1″ brad nails
- 3 – 1×12 – 12 foot Pine or Whitewood Boards
- 4 – 1×2 – 8 foot Pine or Whitewood Boards
- 1 – 1×3 – 4 foot Pine or Whitewood Board
- One sheet 1/4″ plywood, paneling or MDF
- Wood Glue
- Wood filler or Pocket Hole Plugs
- Coat Hooks
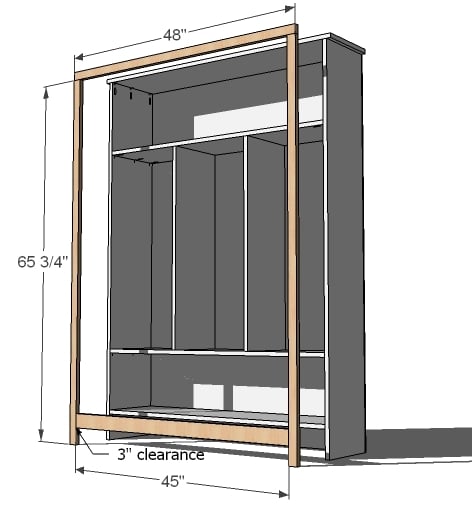
- 2 – 1×12 @ 67 1/4″ (sides)
- 3 – 1×12 @ 46 1/2″ (shelves)
- 1 – 1×12 @ 49 1/2″ (top)
- 2 – 1×12@ 36 1/2″ (locker sides)
- 1 – 1×2 @ 48″ (header)
- 2 – 1×2 @ 65 3/4″ (side trim)
- 1 – 1×2 @ 49 1/2″ (crown)


Instructions
Step 1
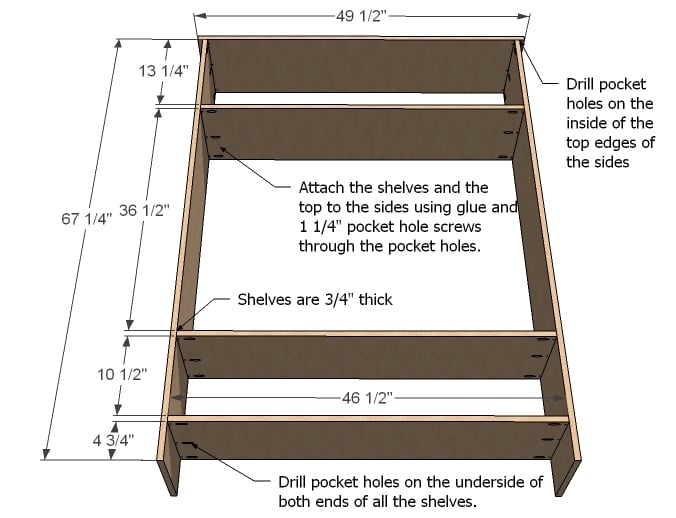
Build the Box
This is so easy. Just drill pocket holes on both ends of all of the shelves and the top ends of the sides. Drill three pocket holes per end, as shown in the diagram. Then mark the sides for the joints of the shelves. Apply glue to the shelves and screw in place with 1 1/4″ pocket hole screws and glue.
Step 2
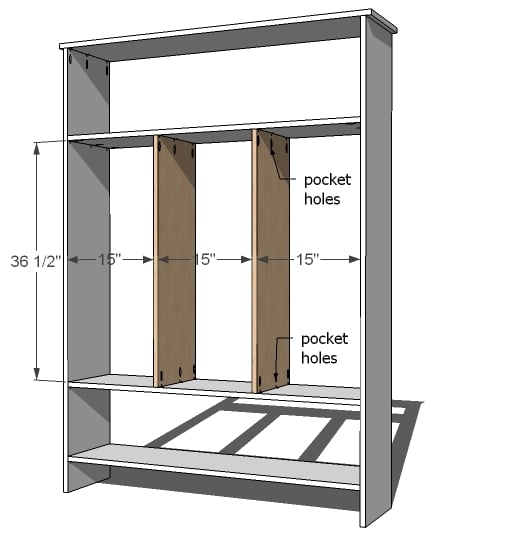
Locker Dividers
Mark the middle shelves as shown above. Drill pocket holes on both ends of each of the dividers. Use 1 1/4″ screws and glue to attach dividers to the shelves.
Step 3
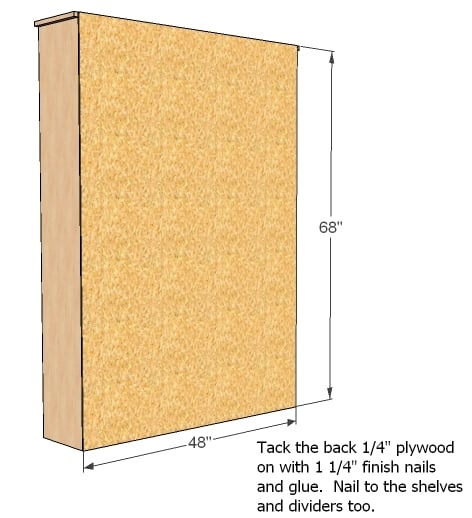
Back
I purposely choose to make the back 48″ wide so that 1) you don’t have to rip plywood and 2) you don’t have to waste plywood. Use 2″ nails and glue to nail the back on. Make sure you all the shelves and dividers too.
Step 4
Face Frame
Drill pocket holes on both ends of the footer and header. Drill two pocket holes per end. Mark legs 3″ from bottom and screw the footer and header to legs as shown above. Tack the frame to the face of the cabinet.
Step 5
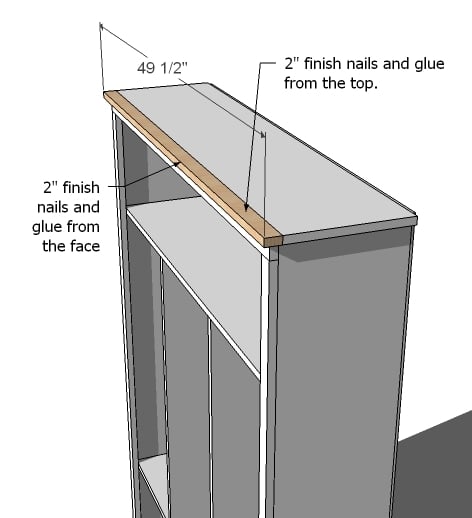
Attach front top trim to finish out the front edge of the cabinet.

Comments
andy friberg (not verified)
Tue, 10/12/2010 - 17:34
Thank you Ana... love this
Thank you Ana... love this site and your work!! I also LOVE the new cubbies in my side entryway thanks to your plans and our hard work!! :)

evelania (not verified)
Tue, 10/19/2010 - 11:36
Hi Ana, This is
Hi Ana,
This is beautiful--I especially love the color! Looking at your other images, including the adirondack chair, I am now curious what paint colors you used. Please tell me they are note "opps" or mixed paint colors. Can you supply the paint name and maker? Thank you!
Jill (not verified)
Sat, 10/23/2010 - 11:38
I LOVE it!! I love the
I LOVE it!! I love the photos. Congratulations!
Erik (not verified)
Tue, 10/26/2010 - 14:54
Hey Ana, Just saw this
Hey Ana,
Just saw this featured in the magazine. Very nice work. I am going to build this for our mudroom. One question, how did you paint/finish it to give it that aged/weathered look? It looks really great.
Ana White (not verified)
Tue, 10/26/2010 - 19:44
Erik, thank you! The finish
Erik, thank you! The finish is simply two coats of cosmic green by Valspar in flat. I let that dry, sanded edges with sandpaper, then added a coat of chocolate glaze (check the faux painting aisle) over the paint. Then a clear top coat. Good luck!
Stephanie Bowling (not verified)
Thu, 10/28/2010 - 05:11
I LOVE this!!! I don't have
I LOVE this!!! I don't have a mudroom, but, have a small homeschool room that I am desperately needing storage for. I need something that can go up against a specific wall and this is the perfect width. But...I'm wondering if it would look bad to add shelving in one of the sections for books. I have lots of puzzles, little boxes of art supplies, etc. It would also be cool for each boy to have a place to hang thier backpack and put their own stuff. I just want to make sure it's practical and won't look strange....opinions???
caroline (not verified)
Thu, 11/04/2010 - 13:48
I'm in love with it! And the
I'm in love with it! And the color just makes it even more irresistable....
I want to use it in my entry way closet (which is wide and narrow) but i want it to be only two cubbies so i can add a rod for jackets. do you have altered dimensions anywhere on the site for this? When I start measuring and doing math, things dont end up well! Thanks!
Karrie Johnson (not verified)
Mon, 11/08/2010 - 10:54
Ana- I love your site! Can
Ana-
I love your site! Can you please tell me what size storage baskets you used in your photos for the cubbies? Thanks!
-Karrie
AJ (not verified)
Mon, 11/22/2010 - 12:56
I built this a few weeks ago
I built this a few weeks ago to hold our hockey gear in the garage (5 kids). The bottom shelf is perfect for skates and roller blades. The thing that REALLY makes this work for me, I used pegboard for the back, so I can hang gear inside, and extra gear hangs behind the unit. This is helpful since the unit is not against a wall! I also added a hook to hang an adult bag along the side. I just wish I had a rod on the other side to hang all the jerseys.
Now, for construction. I won't use MDF, so it's all solid pine 1x12. That made it very easy to get the lumber home in the minivan, but next time I'd use plywood, and 1x16. This was also my first project with the Kreg jig. It's amazing! I splurged on the vice-grip clamp, and I wouldn't want to live without it. I wish I had more time, and I could stain it, and personalize it with nameplates or numbers. Pair this with the "rustic bench" for a great place to gear up during street hockey games!
Lori S (not verified)
Tue, 11/30/2010 - 03:20
THANK YOU ANA!! First and
THANK YOU ANA!! First and foremost, just for empowering women out there who think they can't swing a hammer, or use power tools--your beautiful, practical and EASY to build storage unit just shows all the women (and practical men too), that "necessity" really is the mother-of-invention.....Speaking from a woman who has been building alll my life (mostly out of necessity because "you can't find exactly what you want,when you want it,at the price you want to pay for it"). Starting from a very young age being dragged around to building projects alongside my grandfather,to remodeling a boat with my father, to rebuilding a home with my stepfather, it is refreshing to see these projects being built by "Moms" out there who aren't afraid to share with all of the readers. I applaud you and your husband for building your home by yourselves. I will be looking forward to more of your projects in the coming issues! Thanks again!!
Ana White (not verified)
Sun, 12/05/2010 - 21:10
Lori, thank YOU! I'm so
Lori, thank YOU! I'm so touched by your comment. Really appreciate you kindness. Ana
Amie B. (not verified)
Wed, 12/22/2010 - 04:16
Thank you for sharing the
Thank you for sharing the plans for this great project! I am brand new to this type of furniture building... just finished the three 5 shelves! I am currently in the midst of constructing the locker cabinet and wanted to add some feedback. This is my first big project, so I followed the plans exactly and ended up a little confused along the way. On your cut list, it may help to include the 1x3 45" footer. Also, the materials list has 1" finish nails (later in the plans, it says 1 1/4", but I followed the materials list). I used the 1", but I think they are too short and pull apart from the face frame and back. Last thing, I used the kreg jig and followed its instructions for 3/4" boards. The 1 1/4" pocket hole screws did not seem long enough, so I had to slide the jig forward. Then, the wood plugs were too big for the pocket holes. Being a complete novice and sure that I am doing something wrong, any advice or lessons learned for pocket holes? Thank you again for these amazing free plans!!!
Annette (not verified)
Fri, 12/31/2010 - 10:23
Hi, Ana! I'm such a big
Hi, Ana!
I'm such a big fan! You've got me excited for warmer weather so I can build some things! I love your lockers and wanted to ask: what would the dimensions be to have four of them instead of three? I'm math-challenged and honestly can't figure it out, lol! I want to build this and put it in my large entryway. Any help would be awesome! Again, big fan, love your work!
Jessica (not verified)
Fri, 01/07/2011 - 04:52
I'm a little scared but at
I'm a little scared but at the same time thrilled about making this! I have a gift card to Lowe's from my parents. I also have a Lowe's $10 off project starter coupon. And my dad let me borrow his Kreg jig kit! I even took some before pictures of my entry way and the current storage system I have. All I need is to put on my coat and shoes and head out the door. Wish me luck!
Ana White (not verified)
Mon, 01/10/2011 - 10:30
Good luck! You got this one!
Good luck! You got this one! BTW - Still LOVE mine!
tmchoops (not verified)
Sun, 02/06/2011 - 05:12
I just got my Kreg Jig...I am
I just got my Kreg Jig...I am excited to do this project!!!
Thanks for the inspiration!!! you rock.
Dawn (not verified)
Wed, 02/09/2011 - 09:54
Ana-I love this. We needed
Ana-I love this. We needed some kind of locker system to add to our entryway. Our house is small and crowded, and our mudroom/laundry room is even smaller! I have one quick question, could you use beadboard for the back to dress it up a little, or is the plywood/MDF the best option?
Christina Jo (not verified)
Mon, 02/21/2011 - 07:14
Holy cow... I JUST MADE
Holy cow... I JUST MADE THIS!!!! In four hours.... This is my fourth built plan from you, Ana, and I still stand back in amazement that I have built them!!!!
You are incredible, and thanks for giving me (and a whole lot of others) the confidence to get out there and do this! This is sooo awesome. I keep going outside to look at this locker that I JUST BUILT MYSELF. Amazing!
Thanks again!!
ChristinaJo (not verified)
Tue, 02/22/2011 - 07:50
http://www.facebook.com/album
http://www.facebook.com/album.php?aid=2076462&id=1380494550#!/photo.php…mrgreen
Sat, 03/12/2011 - 12:58
Crates
Ana, could you tell me the dimensions of those crates next to locker cabinet?
Guest (not verified)
Sat, 04/30/2011 - 15:20
can i build this out of MDF
can i build this out of MDF and then frame it in pine?
momsthewordus
Thu, 01/19/2012 - 09:49
Locker doors
Hi, Ana. I love this locker! I'd like to build a single door to cover the center section. The door would have metal attached to it for a magnet board. Would a single door (with sheet metal) be too heavy? This is my first project.
Thank you so much for sharing all of these fantastic ideas! I haven't been able to sleep for two nights because I've been so excited about all the plans I want to try.
kongk
Tue, 05/21/2013 - 06:02
I high appreciate this post.
I high appreciate this post. It’s hard to find the good from the bad sometimes, but I think you’ve nailed it! would you mind updating your blog with more information?
Get more info about W3BZ