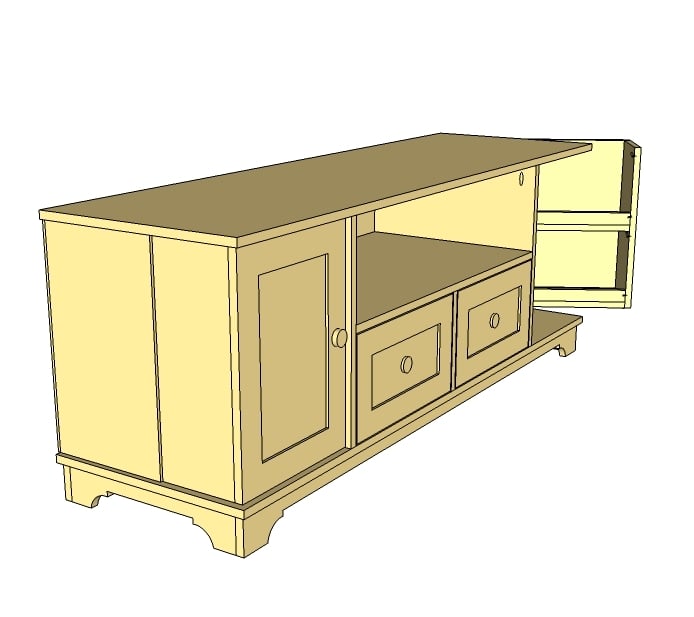
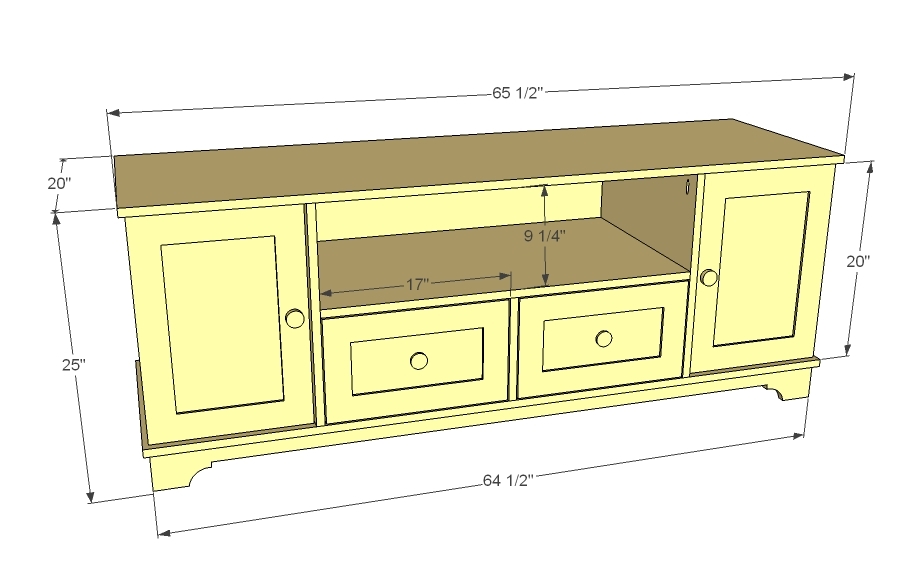
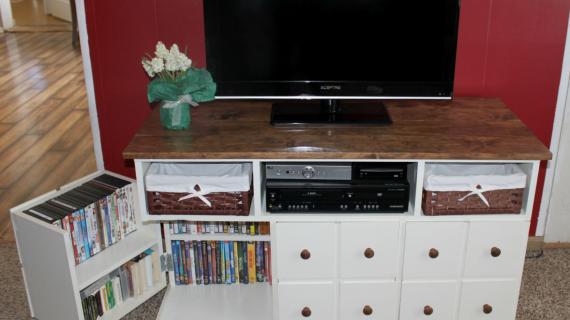
Yes, you can DIY a media console with doors sized perfectly for DVDs, roomy drawers, and even a generous spot for gaming and media equipment. This free, step by step plan is inspired by Pottery Barn's Cynthia Console, with cottage styling, two doors each with two shelves sized for DVD, two roomy drawers as well as cabinet storage.
Fits flat panel tvs.
Preparation
1 1/2 sheets of 3/4" plywood or MDF
1/4 sheet of 1/2" plywood or MDF
1 sheet of 1/4" plywood or MDF
1 - 1x12 @ 6 feet long
2 - 1x4 @ 8 feet long
2 - 2x2 @ 8 feet long
3 - 1x3 @ 8 feet long
1 - 1x2 @ 8 feet long
3 - 1x8 @ 8 feet long
2 - 16" Drawer Slides, Side/Undermount like these
2 - Sets narrow profile hinges
Boards referred to as 1x20s measure 3/4" thick x 20" wide, cut to given lengths.
Boards referred to as 1x12s measure 3/4" thick x 11 1/4" wide, cut to given lengths.
Boards referred to as 1x8s measure 3/4" thick x 7 1/4" wide, cut to given lengths.
This plan also uses 2x2s (1 1/2" x 1 1/2"), 1x4s (3/4" x 3 1/2") and 1x3s (3/4" x 2 1/2")
Make sure your boards measure to these widths.
Cut List for Main Box
2 - 1x20 @ 20" (Vertical Partitions)
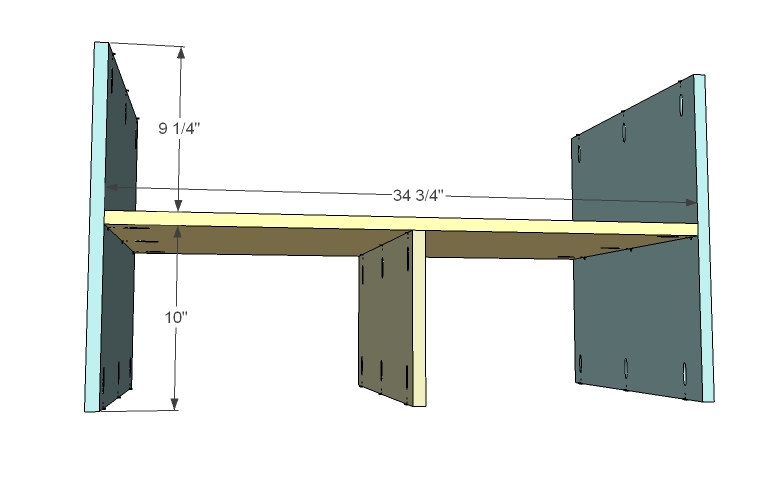
1 - 1x20 @ 10" (Drawer Partition)
1 - 1x20 @ 34 3/4" (Open Shelf Bottom)
2 - 1x20 @ 65 1/2" (Top and Bottom)
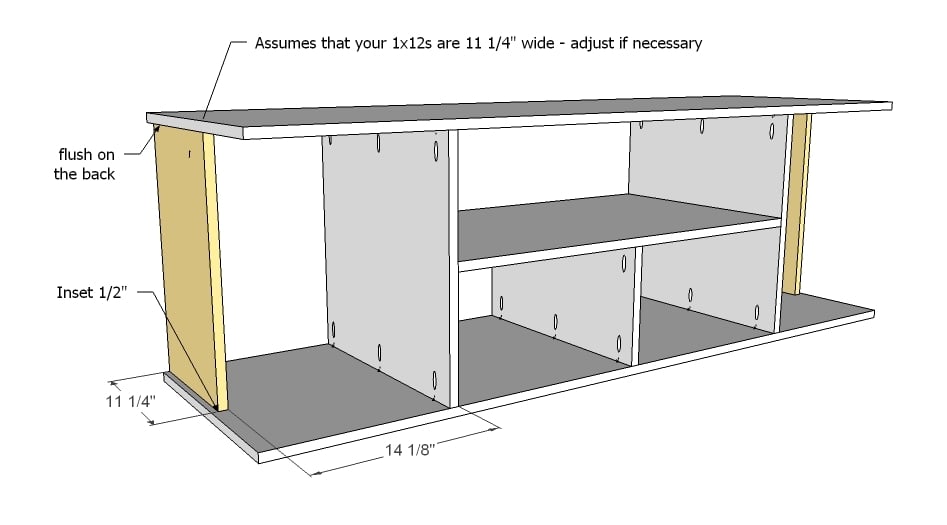
2 - 1x12 @ 20" (Sides)
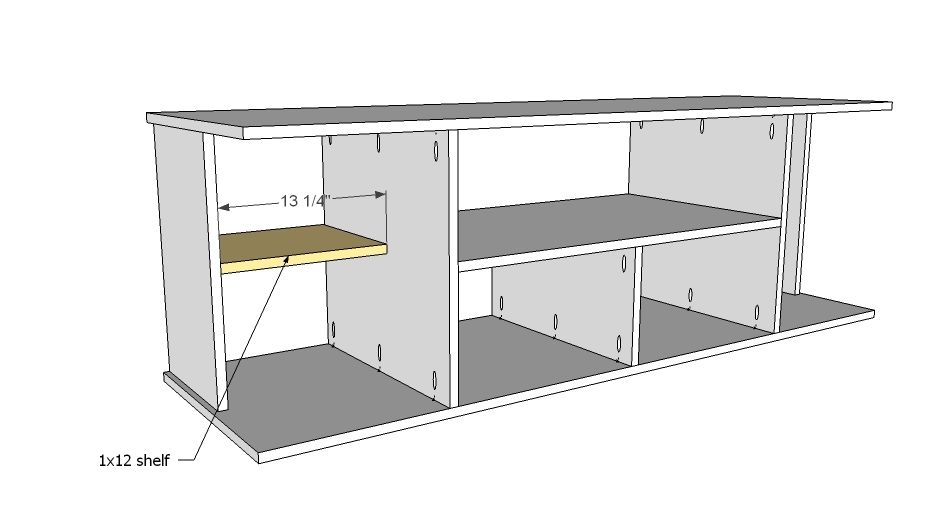
2 - 1x12 @ 13 1/4" (Cabinet Shelf)
1 - 1/4" Plywood @ 21 1/2" x 64 1/2" (Back)
Cut List for Base
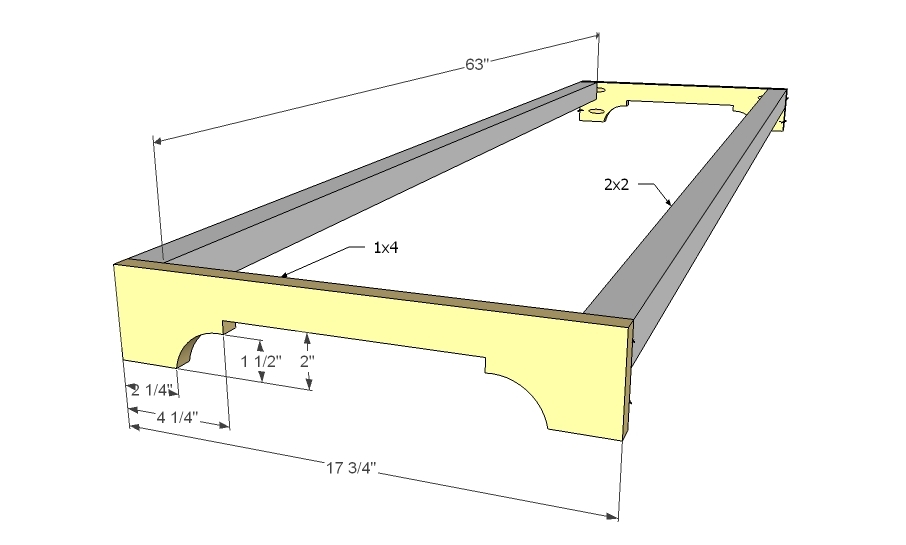
2 - 2x2 @ 63"
2 - 1x4 @ 17 3/4"
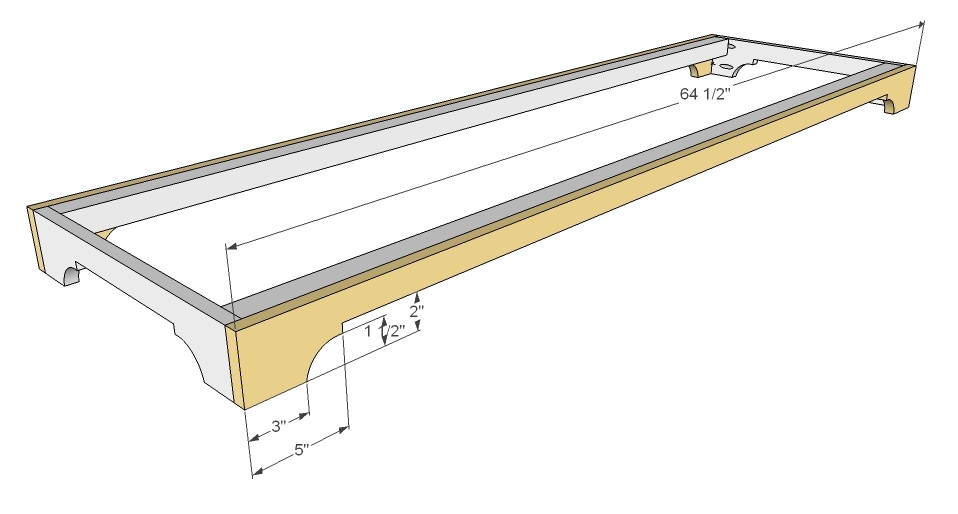
2 - 1x4 @ 64 1/2"
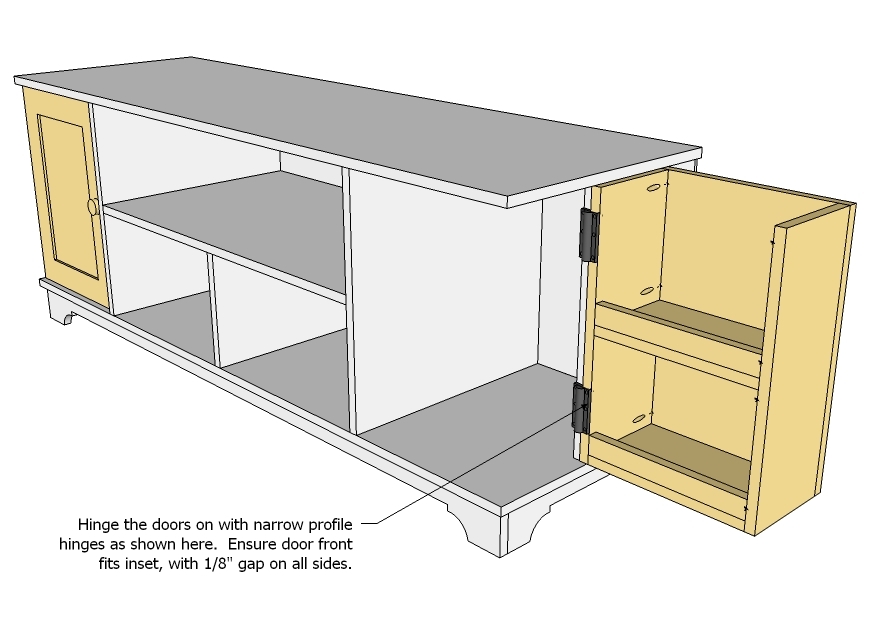
Cut List for Door Storage (2)
4 - 1x8 @ 19 3/4"
4 - 1x8 @ 12 1/2"
4 - 1x2 @ 12 1/2" (Optional ledges to keep contents in door storage)
Cut List for Doors (2)
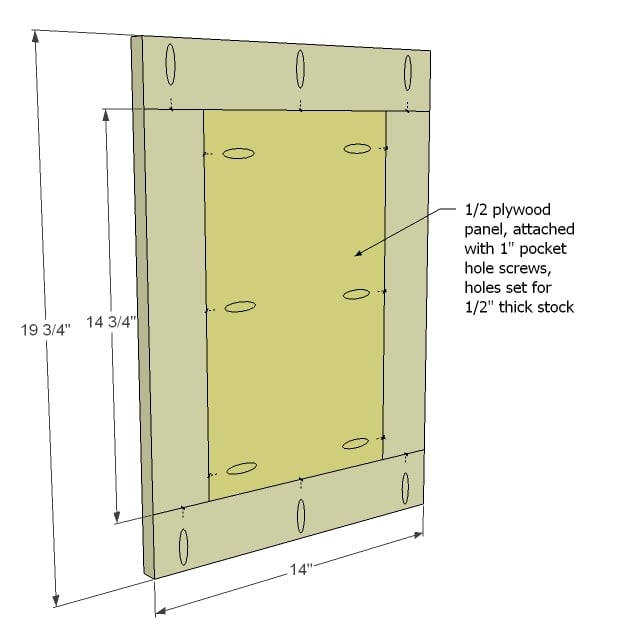
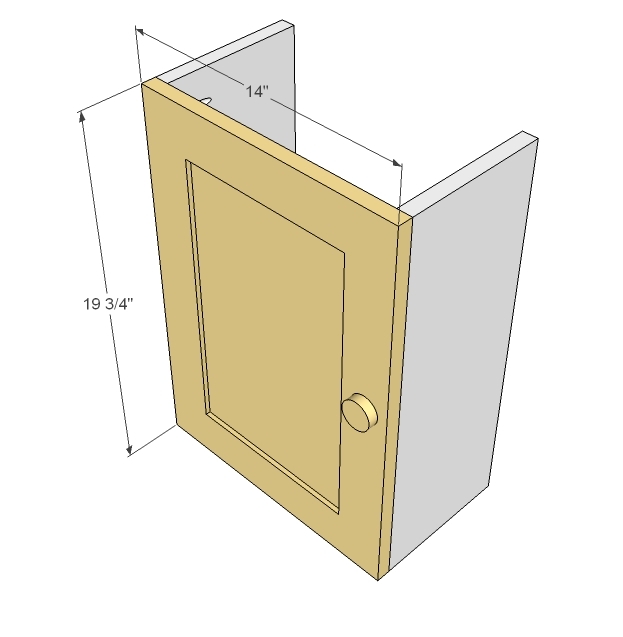
4 - 1x3 @ 14 3/4"
4 - 1x3 @ 14"
1 - 1/2" Plywood @ 14 3/4" x 9" (Center Panel)
Cut List for Drawers (2)
4 - 1x8 @ 14 1/2"
4 - 1x8 @ 16 1/2"
2 - 1/4" Plywood @ 16" x 16 1/2"
Cut List for Drawer Faces (2)
4 - 1x3 @ 16 3/4"
4 - 1x3 @ 4 3/4"
2 - 1/2" Plywood @ 4 3/4" x 11 3/4"
For the 1x20s . . . cut your 3/4" plywood into 20" wide strips, and then treat those strips like boards. You will need to use a tablesaw or cut carefully with a circular saw. Be aware that when building for doors and drawers, you must cut very precisely, or your doors/drawers will not operate correctly.
This plan is very complicated and requires a great deal of precision. Please do not take this project on as a beginner.
Pocket holes are shown throughout diagrams if you choose to use a Kreg Jig. This project can also be built using standard joinery techniques.
Please read through the entire plan and all comments before beginning this project. It is also advisable to review the Getting Started Section. Take all necessary precautions to build safely and smartly. Work on a clean level surface, free of imperfections or debris. Always use straight boards. Check for square after each step. Always predrill holes before attaching with screws. Use glue with finish nails for a stronger hold. Wipe excess glue off bare wood for stained projects, as dried glue will not take stain. Be safe, have fun, and ask for help if you need it. Good luck!
Instructions
Step 1
Step 2
Step 3
Step 4
Step 6
For the footer, first mark and cutout the footer with a jigsaw as shown above. Sand until jigsaw edges are smooth and match. For the long straight part of the cut, I personally would use a circular saw.
Note that the front footer is slightly different, although the same pattern.
Attach side footers to the 2x2s with glue and screws.
Step 7
Step 8
Step 9
Step 10
Doors. There are many ways to build doors, ranging from super complicated to uberly easy. Easy is shown above. Use 1/2" plywood for the panel, framed in 1x3s. Remember that you will need to set your Kreg Jig for 1/2" stock when fastening the panel to the frame. Then you will need to set the Kreg Jig for 3/4" stock when attaching the frame boards together.
For a tutorial on something very similar - except you can skip the raised panel part - go here.
Step 11
Step 12
Step 13
Step 14
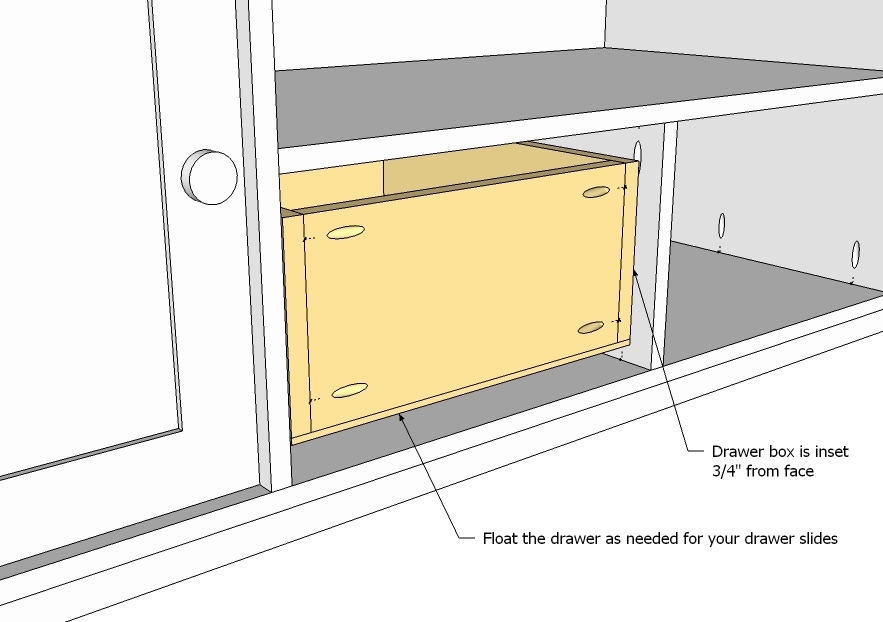
When used properly, drawer slides really aren't that difficult to install. The main thing is to remember that the door face needs 3/4", so the slides/drawer needs to be inset 3/4" at this step. I've got a tutorial on how to install drawer slides here.
Step 15
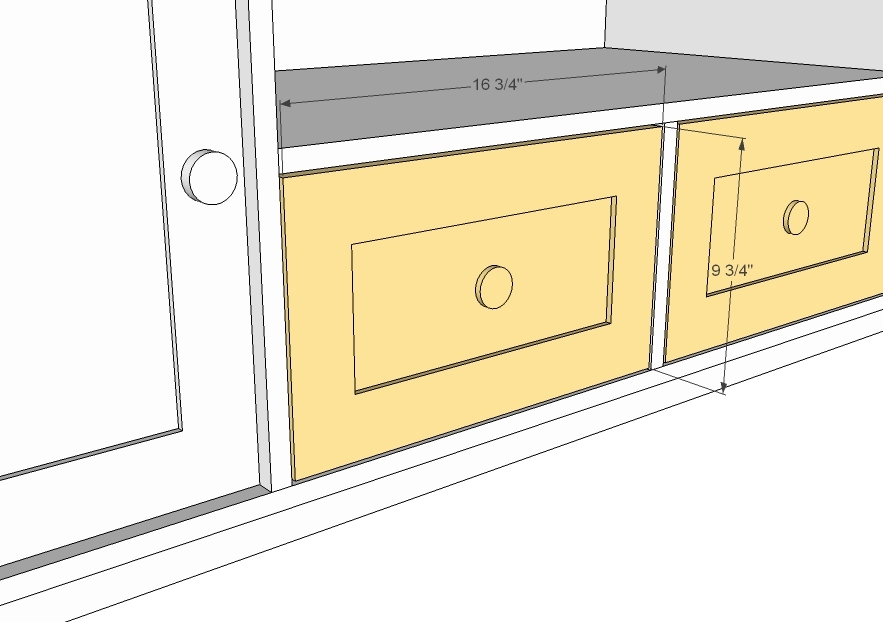
Build the door faces to fit, as you did the cabinet doors. The measurements shown above are for an 1/8" gap on all sides of the drawer face.
My trick for perfect looking drawer faces? With the drawer box full inserted, place the drawer face over the drawer box, centering the face on the opening. Next comes just a few 1/4" finish nails through the drawer face frame into the drawer box. Then open the drawer, and screw the face on from the backside.
Be considerate of the location of pulls/handles when nailing/screwing.
It is always recommended to apply a test coat on a hidden area or scrap piece to ensure color evenness and adhesion. Use primer or wood conditioner as needed.








Comments
ACraftyCauldron
Fri, 05/13/2011 - 09:52
GORGEOUS!!!
I LOVE THIS! Thank you so much for sharing these plans, even without the build. I've often wondered just how much room you had for all of these builds. Love the charity idea!
Marisol
Fri, 05/13/2011 - 14:44
OMG!!!!
I have been DROOLING over this media cabinet in the P&B catalogue for who knows how long!!!! I have already started the Apothecary console :(...but will def. need to make this one down the line!
THANKS!
Nichelle (not verified)
Fri, 05/13/2011 - 14:59
Oooo this is a must build!
Oooo this is a must build! I've been looking for something to fit our needs and this just works perfectly! PLUS it's an excuse to buy the Kreg Jig I've been wanting, you know since I'm saving so much money by building instead of buying. :) Thanks Ana for another awesome plan!
kpcrash
Sat, 05/14/2011 - 06:55
Thank You!!!!
This was one of the other items in the PB catalog (study loft already built was another). Time to visit Lowe's :)
spiceylg
Mon, 05/16/2011 - 09:19
YAY!
Oh my gosh, I've been waiting for these plans and kept looking, and some how missed the post initially! How did I do that when I'm on everyday almost? Thank you so much! I'm so excited! It's exactly what I want/need for our living room. You're the best Ana!
Colleen Hammond (not verified)
Thu, 05/26/2011 - 06:46
This weekend!
We've made a few modifications and will be constructing this for MY Rec Room this weekend. Looking forward to the completed project...and thanks for the plans, Ana!
In reply to This weekend! by Colleen Hammond (not verified)
spiceylg
Mon, 09/19/2011 - 22:30
?
Hi Colleen. Did you ever build this? I don't recall seeing pics of anybody building this and I'm dying to see it!
In reply to This weekend! by Colleen Hammond (not verified)
spiceylg
Mon, 09/19/2011 - 22:30
?
Hi Colleen. Did you ever build this? I don't recall seeing pics of anybody building this and I'm dying to see it!
spiceylg
Mon, 09/19/2011 - 22:28
Tricky?
Hi Ana. Want to build this so bad but you caution against a beginner building this. What is it that makes it tricky, is it the swinging doors? I requested this so I'm being impatient for sure. I don't plan on building it for DVD storage and would modify it to have the sides flush with the front and make regular cabinet doors. Do you think I should still wait until I have more experience under my belt?