


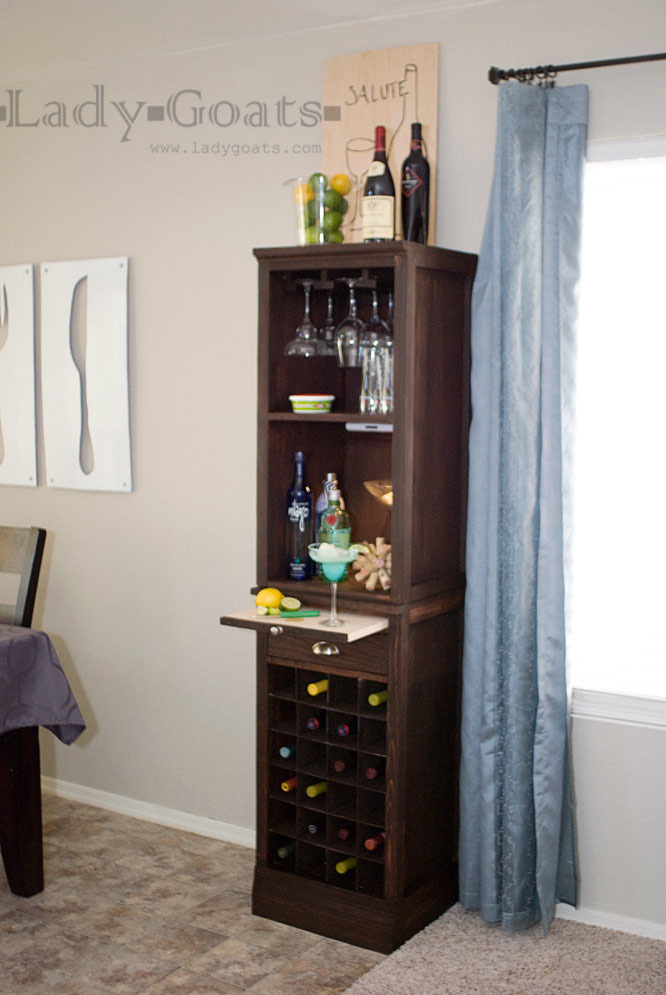
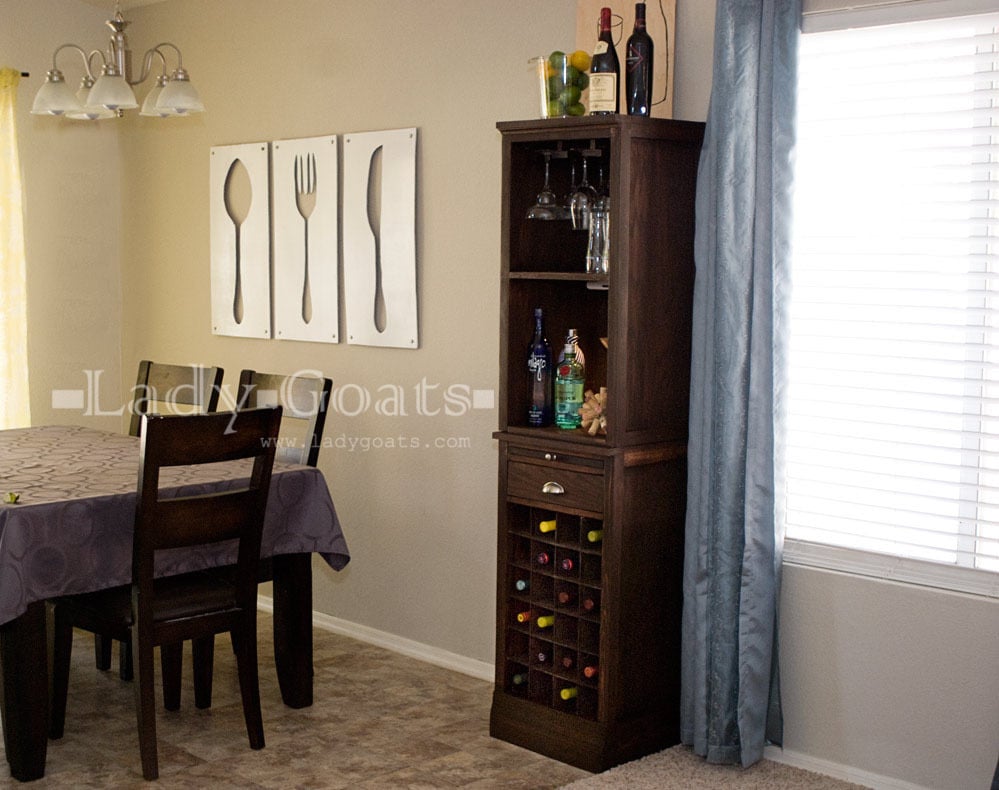
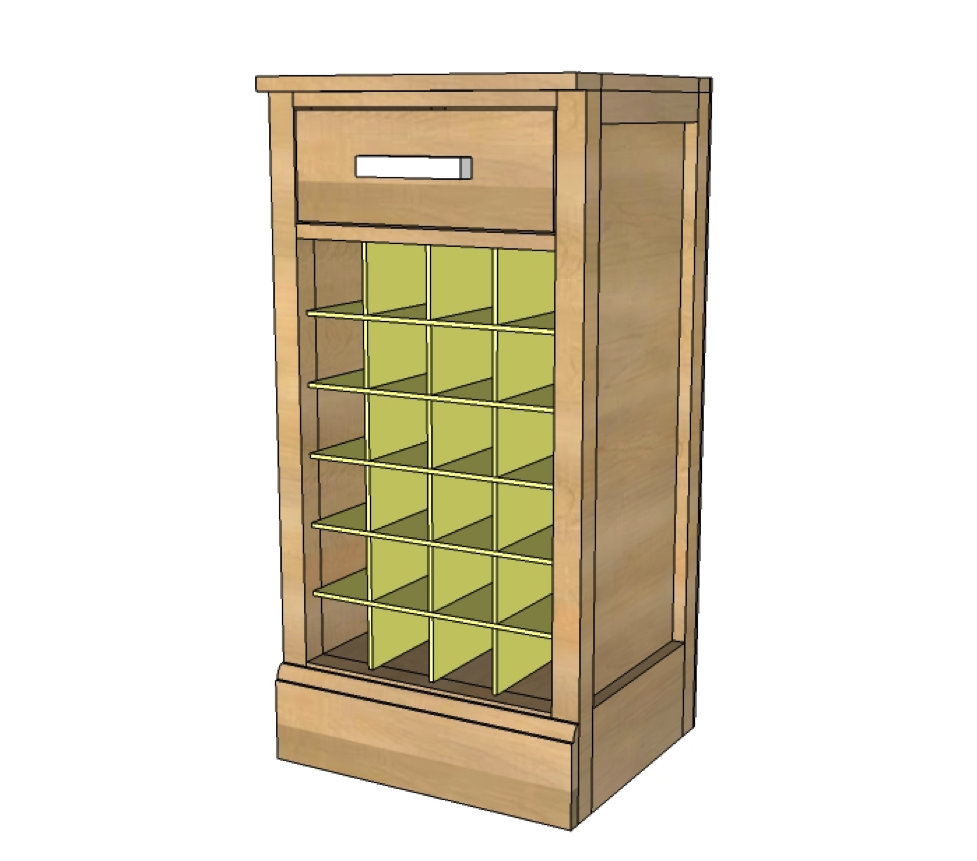
Build a beautiful bar system, inspired by the Pottery Barn modular bar collection. These simple, free DIY plans are for the wine grid base.
A note from Gina:
I was so excited when I saw these plans! My husband really wanted to have a "prep" area at the bar, so Ana and I discussed this, and one possible option was to have a board that sits on top of the drawer box. So you would pull the drawer out and it has a "top" that you can rest things on. Then you can push the top board in (wood rails inside, made of 1/4" stock) to access the drawer contents. I thought that was genius, but the Mr. really wanted a breadboard. I didn't want to use drawer slides, so I kinda winged this, and came up with a great little pull-out. I'll definitely post what I did on my blog, in case anyone else wants to take a peek (and master it so everyone else can build one if they want).
Preparation
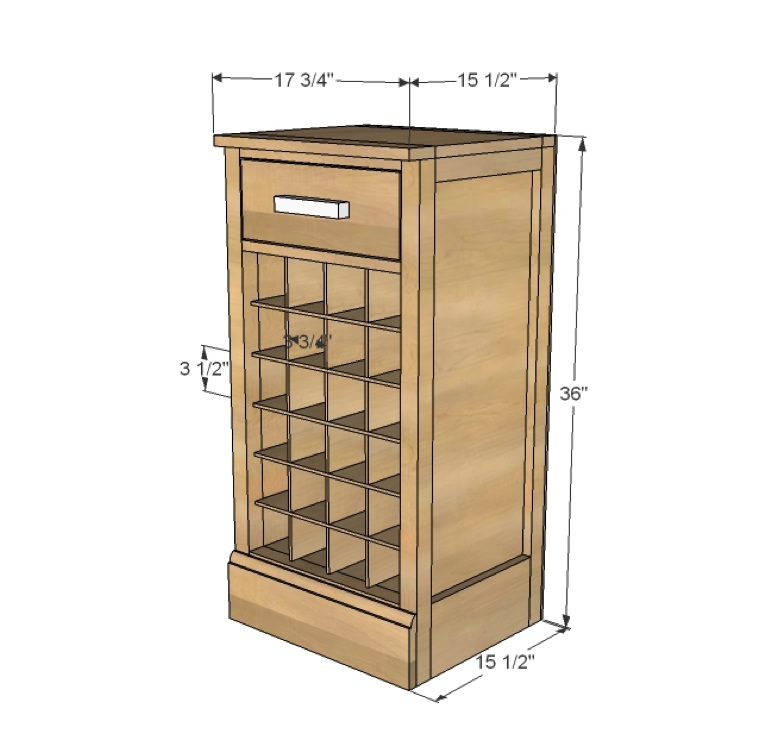
10 feet of 1x12 boards (you can get 32 feet of 1x12 boards from a single sheet of ¾” plywood ripped into 11 ¾” widths – consider if making three bases)
1 sheet of ¼” plywood will cover one base with wine grids and one hutch
2 – 1x2 @ 8 feet long
1 – 1x6 @ 4 feet long
12 feet of 2x2 boards
2 feet of 1x3 boards
6 feet of 1x4 boards
2 feet of 5 ¼” base moulding
Knob or handle
12” drawer sides – may be able to use 14” drawer slides depending on the width of 1x12 boards
Screws and nails, depending on pocket hole use or not
2 – 1x2 @ 11 ¾” – cut to width of 1x12 boards
2 – 1x6 @ 11 ¾” – cut to width of 1x12 boards
2 – 1x12 @ 35 ¼” (shown using ¾” plywood ripped into strips 11 ¾” wide x 8 feet long)
1 – 1x12 @ 14 ¾”
4 – 2x2 @ 35 ¼”
5 – 1x2 @ 14 ¾”
1 – 1x2 @ 17 ¾”
1 – 1x12 @ 17 ¾”
1 – 1x3 @ 17 ¾”
2 – 1x4 @ 13 ¾”
2 – 1x4 @ 14 ¼”
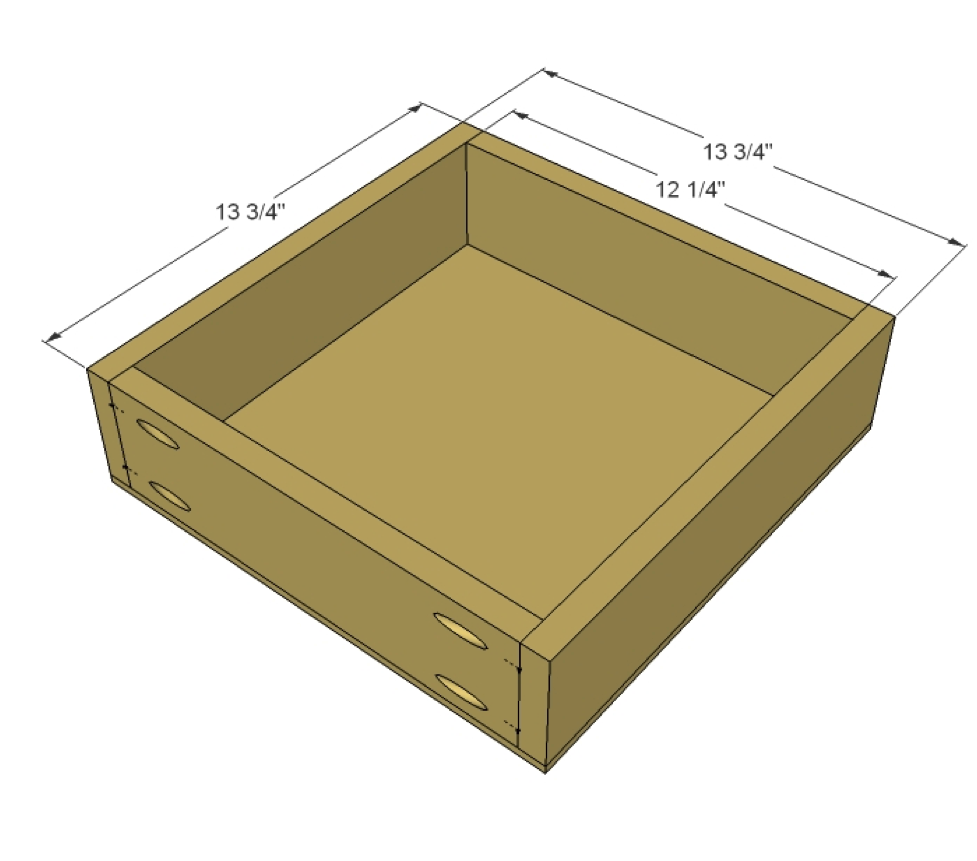
1 – ¼” plywood @ 13 ¾” x 13 ¾”
1 – 1x6 @ 14 ½”
1 – ¼” plywood @ 36” x 17 ¾”
1 – 5 ¼” base moulding @ 17 ¾”
5 – ¼” plywood @ 13 ¾” x 14 ¾”
3 – ¼” plywood @ 13 ¾” x 22 ½”
Rip ¾” plywood into strips 11 ¾” wide to use as 1x12 boards. These boards can also be used as sides for the hutches and additional shelves.
If using the wine grids – cut the ¼” plywood into 1 strip 17 ¾” wide x 8 feet long and 2 strips 13 ¾” wide x 8 feet long. Use the 17 ¾” wide strips for the backs, and the 13 ¾” wide strips for wine grids and drawer bottoms. The 17 ¾” wide strips can also be used for the back of the hutches.


Please read through the entire plan and all comments before beginning this project. It is also advisable to review the Getting Started Section. Take all necessary precautions to build safely and smartly. Work on a clean level surface, free of imperfections or debris. Always use straight boards. Check for square after each step. Always predrill holes before attaching with screws. Use glue with finish nails for a stronger hold. Wipe excess glue off bare wood for stained projects, as dried glue will not take stain. Be safe, have fun, and ask for help if you need it. Good luck!
Instructions
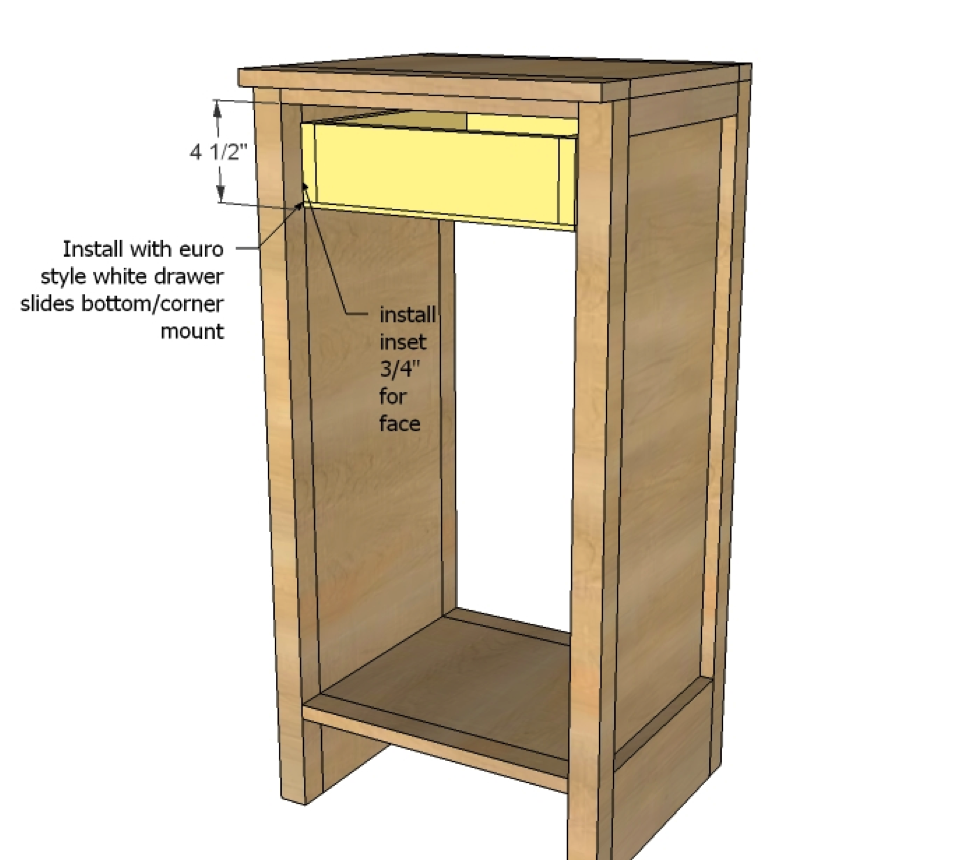
Step 1
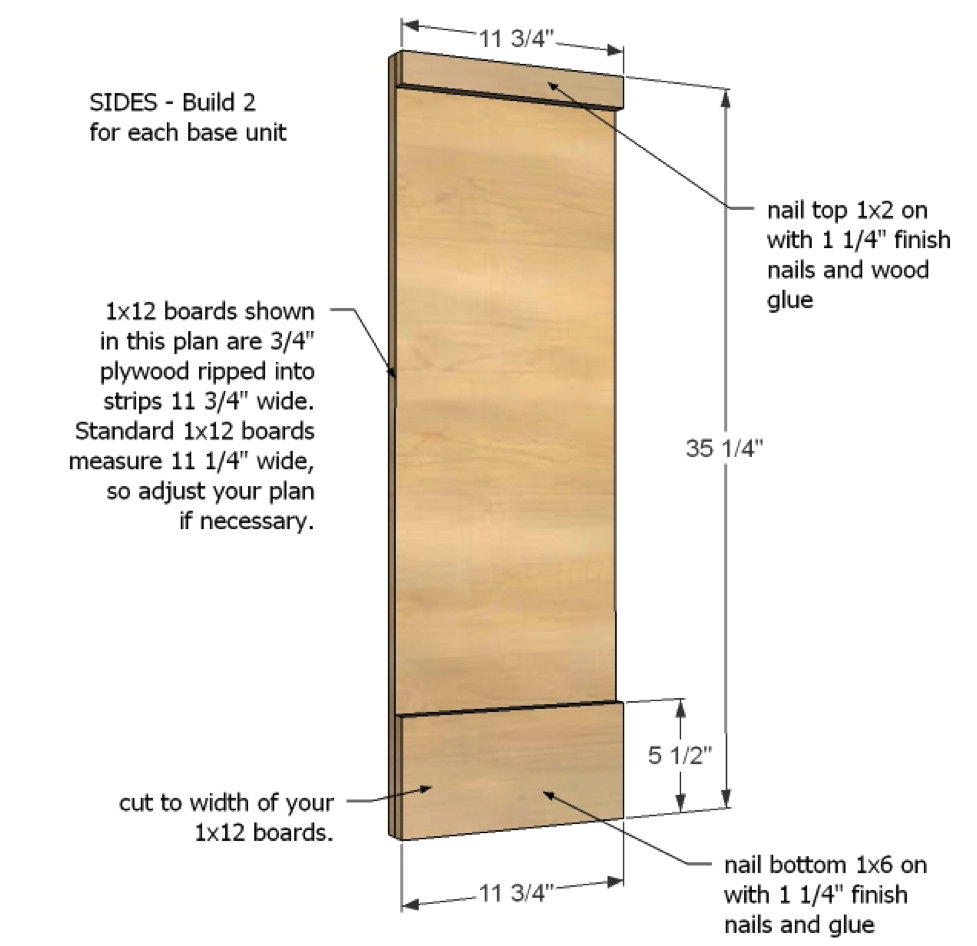
Build the sides. Cut your 1x2s and 1x6s to the width of your 1x12 boards and attach with glue and finish nails as shown. It would also be smart to add your pocket holes to the insides of these boards now (you'll need them on the opposite side of the trim, on the outside edges of the board. You do not need to put them at the top and bottom.) so that you can attach the front and back trim. You'll need to build two of these.
Step 2
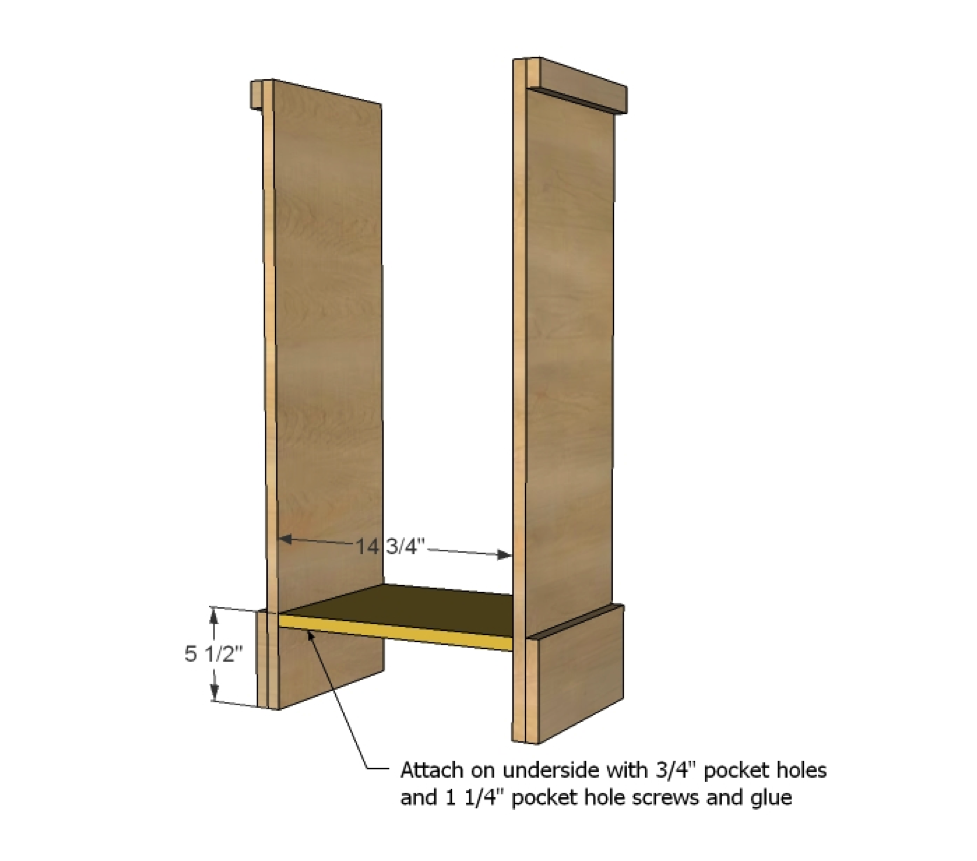
Measure 5 1/2" from the bottom, and attach the bottom shelf using pocket holes set for 3/4" stock and 1 1/4" pocket hole screws.
Step 3
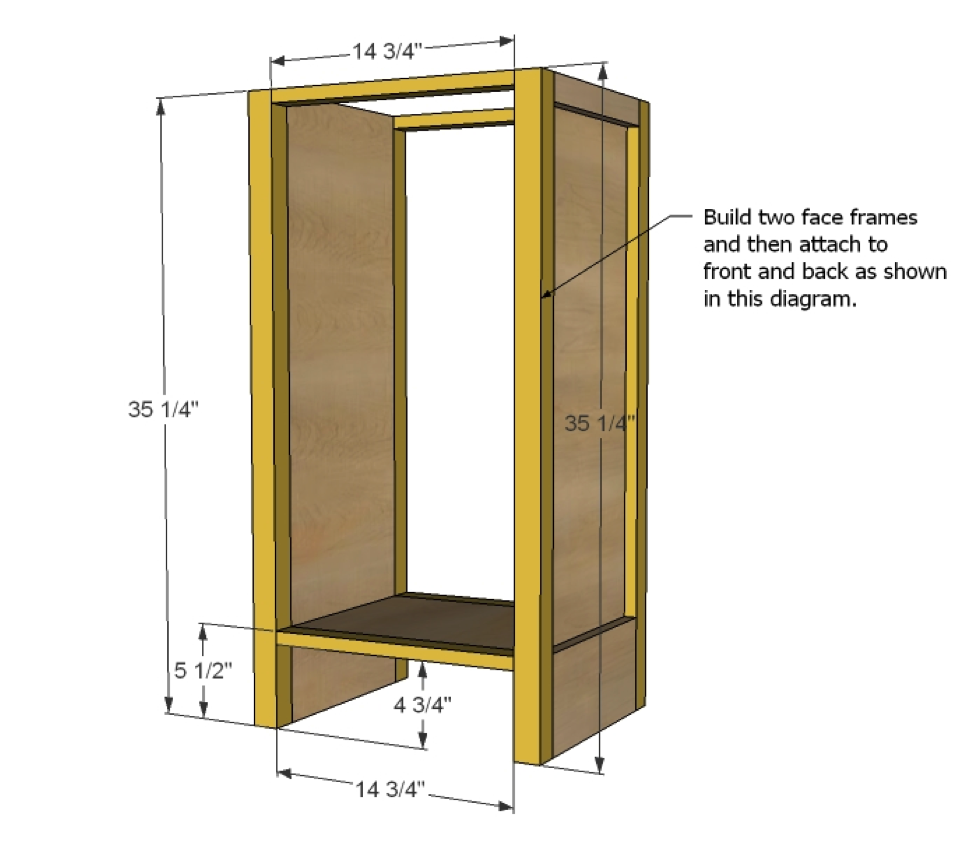
Build two face frames as shown, and atatch to the front and back using pocket holes set for 3/4" stock and 1 1/4" pocket hole screws (these are the holes you pre-drilled in step 1)
Step 4

Attach the top as shown, using glue and 1 1/4" finish nails.
Step 5
Step 6
Step 7
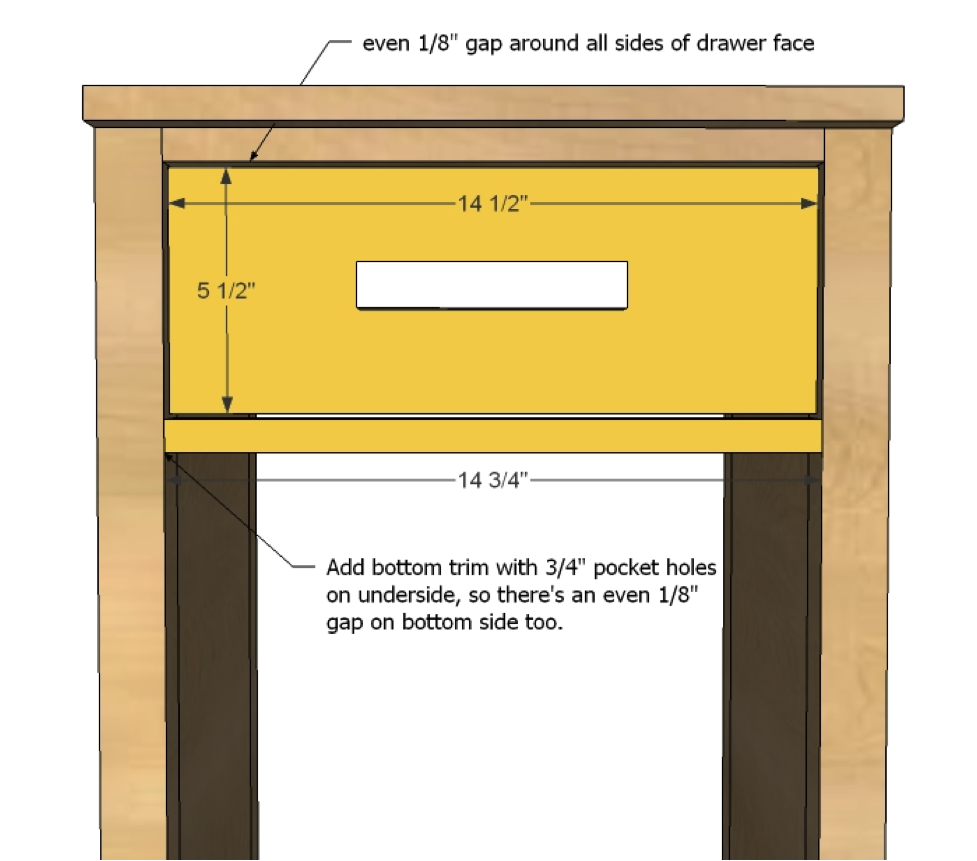
Attach your face frame so that there's an even 1/8" gap on the top and on both sides. Then attach the bottom trim so that there is a 1/8" gap on the bottom, using pocket holes on the underside, and glue.
Step 8
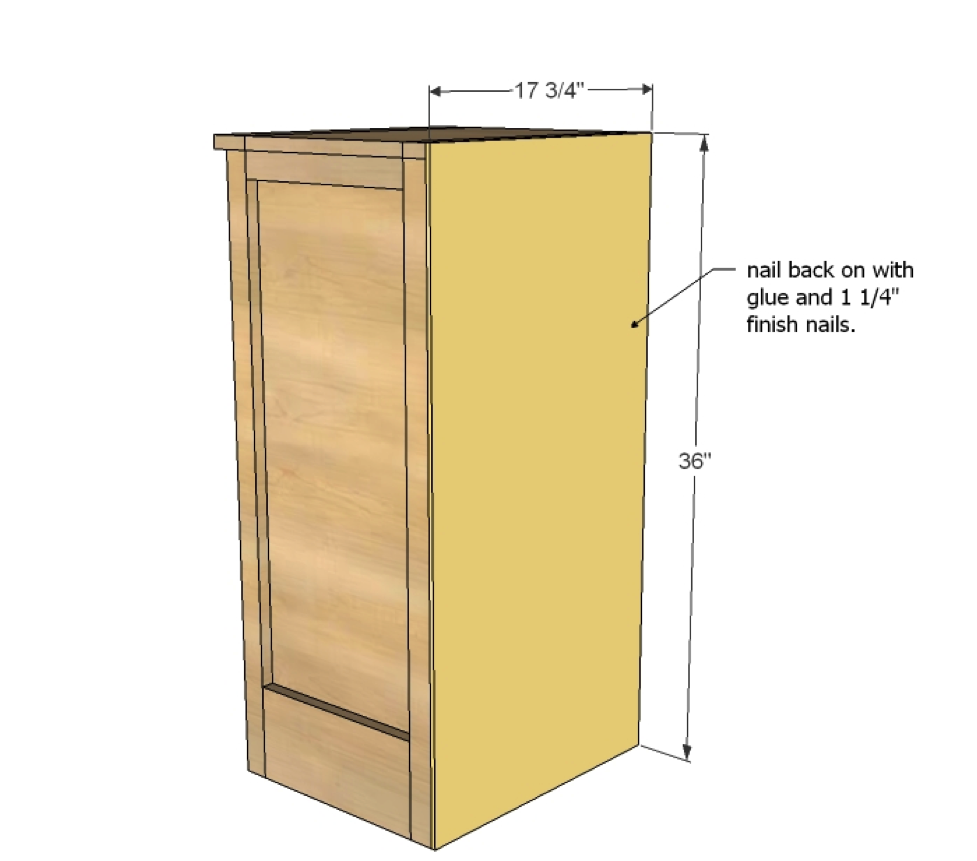
Attach the back with glue and 1 1/4" finish nails.
Step 9
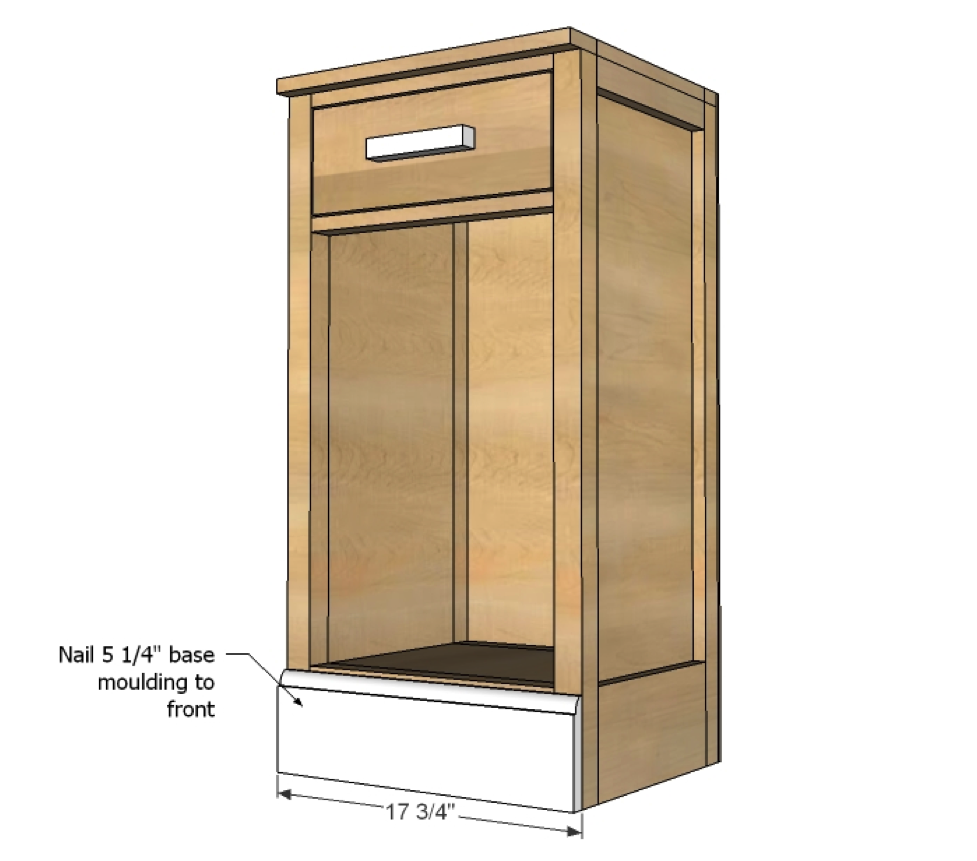
Nail your base moulding to the front. If you can't find 5 1/4" moulding that's stainable, you can buy shorter moulding and cut scrap 1x to make up for the remaining space.
Step 10
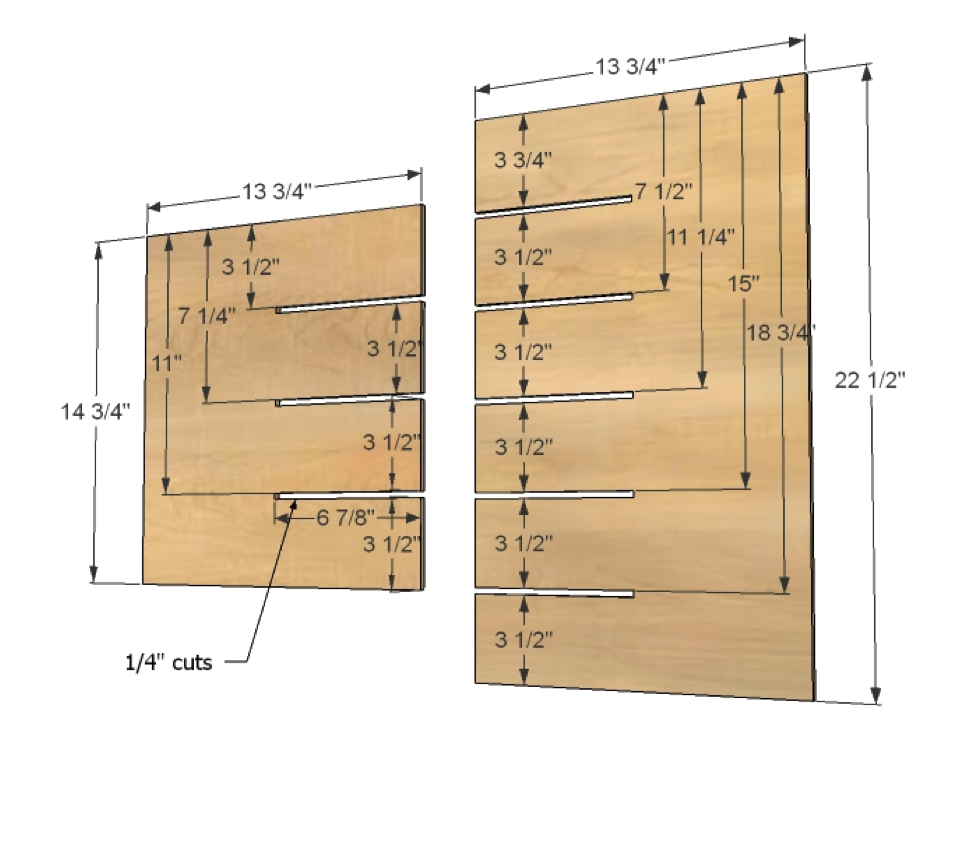
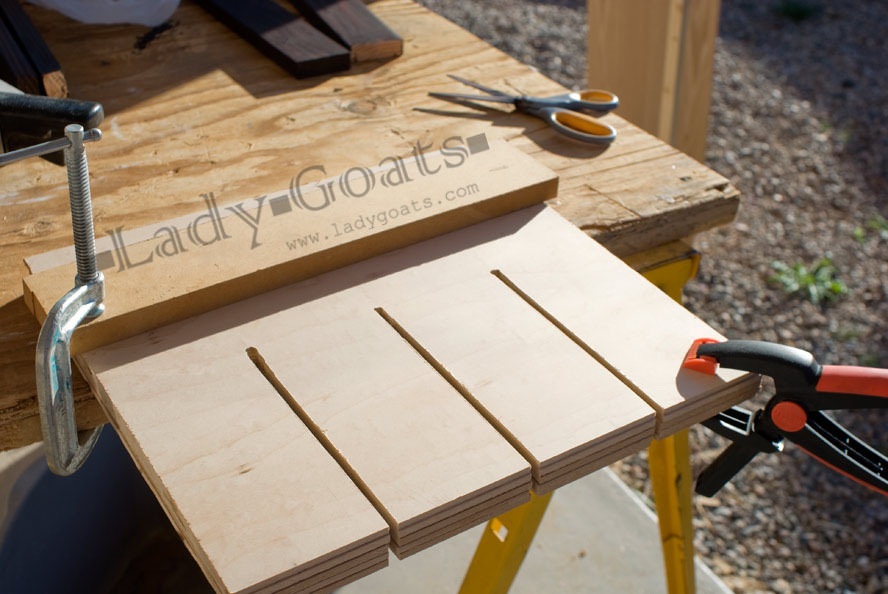
The best way to do this would be with a table saw, and just setting the fence to make these cuts. But if you don’t have a table saw, you can drill ¼” holes at the end of each mark (remember to add an 1/8” to measurements shown so you drill the hole in the center of the cut) and then cutting to that mark with a circular saw or jigsaw. Use a square to mark the cuts long before you cut. Remember, the cuts need to be the width of the plywood thickness.
* Gina marked the cuts as shown above on one of each sized board and clamped all of the boards together (making sure they were perfectly aligned). Then she took her circular saw to make the cuts. If you do this, you'll need to touch up the bottom boards with either a Dremel or a jig saw, since the circular saw's rounded blade made the bottom board's cuts shorter than the top's.
Step 11
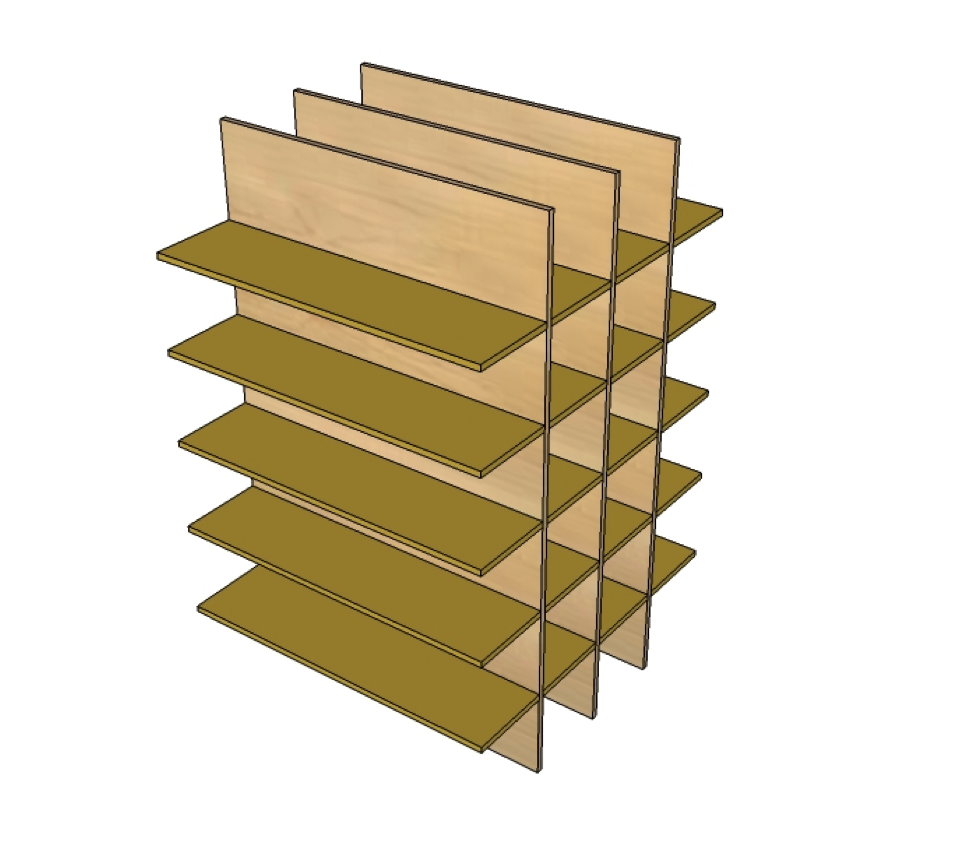
Once all the pieces go together, you should not need glue.
Step 12
The base should hold the pieces tight and square.
Step 13
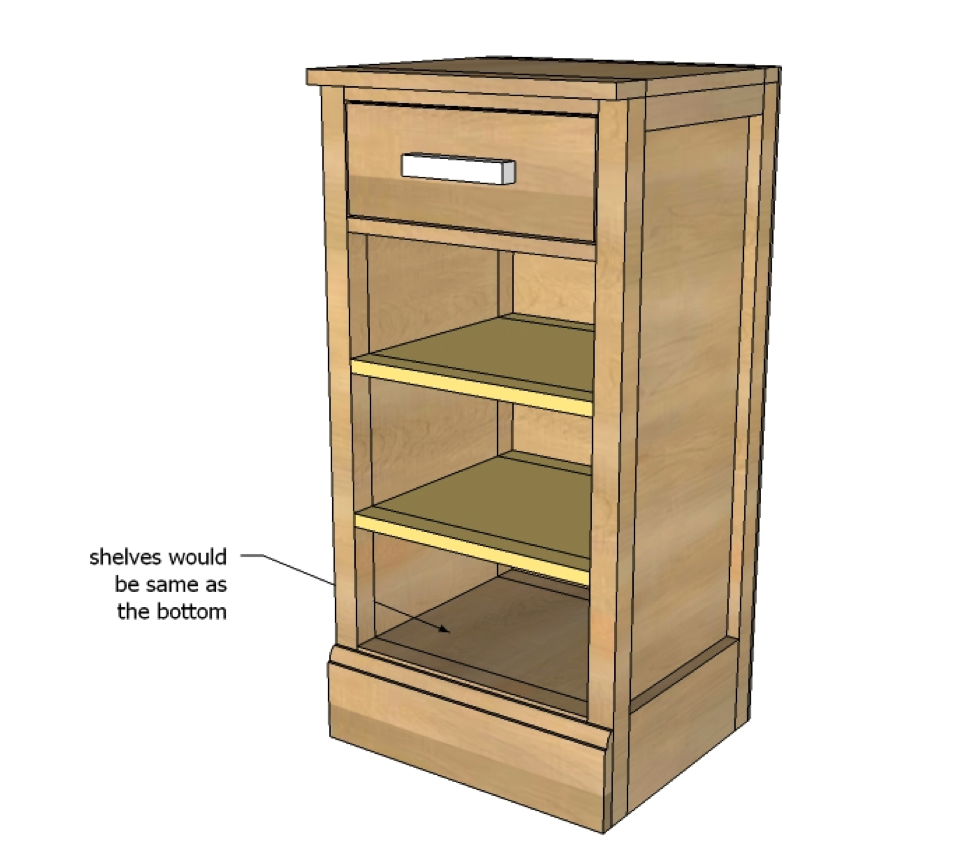
That way you can change it up with shelves if you like!
It is always recommended to apply a test coat on a hidden area or scrap piece to ensure color evenness and adhesion. Use primer or wood conditioner as needed.

Comments
kindlekat
Sun, 01/29/2012 - 17:17
This looks amazing!
THANK YOU so much for building and posting these plans!! I've been thinking about building a wine bar for a long time, and modifying another Ana plan to do so. However, this looks so chic and slim! I love how much space you'll get in one unit, plus it'll be easier to carry if we move. Thanks again!
Lady Goats
Mon, 01/30/2012 - 09:12
A blog post about my modifications
If anyone's interested to see how I modified this to accommodate the breadboard pull-out, I wrote a not-very-interesting post about it. Go here to read it.
claydowling
Mon, 01/30/2012 - 12:41
The Breadboard
It might not qualify as fascinating reading for the general population, but I liked seeing how it was installed.
In reply to The Breadboard by claydowling
Lady Goats
Mon, 01/30/2012 - 15:03
Thanks, Clay!
Glad someone could get through it (I thought it sounded really dry/dull). Then again... I have no attention span!
dananryan
Mon, 01/30/2012 - 15:50
Informative & Entertaining
I thought your post was fun! I absolutely love how this piece turned out. Now to figure out where I could put one...
Guest (not verified)
Tue, 01/31/2012 - 13:07
I LOVE the bar. I was
I LOVE the bar. I was actually just looking at the Pottery Barn version and trying to figure out how we could possibly afford it. These plans are awesome! We were thinking of making 3 bases of this piece just like on Pottery Barn. 2 closed door cabinets and one with the wine holder. What do you think would be the best way to add/build a door?
ana8178
Thu, 02/09/2012 - 11:23
What finish did you use on
What finish did you use on this?
In reply to What finish did you use on by ana8178
Lady Goats
Fri, 02/10/2012 - 07:47
Finish
Hi Ana, I used General Finishes gel stain in Java!
ana8178
Fri, 02/10/2012 - 10:32
Thanks, I love it!
Thanks, I love it!
Daniel (not verified)
Fri, 10/19/2012 - 20:00
cutting board
I see no where on the plans how to make the pull out shelf/cutting board? does anyone have the how to?