

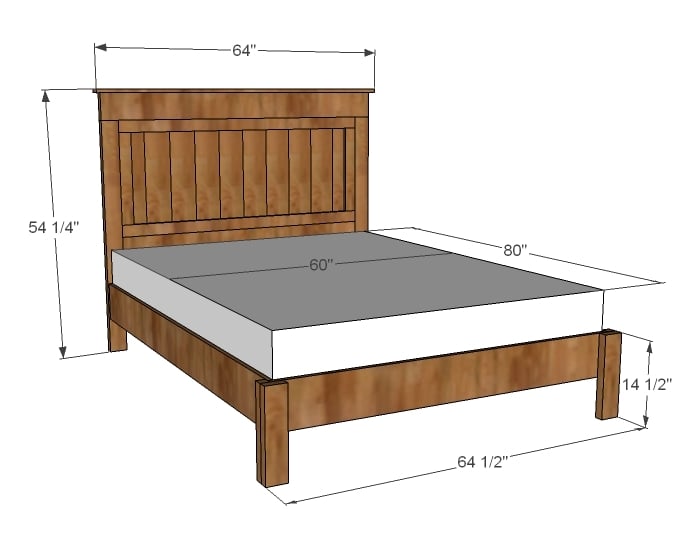
A fancier touch to the Farmhouse Bed. Features decorative moulding and no footboard. Very sturdy freestanding bed.
My mother has been asking for a bed for at least five years now. She's even offered to pay me to make her a bed.
And every year, I have intentions of making my mother a bed for her Birthday.
And every year, I don't get around to it in time.
But not this year.
Today is my Mom's Birthday, and here is the bed that we made for her.

If the bed looks familiar, it's because my mom once commented that she liked Pottery Barn's Somerset Bed, but in White. Really pretty in a stain, eh? (for those of you who checked out the link)

Painting this bed was quite easy in this nifty paint booth made of 2x2s and tarps (the Ram's invention) but making the decision to go through with painting it . . . not easy.

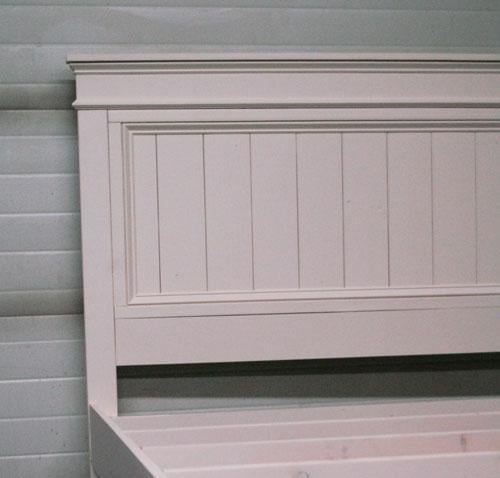
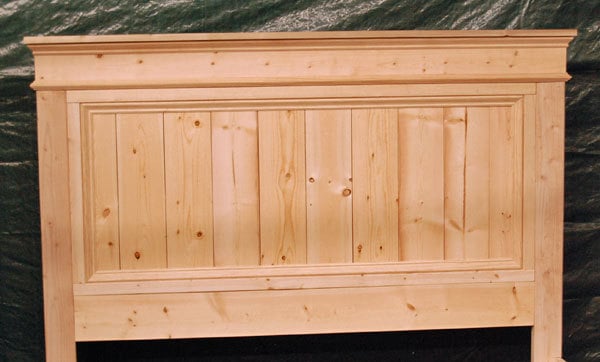
This is what the headboard looked like before any wood filler or sanding. And yes, those are stud grade 2x4s and 2x6s. Amazing how beautiful lumber can be.

And here is two coats of Antique White by Valspar, Flat Enamel, over primer. I'm still playing with the idea of distressing the edges ever so slightly to bring out the moulding in this bed. What would you do? We of course will need to add a final top coat.

The bed stands alone well with the frame secured to the headboard. We choose a 2x4 joist system which will get topped with plywood because we live in a very dry climate, and do not have to worry about mildew buildup in this particular application. Slats are recommended (or a box spring) for those of you who live in a humid climate, but nothing beats the sturdiness and quick setup of plywood.
If you are thinking this might be a cute Valentine's Day project, go for it. The Ram and I worked together on this bed, and we finished the headboard in about two hours. The most time consuming part was the moulding. Believe it or not, because we are nailgun-less the moulding is simply glued and clamped on - and it's not going anywhere. Unless the bed goes too, of course.
Preparation
3 – 1×6 @ 8 feet long
2 – 1×2 @ 8 feet long
2 – 2×6 @ stud or 8 foot length
8 – 2×4 @ stud or 8 foot length
1- 1×3 @ 8 foot length
1 – 1×8 @ 12 feet long
1 – 1×8 @ 8 feet long
1 – 2×2 @ 30″ long
2 1/2″ wood screws
3″ wood screws
1 1/4″ finish nails or wood screws
wood glue, wood filler, sandpaper (medium grit) and other finishing supplies
10 – 1×6 @ 24″ (Panel Boards – cut panel boards at 23 7/8″ to account for saw blade if you need to conserve boards)
2 – 1×2 @ 24″ (Side Trim for Panel – cut at 20 7/8″ if you cut your panel boards at 23 7/8″)
2 – 1×2 @ 55″ (Top/Bottom Panel Trim)
1 – 2×6 @ 55″ (Base of Panel)
2 – 2×4 @ 48″ (Legs)
1 – 1×3 @ 64″ (Top of Headboard)
5 – 2×4 @ 57″ (Joists)
2 – 2×4 @ 80″ (Sides of Bed Frame)
2 – 1×8 @ 80″ (Siderails)
1 – 1×8 @ 61 1/2″ (Footrail)
2 – 2×2 @ 14 1/2″ (Legs)
2 – 2×4 @ 14 1/2″ (Legs)
Moulding
1 – 8′ Stick of Chair Rail like this one from Lowes (use this stick on the bottom tier of the headboard)
3 – 8′ Sticks of Base Cap like this from Lowes (use this type of moulding to trim panel and for the top tier on the headboard)


Instructions
Step 1
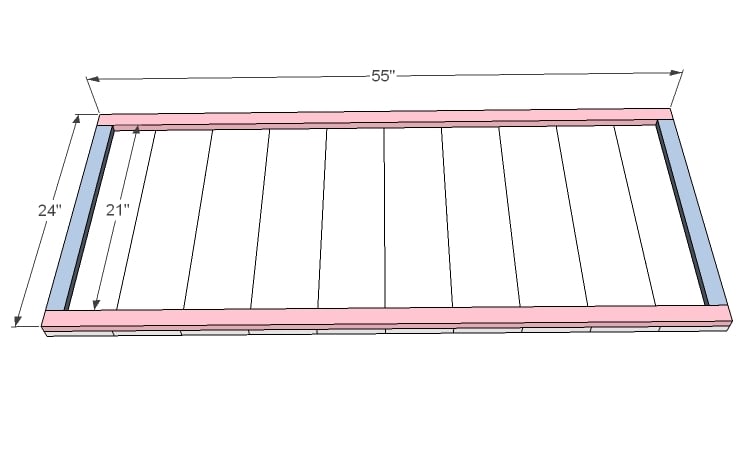
Build the Headboard Panel
If you have a finish nailer, it’ll be a two second job to attach the trim to the panel boards. Otherwise, screw from the back with 1 1/4″ screws to hide your screw holes. Use glue and adjust for square, squaring ends up. I used screws.
Step 2
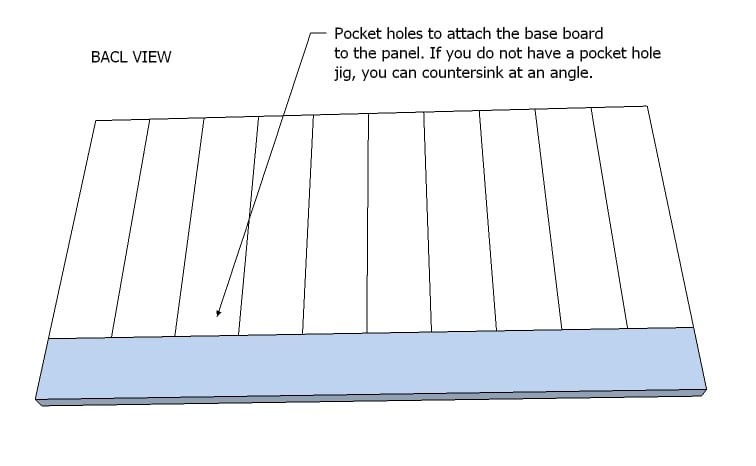
Headboard Base
Now attach the base to the panel. You won’t need a ton of screws, so if you only have a countersink bit, you can carefully predrill holes at an angle. Use 2 1/2″ screws and wood glue. I thought about recommending brackets, but for the cost of the brackets, you could purchase a Kreg Jig™, so I scrapped that idea.
Step 3
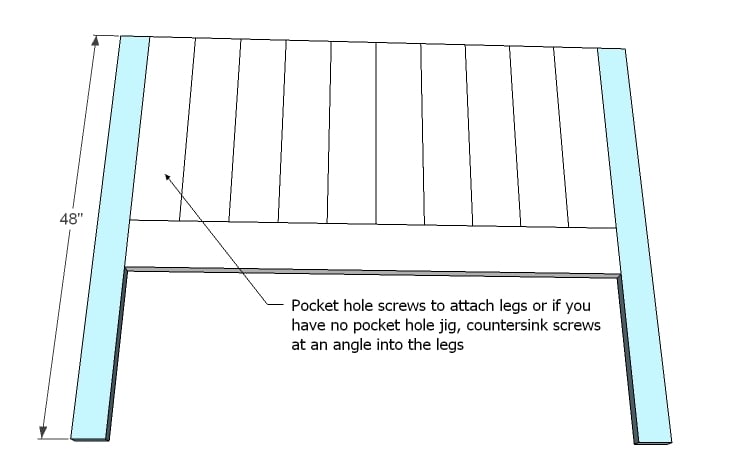
Attach the Legs to the Headboard Panel
Same as the base, attach the legs from back of the headboard
Step 4
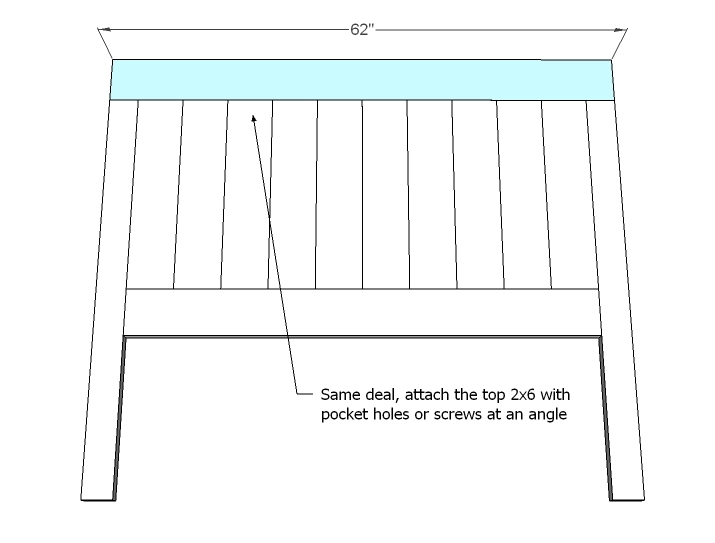
Headboard Top Panel
Now the top panel. If you are really nervous about trying what would be called “toenailing” if you were using nails (screwing at an angle) a scrap piece of 1/4″ plywood that covers the entire panel and overlaps the legs and top and bottom could do the trick too.
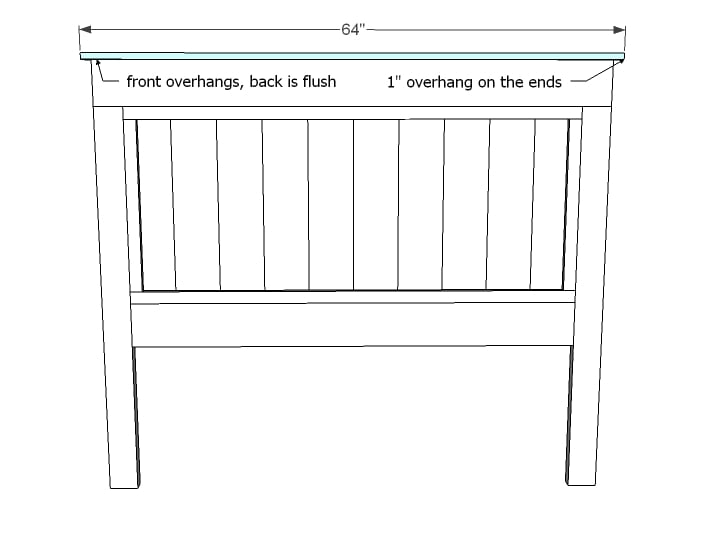
Step 5
Step 6
Moulding
This is the trickiest part, so definitely do some testing before you make your final cuts. All corners are at 45 degree angles. Use a miter box or a miter saw to carefully make your cuts. I did not give measurements here because you should fit your moulding perfectly to your bed rather than my measurements. If you have a finish nailer and 1″ finish nails, glue and nail in place. Otherwise, glue and clamp in place. Avoid letting glue dry on bare wood, as those areas will not accept stain.
Step 7
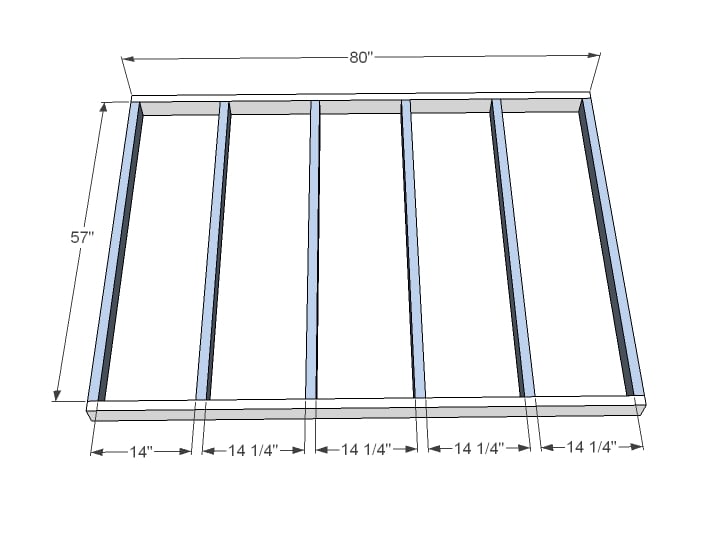
Bed Frame
There are many many ways to build a bed frame, but this is probably my favorite. We do live in a dry climate, so a plywood frame may make more sense for us than you. Make sure you check out our other bed frames if a plywood platform does not work for you. We simply screwed 2x4s together, just like you would to build a wall. Adjust for square. Use glue and 3″ screws countersunk.
Step 8
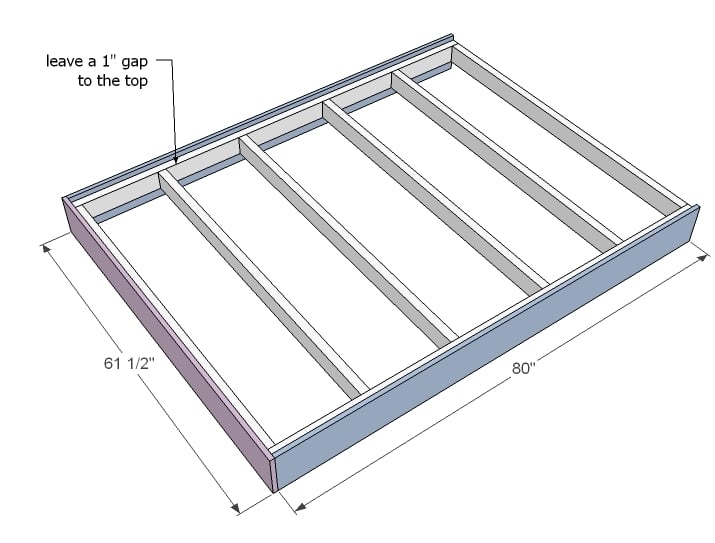
Siderails
Now these are your pretty boards. Either screw from the inside with 2″ screws and glue or use finish nails from the outsides.
Step 9
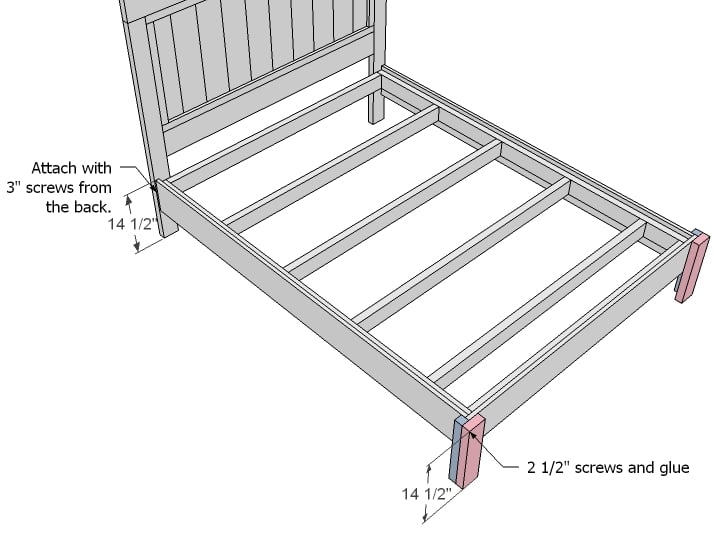
Legs and Assembly
Build your bottom legs as shown above and then attach to the bed frame, flush on top. Then mark the legs on the headboard at 14 1/2″ as shown in the diagram and predrill holes from the back of the headboard into the frame boards. Attach with 3″ screws and NO glue.
Step 10
Finishing
Fill any exposed holes or imperfections with wood filler and let dry. Apply a second coat if necessary. Sand with medium grit sandpaper in the direction of the wood. Vacuum and wipe clean. Prime and paint or stain as desired. For use without a box spring, you will need to add plywood on top of the bed frame or wood slats.

Comments
Swilliams987
Fri, 03/25/2011 - 20:44
This would be fabulous in
This would be fabulous in king-size dimensions and also with a footboard! beautiful!
Mindy (not verified)
Sat, 05/21/2011 - 14:03
Fancy Farmhouse headboard
Hi Ana
Love this head board, started it today finally, after all this rain in Massachusetts passed. We are attaching it to the Stratton bed base because we have very little closet space. I cannot wait to see the finished product.
However I noticed that the cuts for the side trim for the panel is to long.
this is what you have listed above for cuts
(2 – 1×2 @ 24″ (Side Trim for Panel – cut at 20 7/8″ if you cut your panel boards at 23 7/8″))
Change them to 21". your diagram shows 21" not 24" The total is 24 with the top and bottom trim. just change the trim. I did a dry fit and found this out. HTH
BTw we r doing a deep dark stain and distressing the edges.
Thanks for all the DIY plans. I have been dying to get a PB bed set but the cost we just cannot do. Our current bed set is great but I want solid wood not veneer or drawer slides. I just want solids wood construction.
I just wish you guys had for dresser plans.
We r gonna use the open bottom dresser and adapt it to what we want. I will try to make sure i make up some plans.
Mindy
Mindy (not verified)
Sat, 05/21/2011 - 14:07
Forgot to add the 2x6
P.s. I just noticed we r missing a 2x6 too. the top one on the panel at 62"
jimblackjim
Wed, 05/13/2020 - 10:03
Just noticed that it is…
Just noticed that it is missing from the cut list. Fortunately, I believe it is included in the shopping list.
jimblackjim
Wed, 05/13/2020 - 14:46
Sad that after 9 years, this…
Sad that after 9 years, this has not been corrected. For this reason, I will not likely come back to this site for plans in the future.
Guest (not verified)
Fri, 06/24/2011 - 21:49
Hi Ana!! Just wondering what
Hi Ana!! Just wondering what size bed this is--Full, Queen, etc? Hope I find out soon, for I cannot wait to start building :o)
Thanks,
Fouzia
rassyberries
Fri, 07/15/2011 - 10:16
Plans for the matching bedside table?
I love this bed. Ana, do you think you would ever make the matching bedside table? The Sommerset PB bedside table?
I've been trying to draw the plans, but I just don't think I can get it down. If you ever do, I would build it in a heartbeat! Thanks so much!
Guest (not verified)
Sat, 10/01/2011 - 06:07
Footboard?
Love both this and the "traditional" farmhouse bed.
I'm looking to add a footboard to this bed, but want a little more "substance" on the legs.
If I use 4x4 legs, I'm having a hard time modifying the plans since I cannot find 4x6s to add as the top cross beams. Will it look weird if I use a 2x6 as the bottom cross and 4x4s at the top? I can add 1.5 inches by adding 1 inch boards covered by the moulding, but that seems like a lot of extra nonsense.
Anybody with any good suggestions?
Korey (not verified)
Thu, 10/13/2011 - 13:27
Love this Bed and cannot wait
Love this Bed and cannot wait to start making it :) Are these dimensions for a Queen or a full? I am going to be making a full!!
mrsroo0708
Tue, 11/01/2011 - 16:35
Any chance of getting a full and twin size?
I love this bed frame, especially the fact that there is no footboard. I would love the measurements or wood needed for a twin and full size so I can make this for my girls.
Thanks.
guest (not verified)
Fri, 12/30/2011 - 10:53
other widths
Measure the width of the twin bed. Divide this by 6. This is how many vertical 1x6 you will need for the headboard. The 1x6 is what you use for the panels for the width of the bed - use just use less 1x6 pieces for a twin than a fiull or queen size.
Same for bed frame - just cut your 2x4 joists (the ones that run across and support the mattress) 3" shorter than the width of the mattress. I say 3" shorter because you will make up that 3" with the two 2x4 side rails. Hope this helps.
Guest (not verified)
Fri, 11/18/2011 - 22:37
how many coats of primer?
how many coats of primer?
Guest (not verified)
Thu, 02/16/2012 - 13:39
perfect for my husband
I have been planning to have my husband make the farm house bed, but i was concerned about him because he likes to stick his feet out the end of the bed, he hates the sheet and blanket tucked in on his side at the end, so this is perfect, NO foot board for us to deal with, YAY!!! Thank you Ana, i love your stuff, we modified and made a laundry dresser for our laundry room and love it, wish i had it years ago when my oldest kids were little. I appreciate your talent and sharing your plans with us, THANK YOU. Melissa :)
Bryan (not verified)
Sun, 02/19/2012 - 03:59
Which Kreg Jig do you recommend?
Which Kreg jig do you recommend? Is the mini good enough? Thanks.
joeb
Sun, 03/11/2012 - 16:45
My daughter love this bed
She just bought her first house and I like to make one for her but she needs a king size.. do you have the size differeces
Scott Schoffner (not verified)
Mon, 01/14/2013 - 16:15
Mom’s Fancy Farmhouse Bed
I plan on building this bed but have a few questions. First, how much should i expect to spend on materials for this project? and is that at a lowes or home depot? Second, i plan on using a box spring under the mattress but the diagrams above look like they dont account for a box spring and the bed will sit up higher and cover more of the headboard, is that correct?
Thanks,
andyx
Mon, 11/11/2013 - 17:19
moulding links from lowes/home depot?
Hi, can anyone provide the moulding links for either lowes/home depot? I already built the headboard but couldn't find the right trim.
jeremyrobinson
Tue, 09/02/2014 - 13:43
what type of wood!???
This is beautiful!!! But what type of wood did you use? Just out shopping right now for tgis bit cant figure out and decide what to use.
Ryan's Grandma
Mon, 02/23/2015 - 17:35
Raising the frame
This bed is exactly what I am looking for (no foot board) but I need it higher to fit a trundle bed under (13" clearance). How do I adjust the plan to allow for this?
katestokes
Thu, 08/02/2018 - 07:10
Size?
I'm sorry if I missed it. What size bed are these plans for?
In reply to Size? by katestokes
Brian Famous
Fri, 08/03/2018 - 05:43
60" = Queen Bed
Given the dimensions show a 60" wide mattress, that would infer the plans are for a queen bed.
amjoda
Fri, 05/03/2019 - 22:01
I am in love with this…
I am in love with this headboard!! Sadly most of the other pics aren’t loading. Really wish I could see more! Maybe it’s a growing pain thing and will improve soon?? I would seriously appreciate it. Thank you in advance!!
goatworks diy
Wed, 11/27/2019 - 14:42
full plans
Is there any plans of this bed for size full. Its for my sons room and we love the head board on this but need a size full.