
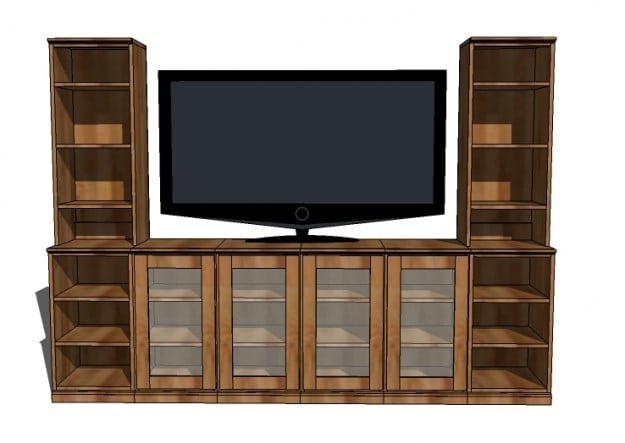

Open base plans for the Basic Collection.
 I am still three years old at heart. Positive reinforcement works on me.
Yesterday, all of the positive feedback on Grace's closet made my day. I make furniture, but you, yes YOU, make my day.
Just wanted to share with you a little something I wrote about you in an interview:
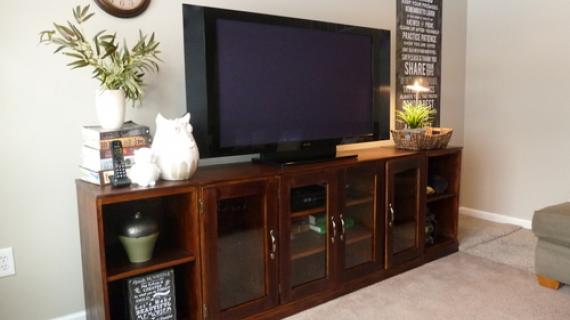
Just the other day, I built this amazing console, and I couldn’t decide on the perfect color. Carrie, a fan on Facebook, posted a photo of a cubby room divider she built and painted a daring shad of plum.


My readers inspire me. They share amazing projects and ideas, stunning finishes, and customizations and improvements on my plans I never would have thought of. They think of extraordinary uses for the simplest pieces, request the most complicated plans and believe that I can deliver. They tell the most amazing stories, persevere under any circumstances. My readers are amazing, and I look to them for inspiration.
And you keep me going. You give me faith that what I am doing is worth my time. Thank you so much for your kindness, your encouragement, and your belief in me. The only way I can express just how much your friendship means to me is to keep giving you plans :)
I've been so busy lately, working on interviews, the new site, and tons of garage time - that this simple collection will be a perfect filler. I am so excited about some of the projects that I will be posting - I hope you love them!
In the meantime, while I finish up some projects, I want to take on a collection of plans inspired by Pottery Barn's Printer Collection. I've been eyeing this collection since the Fall Press Preview was released from Pottery Barn, and it will be perfect to work on in between my personal projects. One of the underlying reasons I'm convinced to work on this collection is because I just can't let you buy it. For the first time (at least that I've seen) Pottery Barn is using the words Particle Board. I've always said, better buy a quality product, even at a high price, than one that will end up in a landfill in a few years. I'm so sad, and I understand completely about our economy and how people just can't afford good furniture right now . . . I don't have the answers, all I have is a saw, a hammer, and a paint brush.

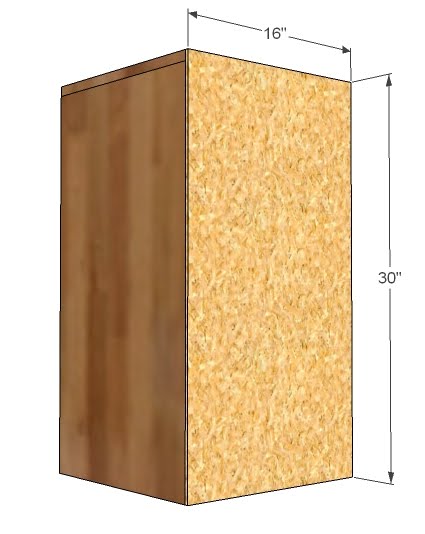
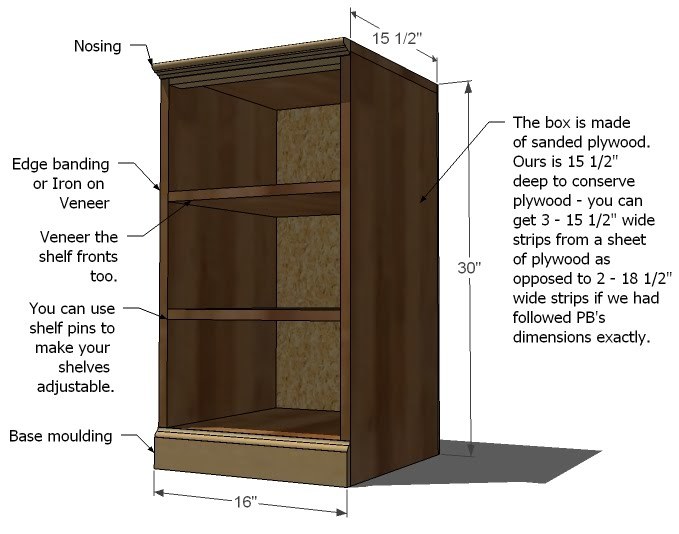
And this is how I would build this collection. I choose to make this collection 3" less deep than Pottery Barn's to save you plywood. You can cut a full sheet of plywood into 3 15 1/2" wide strips (what I call a 1x16) but if we were to make the shelves 18 1/2" deep (like Pottery Barn does) than we would only be able to get 2 strips (this would be called a 1x19). So lets conserve some plywood! Also, all of your leftover pieces are 1x16s, useable for any of the projects that I publish calling for 1x16s (and the rest of this collection!).
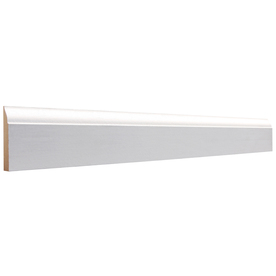
You will need some standard 2 1/4" wide base moulding, like this one from Lowes (image from Lowes).

And some nosing or beading or edging (can be called a few different terms) to finish out the top front edge of your base units. Choose nosing that is 1" to 3/4" wide, in a matching species to your base moulding. Image is from Lowes.

This stuff is for finishing your wood edges. So if you used birch plywood, the edges that are visible on the front will have veneer ironed on. I've used this stuff quite a bit, and it's awesome. It's slightly wider than 3/4" so you have a little error room. Just iron on with a household iron, let dry, and take a razor and skim off the edges that overhang. It is that easy. I promise. Image is from Lowes.

At your hardware store, ask the cutting section to cut your plywood horizontally as opposed to vertically. So they would set their saw at 15 1/2" from the bottom, cutting horizontally. Then they would slide the plywood through three times. This guarantees that all of your boards are the exact same thickness, which is the most important thing.
Amy, one of our readers, told me this. She's so smart, and I'm a little bit smarter because I know her!
Once your boards are cut to 1x16s, just treat them as a 1x12, or 1x10 or any other board. You can still cut a 1x16 on your chop or miter saw, just cut one side, flip it over, and cut the other.
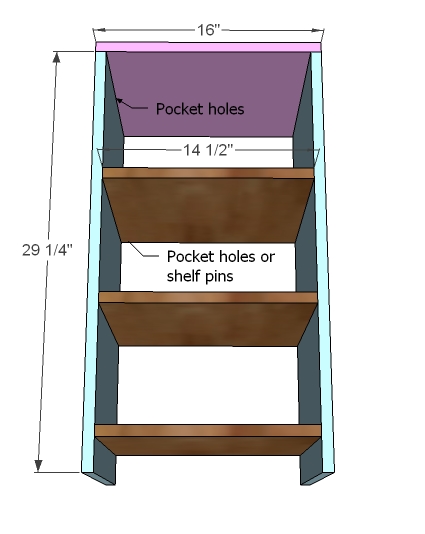
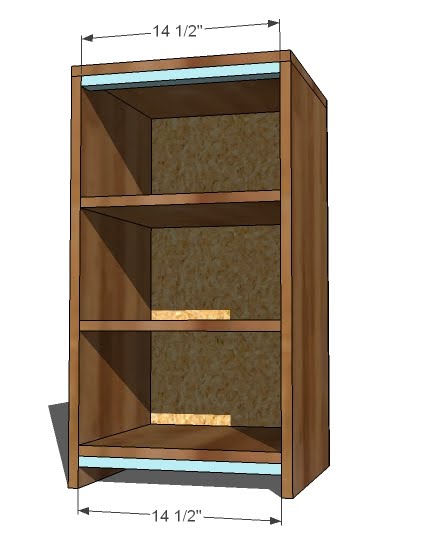
Like most of our projects, you begin by building a box. I'm really in love with my Kreg Jig, and recommend using pocket holes to join everything, but you can use 2" nails and glue too. I spaced the shelves 8" apart, but you can make the shelves adjustable by drilling 1/4" holes 1/2" deep for shelf pins. Just use a 1/4" drill bit with just 1/2" exposed from the drill, and drill the hole until the drill is flush with the wood - fool proof!
Then use 1 1/4" nails and glue to nail the 1x2s on. Don't forget to fasten from the sides too. Keep the front edges flush.
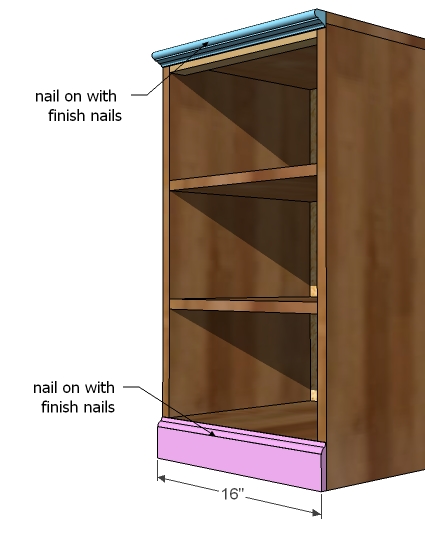
And then just add your moulding. This is the fun part! After your moulding is in place, fill all holes with wood filler, including any holes in the plywood layers, and let dry. Sand with 120 grit sandpaper. Vacuum and wipe clean with a damp cloth. Then apply your edge banding to all exposed plywood edges. Stain as desired.
This piece can be used as an office base, as a nightstand, as an end table - you could even stack several to make a buffet . . . endless possibilities.
Preparation
Please see attached PDF.
Please see attached PDF.

Comments
Erin (not verified)
Wed, 08/25/2010 - 09:48
That is exactly what I have
That is exactly what I have been looking for! I can't wait for the plans to hit the site! Thanks for all of your hard work and inspiration!
liz @ bon temp… (not verified)
Wed, 08/25/2010 - 11:02
I just looked at your new
I just looked at your new site! Can I just say that with all the projects you have me wanting to do, the number one project on my list is to make my hair look just like yours. : )
Chelle (not verified)
Wed, 08/25/2010 - 11:07
it would not be a stretch AT
it would not be a stretch AT ALL to say your website has CHANGED. MY. LIFE!!! I can't wait for you to convert all your plans to a book and publish it someday (I hope you do that... I'll be the first in line to buy that!)
Christy (not verified)
Wed, 08/25/2010 - 11:22
Love the new website!!!! Are
Love the new website!!!! Are you going to be completely switching to that instead of knock-off wood???
Kathryn (not verified)
Wed, 08/25/2010 - 13:05
THANK YOU! I hope more
THANK YOU! I hope more pieces are on the way because I just got this catalog and I'm totally obsessed with having this setup for my entertainment center/bookcase. Only problem is that to get everything I want, I need close to $3000!!!! I made your kids picnic table and it turned out great, now (once new baby is done making me sick) I'm going to start on some toy storage, since I can paint that. Stain still scares me, but I'm getting braver. Thanks for giving us all so much confidence!
thereadingmother0708 (not verified)
Wed, 08/25/2010 - 14:56
It looks great! I can't wait
It looks great! I can't wait for the rest of the plans! We made the apothecary cabinet with the plans to expand it into an entertainment center, I think the sides for this project would be perfect for ours with just a little modification. :)
Thanks for all the work you do!
Foote Family (not verified)
Wed, 08/25/2010 - 18:45
A special thanks to you and
A special thanks to you and your readers (builders) for giving me the courage to do something I never thought I could do!
PP-SD (not verified)
Wed, 08/25/2010 - 21:39
Another brilliant piece. I
Another brilliant piece. I have a birthday coming up and have been asked what I would like. I haven't attempted any of these things yet as I didnt find your site until recently. Im keen to start very soon though.
If you were starting out now, what tools would you ask for on your birthday?
Where is the new website?
Treva (not verified)
Thu, 08/26/2010 - 03:00
I had to laugh when I went to
I had to laugh when I went to the PB site and PB said "Build Your Own--Printer's System Components". I don't think they meant it literally--hehehe ;-)Keep it coming Ana. I love the collection.
http://www.potterybarn.com/products/build-your-own-printers-system-comp…
Kellye (not verified)
Thu, 08/26/2010 - 03:27
Oh Anna! How can we ever give
Oh Anna! How can we ever give you back a 10th of what you've given us! When I point out pieces of furniture I've built with my own two hands (NO HELP) from YOUR plans, I am elevated to a new playing field and my confidence level for what I can do has skyrocketed. You amaze us and I count you in my blessings!!
Looking forward to tackling more and more projects! Keep them coming and we're here to stay!
ana (not verified)
Sun, 08/29/2010 - 18:53
You are very welcome!
You are very welcome!
ana (not verified)
Sun, 08/29/2010 - 18:55
If you've got the budget, a
If you've got the budget, a slidng double compound miter saw would be the ultimate present! Otherwise, a drill, a kreg jig, a jig saw or a round saw are all must have tools. Or just a good hammer and paint brushes! Good tools are great, but there are ways to build without :) Happy Birthday!
ana (not verified)
Sun, 08/29/2010 - 18:55
LOL I just got it!
LOL I just got it!
ana (not verified)
Sun, 08/29/2010 - 19:08
Kellye, your comment made my
Kellye, your comment made my day. Thank you. You make all those late nights worth it :)
Sabrina (not verified)
Mon, 08/30/2010 - 14:32
I love this collection and
I love this collection and really want it for my office nook in the kitchen. Can't wait to build my own now. Thanks Anna!!!!!
ana (not verified)
Mon, 08/30/2010 - 14:36
You are so welcome! I can't
You are so welcome! I can't wait to add the rest of the plans!
Ana White – Bu… (not verified)
Wed, 09/01/2010 - 09:18
[...] That go with these base
[...] That go with these base plans [...]
Open Base Insp… (not verified)
Fri, 09/03/2010 - 09:04
[...] Open Base Inspired by
[...] Open Base Inspired by PB’s Printer Collection AKPC_IDS += "2621,";Popularity: unranked [?] [...]
How to Build a… (not verified)
Tue, 09/14/2010 - 19:35
[...] workshop to help others
[...] workshop to help others build, I’m so thankful that this door plan is so easy. It uses the same base that Niki built and that works with the glass cabinets [...]
thewoodbuilder
Wed, 07/23/2014 - 07:02
door plan
is there a link to the door plan?
Ana White (not verified)
Thu, 09/16/2010 - 14:49
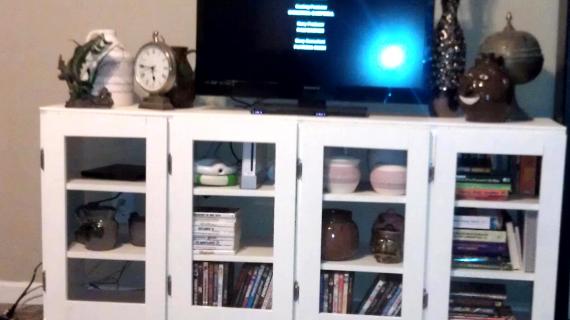
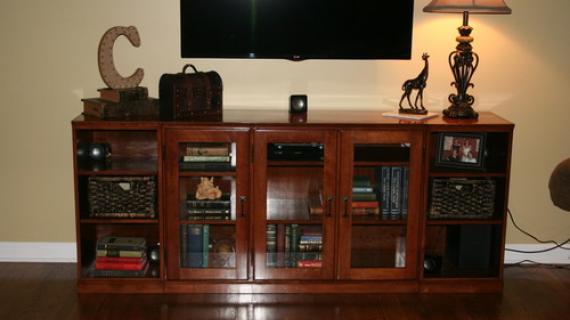
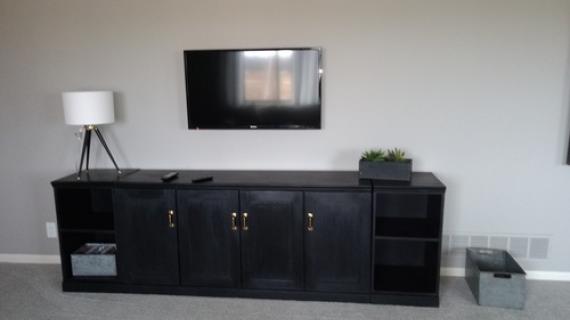
And you gotta check out what
And you gotta check out what Niki built from these plans. Isn't it beautiful! Thanks Niki!

thewoodbuilder
Wed, 07/23/2014 - 07:01
pic not there
anyway to see this picture, just an x in the corner
thewoodbuilder
Wed, 07/23/2014 - 07:01
pic not there
anyway to see this picture, just an x in the corner
Chad (not verified)
Wed, 10/27/2010 - 08:18
That picture is amazing. I
That picture is amazing. I love all of the plans that you put on here, it is truly amazing that you are able to design all of these pieces. I am looking to build the entire PB printer collection as a media center with the bookcases and all.
What combination of plywood species and hardwood board species do you use to get a consistent finish when staining? I would really appreciate your input.
Thanks!
Amy (not verified)
Mon, 11/08/2010 - 08:12
Hi! I have been working on a
Hi! I have been working on a few different projects from your plans Ana! I have built the easy console table, and am waiting for my stain to dry. I have looked at these plans and they'd work great as built-ins for my living room. On one side of my fireplace I have enough space for 3 bases, the other side 5. Would you suggest building 8 separate units, or is there a way to have them built as one for each side? I am having a difficult time imagining what that would entail. thanks for any help!
klp0423 (not verified)
Mon, 02/21/2011 - 04:19
Can I also use MDF for this?
Can I also use MDF for this? Is it best to use plywood? Thanks!
KatieH (not verified)
Sat, 11/19/2011 - 21:27
pdf issues
I LOVE this plan, and am hoping to make a couple for our living room, to replace some shaky little bookshelves that my 16 month old is starting to climb... But I'm having issues opening the pdf. Every time I click it, it opens a window of crazy looking text. I would also love to know about using MDF as posted above. Thanks!
Ana White
Sun, 11/20/2011 - 08:54
Hi Katie, my apologies for
Hi Katie, my apologies for the tech issues we are having currently. Here's a link to the PDF http://dl.dropbox.com/u/40684328/Open%20Base%20Printer%20Collection.pdf
BLB! Ana
balloongal247
Tue, 05/13/2014 - 13:19
How much of a sheet used
Am I right when I look at the plan and see that one base (one plan) uses one of the 1x16s you can rip out of a full sheet of plywood, so you could get 3 of these from a sheet of 3/4" plywood (and part of a sheet of 1/4" for the backs)? I added it up, and that's what it seems to be, but I wanted someone who has done it to verify before I plan accordingly. :P
Nevermind. I just looked at the plan again and realized there was an error in the cut list, it only has one side. You could fit one per half sheet, 2 per whole sheet.