Rustic Modern Bunk Bed

Rustic Modern Bunk Bed
Difficulty
Intermediate
| Print this plan

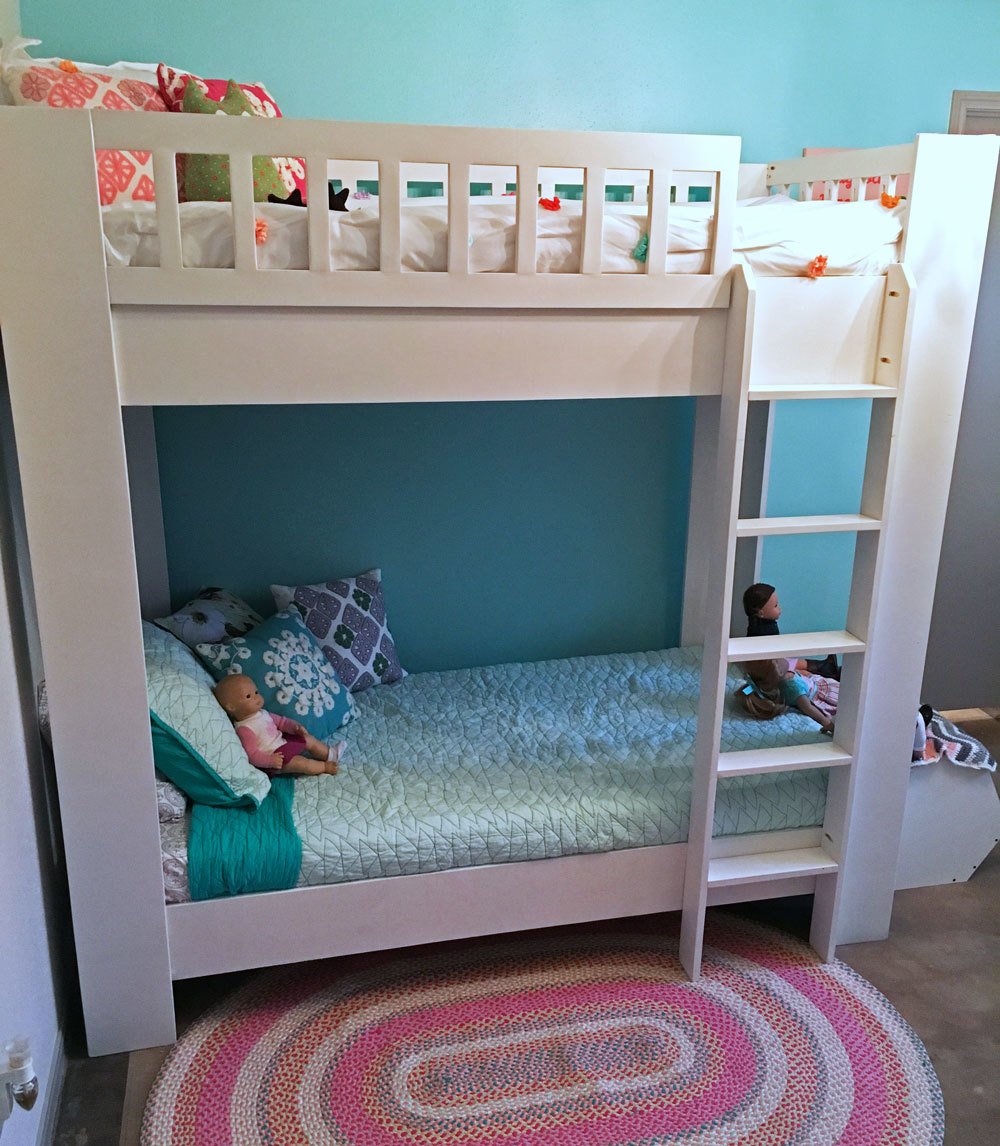
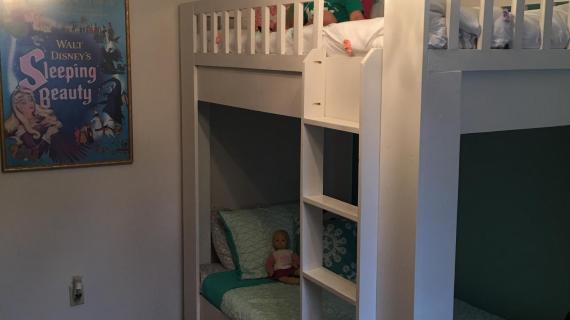
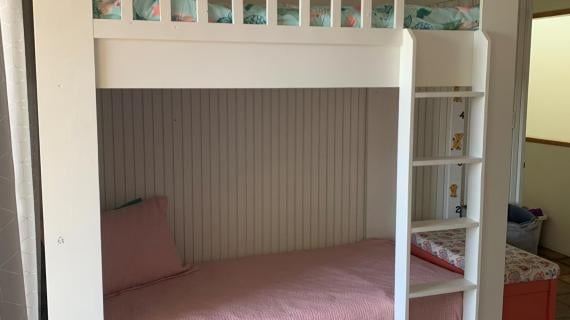
Build your own bunk beds!  This rustic modern bunk bed features wide planking and clean lines.  We love it stained or painted any color of your choice.

Our free plans include step by step diagrams, shopping list and cut list.


Dimensions
Rustic Modern Bunk Bed
Dimensions shown above. Twin size. NOTE: May not work with Bunkie boards or mattress box springs/platforms. Designed to be built using slat system in plans.

Preparation

Shopping List
  • 7 - 1x8 @ 8 feet long
  • 3 - 1x10 @ 8 feet long
  • 4 - 1x6 @ 6 feet long
  • 4 - 1x3 @ 8 feet long
  • 3 - 1x2 @ 8 feet long
  • 3 - 1x4 @ 8 feet long
  • 4 - 2x2 @ 8 feet long
  • Does not include boards for mattress slats
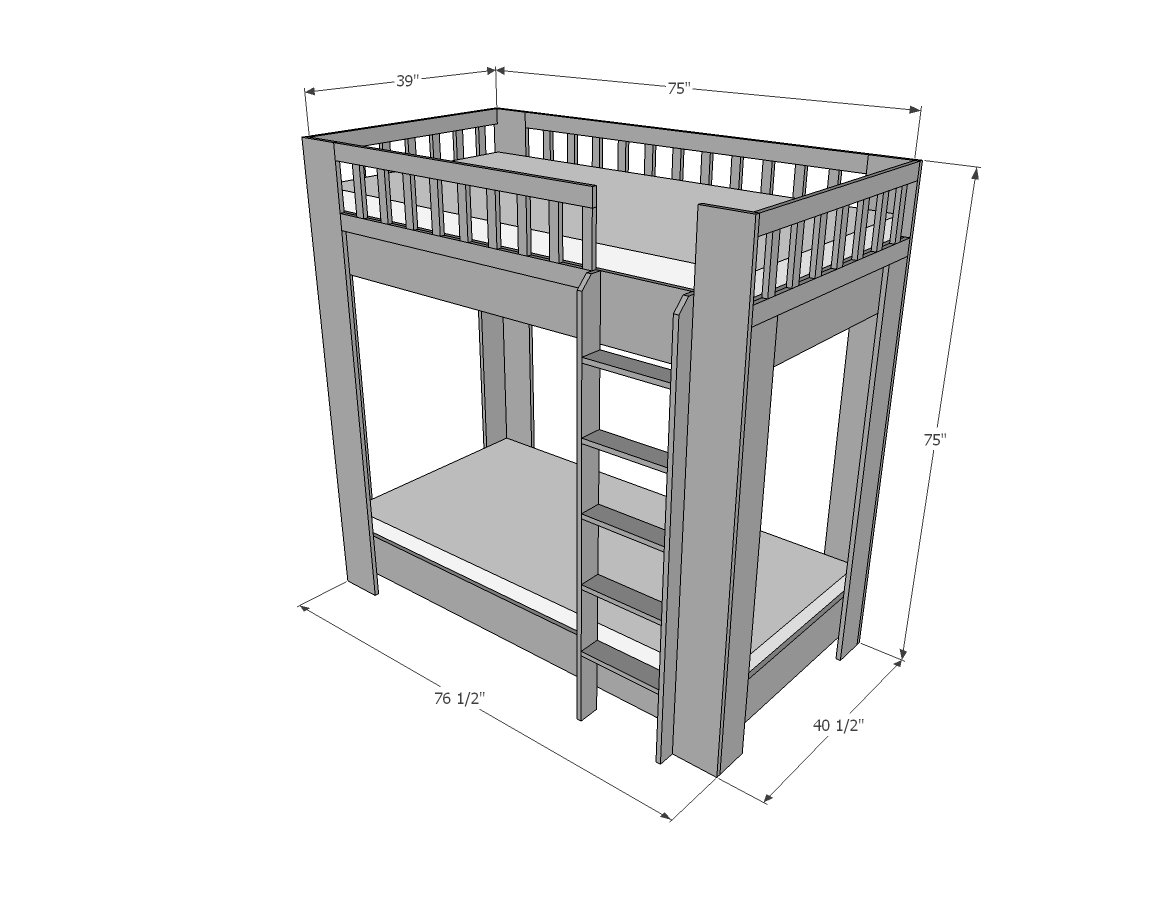
Common Materials
Cut List

MAIN BED STRUCTURE

  • 2 - 1x8 @ 75" - bottom bunk side rails
  • 2 - 1x8 @ 37-1/2" - bottom bunk end rails
  • 2 - 1x10 @ 75" - top bunk side rails
  • 2 - 1x10 @ 37-1/2" - top bunk end rails
  • 4 - 1x6 @ 62-1/2" - end legs
  • 4 - 1x8 @ 75" - side legs
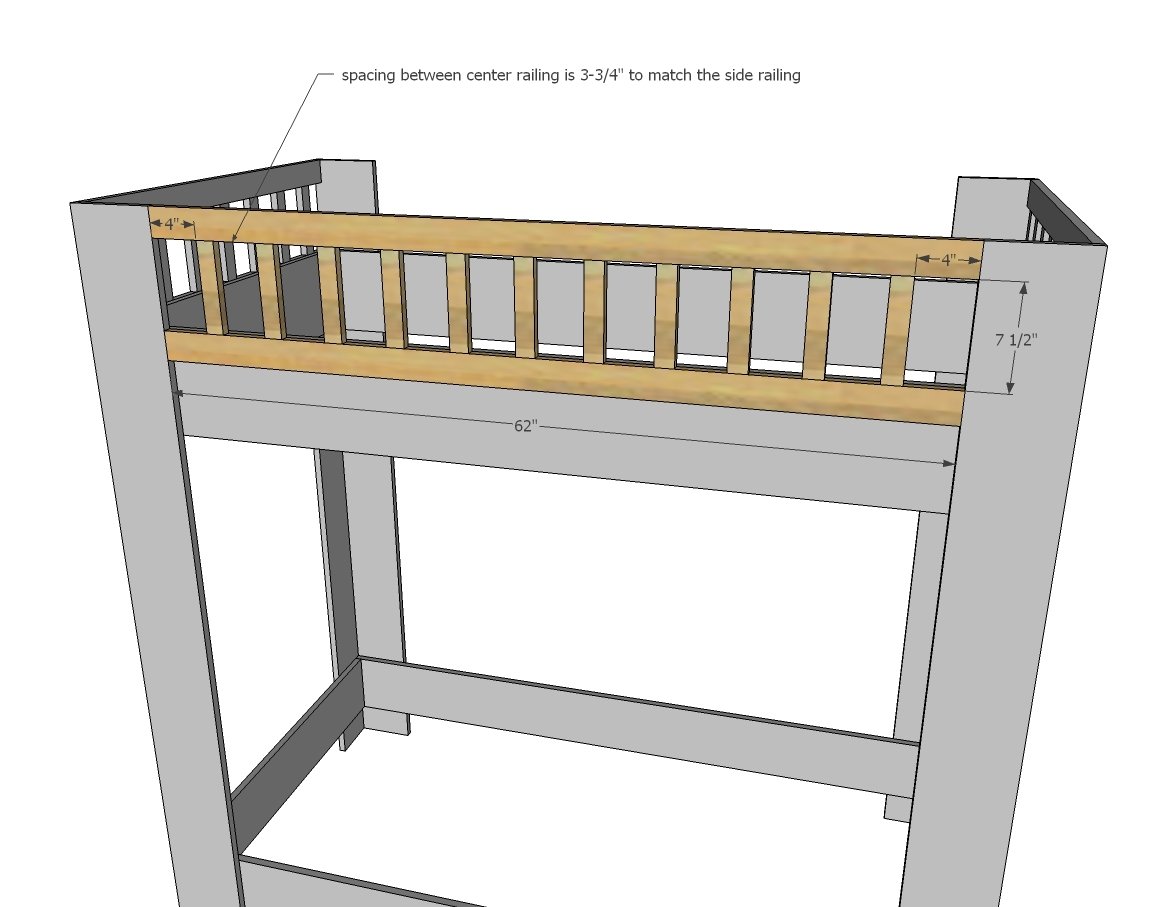
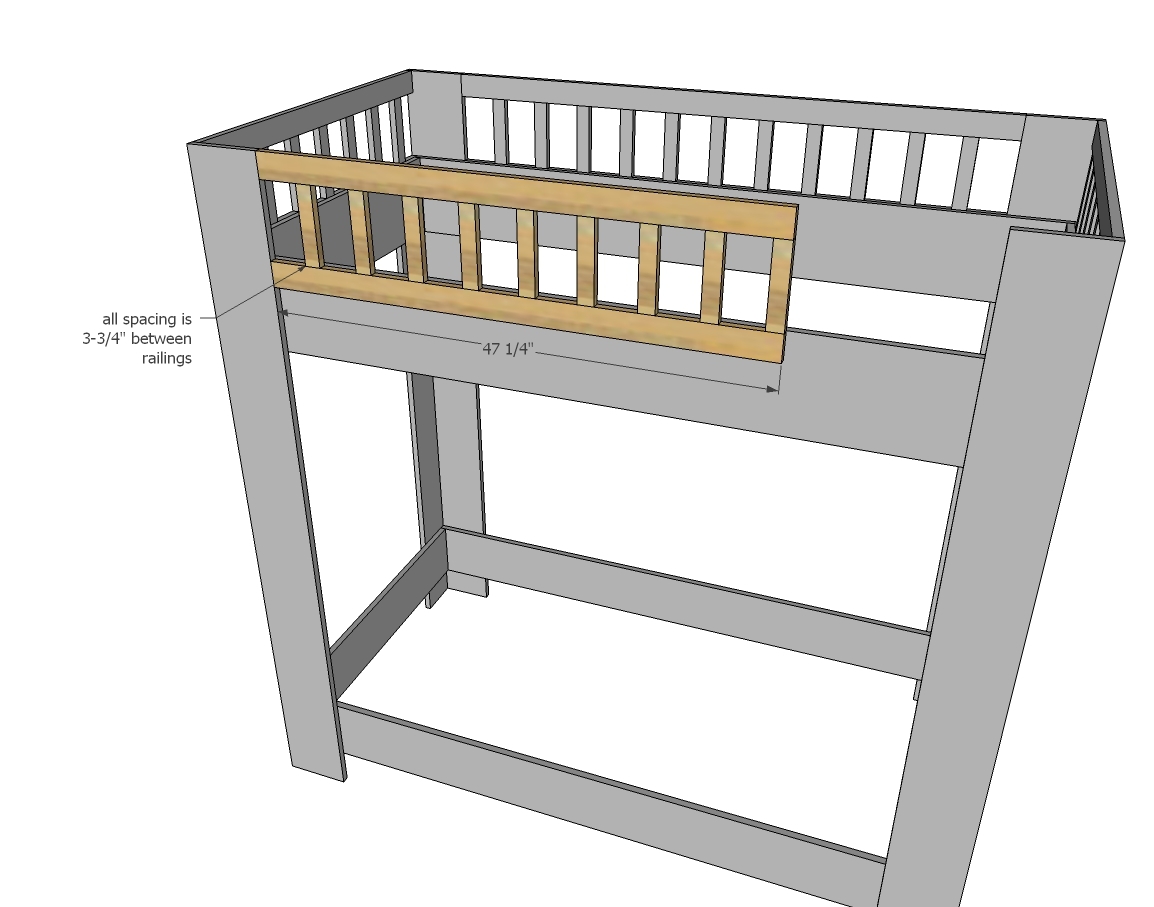
 

RAILING

  • 4 - 1x3 @ 39"
  • 2 - 1x3 @ 62"
  • 2 - 1x3 @ 47-1/4"
  • 34 - 1x2 @ 7-1/2"


LADDER

  • 2 - 1x4 @ 65"
  • 5 - 1x4 @ 13-1/4"


SLAT SYSTEM

  • 4 - 2x2 @ 73-1/2"
  • 1x boards or plywood scraps 3/4" thick @ 37-1/2" long
Tools
Tape Measure
Speed Square
Pencil
Safety Glasses
Hearing Protection
Kreg Jig
Drill
Miter Saw
Power Sander

Instructions

Step 1

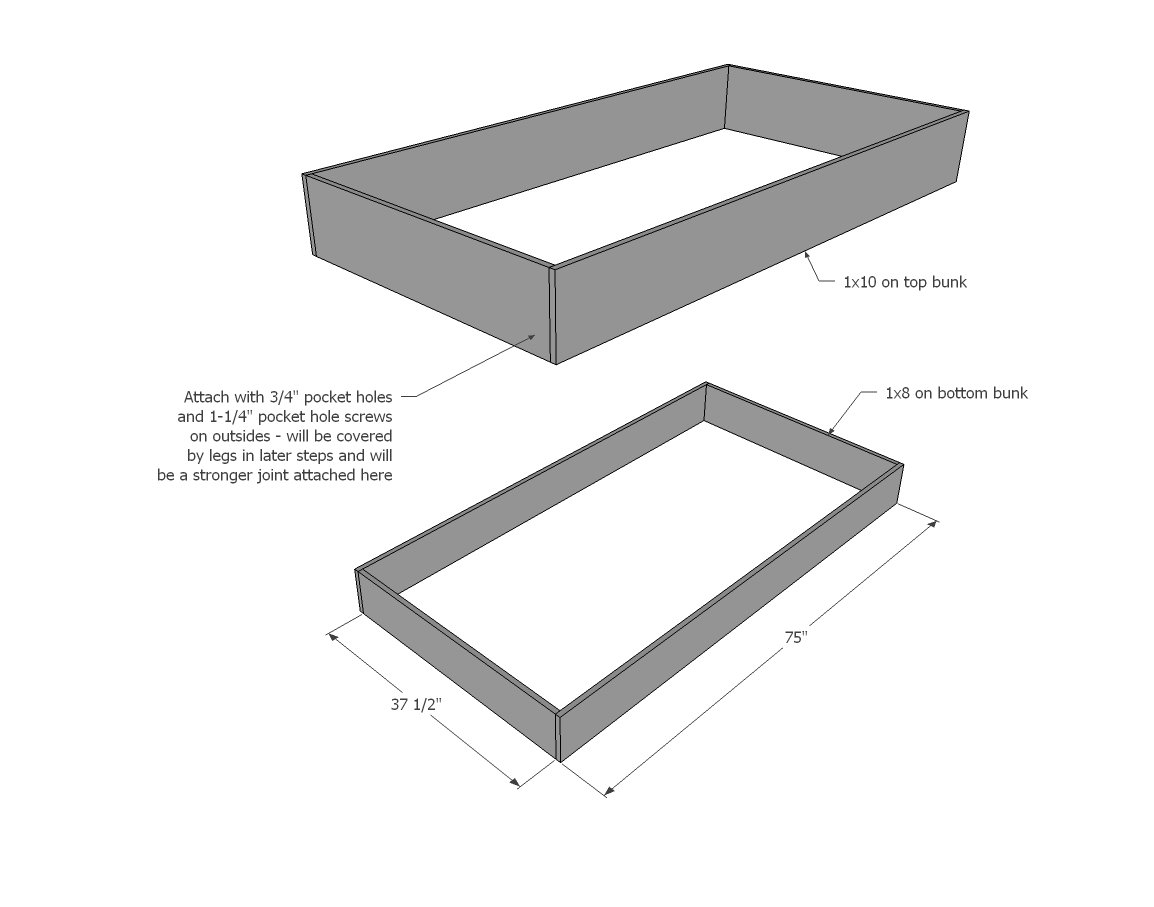
Build the two boxes for the mattress platforms. Place pocket holes on outside - they will be covered by the legs in next step and it is a stronger joint this way. Use glue at all joints.

Step 2

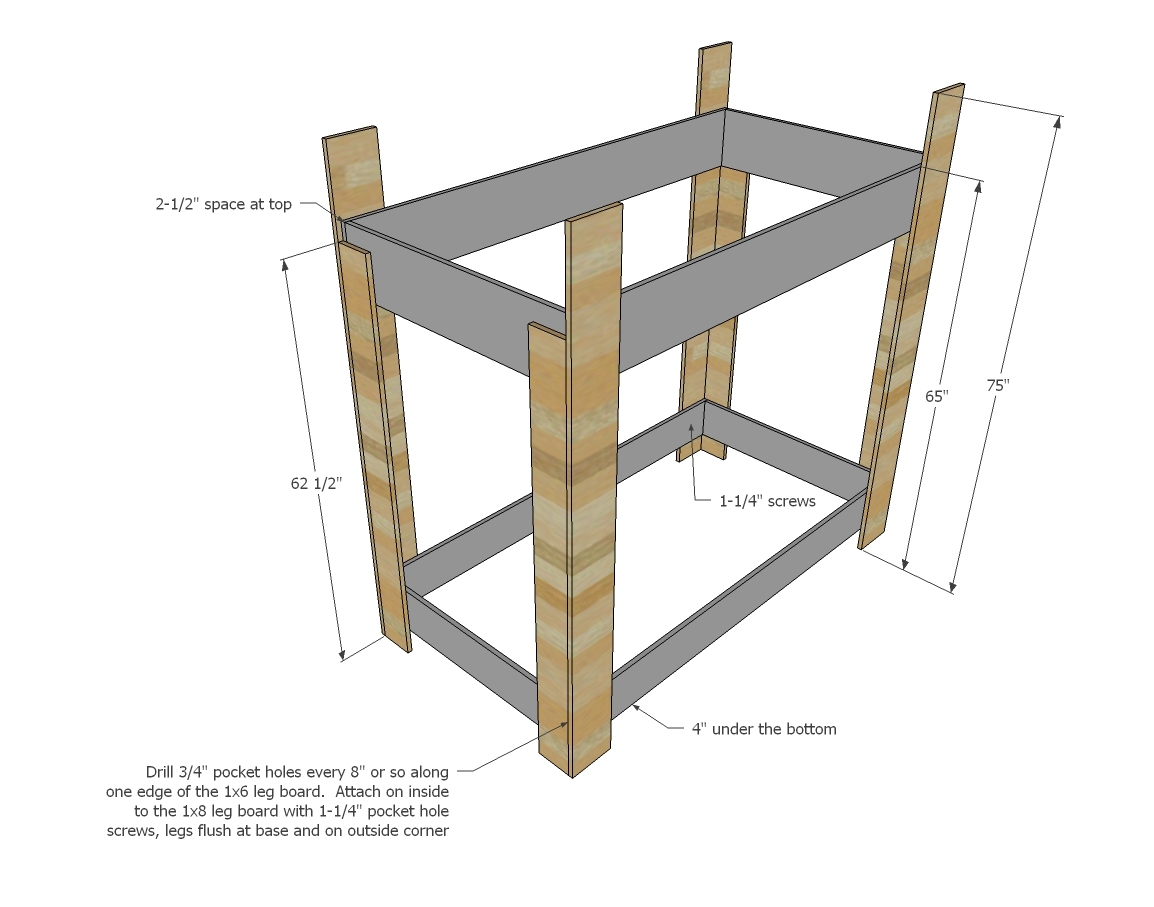
Drill 3/4" pocket holes along one edge of the 1x6 boards. You may want to hide them discreetly where the beds will sit, and can finish where the pocket holes are visible with 1-1/4" nails and glue. Then attach the beds to the legs from insides with screws. I'd prefer glue as well, if the bed is not to be disassembled.

Step 3

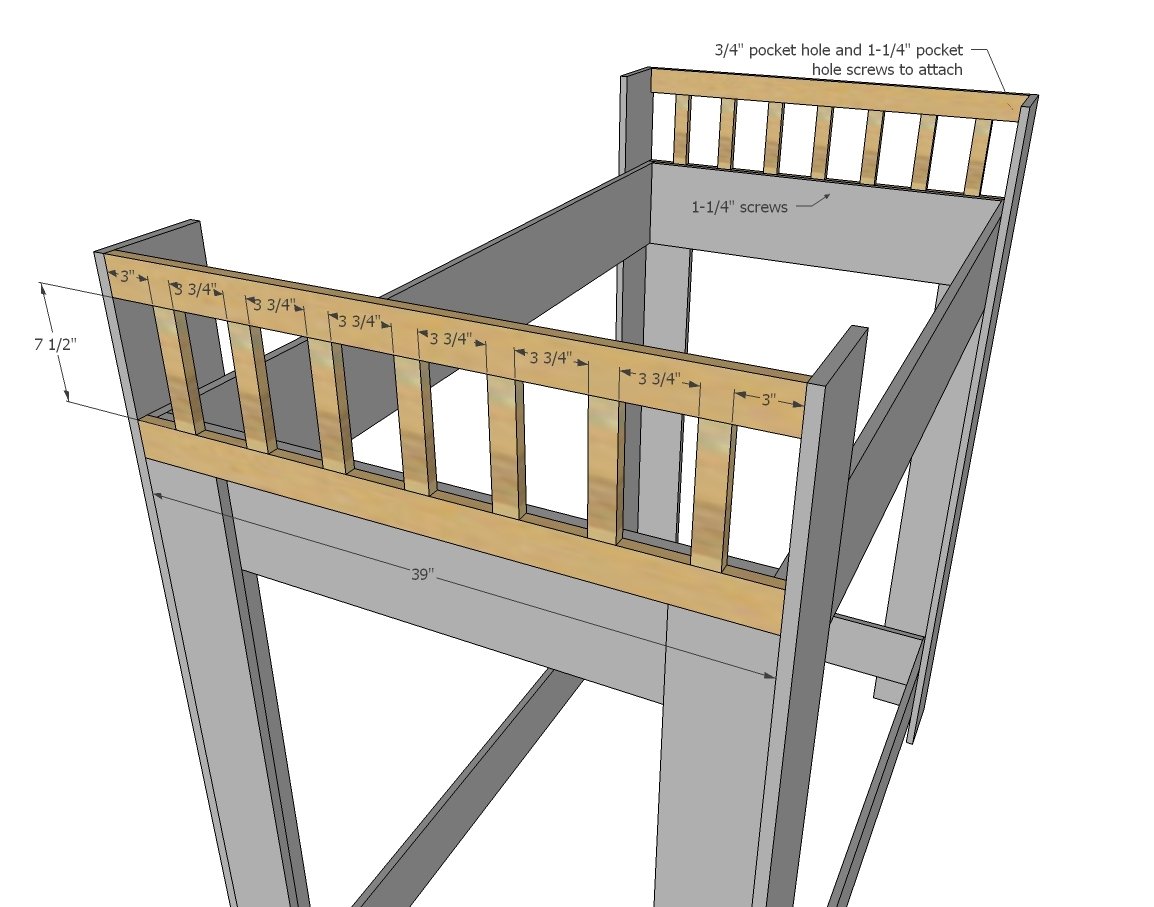
Build the end railing with 3/4" pocket holes and 1-1/4" pocket hole screws. TIP: Cut a couple of 3-3/4" blocks to use as spacer for placing railing. Attach to the ends of the bed. Again, prefer glue if possible to use.

Step 4

Repeat steps to build the bunk bed back guardrail.

Step 5

Step 6

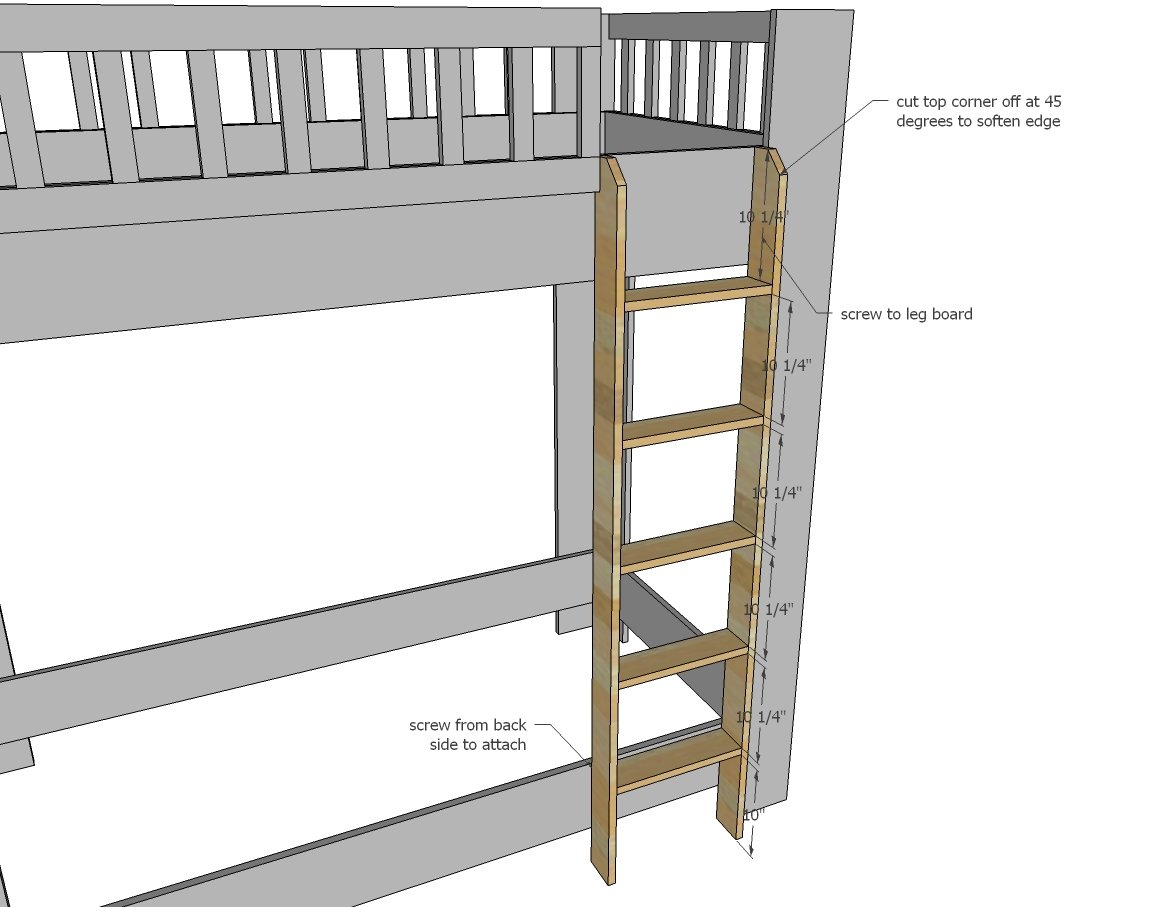
Build the ladder with 3/4" pocket holes on underside or rungs. Attach to bed with screws.

Step 7

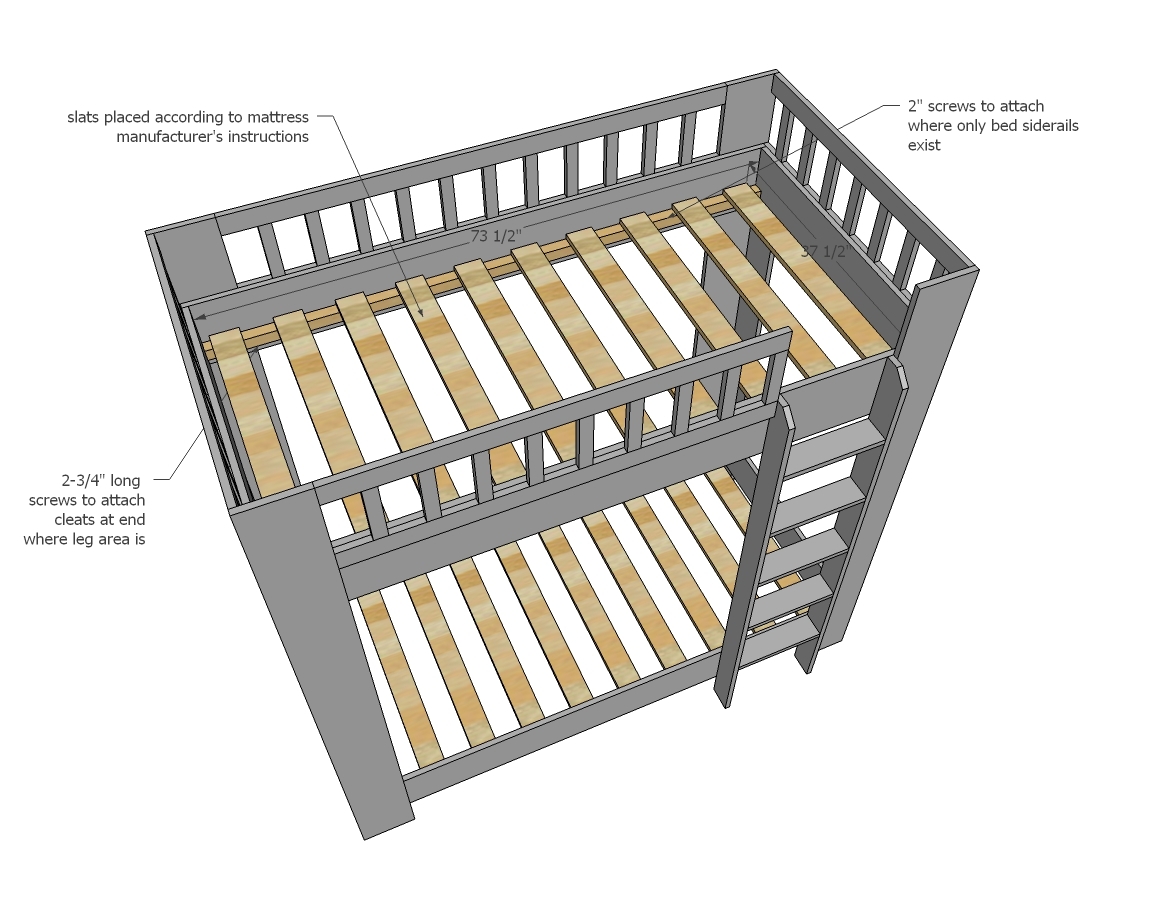
Screw cleats to insides of beds. Place at height desired for mattresses (recommend lower on top bunk and higher on bottom bunk. Screw slats on top of cleats to keep in place. 2x slats can be used for increased strength.

Comments

Vosters42

Wed, 04/06/2016 - 20:35

The boards (Slats) should be 37 1/2 inches because you will be using 4 - 2x2 @ 73-1/2". You will place the slats on those 2x2s. The slats will be the same and the width of the bunk beds. Hope this helps :)

Sarahlynne46

Tue, 01/03/2017 - 14:35

I wanted to build this in a full over full but very new to diy projects and know I would not be able to figure it out simply from looking at the twin over twin instructions and changing the measurements for full. Would love the help for full over full.

OkDesignerMom

Fri, 07/29/2016 - 08:25

Not to doubt the queen of building, but if a twin mattress is 39" wide how does it fix within the 37 1/2" boxes?  The slats should be the same length as the mattress is wide in order for the mattress to fit.  Maybe I'm just not understanding, but I'd hate for someone to build it then their mattresses wouldn't fit.  Thanks for any clarification you can give.  

Frequently Asked Questions

Wood Questions

What kind of wood should I use?
Most of our plans use standard construction lumber like pine or fir. It's affordable, easy to work with, and easy to find. It's also rapidly renewing and biodegradable, so a great eco friendly choice!

Can I use hardwoods instead?
Yes—just keep in mind they're heavier, cost more, and can be tougher on tools and harder to join together and finish. I recommend not tackling a hardwood project until after you have built several softwood projects.

What if my boards are warped?
Choose the straightest boards at the store. You can often work around slight warps by cutting them into shorter pieces.

What wood should I use for outdoor furniture?
Use red-toned or pressure-treated 2x lumber for framing, and cedar or cedar fence pickets for the decking. Outdoor furniture should be built like a deck—your local home center can help recommend the right wood for your climate.

Will my wood move or warp after I build?
Potentially, especially in humid climates. Let your wood acclimate indoors before building. Once acclimated and kept in a stable environment, movement should be minimal. Remember, most houses are built using framing lumber - it's all about keeping moisture down indoors.

Cutting Questions

Do I need a miter saw?
A miter saw is great, creating fast, safe, and precise cuts, even for beginners. But most plans can be built with a circular saw and a straight edge. If using a circular saw to cut, take time to practice, and get good at making cuts, before cutting your project boards.

How do I get clean cuts with a circular saw?
Clamp your board, measure twice, cut slow, and use a sharp blade. This takes practice, so spend some time making cuts. I go through becoming proficient at freehand cutting in my course, it is worth taking if you want to master this skill.

Will the store cut my wood?
Yes—most stores will do rough cuts to help you transport your materials home. But from store to store, the quality of cuts could greatly vary.

Joinery Questions

What screws should I use?
We recommend star-head self tapping screws for framing, most common sizes are 2-1/2", 1-3/4". Pre-drill if close to the edge or you find your wood is splitting.

Do I have to use pocket holes?
Pocket holes are the cheapest, easiest and fastest way to do some joints - like edge to edge or a hidden fastener joint. There are other methods, but these can be time consuming and expensive. We recommend using pocket holes as indicated in plans for best results.

How do I keep things square?
Use a speed square and measure diagonals after each step. Always clamp joints before screwing to keep them tight and flush.

Finishing Questions

Stain or paint before or after building?
A quick sand before and a full finish after gives the best results. Pre-finish if you're doing two-tone or detailed finishes.

What type of finish?
Use oil-based or water-based stain. For paint, cabinet-grade latex or enamel works great. High use surfaces on indoor projects should get a coat of polyurethane, I recommend a Helsman or Spar or other flexible poly that won't crack or peel with wood movement. For exterior projects, use a finish suitable for exterior fences.

How to get a smooth finish?
Start with a well sanded project. Sand between coats (220 grit), wipe clean, and apply light coats with a foam brush or roller.

Plan Questions

Can I change the size?
Many people do, and that's the great thing about building your own furniture! But do keep in mind going bigger might mean more supports are required, and often plans are optimized for minimal material waste.

Are these beginner-friendly?
Yes—plans are written with simple tools and clear steps in mind, with every effort to make plans as simple as possible.

Can I sell what I build?
Absolutely! Just don’t resell or repost the plans themselves.

General Questions

What tools do I really need?
A drill, circular saw, tape measure, square, and a few clamps will get you through most projects.

Do I need a workshop?
Nope! A driveway or small patio is plenty to get started, just make sure you have a level place to work. If you find you are building several projects a year, creating a small workbench is a great way to store tools and have a dedicated workspace.

What if I mess up?
Wood filler, sanding, or flipping boards goes a long way. Mistakes are part of the process!

What can I do to make my projects look more professional?
Start with straight boards, make accurate cuts, clamp all joints, and line up everything neatly. Sand thoroughly, use a neutral finish, and apply it in light coats for a clean look.

I've never built anything before. Where should I start?
Start with a few smaller softwood projects to get hands-on experience. Or if you're tackling a big project, buy a little extra lumber and practice your cuts and joints first. If possible, work with someone who has a bit of experience.

Care & Maintenance

How long will my furniture last?
With good joinery and regular care, your DIY furniture can last for decades. I have pieces in my own home that are over 20 years old and still going strong! One of the best parts about DIY furniture is that it’s easy to repaint, refinish, or repair—so your projects can grow and adapt with you.

How should I care for outdoor furniture?
Lightly pressure wash or hose it down once or twice a year. Tighten screws and reapply finish as needed to protect it—just like a deck or fence. A little upkeep goes a long way in extending the life of your furniture.

How about indoor furniture?
Regularly dust or wipe with a damp cloth. If it starts to look worn, a light sanding and touch-up paint or stain can refresh it in no time. DIY pieces are meant to be durable and fixable—so don’t be afraid to give them some love now and then.

Want to Build with Confidence?

Check out my ebook: 12 Skills to Build Your Own Furniture
It walks you through the core skills every builder needs—measuring, cutting, joinery, and finishing—so you can build beautiful furniture that lasts.

Still Have Questions?

Email us anytime at [email protected] and we’ll be happy to help!