
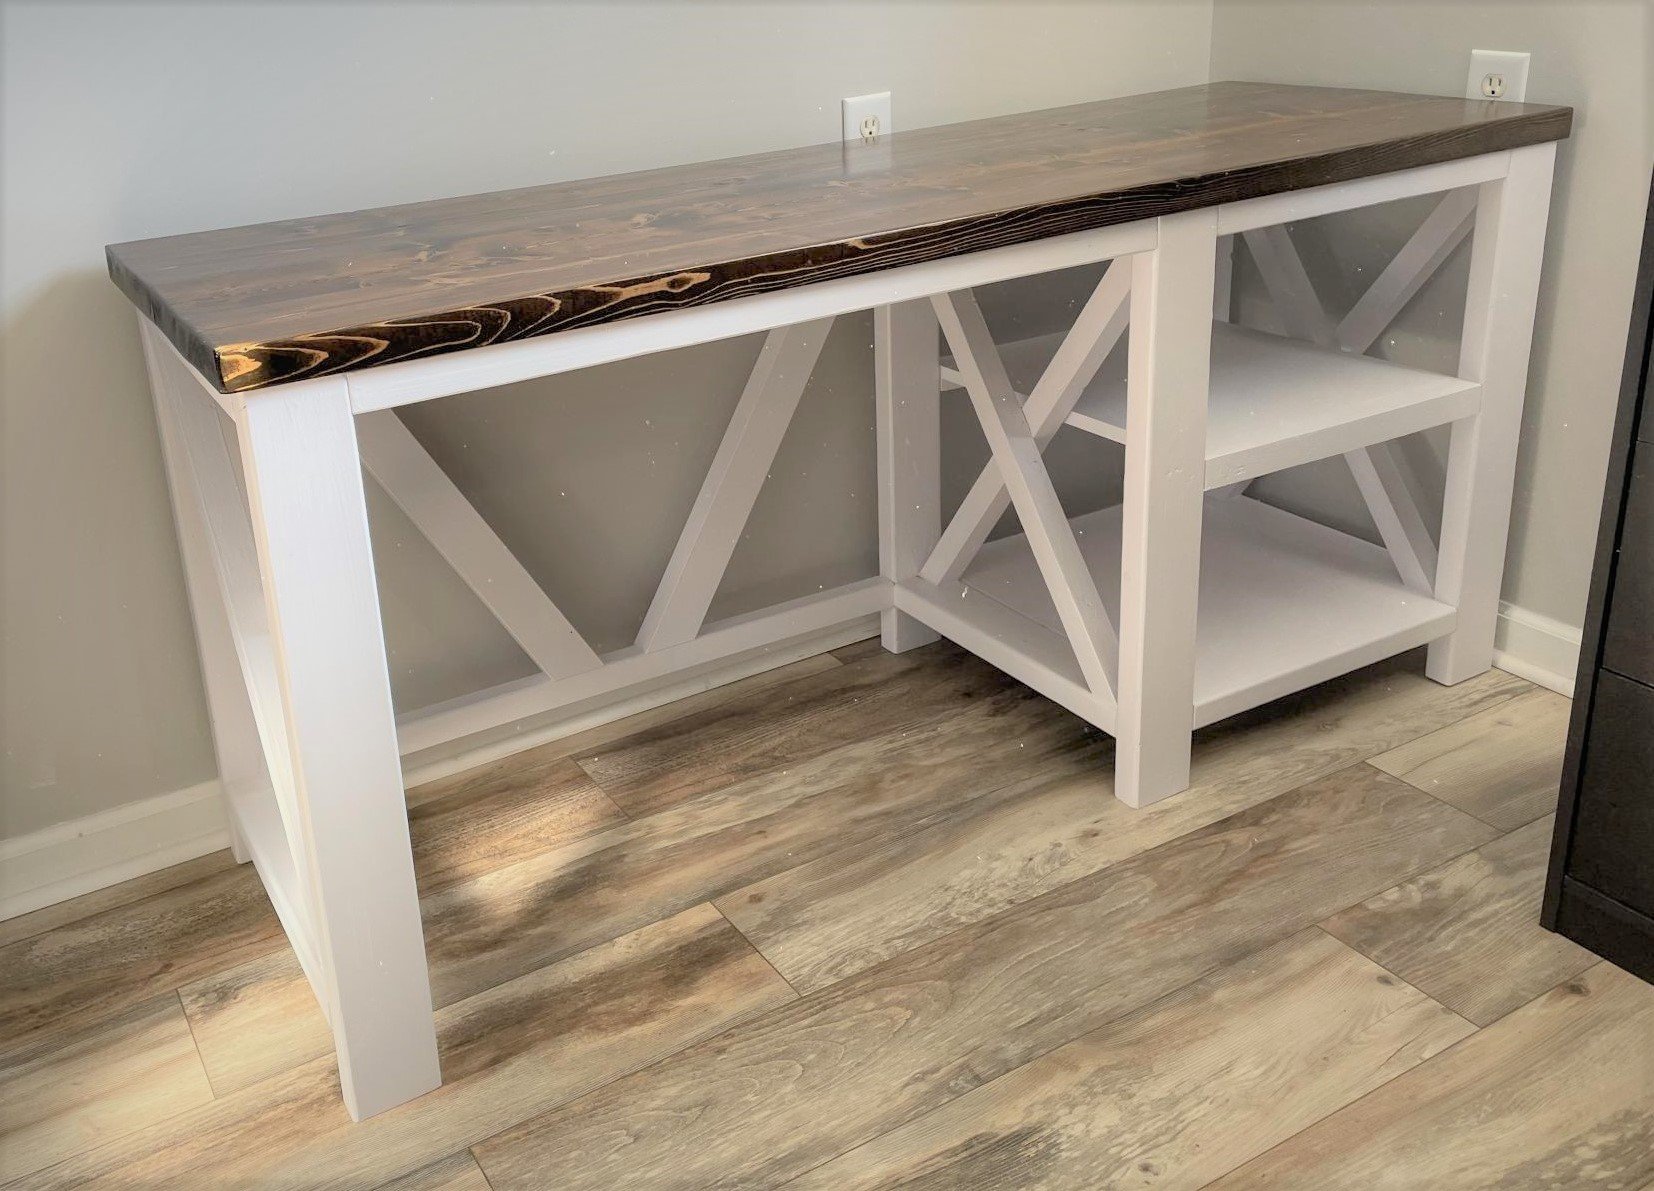

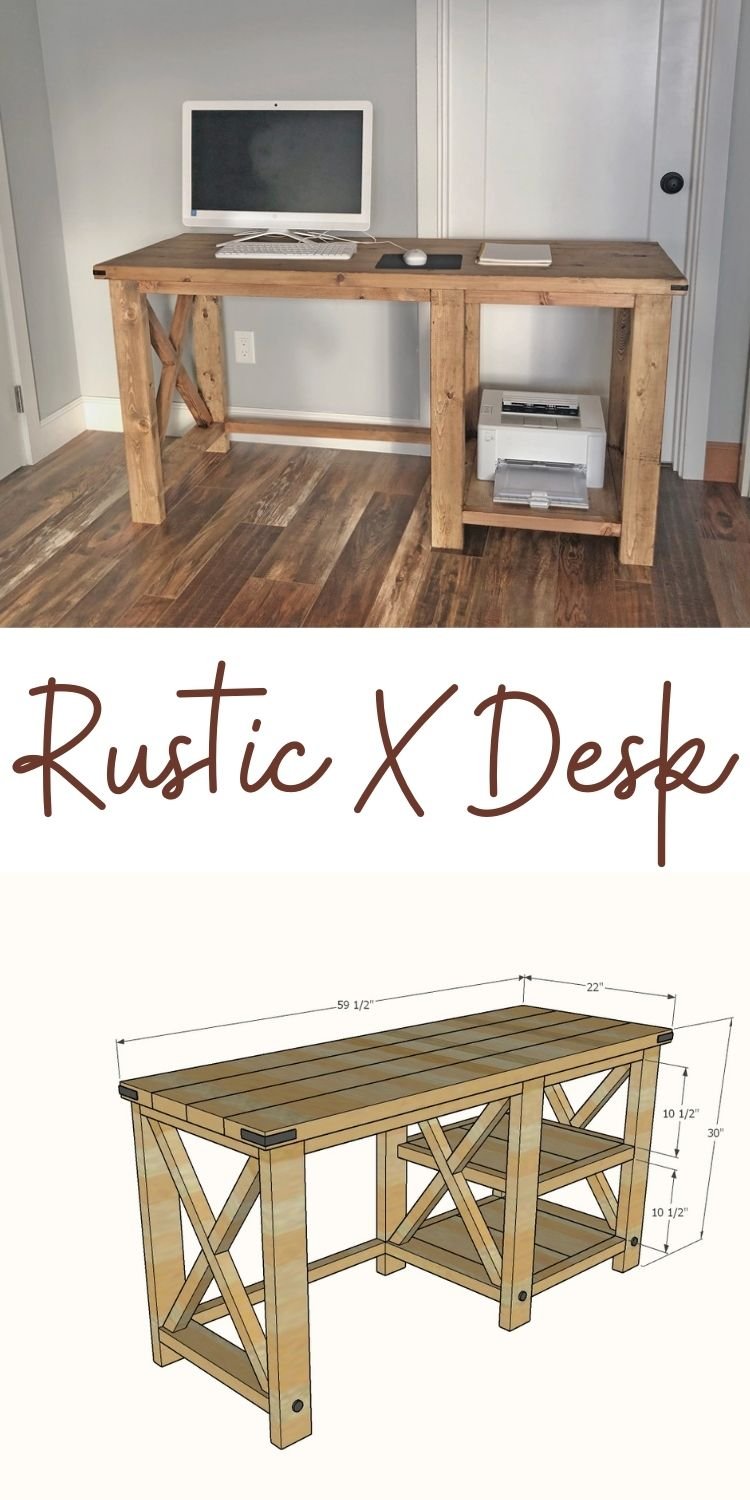
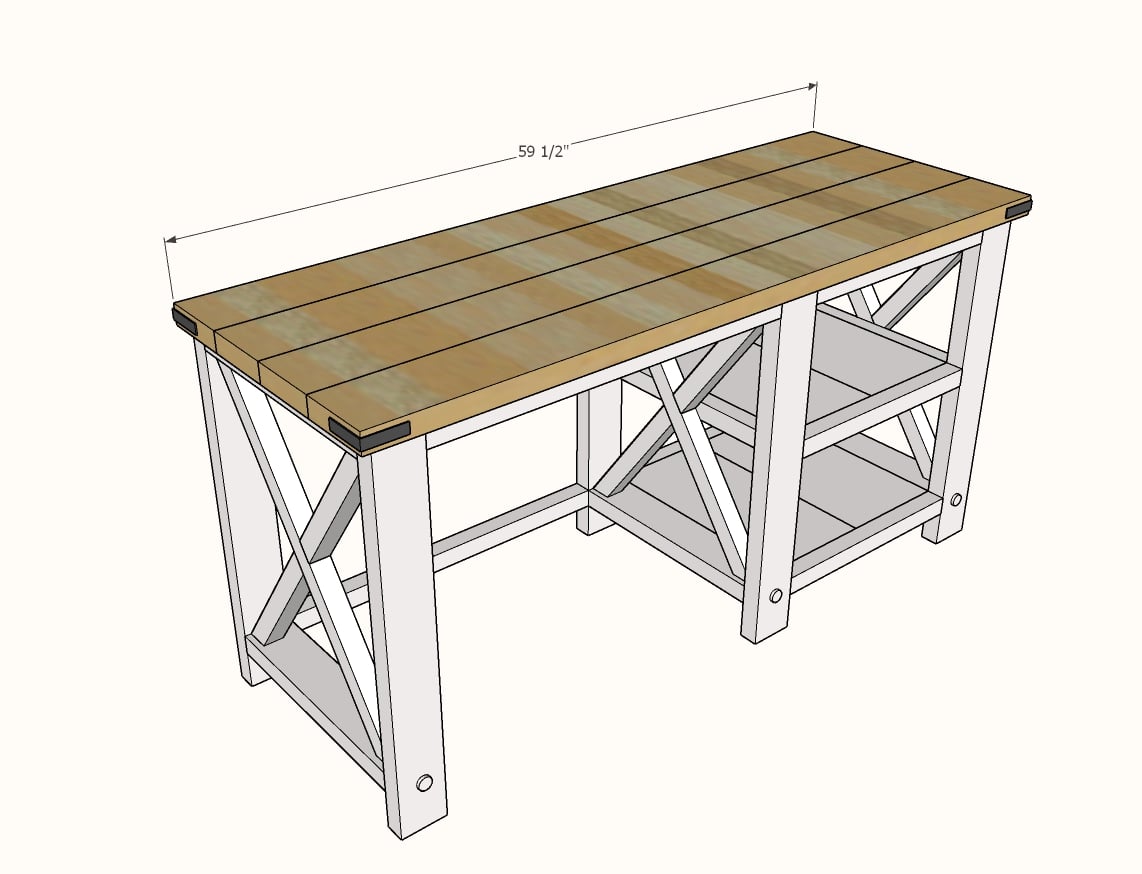
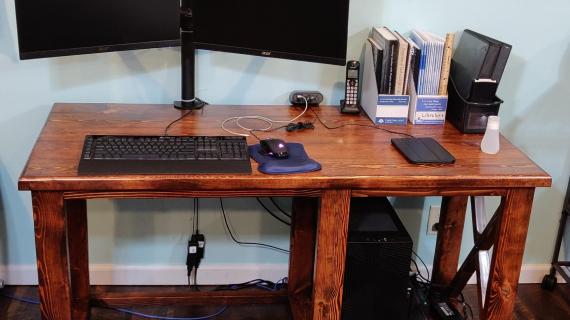
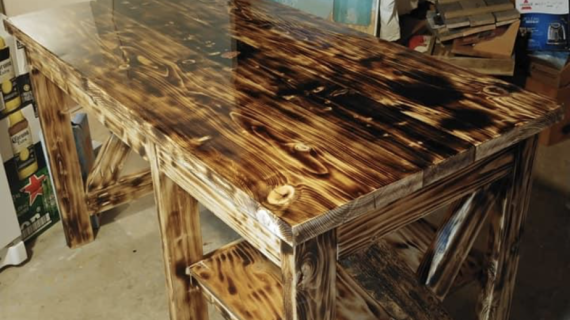
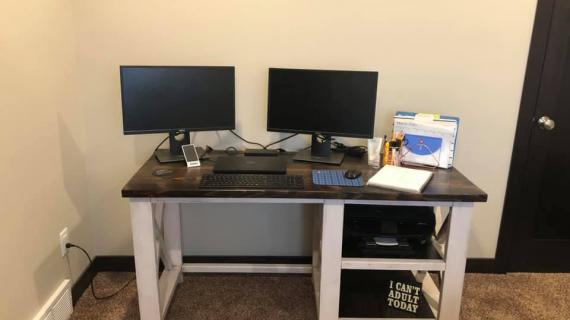
Build your own farmhouse desk with free plans from Ana-White.com. Uses all off the shelf dimensional boards (no plywood!), easy to build with our step by step plans.
Pin For Later!
Preparation
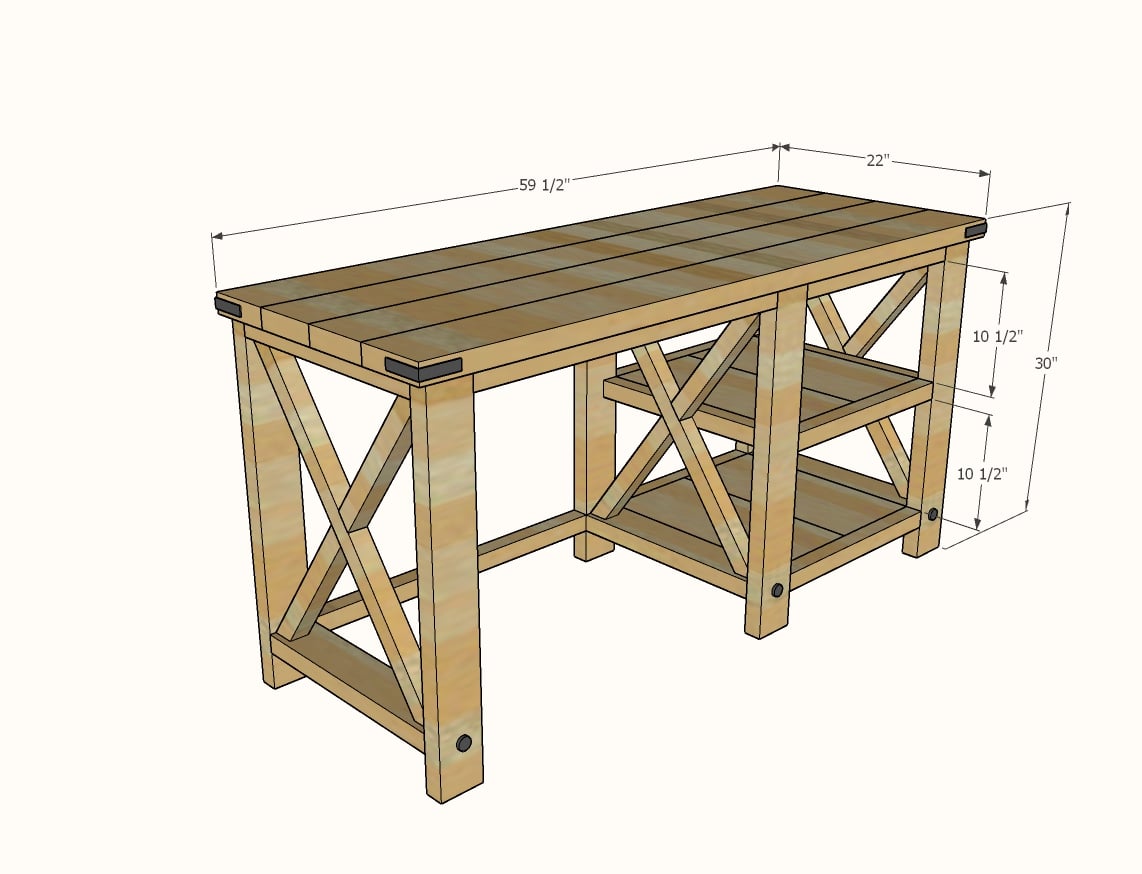
3 - 2x4 @ 8 feet or stud length (92-5/8")
2 - 2x6 @ 10 feet
5 - 2x2 @ 8 feet (I used 2x2 furring strips)
1 - 1x10 @ 6 feet
6 - 2x4 @ 28-1/2" - legs
6 - 2x4 @ 17-3/4" - top and bottoms of leg sets
6 - 2x2 @ ~30" - X detailing
2 - 2x2 @ 17-3/4" - cleats for shelf supports
4 - 1x10 @ 17-3/4" - shelf boards
6 - 2x2 @ ABOUT 18-1/2" - measure and cut in the instructions
3 - 2x2 @ 28-1/2" - chair area 2x2s
4 - 2x6 @ 59-1/2" - tabletop
NOTE: I changed the measurements shown in the diagrams at 18" to 17-3/4" so that all the cuts would fit on the boards by just making the base 1/4" less in depth. This does not change the height or the desktop.


Instructions
Step 1

Drill two 1-1/2" pocket holes on each end of the 2x4s @ 17-3/4".
Attach to the legs at the top.
Attach bottom with a 3" space underneath.
Keep pocket holes on the outsides.
Use 2-1/2" pocket hole screws.
Build three identical.
Step 2
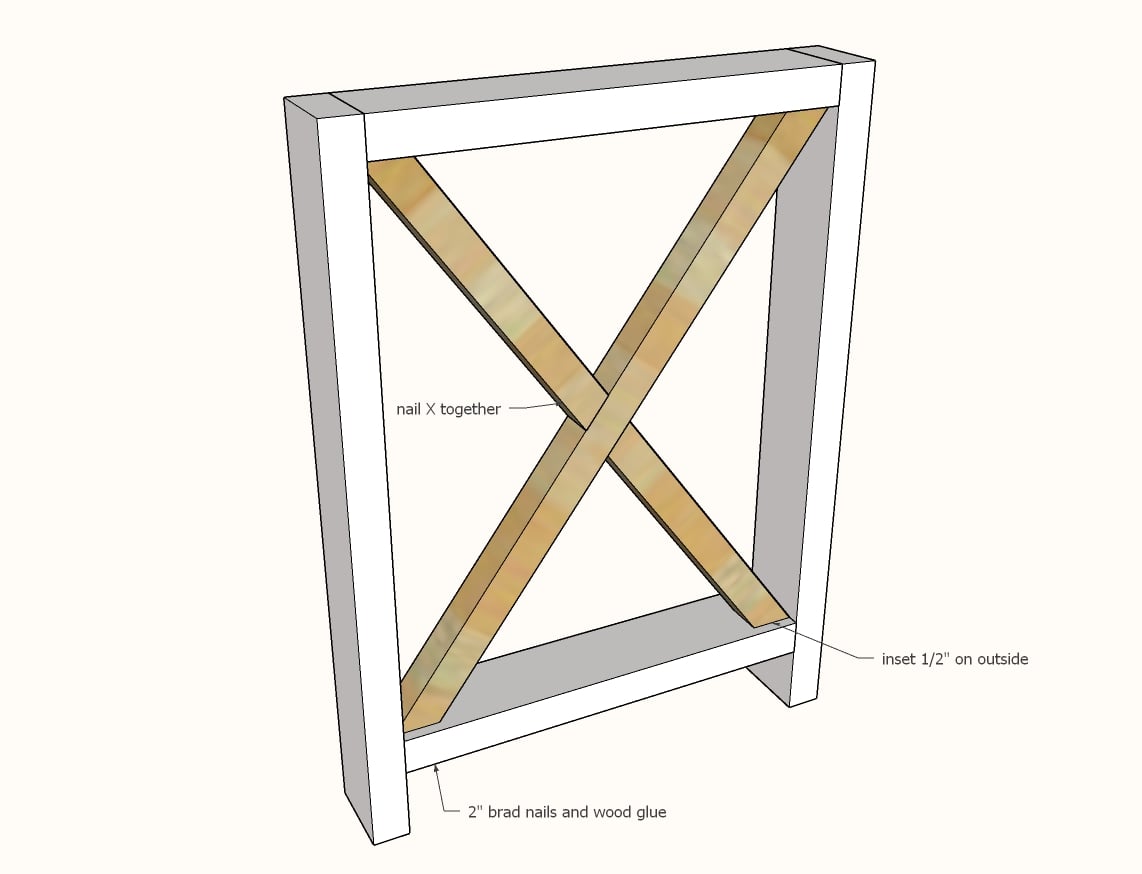
Scribe the X detailing in place in the legs.
Cut out on a compound miter saw.
Attach with glue and 2" brad nails.
Add X detailing to all three.
Step 3
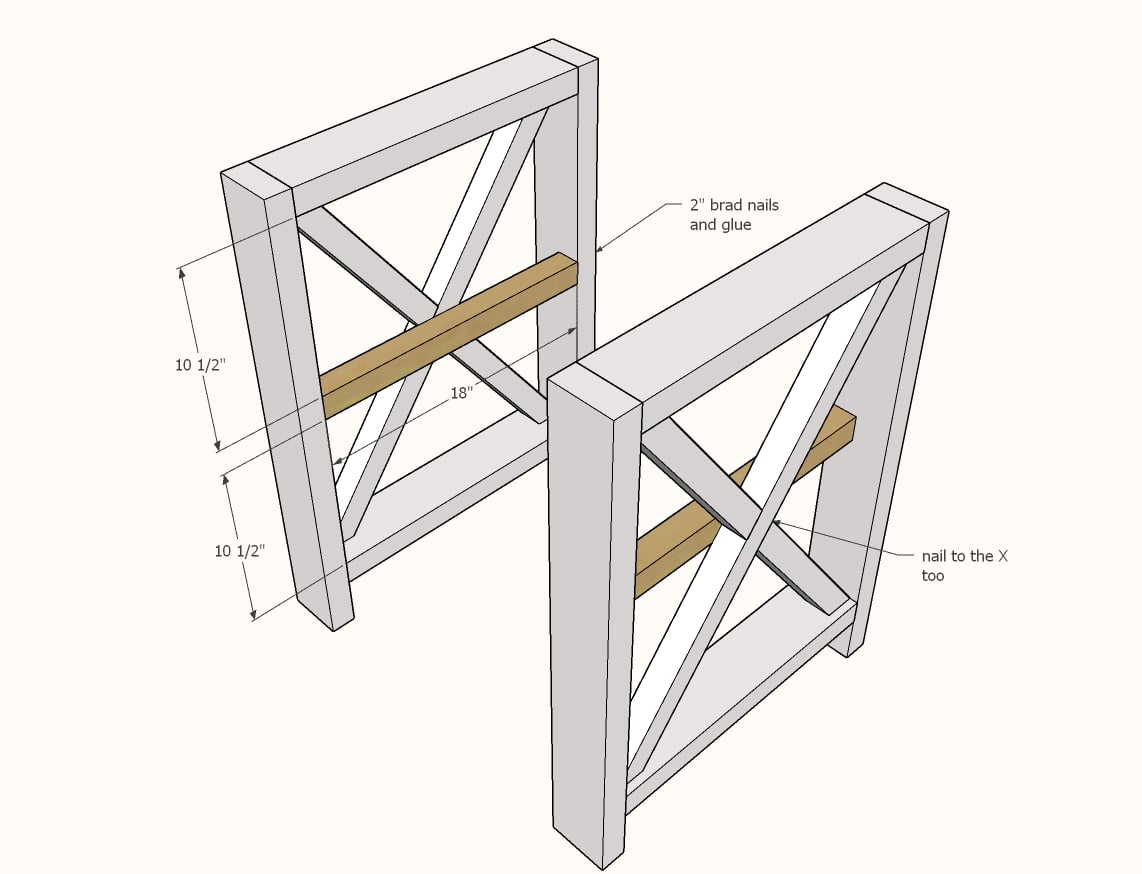
For middle shelf, attach 2x2 cleat with 2" brad nails and wood glue.
Do this only for two of the legs.
Step 4
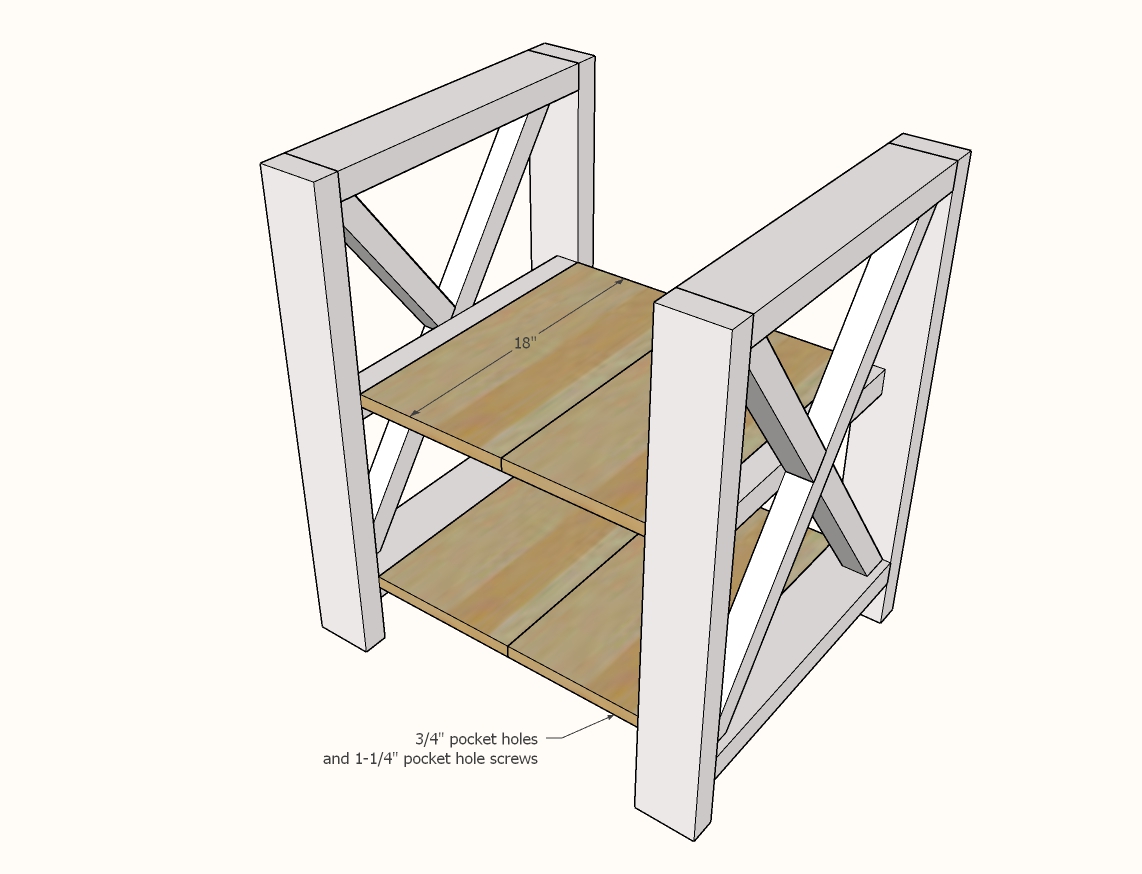
Drill 3/4" pocket holes to connect two 1x10s together and attach with 1-1/4" pocket hole screws.
Then drill 3/4" pocket holes on all four sides of the shelves (2 on each side) and attach with 1-1/4" pocket hole screws to the sides.
Step 5
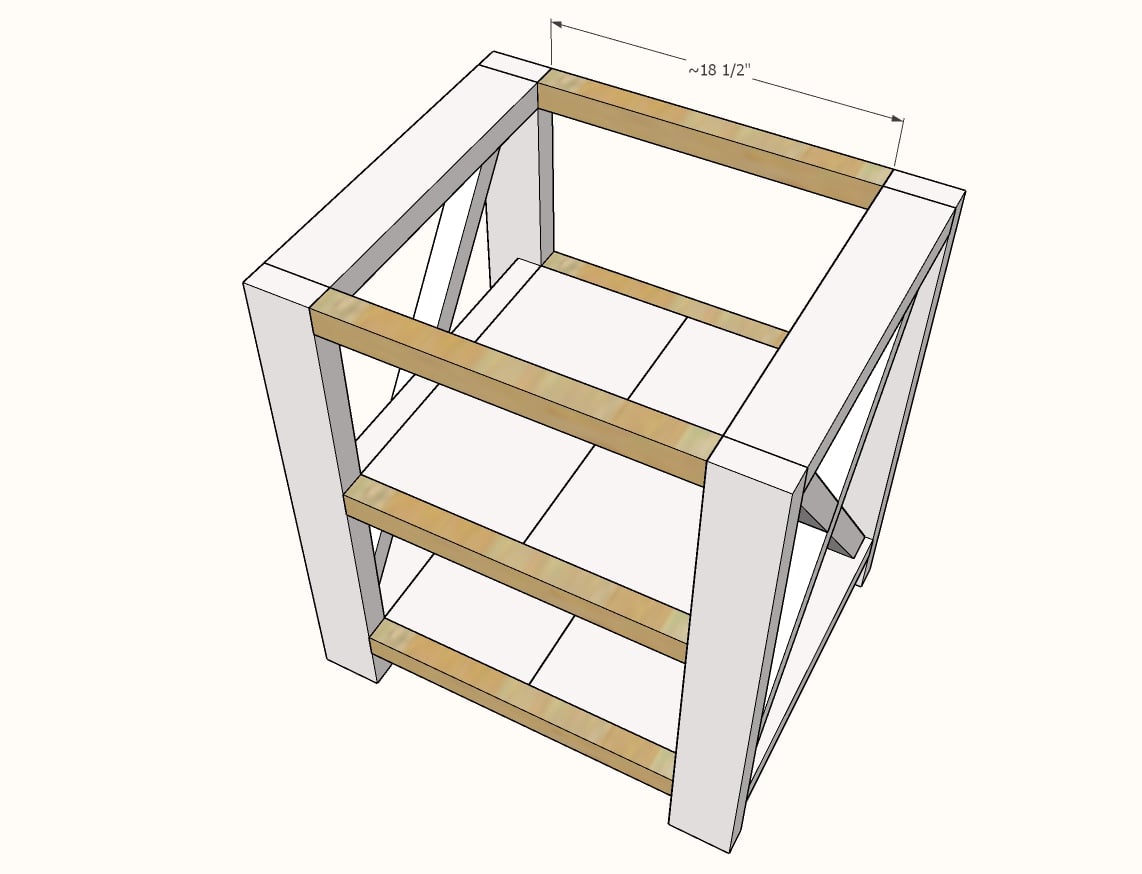
Take a measurement in between the two legs and cut six 2x2s to this measurement.
Drill a single 1-1/2" pocket hole on each end.
Then attach with 2-1/2" pocket hole screw and glue.
Also attach shelf to the 2x2 with 1-1/4" pocket hole screws through holes drilled in step 4.
Step 6
Attach the remaining leg set to the desk with 2x2s and pocket holes.
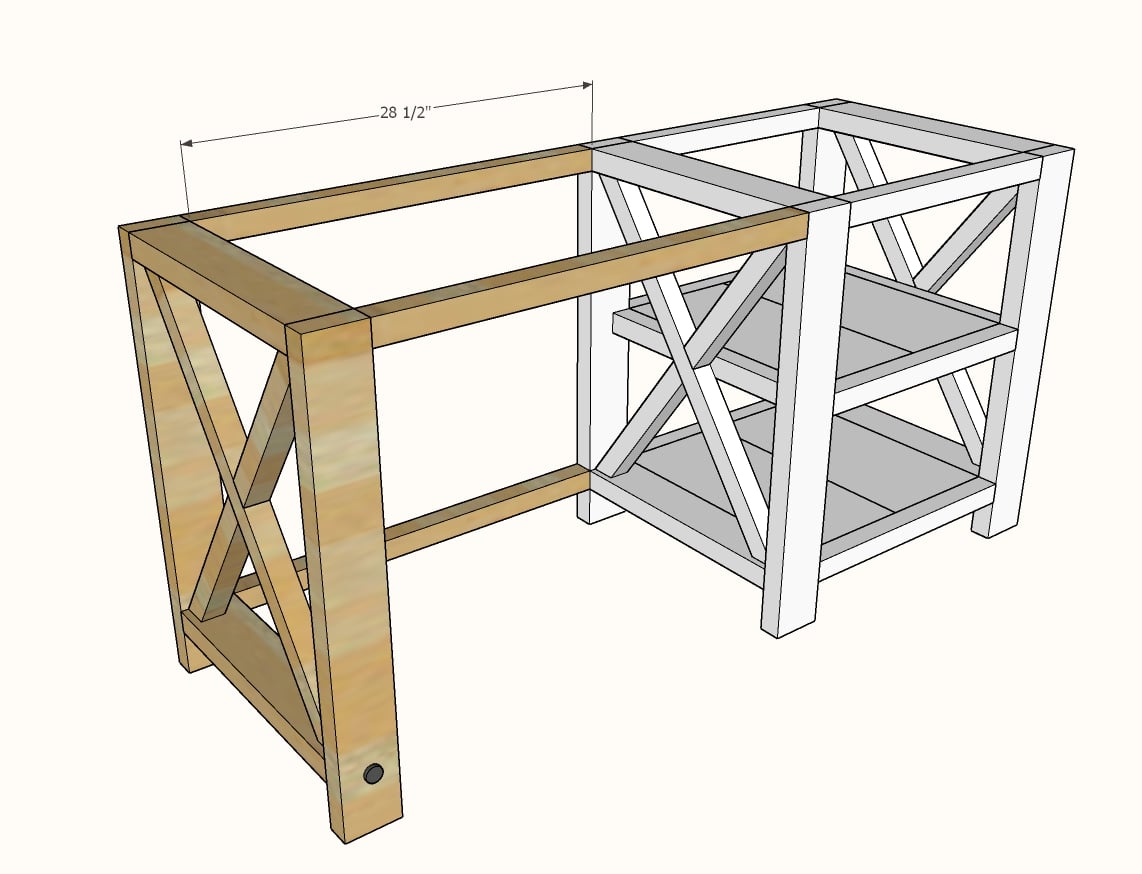
Step 7
Build the desktop first with 1-1/2" pocket holes and 2-1/2" pocket hole screws.
Attach base to underside of desktop.


Comments
Bryan G Price
Wed, 02/26/2020 - 06:09
Very Impressed with your Work!
Hello Ana,
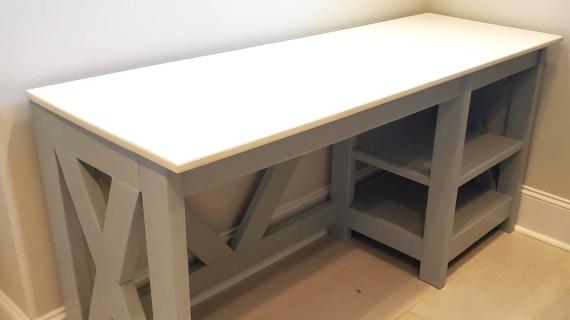
I made a desk similar to this about a month ago. I like your design better though! The X cross pieces and the addition of the shelf for the printer is something I might even go back and see if I can incorporate into my current design.
Thanks for all you do!
Bryan.
RHgaijin2
Wed, 07/15/2020 - 15:45
X Desk
I just recently made this desk for a friend and made a video of it
https://youtu.be/cr35lgWSzHY
boomdog
Wed, 02/26/2020 - 07:27
L Shaped?
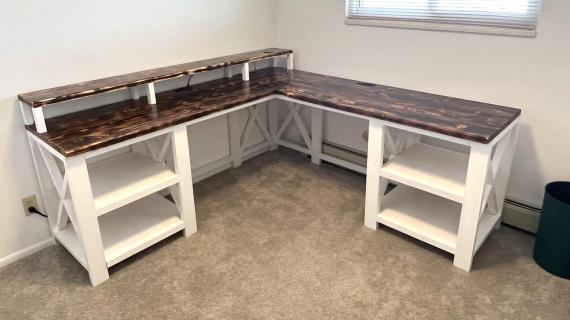
Ana,
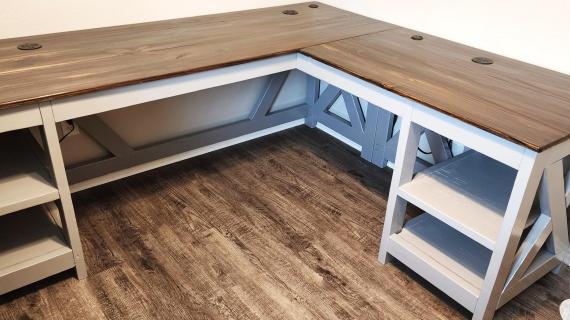
Any chance you can extend this swap the "box" to both sides and then add a 3rd and make an L shape out of this?
Also do you know the approximate weight that a shelf could hold, we have a very heavy color laser printer and I worry about supporting it properly.
Thanks,
Mark
Drunknstein
Thu, 04/16/2020 - 21:56
Plans
How.do I print plans. Is there a pdf file
In reply to Plans by Drunknstein
mvgreen3
Thu, 05/07/2020 - 10:58
There should be a printer…
There should be a printer icon across from the "Save this plan" link.
Lipps
Tue, 06/02/2020 - 21:34
What should you use to…
What should you use to attach the top to the frame?
JBuilt_NotBought
Sat, 07/18/2020 - 13:01
Ana used pocket hole screws…
Ana used pocket hole screws in the video she attached to the plans. I used 2 1/2" GRK deck screws that I had from a previous project that worked just as well. You could also make corner braces and attach that way. Google various ways to attach table top to frame and you'll find endless options.
dech_27
Sun, 07/05/2020 - 20:39
Rustic X Desk with L shape plans?
Hello,
I'm interested on doing this desk but in L shape. Is it possible that you have the plans for this but as an L shape? My husband and I really feel this would be a great desk that is sturdy but would like it as an L shape. We are just having trouble figuring it out how to do it. Thanks in advance!
lvgully2020
Mon, 07/13/2020 - 20:33
Type of Wood?
Hey there Ana...did you just use standard fir boards on this or something like pine or soft maple? Thanks!
big_kahuna642
Fri, 07/17/2020 - 10:46
Varnish yes or no?
Hi Ana. After you stain do you also put a varnish on top to protect or leave it as is?
galliond
Sun, 08/23/2020 - 04:00
Rustic X desk
What angle are the inner and outer cuts on the Xs?
jward71
Mon, 08/24/2020 - 09:08
Angle cuts for X braces
At what angle are the x braces cut at?
jward71
Mon, 08/24/2020 - 09:08
Angle cuts for X braces
At what angle are the x braces cut at?
darwincam
Wed, 09/02/2020 - 12:55
cut to fit, don't get hung…
cut to fit, don't get hung up on the angle
dferguson75
Mon, 09/07/2020 - 20:05
Nice design, tweakable too...
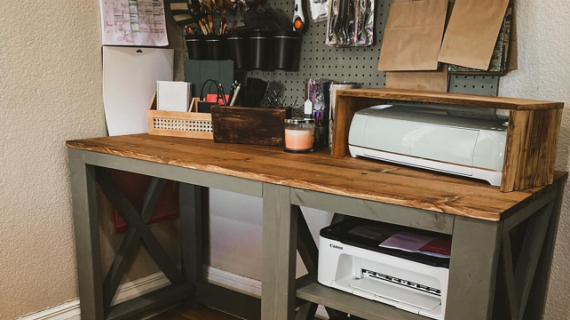
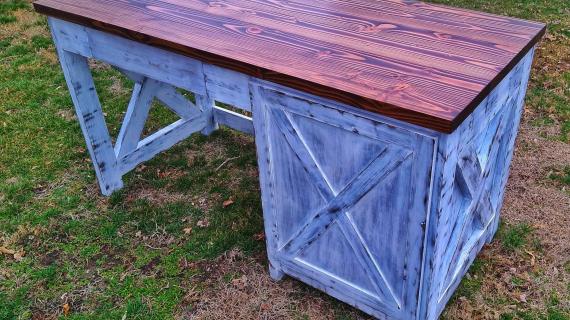
I totally liked that this was a straightforward design to follow and build. The local big box store had an inferior selection of 2x2 furring strips, so I ended up dragging out the table saw and milling my own from cherry-picked 2x4 lumber. I ended up building the first one almost to the letter, leaving out the middle shelf since my kid has a tower PC he'd like to stow in that space. I realized that for his use, we could have gotten away with making the shelf the width of a single 1x10 instead of two 1x10 planks, but what's done is done. We used Minwax #215 red oak stain and finished it with Minwax polyurethane to give it an attractive fit and finish. We also left out the X in the middle since he'd like to be able to access his PC "guts" without having to pull it out. I added a fifth 2x6 to it to give it a more "executive" depth and give my son more room to do his schoolwork. We also grabbed a Wiremold WMC220BK convenience outlet and installed it to give him a couple 120V convenience outlets for a desk lamp, laptop charger, etc. as well as a pair of USB outlets for charging mobile devices without all the clutter of wall warts and having to find extra-long cables.
About the X's, I was having a bit of a trial marking / measuring the "half strokes" so I ended up making both halves of the X from corner to corner and using a router and 3/4" flat bit to cut notches into both halves so they would slide into each other and look like a single piece. It was a bit more challenging to nail in, but we liked how it ended up turning out. Measuring angles is a snap using the speed square, which I noticed that appears on the tool list on many of Ana's plans. It takes the guess work out of mitering the 2x2 used for the X detail (I found them to be a consistent 33.5 to 34 degrees, depending on the imperfections in the 2x4, so YMMV).
I also found it a bit difficult to level the desk with six legs and ended up cutting the "middle" legs off a bit shorter than I would have liked. Even still, the desk's structure is strong enough that I doubt it will exhibit any bowing.
I'm in the middle of making a second desk derived from this design. Instead of the middle legs sort of "cutting" the 2x2 furring strips, I decided to run a 2x4 along the whole width at the bottom and 2x2s along the whole width at top-front and top-back. I'm also adding a fifth 2x6 to the tabletop so there will be plenty of room. It won't have the shelving, since the kid who is getting it just needs a desk large enough to hold his school stuff and a multifunction printer used by everyone.
mziegler32
Mon, 09/14/2020 - 20:20
I swapped the shelves to the…
I swapped the shelves to the other side and narrowed the area for seating to fit our space. Super easy instructions to follow. Turned out really well!
mziegler32
Mon, 09/14/2020 - 20:23
I also added more pocket…
I also added more pocket holes to strengthen the shelves a bit. Still wasn't sure about its strength until someone sat on the shelf before I could stop them. It held them and was sturdy as could be.
LisaGergets
Wed, 12/16/2020 - 18:24
Desktop how to?
Hi Ana! Do you have a tutorial on how to make the desktop?
sha259
Sun, 02/14/2021 - 14:39
Is anyone else getting…
Is anyone else getting different measurements?
The shelf boards are to be 17 3/4 on the cut list but the diagram when placed on to shelf support says 18" or have to run back to get another 2x4x8.
Also is the shelves seem a little untrustworthy to anyone else to support weight.
If im missing something please let me know.
RWMRyan
Mon, 06/14/2021 - 09:31
Nice little desk. Likely…
Nice little desk. Likely impossible to do for under $50 today though.
jeffs23018
Sat, 10/23/2021 - 10:21
another desk
another desk
jeremyhouse76@…
Thu, 04/28/2022 - 07:45
ana, Do you plane or joint…
ana,
Do you plane or joint your wood for these projects?