

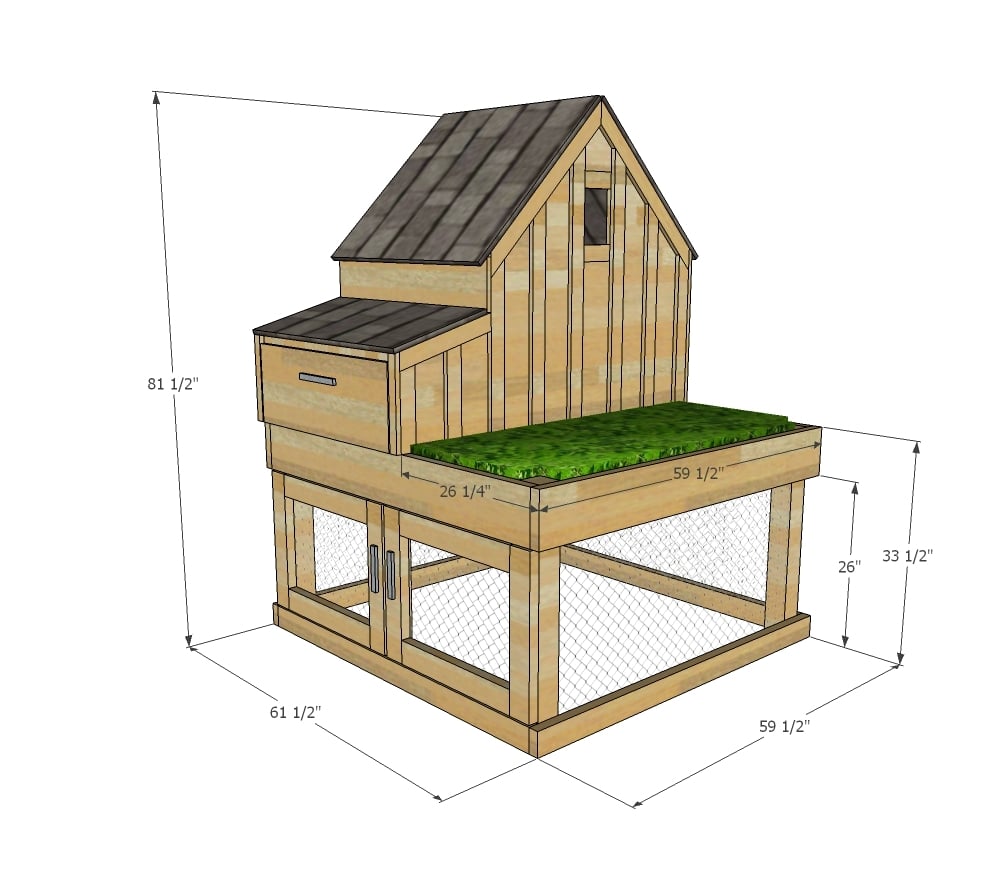
Free plans for small chicken coop with clean out tray and nesting box. Step by step tutorial by ANA-WHITE.com


Hi guys! So thrilled to share with you today a brand new plan!
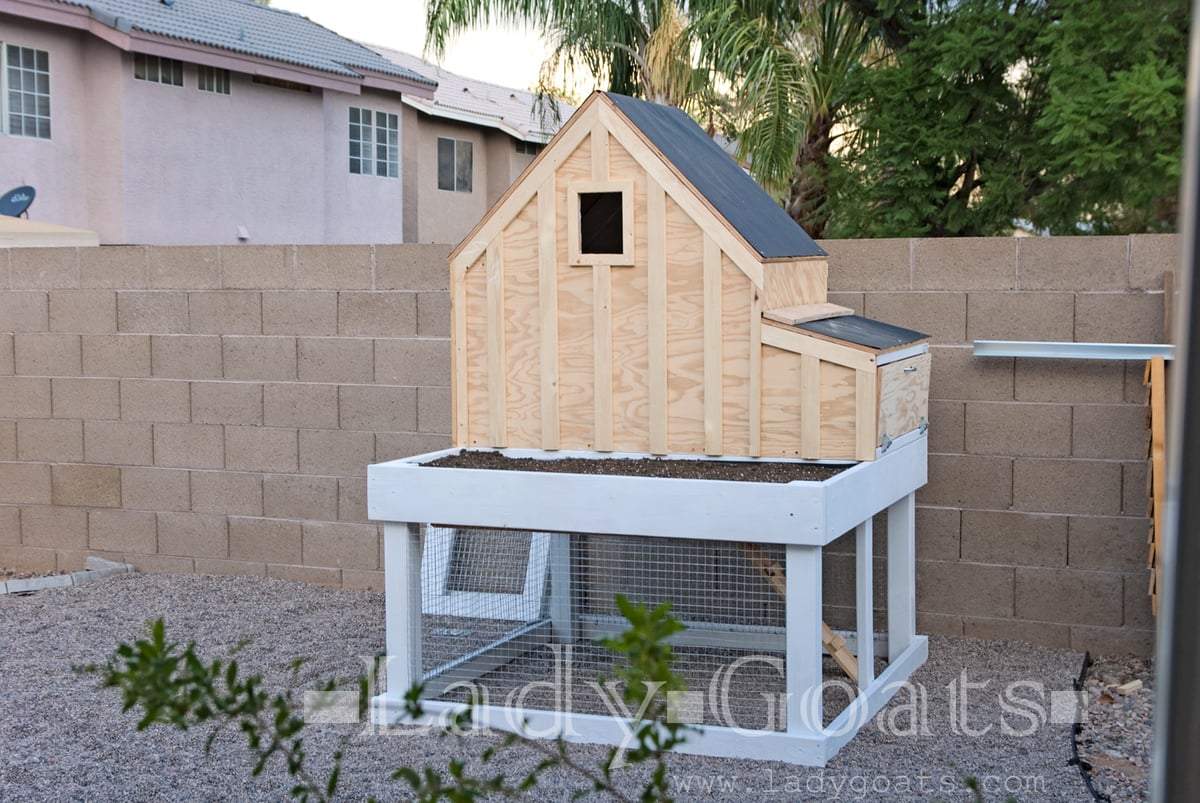
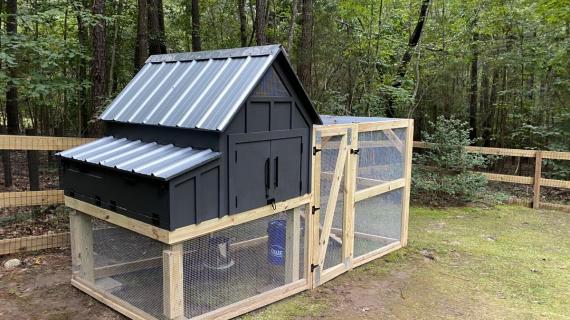
My friend Gina from Lady Goats emailed me a while back about collaborating on a new chicken coop plan. We've got a couple of coop plans on the site, but she specifically needed something compact and cute, with all the functionality of a full size coop.
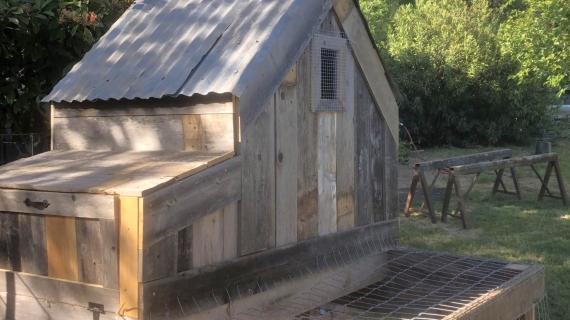
Drawing inspiration from this coop, Gina and I worked together to create a plan that not only had all the features and cuteness, but is easy to build and will last.
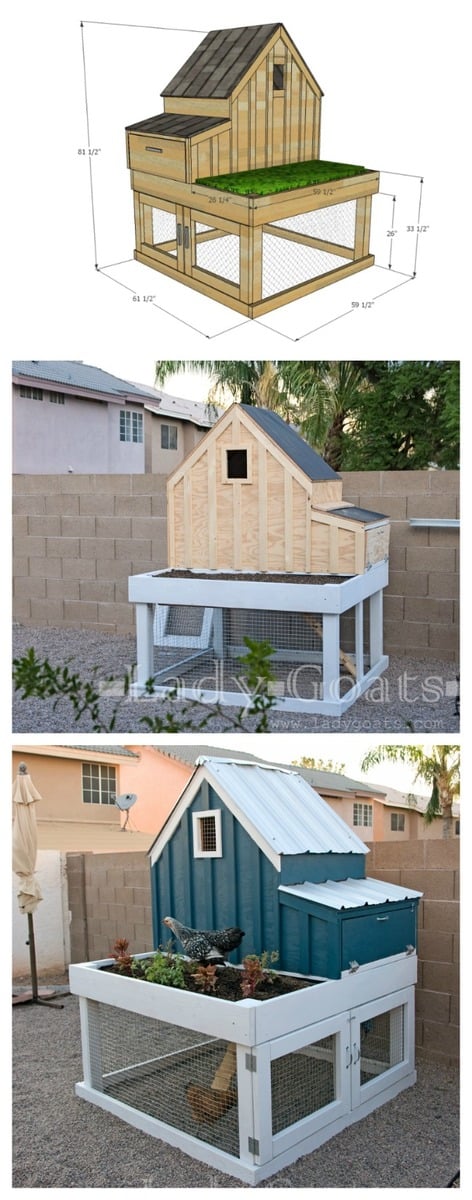
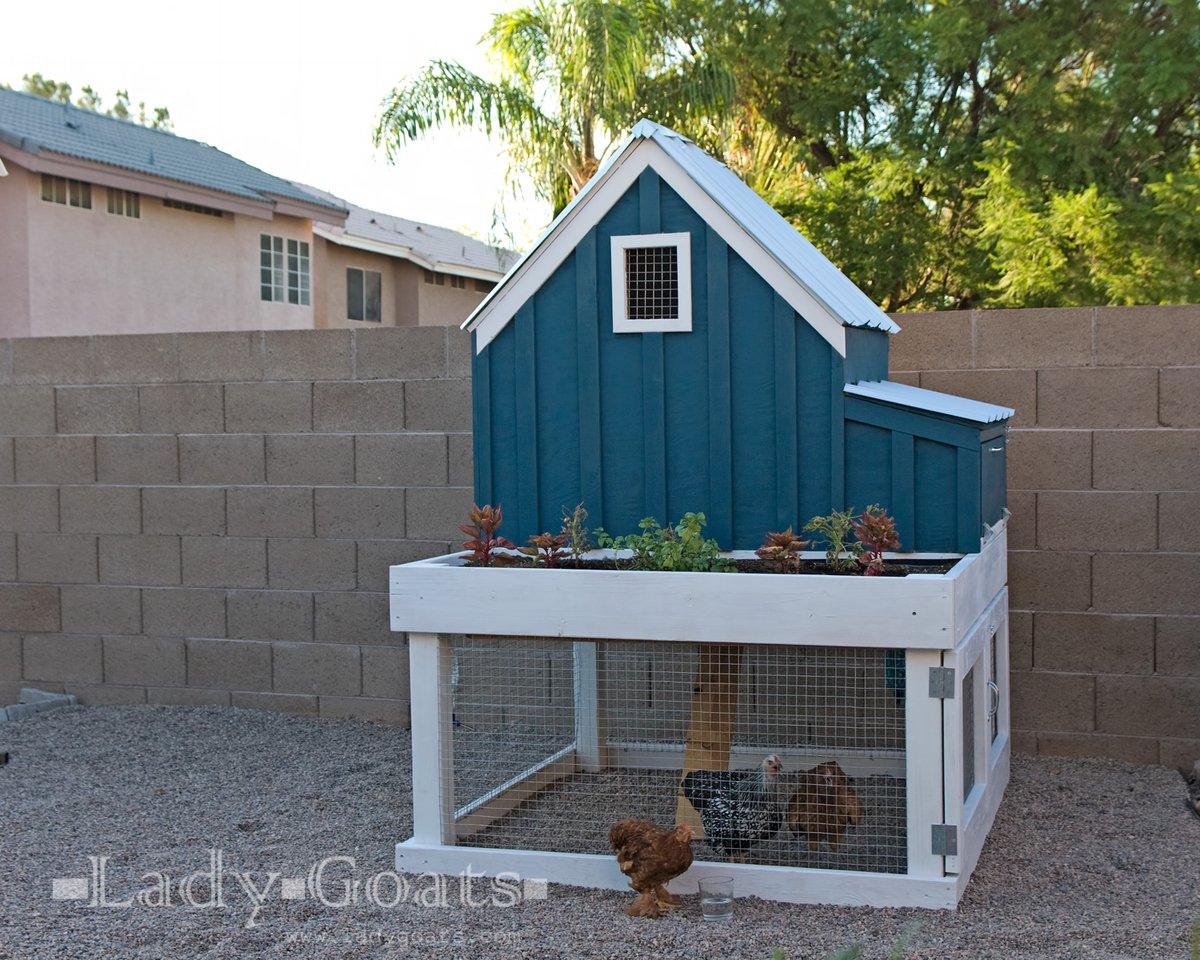
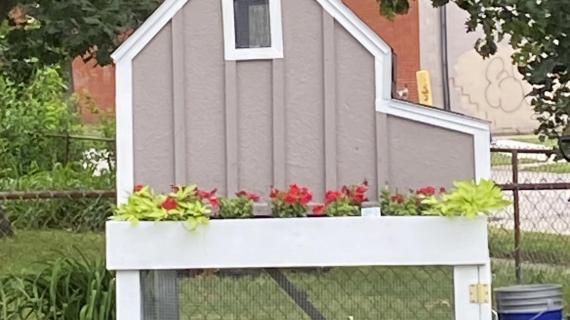
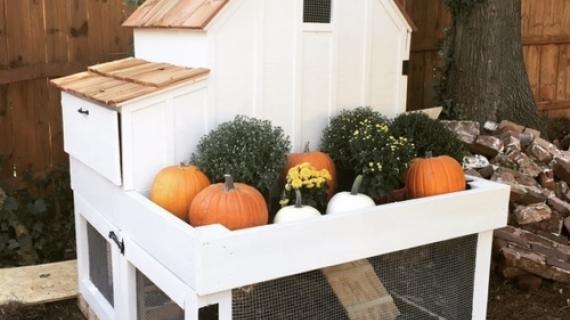
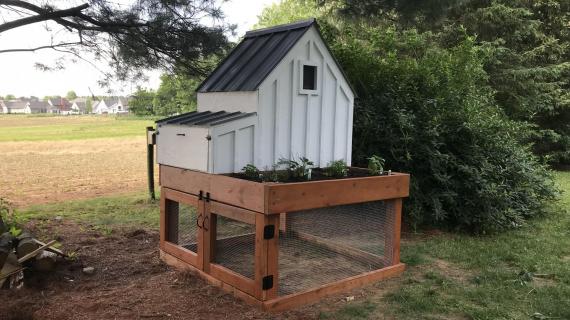
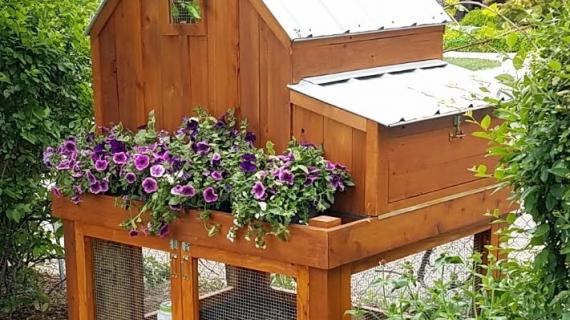
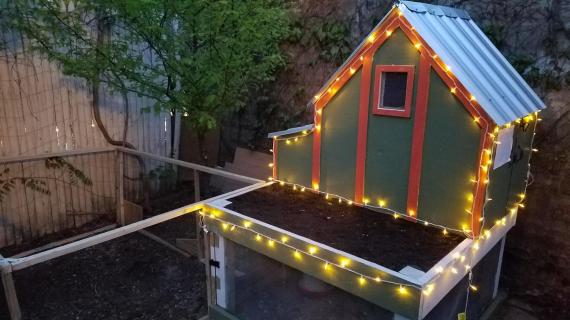
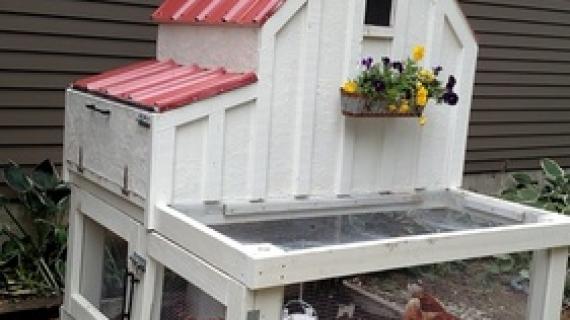
I love how this little coop turned out! It is too cute, but has tons of functionality too!
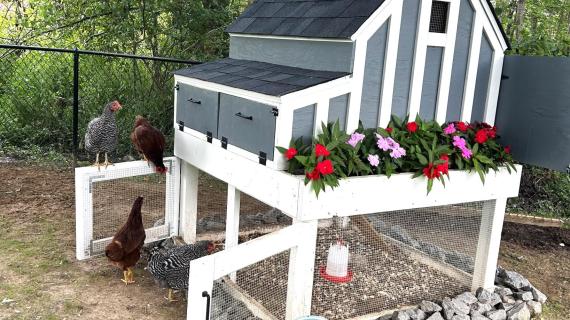
- 25 square foot run
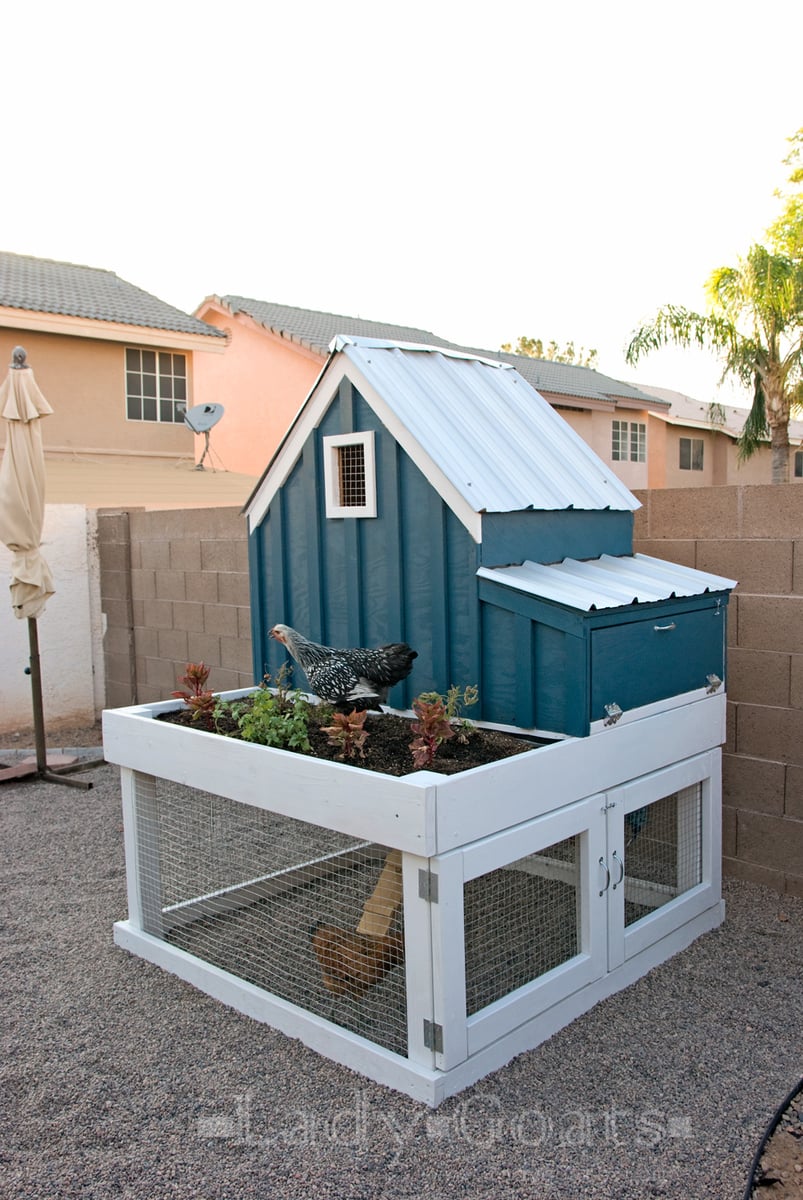
- Planter Box
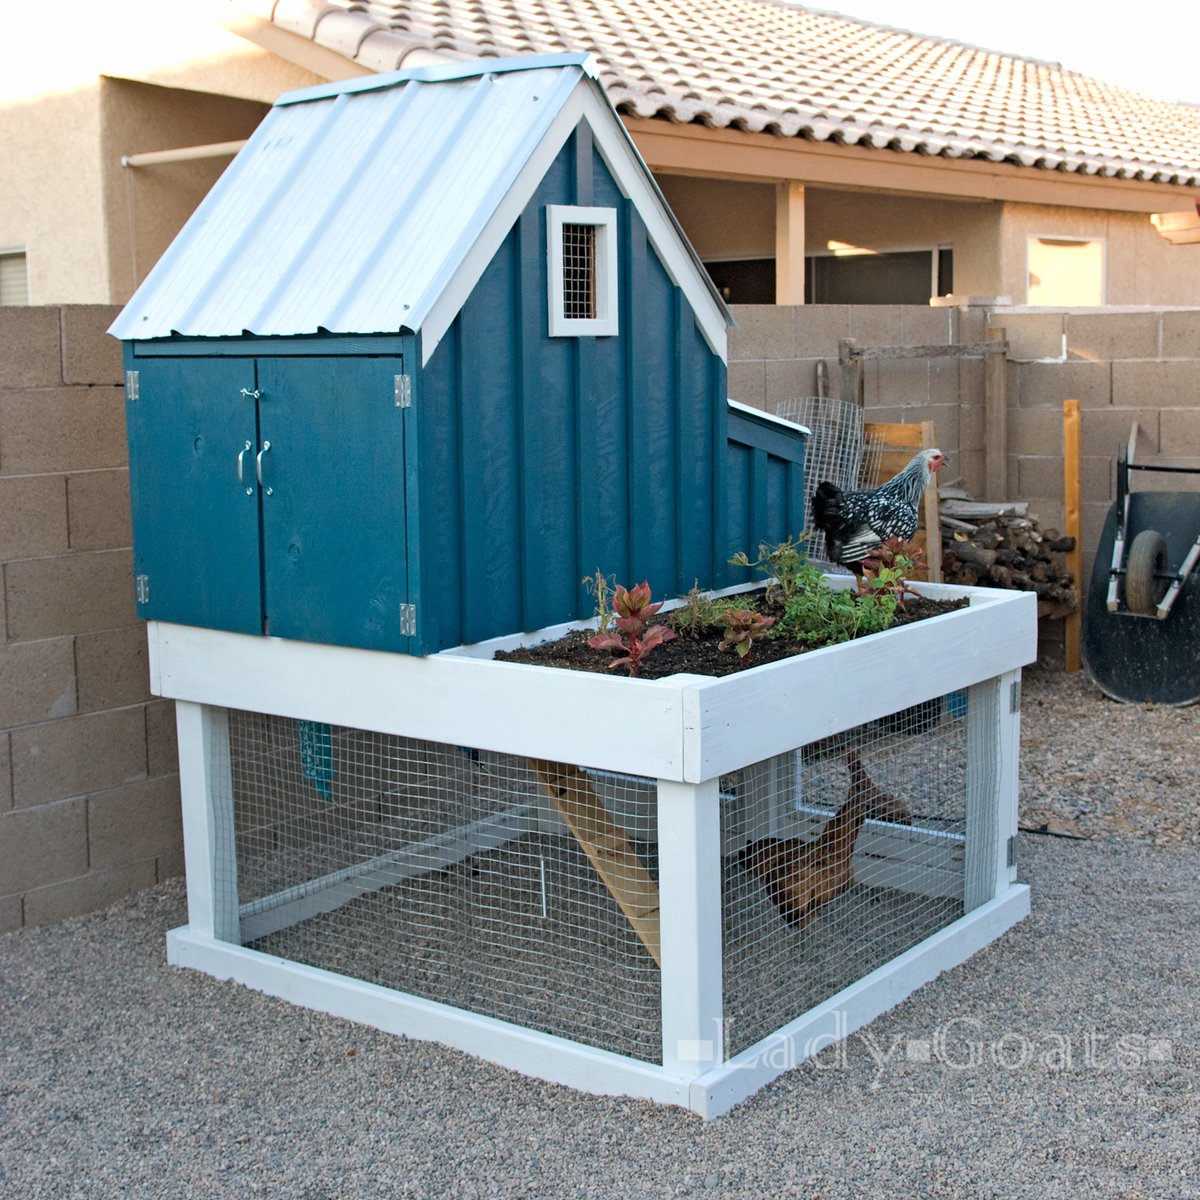
- Nesting Box with Door
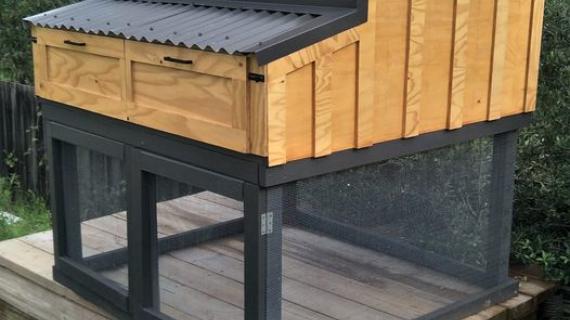
- Clean out tray
- Built in Roosts
- Easy clean out doors
- And lots and lots of charm
I'm sharing the full plans for this chicken coop absolutely free below (if this is the homepage, click READ MORE below), but before you grab the plans, please take a second to read through Gina from Lady Goats' build post with lots more photos and details.
CLICK HERE FOR MORE PHOTOS AND BUILD DETAILS AT LADYGOATS.COM
Thanks so much for using my plans and being part of our site.
XO Ana
Pin For Later!

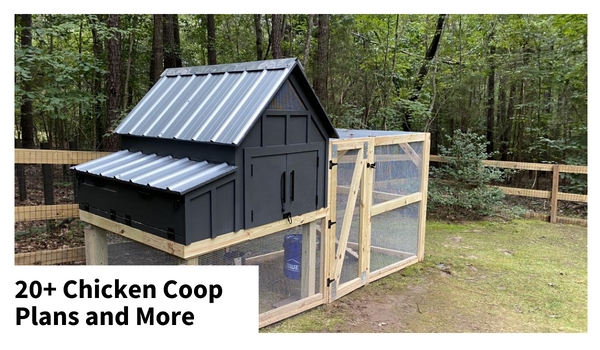
MORE COOP PLANS!
Want even more coop plans? Here's a round up of all of our favorites!
Preparation
- 2 – 4x4 @ 6 feet long (cedar or treated)
- 2 – 2x4 @ 10 feet long (cedar or treated)
- 2 – 2x8 @ 10 feet long (cedar or treated)
- 1 – 2x8 @ 8 feet long (cedar or treated)
- 2 – 2x4 @ 8 feet long (cedar or treated for base doors)
- 7 – 2x4 @ 8 feet long (inside coop so does not have to be treated or cedar)
- 2 – 2x2 @ 8 feet long
- 2 – sheets ¾” plywood, exterior grade
- 1x3s or cedar fence pickets ripped to 2-1/2” and 1-1/2” width for siding and trim
- 1 sheet of ½” plywood, exterior grade (for coop bottom)
- 20’ of 24” wide chicken wire and staples
- 5 sets of exterior hinges
- Latches
- 80” x 36” of roofing – pieces are cut to match roof plywood
BASE
- 4 – 4x4 @ 33-1/2” (legs)
- 2 – 2x8 @ 58-1/2”
- 2 – 2x4 @ 58-1/2”
- 2 – 2x8 @ 59-1/2”
- 2 – 2x4 @ 59-1/2”
- 1 – 2x8 @ 56-1/2”
- 1 – 2x4 @ 33-1/2” (divider between doors)
- 8 – 2x4 @ 22” (doors)
- 5 – 2x4 @ 33” (floor supports)
COOP
- 2 – ¾” plywood @ 48” x 59-1/2” (sides)
- 2 – 2x4 @ 33”
- 3 – 2x4 @ 30”
- 2 – 2x4 @ 43-1/2”
- 4 – 2x4 @ 29-5/8” long point to long point, 45 degrees angles, ends not parallel
- Trim pieces are cut to fit
- 2 – ¾” plywood @ 36” x 31-3/4” – larger roof
- 1 – ¾” plywood @ 36” x 16” – smaller roof
- 1 – 2/3” plywood @ 36” x 7-5/8” (small wall)
- 1 – ¾” plywood @ 32-1/2” x 12” – nesting box door
- Clean out doors are 16-1/4” x 23-3/4” – measure and cut to fit
CLEAN OUT TRAY
- 2 – 1x3 @ 46-1/2”
- 2 – 1x3 @ 32-1/2”
- 1 – ½” plywood @ 48” x 32-1/2”
PLANTER BOX
- 1 – 2x2 @ 49-1/2”
- 1 – 2x2 @ 56-1/2”
- Scrap wood for planter bottom


Instructions
Step 1
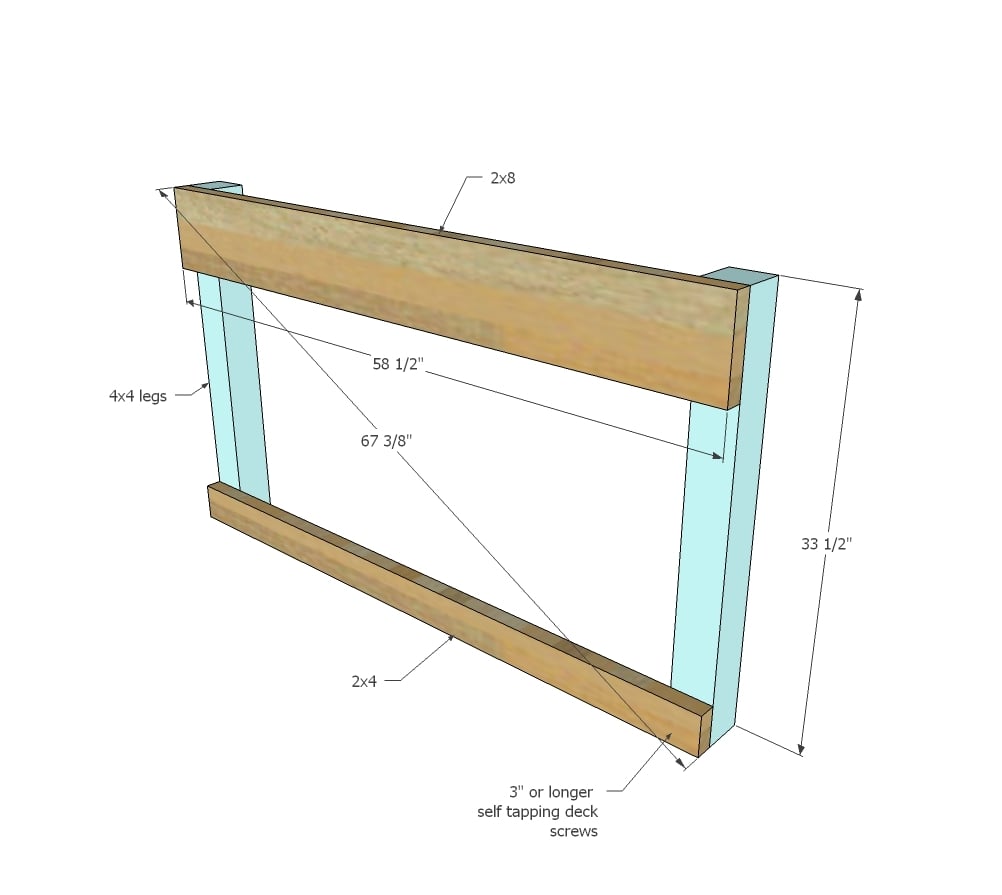
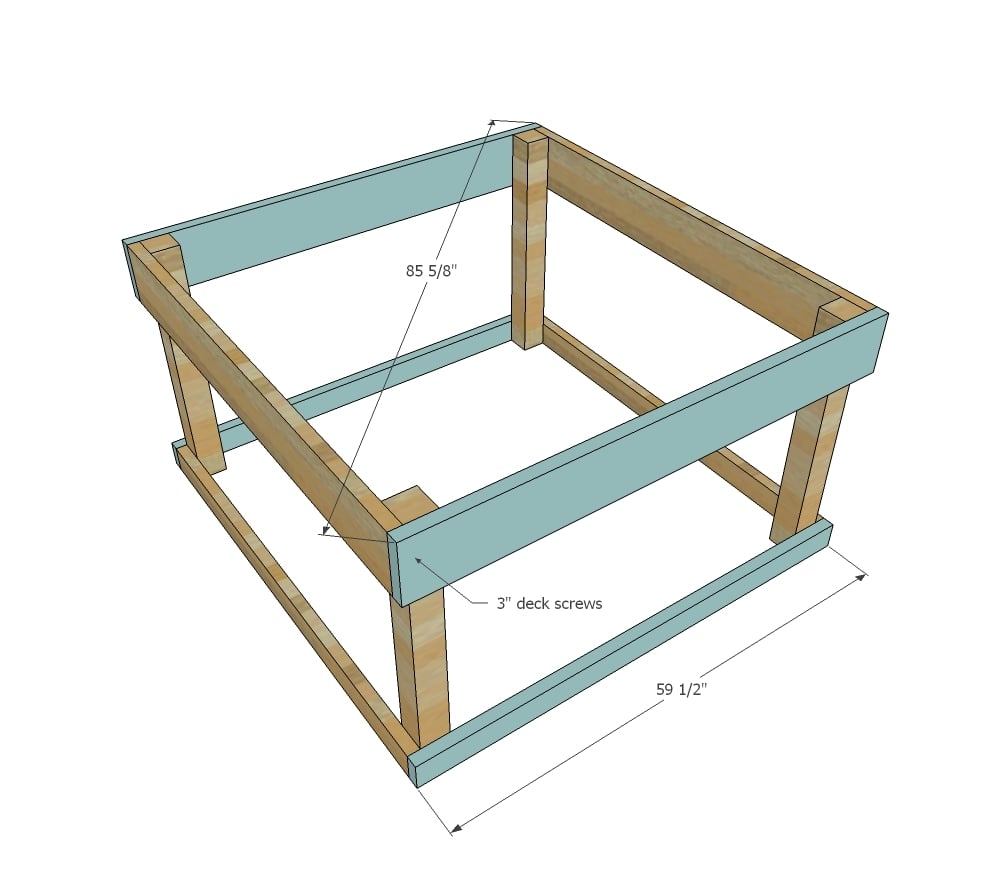
Attach 2x4 and 2x8 pieces to the 4x4 legs with 3" or longer self tapping deck screws. Measure diagonally from both corners to check for square, adjusting for square. Repeat to build the second side.
Step 2
Attach remaining side pieces to complete the run framing. Adjust for square.
Step 3
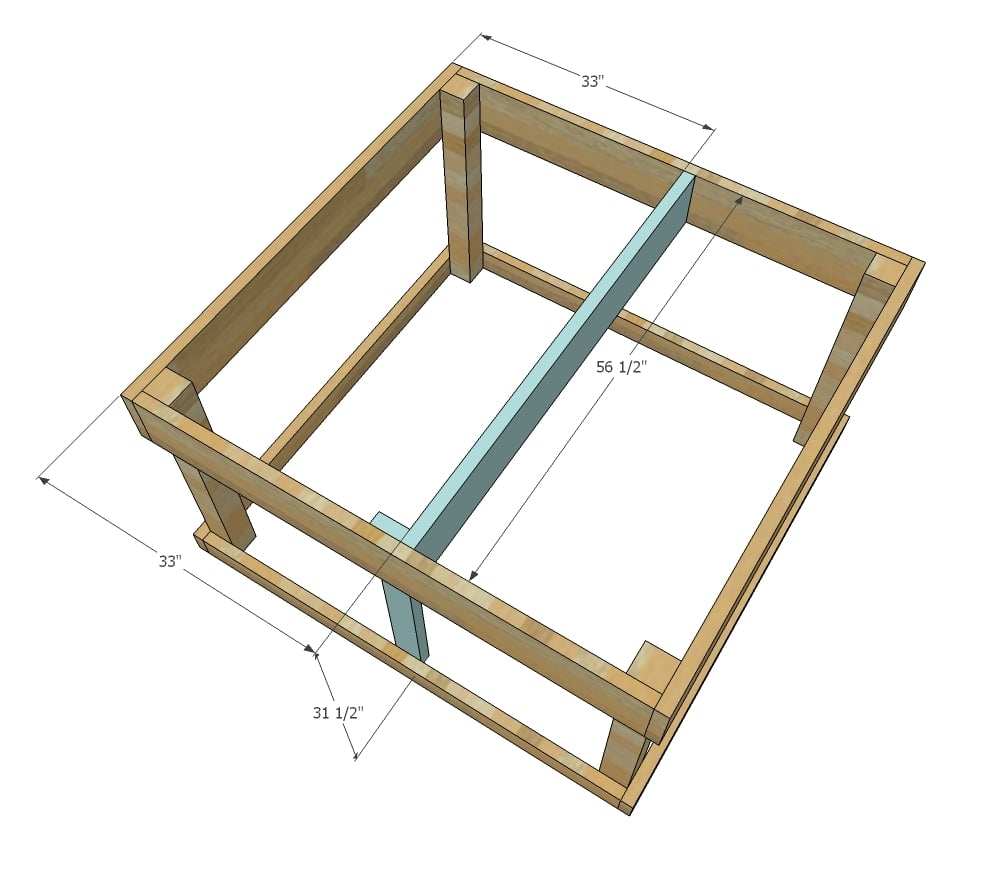
Attach center 2x8 and door support with the 3" decking screws. NOTE: Door support is 33-1/2" long.
Step 4
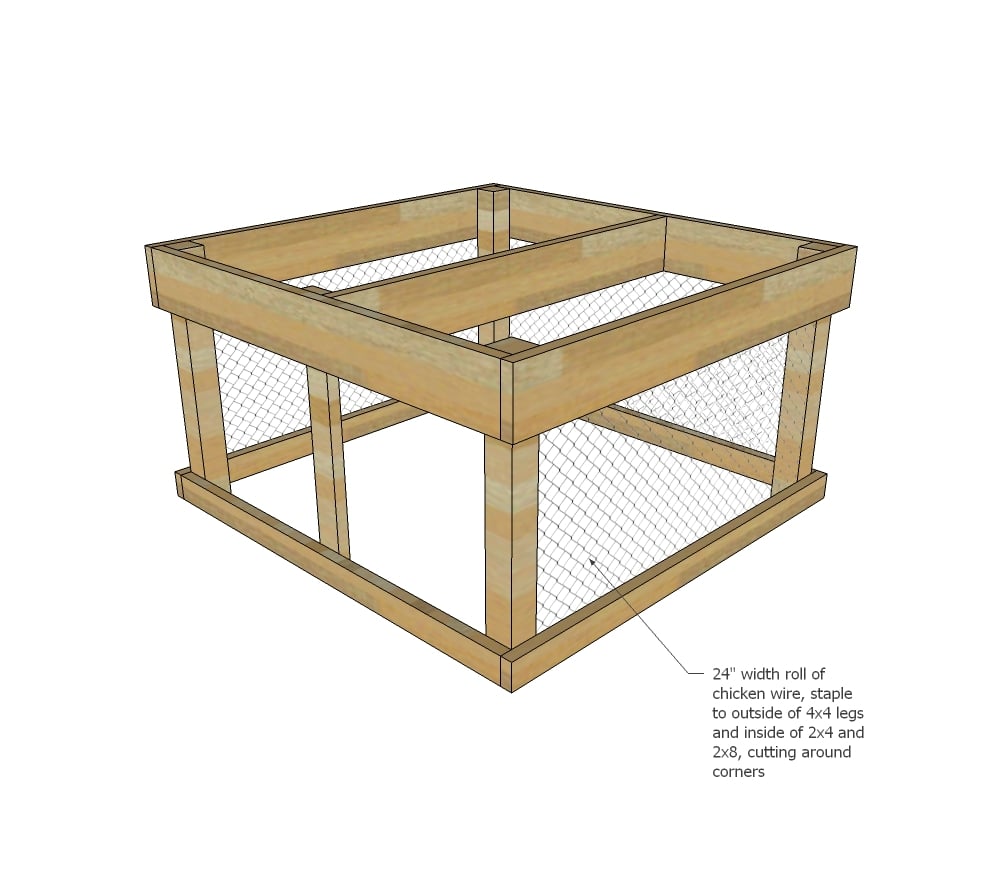
Staple chicken wire to inside, wrapping around legs on outside.
Step 5

Step 6
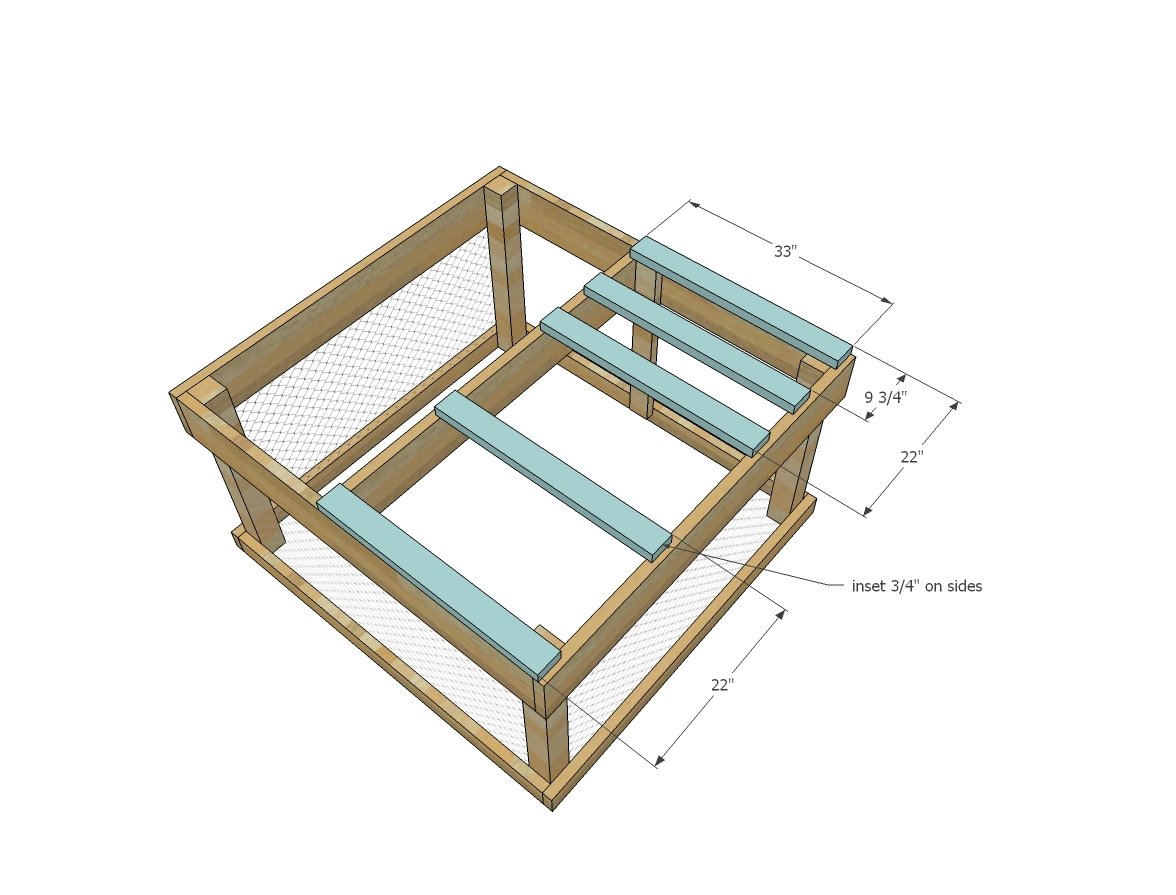
Attach Floor support boards to decking, using the 3" screws.
Step 7
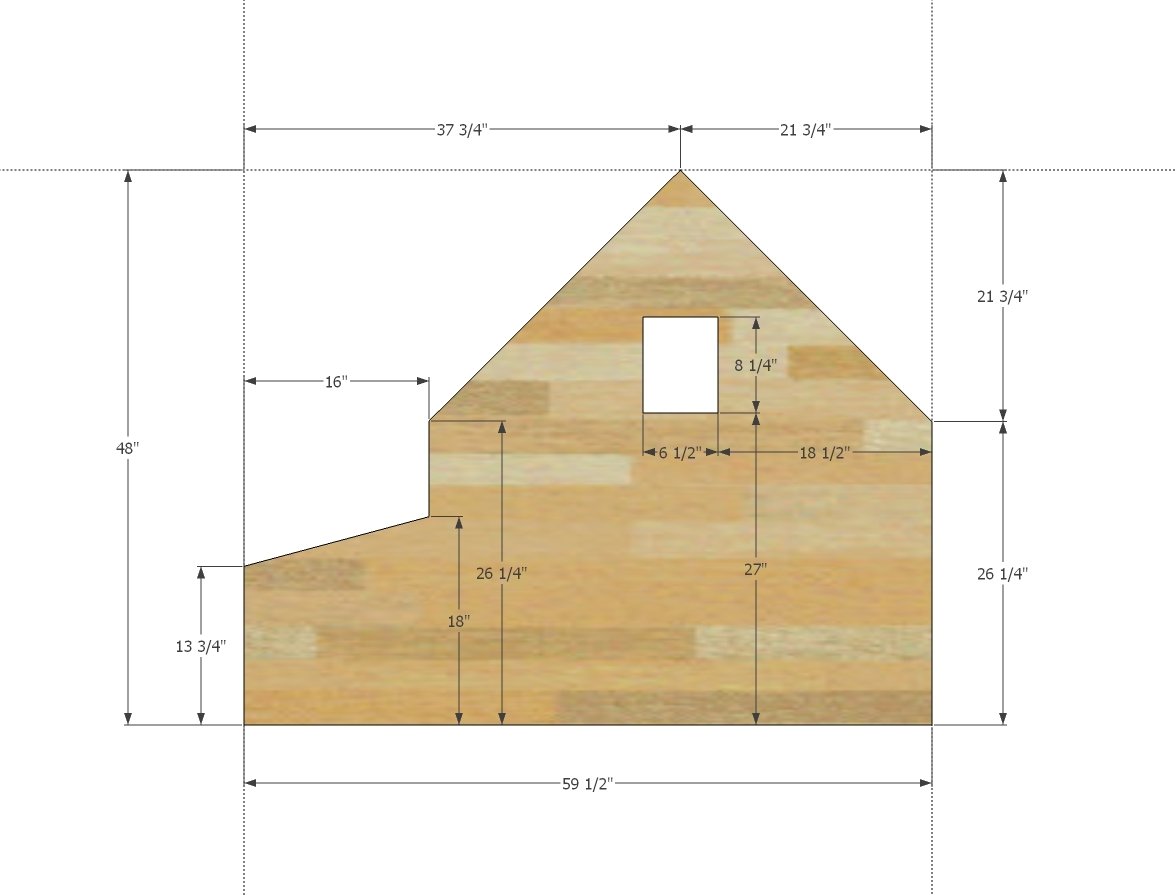
Mark and cut out from 3/4" plywood the side panels using a jigsaw. Conserve plywood for roofing panels by carefully cutting out side pieces to minimize waste,
Step 8
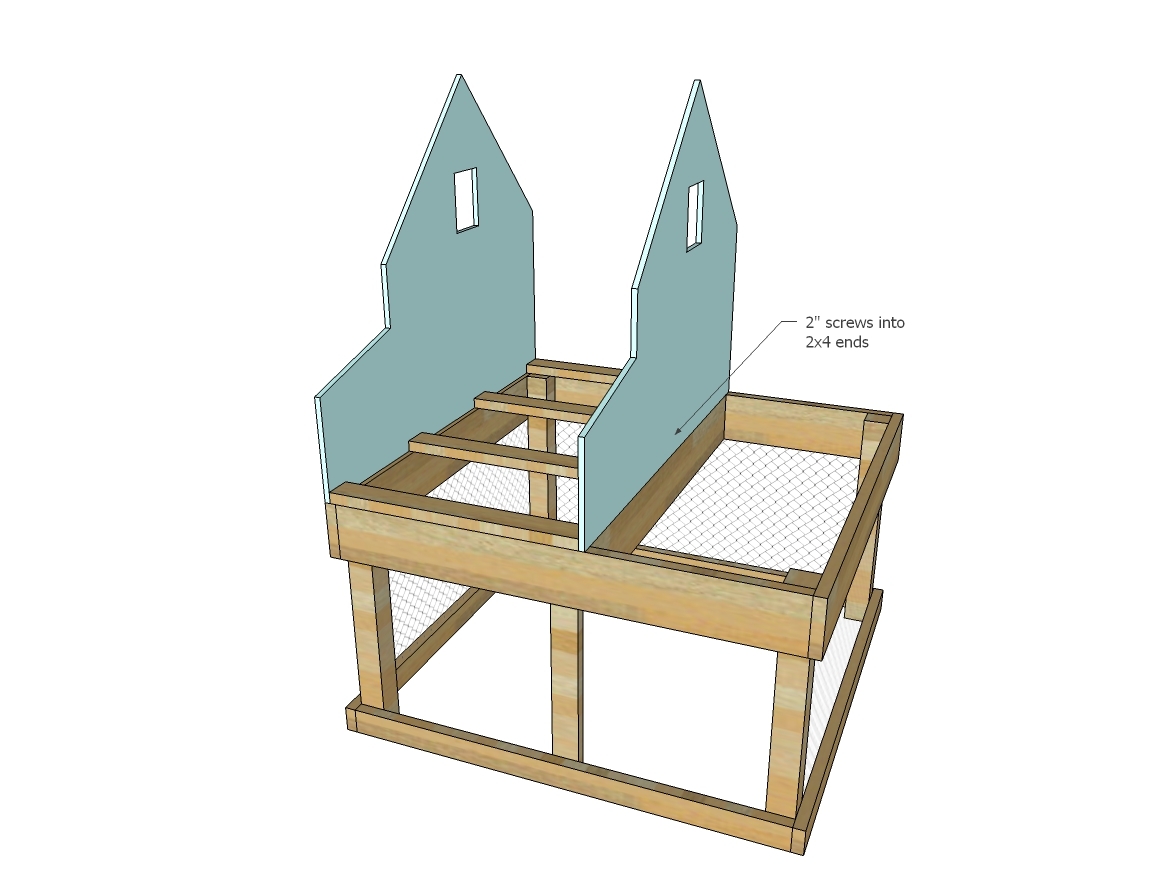
Attach side panels to the floor supports.
Step 9
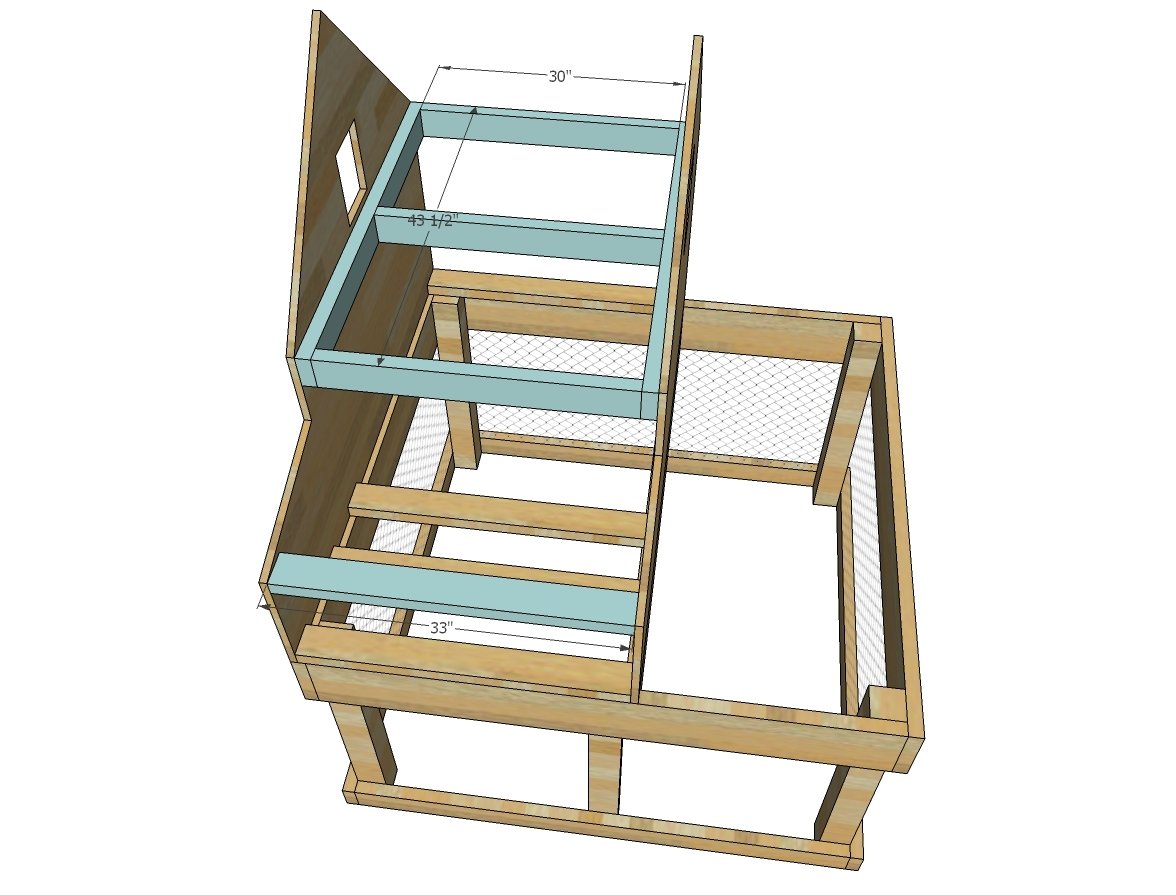
Build the upper floor framing section on the ground using 3" screws. Then attach inside coop at top. Also attach nesting box piece. 2" screws through the 3/4" plywood into the 2x4s.
Step 10
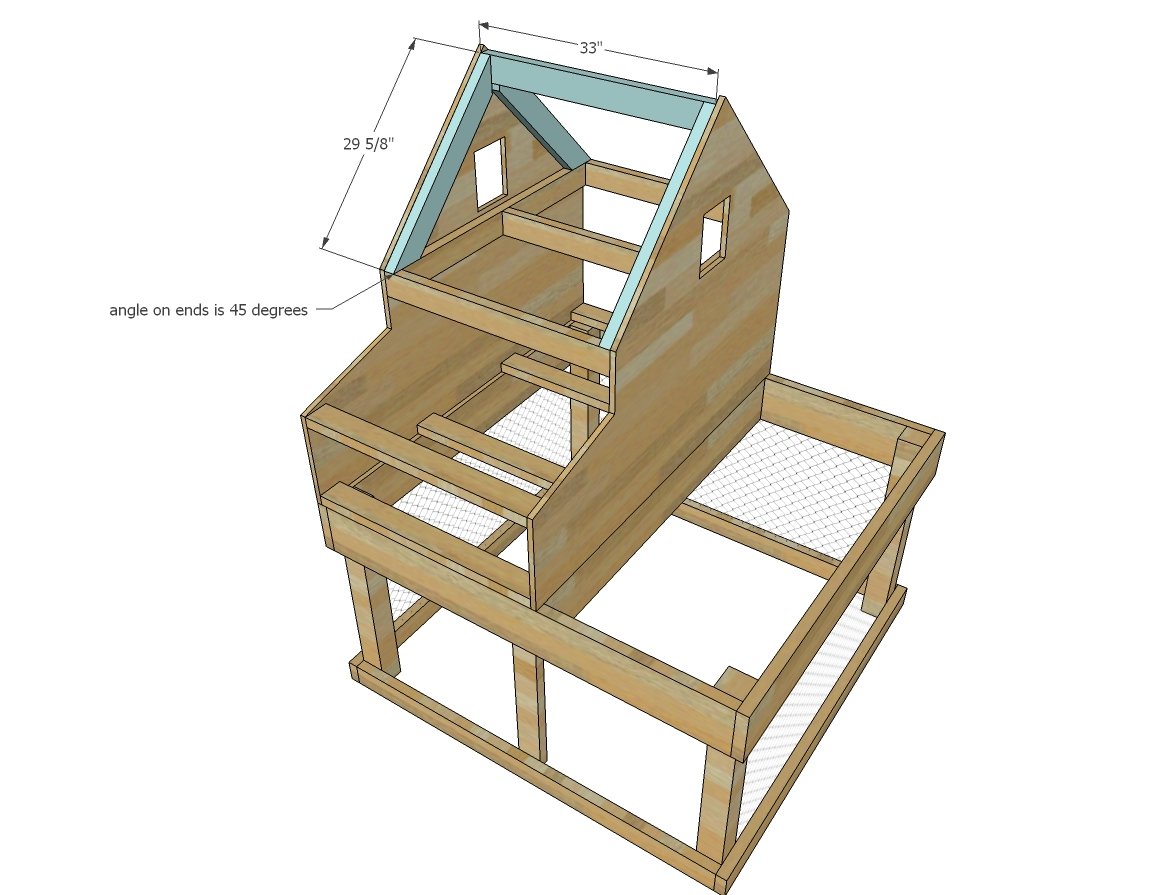
Add the remaining roof framing supports with 2" screws to complete the framing.
Step 11
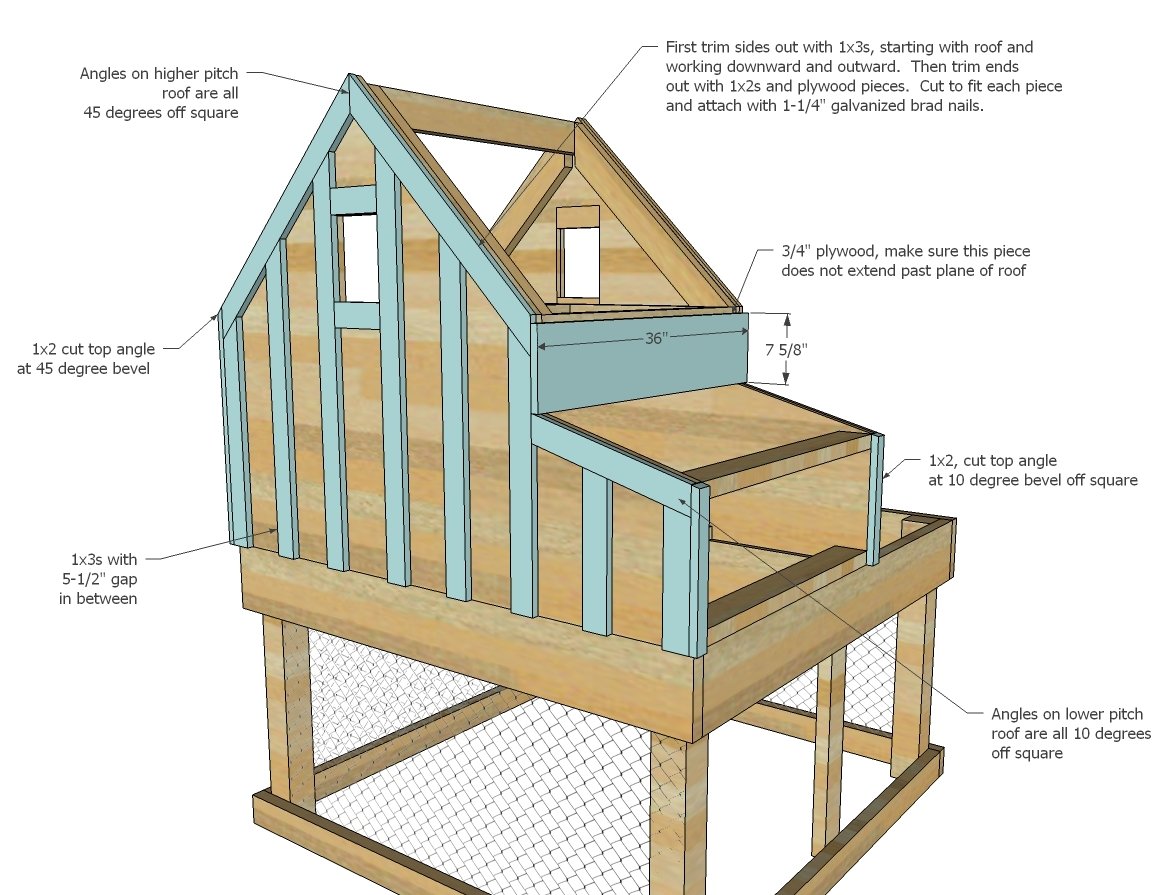
Use galvanized staples or brad nails to add decorative trim to outsides, or 1-1/4" exterior screws.
Step 12
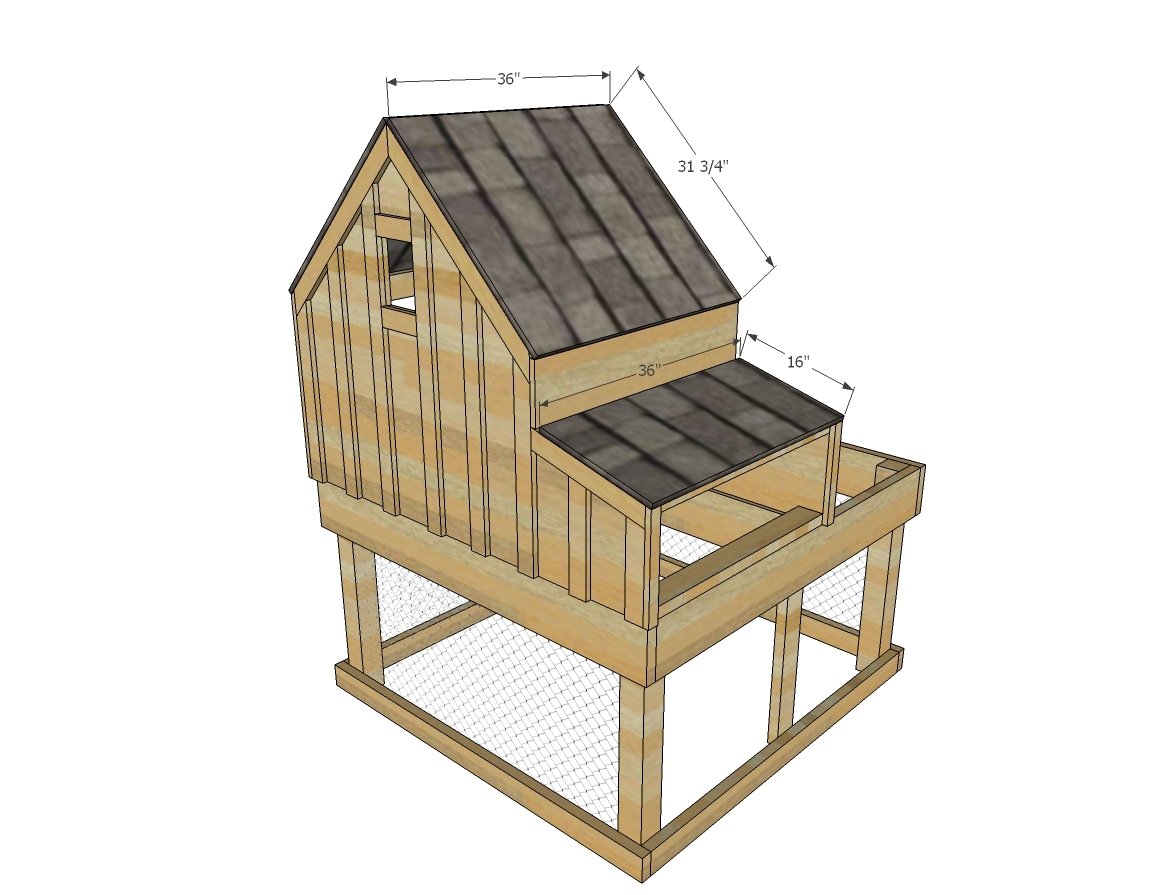
Use the 3/4" plywood scraps to cover roof areas. Attach with 2" screws to the 2x4 framing. Add roofing on top.
Step 13
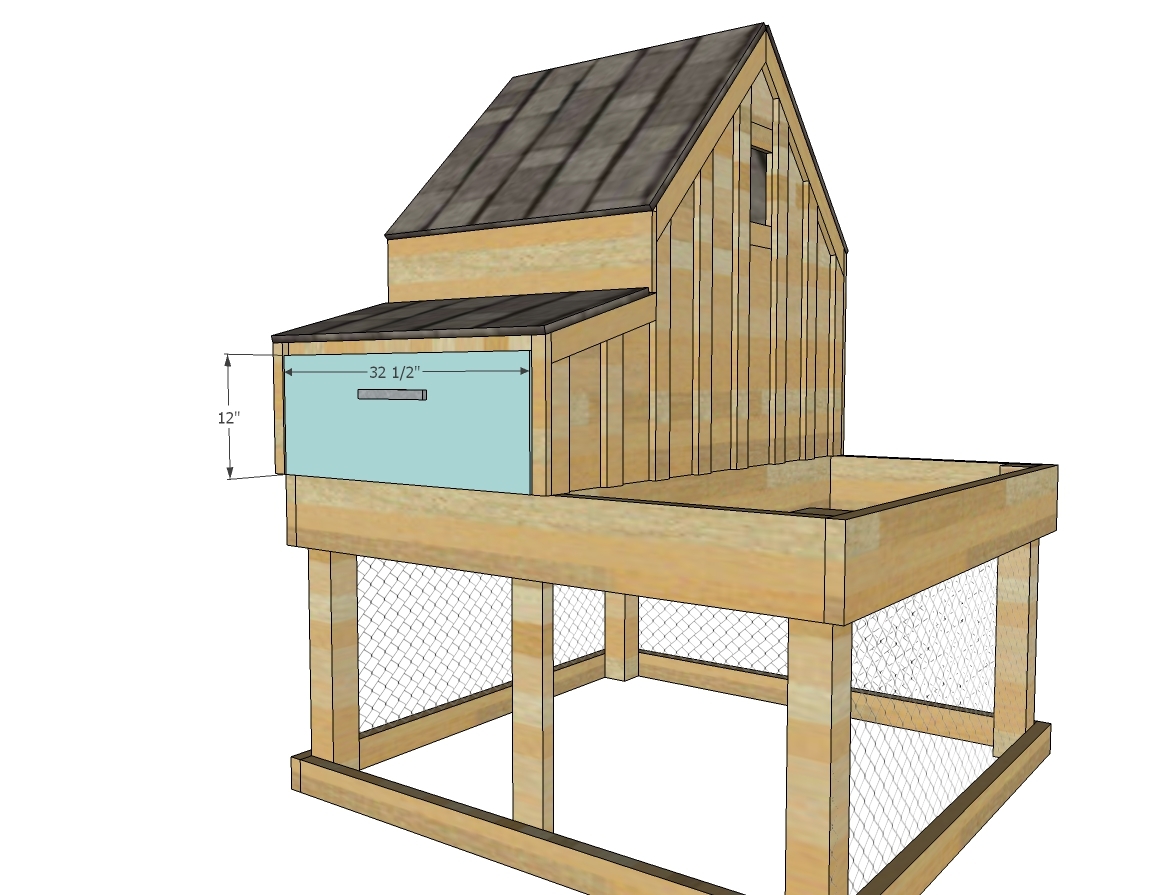
Hinge nesting box door in opeing and use latch to secure.
Step 14
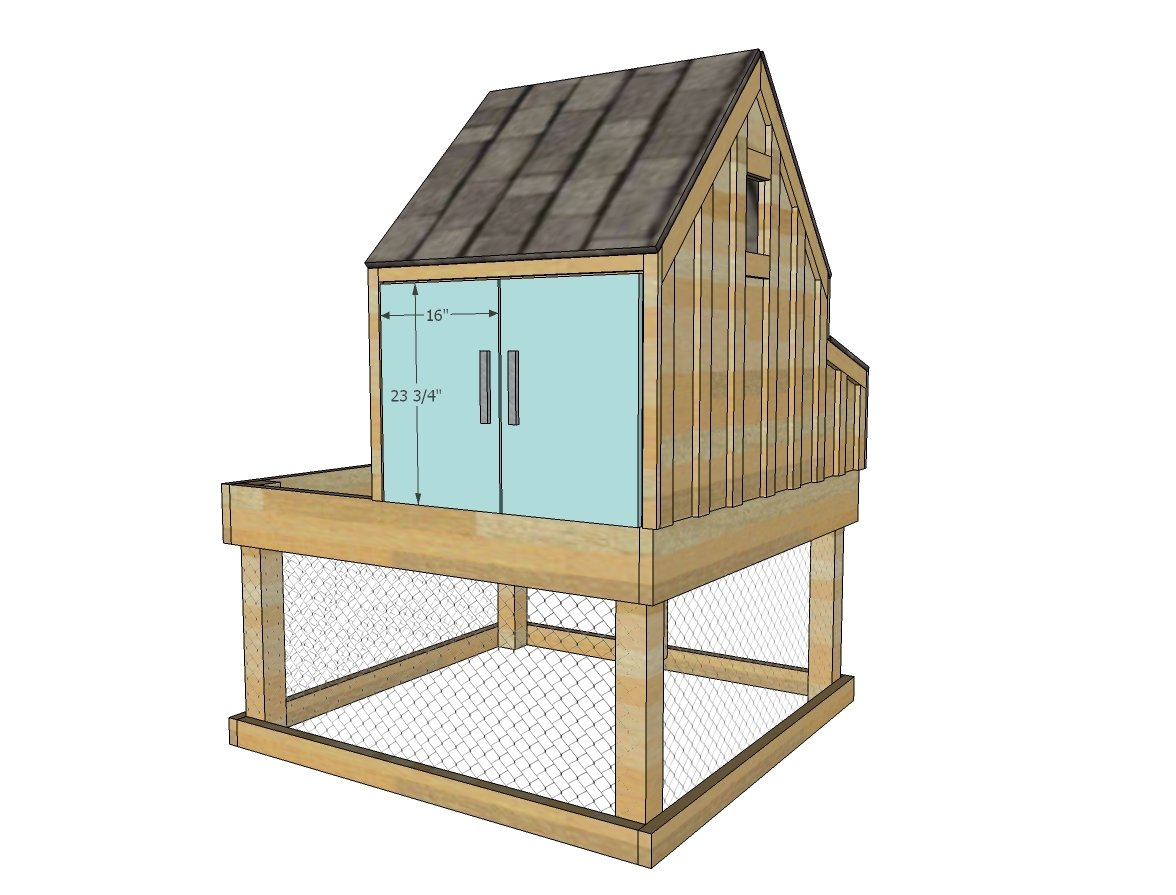
Use 3/4" plywood to build doors to fit the openings. Attach with hinges and latch.
Step 15
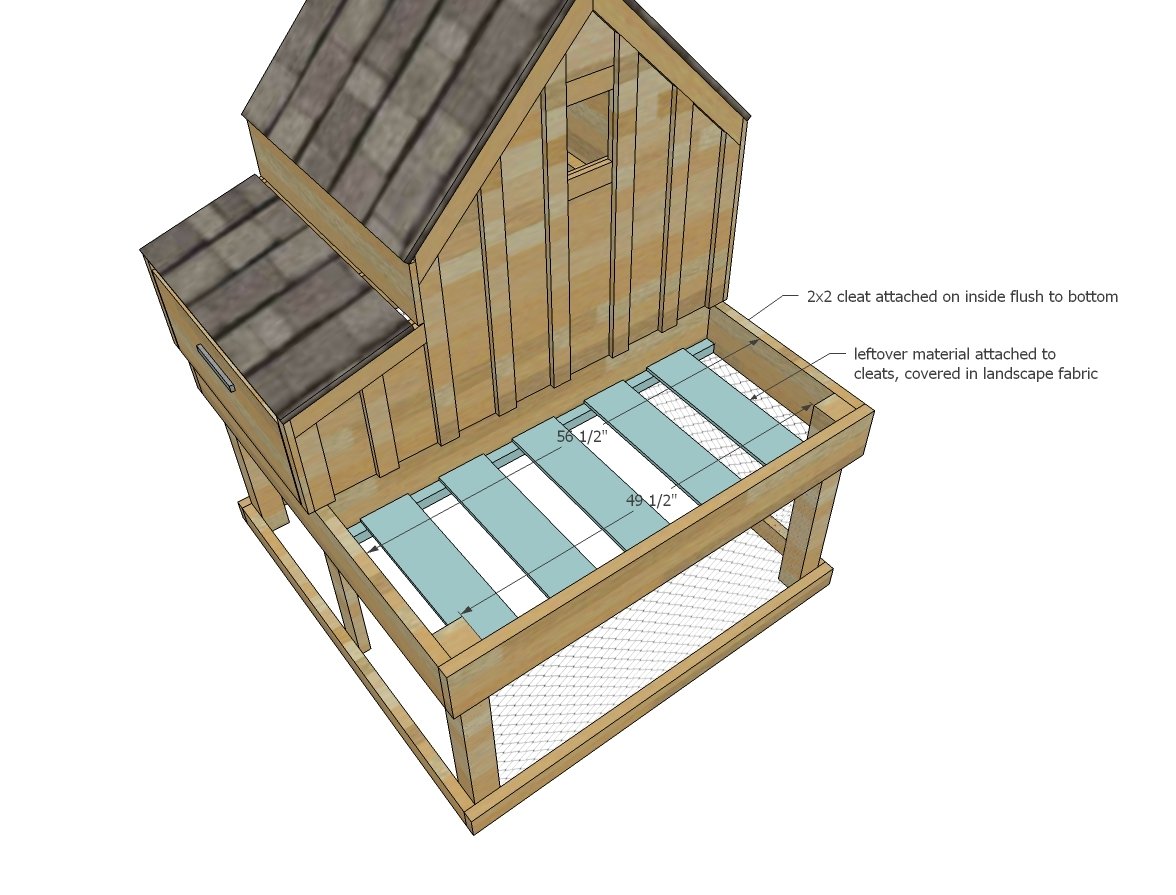
Attach 2x2 cleats inside planter box to 2x8 sides at bottoms with 3" screws. Place any scrap 3/4" material inside and screw down with 2" screws. Add landscaping fabric or other waterproof material to line planter box, with proper drainage holes, stapling to sides. Fill with soil.
Step 16
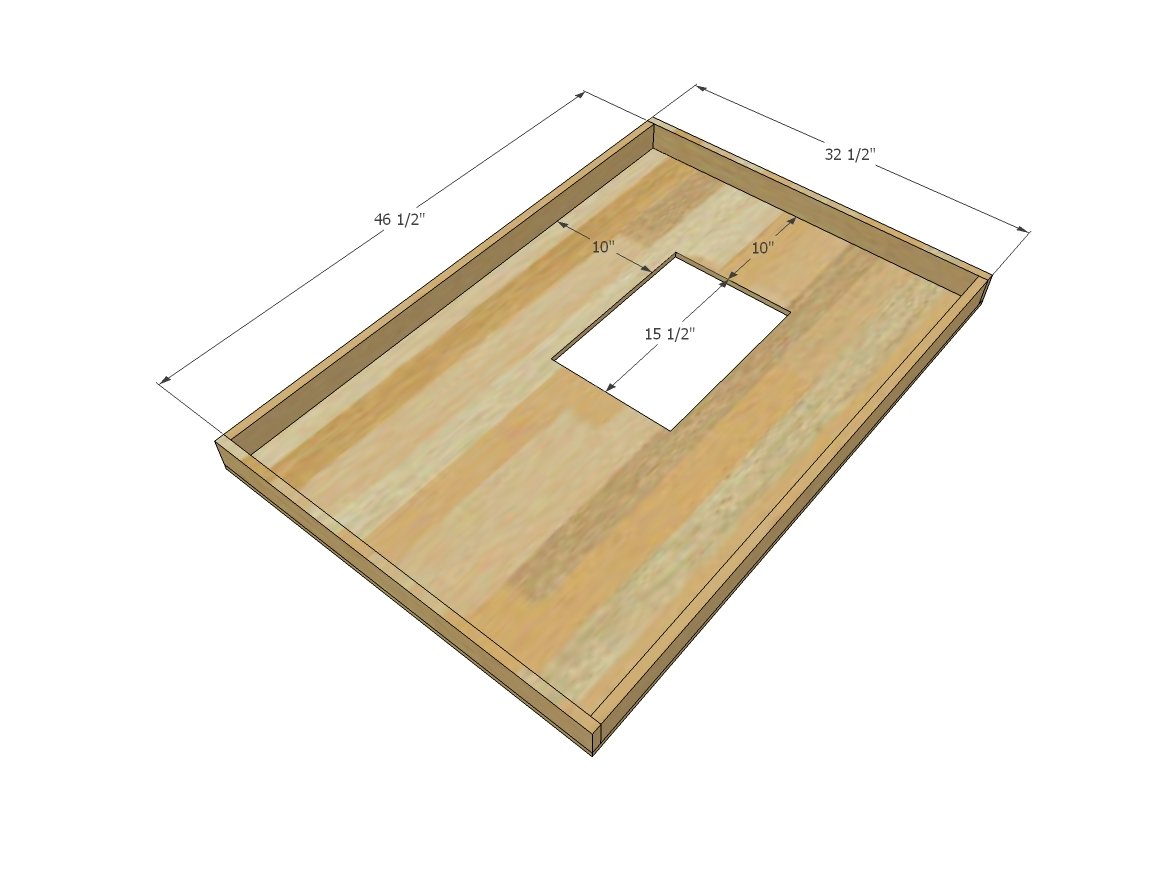
Cut the clean out tray hole to fit the chicken coop, between the floor supports. Add sides and attach with 2" screws.
Step 17
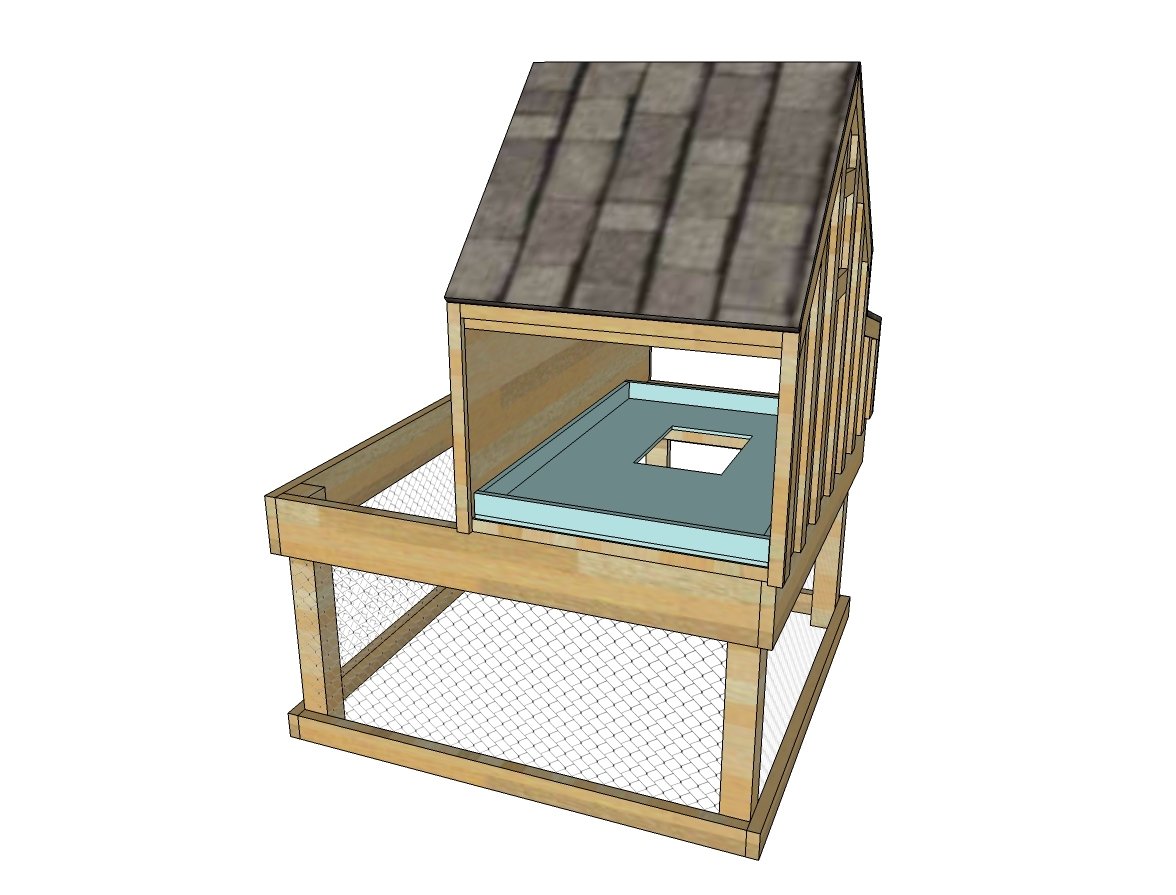
Place clean out tray inside coop.


Comments
jwmeller
Fri, 07/22/2016 - 06:38
Rest of Steps
Are there only 17 steps or did some not load?
In reply to Rest of Steps by jwmeller
Ana White
Tue, 07/26/2016 - 14:30
That is all the steps. Thanks
That is all the steps. Thanks
NickyP70
Tue, 12/12/2017 - 14:48
wire mesh
Would you consider not having the floor in the coop but replace it with wire mesh instead so dropping can fall through?
nalbuque
Fri, 08/23/2019 - 09:29
doors assembly?
Hello. Between steps 4 and 5, how do you attach the wood pieces that make the doors? Glue? Is the hardware cloth alone supposed to hold them together?
TRyan
Mon, 08/26/2019 - 14:14
Doors assembly
You're right, they don't explain that. However, I'd bet this is the step where you'd have to use the Kreg jig listed in the needed tools section. The Kreg allows you to use screws on a diagonal for situations like this.
I wouldn't recommend just using glue. And the hardware cloth alone almost certainly wouldn't work.
doughouse
Sun, 03/22/2020 - 20:32
So, that opening on the…
So, that opening on the bottom is always open? Won't they get cold in the winter?
cgerrells
Fri, 05/15/2020 - 13:56
Finished mine!
Finished mine!
TimsToolBelt
Fri, 05/29/2020 - 08:45
PDF - plans
Is there a pdf for this?
hoos1990
Thu, 06/11/2020 - 13:54
This is a good plan overall…
This is a good plan overall and I enjoyed building it. I would change one thing, and that is I'd put the plywood sheathing roof on before the trim. I would reduce the width of the plywood roofing from 36 to 34.5". Then I would raise the trim pieces so that they cover the plywood roof edge. this will give you a clearer look, and the trim will them butt up to whatever roofing material you put on top (metal or shingles).
Yasin
Thu, 06/25/2020 - 23:02
Thanks
Thanks for sharing this plan
I have made my own "Pigeon Coop" by using and modifying this plan.
Used palette woods and painted with lime.
JakeC_GB
Thu, 07/02/2020 - 19:29
Good for cold weather?
Is this a good design for colder climates? We live in Green Bay, WI and this is our first experience with chickens. Any advice is welcome!
lucigraebner
Thu, 07/30/2020 - 14:42
Cost
How much this project cost?
wijnent
Fri, 10/09/2020 - 14:33
250 dollars up to 350 -…
250 dollars up to 350 - depending where you live (mentioned somewhere here)
wijnent
Fri, 10/09/2020 - 14:31
Units of plan
Dear Ana,
Would it be possible to get the SketchUp file? It would allow me to very easily change the units to the metric system...
Or maybe you could tell me the units on the 'shoppinglist' (e.g. 4x4 or 2x8 - those are not inches, right?)
smearedred
Wed, 03/16/2022 - 09:31
any luck on the sketchup…
any luck on the sketchup file?
Olgierd
Tue, 12/15/2020 - 14:56
Worked out great
Thank you, this made for a therapeutic lockdown project.
eotero
Sat, 04/03/2021 - 17:28
Nesting box floor
Hey, almost done but realized, no instructions for nesting box floor. Add plywood?
rayyhoff
Fri, 01/14/2022 - 18:56
These plans are amazing! We…
These plans are amazing! We are half way through building ours now. When it comes to the planter box however, how do you stop the water from draining into the run and becoming a giant mud pit? We get a LOT of rain during our rainy season. We were thinking about putting plywood on the bottom and slanting it that way it will hopefully drain out, but that’s the best I could come up with.
smearedred
Wed, 03/16/2022 - 09:46
I stapled up a shower…
I stapled up a shower curtain on top of the boards, probably not the best solutions but after trial and error it does not leak into my coop. You could also make it a solid bottom and just put potted plants on the top.