


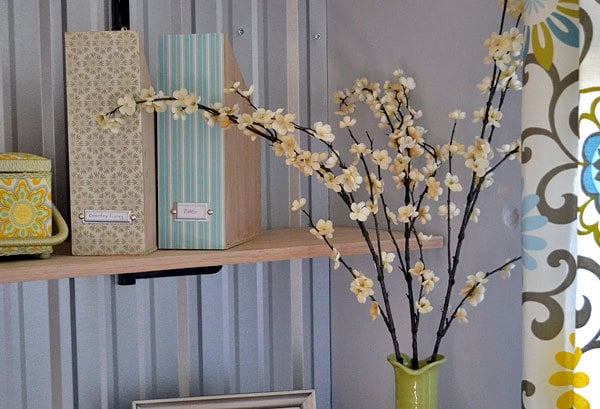
Make your own wood magazine files with bookplates and decorative faces for $2.50 each! These quick and easy magazine files will create order and style in your home!
It is always the most simple of projects that require the deepest thinking. What's the term?


$2.50 Each!!!

$1 in Wood Per File

$.25 Per Bookplate

Scrapbooking Paper is Pretty AND Cheap!

Other Stuff
UPDATE: When I figured the 18 magazine files per sheet of 1/4" plywood, this was assuming a 45 degree angle on the sides. But I choose a 30 degree angle because it is easier to cut with a standard sliding 10" mitersaw. With a 30 degree angle, you will only be able to make 15 magazine files from a sheet of 1/4" plywood. If you would like to maximize the number of magazine files you can make, cut the ends at a 45 degree angle, longest point 12".
Preparation
1/4" plywood (for 9, use 1/2 sheet - for 18, use full sheet)
1x4 @ 8 feet long - 1 for 9, 2 for 18
Glue (Gorilla glue would be great here)
1 1/4" finish nails
Painter's Tape
Book Plates and fasteners
Modge Podge
Scrapbooking Paper (3 sheets for 9, 6 sheets for 18)
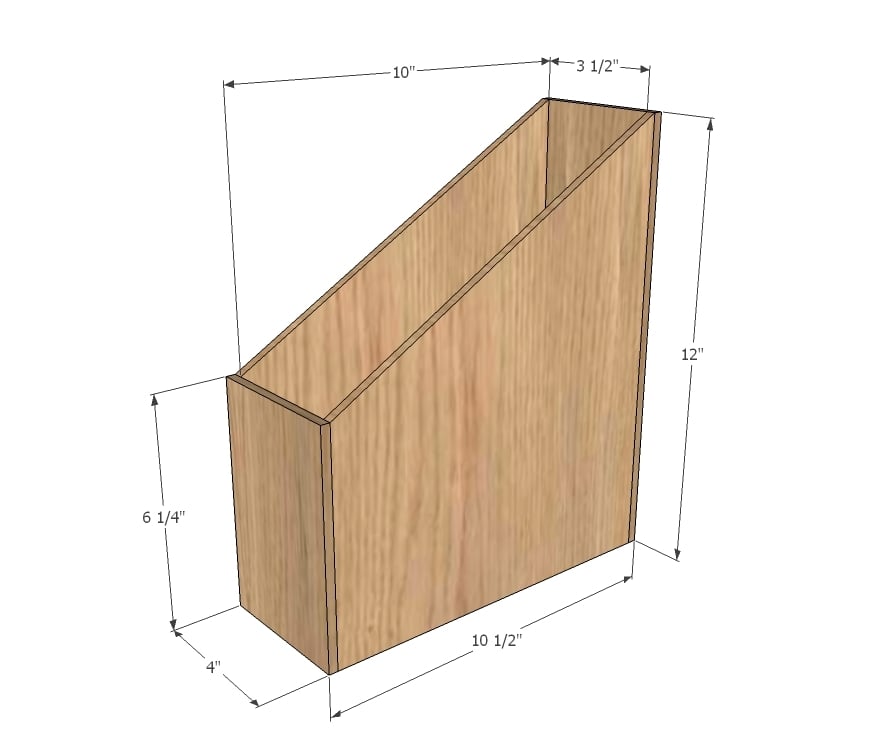
Per File:
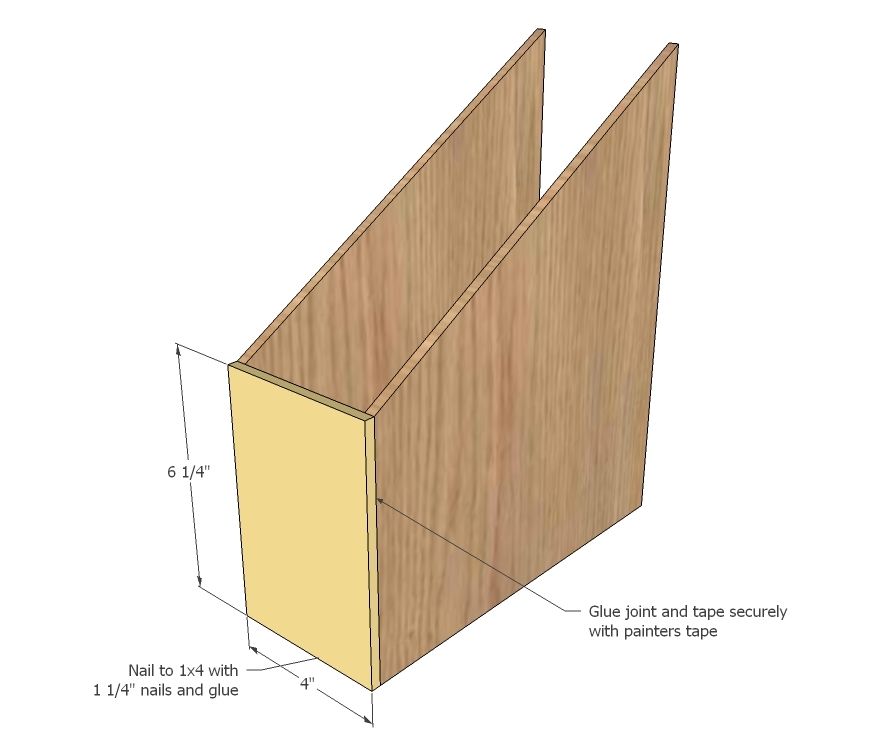
2 - 10" strips @ 12" long, one end cut at 30 degrees off square, longest point measurement (see diagrams in step 2)
1 - 1x4 @ 10" (bottom)
1 - 4" strip @ 12"
1 - 4" strip @ 6 1/4"


Please read through the entire plan and all comments before beginning this project. It is also advisable to review the Getting Started Section. Take all necessary precautions to build safely and smartly. Work on a clean level surface, free of imperfections or debris. Always use straight boards. Check for square after each step. Always predrill holes before attaching with screws. Use glue with finish nails for a stronger hold. Wipe excess glue off bare wood for stained projects, as dried glue will not take stain. Be safe, have fun, and ask for help if you need it. Good luck!
Instructions
Step 1
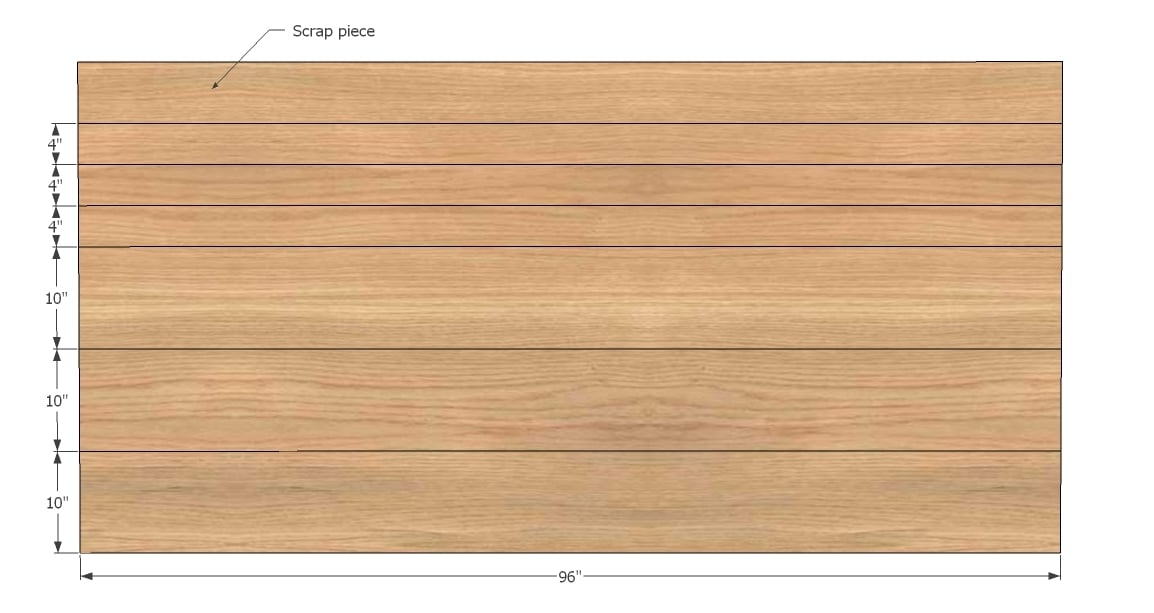
Have your hardware store cut your plywood into strips as shown in the diagram. Otherwise cut your plywood with a tablesaw into strips as shown in the diagram.
By cutting into strips, you can be sure that the plywood grain is all in the right direction, and your wood pieces are consistently the same width.
Step 2
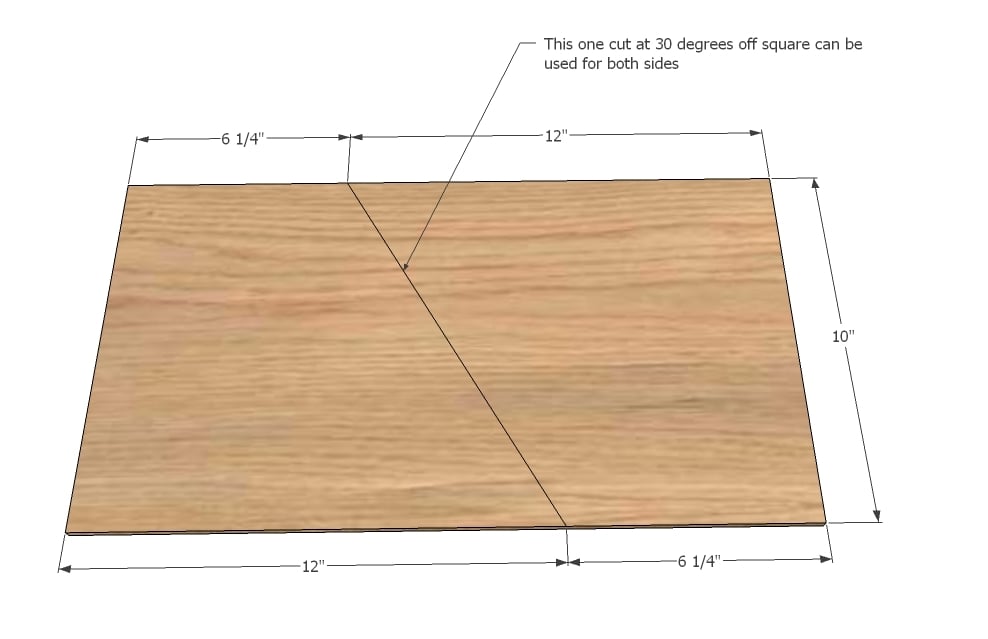
When you cut your sides, you will be able to use the same cut for both sides as shown in diagram. I used one side as a pattern to cut all of my sides from.

Step 3
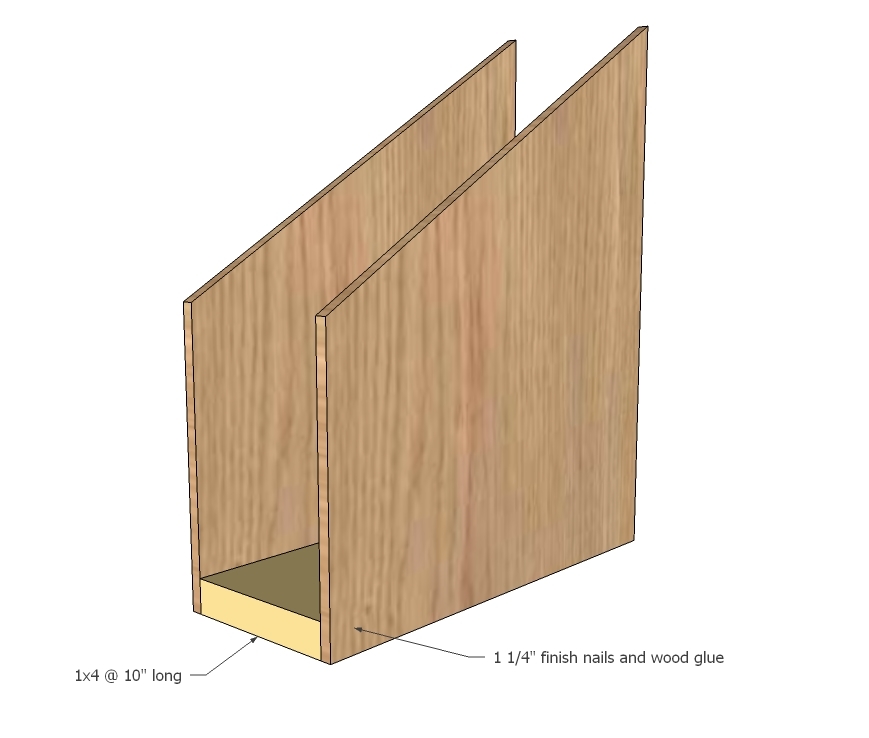
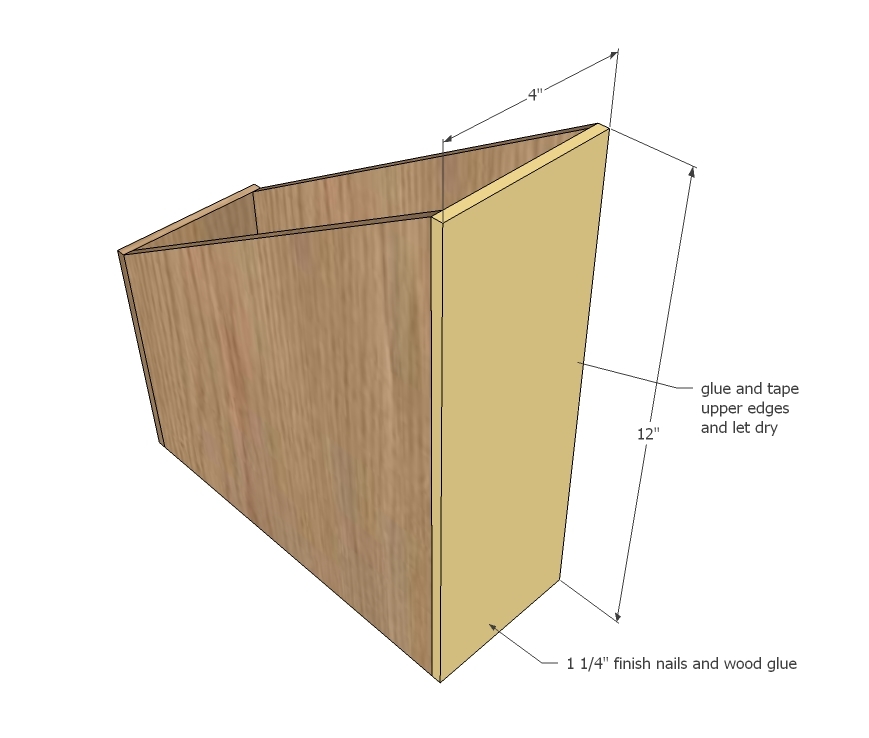
When you are finished cutting the pieces, nail the sides to the bottom as shown above with glue and 1 1/4" nails.
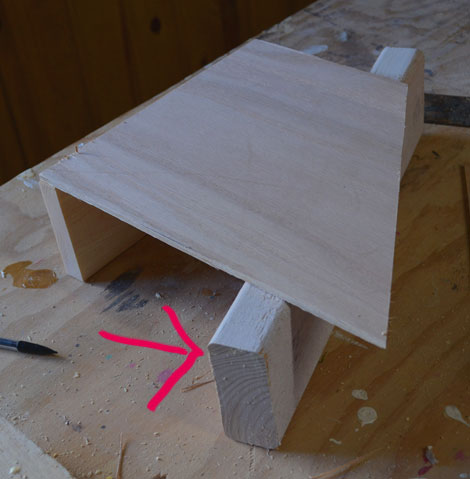
Step 4
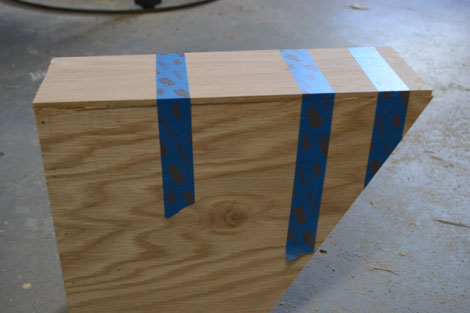
Once both sides are on, attach the front. You can only nail to the 1x bottom board. Glue the sides and tape with the painter's tape, getting the tightest possible joint.
Step 5
Step 6
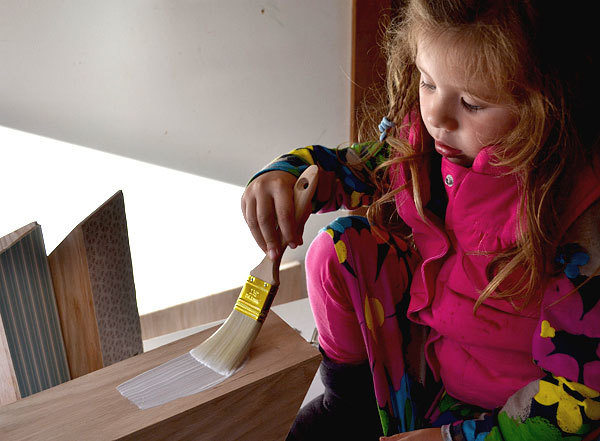
For the decorative fronts, cut pieces of the scrapbooking paper to the size of the fronts (should be exactly 1/3 sheet of scrapbooking paper). Apply a coat of modge podge, apply the paper, followed with another coat of modge podge. Let dry.
Step 7
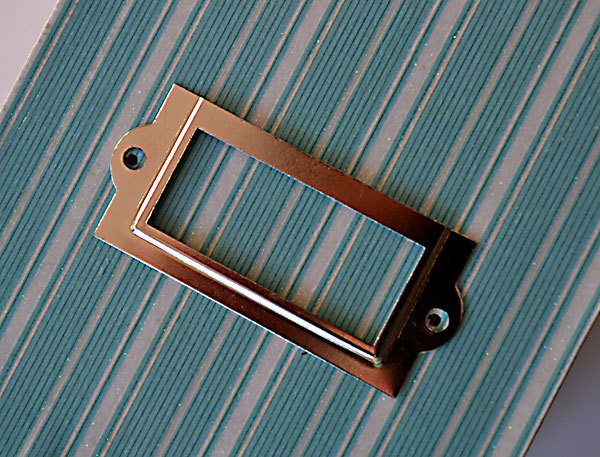
Mark the desired location of the bookplate holes.
Step 8
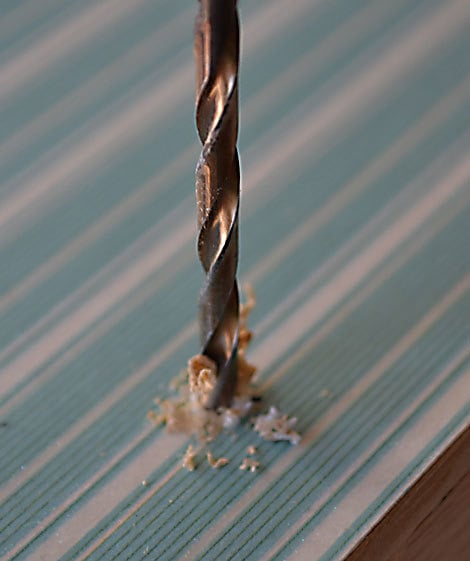
Drill holes with a bit matching the holes in the bookplates at the marked location.
Step 9
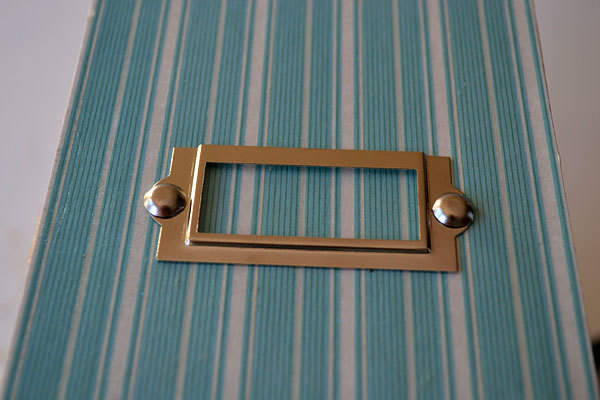
Attach bookplates to magazine files with the brads or screws if using screws. If using brads, use a hammer to flatten the brads inside the magazine file.
Step 10
Fill with magazines and enjoy!
Step 11
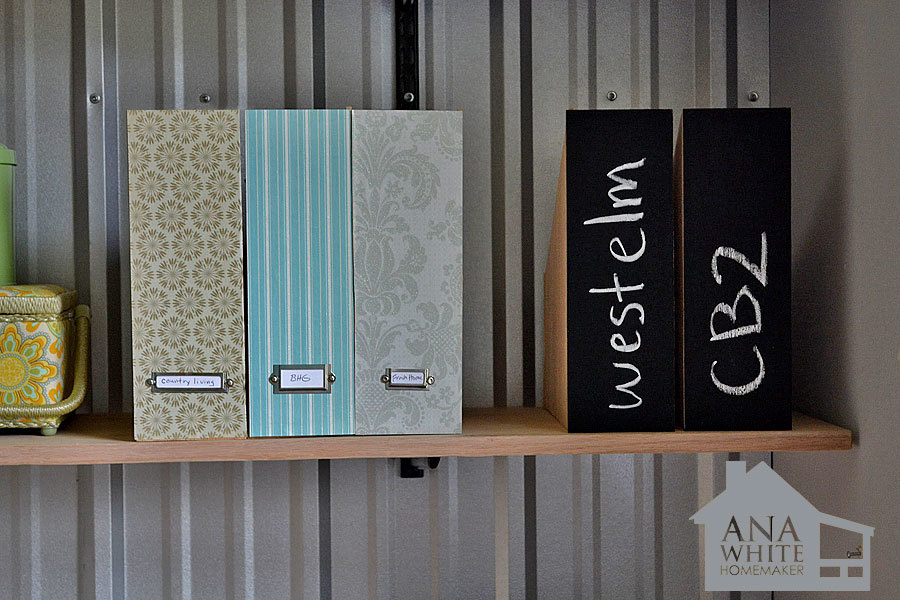
And for a more contemporary look (not to mention cheaper and easier) simply paint the faces with chalkboard paint!
It is always recommended to apply a test coat on a hidden area or scrap piece to ensure color evenness and adhesion. Use primer or wood conditioner as needed.

Comments
emmarosemc
Thu, 09/22/2011 - 07:10
genius!!!!
genius!!!!
Kathy Webster-Link (not verified)
Thu, 09/22/2011 - 07:44
Magazine Storage
These are beautiful! Thank you for the plans and instructions. I forsee some beautiful craft room organizing in my future.
oldpaintdesign
Thu, 09/22/2011 - 07:48
So Smart!
Wow - thanks, Ana! Gone are the days when I buy the ugly, flimsy ones from Ikea! And, I love that you used scrapbooking book plates for hardware - that is such a great money saver!
Catherine Hans… (not verified)
Thu, 09/22/2011 - 07:59
Love it!
I really don't like the cardboard ones but could never justify many of the wooden ones. Fantastic that I can make them myself now!!
Guest (not verified)
Thu, 09/22/2011 - 09:49
Love the Project and the Curtains too!
I love this project as a mom of a young-not-so-rolling-in-the-money family I love that this project is affordable to make and personalize and cheaper than buying! Plus I love (underlined, maybe twice) the curtains that are in the corner of the final pic. If you don't mind sharing I would love to know where you got those!
Cherie Heltne (not verified)
Thu, 09/22/2011 - 09:51
So Happy!
Your office is looking beautiful! You just made my day! I have a ton of 1/4 plywood in the garage just begging to be made into these fabulous organizational tools! Can't wait to build some this afternoon!
Ana White
Thu, 09/22/2011 - 09:56
Thank you everyone, truly an
Thank you everyone, truly an easy project!
The curtains are DIY - I actually haven't quite finished them yet, but will let you know the fabric is available at Joanns and is the Modern Essentials print. Will post more details on that too!
Lori Ferris (not verified)
Thu, 09/22/2011 - 10:17
Will be perfect for our Community Garden
We keep some gardening magazines in our community garden shed for reference and enjoyment. The cheap ones just don't hold up to 40 families, but these will be perfect!
Thanks Ana!
Leah
Thu, 09/22/2011 - 10:19
magazine holder shelf
i'd drill a hole in the other side for charging cords. but look at these mounted on the wall!
http://pinterest.com/pin/183075503/
can i link pins like that? hope so!~
kam (not verified)
Thu, 09/22/2011 - 10:22
Just Brilliant! I love it.
Just Brilliant! I love it.
Stacie (not verified)
Thu, 09/22/2011 - 10:29
Amazing!
Way to go Ana. These are just what I needed today! Pinning this one right now and liked it on Facebook. I love sharing the Ana White love! :) Thanks so much.
Rhoni T (not verified)
Thu, 09/22/2011 - 11:08
Super Excited about this Build!!!
awe-sum!! In the big messy middle of moving my office to the single car garage from the small spare bedroom. I love it, I can make these the size I need for 12x12 scrap paper YEAH!!!! and I love that 1- the don't cost anything 2- I can paint and make them to match me decor Woo Hoo, supper excited about this build.
Stacie (not verified)
Thu, 09/22/2011 - 11:34
Good idea
Great idea to make them to fit 12 X 12! Thanks for suggesting!
Rhoni T (not verified)
Thu, 09/22/2011 - 11:34
NEXT prodject,
right after I finish the shelves to put them on. NO rain all summer and too hot to work outside, so now that it has cooled off we get the rain. I can not complain, about the rain, it is way to much needed!!!
Cindy from Indiana (not verified)
Thu, 09/22/2011 - 12:14
These are going on the to-do list!
Yay - I love these and I need them for the new office area (which is also on the to-do list LOL)!
At this rate, there won't be a room in my home that isn't 'furnished by Ana'.
Guest (not verified)
Thu, 09/22/2011 - 14:14
yAna you're my best friend!!!
yAna you're my best friend!!! These are AWESOME!! THANK YOU!!
Camerons_Mom
Thu, 09/22/2011 - 14:29
Great Idea!
These are amazing! Love it!
Guest (not verified)
Thu, 09/22/2011 - 15:52
This is great, love the
This is great, love the papers you chose.
Guest (not verified)
Thu, 09/22/2011 - 18:45
Love them! Where did you get
Love them! Where did you get your curtains?! Thats exactly what I'v been looking for!
In reply to Love them! Where did you get by Guest (not verified)
emmarosemc
Fri, 09/23/2011 - 12:50
scroll up, someone already
scroll up, someone already asked the question and ana answered!
In reply to Love them! Where did you get by Guest (not verified)
emmarosemc
Fri, 09/23/2011 - 12:50
double post
double post
Debbie Christianson (not verified)
Thu, 09/22/2011 - 19:24
Are you kidding?!?
I just ordered a dozen cardboard ones from Amazon!!! Didn't even think to build them! I hope they have an easy return policy. :)
Spring
Sun, 09/25/2011 - 11:51
Saw these last night
I just saw these last night and fell in love with them. I sent hubby to the hardware store so I can make these after I get done working. I'm so excited to get my beloved Southern Living magazines out of shoe boxes under my bed!
Liz Williams (not verified)
Sat, 12/10/2011 - 05:49
I just picked up some
I just picked up some discontinued wallpaper sample books from a local paint store for FREE! I'm giving them to my daughter for Christmas for decorating her dollhouse. They would be perfect for this project. And, the glue is included on the back of the paper. This makes these cute magazine organizers even cheaper!
how to get rid… (not verified)
Wed, 12/21/2011 - 22:39
It's my first time visiting
It's my first time visiting here. I discovered countless intriguing stuff within your weblog especially the on-going conversation. From the tons of comments on your articles, I guess I'm not the only person relishing reading your website. Carry on the good work.
isocort (not verified)
Fri, 01/06/2012 - 23:35
Nice creation of Wood
Nice creation of Wood Magazine File.I like your work and thanks for sharing the information about how to make it.I learn a new thing from your post.
Ms. Carpenter (not verified)
Sat, 01/14/2012 - 00:03
Just a nitpick
But you can't call something made of plywood "solid wood", especially if you ever sell them. Solid wood implies that there's no filler, and plywood can be more than half glue which coincidentally, is what makes it superior to solid wood for small stuff like this. Less warping and suchlike.
In reply to Just a nitpick by Ms. Carpenter (not verified)
Ana White
Sat, 01/14/2012 - 00:50
You are so right, sorry for
You are so right, sorry for the error on my part. If you wanted to make from solid wood, you can purchase 1/4" thick hobby stock, but you are right, mine are made of 1/4" thick plywood. Will update post. Thanks for taking your time to make our site better. Ana
AngelaJ (not verified)
Tue, 02/28/2012 - 14:32
Hi Ana - thanks so much for
Hi Ana - thanks so much for your inspirational website and all the time you must put into it. I have just bought myself a Ryobi mitre saw & stand and can't wait to get started on the list of projects I love from your site! These look simple enough to start with (first ever project) - can't wait for the weekend!!!
the speckled kat (not verified)
Sun, 07/15/2012 - 10:42
Thank you!!
Thanks so much for sharing this!! I have been searching all over the net for magazine holders to put my scrapbook paper in, which I can easily modify to fit. I can't wait to make a trip to the hardware store and get started! The first step to my dream craft area! yay!!!
rikki07
Fri, 05/03/2013 - 18:36
The most common dimension is
The most common dimension is 1.2m × 2.4m or the slightly larger imperial dimension of 4 feet × 8 feet. Plies vary in thickness from 1.4 mm to 4.3 mm. diese The amount of plies depends on the thickness and grade of the sheet but at least 3.
HippyG
Mon, 08/03/2020 - 09:21
LOVE IT!
I literally looked at my shelf of cardboard magazine files this morning and thought I could make them from wood. Scrolling through the project lists here I came across this post. LOVE IT! I'll be making some soon.