


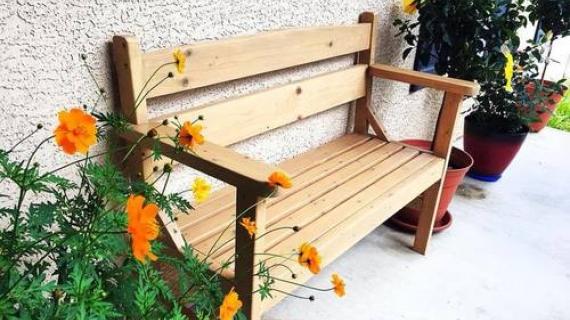
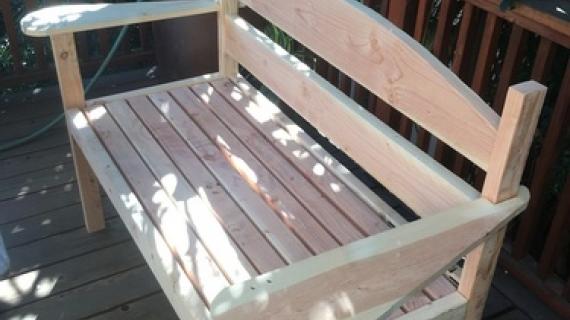
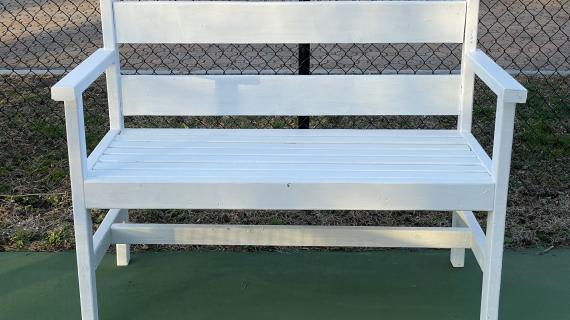
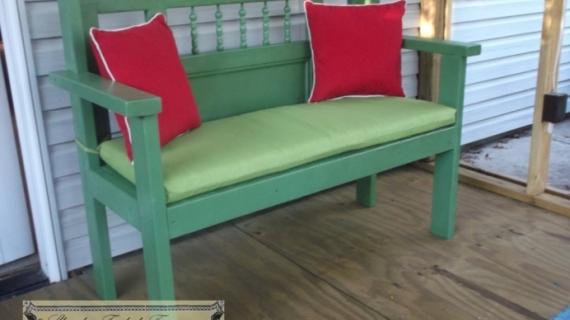
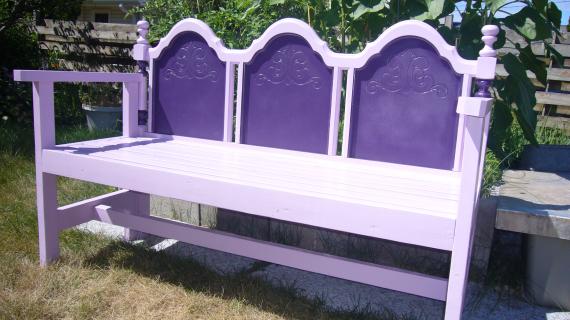
This is a great, deep bench to lounge on outside. I built it to the measurements of my love seat. If you're going to paint, it's easier to paint this before assembling.
Preparation
7 - 2x3x8
8 - 2x3 @ 47'' (7 seat slats and 1 bottom support beam)
Most cuts are self explanatory, but note that a seat support beam needs to be "worked with".


Please read through the entire plan and all comments before beginning this project. It is also advisable to review the Getting Started Section. Take all necessary precautions to build safely and smartly. Work on a clean level surface, free of imperfections or debris. Always use straight boards. Check for square after each step. Always predrill holes before attaching with screws. Use glue with finish nails for a stronger hold. Wipe excess glue off bare wood for stained projects, as dried glue will not take stain. Be safe, have fun, and ask for help if you need it. Good luck!
Instructions
Step 1
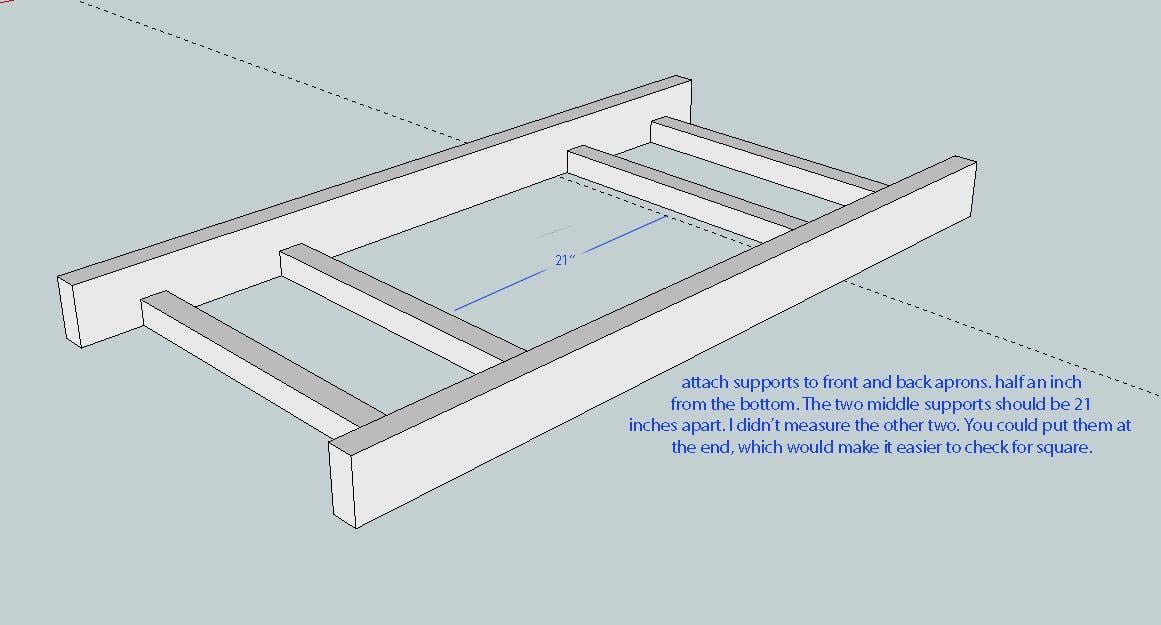
Attach supports to front and back aprons, half an inch from the bottom. The two middle supports should be 21'' apart. I didn't measure the other two, but you could put them at the ends. That would probably have been the smartest thing for me to do.
I forgot to measure a half inch up in the diagram above, but the 2x2s need to be half an inch up. I used a 1/2'' square dowel to support it as I drilled in from the front and back apron.
Step 2
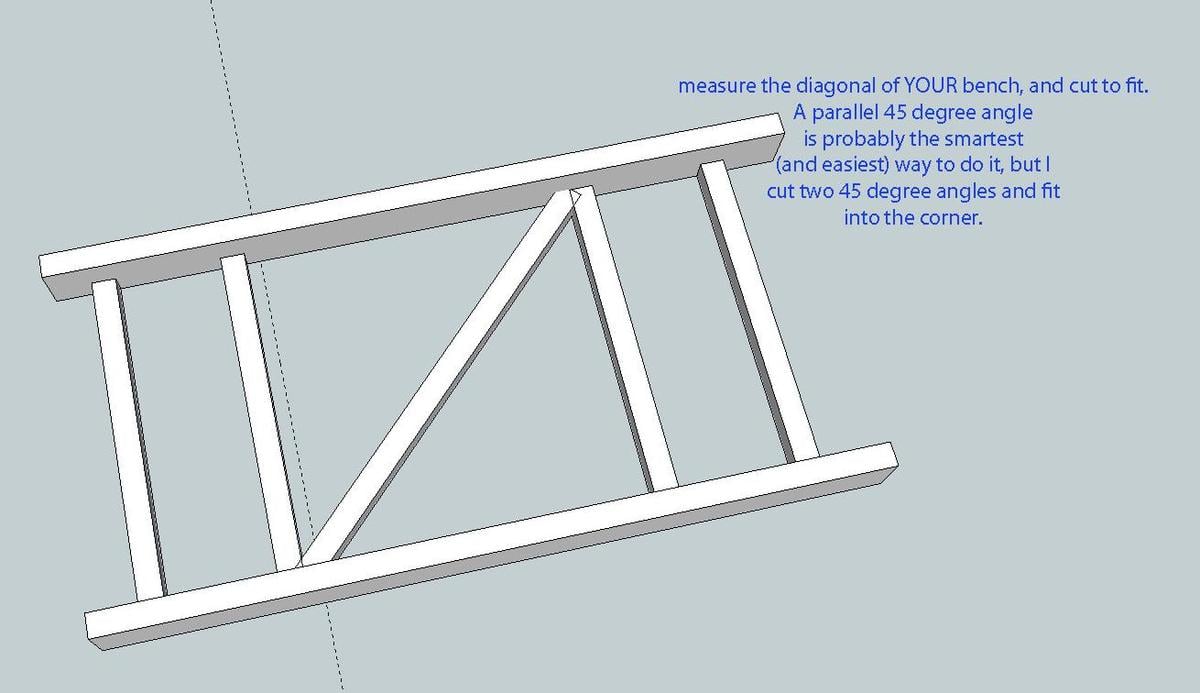
Measure the diagonal of YOUR bench and cut the diagonal support beam to fit. Parallel 45 degree angles would have been easier, but I did two 45 angles at each end to fit into the corner.
Step 3
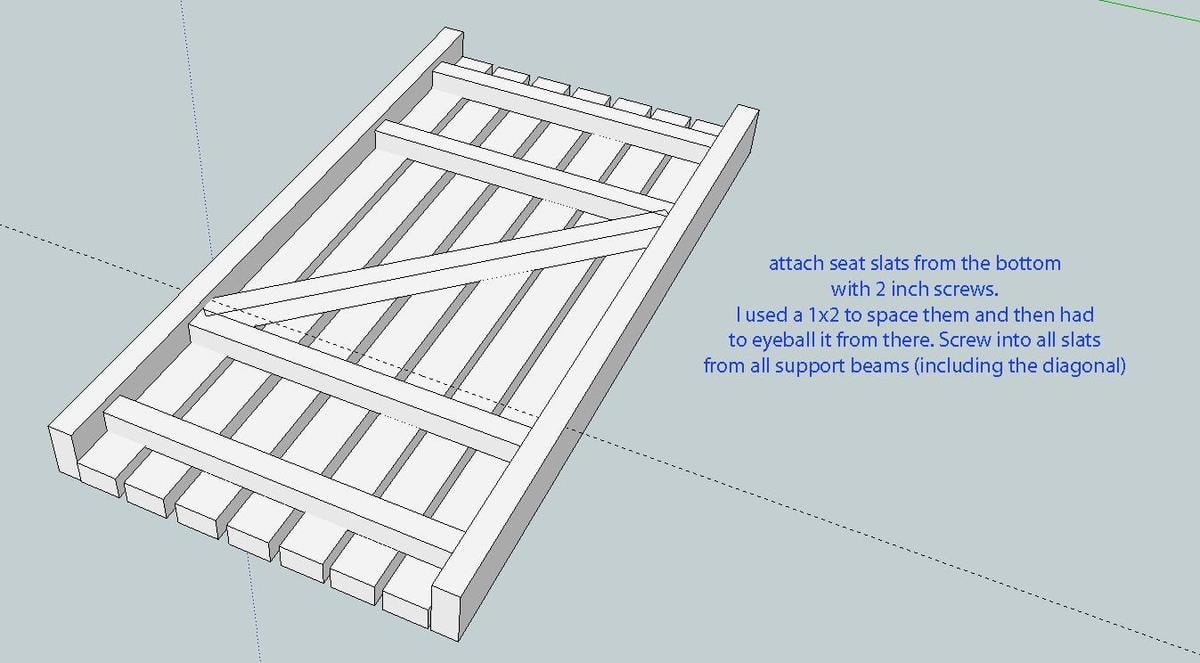
Attach the seat slats from the bottom with 2 inch screws. Space approx 3/4'' apart and then eyeball their spacing from there.
Step 4
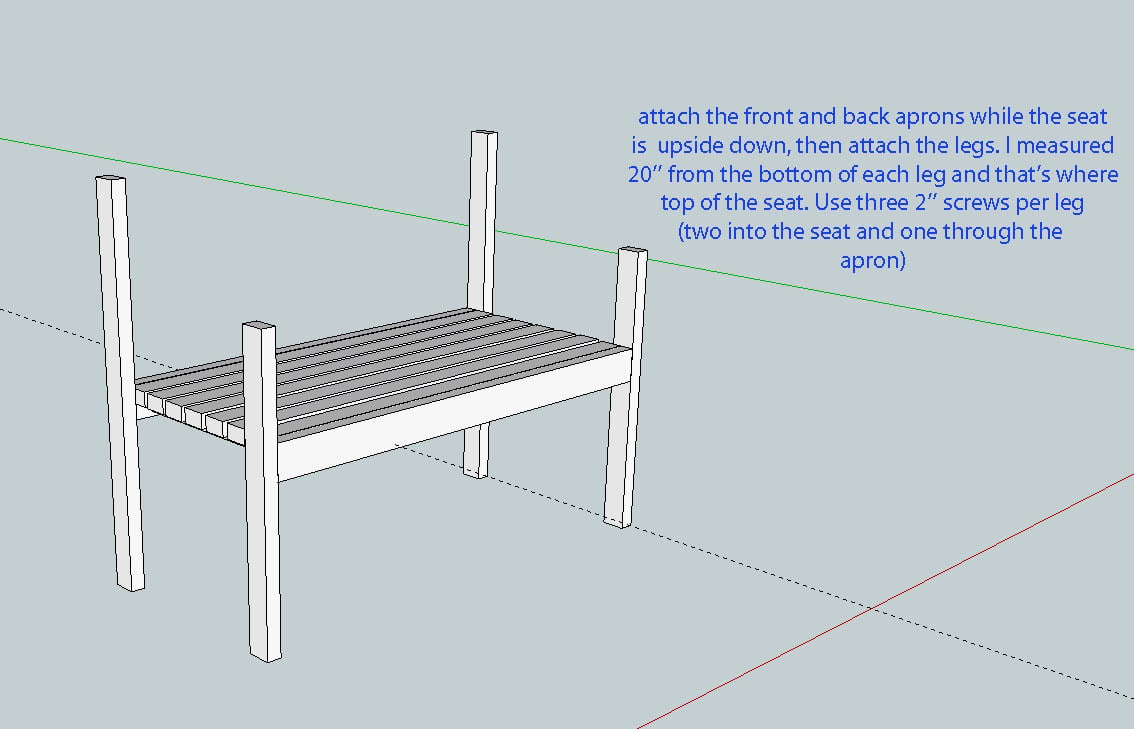
I repeated the first part of this step - oops! The aprons are already there, so ignore that part and just attach the legs. Measure 20'' from the bottom of each leg and that is where the top of the seat should go. Use three 2'' screws per leg (two into the seat and one into the apron)
Step 5

Step 6
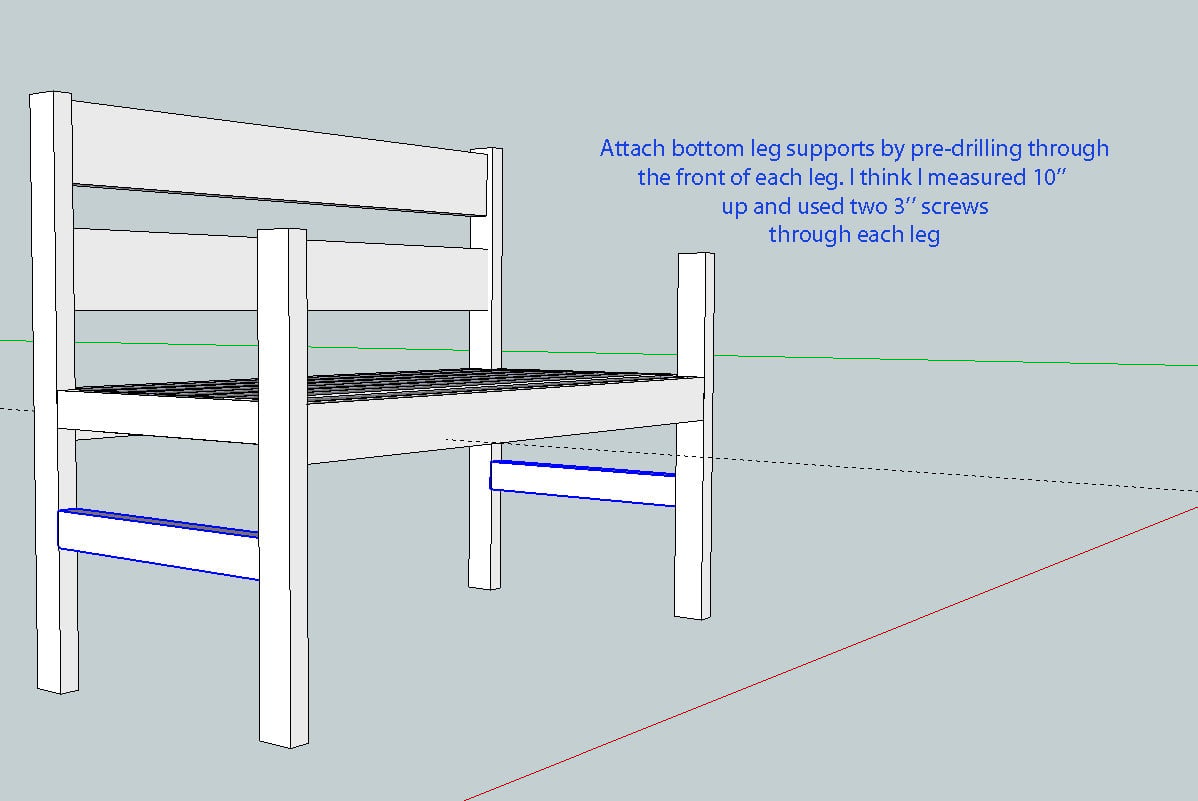
Attach bottom leg supports by pre-drilling through the front of each leg. Measure 10'' from the bottom, and the top of the beam should sit there.
Use two 3'' screws per leg.
Step 7
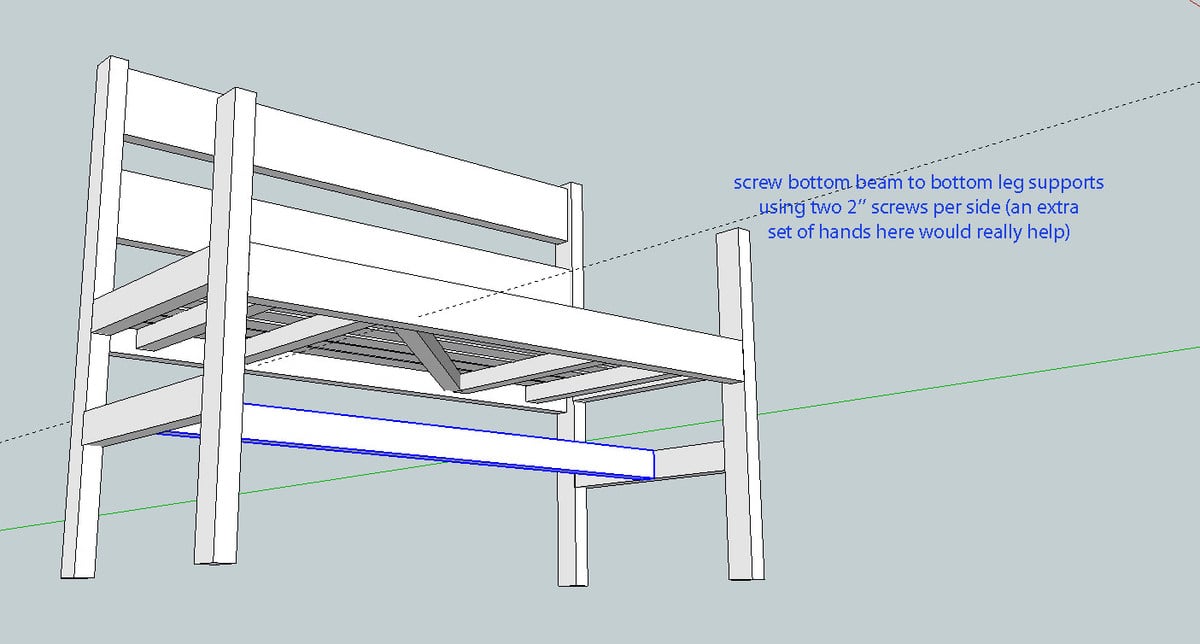
Screw the bottom beam to leg supports using 2'' screws. Use 2 screws per side (grab a stray kid to help)
Step 8

Notch out the arm rests as shown above. This should be to the exact dimensions of your 2x3, so measure your board first. Mine happened to fit perfectly into the dimensions shown.
Pre-drill through the side and screw into the back leg using two 2'' screws. Screw from the top into the front leg (2 screws).
It is always recommended to apply a test coat on a hidden area or scrap piece to ensure color evenness and adhesion. Use primer or wood conditioner as needed.


Comments
Lady Goats
Tue, 03/22/2011 - 18:56
One thing to add!
I added 2x2 supports for extra stability between the legs and seat (45 degree angle, NOT parallel - probably 4 inches long). This was a gift to my Mother-in-Law who lives on an Indian Reservation where everyone is extremely obese, so I wanted to add as much support as I could. Didn't want it to collapse under anyone!
dwtdc
Tue, 04/28/2020 - 19:28
Garden Bench recommended wood
What type wood would you recommend for usage of bench in flower garden. Treated wood, cedar ?
Ana White
Wed, 03/23/2011 - 00:41
I want to make this!
Thank you so much for sharing! I love this!
mindyl
Fri, 03/25/2011 - 08:59
I want to make this without
I want to make this without the legs and hang it on my porch.
Guest (not verified)
Wed, 03/30/2011 - 13:42
what about the legs?
We are trying to build this right now, and the plan doesn't have any measurements for the legs. What size wood, and how long for the front and back legs? Thanks!!
In reply to what about the legs? by Guest (not verified)
claydowling
Wed, 03/30/2011 - 14:29
The legs
look like 2x4 stock. Make them a comfortable length. Somewhere between 32 and 36 inches is probably appropriate for the back. The front should be slightly lower. The method I use is to sit on a chair or bench that's comfortable and measure from the floor. For real quick and dirty, and a bit more accurate, I just make a mark on a stick at the appropriate height.
In reply to what about the legs? by Guest (not verified)
Lady Goats
Wed, 03/30/2011 - 19:45
WHOOPS!
Oh gosh, how could I have missed that?! SO sorry! The legs are 2x3s, and the back legs are 40'' and front are..... uhmmmm... (opening SketchUp now!) 30!
Guest (not verified)
Wed, 03/30/2011 - 20:11
Thank you! Thank you!
Thank you so much! My sons are actually building the bench. They are having so much fun with it. Thanks for sharing your plans!
In reply to Thank you! Thank you! by Guest (not verified)
Lady Goats
Wed, 04/06/2011 - 09:55
How Fun!
I'm giddy that your sons are doing it! CUTE! It's perfect timing, too, for a good ol' bench! :-)
richard (not verified)
Thu, 05/17/2012 - 00:46
bench
you look so beautiful x
Rob (not verified)
Thu, 04/21/2011 - 10:46
Wood to use
Hi Gina,
I am interested it doing this as my second-ever wood project (first was dog house). I love that it is relatively inexpensive to make. I am wondering what kind of wood to use? I assume pressure treated wood is needed? Not sure if the big box home stores carry all of these sizes?
Thanks,
Rob
In reply to Wood to use by Rob (not verified)
Lady Goats
Thu, 04/21/2011 - 13:35
Wood to use
Rob, I just used fir and pine (studs and furring strips). For protection, you can use 1 part linseed oil and 1 part paint thinner (if you plan to leave natural) or use an exterior paint (provides better UV protection). It's easier to do these before assembling. HTH!
In reply to Wood to use by Rob (not verified)
claydowling
Thu, 04/21/2011 - 14:19
Deck sealer
After I sealed my deck, I had a lot of deck sealer left over, so both my dad and I have used it to seal all of our outdoor furniture. That way it matches our deck, and it's well protected.
If you don't use exterior grade fasteners, it's a good idea to give it a coat of sealer after assembly as well, to protect the fasteners from rust. But really, better to use exterior grade (or deck grade) fasteners.
ferbit
Wed, 04/27/2011 - 20:14
SOOOOO excited to make this!
We have a pretty large yard and I'm dying to make little "reading nooks" and spots to sit and pretend all over the place. LOVE LOVE LOVE this bench! So excited to make it! I think it would make a perfect reading spot. :)
Rob (not verified)
Mon, 06/06/2011 - 09:13
finishing touches
Hi,
Finally bought the wood, just waiting to have some time to put it together.
How did you do the rounded corners on the arm rests? How about the shape of the top back board?
Thanks again,
Rob
claydowling
Mon, 06/06/2011 - 11:09
Rounded corners
I don't know how Ms. Goats did it, but a common trick for rounded corners is to use a quarter as a template. You can cut it with a jig saw, although it might be easier to pull off with a rasp. They're cheap and they are a basic tool for anything with curved shapes. You'd also need a wood file (very different from one designed for metal) to clean up the surface. I just picked them up at Lowes for under $10 each, because I have a few rounded corners to put on furniture in the next month or two.
Tim March (not verified)
Sat, 06/11/2011 - 16:04
materials list not enough 2 x 3
Maybe I'm missing something here but the materials list calls for 5 - 2"x3"x8' which doesn't seem to be enough...short by over 16 ft?? By my calculations you will need another 194" of 2"x3" so you could get by with another 8 footer plus a 10 footer or some combination to get you there....anyone else find this or am I looking at the plans wrong....Tim
mamalecia11
Fri, 06/17/2011 - 21:48
2X3s
I calculated it just now and it does look like you need 7-2X3X8s. Alecia
Lady Goats
Mon, 06/27/2011 - 12:38
2 x 3s
You are absolutely correct - I hadn't accounted for the legs when I had done the shopping list (mentioned in an earlier comment). When I fixed the cut list, I totally forgot to add to the shopping list. I'm so sorry (I have a few extra 2x3s in my garage, if you wannem! ;-)).
The rounded corners were done with 80-grit sandpaper. I used my random orbital sander and went in a continuous motion to round them out. The only "trick" to this is making sure that you don't spend more time on one area than the others, and it'll come put perfect (at least it has for me, every time). Took about 3 minutes per curve (much better than jigging them and then sanding afterward!)
The shape in the back was done with a jig saw. I just measured the middle and an equal spot on both sides and took my level from point to point. Drew it on with a pencil and went to work (that was the worst part of the whole thing!).
(I'm editing the shopping list now - sorry!)
claydowling
Mon, 06/27/2011 - 15:00
An alternative for curves
An alternative for curves like that is to use a rasp and a wood file. Lowes and Home Depot sell a combo rasp and file for under $7. Rasps cut these kind of curves really fast, and can even do inside curves. One of the first tools I learned how to use as a kid.
Lady Goats
Fri, 07/22/2011 - 09:41
I'll be building this again this weekend
Following my plans exactly... just to see how badly I screwed 'em up ;-)
Then I'll edit 'em, if needed, so there's no more question.
pattyz
Thu, 09/08/2011 - 06:01
six foot armless
I would like to make my bench longer and remove the arms. What changes should I make to these plans and materials list? Should I add any extra legs or bottom supports?
Thanks in advance.
guest (not verified)
Sun, 09/25/2011 - 20:41
On my TO DO List!
I think my mom would love this for her yard or patio. I am planning on making this for her for Christmas. I'm excited to get started! Thank you for the wonderful plans! Are there more pictures of ones others have made. I'd love to see everyone's version of this bench!
Teresa
Rob (not verified)
Mon, 09/26/2011 - 06:28
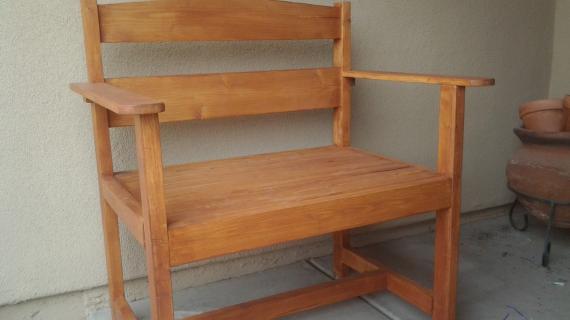
Finished Bench
Hi All,
Just wanted to let you know, I finished the bench over the weekend. It is my 2nd ever project (after dog house) and it turned out great.
I think you'll be able to see it here:
https://picasaweb.google.com/lh/photo/4o2VkjS7gQFXhNHL9dx4KojUHVUxyH85G…
Thanks Lady Goats!
Rob
In reply to Finished Bench by Rob (not verified)
Lady Goats
Thu, 09/29/2011 - 12:19
Rob... I'm in awe....
I didn't get any finished phtotos of my original OR second bench (both were gifts), but I just ended up painting them and thinking they were just "ok". Yours is GORGEOUS. I really am just... awe struck!
Rob (not verified)
Thu, 09/29/2011 - 12:26
Aww shucks, thanks!
Aww shucks, thanks! Hopefully my dog won't eat it up.
I really appreciate the plans, your time and this website.
I wonder what my next project should be?....
Thanks
Rob
Lady Goats
Thu, 11/03/2011 - 08:13
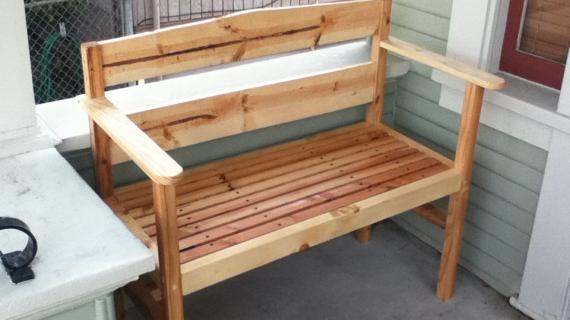
Rob's Bench
for those of you looking for staining inspiration!
he left the link above so you can click the full sized photo.
Coley (not verified)
Thu, 12/08/2011 - 19:36
Garden Bench
What kind of wood did you use? Cedar is great but expensive. Would staining or painting help untreated pine last outdoors? The bench is awesome looking, can't wait to get started on it.
In reply to Garden Bench by Coley (not verified)
Lady Goats
Fri, 12/09/2011 - 18:07
Wood to use
Hi Coley, I used douglas fir and spruce (which are what the studs and furring strips in my area are made from - so, in other words, "the cheap stuff"). Both of the ones I've built are holding up VERY well with paint. Staining and finishing with a deck sealer, linseed oil or poly would definitely help it last. With anything untreated, I'd just recommend that you inspect it annually (every spring, when it's finally warming up enough to go outdoors, just do a quick look-over). If it's showing signs of wear, you can refinish it. Or do what a friend of mine does, and slap more poly on top of the older stuff (no sanding required!). Hope this helps!
claydowling
Sat, 12/10/2011 - 07:22
Avoid polyurethane
Not that polyurethane isn't wonderful stuff, but it breaks down quickly under sunlight.
I've heard that you can get a similar effective clear-coating by using the straight deep color base for oil paint. That's the paint before they mix any color in.
In reply to Avoid polyurethane by claydowling
Lady Goats
Sun, 12/11/2011 - 11:59
You really had me questioning myself!
Clay, I had to go out into the garage to make sure it was Poly that I used on a bench, because you really had me questioning myself! In fact, I was using poly... and it's ok! I definitely recommend that in every case, you research the finish for your project, and should've specified it in my comment above, but I have an exterior grade poly. The "Zar Ultra Exterior", which specifies uses for "marine (above water-line) surfaces, fences, outdoor furniture, exterior doors, and other wood surfaces exposed to direct sunlight."
So, if anyone does choose to go with poly, make sure it is an exterior grade. I haven't had a problem at all with mine. Well... except that it skins over... Have any suggestions for that, Clay?
claydowling
Sun, 12/11/2011 - 19:28
Skinned Poly
I'm not sure what to do about that. I just keep the stuff sealed, but I haven't used an exterior grade poly in a long time, and that was spar urethane, which has a very different formulation.
I have started pouring my poly into a small glass jar and thinning it 1:1 with mineral spirits. It improves the flow so that I don't get brush strokes. It also lets me seal the can of poly up right away which should reduce the skinning.
Coley (not verified)
Sun, 02/12/2012 - 13:36
2x3s
Ok this may sound stupid but I can't find 2x3s at the box store. Can I sub it for 2x4s or should I buy twice as many 1 x3s and glue n' screw them together?
In reply to 2x3s by Coley (not verified)
Lady Goats
Sat, 02/18/2012 - 19:08
2x3s
Sorry for the WAAAY delayed response! I didn't see this, :-/
Your store definitely has 2x3s. I promise!!! :-) You'll just have to look for them by the studs. I can't find 2x3s online at my local blue, but (sure enough), they're located near the 2x4s.
BuildMeAnArk
Sun, 04/08/2012 - 10:31
Great plans, slimmed down to fit
This bench was perfect for our front porch, but after I bought all the lumber I realized how big and substantial it would be. So, I slimmed it down and swapped out the following: seat slats 1x2, posts and supports 2x2, arms 1x3, backrest 1x6, aprons 2x3. Looks great and feels like a better fit for our porch. Enjoying the afternoon sun in style now, thanks!
Michelle Funk (not verified)
Sat, 06/09/2012 - 19:49
I'd like to make this bench a
I'd like to make this bench a little more narrow (by about 4 inches). If I adjust the length of slats (seat and back) and back/front aprons will I be good to go?
In reply to I'd like to make this bench a by Michelle Funk (not verified)
Lady Goats
Sun, 06/10/2012 - 19:01
Yep
Good to go!
Thiru (not verified)
Mon, 08/13/2012 - 07:47
Garden Bench
Brilliant bench and comprehensive plans. Thank you so much.
Just a question on your comment in step 1 :
"I forgot to measure a half inch up in the diagram above, but the 2x2s need to be half an inch up." (this refers to the seat upports.
If the seat slats are going to be "flush" or aligned with the top of the front and back aprons, and these seat slats are 2X3s, surely the seat supprts need to be 2 inches up in the diagram and not half an inch up? Please clarify, I am just a beginner.
In reply to Garden Bench by Thiru (not verified)
Lady Goats
Mon, 08/13/2012 - 09:51
Excellent Question
The measurement was correct. I chose to put them 1/2" up because it seemed like it would be easier for people to manage, but that is indeed "upside down". If you wanted to do it from the other side, you would put it 1 1/2" up (that's the actual dimension of the "2" in 2x3).
What you could do instead is to put the 2x3s underneath so that it'll be flush on the top, and screw from there.
If I only managed to confuse you in my answer, just note that it really is 1/2" - as confusing as it seems :-)