
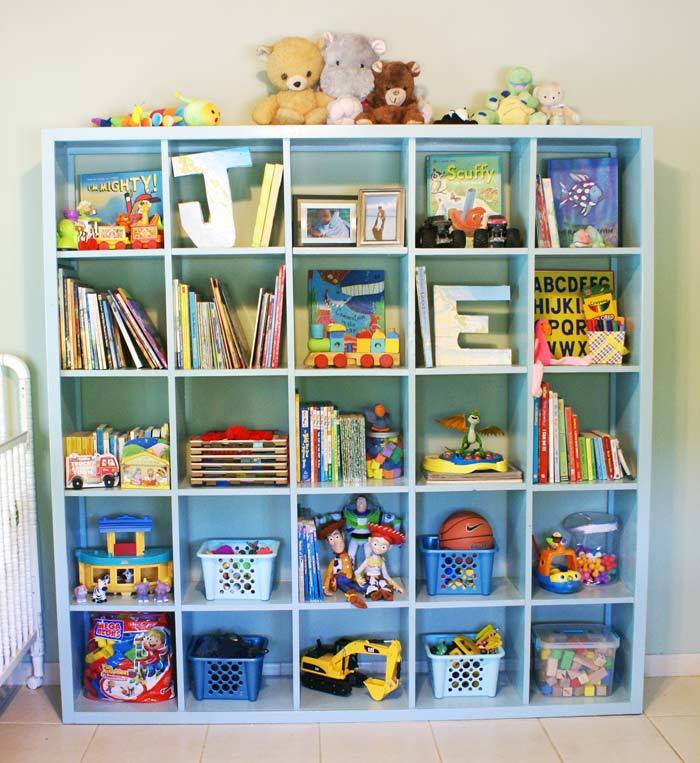

Make a room divider cubby system to organize an entire room. Free easy step by step plans.

Preparation
12 – 1x12 @ 6 feet long OR 8 1x12 @ 10 feet long
10 – 1x2 @ 6 feet long
100 - 1 1/4” pocket hole screws
1 1/4” finish nails
Wood glue
2 – 1x12 @ 70 1/2”
4 – 1x12 @ 69 3/4”
2 – 1x12 @ 72”
2 – 1x2 @ 70 1/2”
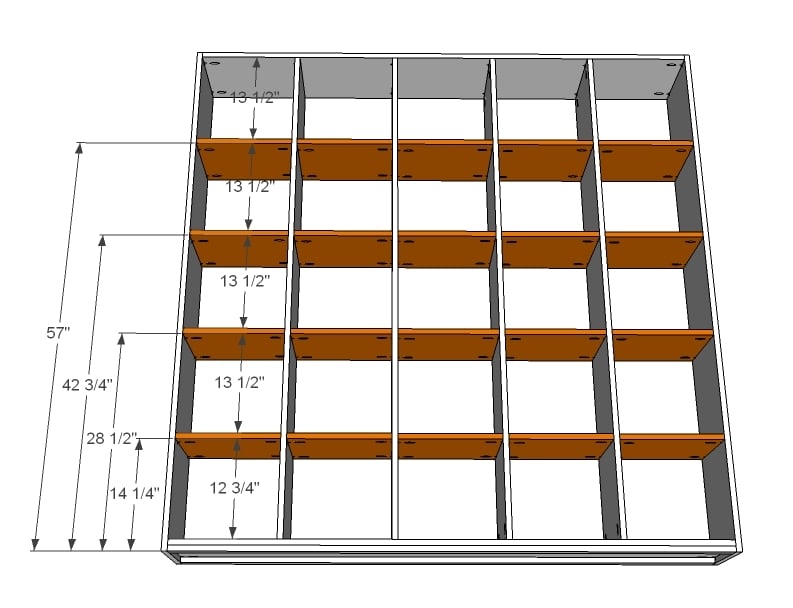
20 1x12 @ 13 1/2”
4 – 1x2 @ 69”
4 – 1x2 @ 72”


Please read through the entire plan and all comments before beginning this project. It is also advisable to review the Getting Started Section. Take all necessary precautions to build safely and smartly. Work on a clean level surface, free of imperfections or debris. Always use straight boards. Check for square after each step. Always predrill holes before attaching with screws. Use glue with finish nails for a stronger hold. Wipe excess glue off bare wood for stained projects, as dried glue will not take stain. Be safe, have fun, and ask for help if you need it. Good luck!
Instructions
Step 1
Make sure you have a flat workspace at least six feet by six feet for building this bookshelf. Make all large cuts first, followed by smaller cuts. Drill all pocket holes prior to assembly. Use glue on all joints.
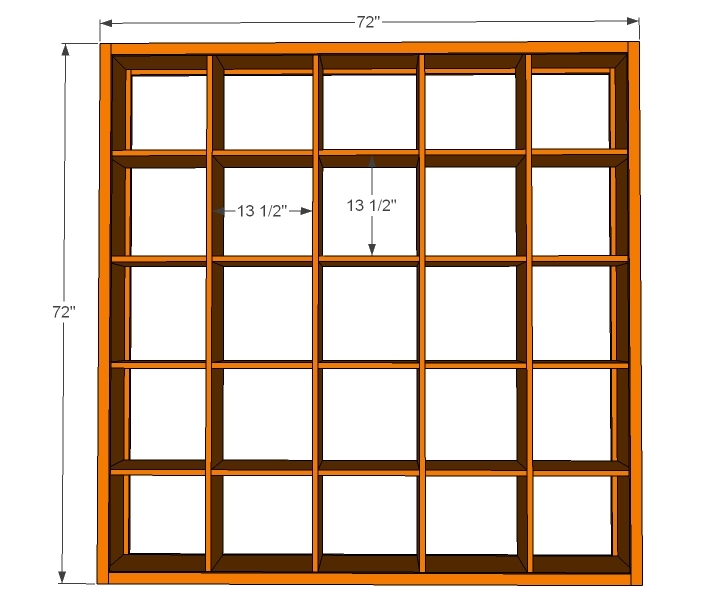
Mark top and bottom boards as shown in diagram, carefully measuring to make sure there is a 13 ½” gap between all shelves. Also drill pocket holes on both ends of top and bottom prior to assembly. It will be difficult to drill pocket holes once attached to the project.
Step 2

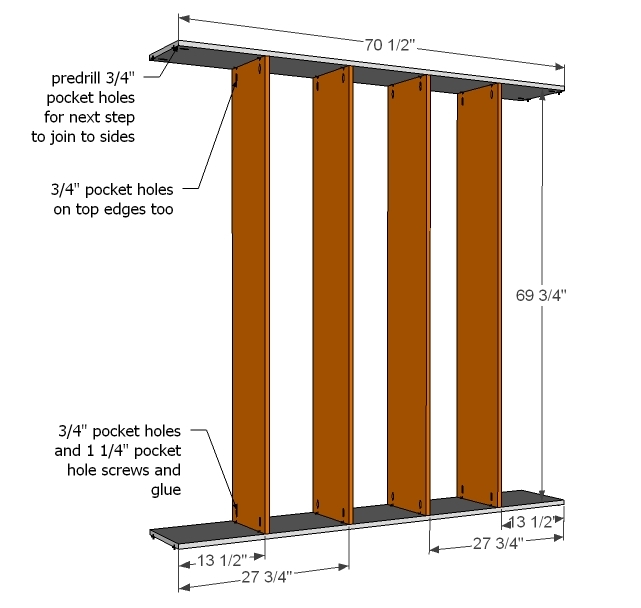
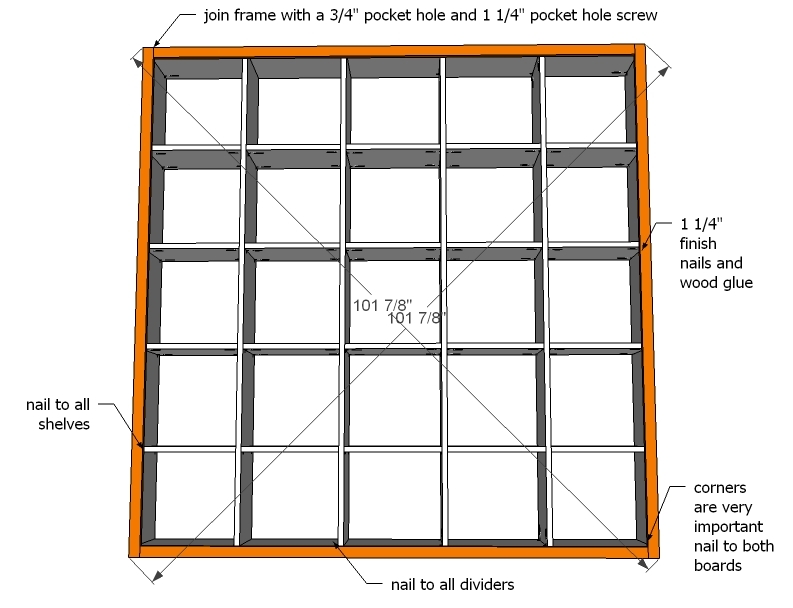
Attach sides to the sides, using 1 1/4” pocket holes and glue. Adjust the entire project for square by taking a diagonal from opposite outside corners, ensuring both diagonals match in length (see last step).
Step 3
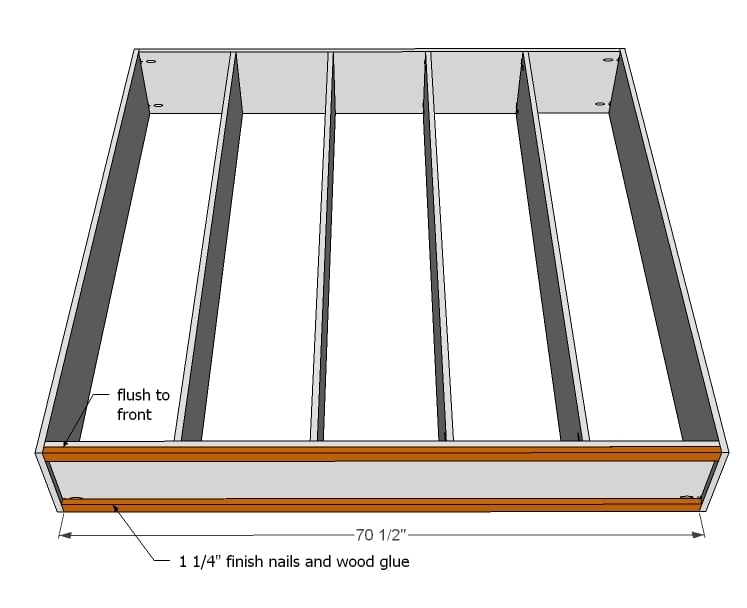
Use 1 1/4” finish nails and glue to attach bottom support trim to bottom. Also nail through the sides into ends for additional support.
Step 4
Drill 3/4” pocket holes on each end of each shelf. Mark shelf locations on all sides and upright boards. Attach shelves with 1 1/4” pocket hole screws and wood glue. TIP: Alternate drilling pocket holes offset on each end so screws do not line up exactly when you go to place shelves. IF you do have a situation where screws bump into each other, just drill another pocket hole offset.
Step 5
It is always recommended to apply a test coat on a hidden area or scrap piece to ensure color evenness and adhesion. Use primer or wood conditioner as needed.

Comments
birdsandsoap
Wed, 12/21/2011 - 00:40
Awesome!
I love that cheery blue! This build is going on my list!
Brian (not verified)
Wed, 12/21/2011 - 04:50
Will use for my wife's craftroom, buuuut...
My question is: What is more structurally sound...having the horizontal weight-bearing shelves be resting on the screws, or should the whole design be rotated 90 degrees so that the weight-bearing shelves rest on wood instead of only screws? I guess it wouldn't really matter in the end, as we probably won't be storing baby elephants on the shelves, but it's just a question I have. Thanks for the post!
amykelmann (not verified)
Wed, 12/21/2011 - 08:30
ditto
I second that thought....is there a good reason NOT to turn it?
In reply to Will use for my wife's craftroom, buuuut... by Brian (not verified)
claydowling
Wed, 12/21/2011 - 09:07
Horizontal Shelves
I think your plan will be a lot more sound, Brian. This is probably strong enough as-is, but the added strength won't hurt and might help.
Another option is egg-crate construction. The tools to do that are a bit more advanced though, and you should check YouTube for some instruction on doing it.
In reply to Will use for my wife's craftroom, buuuut... by Brian (not verified)
Ana White
Thu, 12/22/2011 - 11:09
Hi Brian, this could be built
Hi Brian, this could be built either way, but the full vertical sides actually bear the weight of all the shelves, transferring the weight of the shelf contents down to the ground. The pocket hole screws are extremely strong and hold shelves up of much wider widths. Also, by going this route, all pocket holes are hidden to the underside. That said, there's no reason you could not go the other way. Hope this makes sense!
Happy Holidays! Ana
Brian (not verified)
Thu, 12/22/2011 - 15:29
Thanks for the answer, Ana
I understand your comment, but I'm more interested in the strength of the wood instead of the necessary shear force to bust the screws. But like I said, I don't think much being stored on the shelves would cause an issue either way.
BTW...what's the weather in Alaska like? I need to travel to Anchorage for my job on Jan. 9. I'm pretty pumped about it.
Thanks again!
Ryan Griffin (not verified)
Wed, 02/01/2012 - 23:15
Strength of Design
Actually it would be better to rotate this shelving unit. Ana mentioned that the holes would be visible, but not if hidden with the wood filler as suggested in the plan. In either case the weight will be transferred to the vertical pieces but, by rotating, it will prevent any gaps that may open along the perimeter of the individual shelves. Just open up the .skp file, rotate the unit, export a new .jpg and upload to your site ;).
If you are going to stain the unit, just insert the appropriate sized dowel and careful saw off the excess with a dovetail saw or a sharp chisel. Sand this smooth and stain away!
Griff
SingleMomThriving
Wed, 12/21/2011 - 05:56
Just added to my "To Do" list
I've been looking for a piece like this for my own bedroom. Thanks for sharing this.
babysteps
Wed, 12/21/2011 - 06:53
Kreg Jig is Great for this
This project would be super fast, easy and strong with the Kreg jig. If anyone is planning on making this and hasn't yet invested in a Kreg jig, buy one. You will never regret it!
kiley (not verified)
Wed, 12/21/2011 - 07:37
Helps me with my pinterest plan too!
Wonderful! I must have the bug/obsession with pinterest too becuase when i saw this on facebook this morning I thought of this pin (http://pinterest.com/pin/198158452323818757/) that I have already purchased a 10$ dresser for, just needed to find out how to make cubes. Thanks Ana!
Melinda Greer (not verified)
Wed, 12/21/2011 - 11:27
what would it take to make the depth 15"
Ana-I would love to build this to store my scrapbooks A 12x12 3 ring binder measures 13x15. It is hard to find shelves with this depth the don't cost an arm and leg.
What would it take to change the plan to make it deep enough to store this albums. Make it from Plywood?
Thanks
claydowling
Wed, 12/21/2011 - 11:35
Plywood as material
Plywood would be an excellent material for deeper shelves. You'll need a good plywood cutting jig, and you'd want a way to dress the front of the shelves too, because the edge of the plywood is unappealing. Solid wood would look nice, but heat-activated edge banding would also work.
Ryan Griffin (not verified)
Wed, 02/01/2012 - 23:23
Plywood
I agree that plywood would make an excellent candidate for this unit. Instead of the pocket holes/screws, you could use a table saw or router to make dados for some added strength. Another option for covering the exposed edges of the plywood would be to face it out with some 1x stock. Kids are so rough on furniture, edge banding veneer may peel off over time.
The facing would look something like this...
http://hgtv.sndimg.com/HGTV/2009/02/03/HCCAN406-Hutch-WIP-s4x3_lg.jpg
Griff
rhonit
Mon, 01/16/2012 - 18:21
i had the same question
about being able to use for scrapbook supplies, my husband said the same thing, that we could use ply and trim out with wood like we did in our livingroom. i would like to show you pictures but can't get them to load.
Lisa R (not verified)
Wed, 01/25/2012 - 12:55
Cost
Can anyone give a rough estimate on cost to build this?
In reply to Cost by Lisa R (not verified)
exuma_momma
Thu, 02/02/2012 - 04:36
Cost (from the Bahamas)
Hi Lisa,
My rough cost for this was about $250 after the paint and everything. I will say this though, some of my materials cost a bit more than they do in the US because I live on a little island in the Bahamas and everything has to be imported. Hopefully this will give you a ball park though.
Good luck!
Guest (not verified)
Sat, 02/25/2012 - 18:42
I can't see it costing much
I can't see it costing much more than 100. Those are basic boards sold at Home Depot or Lowes.
In reply to I can't see it costing much by Guest (not verified)
exuma_momma
Mon, 02/27/2012 - 12:39
Cost
You're probably right about that...but I don't have a home depot or lowes in the Bahamas... the $250 was my rough costs for supplies there, as I mentioned. Definitely shouldn't cost that much in the US. Hope this helps.
Tausha (not verified)
Mon, 10/15/2012 - 19:53
I wonder how good this will
I wonder how good this will look if you make it look like old barn wood by beating the wood and staining it? I'm thinking I will have to try it!!!
Morgangarvin
Wed, 01/29/2014 - 10:02
Outside Pieces
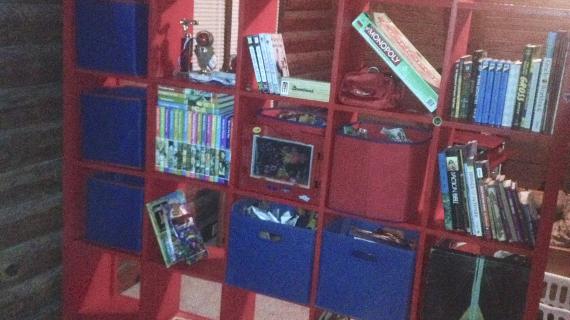
I am beginning this project. I can tell in both the picture of the blue cubby whole piece and in the diagram that the outide pieces (70 1/2in and 72 in) are thicker than 1 inch. Did you use 2x12 for those instead of 1X12?
Thanks!
In reply to Outside Pieces by Morgangarvin
exuma_momma
Wed, 01/29/2014 - 12:35
Outside pieces
The frame was build with the 1x12, and then we added a 1x2 frame around the entire piece to give it that finished look. That's what makes it look like it is a 2x board. Hope this helps. Good Luck!
starrienyte
Sun, 10/12/2014 - 17:45
Alteration question
I'm a real beginner with this stuff. If I wanted to leave the middle part open like this room divider would I need to change anything? Also considering adding doors to the lower shelves for more concealed storage.