
Well .... Mom likes the kitchen plans!
I do believe with the tireless help of you and so many others we have created the best possible kitchen design for the Momplex.
Sure, it helps that we can build whatever we want (and you can too - easy plans are on their way very soon!) but boy, did we have some challenges!
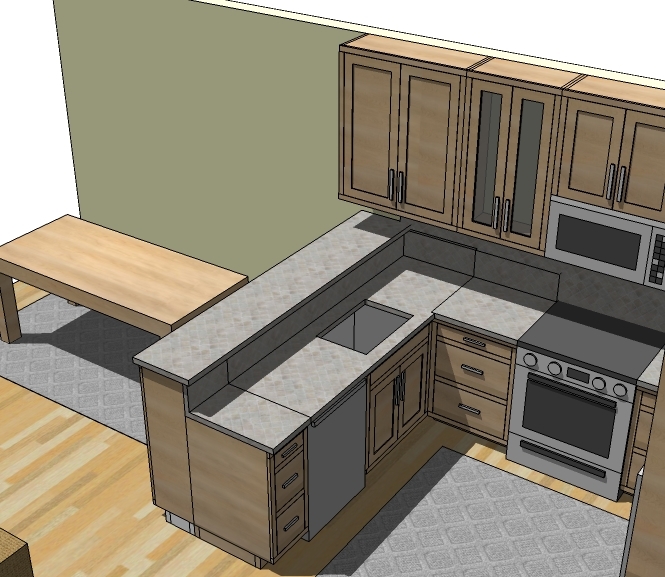
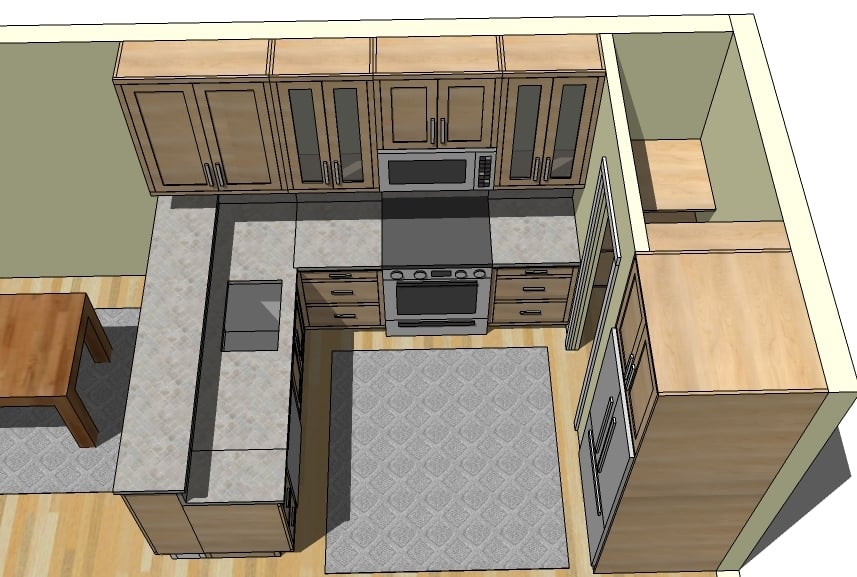
For starters the space is small. And every inch we add to the kitchen is an inch less for dining and living space. But despite the tiny layout, we demanded the kitchen do and store more, flow better, have a backsplash and a pantry. Of course the fridge must be boxed in, the cabinets symmetrical and balanced, the dishwasher next to the sink. A pretty tall order for less than 100 square feet!
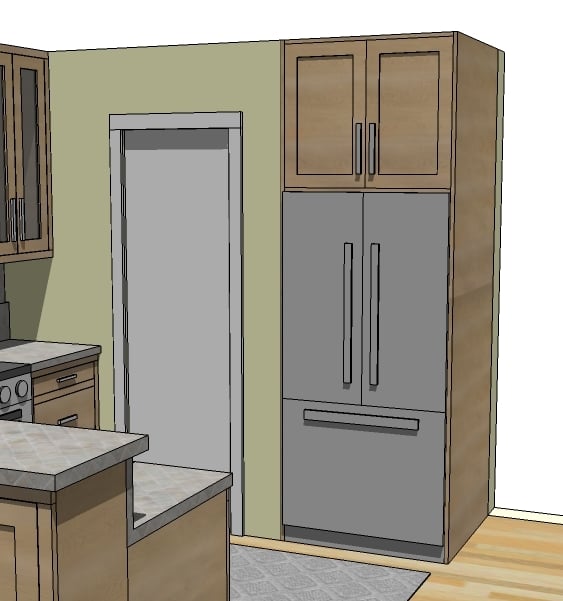
Let's start in the corner with the fridge. We'll be boxing in the fridge to give it that custom cabinetry look, and adding storage to the top. No biggie here! This will be easy to do and certainly not cost $2000!
Moving along to the pantry. In this particular kitchen, we have decided on the straight pantry. It just seemed like the best option for saving counterspace and creating easily accessible storage.
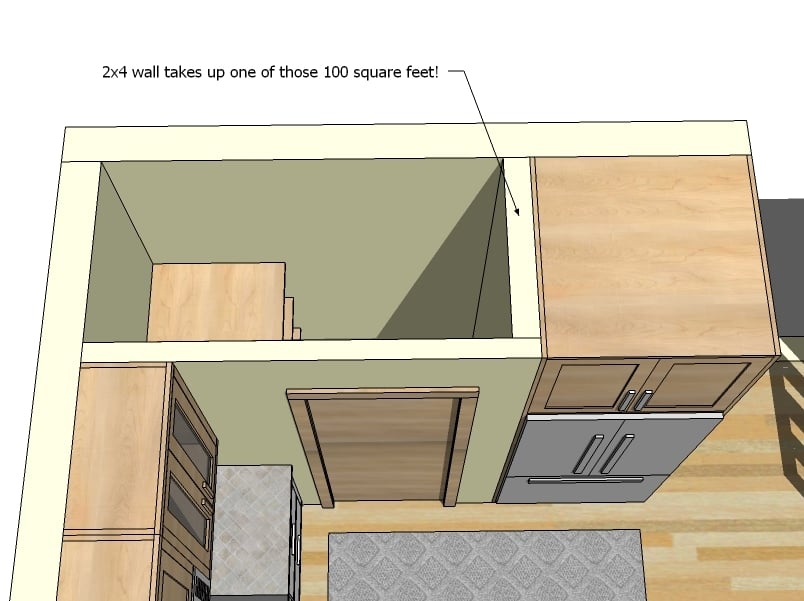
But that wall between the pantry and the fridge kept me up at night. There is exactly 96 square feet to this kitchen, and I wasn't about to give one up to a 2x4 wall.
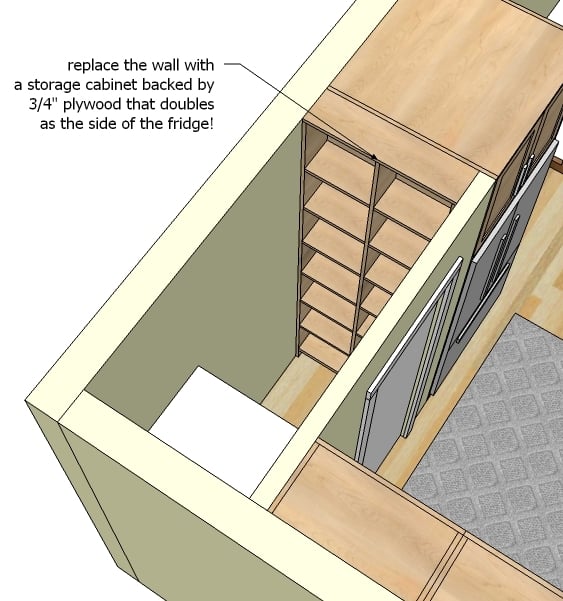
Ah ... now I can sleep at night again!
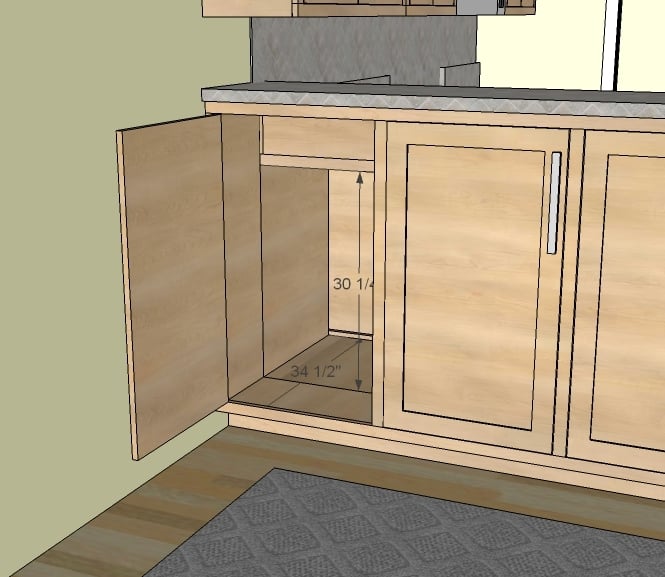
We decided to swap out the 2x4 wall for some open shelving, using the side of the fridge framing as the back. Now we don't loose a square foot. We gain two square feet of very useful and accessible storage!
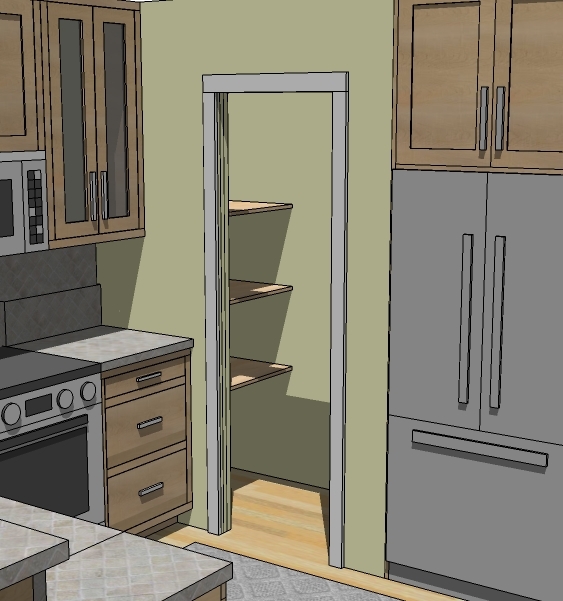
The pocket door is a must! When opened, it will completely disappear into the wall.
And of course, the main pantry storage, shelves each 4 square feet is size, can store everything from extra paper towels to giant bags of rice.
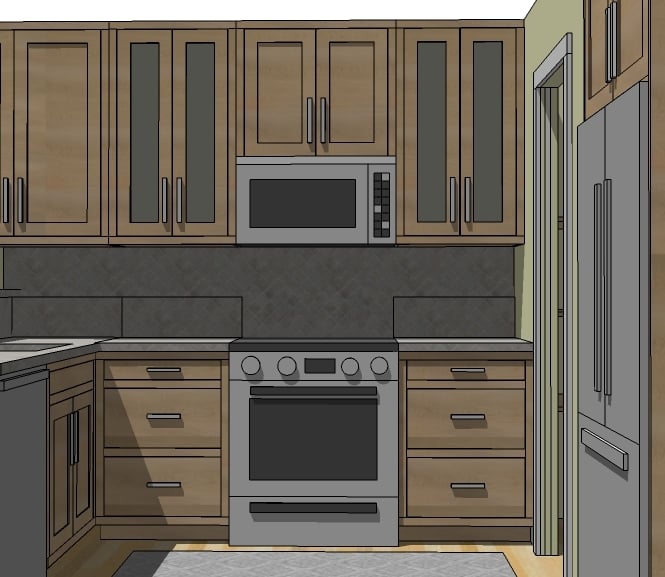
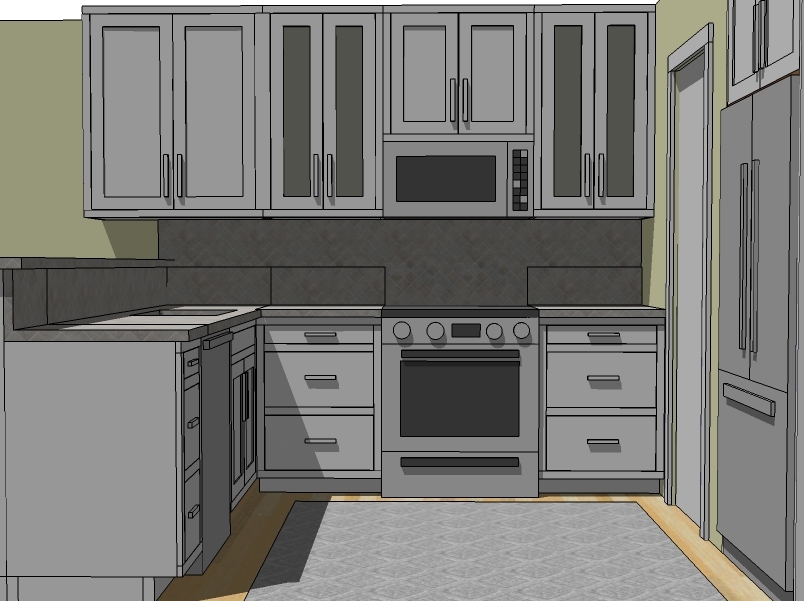
One of the things both Moms have asked for is lots of drawers on the lower cabinets. What do you think of drawers on either side of the range? I thought this would be the perfect spot for storing pots and pans, tupperware, and lids.
With the pantry large and storage friendly right there, the drawers will be a nice alternative to the open shelving behind the pocket door.
Up top ... nothing set yet - it'll be up to the Mom's on what type of shelving or cabinetry they want. But for now, storage behind doors seems to be the favorite.
We'll get to that corner in a bit! I promise!
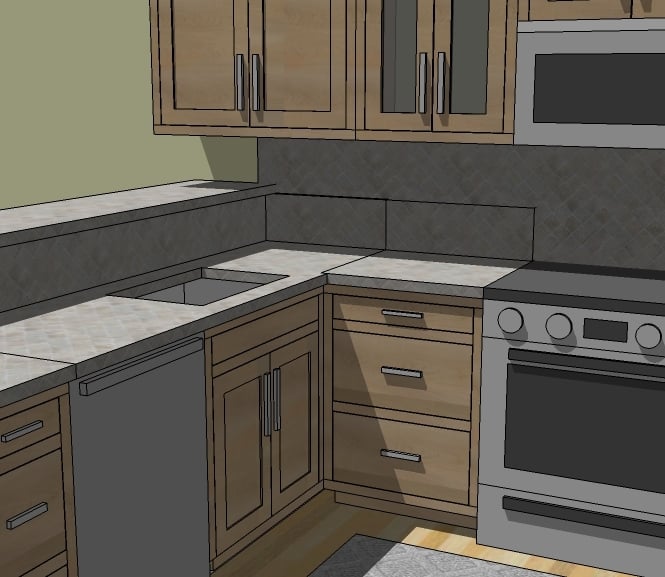
We did end up adding a backsplash per Mom's request.
Lots or room for dirty dishes! And with the backsplash, we add a little bar height counterspace for serving food or moving dirty dishes. Good spot for a fresh baked pie to cool!
We won't be using it for an eating bar because it's quite small and who would want to sit with their back to this view?
<div><br></div><div><img src="https://lh3.googleusercontent.com/--V0vttZbmc0/TicVjOs3wPI/AAAAAAAAIxY/…; alt="" align="none"></div><div><br></div><div>Can you believe that<a href="http://ana-white.com/2011/07/momplex/building-forms" title="" target="_blank"> we started on these footer just over six months ago? </a>Wonder where we'll be in six more months!</div>
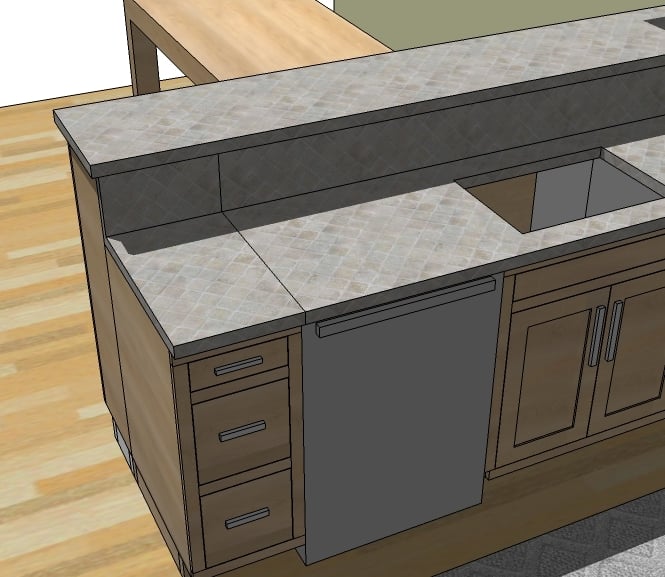
Of course the Mom's get dishwashers. And to end the cabinets, we'll either do a tray cabinet or more drawers. I personally like drawers for flatware here. Easy to put away, and diners can access the flatware without intruding on the cooks.
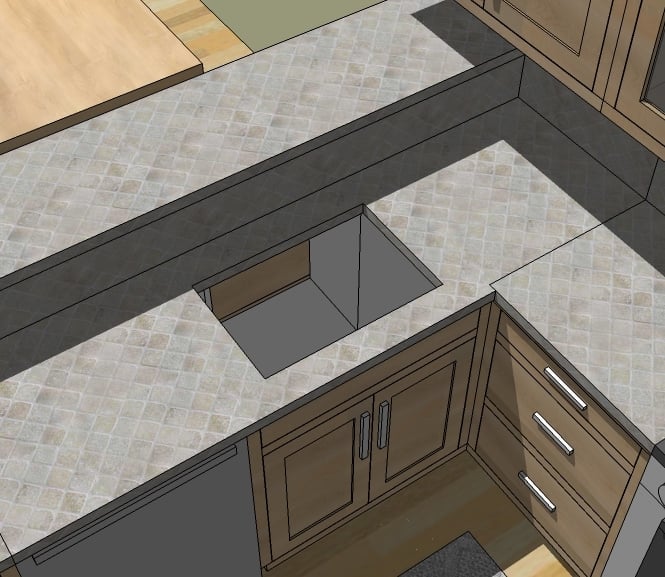
The backsplash bar does take a little bit or room up, but we still have enough room for a full size table. And it's not all wasted space.
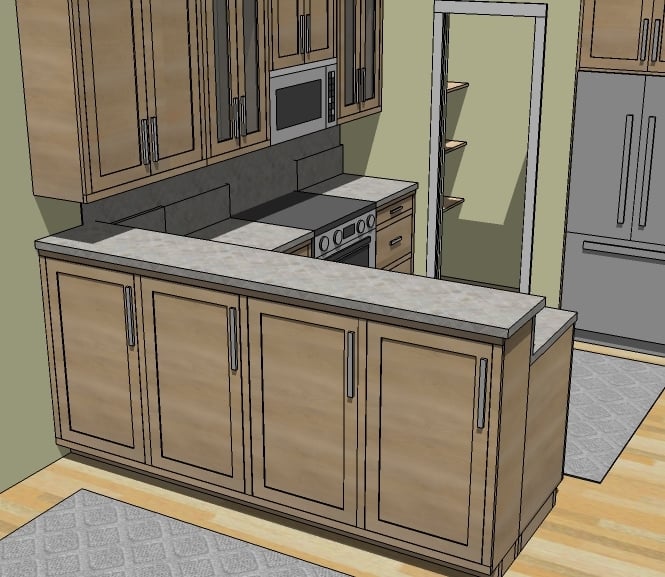
Normally, you would just frame up a pony wall behind the sink cabinets and slap a bar on top. Wouldn't doors be prettier?
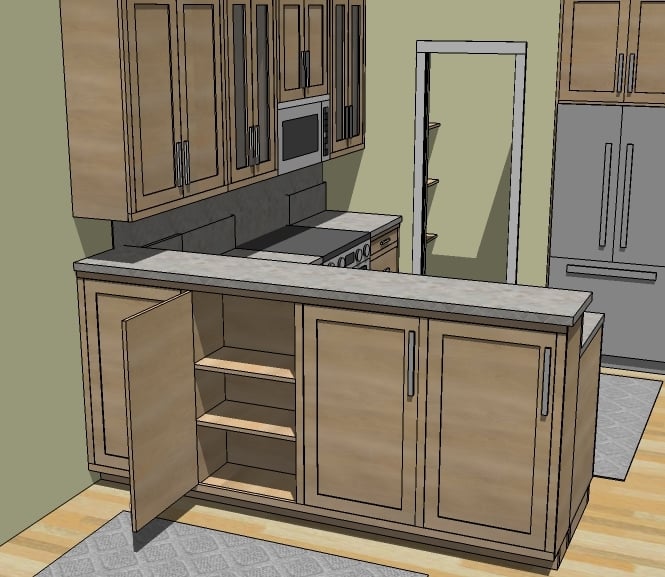
And more useful?
Here we swap out a 2x4 wall for a ton of very accessible storage! Think beyond linens and servingware, what about arts and craft supplies, a stash of kid's board games, or even an office in there?
From the last cabinet, the corner can be accessed. Great spot for the pressure cooker or the printer in you are going the office route. Most likely? A great spot for the grandkids to play hide and seek.
So what do you think?
We are off to the garage right now to build cabinets! Can't wait to share those plans!
Comments
emmarosemc
Wed, 12/28/2011 - 11:38
Wouldnt be my first choice
jigganancy
Wed, 12/28/2011 - 11:50
what would be your 1st choice?
In reply to what would be your 1st choice? by jigganancy
emmarosemc
Wed, 12/28/2011 - 12:47
I already gave my opinion in
CGCouture
Wed, 12/28/2011 - 11:56
I can't wait to see the plans
Guest (not verified)
Wed, 12/28/2011 - 11:59
I like the layout of the
In reply to I like the layout of the by Guest (not verified)
birdsandsoap
Wed, 12/28/2011 - 13:22
There is a bit of space left
In reply to There is a bit of space left by birdsandsoap
spiceylg
Thu, 12/29/2011 - 06:32
Drawers
Guest (not verified)
Wed, 12/28/2011 - 12:00
Love!
whitney_smith
Wed, 12/28/2011 - 12:12
Looking good!
Jenny U (not verified)
Wed, 12/28/2011 - 15:27
I agree, that corner is going
Stephanie (not verified)
Wed, 01/04/2012 - 08:54
I have a cabinet there on my counter...
viola
Wed, 12/28/2011 - 12:36
Loving the kitchen
k g (not verified)
Wed, 12/28/2011 - 12:52
LOVE what you've done. Great
darlasowders
Thu, 12/29/2011 - 06:24
I almost bought one of these...
Andrea H (not verified)
Wed, 12/28/2011 - 13:00
Drawers next to dishwasher
Kaila (not verified)
Wed, 12/28/2011 - 13:03
Nice layout!
Ana White
Wed, 12/28/2011 - 13:51
Thanks everyone! Especially
Madrigorne (not verified)
Thu, 12/29/2011 - 06:58
Cabinets
birdsandsoap
Wed, 12/28/2011 - 14:05
Beautiful custom kitchen!
OK Designer (not verified)
Wed, 12/28/2011 - 14:10
just a thought
Esther (not verified)
Wed, 12/28/2011 - 14:57
Love it and totally agree
Maria in Maui
Wed, 12/28/2011 - 17:35
Love it!
Ulrike (not verified)
Wed, 12/28/2011 - 17:38
I think it looks great. For
viola
Wed, 12/28/2011 - 18:04
Cookie sheets
Margaret Kubiszyn (not verified)
Wed, 12/28/2011 - 18:28
Pocket doors
Madrigorne (not verified)
Thu, 12/29/2011 - 07:01
pocket doors
Stephanie (not verified)
Wed, 01/04/2012 - 09:06
She'll be fine
Hillary (not verified)
Wed, 12/28/2011 - 18:53
Looks fantastic!
Bunnie
Wed, 12/28/2011 - 20:57
I love the kitchen and think
Vicki B (not verified)
Wed, 12/28/2011 - 21:10
instead of individual drawers?
Guest (not verified)
Fri, 12/30/2011 - 09:40
Drawers versus pull-out shelves
BookladyDavina (not verified)
Thu, 12/29/2011 - 00:49
looks fabulous! so hard to
Guest (not verified)
Thu, 12/29/2011 - 00:59
Looking good so far - don't
Brenda Klingle (not verified)
Thu, 12/29/2011 - 01:02
Looking great
Jen B (not verified)
Thu, 12/29/2011 - 04:19
Coming right along
cakelady
Thu, 12/29/2011 - 05:41
Corner Upper Cabinet
Brian Forbes Colgate (not verified)
Thu, 12/29/2011 - 06:17
Double Ovens
darlasowders
Thu, 12/29/2011 - 06:31
I have this frigidaire:
k g (not verified)
Thu, 12/29/2011 - 20:54
Here's a current Maytag model
spiceylg
Thu, 12/29/2011 - 06:45
:)
llama (not verified)
Thu, 12/29/2011 - 07:03
keep in mind boxing the
Stahli S Claassen (not verified)
Thu, 12/29/2011 - 07:05
Keep the drawers!! I just
Guest (not verified)
Thu, 12/29/2011 - 07:19
Looks great but....
Loni (not verified)
Thu, 12/29/2011 - 07:48
corner drawers
In reply to Looks great but.... by Guest (not verified)
birdsandsoap
Fri, 12/30/2011 - 22:43
same here!
Guest (not verified)
Thu, 12/29/2011 - 07:40
I had a U in my last kitchen
Guest (not verified)
Thu, 12/29/2011 - 07:42
Oops...*couldn't get into the
Sotamom (not verified)
Thu, 12/29/2011 - 07:56
Works great
Juli (not verified)
Thu, 12/29/2011 - 07:56
Drawers
In reply to Drawers by Juli (not verified)
birdsandsoap
Fri, 12/30/2011 - 22:49
genius!
Jenn W (not verified)
Thu, 12/29/2011 - 08:06
Love it. Beautifully short
Jenn W (not verified)
Thu, 12/29/2011 - 08:08
Cookie sheets - I store mine
Sarah R. (not verified)
Thu, 12/29/2011 - 09:24
Genius!! Why can't I think of
Guest (not verified)
Thu, 12/29/2011 - 08:16
Looks fabulous! I love the
eledyce
Thu, 12/29/2011 - 08:29
whoopee!!!!
annalea
Thu, 12/29/2011 - 09:15
Looks great!
Molly (not verified)
Thu, 12/29/2011 - 09:34
Left cabinet
JulieW (not verified)
Thu, 12/29/2011 - 09:44
I think it looks fantastic.
khteague
Thu, 12/29/2011 - 09:51
Switch the sink and dishwasher
Guest (not verified)
Thu, 12/29/2011 - 09:50
almost exactly like mine
Guest (not verified)
Thu, 12/29/2011 - 09:56
UPPER CORNER CABINET
Ruth P (not verified)
Thu, 12/29/2011 - 10:26
Staying up stressing about a
AmyK (not verified)
Thu, 12/29/2011 - 10:48
Sink seems too close to the corner
MarcieO (not verified)
Thu, 12/29/2011 - 10:57
I loved having a couple
Guest (not verified)
Thu, 12/29/2011 - 19:09
Appliances
Carie (not verified)
Thu, 12/29/2011 - 21:41
One more cool addition
Guest (not verified)
Fri, 12/30/2011 - 06:36
Pans
smasumur
Fri, 12/30/2011 - 07:01
More cabinet ideas perhaps?
Guest (not verified)
Fri, 12/30/2011 - 07:08
Likes and dislikes
Sunny (not verified)
Fri, 12/30/2011 - 11:19
Suggestion for the "printer" cabinet
cathy pickren (not verified)
Fri, 12/30/2011 - 12:53
i love this -
sgilly
Fri, 12/30/2011 - 19:52
Love it, Ana
SabySmooth1
Fri, 12/30/2011 - 20:36
Love it!
Patty (not verified)
Sun, 01/01/2012 - 21:05
Pocket Door Love
redhead_61
Tue, 01/03/2012 - 13:16
I can see the plan changed
Airedalian (not verified)
Mon, 01/16/2012 - 12:24
Have you considered lining
Guest (not verified)
Fri, 02/17/2012 - 21:54
Girls are so lame.
Joann Guariglia (not verified)
Fri, 02/24/2012 - 21:24
Sink