
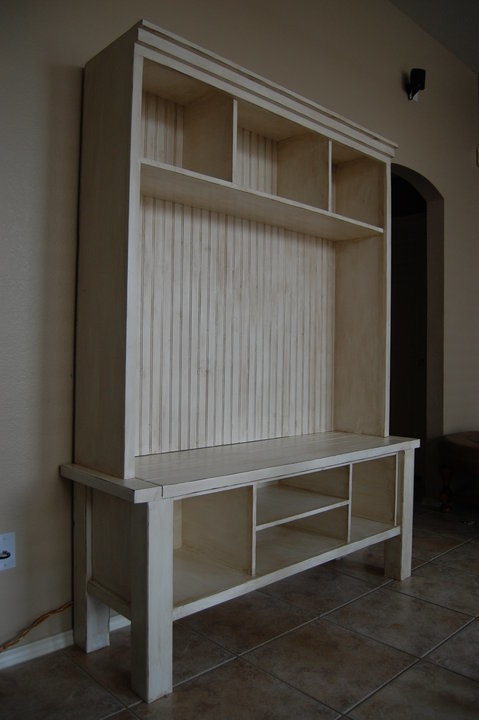

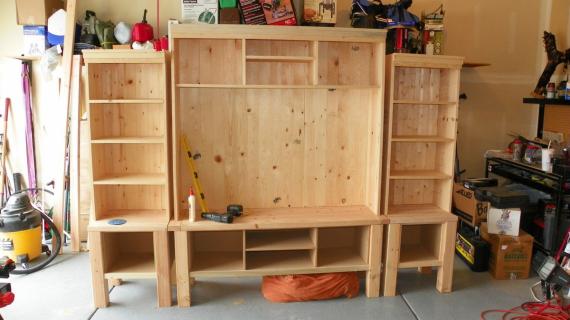
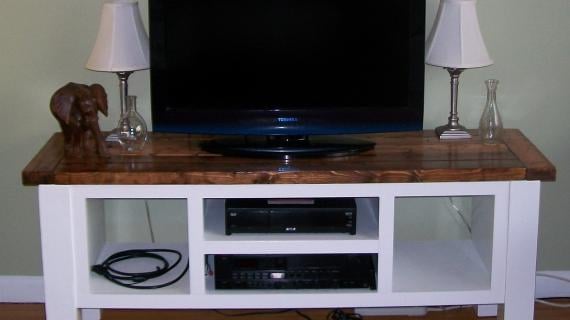
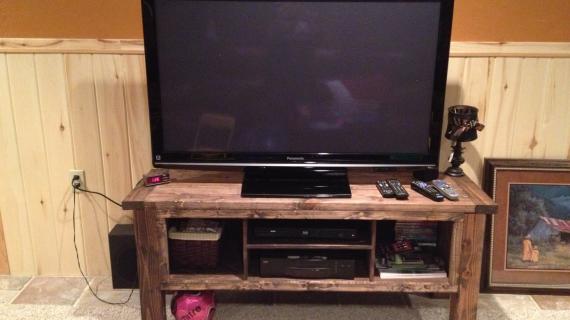
From our beloved Tryde Collection, now with storage! Special thanks to Stephanie for sharing her amazing photo!
 I've been promising everyone a media console that matched the Tryde Collection for quite some time. But what could be rustic enough, substantial enough, to go with our Tryde Collection?

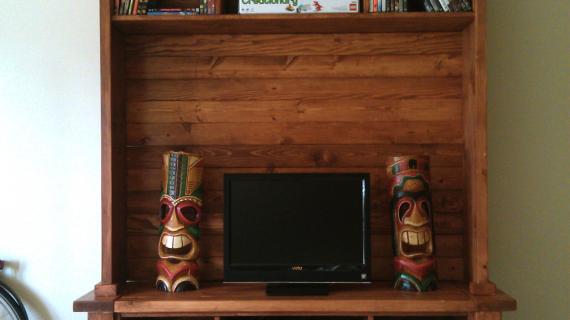
This fall season, I've noticed a strong trend for less adornment, more sturdy structure. And I couldn't be more excited, I'm personally a big fan of Early American Furniture styles.

Wait a second, are we already talking about fall? Yikes, I'm not ready!

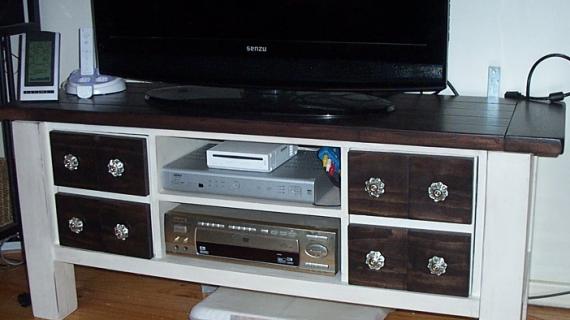
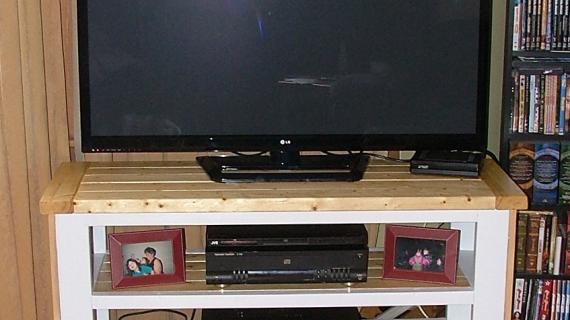
And here is from Stephanie! I absolutely love the antique white finish! Thanks so much for sharing, Stephanie!

I hope you spend a second over at our Tryde Collection, because many, many readers have been successful with this collection, and the media center builds on the success you've had with those tables.
Preparation
1 - 3/4" Plywood or MDF, cut into strips 15 1/2" wide, 8 feet long (referred to as 1x16 boards)
1 - 1x12 @ 6 feet long
3 - 1x2 @ 8 feet long
3 - 2x4 @ 9 foot stud length
1 - 1/2 sheet of 1/4" plywood
1 - 4x4 post, untreated
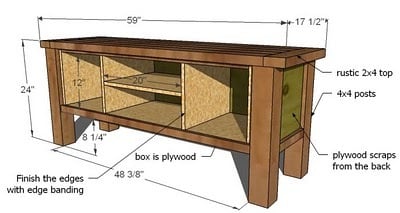
Please see the PDF for the full cut list.


Please reference the PDF attached to this post for the instructions.

Comments
Jennifer Doherty (not verified)
Fri, 07/16/2010 - 03:59
This is beautiful! I don't
This is beautiful! I don't need a tv console, but now I'm wishing I could get rid of mine and build this!!! Hahahahaha!
Quick question though... On step 8, you mention marking a screw pattern so it looks decorative attaching the top boards. Why wouldn't you just screw from underneath? Or is that much easier SAID than done?
Stan and Julie… (not verified)
Fri, 07/16/2010 - 04:59
not sure if you noticed but
not sure if you noticed but your pdf still says "storage bed tower" from the last post...
Ana White (not verified)
Fri, 07/16/2010 - 06:46
Jennifer, you absolutely
Jennifer, you absolutely could screw from underneath . . . better yet, build your tabletop with pocket hole screws first, than glue and attach with just a few screws from underneath. However, I try to give the absolutely easiest method, and then hope people with more advanced skills/tools can make the customizations that they want. The main issue I see with screwing from underneath is not getting your drill inside those cubbies.
As far as screwing from the top, be aware that even the Pottery Barn Hyde Collection has screws showing at the end of every single top board, its part of the look and the character of the piece. You won't need many screws with the right application of glue, two per end would do.
Ana
Kristy Evans P… (not verified)
Fri, 07/16/2010 - 18:31
I just built the Tryde Coffee
I just built the Tryde Coffee Table tonight and will be making the other pieces in the collection hopefully in the next week. I was so excited to see this tonight because we were talking about what we could do for a media center. I love these plans. I'm confused though... Are there no plans for the top piece yet or did I miss them somewhere along the way? Thanks for the great plans! You've inspired a few girls to get out and build something as the hubs sit back and watch... and laugh a little.
Jeremy (not verified)
Tue, 07/27/2010 - 12:12
I have built the Tryde Coffee
I have built the Tryde Coffee Table and the Tryde end tables, both are easy and look great. I am considering making the Media Console. Will you be posting plans for the top half? I can only find plans for the lower half.
Andrew (not verified)
Fri, 10/08/2010 - 08:13
Thanks — these plans look
Thanks — these plans look great! I'm putting together a shopping list even now for an embiggened version (my home theater equipment is too deep for a 15.5" box). However, I noticed while trying to download the plans that they're in Scribd's "Archive" section, which recently was put behind a paywall. Would it be possible for you to make these plans available another way?
Ana White (not verified)
Fri, 10/08/2010 - 16:05
Andrew, I'm so sorry! I have
Andrew, I'm so sorry! I have this file uploaded to here http://ana-white.com/PDF%20PLANS/Knock-Off%20Wood%20tryde%20media%20con… and here http://ana-white.com/PDF%20PLANS/Knock-Off%20Wood%20Tryde%20Media%20Con… Hope this helps! Ana
DIY TV Console… (not verified)
Wed, 10/13/2010 - 08:22
[...] perhaps he could find a
[...] perhaps he could find a design that he could modify to his specs? He did. In fact, not only did he find something, but he actually made the console all while I was gone at Art Weekend on Saturday. I was so [...]
Media Console … (not verified)
Thu, 12/02/2010 - 20:10
[...] start off with a link
[...] start off with a link to the plans to build your own Media Console The pattern and instructions are here Ana also has instructions for the beginner and everything you need to know to get started here [...]
Media Console … (not verified)
Sat, 12/04/2010 - 19:46
[...] off with a link to the
[...] off with a link to the plans to build your own Media Console The pattern and instructions are here Ana also has instructions for the beginner and everything you need to know to get started here [...]
spiceylg (not verified)
Tue, 12/14/2010 - 04:45
I need a buffet for my dining
I need a buffet for my dining room. I'd make this taller for this use, but wouldn't want the open compartments. Can this easily accomodate adding doors/drawers? It would be my first build and I'm clueless!
Ashley (not verified)
Wed, 12/22/2010 - 18:07
Hubby and i recently got a
Hubby and i recently got a flat screen tv for our christmas present for each other. So a tv console is deffinatly needed. We have currently built the hyde coffee table so this would deffinatly go very well with that piece. We only want the base the hutch part would overwhelm the space. But, would it be hard to attach doors to it?? That way little fingers arent tempted to mess with expensive components.
Amy French (not verified)
Sun, 02/20/2011 - 15:09
Quick question- where are the
Quick question- where are the detailed plans? The drawing isn't enough to get the depth of the box. The plans at the bottom of the page are for the Brookstone desk. This is the one I'd really like to build, but without more info I'm not sure how to do it.
Thanks!
telesis37
Sat, 08/06/2011 - 06:35
Shopping List Question.
Hey, Ana! I've been obsessing over this site since I found it 2 weeks ago. I'm in the process of setting up my garage work space and this media console is going to be one of my first projects. I downloaded the .pdf file and the shopping list calls for a 1x12 @ 6' but then it doesn't appear on the cut list or anywhere in the plans. Am I missing something? I do that sometimes, haha.
Geoffrey (not verified)
Fri, 12/16/2011 - 07:14
Media Console plans
Hi,
i stumbled across the plans to build this media console but can only find the instructions for the hutch. Is there anyway someone can send me a link or tell me where I can find the specific plans?
The link posted on this site just opens a pdf. with a bunch of symbols and letters.
Thanks all!
-Geoffrey
[email protected]
In reply to Media Console plans by Geoffrey (not verified)
spiceylg
Fri, 12/16/2011 - 08:12
Plans
Hi Geoffrey. You were at the right place. If you look under the title PDF, you have to click it to bring up the plans.
In reply to Plans by spiceylg
spiceylg
Fri, 12/16/2011 - 08:13
PDF
It's right before the first computer generated pic.
Geoffrey (not verified)
Fri, 12/16/2011 - 08:28
GOT IT
I just got it now! THANK YOU!
Apparently firefox and safari didn't want to open it, but Internet explorer worked fine!
mrlisk (not verified)
Sat, 12/31/2011 - 06:00
PDF
I can't get the PDF to download - I only have access to Chrome and Safari. Any thoughts? Other PDFs have worked for me on this site, would love to have this one to build this project for a friend!
NicolePowers
Thu, 03/08/2012 - 13:38
I cant download the PDF
I cant download the PDF either... HELP, i love this peice!!!!!!
NicolePowers
Thu, 03/08/2012 - 18:06
Okay, so i downloaded the PDF
Okay, so i downloaded the PDF but the instructions arent included in that.. i found the instructions for the hutch nut not the console. i would really like to build this.. can you please send me a link to the instuctions??? THanks
Guest (not verified)
Fri, 03/16/2012 - 16:00
detailed plans...
i can't seem to find the detailed plans either. the pdf is just a bunch of symbols. does anyone have the plans? thanks
In reply to detailed plans... by Guest (not verified)
claydowling
Fri, 03/16/2012 - 17:40
PDF Downloads
The PDF links don't work right here. If you right click and save the link, you'll save a working PDF to your disk.
JClarke (not verified)
Fri, 08/10/2012 - 06:10
TV Console Bigger
Is it possible to get the dimensions for one that is 75" wide?
claydowling
Sun, 08/12/2012 - 06:46
Making it longer
JClarke, you can probably make it longer by modifying the long top pieces, and the long parts of the shelf underneath. You might need to install an additional set of the smaller middle shelves to take up the slack. You can play with the width of that a little bit to make it work out right. Measure the width of your audio/video equipment before you size the shelves though.
clcollins426
Mon, 08/03/2015 - 09:31
Questions about modification
Hi Ana, do you have the plans for the top half of this? Also, if I wanted to add doors to the sides of the bottom, what would be the easiest way to do that? Thanks for the help!
--Courtney
In reply to Questions about modification by clcollins426
Ana White
Wed, 08/05/2015 - 10:30
Hi Courtney! Take a look
Hi Courtney! Take a look here
http://ana-white.com/2010/07/tryde-media-console-hutch
MizT49
Tue, 10/27/2015 - 05:05
Tryde Media Console
Hi Anna
I have went over and over this plan trying to figure out where I would use the 1x12" that the plan calls for but it isn't listed in the PDF that I download for this build. Am I missing something or is this used for the top of console insteed of the 2x4 boards? if so do I still need to purchased them? I can normaly follow your plans very easly because they are so well designed but this one is throwing me...Thanks Anna