
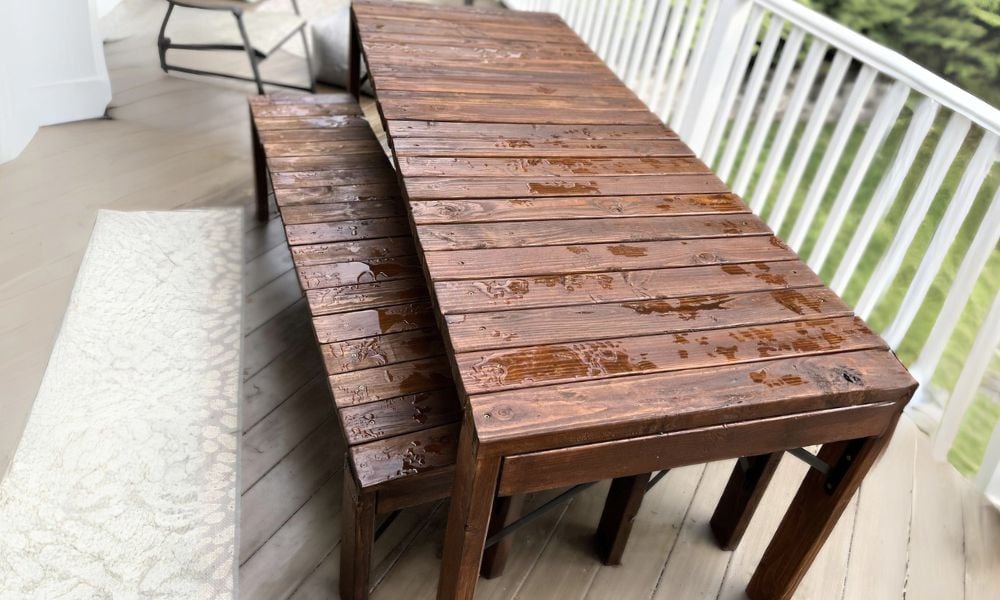

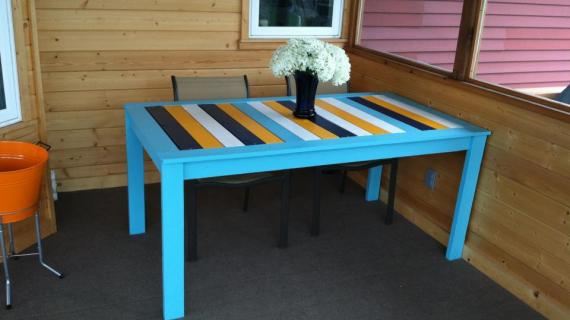
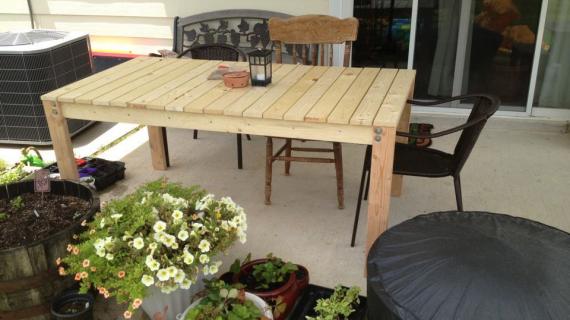
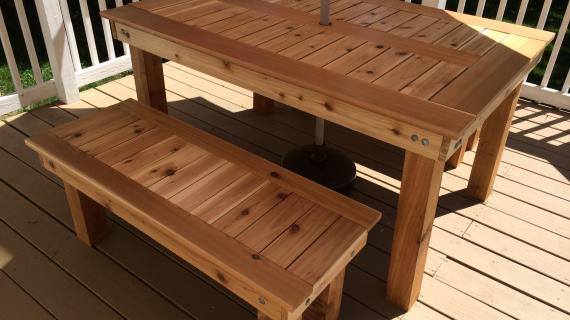
Build your own outdoor table! We love the simple styling and clean lines of this outdoor table. This simple plan requires no special tools and is beginner friendly! Build and enjoy this weekend! Free plans by ANA-WHITE.com
Preparation
- 4 - 2x4 @ 8 feet long (cut longest boards first)
- 5 - 1x4 @ 8 feet long
- 100 - 1-1/4" to 2" long - self tapping exterior screws (look for star bit ones)
- 25 - 2-1/2" long self tapping exterior screws
3 - 2x4 @ 56-1/2" - frame
2 - 2x4 @ 28-3/4" - frame ends
4 - 2x4 @ 29-1/4" - legs
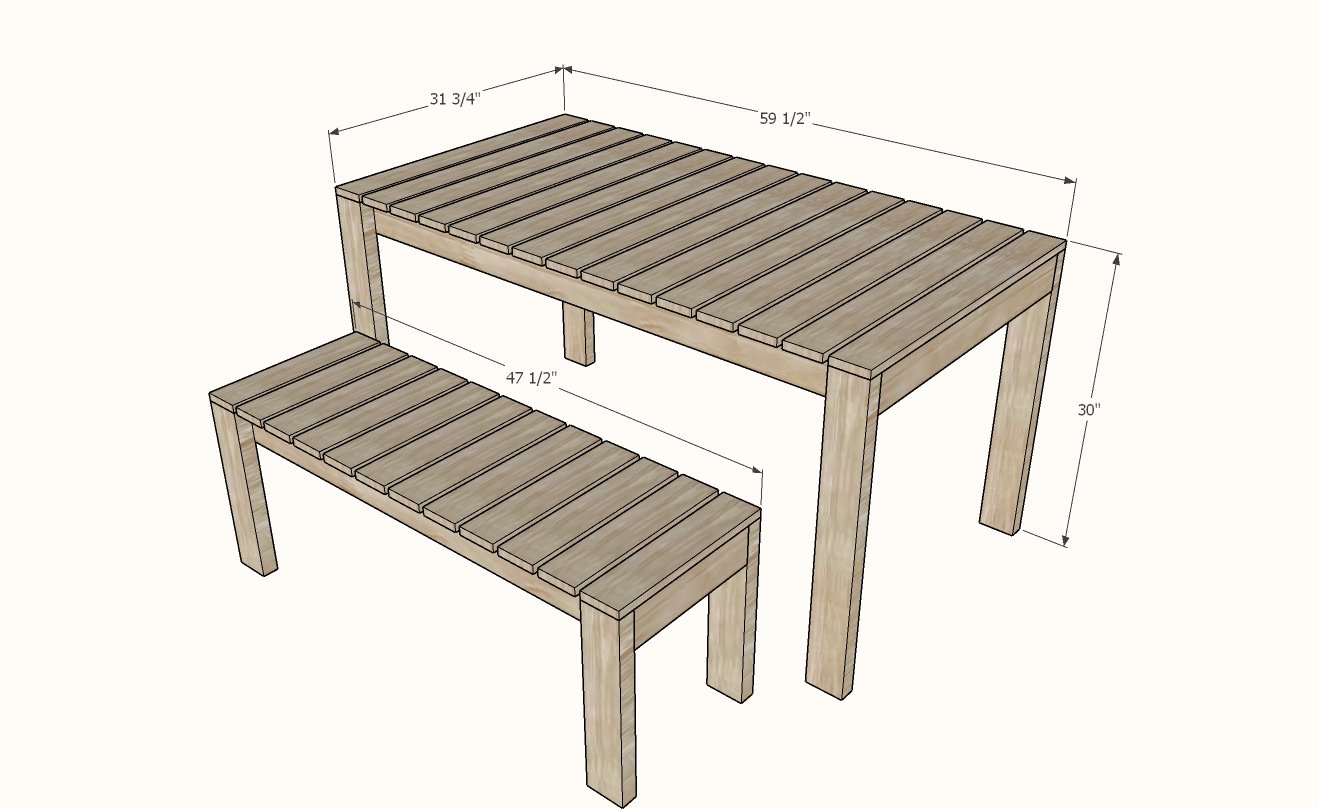
15 - 1x4 @ 31-3/4" - tabletop boards


Instructions
Step 1
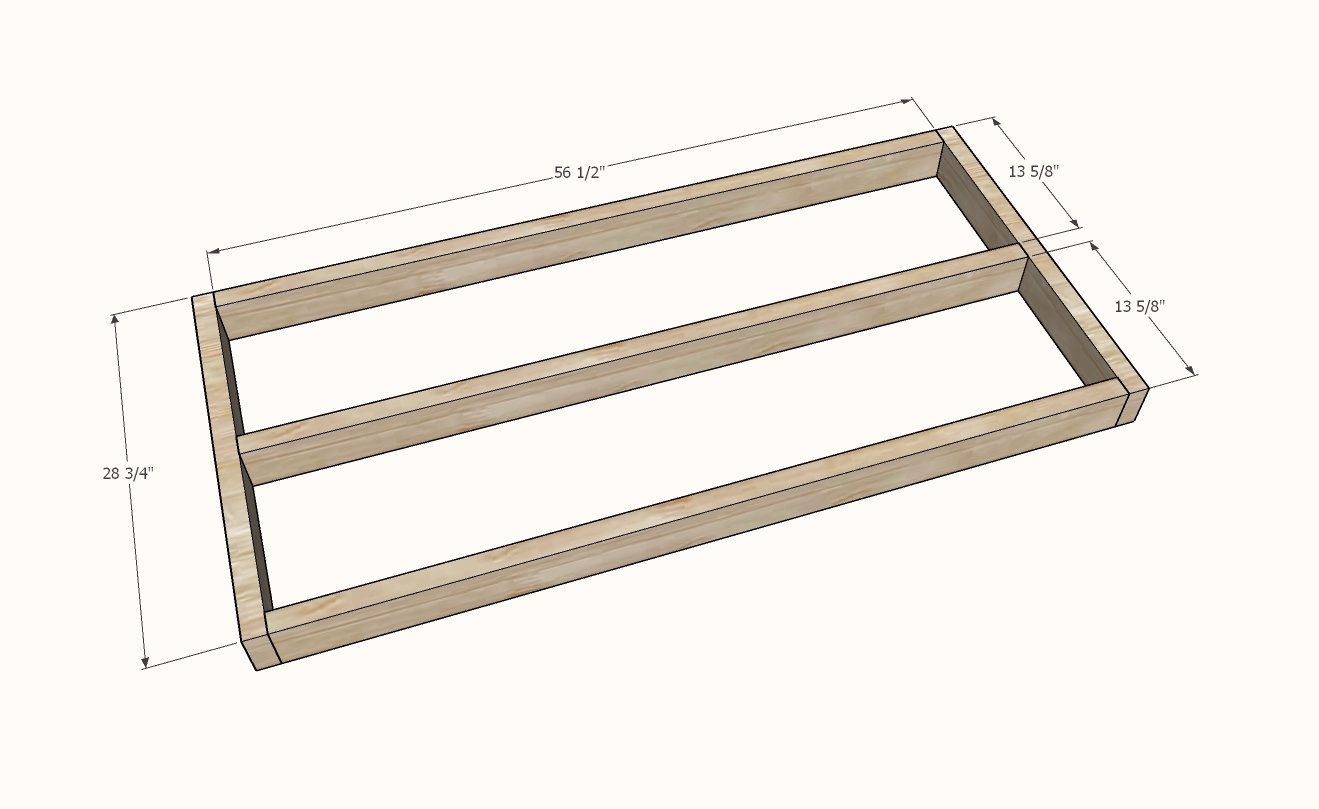
Build the frame of the table with the longer screws, two screws per joint.
Adjust for square by taking opposite diagonal measurements and adjusting until the opposite diagonals match.
Step 2
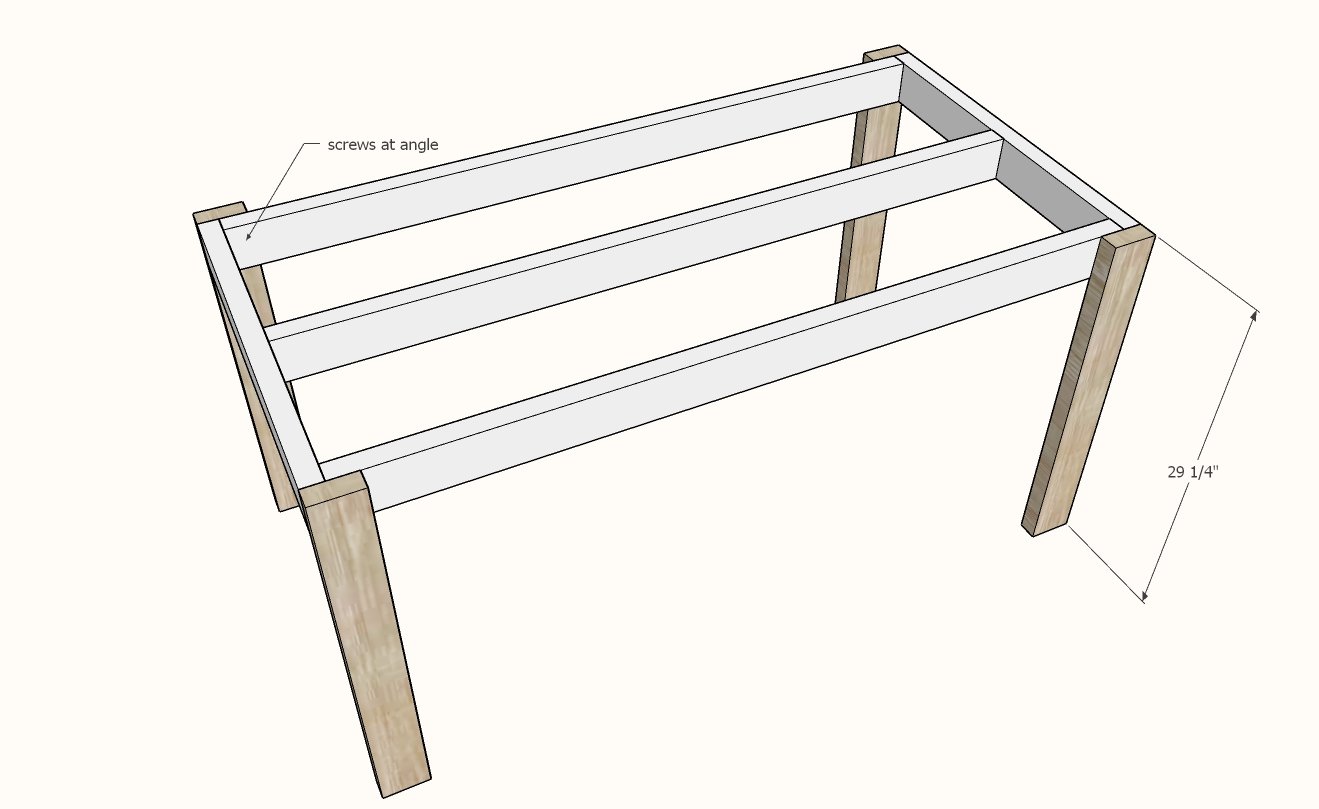
Attach legs to the frame (will be easiest upside down). Multiple screws at an angle into the legs will be stronger than screws straight on.
Step 3
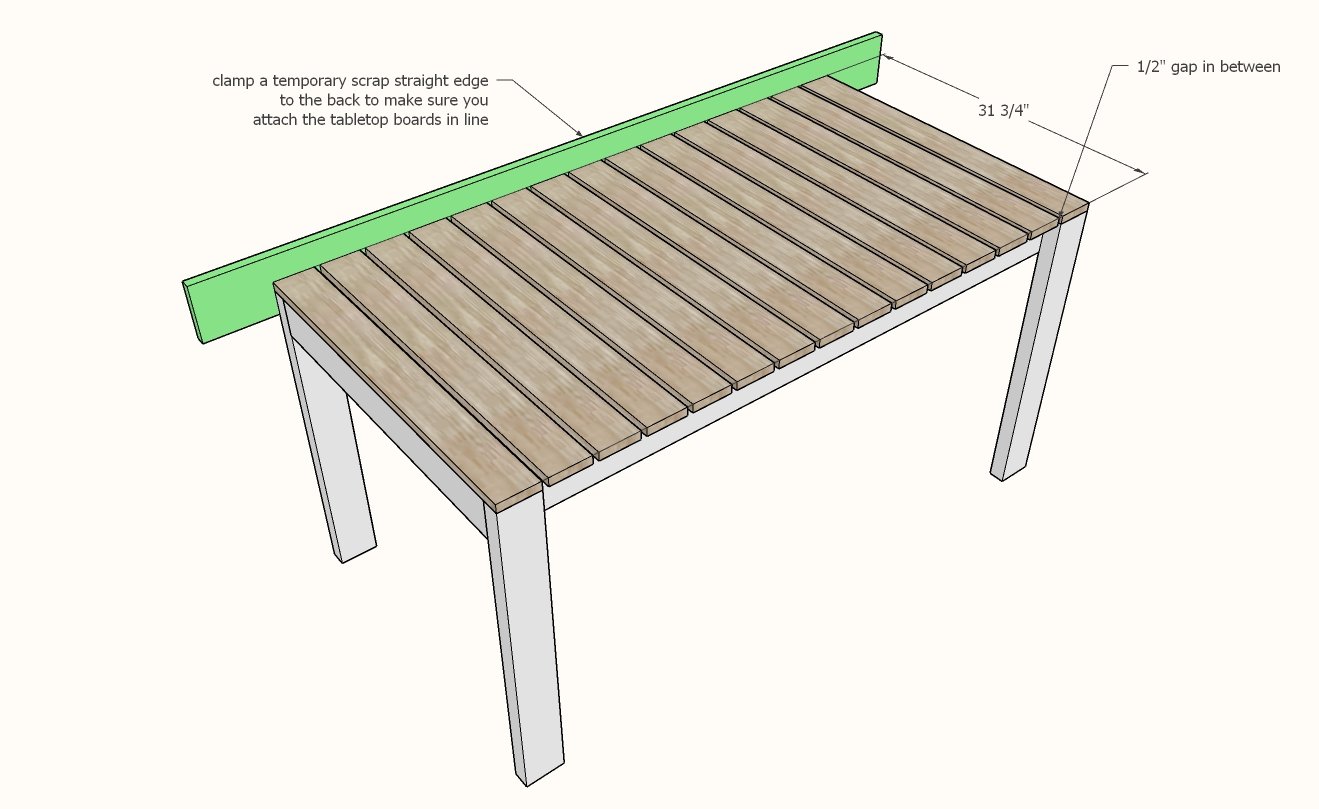
Clamp a straight edge to the outside of the table and lay out the tabletop boards with a 1/2" gap in between. Screw down with the shorter screws.
For the end boards, screw to the end of the frame too - this will add considerable strength to your table.


Comments
The Schulze Fam (not verified)
Thu, 04/22/2010 - 20:13
You are seriously my hero!! I
You are seriously my hero!! I found your blog a few weeks ago and have (like everyone else) been addicted! I've already made a few shelves and every week my list of wants gets bigger.
I have been wanting to get into woodworking for years but have always been to intimidated to get started till I found your blog. I'm in heaven, your plans are so easy to follow.
My husband and I most the year are living pay check to pay check so the possibility of getting fancy furniture was next to zero. Now I'm so excited to be able to learn a new skill and frunish my house with all I could ever want.
Thank you so much!
p.s. My next project is the stackable chairs and who know maybe this awesome table to go with!
Missing RMP&B … (not verified)
Fri, 04/23/2010 - 03:13
Just a quick tip - for
Just a quick tip - for outdoor tables, stain all boards before assembly. This will help ward off any warping and mold. Also, when you are laying the boards across the top of the table, make sure the grain on the board alternates up and down. By looking at the end of the board, you will see he grain direction in the shape of a "u". The "u" can be up for the first table-top board, and down for the second. This will help your table stay relatively flat as the boards expand in the wet and the sun.
I learned all this the hard way after making my first outdoor table (not with Ana's plans).
Great plans - I LOVE YOUR SITE!
Priscilla (not verified)
Fri, 04/23/2010 - 04:52
I LOVE YOU!We just built a
I LOVE YOU!
We just built a deck and you've inspired me to build my own furniture!
heather (not verified)
Fri, 04/23/2010 - 06:28
Wow! I love it. I am dying
Wow! I love it. I am dying to make it. Thanks, Ana!
Lisa Roszler (not verified)
Fri, 04/23/2010 - 06:46
Ana, wow, you just cannot
Ana, wow, you just cannot realize how much you empower and inspire all of us. Bless you!
Flipperdelph (not verified)
Fri, 04/23/2010 - 07:09
I absolutely love your blog
I absolutely love your blog !!! Amazing what you can do, how creative you are ! I just bought a saw (a small one though...), I have a drill, I am ready to soon start my firat project !
I have a request for you, even though it probably is insulting to your talents...:could you post some plans for wood plant pots to match these great table and chairs? Thank you soo much !
artkdz (not verified)
Fri, 04/23/2010 - 07:48
I love this plan - really
I love this plan - really simple. Just a question - what's the best kind of wood to use? Would we use pressure treated wood since it's outside or do we need untreated wood since it would be around food, etc.? Cost is also, of course, an issue.
The Trees (not verified)
Fri, 04/23/2010 - 15:48
Ana, I love love this patio
Ana, I love love this patio set design. I just finished the picnic table and this will be project #2. I wanted to echo another comment in requesting a planter box in the same style, also realizing how rediculously simple that probably is. Maybe I should just give it a try :)
Thanks for taking the intimidation away from this craft, you make it totally doable.
Susan (Between… (not verified)
Fri, 04/23/2010 - 18:37
Ana...this is great! Love
Ana...this is great! Love the look! One of these days I'm going to build one of the great projects from your site. In the meantime, I'll just stop by and be amazed at your talent and skill!
Susan
Dayna (not verified)
Sat, 04/24/2010 - 10:25
I just priced the cost of the
I just priced the cost of the wood with the cedar that is on sale at Mendards this week for the table and two benches. (they didn't list 1X3 so I just used the 1X4 price for all the bench pieces...just for an idea). $116.14 for the set.
Tasha Roe (not verified)
Sat, 04/24/2010 - 15:25
can i just tell you that i
can i just tell you that i love you!
i mean it. i love you!
we were pricing tables, chairs, and benches for under our covered patio and they STARTED at $700. not going to happen. this is seriously a dream come true!!
thanks so much, Ana!!
Erica (not verified)
Tue, 05/11/2010 - 02:57
I just finished building this
I just finished building this table and matching benches as my first woodworking project ever! They came out looking great, and we got to have our first meal on them on Mother's Day.
My husband has been a hobby woodworker for 8 years, so it was wonderful to build something too. I did this set all by myself, and now I have the confidence to build other projects.
Thank you Ana!
Jeannine (not verified)
Wed, 05/12/2010 - 10:21
If I wanted to adjust this
If I wanted to adjust this plan to make this a 10' table (and matching benches) would I need extra support and if so where. We have a large deck on the top of our "boat house" at our lake, and I want a big long "farm type" table for up there. This looks simple but I need it quite a bit bigger.
Guest (not verified)
Mon, 06/06/2011 - 11:55
10 ft table
Jeannine,
How did your 10 ft table turn out? Any suggestions?
Joe
In reply to If I wanted to adjust this by Jeannine (not verified)
claydowling
Mon, 06/06/2011 - 12:08
Added support
Ana's suggestion of using 2x4 might work, but I think you'll get a better strength for weight tradeoff if you use 1x6 instead of 1x4 for the long stretchers. Wood resists flexing the most across its width. It's also imperative to pick wood without dead knots (the dark brown, resin-filled ones). Any knots should be roughly the same color as the surrounding wood. This is sometimes referred to as Furniture Grade lumber and you'll pay a premium for it. You'll get a big payoff in strength though. Dead knots always fail under load.
Ana White (not verified)
Fri, 05/14/2010 - 07:32
Jeanne, you would probably be
Jeanne, you would probably be fine, but if you wanted to beef up your table for a longer size, you could use 2x4s instead of 1x4s for the supports and aprons. Your cut list will change, but since you are already making it longer, you are going to be modifying anyways. I think it will be gorgeous! Can't wait to see pictures!
artkdz (not verified)
Sat, 05/15/2010 - 14:12
question from a newbie.
question from a newbie. Should we stain the wood before or after we build the table? If before, what do we do about areas that we sand, holes that are filled, etc.? We've got our wood - got some Cypress so it'll be nice outside - and it's all cut and ready to go.
Tracey (not verified)
Mon, 05/17/2010 - 14:09
Thank you SO SO SO much. I
Thank you SO SO SO much. I have been scouring the world looking for a huge wooden table, and I actually think I can make this one! I love it!
Also, Jeannine, just an idea, I think we're going to make 2 smaller tables (60 inches long each. We also want a long table, but decided that 2 small ones would be more versatile, since they could be placed end to end or side by side to make a large square.
I am so excited to make this and complete the patio of my dreams!
BloggingKitty (not verified)
Tue, 05/18/2010 - 13:40
I bought the wood for this
I bought the wood for this project but haven't started because I don't know if I use the interior conditioner and stain I already own and apply several coats of outdoor-strength varnish or buy the wood conditioner and stain specificaly made for outdoor use?
I'm tempted to use what I already have to save money. What do you guys/gals think?
Chris (not verified)
Fri, 05/21/2010 - 06:07
To make this with the 1/4"
To make this with the 1/4" gap you instructions state make all aprons 1/4" shorter.
Is this correct or did you mean just shorten the side aprons. I do not see why this would change the end aprons length.
Ana White (not verified)
Fri, 05/21/2010 - 06:20
sorry, yes just the side
sorry, yes just the side aprons! Thanks for catching this.
wazlo21 (not verified)
Sun, 05/23/2010 - 19:04
Thanks for the great site! I
Thanks for the great site! I have been looking at purchasing a Kreg jig and after reading the directions I have a question. In a couple of the steps it says to attach two 3/4" pieces together using 2" screws. From reading up on the Kreg jigs, it looks like one should use the 1 1/4" screws. Is there a way to change a setting on the Kreg jig to keep the longer screws from poking through?
Kathy (not verified)
Tue, 06/22/2010 - 19:18
I LOVE this table and had the
I LOVE this table and had the same question about making it larger so I took your advice for the extra supports from 2x4's and made a 10ft table. I love it! It has a few flaws but I painted it black so really, no one will notice. I have a picture but don't know where to post it.
Chantelle (not verified)
Fri, 07/09/2010 - 06:28
Thanks so much for these
Thanks so much for these plans Ana! My husband and I built this table last night (using MY tools) and it turned out great!! It is even sturdier than I expected. We took your suggestion and bolted the legs so that they can be removed for easy storage in the winter. Thanks again :)
Gonna Be Sitti… (not verified)
Mon, 11/15/2010 - 17:35
[...] out what kind of table
[...] out what kind of table and chairs to put out there. Hubby wants to build a table like this one on Ana-White or find one like it. I actually did find a Pottery Barn table quite similar this weekend on [...]
Guest (not verified)
Wed, 04/06/2011 - 06:20
PB Potting Bench
Good morning,
I'm new to the website, found it searching in the wee hours of the morning and couldn't get off!!! About to go to the hardware store and start my first project. Wish me luck that I have all my fingers when done!! I was wondering if we could submit ideas and possibly get feedback? There is a potting table in PB that caught my eye and I was going to attempt it on my own, then I found your website and realized there is a chance that I could do this. It's called the Abbott-Zinc-Top Island. I realize that the top is an issue and that could be modified. I would love to have your input on this if possible. Thanks!
marlaandwilliam
Tue, 05/03/2011 - 09:26
Palette-worthy?
Ana - could this be made out of found palettes??
In reply to Palette-worthy? by marlaandwilliam
claydowling
Tue, 05/03/2011 - 10:28
Pallets
It could definitely be made out of pallets. You might want to invest in a plane to make the surface less likely to chew your arms and hands up though. A lot of pallet wood is pretty rough. A belt sander could also work, but the plane will be faster.
FRANK H (not verified)
Thu, 05/12/2011 - 07:24
RUN BOARDS LENGTH WISE?
What about running the boards length wise. Any issues with just changing the direction of the support boards and then the running the tabletop boards length wise. Not sure how that would affect the aprons, if at all??
pamcaeks908
Sat, 05/28/2011 - 12:17
Super Excited!
I am in LOVE with this site! I have been bugging my husband for a few years now for patio furniture. We usually get the hand me down stuff from family. I am a SAHM and with one income it is next to impossible to afford new furniture, indoor or outdoor! I just showed him these plans and we are EXCITED to build our own. I'm sure our dinners on the patio will be that much more enjoyable, knowing we are sitting at a table we built ourselves! Thank you so much Ana- We look forward to building many things, thanks to you!
Buffy (not verified)
Tue, 06/28/2011 - 11:10
Could this be built with
Could this be built with composite lumber that would be maintenance free? Has anyone tried it?
JeniDavis
Fri, 07/08/2011 - 14:04
I need help!
Im going to build this table as a surprise for my husband for our anniversary. Here's my issue though. My patio is 13' x 13' and this table is a little too big for my space. I was thinking of reducing the size down to approximately 4' x 4' but because this will be my first time building anything I am unsure how to do so. Can anyone help me with a new list of cut sizes please?!
Connie (not verified)
Fri, 07/15/2011 - 09:09
Outdoor Dinning Table
I would love to build my own outdoor dinning table, but can you please provide me with the cut list & shopping list for an 8 foot long dinning table. Would really appreciate it. This is my first project, so I want ti to be perfect. I will send you a photo when I'm done. I am really excited to get started.
Thanks so much, I love your website.
Connie
Toronto
iheartglamour
Fri, 07/22/2011 - 11:22
Plan for larger table
Hi-
Does anyone have the plan to make this larger, say seating 10 or 12 people? I read through the comments, but don't quite get how to adjust it (not super saavy with building). I need it spelled out.
Just discovered this site and am obsessed. Thanks so much for it.
Guest (not verified)
Thu, 09/29/2011 - 06:27
Larger Table
I would also love a plan for this table that sat 8-10 people. would we need an additional support in the middle? Thanks!
garret moosman (not verified)
Mon, 10/31/2011 - 09:46
Where is the plans for the
Where is the plans for the chairs...
Jason! (not verified)
Wed, 03/14/2012 - 16:22
This is beautiful
this looks like a great table, I Look forward to buying all of these things. I'll finally be buying my circular saw this weekend then proceed to Lowe's to get my supplies. This table looks great, I was wondering you should try to post some type of Circular table thats taller, and can seat 4 in the same type of wood gap material. I know it's really popular, and if I could find plans to make one I would. But the circular wood would be quite a trick that I don't know yet.
Joe C (not verified)
Thu, 03/22/2012 - 19:19
So easy
I'm relatively handy, and I own a compound miter saw that doesnt get much use... this project was so incredibly easy - I'll be building MUCH more. The plans and cut list make this dead simple. This was surprisingly fast to make also.
I used pine from home depot (not premium) it was about $70 in wood.
For a beginner, I'd love to see details on exactly where to put the screws and how many. I dont have a kreg jig, and I haven't fastened my top boards yet - how should I do it? two screws on each support beam? so 8 per board? or is that overkill?
And I dont know about anyone else or how this is even possible - but I think this plan is short one 1x4 board.
The plans call for:
"5 – 8′ – 1×4 (Supports and Aprons)"
So four boards could be cut to:
4 – 1×4 @ 64 1/2″ (Supports)
(with 32" waste on each)
Leaving you with only one 96" board to get all this out of:
2 – 1×4 @ 32 1/2″ (End Aprons)
2 – 1×4 @ 60 1/2″ (Side Aprons)
What am I missing?
Tableguy (not verified)
Tue, 07/31/2012 - 11:02
Agreed
Yeah, I had to buy an additional 6 foot 1 x 4. But maybe I'm just bad at math;)
JODY FRIEDMAN (not verified)
Thu, 08/16/2012 - 20:08
Table - Ana White
Hi Joe,
What did you find out about this?
Did you screw in 8 screws to each table top plank?
if so, how did you hide the tops of the screws that were showing on the top of the table?
i'm considering buying a Kreg for this, but it seems I'm stuck using the Kreg screws only?
any help is appreciated thx!
Joe C (not verified)
Fri, 08/17/2012 - 06:37
Kreg needed?
Hi Jody,
I did not screw from the top, my handyman suggested against that and I'm glad he did. I screwed in from the bottom. I did not buy a Kreg jig either. All the kreg does is helps you angle your drill precisely. I chopped a couple of little blocks and built my own jig. Just something to hold the angle consistent - but halfway thru it- I had the angle down pat and didnt need it. The Kreg is expensive, if you can afford it - go for it - it will make it easier. If you're crafty and handy you can work around it.
If I were to do it again I'd figure out how to do all that with the table upside down, perhaps building a brace of some sort - equally spacing out the top boards is challenging - i used some spacers - but after a few boards the fraction of an inch differences add up - so in the end I made lots of eyeball adjustments - but it all came out great.
So... some other things... when I was building this, I had it out on my back patio, with the plans and everything all laid out. I had a handyman at my house a few days doing other work. He offered to help me if I needed it on the patio (he was more interested in fun carpentry than hanging drywall). Anyhow - he told me one day that he was looking at the plans and disagreed with some things. For one, he suggested some corner braces, he pointed out that there was nothing to prevent twisting. So I very simply cut a couple of scrap pieces into small triangles and screwed them on the inside corners - it helped alot. The other thing I would do differently, is add a second board to each leg. The boards used for the legs are pretty thick - so there isnt much flex to the boards themselves, but since they are all fixed in one direction - another board perpendicular, (hard to describe) so the legs look like an L shaped piece of molding standing on its end.
Feel free to contact me with other questions.
Here is my finished table: http://i45.tinypic.com/1z4frf8.jpg
GnomeKing
Sat, 12/14/2013 - 20:56
Using scraps you can do it as listed
You only need 17 tabletop boards. These are about 3' each so you get 4 out of each 12' board. That means 4 of the boards will be cut into tabletop pieces and only one tabletop piece will come from the last 12' board. So you use the last 8' board to get one side apron and end apron and the 9' left over from the 5th 12' board to get the other side and end apron.
Guest (not verified)
Fri, 03/23/2012 - 15:30
wood...
What kind of wood should be used for this project? Would love to do it but need to price it out. What kind of wood did you use?
Thanks!
Lori N (not verified)
Fri, 03/30/2012 - 18:52
Love the table, have the pcs cut, concerned about stability
I love this table and have everything ready to begin construction. We are concerned that the legs are not going to be sturdy enough if someone were to lean on or push into it. The 2 x 4 leg only goes into a 3/4" thick board. We purchased 1/4" carriage bolts so that we can remove the legs for storage. Wondering what others might have done to add stability to the underside for the leg support.
In reply to Love the table, have the pcs cut, concerned about stability by Lori N (not verified)
windjamer812
Fri, 03/30/2012 - 22:13
Table Leg Stability
You can simply add a cross member (2" x 4") in between the legs at the ends of the table. For added support run another cross member the length of the table between the aforementioned supports. These could all be attached using bolts as well which would allow you to remove them for storage.
Tonya Tuntevski (not verified)
Tue, 04/10/2012 - 10:49
How to secure the table top
I'm a newbie but this looks pretty straight forward. The only question I have is when you secure the boards on top to the supports and apron how does it work with 2" screws? If you're using a 1 x 4 I know it's really not a full 4" but still a 2" screw isn't going to go through the support and partial way through the table top board. Are you screwing them in on an angle?
Tsu Dho Nimh
Thu, 04/12/2012 - 08:46
Straight down!
They are fastened down through the table top into the crosswise supports and apron. I assume they are countersunk. The screws would be visible, or you could use wood filler.
Visible brass screws look good in outdoor furniture.
Jessica W (not verified)
Thu, 04/12/2012 - 17:08
Kreg
Use a Kreg Jig for better stability and to hide those screws!
Jessica Renee (not verified)
Tue, 05/29/2012 - 12:01
A 1x4 is typically 3/4"
A 1x4 is typically 3/4" thick. So, once you get the screw (put in straight down/square) through the table top board you'll have another 1 1/4" that will secure the board into the support/apron.
If you aren't using a Kreg Jig, you'd be screwing from the top of the table down and not from the underside. I think that's where you might be confused, too.
Jessica W (not verified)
Thu, 04/12/2012 - 17:09
Kreg
I think you use the Kreg Jig for better stability and to hide those screws. I didn't know what it was before finding this blog, but it looks like a great tool!