
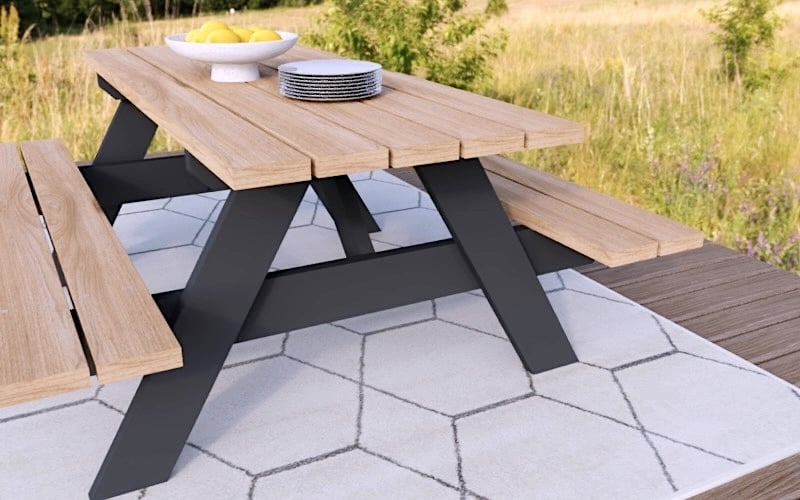

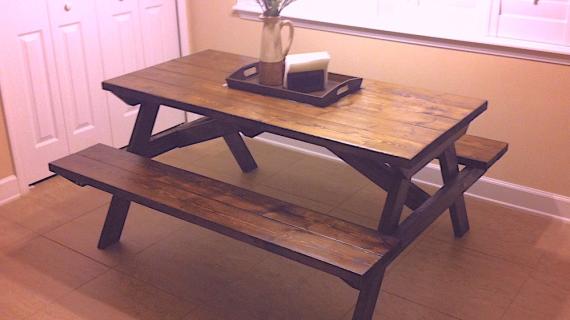
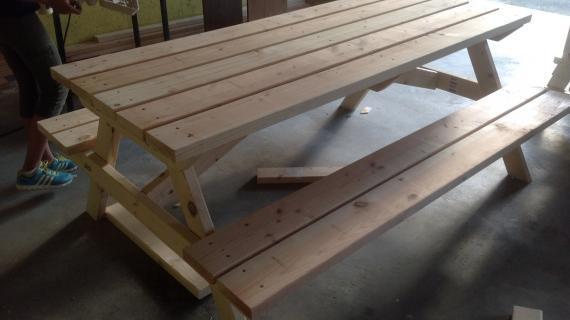
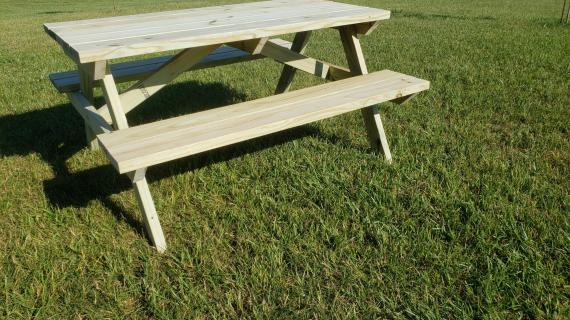
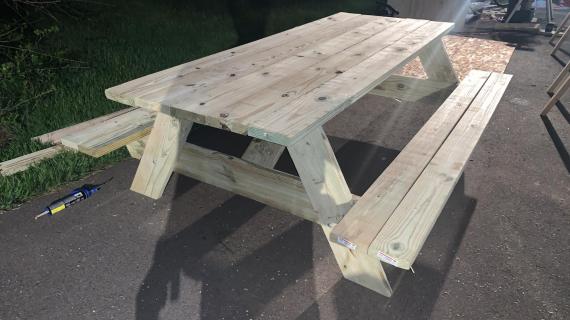
This is the easiest plan to build your own picnic table. This free plan includes step by step diagrams, well thought out steps, optimized use of materials and video tutorial.
This plan is designed so one person can build a picnic table.
Free plans with PDF from Ana-White.com
Click here to download free PDF plan for Ana White Easy Build Picnic Table
Picnic Table Plan Features
Building a picnic table should be easy AND attainable by one person. This plan is designed to be just that -
- Optimize the use of wood for less cuts, more table space
- Innovative building process makes building this table easy
- You can build this table by yourself - it's designed for one person to build
- Cost should be under $100 to build depending on local lumber prices
- This is a great outdoor project that has been built thousands of times by people everywhere!

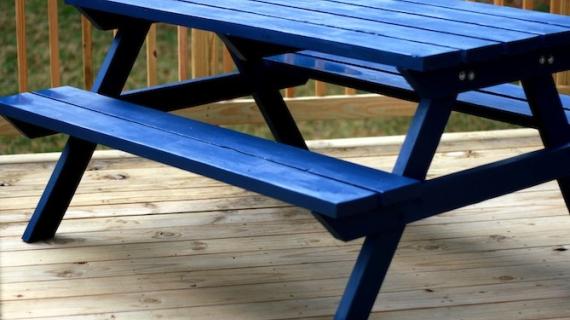
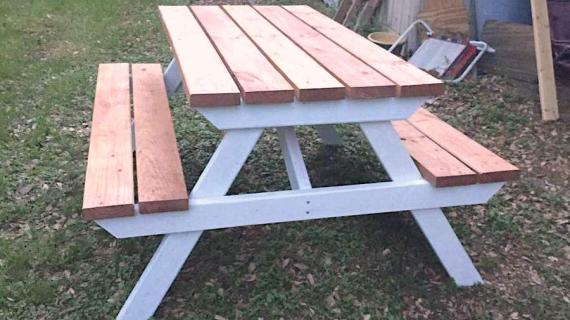
Big Kids Picnic Table Size Build photo submitted by Fethiye
Picnic Table In Different Sizes
We love building picnic tables and have several different sizes, all with free plans.
- 8 foot picnic table plans
- Big Kids picnic table (adults can sit at this table but it is smaller)
- Preschool picnic table (this is a lightweight version, suitable for preschool aged children)
What Wood Type Should I Use to Build this Picnic Table?
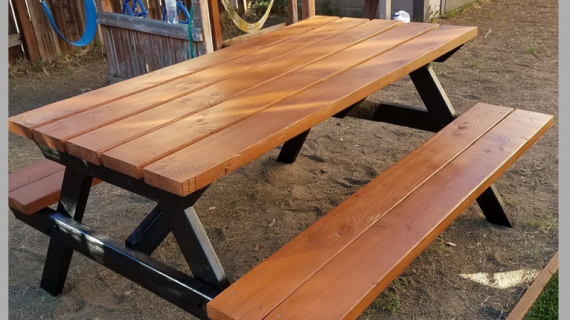
I recommend building this table out of Douglas fir or other outdoor appropriate materials that are popular in your local area for building decks. Painting or staining with an exterior appropriate finish and keeping up with the finish will increase longevity.
I do not recommend using treated lumber for the tabletop or seats (as these areas come in contact with food). A good compromise is to use treated lumber for the legs and supports, and untreated for the tabletop and seats.
How Should I Finish My Picnic Table?
The picnic table should be painted or stained how you would paint or stain your deck.
I recommend an exterior penetrating stain (can be opaque or semi transparent).
I do not recommend paint, as the wood will swell and shrink with the weather, and this will cause your paint to crack and peel. To get the paint look, choose an opaque stain.
If you'd like more information on finishing outdoor furniture, I share all my secrets here.
How to Build It - Ana White Picnic Table Video Tutorial
Watch this super quick video tutorial to help you visualize how to build this picnic table.
Here's Some Tips to Build Better Outdoor Furniture
What type of wood to use? What type of screw? How to finish the picnic table? All the details are in this video:
Or check out the written post below -
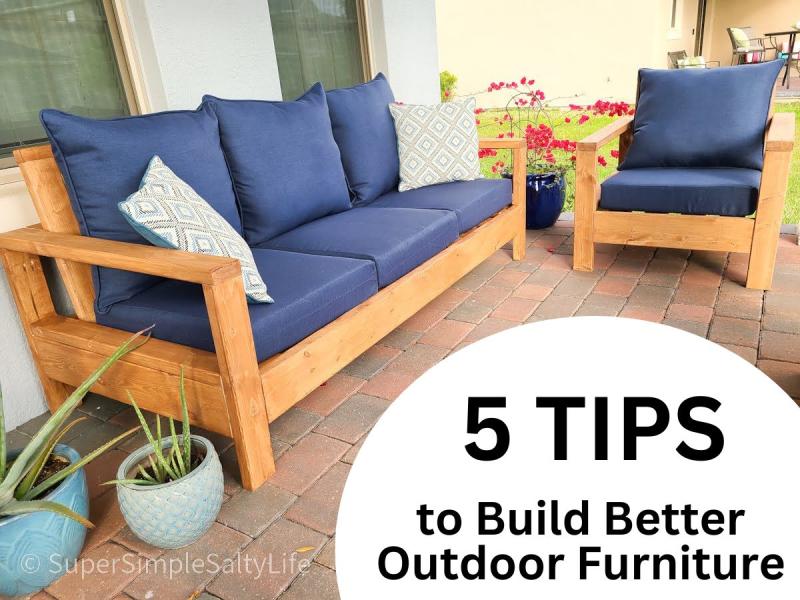
Want to build better outdoor furniture? Over the twenty years I've been building, maintaining, and enjoying my own outdoor furniture, I've learned a few tips that can help build longer lasting furniture.
Pin For Later!

Preparation
- 100 - 2-1/2" long self tapping wood screws, star bit, exterior appropriate
- 3 - 2x4 @ 8 feet long (can also be 92-5/8" stud length)
- 7 - 2x6 @ 12 feet long - cut in half for transport, use a circular saw and speed square to make accurate cuts
- 1 - 2x2 @ 8 feet long
TIP: Apply finish to the boards now, then after assembly, you will just need to touch up a few spots and cut ends.
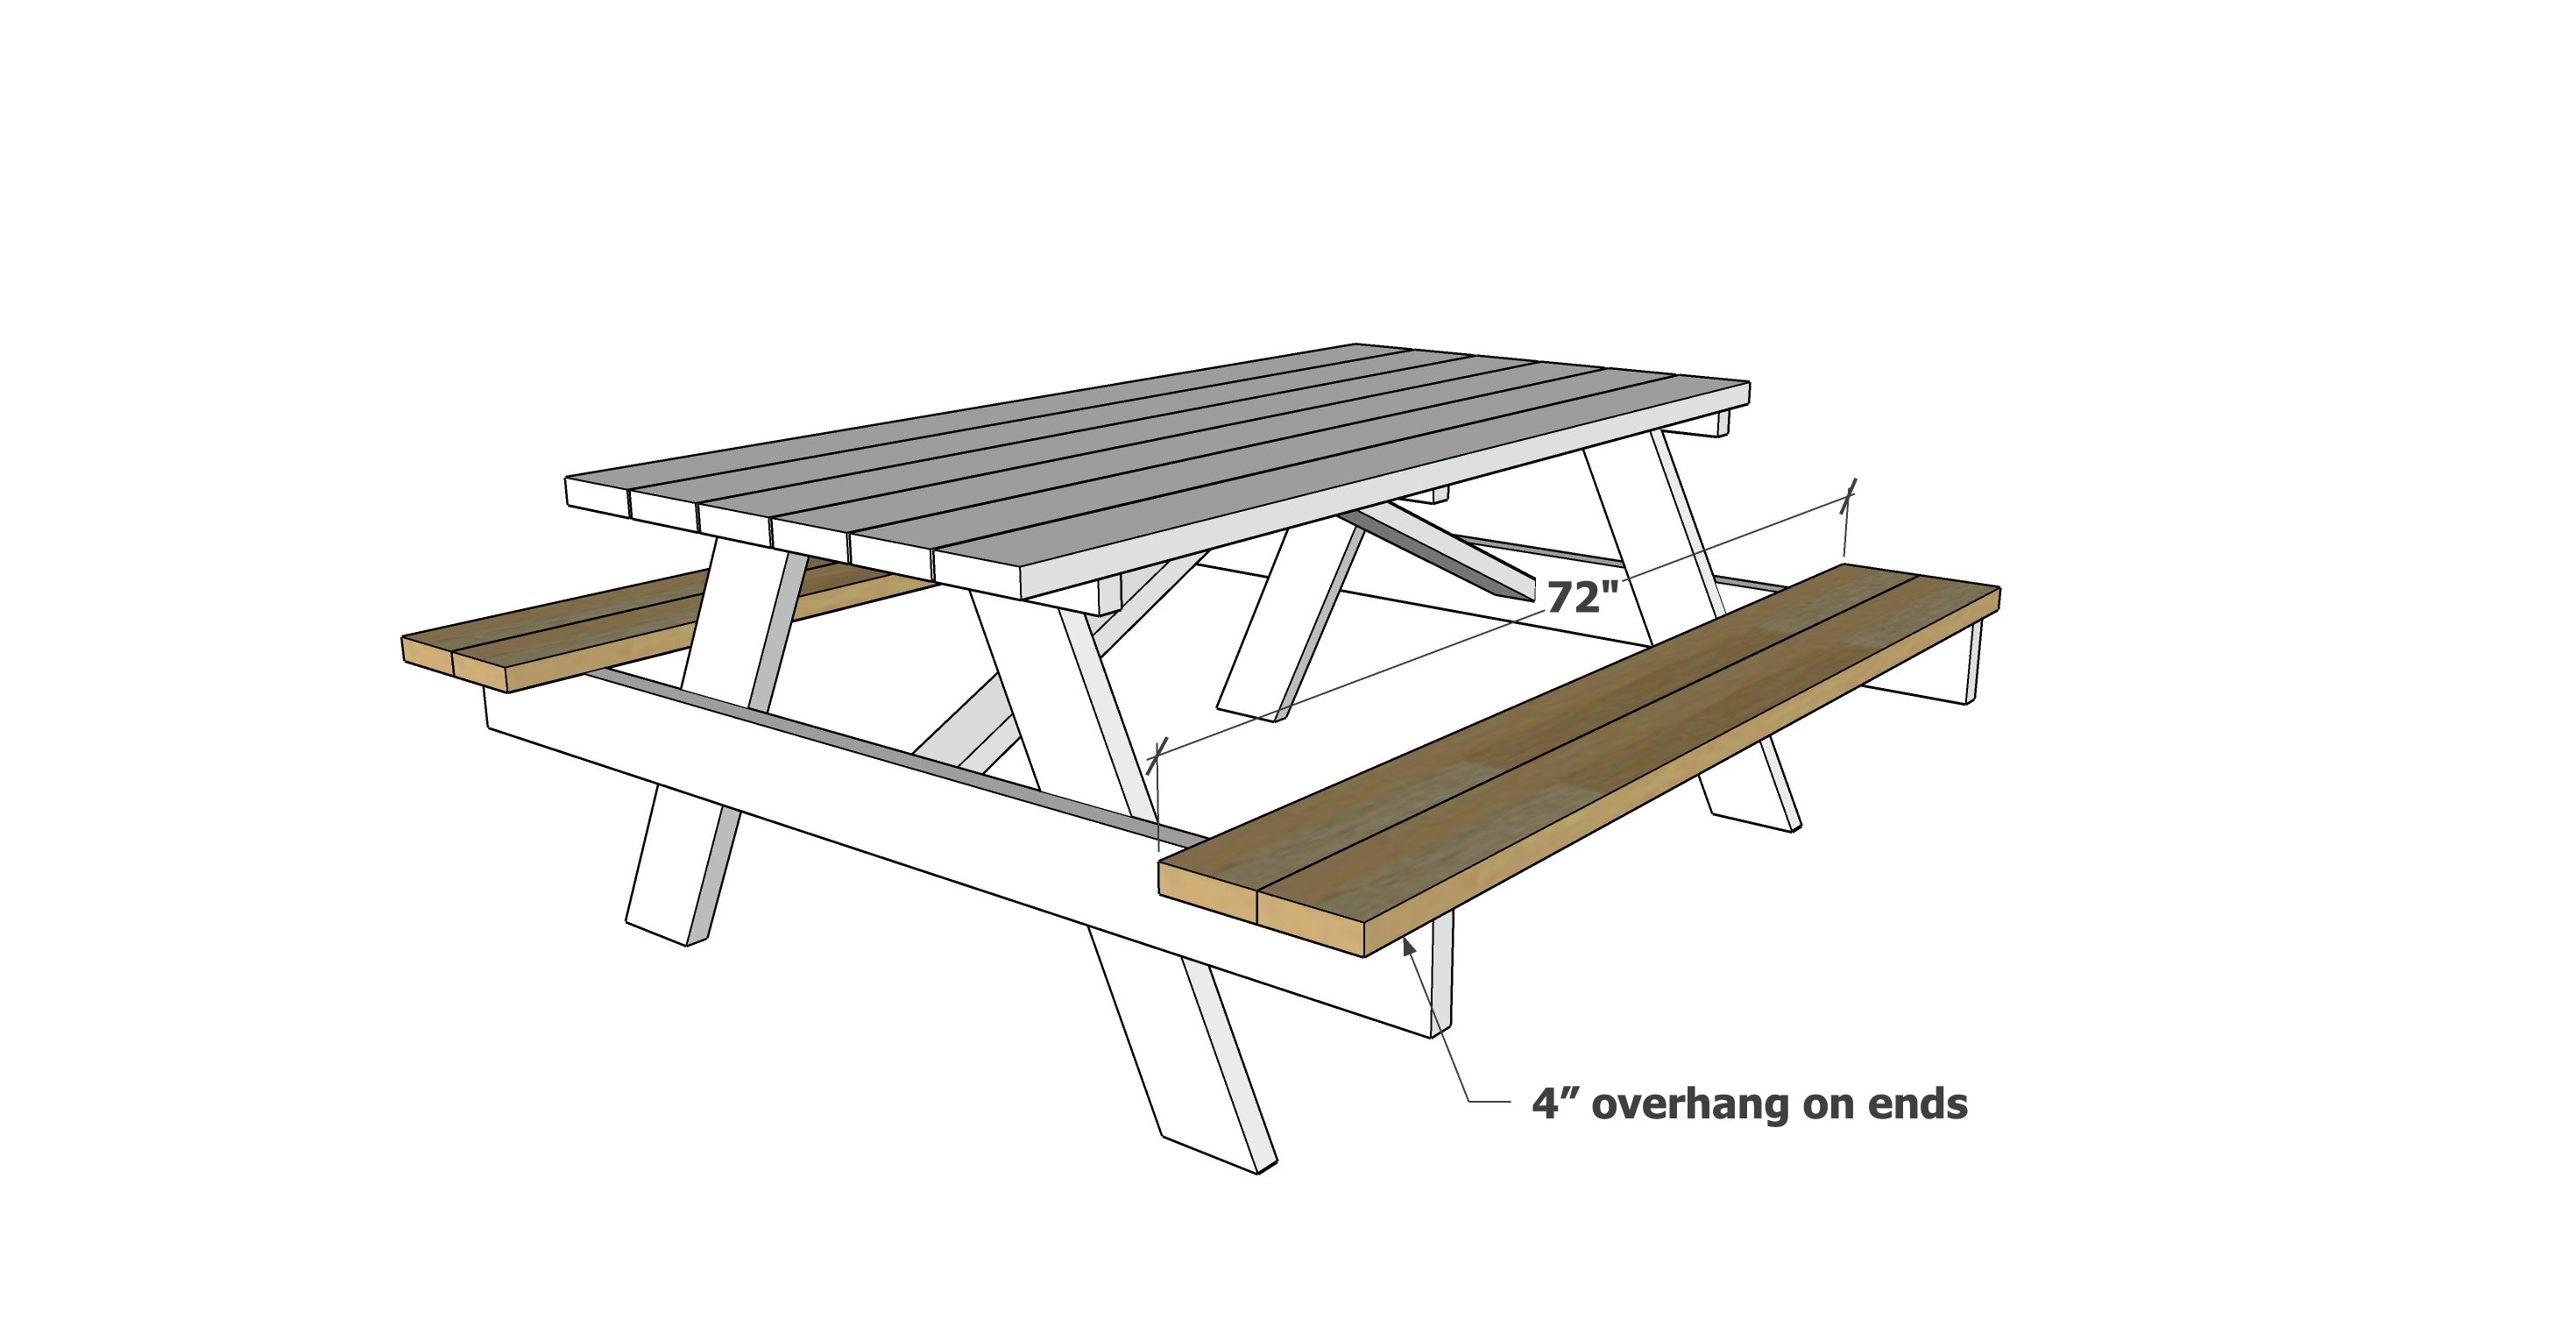
- 12– 2×6 @ 72″ (Tabletop boards, Seat Supports and Seat Boards)
- 2 – 2×2 @ 34-1/4″ (Tabletop Supports)
- 1 - 2x2 @ 27" (Center Tabletop Support)
- 4 – 2×6 @ 31-3/8″, both ends cut at 25 degrees off square, ends are parallel, long point to short point measurement (legs)
- 2 – 2×4 @ 32-7/8″, both ends cut at 25 degrees off square, ends NOT parallel, long point to long point measurement (Cross Supports)
- 2 - 2x4 @ 63" - under seat supports (not shown in diagrams, goes under seat to support the seat span)


Work on a clean level surface. Check for square after each step. Get some help on this project, it will be difficult to work alone. Recommended to paint and stain your boards before building to ensure all edges are sealed, then touch up paint after finishing. Use necessary safety precautions and equipment. Predrill and countersink you screws or drill holes for bolts and tighten with a washer and nut. Remember, you can click photos for a larger view.
Instructions
Step 1
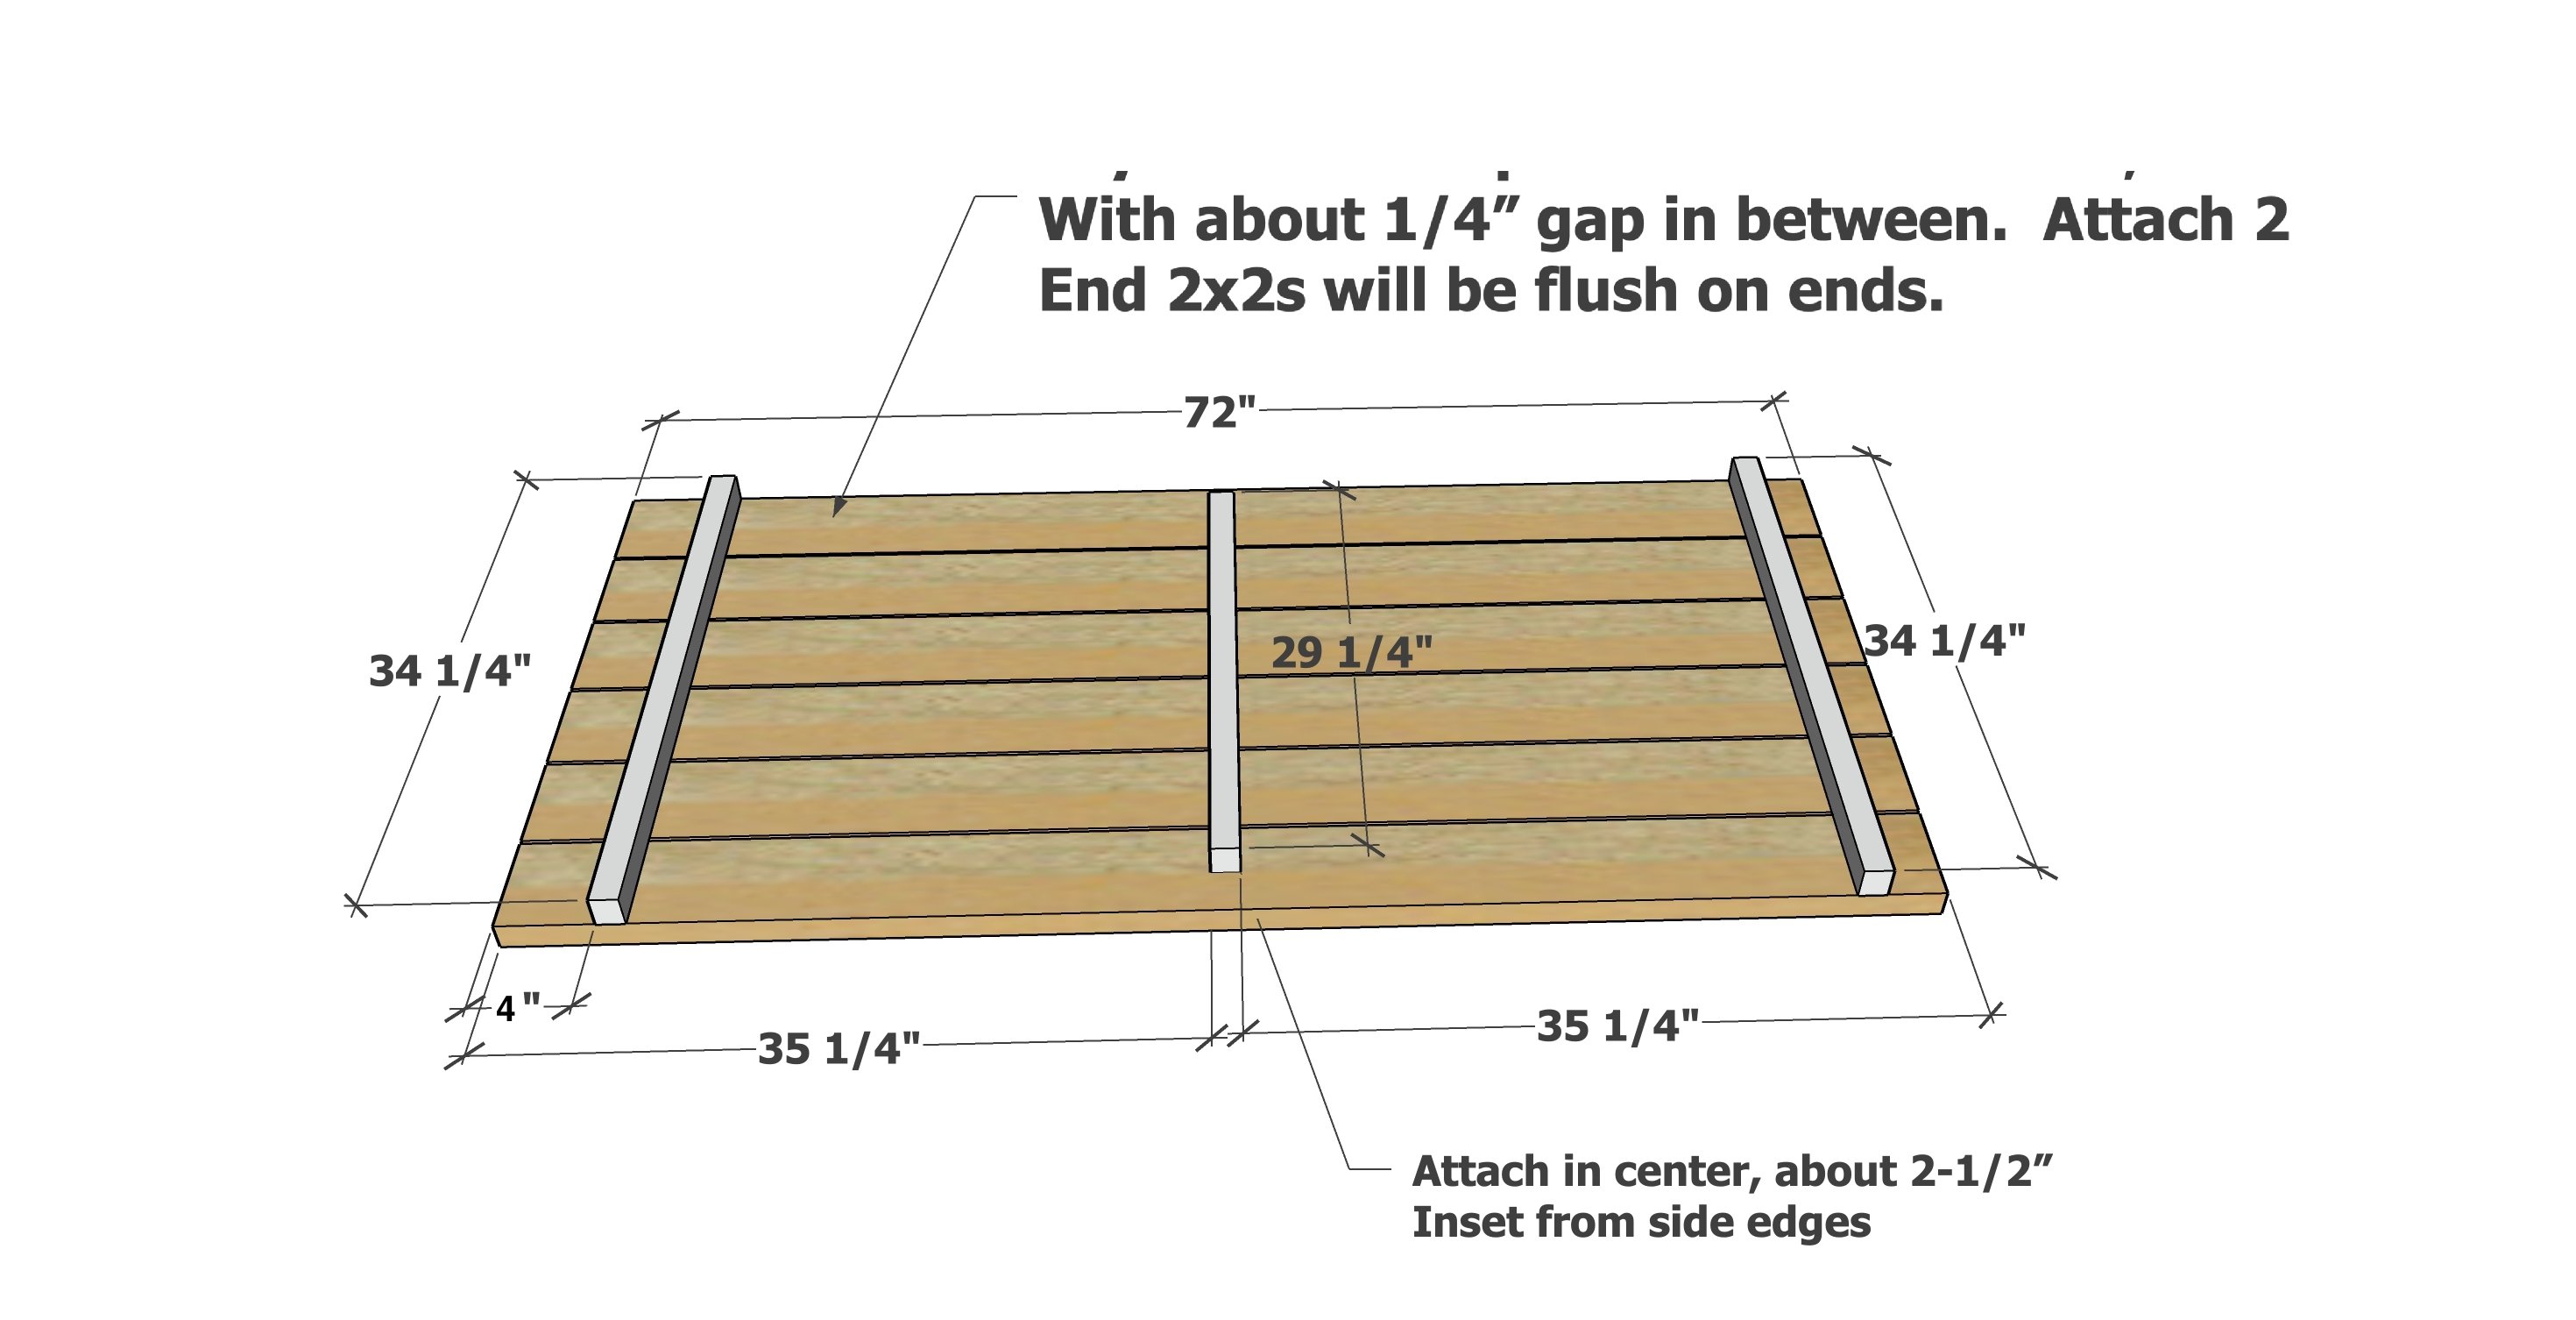
Tabletop
Lay the 2x6 tabletop boards out on a flat level surface. Check to make sure tabletop is square (not a parallelogram) by taking diagonal measurements and adjusting until diagonals match.
Attach the two longer 2x2s, 4" from the outside, to the tabletop, with 2-1/2" self tapping screws. The gap between is about 1/4".
Attach the shorter 2x2 to the center as shown.
Step 2
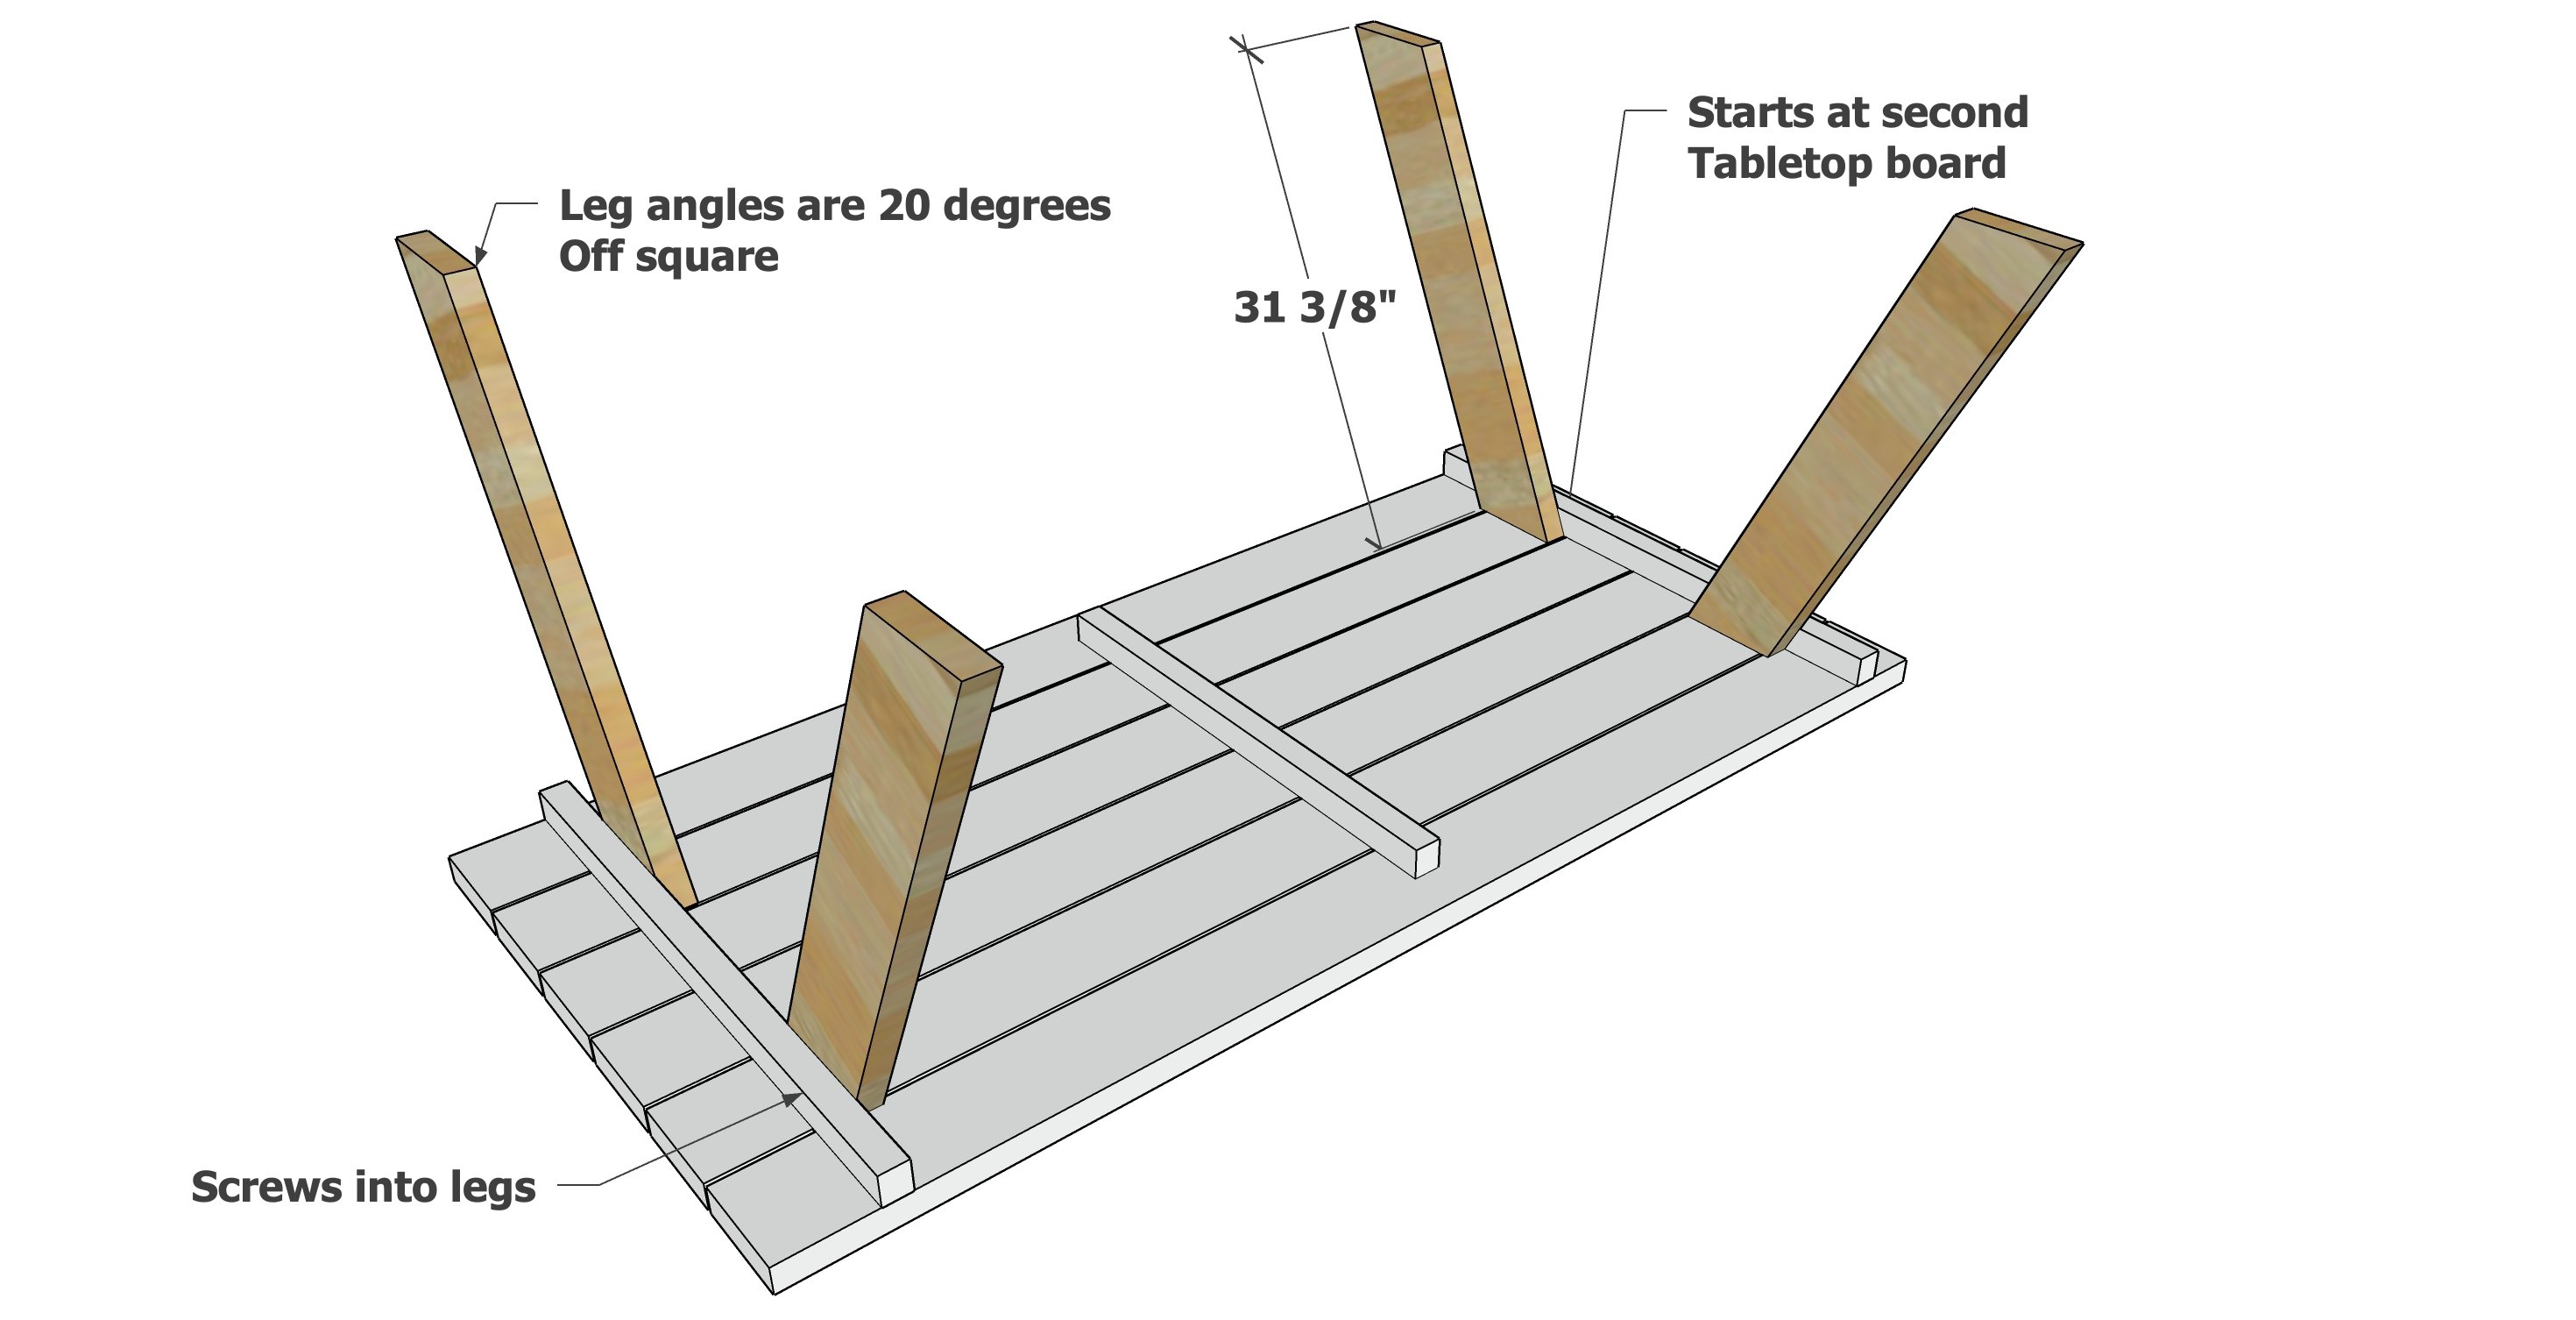
Legs
Cut the legs at 25 degrees off square, long point to short point measurement, ends are parallel.
Attach to the 2x2.
Correct angle is 25 degrees.
Step 3
Seat Supports
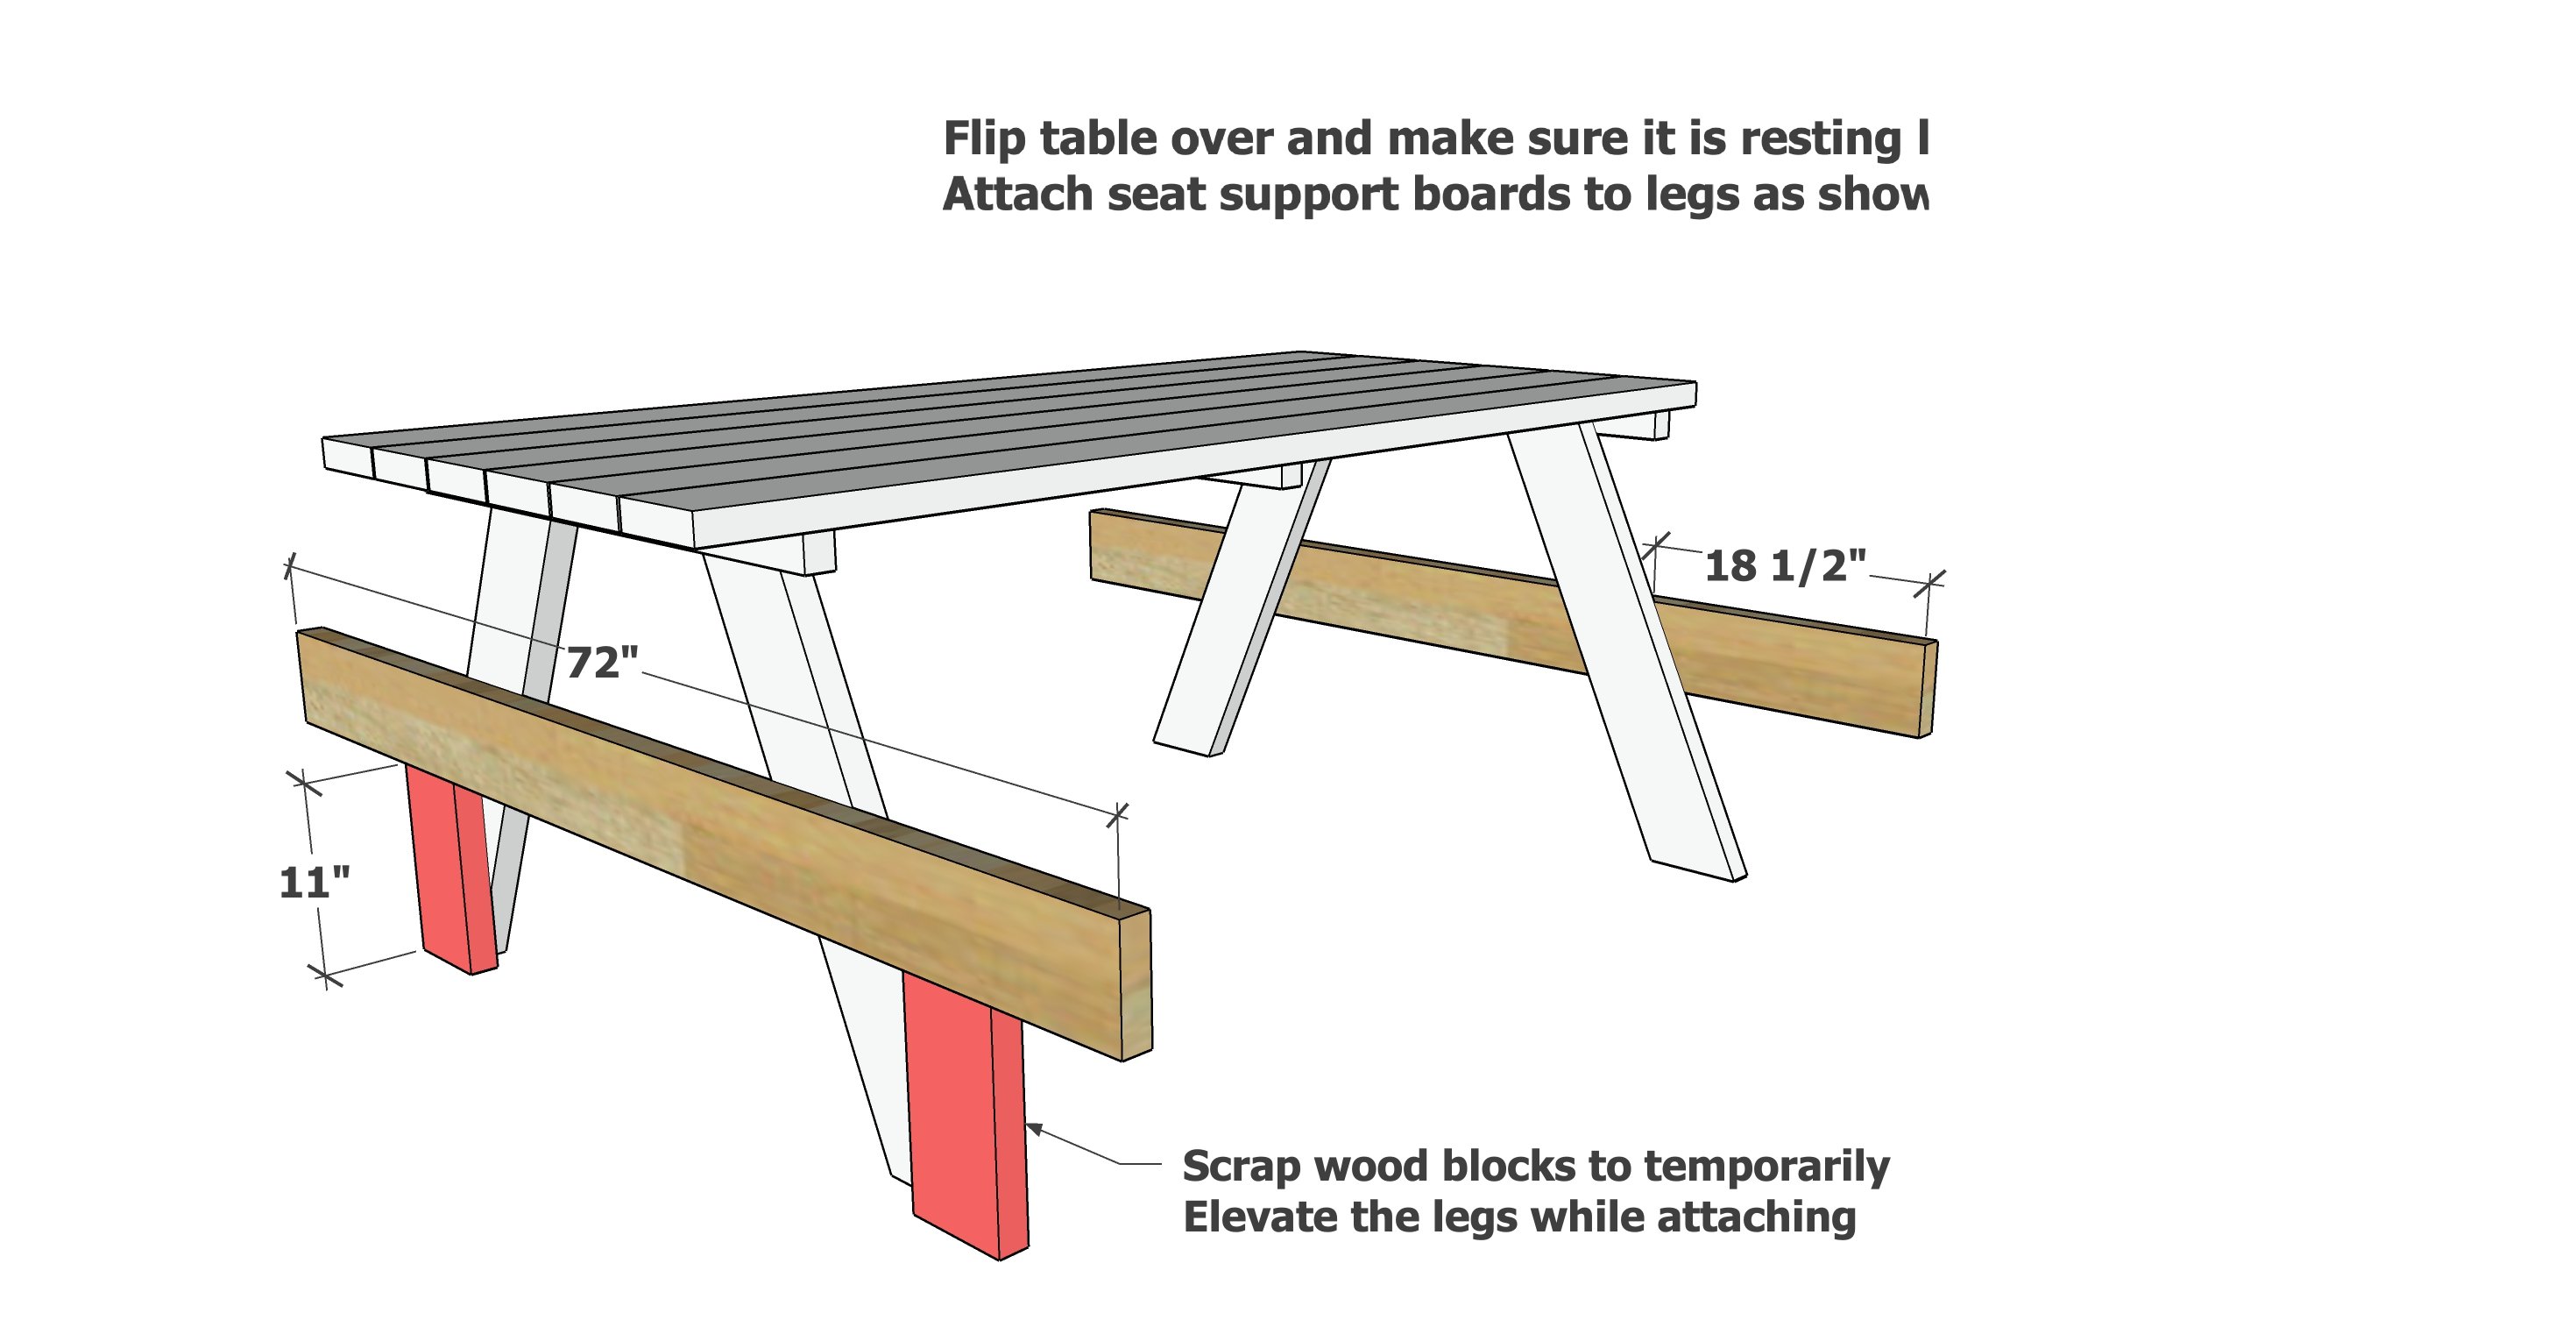
Flip the picnic table over and make sure it rests level and does not rock.
Cut two scrap wood blocks to 11".
Set under the seat board and adjust the seat board until the overhangs on the ends are equal.
Attach with 4 screws per joint.
Step 4
Center Cross Supports
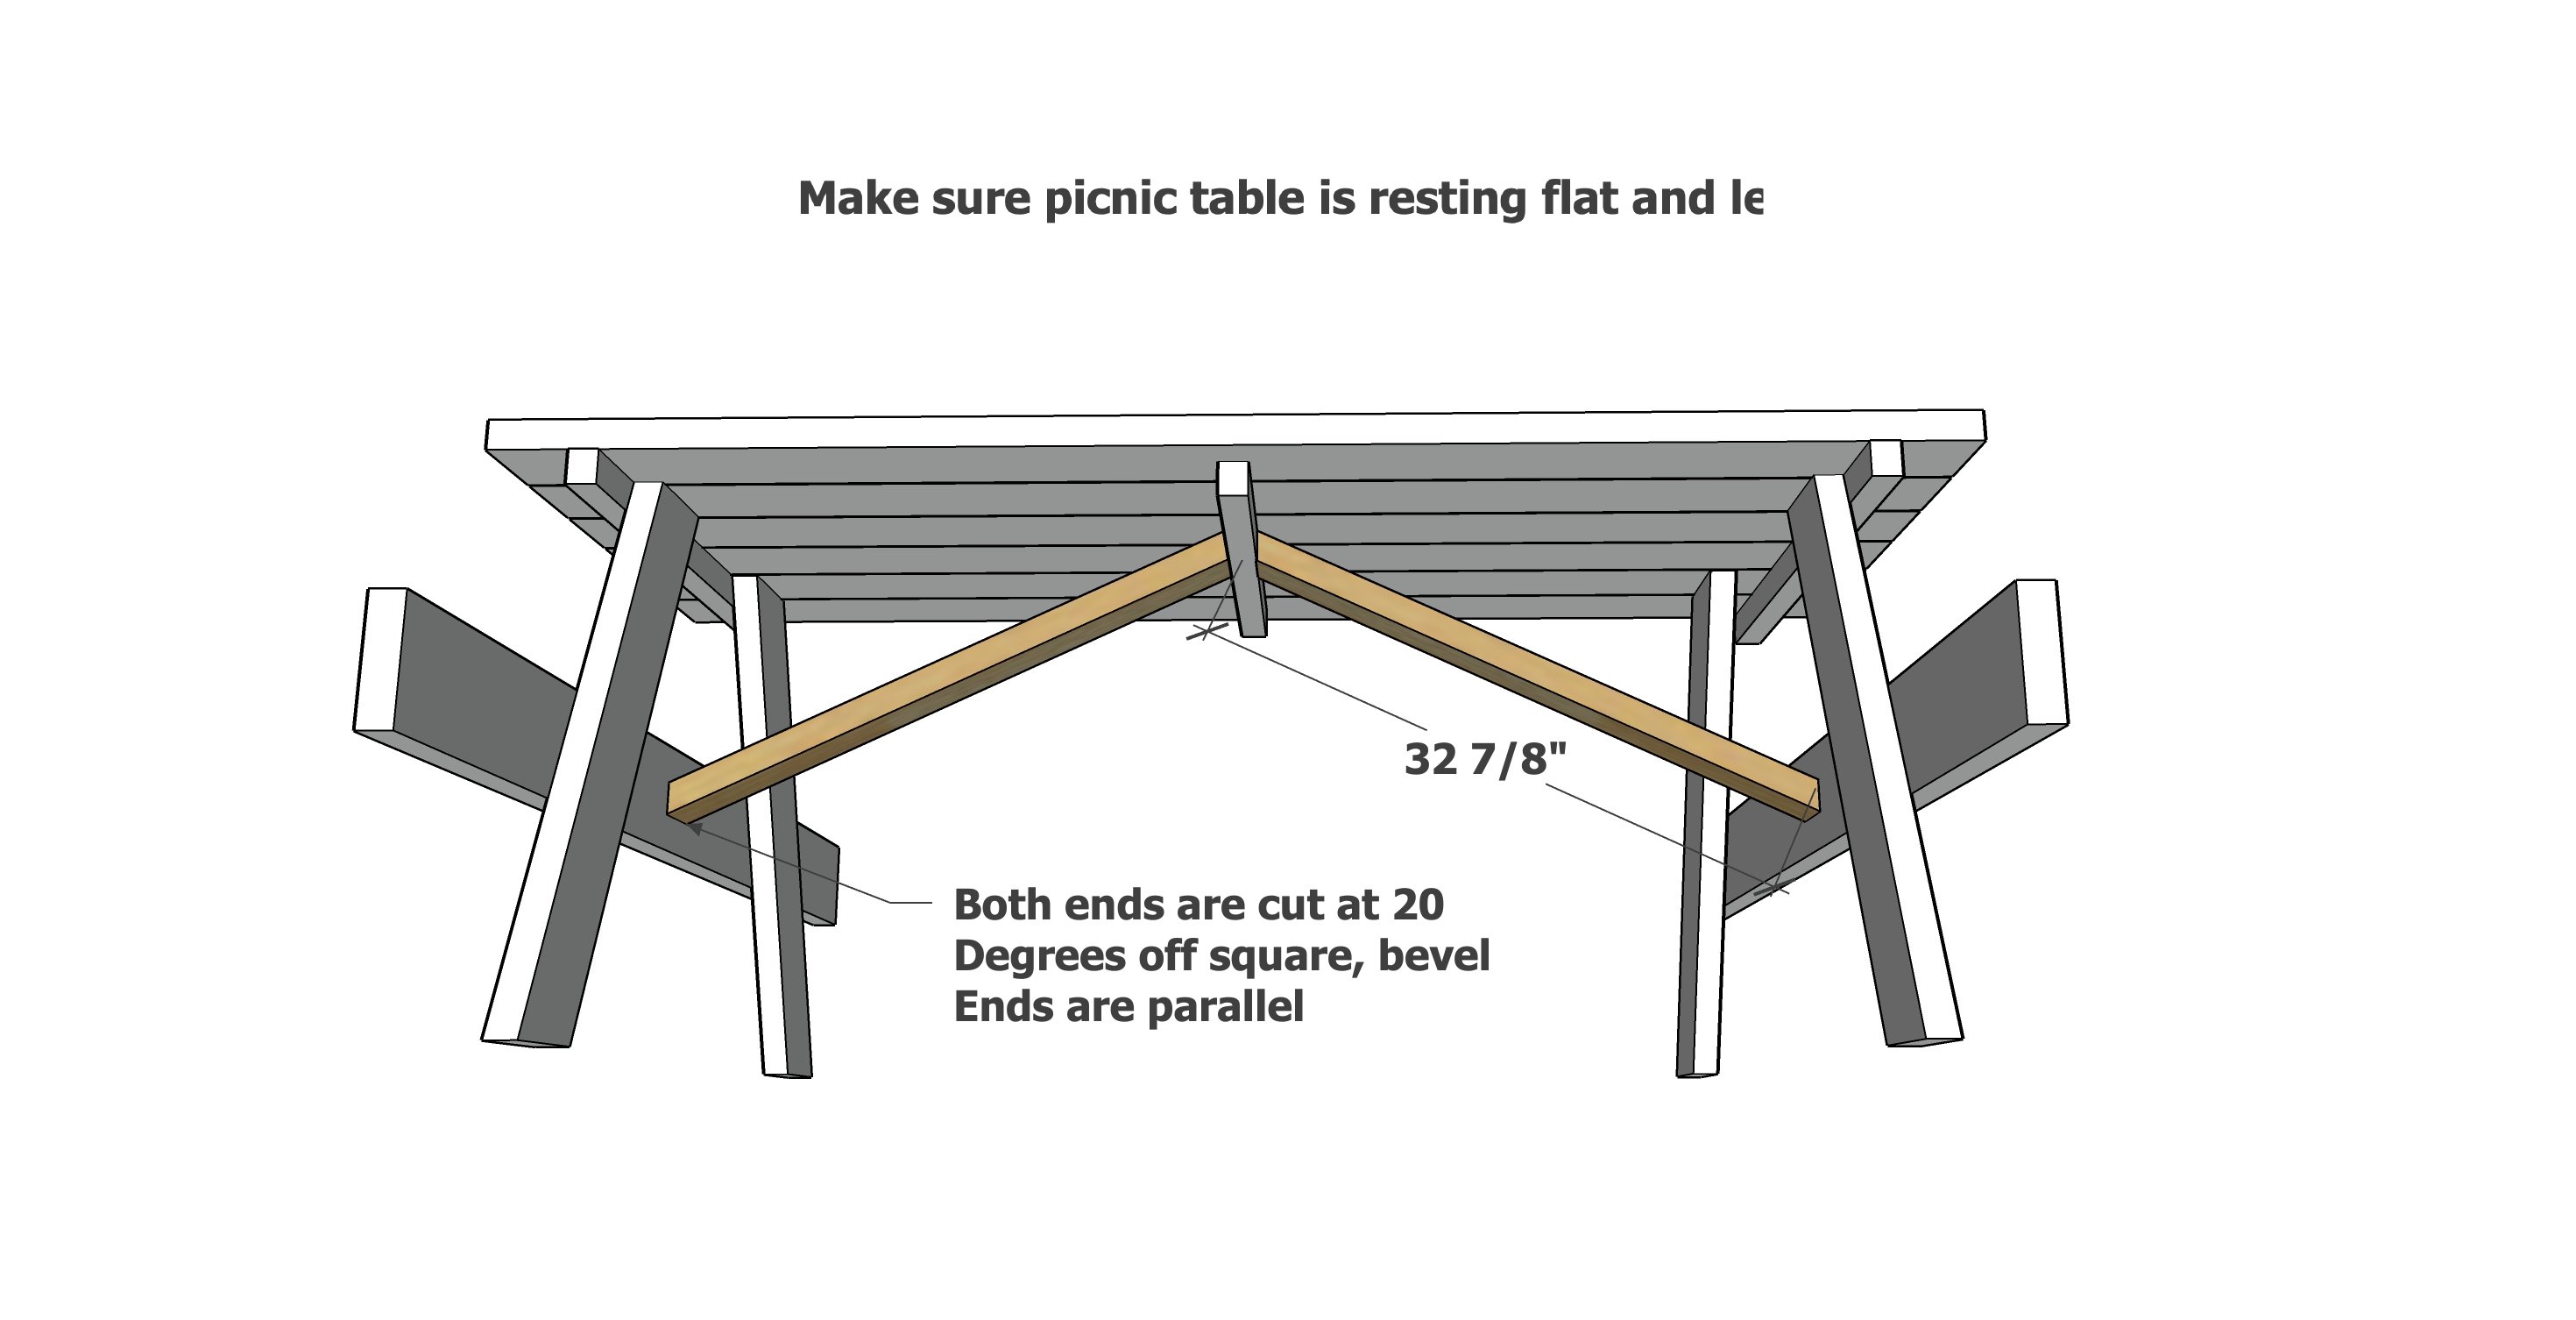
Make sure the table is level and legs are plumb.
Cut the center cross supports at a bevel, 25 degrees off square, long point to short point measurement, ends are parallel.
Attach the first support with screws.
The second support will be tricky to attach at the top. For the center attachment, the first cross support will be in the way. Simply drive the screws at an angle to get around the first cross support, into the end of the second cross support.
Correct angle is 25 degrees.
Step 5
Seat Boards
Attach the seat boards to the seat supports with screws.
Sand the entire project with 120 grit sandpaper. Soften outside edges for comfort.
Remove all sanding residue with a vacuum and damp, lint free cloth.
Avoid "film forming" paints or polyurethanes, as the wood may expand and contract with outdoor climate moisture, and this will result in the paint or poly cracking and peeling.


Comments
crystal (not verified)
Tue, 04/27/2010 - 21:50
Ana, I seriously think you
Ana, I seriously think you are a mind reader! I have been hopefully waiting for these plans & you made them happen girly! I love your blog. My hubby and I are really young parents just trying to make our new house a home and of course I have champagne taste on a cheap beer budget! but thanks to you I can actually decorate the way I want to and not have to resort to cheap big box furniture. Thank you, thank you, thank you! ;)
Okay (not verified)
Tue, 04/27/2010 - 22:23
I have finished toddler
I have finished toddler picnic table last weekend.
now it is hard for me to choose paint color.
Cheryl's Creat… (not verified)
Wed, 04/28/2010 - 02:51
Ana, thanks for your plans, I
Ana, thanks for your plans, I went to the store and purchased all the supplies with my son, then came home and we worked on this table as a family, I am so excited to paint it next, thanks so much your blog site is amazing and so inspiring, as a mom of 4 I am on a tight budget, but love style and new ideas....you make it happen...
1 Funky Woman (not verified)
Wed, 04/28/2010 - 02:54
Love this! Thanks for the
Love this! Thanks for the plans! I love all the great colors people used!
Jenny (not verified)
Wed, 04/28/2010 - 02:58
I would have made one when my
I would have made one when my children where little if the mini picnic tables had been around. I never saw them in wood, just classic plastic.
I love all the colors.
Liana (not verified)
Wed, 04/28/2010 - 03:18
I am so glad I found this
I am so glad I found this site. And this might get old, but you really are an inspiration! My husband (who can't hang a picture) is not convinced yet that this is a worthy endeavor but I aim to prove him wrong.
Just got wood yesterday for the bigger kids picnic table. I bought nails that you would use for a composite deck cause I'm scared of rust. Were these the right choice?
Also, I'm such a beginner, I would love to see more tutorials like how to use a "square" and simple things like that or did I miss this somewhere? I bought the jigsaw/ sander too so I'm hoping I can use those for angle cuts??!!
After seeing so many other people's work, the chant in my head says, "I can do it" but I'm soooo scared. Guess just gotta jump in!!
Valerie (not verified)
Wed, 04/28/2010 - 03:27
I think I know what we are
I think I know what we are doing this weekend! Ok, well first we need to mow the lawn.. but THEN we are going to build this table. This is just what I have been hoping for. Thanks Ana! You just continue to amaze me. *high five*
Jenelle (not verified)
Wed, 04/28/2010 - 06:05
Is everyone using oil based
Is everyone using oil based paint to paint these? My husband and I are having a disagreement on how to paint ours :)
Jen (not verified)
Wed, 04/28/2010 - 06:57
Thanks Ana! With spring here
Thanks Ana! With spring here in Alaska we are all looking forward to picnics. I made the toddler one last weekend and it went so well I was thinking a full size one Then ta dah here it is! Thanks:)
Becca (not verified)
Wed, 04/28/2010 - 07:17
Sweet!!! I planned on making
Sweet!!! I planned on making the kid size, then you came out with the big kid size, and I thought, OHHH, let's build that one. But now, I am going with the full size that way the whole family can fit for a picnic!!! You are so wonderful!
Michelle (not verified)
Wed, 04/28/2010 - 10:50
Thanks for these plans! I
Thanks for these plans! I was hoping to make a full (adult) size picnic table!
Katie Seamons (not verified)
Fri, 04/30/2010 - 14:18
We found a saw at a garage
We found a saw at a garage sale this morning...is it impossible to make these things without a nail gun. Just to use finishing nails and a hammer? I am really excited to do these projects but can't stomach buying more tools on a students budget...
Carmen (not verified)
Sat, 05/01/2010 - 01:45
I stumbled on this blog a few
I stumbled on this blog a few weeks ago and decided to build this as my first DIY project since my child surely would not criticize something so super cool? She loved it!! It was so easy (after I figured out how to use the saw that is). Anyway, I am raising money for my 2 day walk for breast cancer in late October and have decided to make some of these to sell for my team to raise funds...I mean who would not LOVE a pink picnic table for a cause? Thanks so much for making these available...making a bed next since my 4 year old saw the farmhouse bad and " can not live without it."
Bri (not verified)
Sat, 05/08/2010 - 04:09
Katie...yo woldn't need a
Katie...yo woldn't need a nail gn for this one...jst a drill and drill bits.
I built the bigger kids table and my kids were sitting at it during my garage sale and people liked it and now I have 5 orders for people who want to by one! PAINT BEFORE YOU BUILD!! and we used Killz brand high gloss exterior paint Jenelle
Wendy (not verified)
Sat, 05/08/2010 - 10:40
I'm thrilled to find these
I'm thrilled to find these plans for an adult-size table. Because we don't have a deck and our table will be on the grass, I prefer a traditional picnic table rather than a table and chairs. I was appalled to find that our home-improvement store did not carry plans for such a basic project. Pre-made ones I found were priced in the hundreds for what I estimate is about $50 worth of materials. This will be my first summer building project.
Sara (not verified)
Thu, 05/20/2010 - 17:47
I just finished the full-size
I just finished the full-size picnic table today, and I absolutely love it. It looks so natural in our mountain setting. I blogged about the process here on my blog, The Handy Hausfrau.
A quick tip: measure and draw the 30 degree angles on the legs and the 25 degree angles on the center supports before you cut the boards. If you cut the pieces to 33" and 28.5" respectivly before you mark the angles, you won't have enough board to make two parallel cuts.
Thanks for the plans, Ana, and keep up the great work. I can't wait to build another one of your projects.
jimssolidwoodp… (not verified)
Fri, 09/03/2010 - 05:41
Excellent, l want to make 2
Excellent, l want to make 2 of the adult table for back yard and 1 tiny one as a hint for my kids to give me some grand children lol.
And l want to make onee for my son's wife's nephew made him a 2 x4 ft book sheelf at his tiny height 12 months old then, so if l make him a little table aam sure he will like it, since l have no grandkids to spoil l will build this little guy kiddie furniture lol.
Your great Ana
Jim
Emily (not verified)
Sat, 09/11/2010 - 12:36
Ana, Thanks so much for
Ana,
Thanks so much for these plans! My hubby and I just moved into a new home and the owner of the house had a picnic table and when we asked about it he said he was going to keep it. We didn't let that stop us! I had been "lurking" on your site for a while and had bookmarked many of the plans you have, so I printed out these and my hubby built us a great plum table. Oh, and we used Sara's tip re: measuring the angles before cutting. We've gotten lots of compliments and some even asked if he built this from a kit because it was so sturdy and great!
After finishing ours, he built a toddler one in pink and purple for our friend's daughter. Her table was supposed to go outside, but the little one loved it so much she asked to keep it inside because she didn't want it to get dirty.
Next up, the storage daybed, shelves and, my absolute fave, the farmhouse table from Restoration Hardware! Thanks again for all these great plans!
Emily
sara (not verified)
Mon, 01/24/2011 - 12:18
I want to extend this tables
I want to extend this tables length by about two feet. Has anyone done this? Will I need to add extra support (third leg in the middle)?
Thanks!
zookeeperjay
Sat, 08/13/2011 - 07:43
seating
I CANNOT wait to get started on these! Can somebody tell me how many this plan seats comfortably? Maybe, I'll just make 2. We have a large family, and we are hoping to expand it still. ;o) I am new to the site and so excited about all these fun ideas for our home. Thanks Jay
adventurentogether (not verified)
Mon, 11/26/2012 - 15:40
How much overhang is okay?
I am making this table for our dining area. It will be a 10 ft table, so I plan to basically double the table, only using 10' long boards on the top and seats. For the middle supports, I plan to join the two supports together. I am also going to use all 2x6s instead of 2x4 for the support. I may use 2x12 for the top and seats, depending on the price. If I extend the overhang to be a foot from the end supports so there is plenty of leg room for sitting at the ends, will the table still be stable?
jere7782
Fri, 05/03/2013 - 14:21
how many adults will this
how many adults will this picnic table sit comfortably? Thank you
Spider9000
Sun, 03/01/2020 - 12:17
4. I made it 8 ft long…
4. I made it 8 ft long because why waste the 8 ft boards. Also, I recommend moving seats out about another 5.5 inches. It felt too close to the table top and was difficult for even a thin person to get in and out
Al Lulu
Wed, 10/30/2013 - 11:07
12 inches down?
I'm so confused. I started this project and, like all my work, I have to shim something because I measure like a fool.
I totally get the 11.5" on either side of the seat supports, but if I am also trying to measure them down 12" that math doesn't work out. Which is more important? Help!
BuildMeAnArk
Fri, 07/18/2014 - 12:39
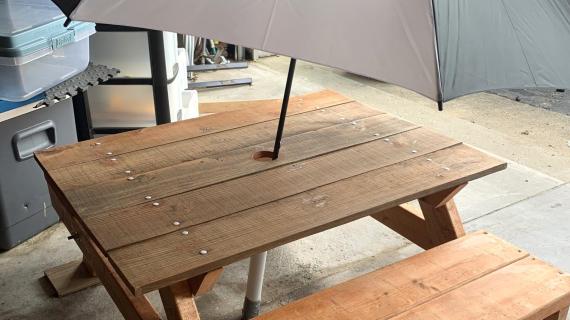
Umbrella?
I'd like to include an umbrella hole in the middle of this picnic table. Any thoughts on how to best do this? If I include 4 board supports and thus separate the center supports by 2-3 inches, what angle will I have to cut the leg cross braces? Thoughts?
memphistr
Mon, 12/07/2015 - 14:34
A little longer
Great Plans but 1 sugggestion. I helped my son build three of these tables for an Eagle Scout project. We followed the plans (using stud length 2x6s) and noticed that we could have had 12 inches of overhang on the seat and the top. We did this on the other 2 tables and it worked perfectly. Just a suggestion if you want a little more room on the outside.
Spider9000
Sun, 03/01/2020 - 12:08
Adjusted seating
Love this plan. Took one day and the materials are cheap. I did redo part of it though. After following the plan the seats felt too close to the table top. I’m not a huge guy - 5’11, 160 - but even I had to sit first then swing my legs over. I recommend moving the seats out about another 6 inches.You will have to adjust the miter angles on the diagonal supports though.
Spider9000
Sun, 03/01/2020 - 12:13
Also, it made more sense to…
Also, it made more sense to me to make the table 8 feet instead of having a bunch of waste. I just added one more set of legs and support in the middle.