


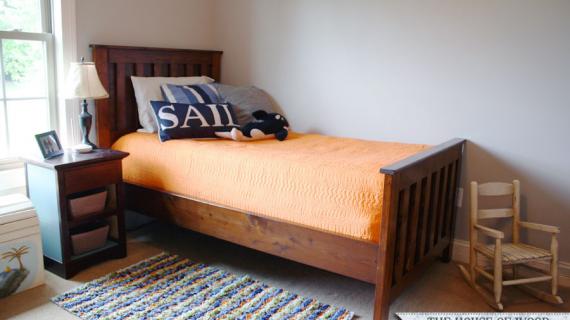
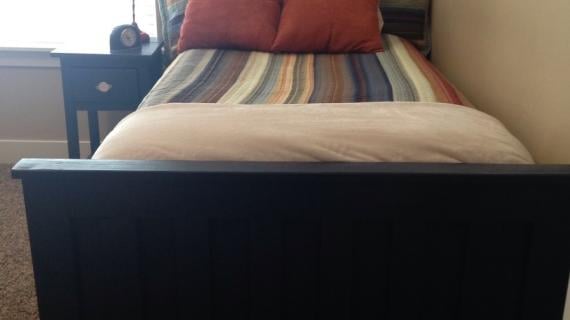
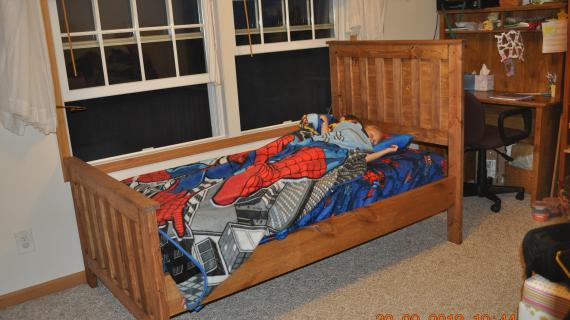
How to build rustic camp style pine bed! Free step by step plans include everything you need to DIY furniture!
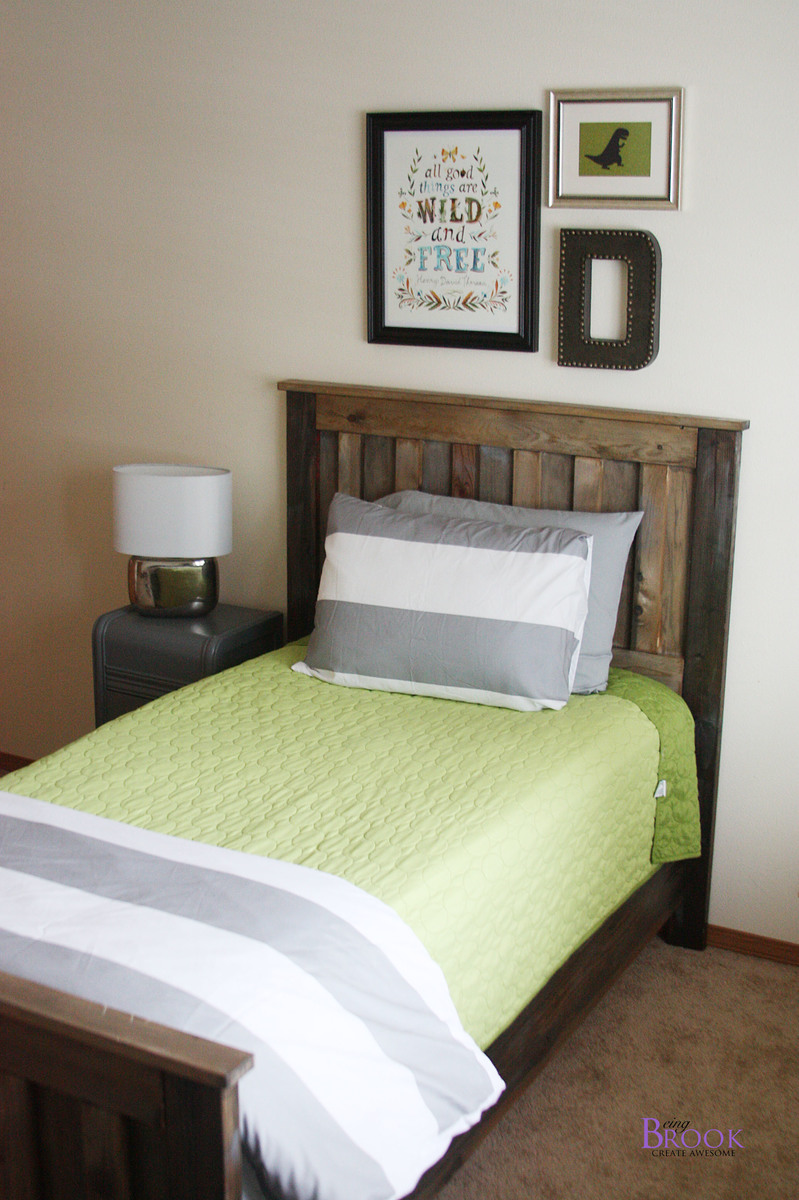
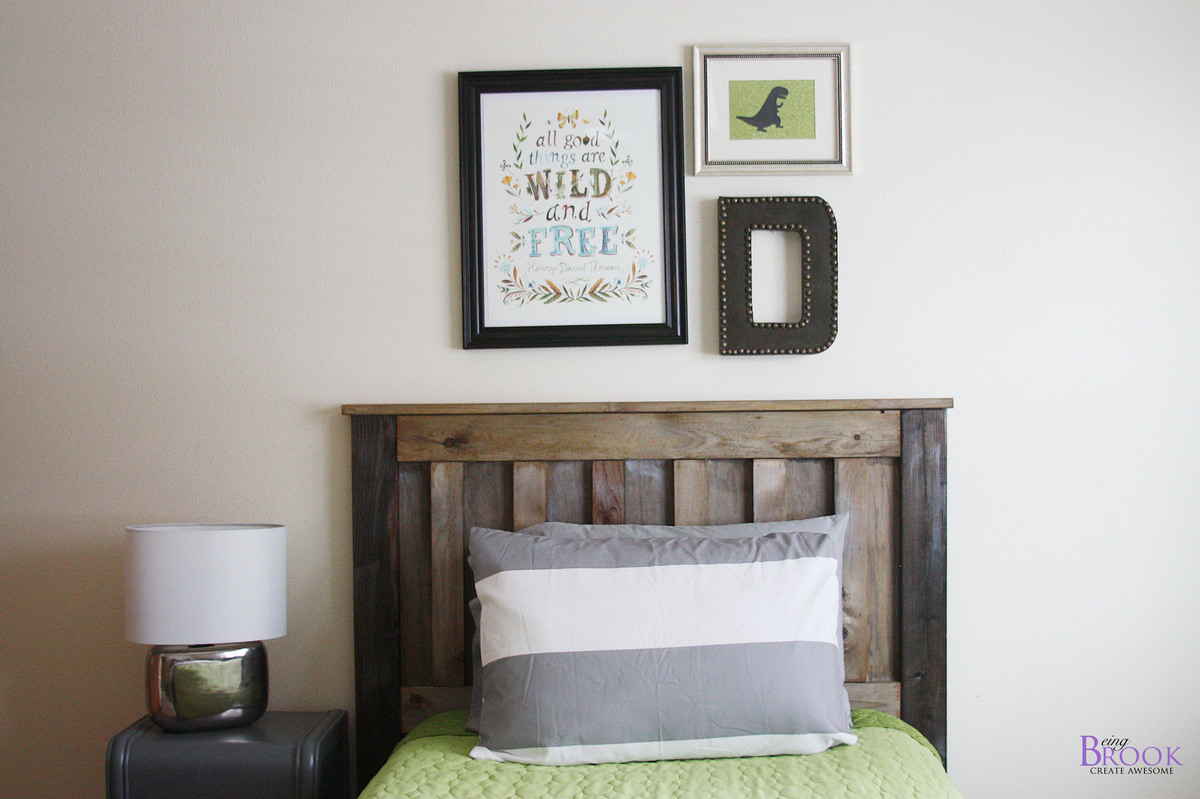
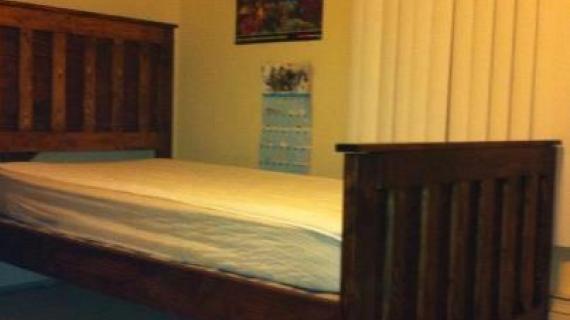
Can you believe that this bed is made with 2x4s?
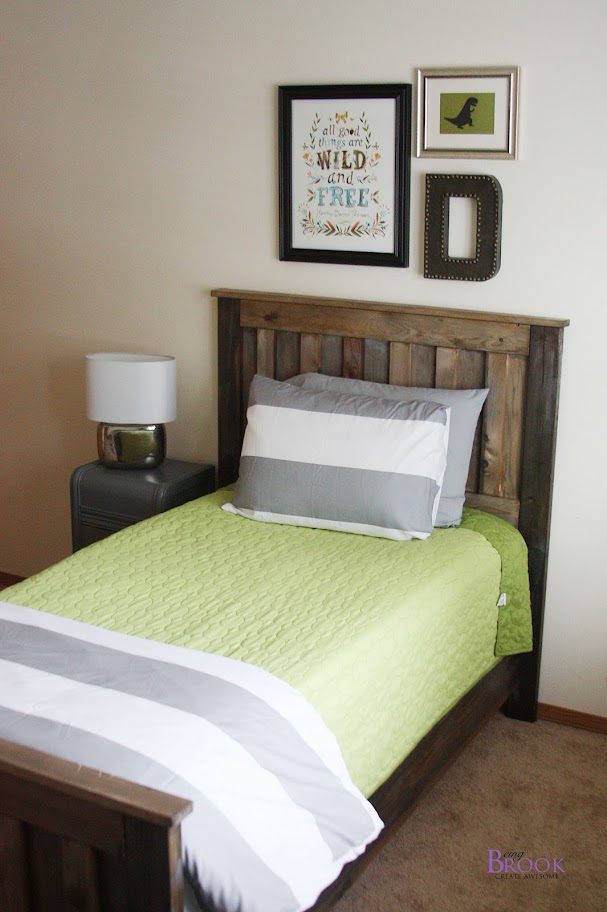
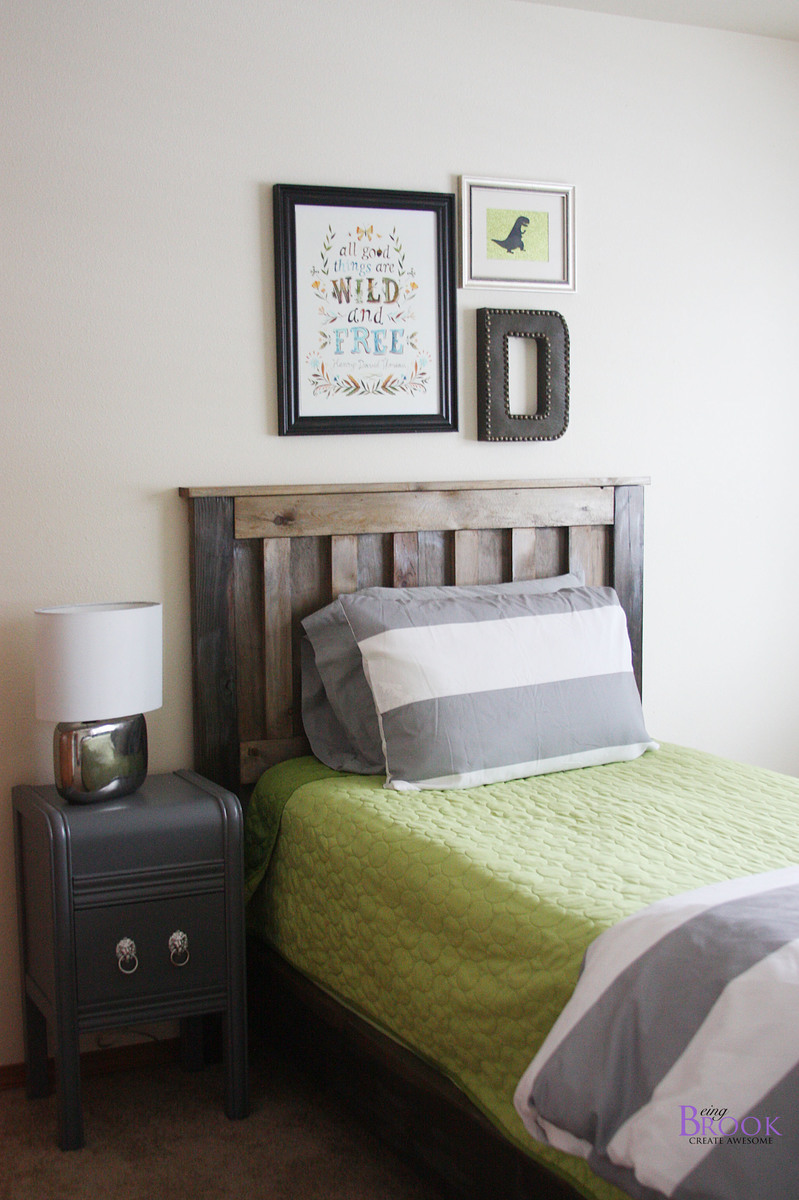
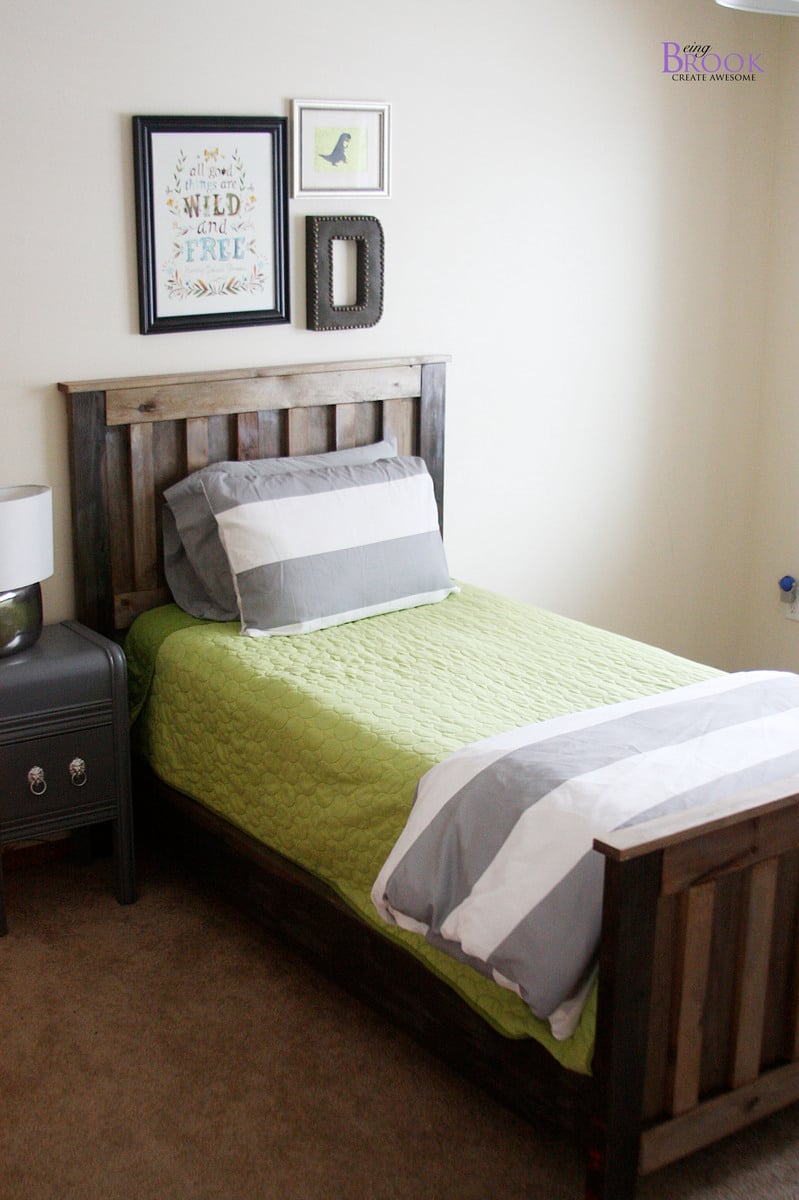
Now in fairness, anything Brook touches becomes awesome. This I know. But I still can't help but stare at this beautiful bed!

Brook writes:
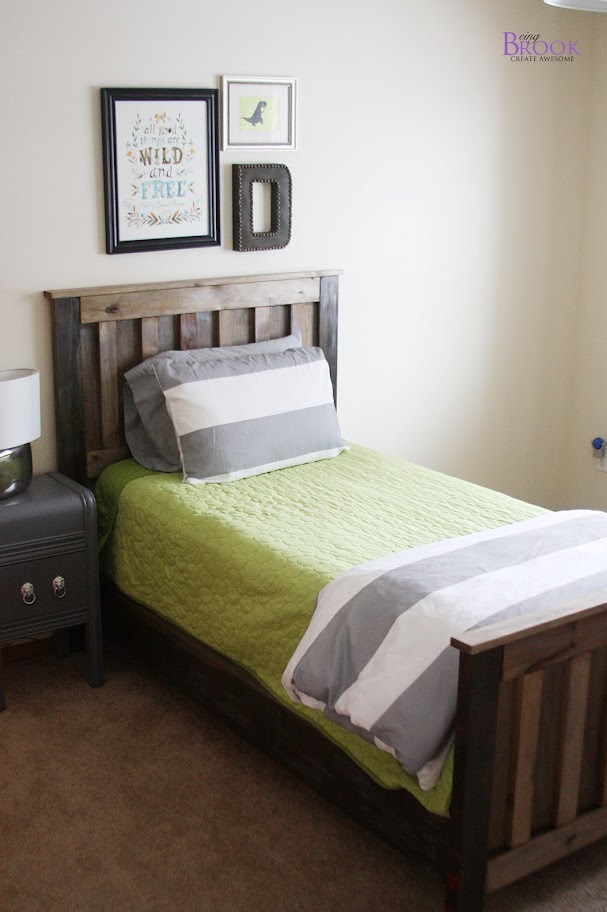
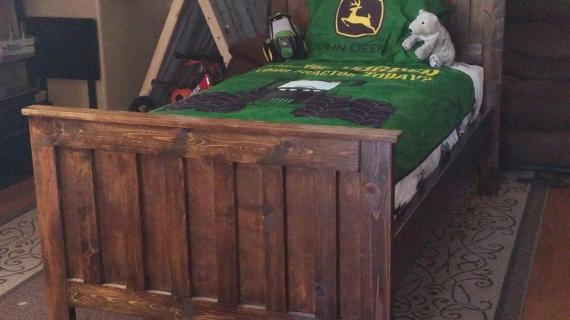
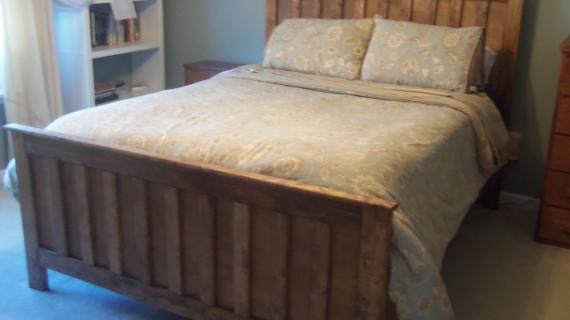
To give the wood the aged look I mixed steel wool with vinegar and painted it on with a paintbrush. After it dried I brewed a couple bags of breakfast tea and painted it on. Then I dry brushed on some silver paint in a few spots to give a little added texture and shimmer. The whole bed got a couple coats of polycrylic to protect the finish.
So there you have it. 2x4s, steel wool, vinegar, breakfast tea and some dabs of silver paint. The secret recipe to beautiful rustic simple furniture.
I've shared the step by step plans below, and I hope you take a second to stop over and read Brook's post on building and finishing this bed. Thanks Brook!
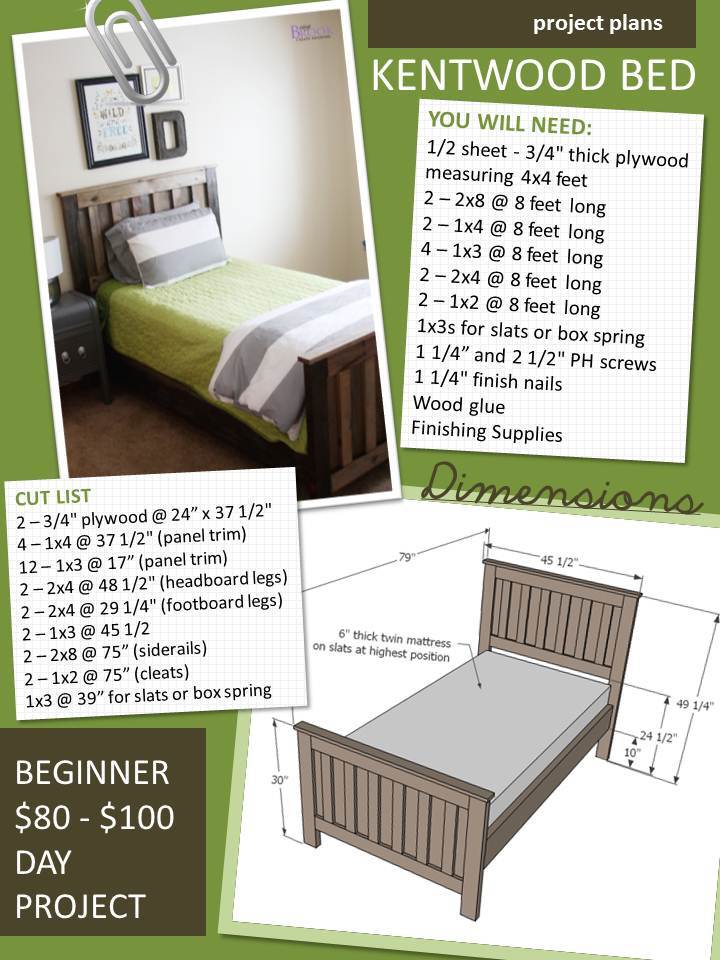
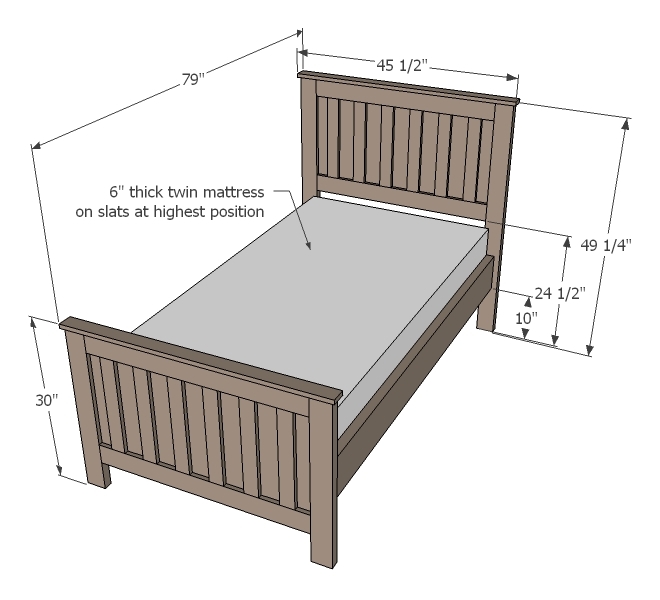
And here's the plans!

Preparation
- 1/2 sheet - 3/4" thick plywood, measuring 4'x4'
- 2 – 2x8 @ 8 feet long
- 2 – 1x4 @ 8 feet long
- 4 – 1x3 @ 8 feet long
- 2 – 2x4 @ 8 feet long
- 2 – 1x2 @ 8 feet long
- 1x3s for slats or box spring
- 1 1/4” and 2 1/2" pocket hole screws
- 1 1/4" finish nails
- Wood glue
- Finishing Supplies
- 2 – 3/4" plywood @ 24” x 37 1/2" (panels)
- 4 – 1x4 @ 37 1/2" (panel trim)
- 12 – 1x3 @ 17” (panel trim)
- 2 – 2x4 @ 48 1/2" (headboard legs)
- 2 – 2x4 @ 29 1/4" (footboard legs)
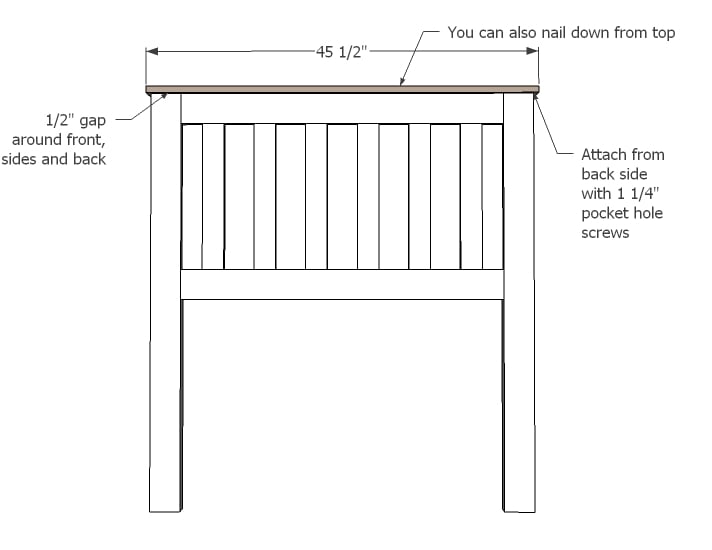
- 2 – 1x3 @ 45 1/2" (top of footboard and headboard)
- 2 – 2x8 @ 75” (siderails)
- 2 – 1x2 @ 75” (cleats)
- 10 - 1x3 @ 39” for slats or use box spring


Please read through the entire plan and all comments before beginning this project. It is also advisable to review the Getting Started Section. Take all necessary precautions to build safely and smartly. Work on a clean level surface, free of imperfections or debris. Always use straight boards. Check for square after each step. Always predrill holes before attaching with screws. Use glue with finish nails for a stronger hold. Wipe excess glue off bare wood for stained projects, as dried glue will not take stain. Be safe, have fun, and ask for help if you need it. Good luck!
Instructions
Step 1
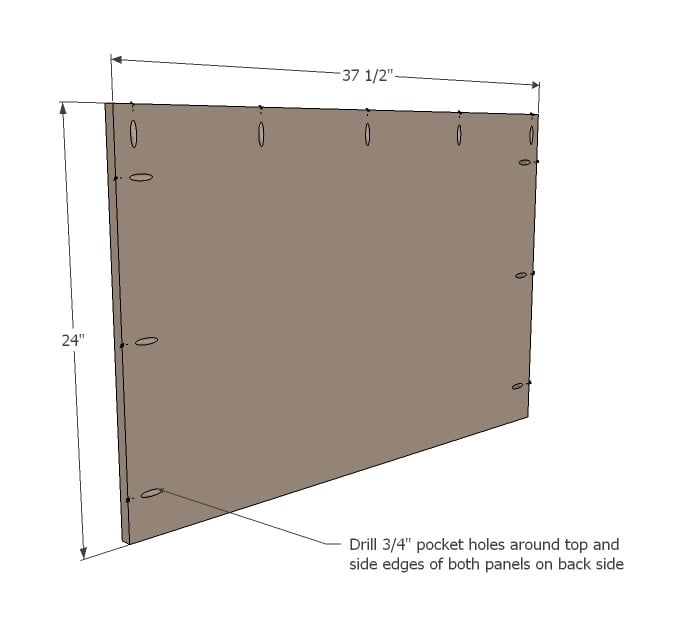
Go ahead and drill 3/4" pocket holes around side and top edges of both plywood panels. These holes are for attaching legs and top in later steps.
Step 2

Then add the top and bottom trim to fronts. TIP: you can also Kreg Jig the slats (next step) to top and bottom trim before attaching.
Step 3
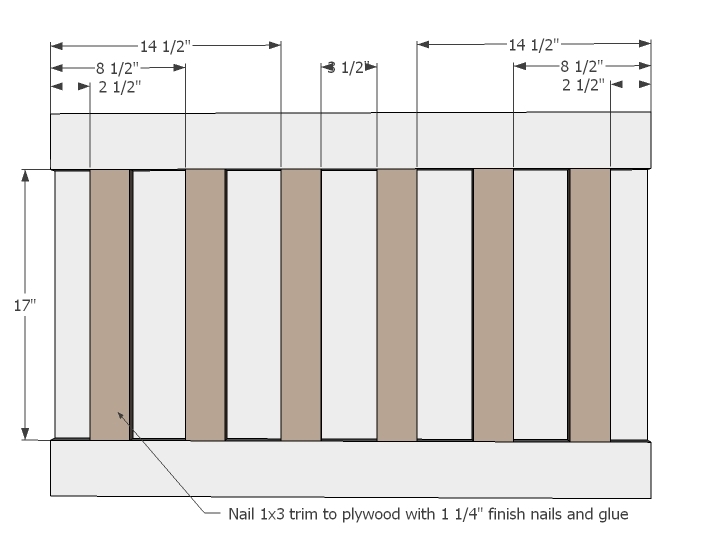
Attach slats, spaced as shown in diagram.
Step 4
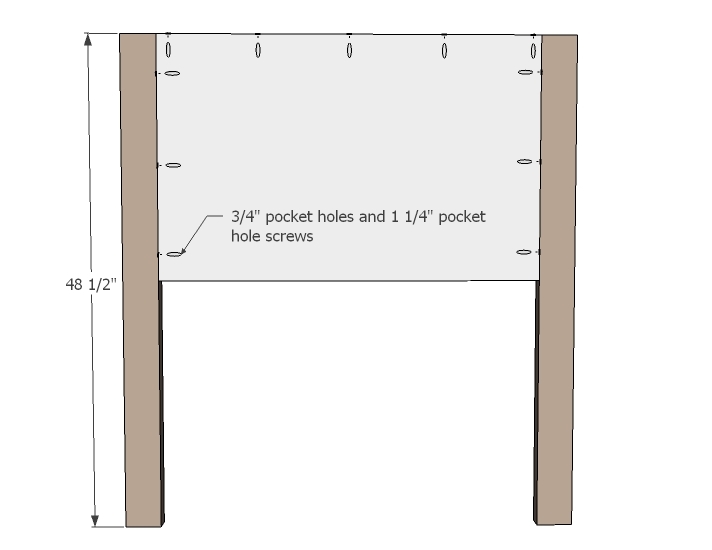
Now for the headboard, attach longer legs.
Step 5
Step 6
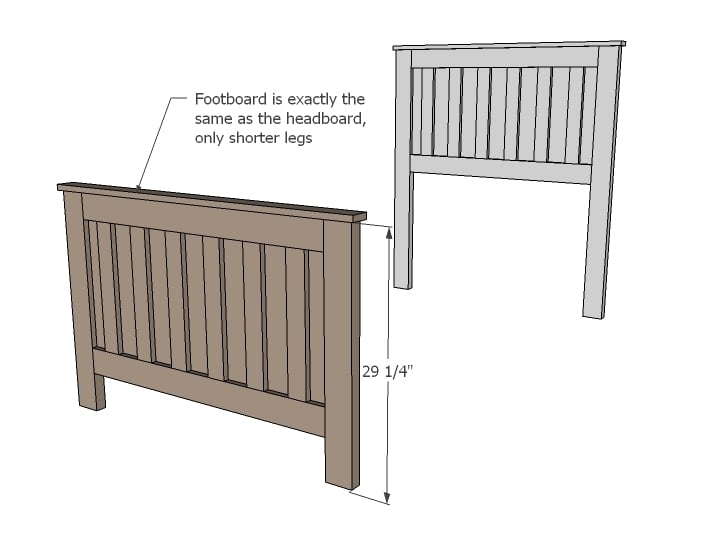
Footboard is same as headboard, only uses shorter legs. I like simple :)
Step 7
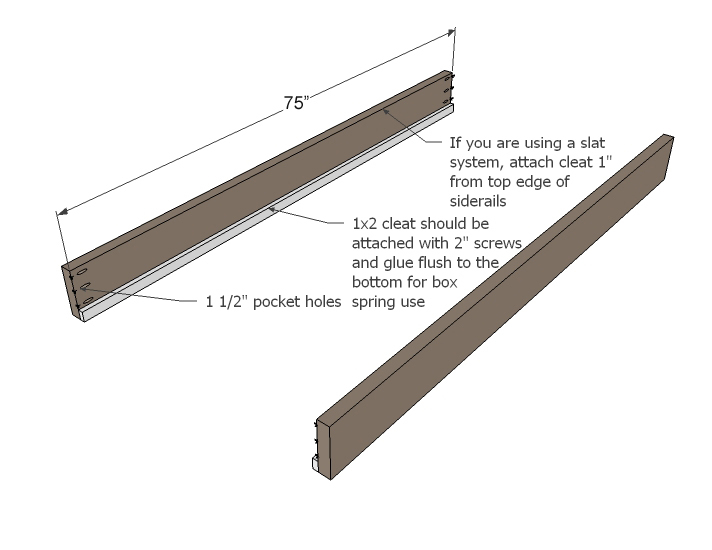
Now let's build those siderails! If you have a boxspring, you probably want the cleat attached at lowest possible position. Without a boxspring - using a slat system - you might wish to attach cleat at highest possible position - 1" down from top edge.
Step 8
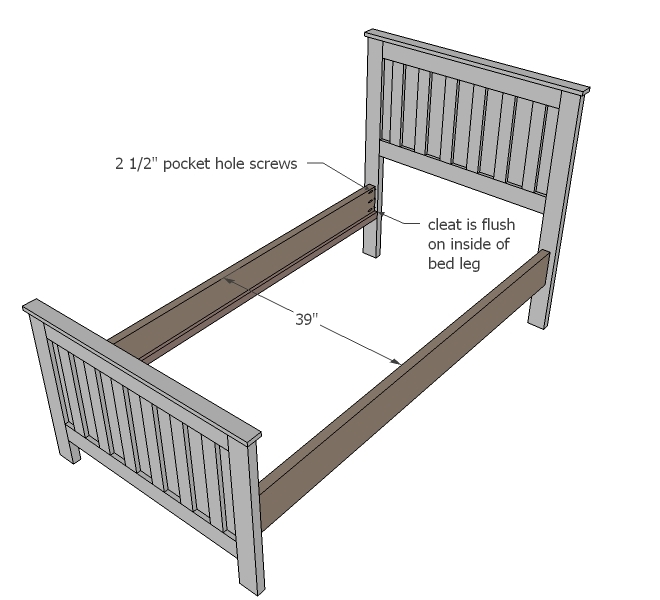
Attach siderails to headboard and footboard.
NOTE: For easier assembly/disassembly you can buy special bed hardware for attaching siderails.
Step 9
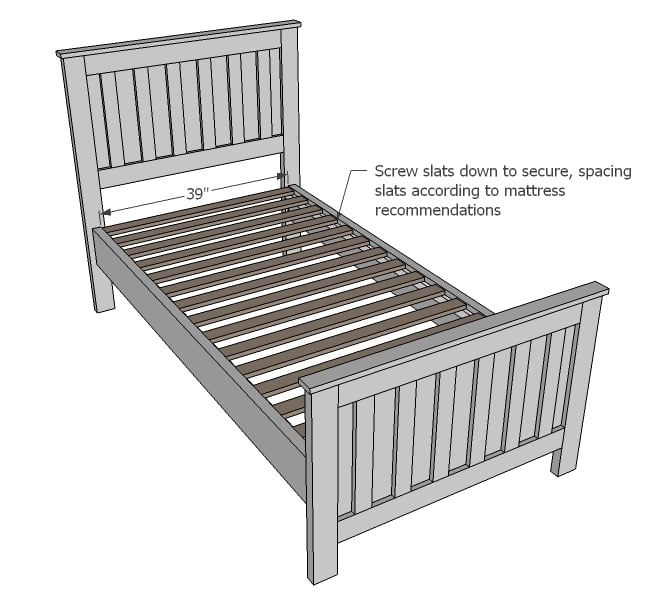
And finally, add slats or bunkie board or box spring.
It is always recommended to apply a test coat on a hidden area or scrap piece to ensure color evenness and adhesion. Use primer or wood conditioner as needed.


Comments
sherx2 (not verified)
Thu, 03/15/2012 - 11:41
queen size ?
WIll you be doing this in a queen size version?
Also how could you just make the headboard and
attach it to a (free standing) metal frame
for matress and box springs.
Thanks!
In reply to queen size ? by sherx2 (not verified)
Ana White
Fri, 03/16/2012 - 11:27
Queen Size
CGCouture
Thu, 03/15/2012 - 11:50
You mention being able to
You mention being able to purchase special hardware to make assembly/disassmbly easier, but I have no idea what it's called or where to find it. Could someone please provide that information? Thanks!
This bed is awesome, I have changed my mind about which bed I want to build for my husband and I's room several times over now....I'm paralyzed by indecision! ;-)
In reply to You mention being able to by CGCouture
claydowling
Thu, 03/15/2012 - 11:59
Knockdown hardware
The general term for it is knockdown hardware. In this particular case, you're probably going to be happiest with bed frame brackets, which are sold by Rockler among others. A cross dowel nut might also work, and Tage Frid had a slick little trick he could do with a t-nut, a dowel, and a bolt, so that the hardware was almost completely hidden. The Tage Frid trick is documented in his book on furniture design (book 3 of Tage Frid Teaches Woodworking), if you want to get completely DIY about it.
Carrie Wittenberg (not verified)
Fri, 03/16/2012 - 08:05
knockdown hardware
I used the brackets from Rockler on the Farmhouse Bed I made for my sister. It takes a little work with a hammer/chisel to get them mounted nicely but they work great when they're done! The rails come unhooked on both ends so you can take the bed apart into 4 pieces (headboard, footboard and 2 side rails).
Just be sure you start making the holes for the hooks to slide into with the bracket mounted right side up. I made that mistake and couldn't figure out why the hooks weren't sliding in. Turns out that they were resting on the mounting screw because I put the bracket on upside down! Easy fix but I sure did feel stupid!
Sara Jayne (not verified)
Fri, 03/16/2012 - 10:51
We have built two beds of our
We have built two beds of our own design, using some of Ana's as a starting point. We use deck hardware to put the side rails on so then you can unscrew it to take it apart for moving. It's about $20.
Rachel Harwood (not verified)
Thu, 03/15/2012 - 18:03
Love this!
I was thinking I would just make my girls matching headboards for their beds, but now I'm thinking I might make them matching beds instead! Love this bed! :)
I'm sure I can figure out how to alter it for a king single bed, I'll just measure the mattresses that we already have and adjust the sizes of the wood to fit.
Donna @ Edible… (not verified)
Fri, 03/16/2012 - 07:47
It looks great!
And if you have the time and material to make a Kentwood shelf as well and put it in the corner, you have a real hit!
Michael Brooking (not verified)
Fri, 03/16/2012 - 13:52
King Dimensions
I think the work you are doing is great and very inspirational. I have been looking for project ideas for a king size bed. Will you be positing dimensions for this project or is there already a place they can be found for a king?
sherx2 (not verified)
Fri, 03/16/2012 - 23:23
Thanks Ana !! As always you
Thanks Ana !!
As always you rawk !
birdsandsoap
Sun, 03/18/2012 - 00:30
Katie Daisy! I love her
Katie Daisy! I love her artwork!!!
tcsal (not verified)
Thu, 03/22/2012 - 19:40
Toddler size?
I love this bed and can't wait to make it for my son. Can this be made in toddler size?
Angela Stallings (not verified)
Sun, 03/25/2012 - 09:01
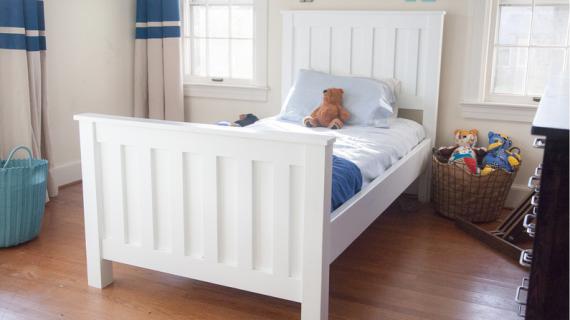
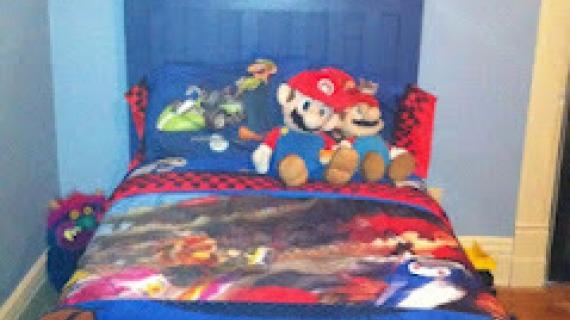
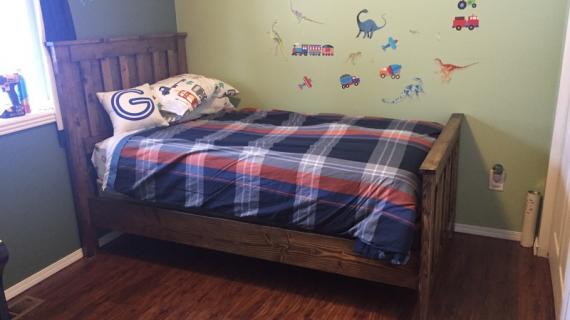
I love the bedding in the
I love the bedding in the picture, the gray and white comforter, with the green quilt underneath! I've been looking for something similar for quite some time, where did you find the bedding?
Brook @ BeingBrook (not verified)
Thu, 03/29/2012 - 15:31
Bedding
The green quilt is a cheap one from Target. It was $25 or so for the sham and quilt. I think it is the Target Brand. The striped duvet was $20 and is also from Target. It's the room essentials brand (if I remember correctly!)
The quilt I've had for a year or two and it washes up really well and hasn't faded or frayed at all.
Walter (not verified)
Tue, 04/17/2012 - 23:27
Full/Double dimensions
Great design. I am going to attempt this on my own, but I have a question: do you have any suggestions on scaling the plan for a full/double bed? I gather that the width of head/footboard are approx. 6.5 inches wider than the width of the mattress, but I'm at a loss as to how to adjust leg lenth, etc. Any advice would be really appreciated.
WK
Walter (not verified)
Tue, 04/17/2012 - 23:28
Full/Double dimensions
Great design. I am going to attempt this on my own, but I have a question: do you have any suggestions on scaling the plan for a full/double bed? I gather that the width of head/footboard are approx. 6.5 inches wider than the width of the mattress, but I'm at a loss as to how to adjust leg lenth, etc. Any advice would be really appreciated.
WK
ginabeena12
Thu, 05/22/2014 - 19:47
Full Size
Hi! I noticed that there were a large amount of requests for the full size plans. Did anyone ever get a hold of the full size plans?? I think that they would be great for my sons room but he already has a full size mattress and box spring.
Thanks so much for the help in advance!!
mggarrett
Thu, 04/26/2012 - 19:08
Full / Double Size
I really love this design! However, I was wondering if you had a full / double version?
I have 4 teenage boys and they share rooms. Therefore, I was looking at building a full/double size loft with this design and then this same design for the full/double size bed below cabin style. Do you have any suggestions / plans? Also, I would need to install knockdown hardware for when we move...any suggestions? Thank you!!!
Marci (not verified)
Wed, 06/06/2012 - 13:50
Paint for Bentwood bedframe
I was wondering if you could provide suggestions for repainting a bed with similar board patterns to the color(s) of the bedframe you have constructed. How do you create that two tone effect? What colors were used? Technique?
My bedframe currectly is two toned but in a Lighter color.
Obviously, I'm a newbie! Thanks for any help you can provide.
candyfdz
Wed, 06/27/2012 - 12:45
Trundle?
I would love to make this bed but with a trundle. I have two boys and a smalll room. Any idea if this could be done? Would love some input. Thanks!!
Lindsay (not verified)
Thu, 06/28/2012 - 08:57
Headboard only
I really want to make this for my boys' room, but it's a small room and would be overwhelming as is, so I want to make a headboard only. This would be my first project, and I'm nervous about trying to dissect the wood needed and cut list for just a headboard. Would it be possible to post supplies needed and a cut list to just make a twin headboard, please? Thanks!!!
klmarggr (not verified)
Tue, 07/17/2012 - 08:49
Kentwood - Full Size???
A co-worker just showed me this site and I am in love!!! I have a 3 year old that I need to get into his own bed but would like to build him a full size version of this bed. Does anyone have plans for a full size? Thank you so much!!
klmarggr (not verified)
Tue, 07/17/2012 - 08:56
Full Size - Kentwood?
A co-worker just showed me this site and I am in love!!! I have a 3 year old that I need to get into his own bed but would like to build him a full size version of this bed. Does anyone have plans for a full size? Thank you so much!!
Shields Taylor (not verified)
Tue, 08/28/2012 - 05:57
Full size?!
Do you have plans to make this a full size bed?
Vanessa Z (not verified)
Wed, 01/02/2013 - 17:45
King Size plans
Do you have these plans converted to King size?
keesha_irwin
Thu, 04/03/2014 - 18:14
Full size
Hello! My son saw this bed and has asked if i would make it for him! He has a full size. Are there plans for this? Or do i just make the cuts width-wise 6.5" longer? I would make the headboard a little taller a well....thoughts? Suggestions?
smithj33_aw
Sat, 07/05/2014 - 20:45
Be careful
I just built this bed and it was easy. Looks great as well. A couple things to note:
First, this bed is wider than it needs to be. Pottery Barn beds are 42" wide and this one is 44.5" for some reason. Wish I would have noticed beforehand. 2.5" is a big difference. It puts the rails on very inside edge of the posts which looks a little awkward and makes it easier to hit your toes walking by.
Second, if you choose to use bed rail hardware, make sure you account for the extra width. My hardware added 1.75" to the width of rails which means there is a lot of space between the mattress and the rail.
Third, the bed is crazy tall in the stock height. You will most likely end up trimming some off the legs.
I am going to see if I can take some of it apart to narrow the whole thing, but it won't be easy. Great plans overall, but think your project through before assembling.
morrisaaron
Sun, 05/31/2020 - 01:18
Built this bed for my toddler and painted!
This is an excellent sturdy bed! I just got done building one for my tall 3 year old. I decided to color match paint to his pottery barn gray dresser, so I took time to sand and fill a little more.
I used Rockler 5" bed rail hardware to attach the rails to the frames.
I used Valspar (lowes) Cabinet & Furniture Enamel and sprayed it on with a Graco Truecoat gun.
For primer, I sealed the knots with Killz oil based primer, and then sprayed the rest with Killz 2 latex primer (I already had these on hand, otherwise I would have used a Zinnser product).
The bed is a 8" Simmons memory foam from costco, so I built it as a platform bed, using 15 slats (39" 2x3, spaced out every other slat).
You can see my results here, I'm very happy with it for my first major woodworking project. https://photos.app.goo.gl/hQbnJivh2Kf9Xaw48
I also already had a collection of Ryobi tools including their cordless circular saw and brad nailer. I picked up the orbital sander (OMG its awesome). I already had the Kreg rip cut guide which made it fast and easy to cut the plywood square without owning a table saw. I also bought the cheap $20 kreg jig kit and that worked fantastic.
Project took a total of about a week and most of it was just waiting for paint to dry between coats and then harden up for a few days before final assembly.