Star Doll Closet for American Girl or 18" Doll

Difficulty
Intermediate
| Print this plan

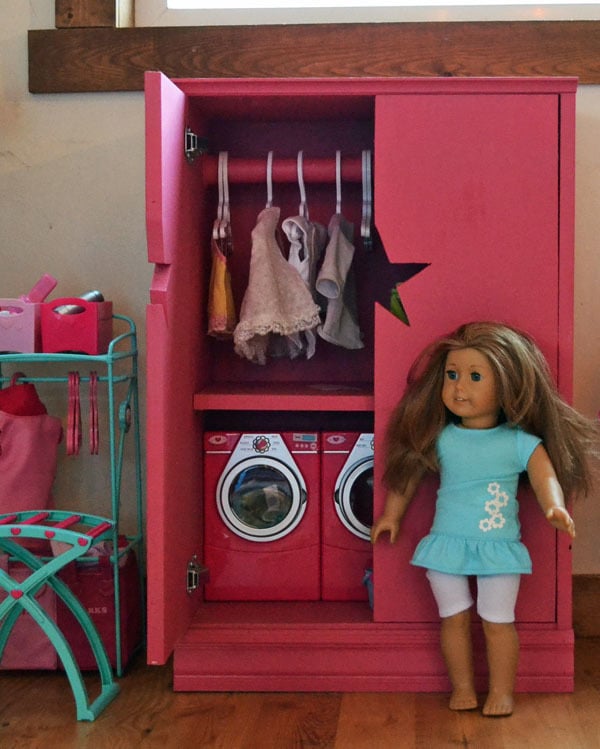
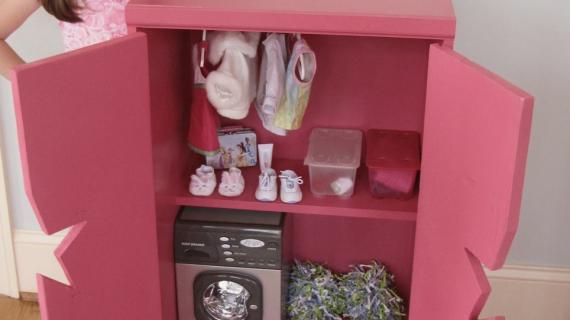
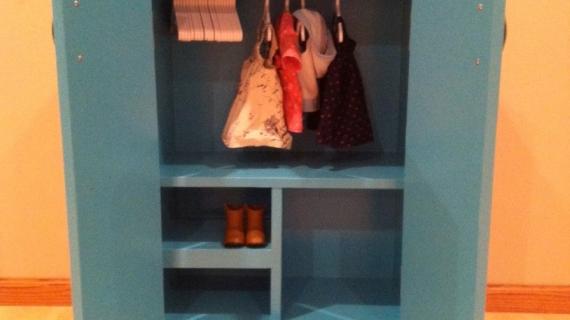
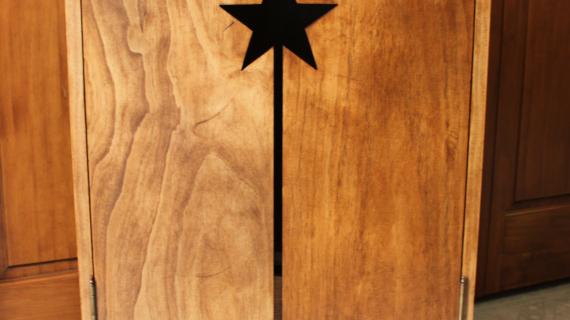
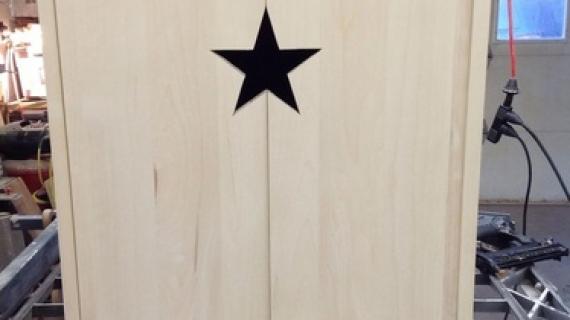
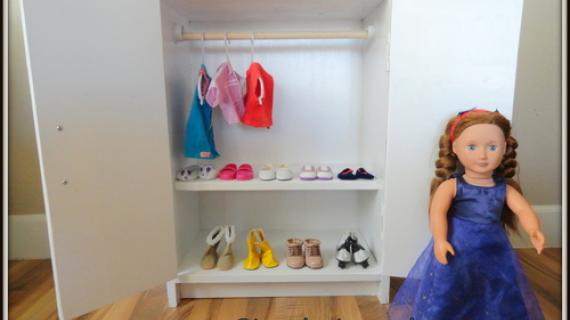
For American Girl or 18" Doll, make a storage cabinet or armoire with star cutout. Free plans.

I hope you had Merry Christmas!

I know I've been a little quiet this weekend. We've been spending some much needed family time, just hanging out at home mostly in our jammies, doing things like cooking and eating and playing board game.  And of course Grace is playing with her new toys!
Before we get to what Grace is playing with - and I'm super excited about putting her toys in when she's not playing with them - wanted to highlight a few amazing toys made by you!

Shared on our Facebook Page ...
Tool Workbench from Aisha

Clara Table and $4 Chairs from Lisa
Dream dollhouse not just for girls by Chris
And Bragged (thank you!) ... here's just a few ...
There's so many amazing projects, I can't post them all - but I hope you take a second to check out all the amazing projects on the Brag Blog!  There are many more projects just as darling as these full of ideas and tips and tricks.  And to those of you submitting projects, a huge thank you!  You are keeping us inspired!
And sweating!
Whew, now it's my turn to post the project I made for Grace.  This is hard!  All of your projects are so good!  
I made this simply doll armoire to store all the accessories Santa was bringing for Grace's American Girl. 
Lucky gal ... I've been dreaming of a washer and dryer in my closet for years!
And yes, Grace loves her little doll cabinet.
And Moms are going to love it too.  The cabinet holds the doll accessories, and is sized to work as a nightstand.  I cut a star out of doors instead of spending more on handles or knobs and spray painted everything pink.  The shelf is adjustable, but you can make a fixed shelf.
All accessories you see are purchased from Target.  Grace is of course DIY.
Do you have a basket full of doll accessories with no where to go?  You can build this cabinet in no time for about $30 in lumber and materials.  
Dimensions
Dimensions are shown above. NOTE: I altered the plan 1 1/4" shorter so all cuts can be made from a single 1x12 8 feet long.

Preparation

Shopping List

1 - 1x12 @ 8 feet long
1 - 1x10 @ 6 feet long
3 1/4" base moulding or 1x3 for footer (20 1/2" long)
Top edge moulding (20 1/2" long)
wood dowel for closet rod
rod pockets
hinges for inset cabinets
You can use either 2" screws or 1 1/4" pocket hole screws

Common Materials
1 1/4 inch finish nails
120 grit sandpaper
paint
paint brush
Cut List

2 - 1x12 @ 28"
1- 1x12 @ 20 1/2"
1 - 1x12 @ 19"
1 - 1x10 @ 19"
1/4" plywood or other backerboard 20 1/2" x 28 3/4"
Moulding @ 20 1/2" OR 1x3 @ 19"
2 - 1x10 @ 24 1/2"

Cutting Instructions

See step 1 before cutting boards.

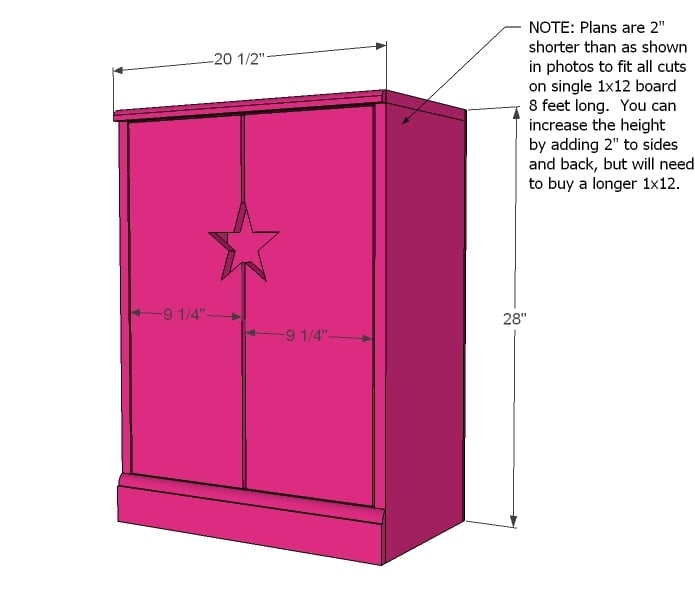
NOTE: Cut list is adjusted from diagrams to be 3/4" taller than diagrams to maximize board use.

Tools
Tape Measure
Speed Square
Pencil
Safety Glasses
Hearing Protection
Drill
Jigsaw
Brad Nailer
Power Sander
Drill Bit Set
General Instructions

Please read through the entire plan and all comments before beginning this project. It is also advisable to review the Getting Started Section. Take all necessary precautions to build safely and smartly. Work on a clean level surface, free of imperfections or debris. Always use straight boards. Check for square after each step. Always predrill holes before attaching with screws. Use glue with finish nails for a stronger hold. Wipe excess glue off bare wood for stained projects, as dried glue will not take stain. Be safe, have fun, and ask for help if you need it. Good luck!

Instructions

Step 1

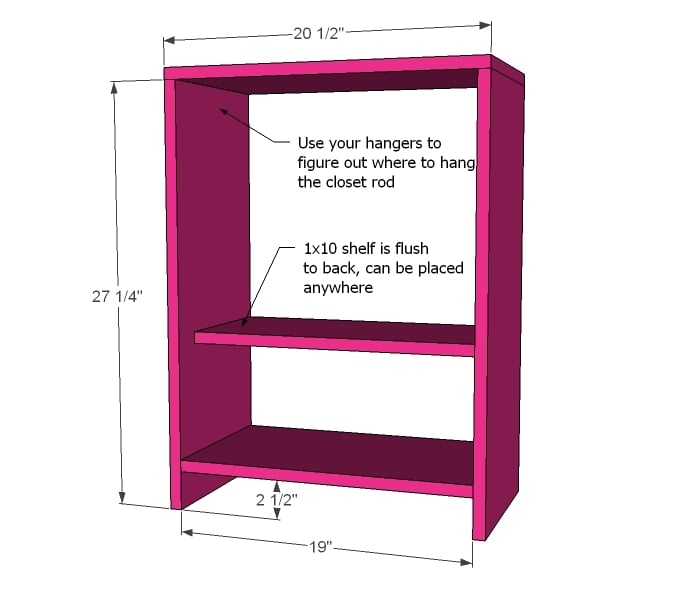
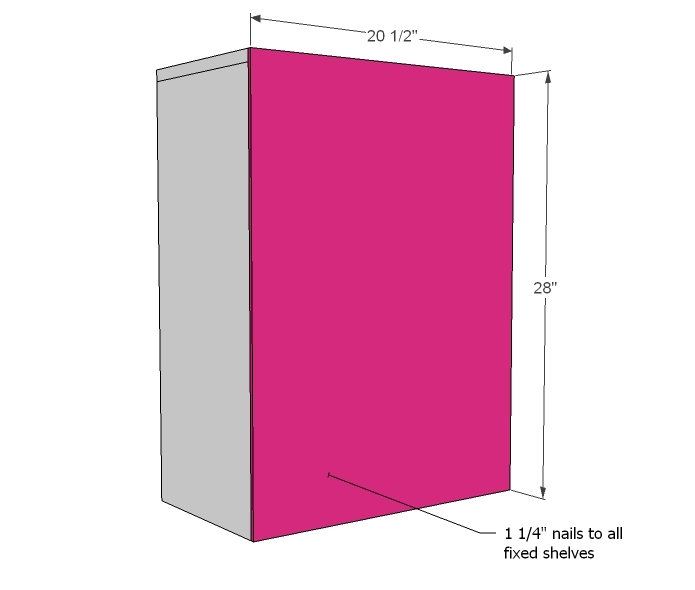
Measure the width of your 1x10 boards. If they are 9 1/4" wide, you are good to go. Otherwise, you will need to adjust the width of this cabinet. Take the width of your 1x10 board and multiply by 2. Add a half inch. This is the width of your shelf. Add another 1 1/2" and this is the width of you top.

Build the box as shown above. Shelf placement is up to you - I made mine adjustable with shelf pins, but you could also screw in place. Use either countersunk 2" screws and glue or pocket hole screws.

Adjust for square.

Step 2

Cut back to fit and attach, ensuring cabinet is square.

Step 3

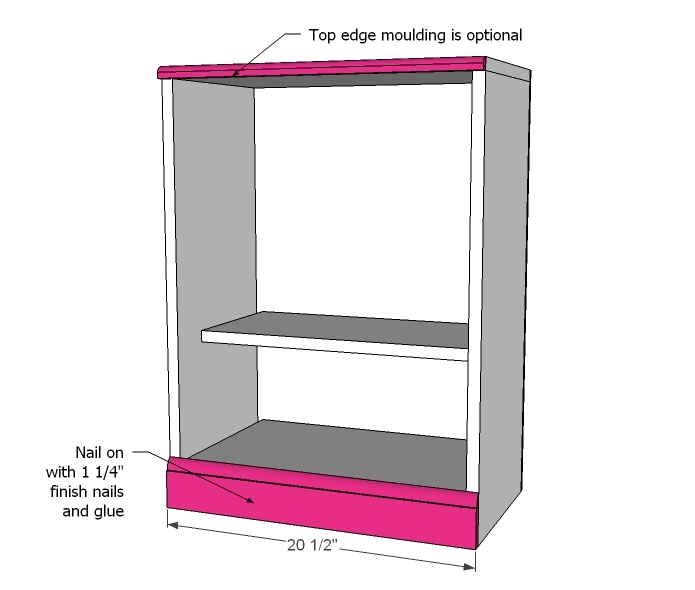
If you choose to use moulding, add to top edge and bottom with 1 1/4" finish nails and wood glue.

Step 4

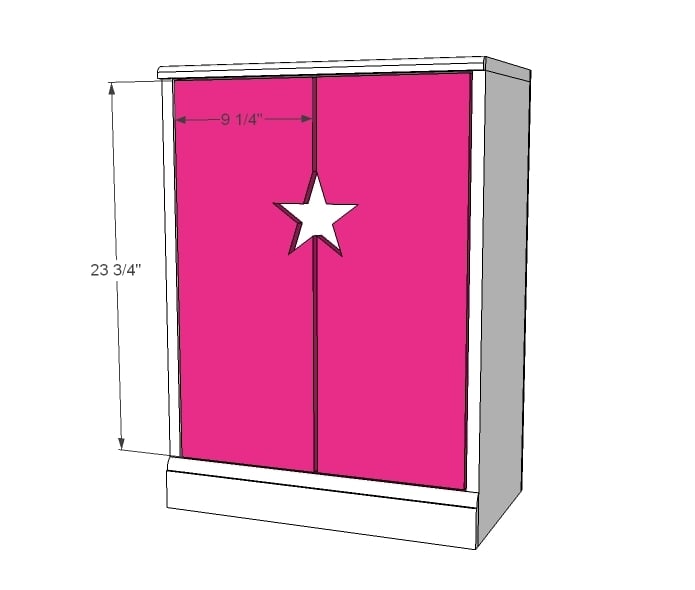
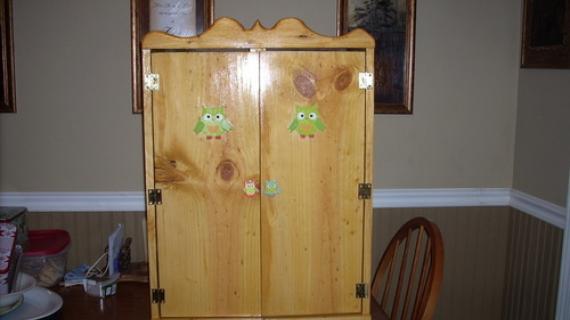
Cut doors 1/4" less than overall height. Install, screwing in place. I used Euro Style Butt Non Mortise hinges for Full Overlay/Inset, but an alternative is to use standard hinges placed on the face of the cabinet.

Clasp or hasp is recommended to keep door shut.

If you are cutting the star from door fronts, see step 6.

Step 5

Step 6

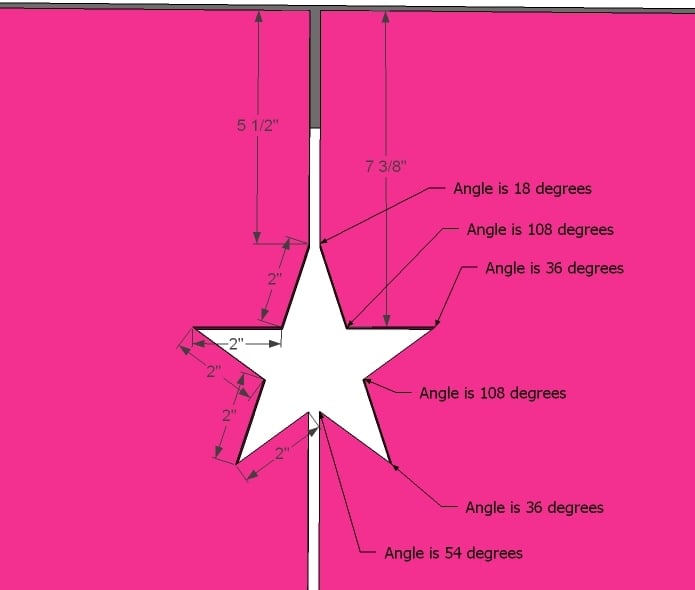
The star was actually really easy to cut and so cute (and cheap!). Just practice first, use a compass to get the angles right, and cut out carefully with a jigsaw making straight cuts. I filed smooth with a file.

Finishing Instructions
Preparation Instructions
Fill all holes with wood filler and let dry. Apply additional coats of wood filler as needed. When wood filler is completely dry, sand the project in the direction of the wood grain with 120 grit sandpaper. Vacuum sanded project to remove sanding residue. Remove all sanding residue on work surfaces as well. Wipe project clean with damp cloth.

It is always recommended to apply a test coat on a hidden area or scrap piece to ensure color evenness and adhesion. Use primer or wood conditioner as needed.

Comments

Bonny Eicher (not verified)

Tue, 12/27/2011 - 07:43

Just wanted to say how amazing you all are who made these wonderful gifts! It really gives me inspiration. Merry Christmas and Happy New Year.

Aisha

Tue, 12/27/2011 - 20:41

Beautiful work as usual Ana!! I love the comment about Grace being DIY. And imagine my shock when I saw my little workbench featured up there. I just about fell out of my chair! Thanks for the amazing plans, you`re one of a kind!

Guest (not verified)

Wed, 12/28/2011 - 06:06

LOVE the design! I just rearranged my girls room to where they can now have a nightstand between their beds. I was planning to use an old table, but this will be perfect for them since they are into all things American Girl right now. FYI, you forgot to put the plywood in the shopping list. It is in the cut list though.

Nate Feinberg (not verified)

Sat, 01/07/2012 - 12:24

I have tried to download the PDF file of the doll closet with the star cutout but it keeps giving me an error message. Can you please help me. I have a request from my 6 year old granddaughter to build one for her plus two beds. I would appreciate any help you can give me.

Thanks,

Nate

Karis (not verified)

Wed, 01/11/2012 - 17:05

My daughter just got her first AG doll for Christmas and we have been searching for a wardrobe. She also got the bunk beds for her doll on your site and I was hoping that you would be coming up with a wardrobe and here it is!!! Thank you for being so amazing and sharing all your plans. This will be perfect for her birthday!

jenni (not verified)

Thu, 01/12/2012 - 16:39

OMG!!!!!!! it is so pretty i just want it..i showed it to my pappaw and he said he will try to make it for me i have 5 ag dolls.............

Gail Scharf (not verified)

Tue, 04/24/2012 - 05:31

I am also having trouble opening this as a PDF. Can you help? What am I doing wrong. Love your patterns. I just made one of your raised beds and am going out to make more. So excited. They look great and are so economical!

Jeff (not verified)

Fri, 05/11/2012 - 12:52

Love this, but I am having the hardest time finding hinges like those. I can find the regular mortise ones but don't really want to but a forstner bit just for this. Where did you get those?

kimmeam (not verified)

Mon, 06/18/2012 - 08:53

I am so excited to make this! It will be perfect for my Chloe Belle! She is my 4 year old yorkie diva. Her wardrobe is twice the size of mine, I swear! She loves loves her clothes. Thank you for the fabulous instructions. I'm going to give it a try all by myself ;)

Nana Rebecca (not verified)

Wed, 10/17/2012 - 18:29

Ana, thank you so much for posting these marvelous patterns! And FREE too. I'll be making several things for my granddaughter's American Girl Doll and find your directions beautifully written. I'm delighted to have found your site! Thanks again.

Fern + McKenna <3 (not verified)

Mon, 11/05/2012 - 07:36

I love this so much, but lack the skills and tools to make it. Also, living in the UK cant get target stuff >_

Jen Steffes (not verified)

Mon, 12/17/2012 - 19:39

My husband is making the AG Armore from your site and we are so close to finishing, but we cannot find the hinges at Home Depot! Is there another name for them or do you have a picture of them? Can you let us know where you got them? We are going to try again tomorrow night at Menards! Thanks so much for your amazing ideas and talent! Merry Christmas!

Monster1122

Mon, 05/20/2013 - 05:02

Thank you so much for the post you do. I like your post and all you share with us is up to date and quite informative, i would like to bookmark the page so i can come here again to read you, as you have done a wonderful job. http://hgh3x.com

Kindes88

Sat, 06/27/2015 - 17:50

Omg love the pink AG closet. Got the instructions to build the closet but would like the instructions and supply list for the washer dryer. Could you please share that info? My daughters bday is coming up and I need to make this with the washer dryer included

douglasnoe

Sat, 01/02/2016 - 09:27

Made the farm bed and will now try the wardrobe ever figure out how to get the plans

Frequently Asked Questions

Wood Questions

What kind of wood should I use?
Most of our plans use standard construction lumber like pine or fir. It's affordable, easy to work with, and easy to find. It's also rapidly renewing and biodegradable, so a great eco friendly choice!

Can I use hardwoods instead?
Yes—just keep in mind they're heavier, cost more, and can be tougher on tools and harder to join together and finish. I recommend not tackling a hardwood project until after you have built several softwood projects.

What if my boards are warped?
Choose the straightest boards at the store. You can often work around slight warps by cutting them into shorter pieces.

What wood should I use for outdoor furniture?
Use red-toned or pressure-treated 2x lumber for framing, and cedar or cedar fence pickets for the decking. Outdoor furniture should be built like a deck—your local home center can help recommend the right wood for your climate.

Will my wood move or warp after I build?
Potentially, especially in humid climates. Let your wood acclimate indoors before building. Once acclimated and kept in a stable environment, movement should be minimal. Remember, most houses are built using framing lumber - it's all about keeping moisture down indoors.

Cutting Questions

Do I need a miter saw?
A miter saw is great, creating fast, safe, and precise cuts, even for beginners. But most plans can be built with a circular saw and a straight edge. If using a circular saw to cut, take time to practice, and get good at making cuts, before cutting your project boards.

How do I get clean cuts with a circular saw?
Clamp your board, measure twice, cut slow, and use a sharp blade. This takes practice, so spend some time making cuts. I go through becoming proficient at freehand cutting in my course, it is worth taking if you want to master this skill.

Will the store cut my wood?
Yes—most stores will do rough cuts to help you transport your materials home. But from store to store, the quality of cuts could greatly vary.

Joinery Questions

What screws should I use?
We recommend star-head self tapping screws for framing, most common sizes are 2-1/2", 1-3/4". Pre-drill if close to the edge or you find your wood is splitting.

Do I have to use pocket holes?
Pocket holes are the cheapest, easiest and fastest way to do some joints - like edge to edge or a hidden fastener joint. There are other methods, but these can be time consuming and expensive. We recommend using pocket holes as indicated in plans for best results.

How do I keep things square?
Use a speed square and measure diagonals after each step. Always clamp joints before screwing to keep them tight and flush.

Finishing Questions

Stain or paint before or after building?
A quick sand before and a full finish after gives the best results. Pre-finish if you're doing two-tone or detailed finishes.

What type of finish?
Use oil-based or water-based stain. For paint, cabinet-grade latex or enamel works great. High use surfaces on indoor projects should get a coat of polyurethane, I recommend a Helsman or Spar or other flexible poly that won't crack or peel with wood movement. For exterior projects, use a finish suitable for exterior fences.

How to get a smooth finish?
Start with a well sanded project. Sand between coats (220 grit), wipe clean, and apply light coats with a foam brush or roller.

Plan Questions

Can I change the size?
Many people do, and that's the great thing about building your own furniture! But do keep in mind going bigger might mean more supports are required, and often plans are optimized for minimal material waste.

Are these beginner-friendly?
Yes—plans are written with simple tools and clear steps in mind, with every effort to make plans as simple as possible.

Can I sell what I build?
Absolutely! Just don’t resell or repost the plans themselves.

General Questions

What tools do I really need?
A drill, circular saw, tape measure, square, and a few clamps will get you through most projects.

Do I need a workshop?
Nope! A driveway or small patio is plenty to get started, just make sure you have a level place to work. If you find you are building several projects a year, creating a small workbench is a great way to store tools and have a dedicated workspace.

What if I mess up?
Wood filler, sanding, or flipping boards goes a long way. Mistakes are part of the process!

What can I do to make my projects look more professional?
Start with straight boards, make accurate cuts, clamp all joints, and line up everything neatly. Sand thoroughly, use a neutral finish, and apply it in light coats for a clean look.

I've never built anything before. Where should I start?
Start with a few smaller softwood projects to get hands-on experience. Or if you're tackling a big project, buy a little extra lumber and practice your cuts and joints first. If possible, work with someone who has a bit of experience.

Care & Maintenance

How long will my furniture last?
With good joinery and regular care, your DIY furniture can last for decades. I have pieces in my own home that are over 20 years old and still going strong! One of the best parts about DIY furniture is that it’s easy to repaint, refinish, or repair—so your projects can grow and adapt with you.

How should I care for outdoor furniture?
Lightly pressure wash or hose it down once or twice a year. Tighten screws and reapply finish as needed to protect it—just like a deck or fence. A little upkeep goes a long way in extending the life of your furniture.

How about indoor furniture?
Regularly dust or wipe with a damp cloth. If it starts to look worn, a light sanding and touch-up paint or stain can refresh it in no time. DIY pieces are meant to be durable and fixable—so don’t be afraid to give them some love now and then.

Want to Build with Confidence?

Check out my ebook: 12 Skills to Build Your Own Furniture
It walks you through the core skills every builder needs—measuring, cutting, joinery, and finishing—so you can build beautiful furniture that lasts.

Still Have Questions?

Email us anytime at [email protected] and we’ll be happy to help!