
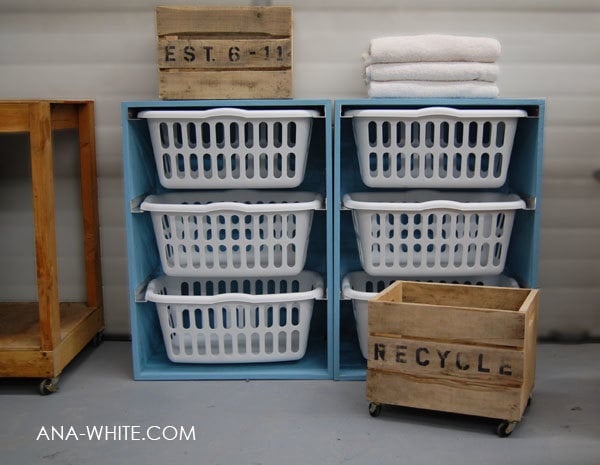

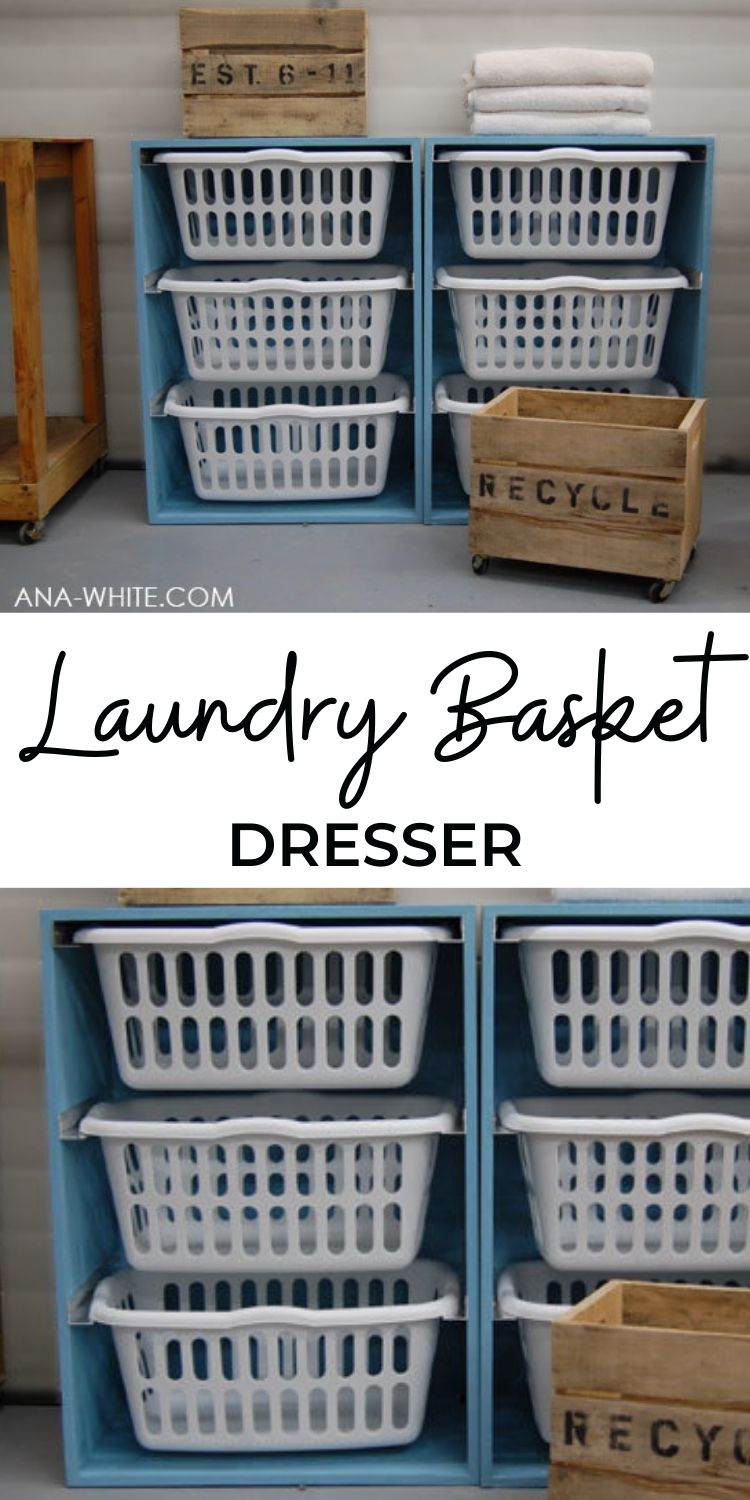
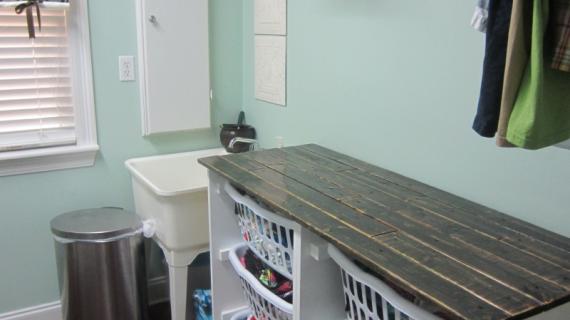
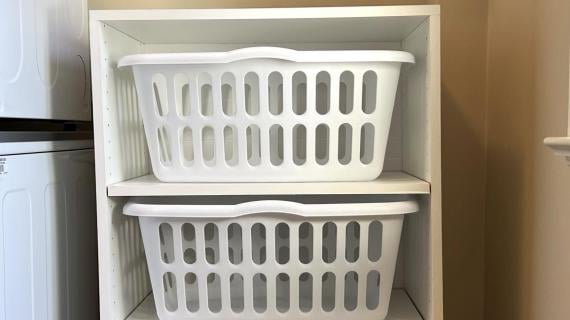
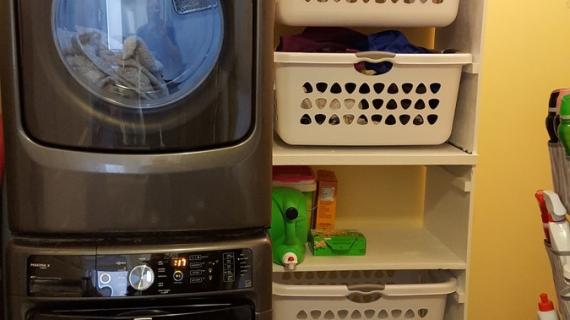
The Laundry Basket Dresser has taken my laundry room from the messiest room in my home to the tidiest. It's so easy to pull laundry out and put it directly into baskets. I then can take each basket to it's respective room and fold and put laundry away. For any busy home, these are a must.
This really wasn't my idea. I have some smart sisters. They looked at the piles of laundry in my tiny laundry room, and said, Ana, what if . . . 
All your laundry baskets could be like drawers in a dresser . . .

And we didn't have to see your dirty - and clean - laundry every time we visit.
In my defense, most of the piles of laundry in my home are clean. They just rarely make it to the dresser.
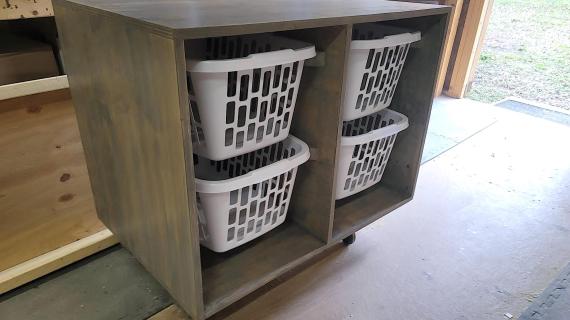
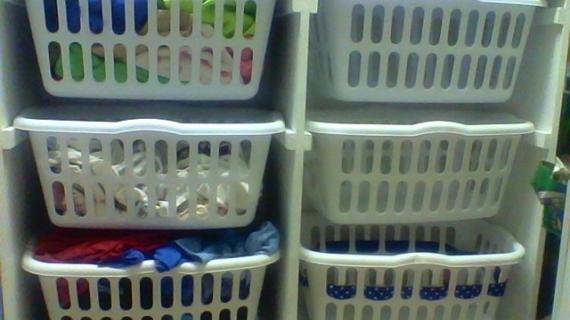
But this is one dresser that I can work with.
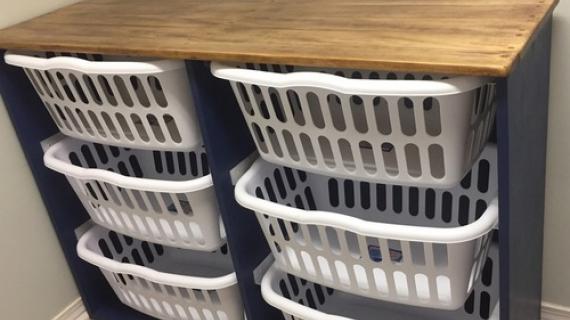
I can deal with stacks of laundry with this system! Do you have a laundry problem?

PS - If you are interested in a slightly different size/configuration, check out these plans as well!
Pin For Later!
Preparation
3/4″ Plywood cut into 15 1/2″ wide x 8 feet long strips (referred to as 1x16s)
1/4″ Plywood for the backs
1 1/2″ x 1 1/2″ metal angle (ask for it at Blue or Orange)
2″ wood screws or 1 1/4″ pocket hole screws 3/4″ wood screws (to screw the metal angle to the insides of the boxes)
1 1/4″ wood screws
wood glue
wood filler finishing supplies
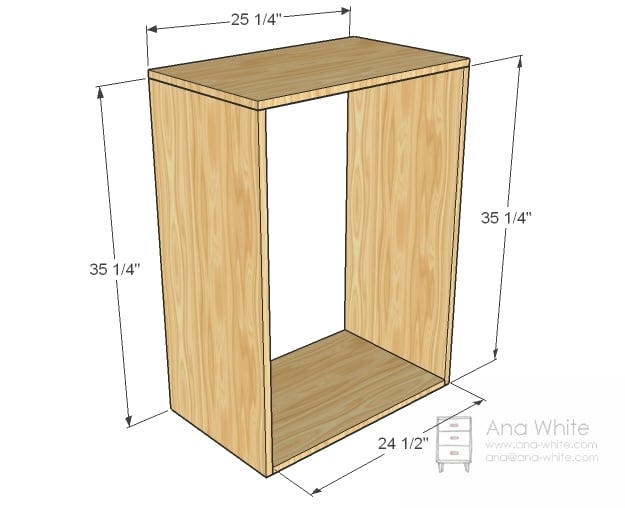
2 – 1×16 @ 35 1/4″ (Sides)
1 – 1×16 @ 24 1/2″ (Bottom)
1 – 1×16 @ 26″ (Top)
1 – 1/4″ Plywood @ 36″ x 25 3/4″ (Back)
6 – 1 1/2″ x 1 1/2″ Metal Angle 15 1/2″ long (ask hardware store to cut or cut with a hack saw)


Instructions
Step 1

Build the Box
I used pocket holes, but you can also use 2″ wood screws countersunk and screwed together to build the box.
NOTE: Top Measurement should be 26″
Step 2
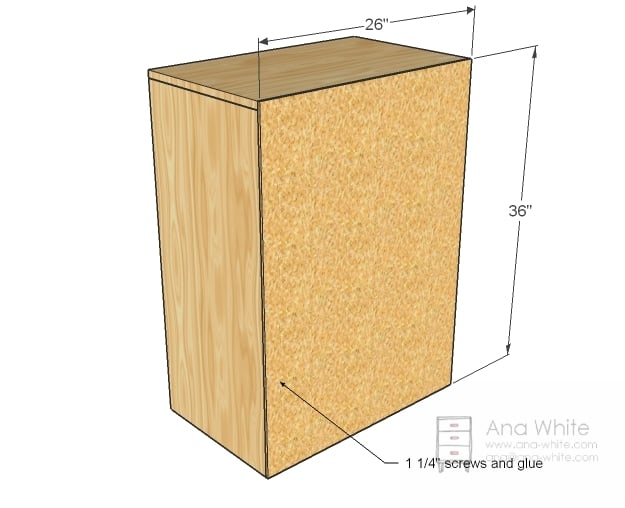
Back
Adjust for square then screw the back on with 1 1/4″ screws and glue. I finished mine at this stage by filling all holes with wood filler, all plywood edges, and any imperfections in the plywood. I then sanded with coarse sandpaper because the plywood was builder grade cheapo stuff, the finished with medium sandpaper. Finally, I primed and painted with ooops paint in semigloss from Valspar.
Step 3
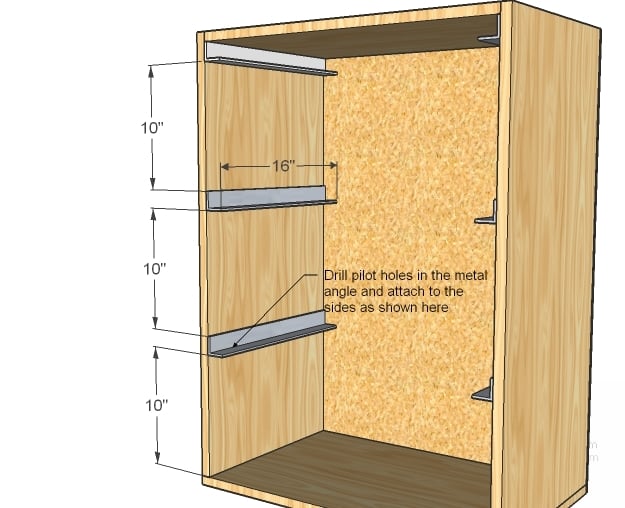
Metal Angle
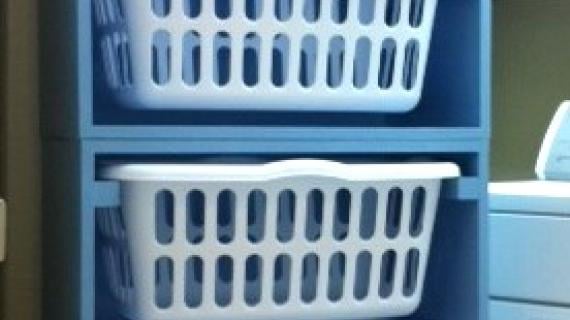
If you are intimidated by metal angle, you can always use 2x2s glued and screwed here. Cut the metal angle with a hack saw and predrill holes (three per slide). Mark locations with a square and screw metal angle to the sides. TIP: Screw at a very slight downward angle to keep the baskets to the back of the box instead of sliding forward.
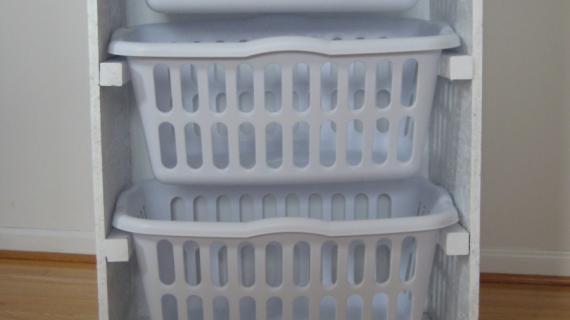
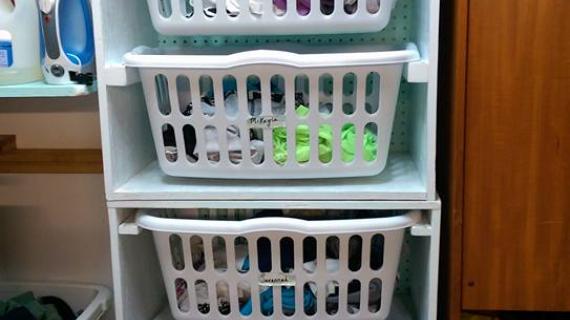
If you choose to stack, make sure you secure the top laundry basket dress to a stud in the wall.


Comments
Rachel (not verified)
Mon, 11/15/2010 - 22:26
Genius! I love this idea!
Genius! I love this idea!
Mlb71100
Sun, 01/08/2012 - 17:41
Will modify if for a loft project.
I can't wait to make this for my sons' loft. Theirs will be low and approx. 5th long with pull out bins for toys. I bought the supplies today, now I just need time to do it:)
motherof5bears (not verified)
Wed, 11/14/2012 - 07:43
Pull out bins for toys.
Oh my!My heart just started to race this would be sooo good for toys. They can take the basket where ever they want to play and bring it back to the basement when they are done.
In reply to Genius! I love this idea! by Rachel (not verified)
Smartmiltoys
Sun, 11/13/2016 - 04:13
That laundry dresser is super
That laundry dresser is super, extra fabulous! You’re right, it is a good idea for toys as well. What talent she has. I’m going to check out her site. I’m not that ambitious, at least not right now, but I would love to have a laundry basket dresser for my laundry and one for toys. Thanks for sharing this.
Jennifer (not verified)
Mon, 11/15/2010 - 22:29
I hate laundry too! and mine
I hate laundry too! and mine is usually clean too and has a hard time making it to the dressers! glad to know I'm not the only one in this boat! I love this idea. thanks
Katy (not verified)
Mon, 11/15/2010 - 22:34
Those are great! I used to
Those are great! I used to have a laundry couch before we moved....All the clean laundry would go onto the couch...It was just easier. This storage could have work for me back then. Now it'll work fo me now. thanks Anna.
Tania (not verified)
Mon, 11/15/2010 - 22:46
It's supposed to go in the
It's supposed to go in the dressers? Haha! Genius idea!
Miranda (not verified)
Mon, 11/15/2010 - 22:56
I love this!! I wish I had
I love this!! I wish I had the tools, but we still haven't accumulated any since moving here to AK. What a great organizing idea. I'm impressed with you AND your sisters!
Guest (not verified)
Sun, 01/29/2012 - 13:33
Home Depot
Just a thought for you but Home Depot will cut any wood that you by there. I made a complete entertainment center with plywood from their and they cut all of it. I live in an apartment and don't have cool tools either.
Jill B (not verified)
Fri, 11/30/2012 - 08:53
Great Tip on Home Depot
What a fantastic tip. Thanks so much for sharing, I never would have known they will do that; now that I know, this project actually seems feasible for me. The laundry dresser may in fact change my life.
Joan (not verified)
Mon, 11/15/2010 - 23:25
Great idea! I'm thinking this
Great idea! I'm thinking this would work for a recycle tower also.
Julie (not verified)
Tue, 11/16/2010 - 00:33
Love this idea! I hate
Love this idea! I hate laundry and it spends a while down there in my laundry room. This will make the clutter look good!
Trish (not verified)
Tue, 11/16/2010 - 00:47
awesome idea ...now if I just
awesome idea ...now if I just convince my husband
Laurie V (not verified)
Tue, 11/16/2010 - 00:57
Cool. I was thinking you
Cool. I was thinking you could also add wheels, finish the back, and when people come over, you could just flip it around. You could even paint on fake drawers on the back to look like a "real" dresser, haha!
In reply to Cool. I was thinking you by Laurie V (not verified)
Chair
Mon, 04/04/2011 - 17:55
LOL
Clever and practical!! :)
Karlee
Tue, 12/27/2011 - 02:32
That would be an adorable
That would be an adorable idea!
Guest (not verified)
Sun, 02/19/2012 - 11:36
Great idea!
Great idea!
Melinda (not verified)
Tue, 11/16/2010 - 01:22
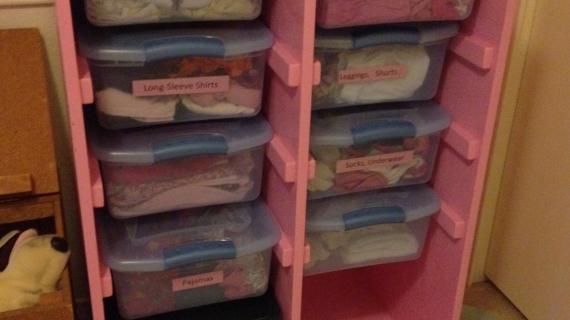
This would be amazing storage
This would be amazing storage for a childs playroom as well. You could substitute laundry hampers for the clear plastic bins. I may have to do this for my child's playroom as well as my laundry room! Thanks for the plans!
Erica (not verified)
Tue, 11/16/2010 - 01:37
It's like you read my
It's like you read my mind...I had just this idea in mind for my utility room. I also wanted to have some sort of horizontal system similar to this one for my recycling.
Kari (not verified)
Tue, 11/16/2010 - 01:54
This is an awesome idea!
This is an awesome idea! Also something you could use for recycling if you wanted as well. Thanks Ana! And Laurie love the idea of finishing the back and painting on faux drawers!
Tracy (not verified)
Tue, 11/16/2010 - 01:59
That is an excellent idea!
That is an excellent idea! Ha ha right up my alley!
Ashley (not verified)
Tue, 11/16/2010 - 02:01
Love it, but I wonder if the
Love it, but I wonder if the plastic sides of th ebasket might end up caving in with the weight of the laundry eventually?
LOVE Laurie's idea as well about being able to spin them around and hide the insides.
Jones (not verified)
Wed, 06/06/2012 - 09:16
I was wondering as well about
I was wondering as well about the weight limits. How sorry would someone be to adjust this for dollar-store baskets, and then not being able to get the same size later?
Tension rod curtains are golden for closing off the mouth of a cubby.
Shelly (not verified)
Tue, 11/16/2010 - 02:02
My husband says THANK YOU. I
My husband says THANK YOU. I have begun to refuse to put anyone's clothes away they are all capable of doing it themsleves. This way it does not have sit in boxes in the hall it can have a real home until they come to get thier own laundry. Thank you again.
Kev (not verified)
Tue, 11/16/2010 - 02:04
Could you use 2x1 instead of
Could you use 2x1 instead of angle looks sharp on front edge?
In reply to Could you use 2x1 instead of by Kev (not verified)
mrsbennett
Sun, 05/15/2011 - 15:40
that was my thought
the angled metal was super expensive when i went to look for it so i'm planning on substituting with either 1x2 or some scrap 2x4 ripped down!
Emily (not verified)
Tue, 11/16/2010 - 02:04
I had to laugh when I saw
I had to laugh when I saw this! my husband has used this method for years for his clothes. He normally gets made fun of for it.... he was just ahead of the game!
Love it.
Carrie (not verified)
Tue, 11/16/2010 - 02:16
I'm thinking Toys!!! and love
I'm thinking Toys!!! and love the idea of finishing the back and turning them around!! perfect for the living room!!!! this one is a must for us.
Chris S (not verified)
Tue, 11/16/2010 - 02:29
I have been using almost this
I have been using almost this same system for about three years now, and it works beautifully! We had two shelves put in our laundry room directly under the hanging bar. I sized them to hold two laundry baskets each. I fold each person's laundry into their own basket. Everyone in the house is responsible for taking their basket to their room, putting away the clothes, and returning the basket. And if they forget, their pile is out of the way and not my problem. Love it!
Anna R (not verified)
Sat, 01/21/2012 - 06:59
Good use of wall space
I would love to see a picture of your laundry system. My laundry room is small, and using the wall space would help.
Brenda Hester (not verified)
Wed, 02/22/2012 - 10:58
Baskets to sort colthes, so everyone gets their own
For small rooms...those shelves, that are at Bed, Bath and Beyond - $9.99, that sit on the back of your washer...can also sit on the back of the dryer. They are smaller but you just have to find smaller but TALLER baskets.
Tracie (not verified)
Tue, 11/16/2010 - 02:33
Love these!!!!!
Love these!!!!!
Jennifer Woiccak (not verified)
Tue, 11/16/2010 - 02:42
This would be perfect for my
This would be perfect for my house- our laundry area is basically a closet in my kitchen. I could sort all my laundry and have it neatly hidden while I was doing it all day. Awesome idea!!
Tanja (not verified)
Tue, 11/16/2010 - 02:42
Are you kidding me?!?!!
Are you kidding me?!?!! LOOOOVE IT! JUST WHAT I NEED!!! FANTASTIC! What a fantastic idea!!! Keeping it simple and so darn effective!!! And totally affordable! Of course now I'm thinking about smaller scale ones for the kids rooms as well. Your sisters and YOU rock all the way!!! Thank you!
Jackaboomomof2 (not verified)
Tue, 11/16/2010 - 02:44
These are AWESOME!! I see
These are AWESOME!! I see myself adding a simple door to the front, my kids could easily put their clothes away in there, or toys, or stuffed animals... my head is spinning with ideas. Thanks Ana!!!
Molly (not verified)
Tue, 11/16/2010 - 02:46
I love it! Love the idea of
I love it! Love the idea of wheels also. It would be great for fabric storage for sewers/quilters as well and several boxed together would provide a base for a nice sized cutting surface. Can't wait to start building a few!
Dorothy (not verified)
Tue, 11/16/2010 - 03:17
This is the most brilliant
This is the most brilliant idea EVER!!!! I am so doing this. Our laundry area is the basement floor and it's ridiculously messy. And I hate it. This will solve my problem. THANK YOU!!!
Dana (not verified)
Tue, 11/16/2010 - 03:24
I really, really, REALLY love
I really, really, REALLY love this idea!! I just need to figure out where it could fit near my laundry room.....
Valerie Stayton (not verified)
Tue, 11/16/2010 - 03:26
GREAT IDEA! Instead of
GREAT IDEA! Instead of clothes hampers they can each have their own basket and since they are 2 to a room I could make it 2 high. Oh I think you are on to something here. :-D
Lindsay (not verified)
Tue, 11/16/2010 - 03:29
This would be great for
This would be great for storage in toy room too.
Julie (not verified)
Tue, 11/16/2010 - 03:31
Ana, I LOVE this idea. I want
Ana, I LOVE this idea. I want to build it right away...just a quick question though. Is it 26" on top? In some pictures the 26" cut is on top and on others it is on the bottom. Which is the best way to build this? Thanks so much for all you do. I love your designs and can't wait to get started on this.
Jeannine (not verified)
Tue, 11/16/2010 - 03:32
I love this idea too! I saw
I love this idea too! I saw on another site where someone did something similar but did 3 baskets wide and 2 high and used it as a base for their new front load washer and dryer instead of paying the $200-$300 each for the bases for the units. I think they were constructed with more "robust" wood to accommodate the weight of the washer and dryer but same basic system. I have kept this in the back of my mind for when we replace our washer and dryer and can hopefully go to a front load system. Thanks for sharing you plans!
Michelle (not verified)
Tue, 11/16/2010 - 03:43
I have a confession to
I have a confession to make...I have been wanting something like this for a long time but not for the laundry room. My kids are ... well... I have 4 teenage kids and the laundry situation at my house is just outta control. And not in the laundry room but in the kids bedroom. I often thought if there was a way to make them dressers that were laundry baskets, they could just throw their clothes in them and that would be that, after all that's what they try to do with their dressers anyway but the drawers are not deep enough and they just stuff and stuff until the bottom falls out, literally! So I have been wanting to figure out something clever but all I kept coming up with was a book shelf and put the baskets in that. This is just so great!! THANKS SO MUCH from the bottom of my heart :D
Amanda H. (not verified)
Tue, 11/16/2010 - 03:45
This is great. Tons of uses
This is great. Tons of uses besides laundry too! Toy storage, Shoe storage and the list goes on! You could also put a piece of fabric on the front to hang down to "hide" it when you have company. Thanks Ana (and sisters)!
Patricia Christie (not verified)
Sat, 09/08/2012 - 10:48
I live in a high dust area
I live in a high dust area (depleted top soil, high wind = lots of dust), and I don't have a lot of tools. I love the "dresser" with the doors, but I'm not confident enough that I could pull that off. I was thinking the fabric panels would be a good idea, too! I could attach the fuzzy tape to the front edge of the wood case, and sew the hook tape onto fabric panels, and voila! If I want to change out the panels, or just wash them, it would be easy-peasy!
Rachel (not verified)
Tue, 11/16/2010 - 03:46
Yes!!! This is exactly what I
Yes!!! This is exactly what I need! I even already have the laundry baskets! Perfect :)
Kate (not verified)
Tue, 11/16/2010 - 03:46
I'm so excited! My husband
I'm so excited! My husband and I were just "discussing" our overflowing laundry problem the other day. These plans will work perfectly!
srelliot (not verified)
Tue, 11/16/2010 - 04:00
Oh my Goodness! I totally
Oh my Goodness! I totally love this idea!!!! I hate laundry, I can handle washing and drying....but folding and putting away I absolutely despise! I am going to make this! I have the baskets all over my laundry room and this would be perfect to organize it!
momto3oke (not verified)
Tue, 11/16/2010 - 04:06
I love you Ana White! And
I love you Ana White! And apparently your sisters too! Laundry is my worst nightmare! My laundry room is a disaster with the piles spilling out into the hall and our living room itypically has a few baskets of folded laundry and unfolded laundry goes on the "laundry chair"...you know...if its one the chair, its clean, if its on the floor, its dirty. LOL! This is the answer to my laundry prayers! And I've been dying to build lately too. Now I have an excuse!
kimber (not verified)
Tue, 11/16/2010 - 04:10
This is AWESOME! No.
This is AWESOME! No. Really. What a fabulous idea. Thank you so much (and sisters) for sharing this. I just can't decide where to put it! (Since my laundry room is so small I can't even fit this in there. But I can't fit my laundry in there anytime, so this way my laundry will look good where ever I put it! Wonderful!!)
You rock!