
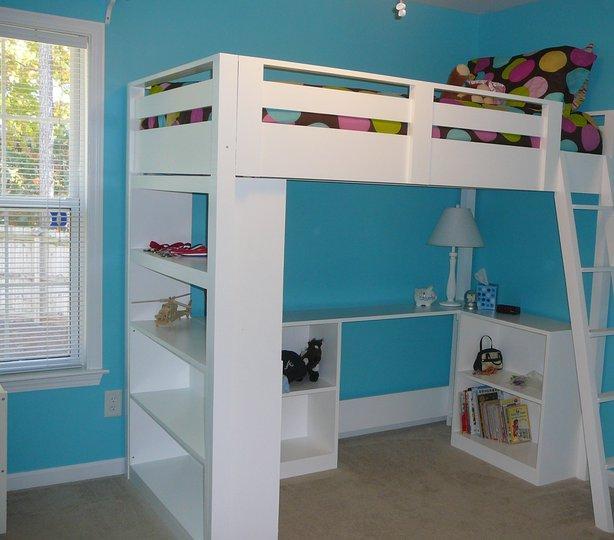

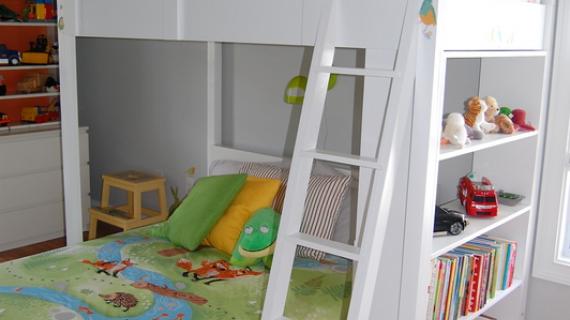
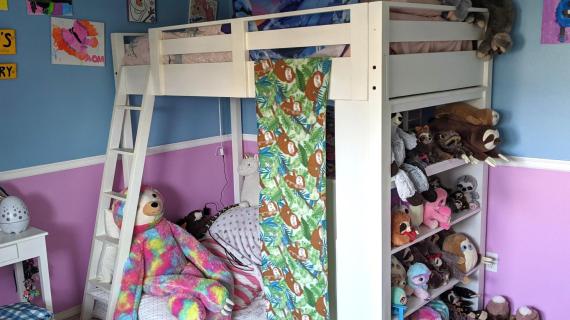
A large bookshelf plan that fits under the loft bed. Adds open storage in a pass through top design. Closed bottom design. Features four shelves. Free step by step plans with full diagrams by ANA-WHTE.com
See also: Loft Bed Plans and Under Loft Bed Desk System Plans
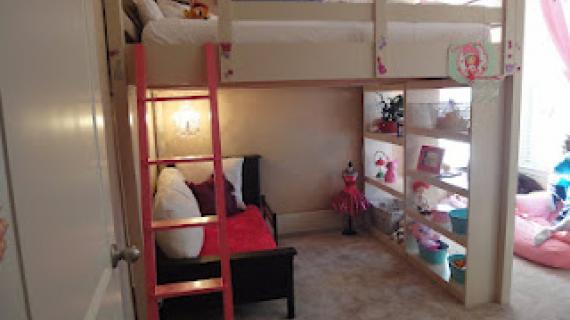
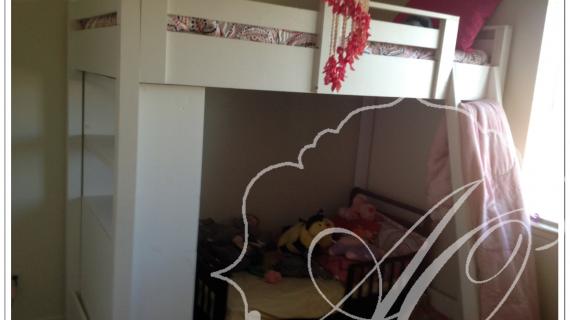
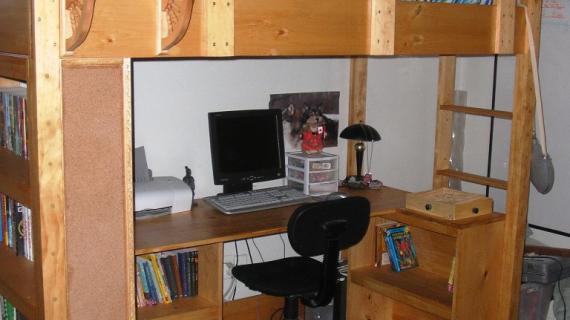
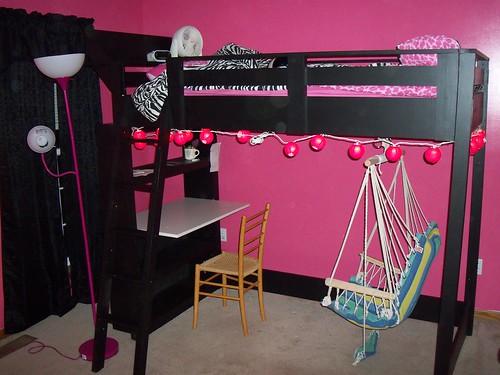
We wanted to add some storage under the loft bed - since that's why you do a loft bed, right? To increase the useable space in the room.


And you could even hide a CPU tower back there.

Today we will focus on the big bookcase. You can omit the bottom supports on the loft bed if you are going to be attaching the bookcase. The bookcase will give you all the support that you need.

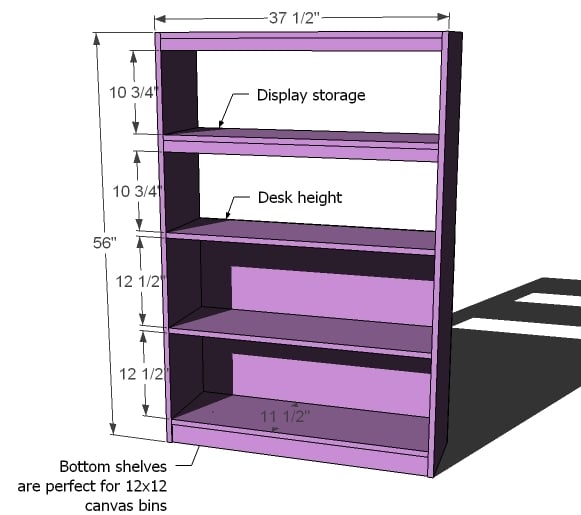
Overall Dimensions are shown above. What we are building today is a simple bookcase that could be used without the loft bed. Composition is 1x12 boards with 1x2 and 1x3 trim and 1/4" plywood back. This bookcase can be made from solid wood for a natural stain finish.
Preparation
- 2 – 1×2 Boards, 8′ Long
- 1 – 1×3 Board, 8′ Long
- 2 – 1×12 Boards, 10′ Long (Cut 2 Sides from one, and 3 Shelves from the other)
- 1 – 1×2 Board, 8′ Long (Cut 2 Shelves from this board)
- 1/4″ plywood 30″ x 38″ or larger
- 2″ self tapping wood Screws
- 3/4″ brad Nails (for tacking down the back, could be up to 1 1/4″ length nails)
- Glue
- 2 – 1×12 @ 56″ (Sides)
- 5 – 1×12 @ 36″ (Shelves)
- 1 – 1×3 @ 36″(Footer)
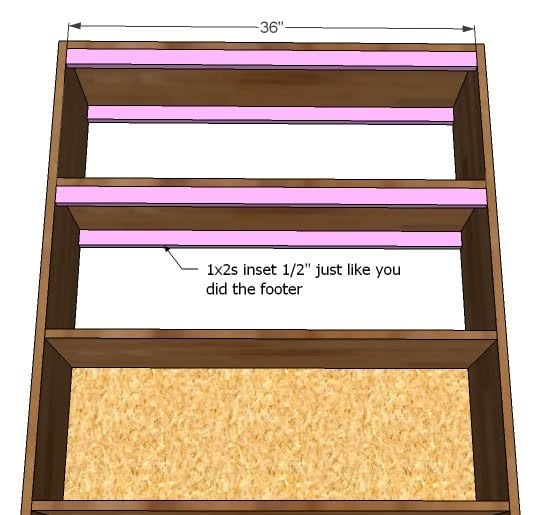
- 4 – 1×2 @ 36″ (Shelf Trim)
- 4 – 1×2 @ 9″ (Optional Shelf Supports)


Since we essentially build chop-screw-paint, the instructions are pretty simple. Work on a clean level surface with good straight boards. Check for square after each step. Use self-tapping screws or pre-drill and countersink all of your screws. Be safe and have fun!
Instructions
Step 1
This bed was very much inpsired by Pottery Barn Teen’s Sleep and Study Loft. According to Pottery Barn Teen, their bed was made of:
Frame: Pine
Panels: MDF with veneers
Slats: Pine
Drawer Box: Plywood
Shelves: MDF with veneers
Knobs: Pine
Ladder: Pine
This is also the most economical materials to buy.
Step 2
LOFT BED
Build the loft bed, but you can skip the bottom support on the side that this bookshelf will be installed. Loft bed plans can be found here. This bookshelf is designed for a twin bed. You can alter the bed by cutting all shelves and trim to 51″ long, assuming that your full size bed mattress measures 54″ wide.
Step 3
BUILD THE BOX
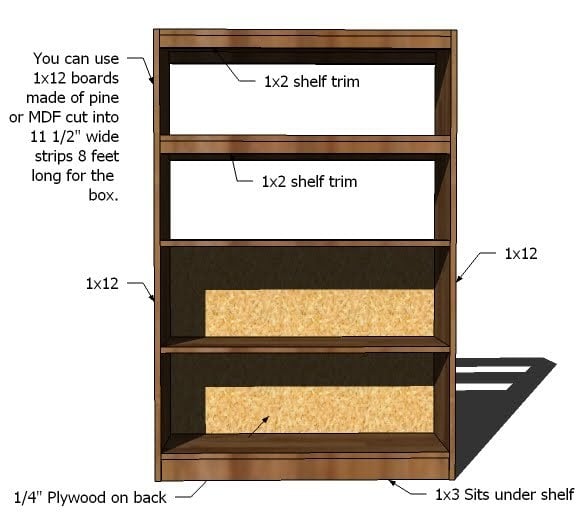
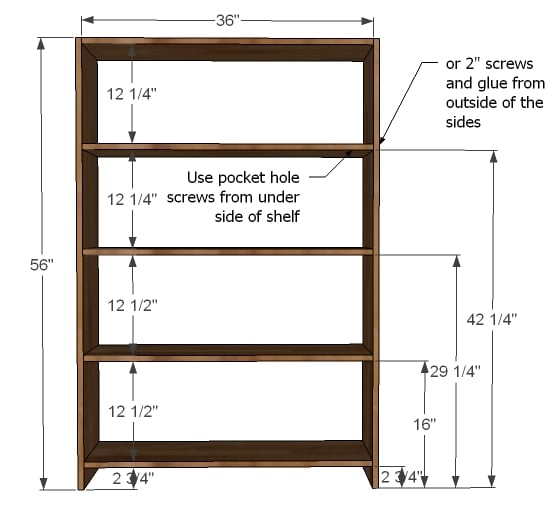
Use the 1x12s to build the box as shown above. It is always recommended to measure and mark your joints on both sides of the joint so you know where to line the board up and where to screw. If you have a Kreg Jig™, you can drill pocket holes on the undersides of the shelves and attach the shelves to the sides. If not, 2″ wood screws and glue will keep everything in place. Don’t forget, we will also be adding a back that will hold the shelves in place and shelf trim.
Step 4
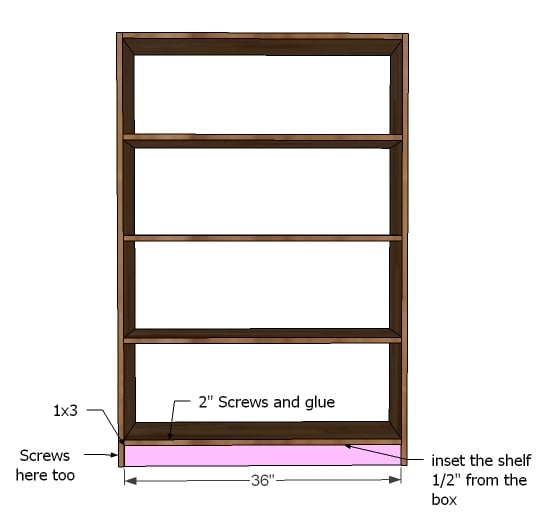
FOOTER
Attach yoru footer as shown above. If you are using a Kreg Jig™, simple drill your pocket holes on the ends of the 1×3 and attach to the sides. Otherwise follow the instructions above.
Step 5

Step 6
TOP SHELF TRIM
Just like the footer, attach the top shelf trim as shown above. Use glue and 2″ screws.
Step 7
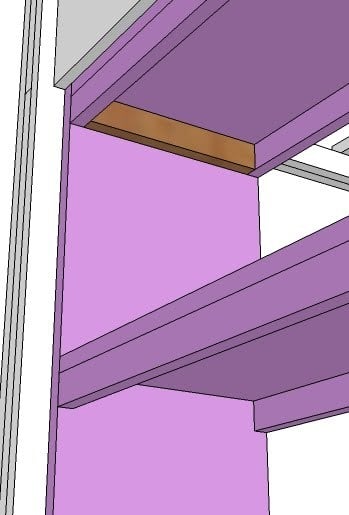
OPTIONAL: SHELF SUPPORTS
If you know these shelves are going to be taking some abuse, it would be a good idea to cut scrap pieces of 1x2s and fasten to the sides of the bookshelf under the top shelves. This will keep the top shelves from ever moving. The bottom shelf is attached through the grain to the back, and they are not going anywhere. But the top shelves are attached through the end grain, and a support like the one pictured above would add considerable strength to the shelves (and you already have the scraps laying around!). The 1×2 will be 9″ long if you inset your shelf trim pieces 1/2″.
Step 8
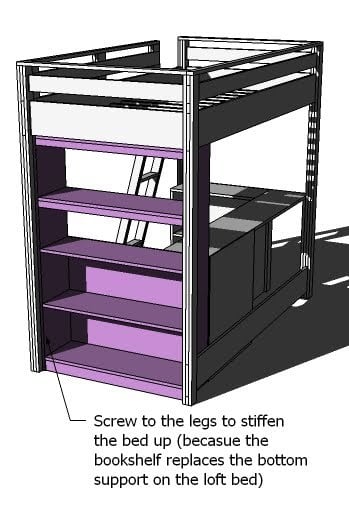
ASSEMBLY
Screw the bookshelf to the sides of the legs to stiffen up the loft bed. The bookshelf replaces the bottom support, so you need something to keep the loft bed legs square.

Comments
Yolanda (not verified)
Mon, 06/07/2010 - 19:32
Love the original loft bed
Love the original loft bed and love this room within a room design even more. What an efficient use of space. It’s amazing the way you break these unwieldy-looking projects into small we-can-do-it bites.
liesel (not verified)
Mon, 06/07/2010 - 20:00
this is the most tempting
this is the most tempting project yet!! I love loft beds! Thanks so, so much for all the great plans!
Amy (not verified)
Tue, 06/08/2010 - 02:47
I was hoping you would add
I was hoping you would add this to the loft bed! My daughter has been asking for this bed from pbteen for over a year!
Gnomeful Things (not verified)
Tue, 06/08/2010 - 03:33
While the original bed was
While the original bed was too high for my girls (we opted for the fort bed) I am really excited by the modifications because this bed is now perfect for my niece. My sister will be thrilled!
merideth (not verified)
Tue, 06/08/2010 - 03:49
i love it. my little guy's
i love it. my little guy's bedroom is 8'x8'. tiny. and his windows are tall & start really low to the ground, so there is only one place for his bed. when our big kids lived in this room (at various times), we had a "cargo furniture" loft bed with dresser 7 desk underneath. BUT! that furniture is SO massive and the ceilings are SO low. a lower loft bed is a great idea!
Crystal (not verified)
Tue, 06/08/2010 - 04:03
What a great addition to the
What a great addition to the loft! My husband and I are planning on building TWO of your loft beds this year. Two kids, one small room, lots of toys... we were so happy to find the plans for the loft bed! Of course... we'll be building the kids' beds *after* we build our queen size storage bed ;-)
Christine (not verified)
Tue, 06/08/2010 - 04:10
Thank you so much for adding
Thank you so much for adding on to the loft bed! This is the deal clincher for me!! I have been eying the pb teen one for my 8 yr old, but now I have the plans! Please keep posting on this 'cause I'm building the whole set!!!!
Thanks so much for all you do!!
You are AMAZING!!!!!
Keli (not verified)
Tue, 06/08/2010 - 04:28
Thank You Thank YOu!!! I have
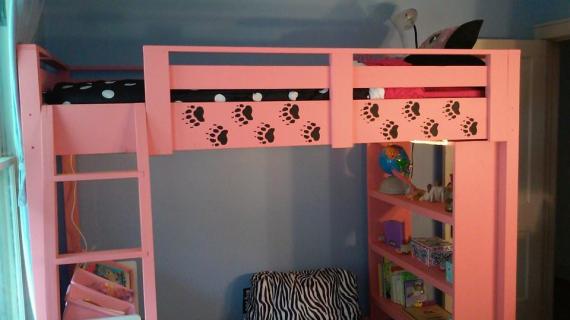
Thank You Thank YOu!!! I have been waiting for additions to the loft bed! I am really excited to build this for my daughter....we are painting it HOT pink!!!
Drea (not verified)
Tue, 06/08/2010 - 05:28
I adore this bed! My 7-year
I adore this bed! My 7-year old stepdaughter's room is teeny tiny, so this would be a perfect use of space. My only reservation is wondering whether this will be considered a "baby bed" in a few years. Anyone have teenagers that use/want a bed like this?
Adelle (not verified)
Tue, 06/08/2010 - 05:53
wowowowowow! I just found
wowowowowow! I just found your blog and how appropriate I just started my own blog and I put up that I was going to build a loft bed for my son and my ahm drawing! lol. I'd love some tips for the futon if you've got them!
http://justneedsafreshcoatofpaint.blogspot.com/2010/06/inspiration-litt…
Adelle
Gnomeful Things (not verified)
Tue, 06/08/2010 - 06:08
Drea - My niece is 10 and has
Drea - My niece is 10 and has a similar bed that she loves. But it's heavy and has a solid wall that won't let light through. Her sister who is 12 also has a loft bed and loves hers as well. I don't think these are "baby" at all.
Eric (not verified)
Tue, 06/08/2010 - 08:22
This is great! i think we
This is great! i think we will be building this for my older girl and my younger will get a copy of PB Teen's vanity loft. Great Job Ana!
Katie (not verified)
Tue, 06/08/2010 - 09:08
You made my day! This is the
You made my day! This is the addition to the loft bed I was waiting for. :) I'll be adding a corkboard or magnetic chalkboard to the back to display all of my kids artwork. Two of these are on our project list for the year for my 2 oldest.
Darla (not verified)
Tue, 06/08/2010 - 13:51
Awesome!! It looks like the
Awesome!! It looks like the shelf could face either direction. Is that correct? I would just have to attach it from the outside through the bed's legs? I could do it either way, but it might be a little tight in my son's room the way it's shown.
Darla (not verified)
Tue, 06/08/2010 - 13:54
Oh, and about the "babyish"
Oh, and about the "babyish" factor: Loft beds are definitely designed with teens in mind. Young adults often take this sort of bed to college to make the best use of space in dorm rooms.
Building Hope (not verified)
Tue, 06/08/2010 - 14:12
I was just waiting for this
I was just waiting for this addition to get started. I almost posted a question on Fb asking when you might do it but didn't want to be a nagola :) Thanks for reading my mind!
MommyKate (not verified)
Tue, 06/08/2010 - 16:02
oh.... hmm... this is a
oh.... hmm... this is a tempting project... I need to finish my adirondack chairs and my kitchen bench to get a little more confidence under my belt before tackling this one... but I think it just made the list!
Stephanie Glover (not verified)
Tue, 06/08/2010 - 18:47
Oh my gosh Ana you are
Oh my gosh Ana you are amazing. It's like you read my mind or something!! When I saw the kids picnic table awhile agoI wanted an adult-sized one so bad, and was hoping you'd post plans for one. Well after just a few days of not checking in on your blog I found just that! An adult picnic table! And tonight as I was putting my daughter to bed I was thinking about how tiny her room is and how I wished we had bought a bunk or loft-style bed for her room so we could at least have the floor space...and what do I find on your blog??? A loft style bed. You are fantastic! I am absolutely AMAZED that this has happened twice! WHOA! =0) Thanks so much for all the inspiration.
Sawdustmomma (not verified)
Wed, 06/09/2010 - 17:06
Oooh, my bed!!! I'm so
Oooh, my bed!!! I'm so honored!
I love the bookshelf plans. If we didn't already have bookshelves to put under there, I would use your plans.
I so love this plan. I can't wait to finish it tonight.
LouAnn (not verified)
Wed, 06/09/2010 - 17:11
perfect! we have been looking
perfect! we have been looking at PB but don't have the $$. Now if I can just convince DH that we can build this ourselves!!!
Brannon (not verified)
Fri, 06/11/2010 - 10:55
Thank you!! My husband just
Thank you!! My husband just started building your loft bed, and we were trying to figure out how to modify it like the PB Teen one with shelves. Now we have the plans!! Perfect!
AdronsCatherine (not verified)
Wed, 06/23/2010 - 07:49
My 15 and 12 year old girls
My 15 and 12 year old girls have been needing something like this! The teen is wanting the desk - any plans for that in the near future? I just love these!!!
Ana White – DI… (not verified)
Fri, 09/03/2010 - 08:51
[...] Like this amazing loft
[...] Like this amazing loft bed built from these plans (desktop plans and bookcase plans). [...]
Leslie (not verified)
Sun, 10/03/2010 - 12:16
I LOVE, LOVE this bed! We
I LOVE, LOVE this bed! We found it when I googled "make your own pottery barn inspired loft bed." I really think we could make one of these for each of our kids. If anyone on here has made one, I'd really like to know how much it cost them.
John M. (not verified)
Thu, 12/30/2010 - 08:17
I'm getting ready to build
I'm getting ready to build this and I was wondering if this line in the shopping list has a typo.
1 – 1×2 Board, 8′ Long (Cut 2 Shelves from this board)
shouldn't this be a 1x12? Like this:
1 – 1×12 Board, 8′ Long (Cut 2 Shelves from this board)
bobgaivin (not verified)
Thu, 01/06/2011 - 05:13
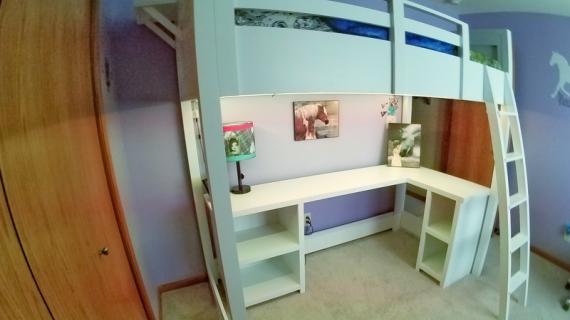
My daughter (10) and I built
My daughter (10) and I built the Loft Bed with the optional Desk/Bookshelf as my contribution to her 10th birthday bedroom makeover.
I added a cantilevered shelf to the top of the headboard to accommodate a reading lamp, alarm clock and books.
We used white melamine for the desktop and added melamine iron-on banding for the edging
She and her cat love it!
Apparently board widths are different in Alaska, so double-check measurements and "dry fit' with scraps before cutting the middle piece of the 3 piece legs.

Kelli (not verified)
Mon, 01/17/2011 - 05:54
Our 6 year old is begging for
Our 6 year old is begging for a loft type bed. Im torn, I love this plan and the playhouse but wonder if the playhouse loft bed would be to "young" for her. My concern is her falling off, can anyone tell me if once a mattress is on, is their still enough height to be considered "rails?" I hope this question makes sense, If anyone could tell me how much taller the rail area is over their mattress.
Thanks!
bobgaivin (not verified)
Wed, 01/19/2011 - 17:30
Kelli, We are using a
Kelli,
We are using a mattress only, no box spring.
We have 7.5" of safety railing height left over with no one in the bed.
As you roll closer to the edge, the mattress compresses and the safety clearance increases.
With a box spring, the mattress is flush with the railing top.
We left the box spring off to give her more headroom with our 8' ceiling.
Sarah G (not verified)
Mon, 01/24/2011 - 10:54
Okay, so here's my request:
Okay, so here's my request: Combine Tabitha's lower loft bed, with the stairs of the playhouse. I don't trust either mine or my husband's abilities to do this =O)
We have SMALL rooms with ceiling fans and twin almost 4 yr old girls, so the stair idea is exactly what we need. Building a full-sized loft in their room seems like a recipe for decapitation. I LOVE the playhouse idea, but we want these beds to last into at least their tweens, and my husband, the realist, somehow doesn't think the playhouse would do that. I will GLADLY share photos of the finished project!
Sarah G. (not verified)
Mon, 01/24/2011 - 10:59
We have TINY rooms, each with
We have TINY rooms, each with a ceiling fan, so here's my request: combine Tabitha's shortened loft with the stairs. Our girls are almost 4, so the idea of stairs is perfect. And the shortened loft does my heart good, as a full-sized one plus a ceiling fan seems like a recipe for decapitation!
THANK YOU!!!
Elle (not verified)
Sun, 05/01/2011 - 09:53
just like PBTEEN
OMG, this looks just like the sleep and study loft bed from PBteen! Come to think of it alot od Anas plans look like Pottery barn, But more afordable! YEY!
kareen (not verified)
Sun, 06/26/2011 - 07:14
thanks
I was eyeing the one on PBteen.com wishing my girls' room was large enough for it as the sleep+study loft only comes made for full size matresses. so i told my hubby why not take that idea, and recreate it for a twin size. then I found this on ur blog, which helps so much with the measurements!!! I have tree girls sharing one very narrow room, i figured a loft on one side and a twin bunk on the other will help alot! (my two younger ones are sharing a bed right now, due to lack of space!) the only question I have is... how can I get an idea of how much the materaials will cost me to build the loft and the bookcase? I would be shoping at Lowes or Homedepot!
kareen (not verified)
Sun, 06/26/2011 - 07:16
3 girls..my bad! (im a horrible typer!..lol)
I ment to say i have 3 girls not tree girls!
ktsg2007
Sun, 06/26/2011 - 10:50
How to find lumber cost at "L's"
Go to the main page of their site, type in "lumber" without the quotes and it will bring up the page with all the types of lumber that you might need.
Hope this helps! :)
kareen
Sun, 06/26/2011 - 15:34
yes, thank you!
yes, thank you!
rlcollins3
Fri, 07/22/2011 - 16:38
Loft Bed with Bookcase
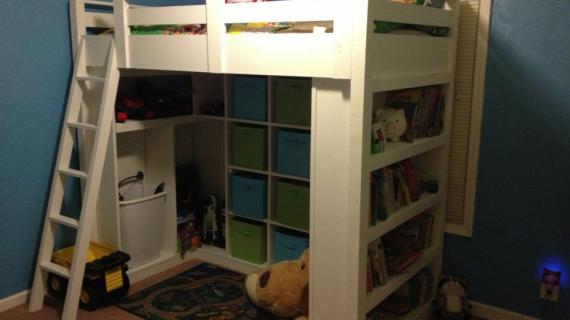
Ok so our youngest needed some extra space in his room. We decided to go with this style bed. Saw the project and decided to tackle it. We made some adjustments to it. We made the end of the bookcase magnetic and left the back of it off. This allowed him to access his books from both sides. Here are some pictures. (and yes I know some of them are sideways. Thought I could fix them once I uploaded them.) http://www.flickr.com/photos/rebeccac3/sets/72157627257887354/
Enjoy!
Guest (not verified)
Sat, 08/06/2011 - 12:03
Love it!
Saw this bed at PB and fell in love. I refuse to pay their prices, though, and hubby said he could build it. So I googled it and found your site! How wonderful. You have a new fan, and thank you for doing the legwork on this fabulous project!
Guest (not verified)
Sun, 08/07/2011 - 13:16
Time it took to build?
Just wondering how long it took anyone out there to build this?
Debbie (not verified)
Fri, 08/19/2011 - 15:03
1 X 3's
Love all the great plans! I am looking into building the loft bed for my grandson as my first project. Our builders supply stores only carry 1X2 or 1X4. Which would be better to use in place of the 1X3's in the plan.
Thanks!
Ken Barker (not verified)
Sun, 10/21/2012 - 15:18
loft bed with storage
I built this, and discovered to my dismay that the bed plans call for bottom rials on three sides. After completing bed, then ready to secure shelves to same, the left-hand bottom rail interferes. Then I discovered that bed plans call for three bottom rails, shelf plans call for two bed bottom rails.
Goop (not verified)
Thu, 01/03/2013 - 10:40
Full loft
Did anyone make this for a full size bed? if so can you share your measurements pretty please I need to make this for 5 and 6 year old ASAP I need to get the 5 yr old to stay in her room!!
Goop (not verified)
Thu, 01/03/2013 - 11:43
Is there a way to get plans
Is there a way to get plans for a full bed?
CrazyKate
Fri, 07/10/2020 - 11:57
Full vs twin loft?
I built this loft bed 8 years ago! This bed is so incredibly sturdy! Even overweight parents could climb up to read a book to kids at night!
Fast forward....my youngest daughter wants this bed... but in full size mattress vs twin. Ana... are there plans you’ve sent out to adjust for full mattress vs twin?
Thank you so much! We have built so many things using your amazingly detailed & easy to understand plans. You are amazing!