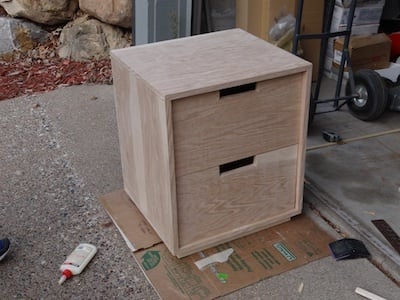
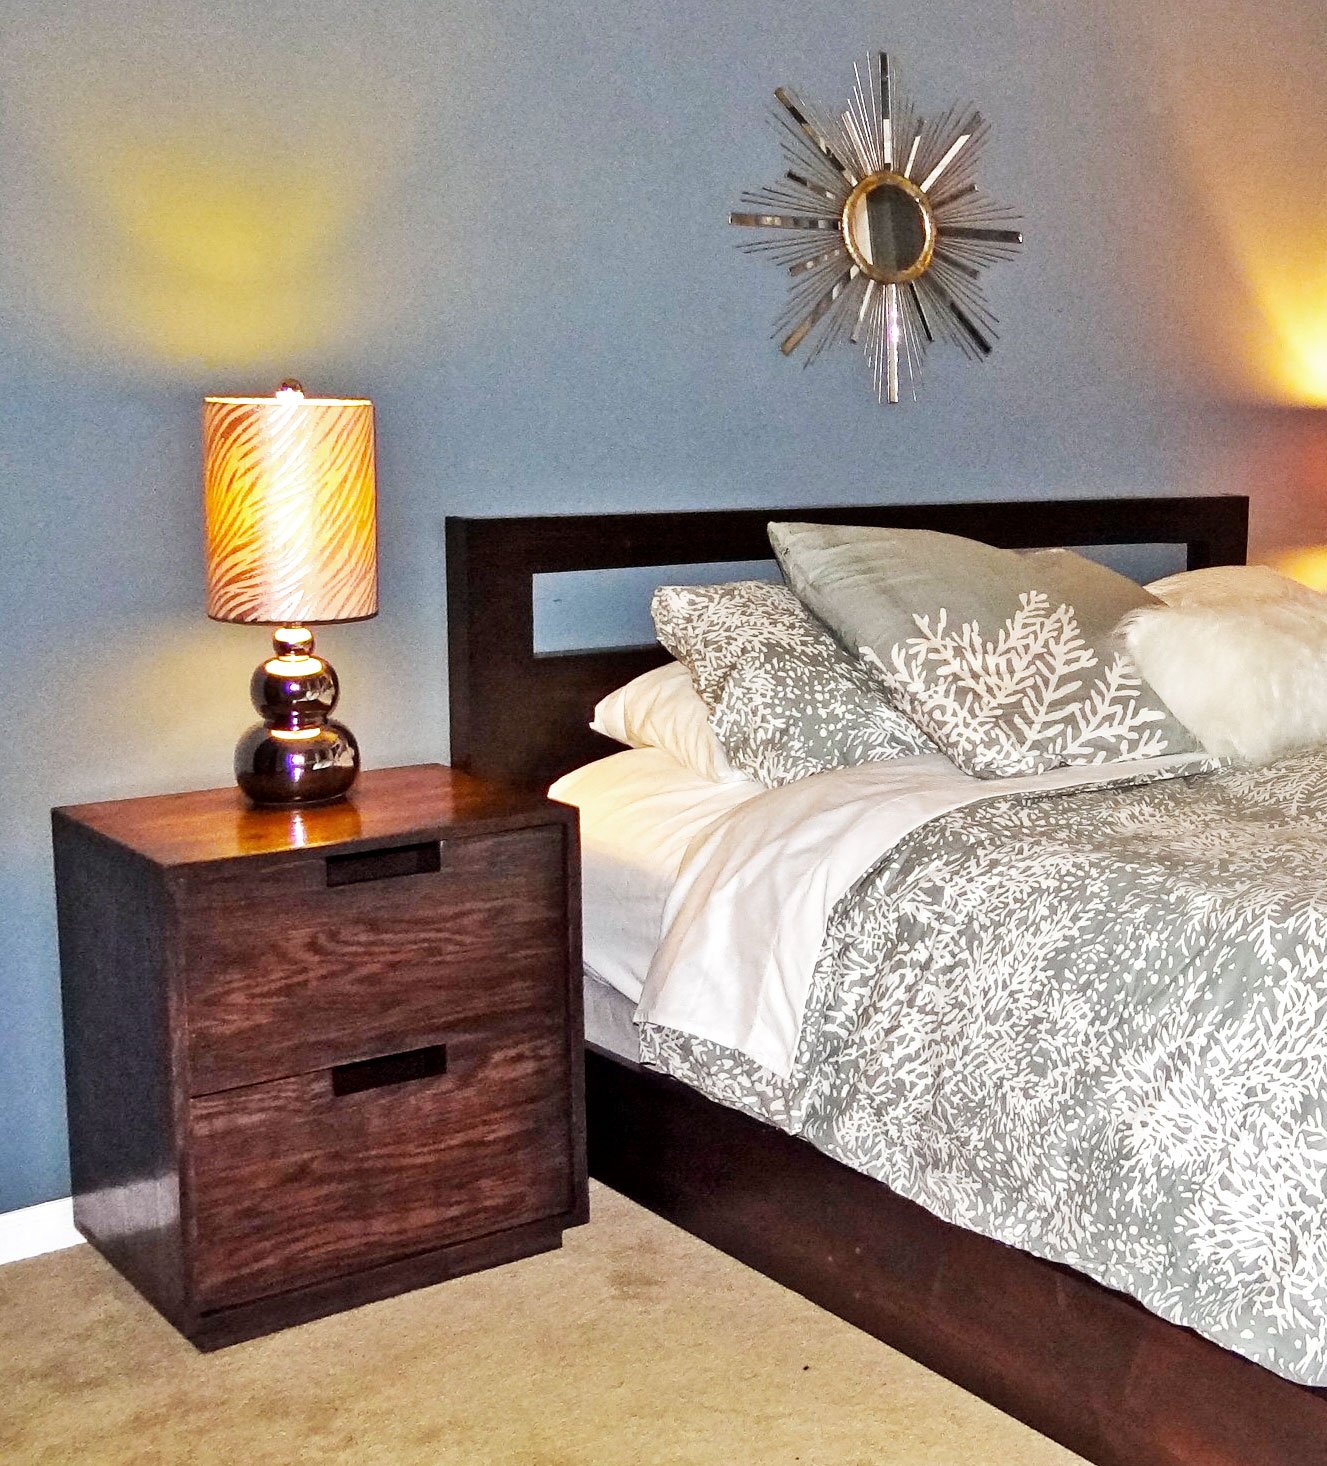
Simple clean lines and lots of storage. This modern cutout nightstand matches our modern cutout headboard and chunky leg platform bed - so you can upgrade your bedroom with nice furniture on a budget. Free step by step plans including full diagrams, shopping and cut lists.

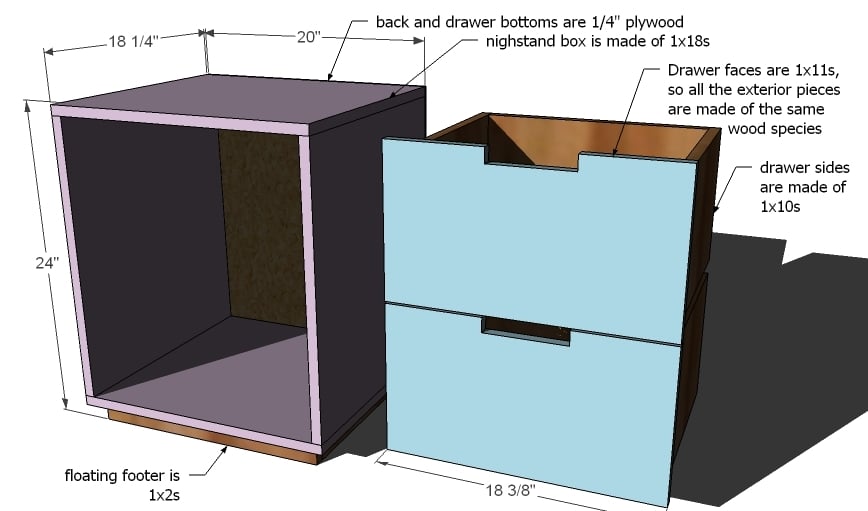
Preparation
Shopping List for 2 Nightstands
- 1 – Sheet of 3/4″ MDF (for painting) or A1 Hardwood Plywood (for staining)
- 1 – Sheet of 1/4″ plywood
- 2 – 1×10, 8′ Length
- 2 – 1x2s, 8′ Length
- 4 – 16″ Drawer Slides with standard 1/2 clearance on sides (corner mount works best)
- Wood Filler
- 2″ Screws
- 1 1/4″ Nails
- Wood Glue
- Finishing Supplies
CUT LIST FOR 2 NIGHTSTANDS
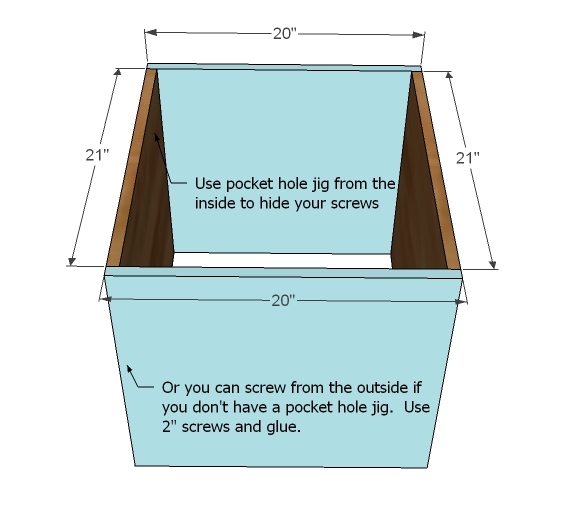
- 4 – 1×18 @ 20″ (Top and Bottom)
- 4 – 1×18 @ 21″ (Sides)
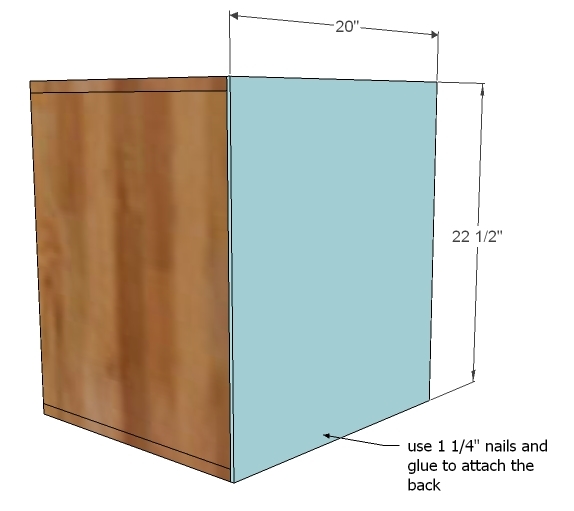
- 1 – 1/4″ Plywood @ 20 x 22 1/2″ (Back)
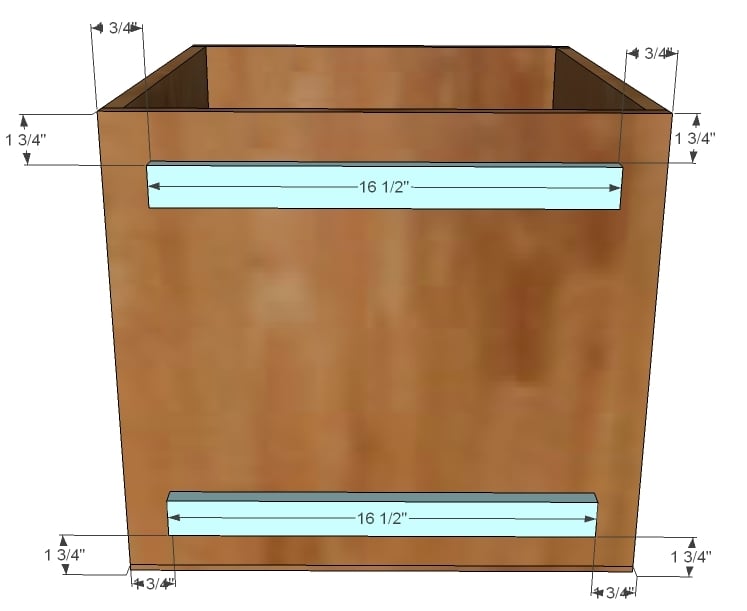
- 4 – 1×2 @ 16 1/2″ (Cleats)
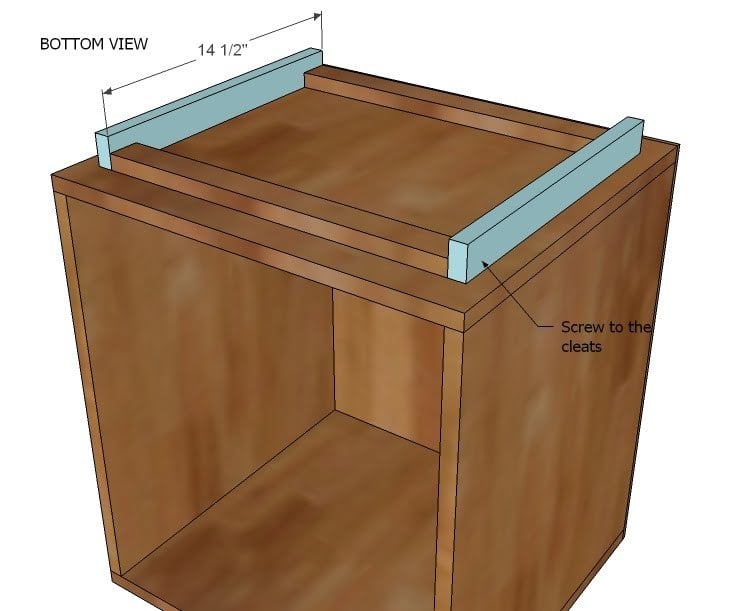
- 4 – 1×2 @ 14 1/2″ (Side Footer)
- 4 – 1×2 @ 18″ (Front and Back Footer)
CUT LIST FOR FOUR DRAWERS
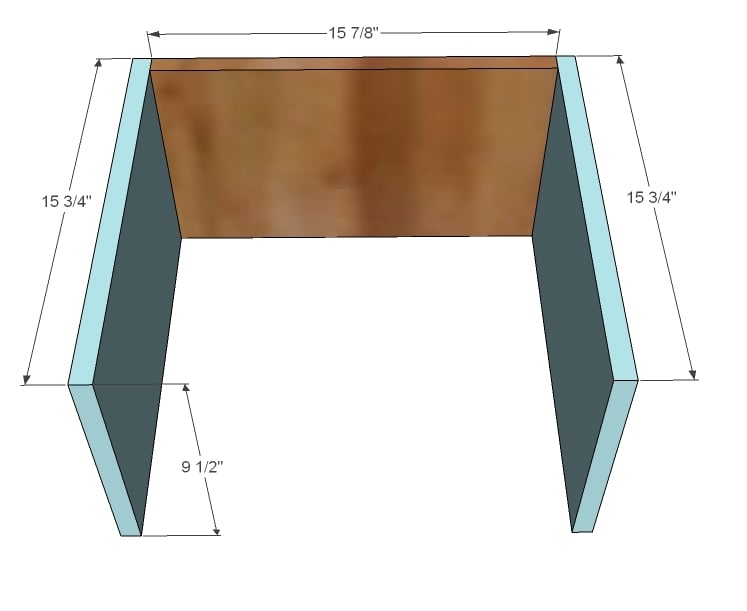
- 8 – 1×10 @ 15 3/4″ (Drawer Sides)
- 4 – 1×10 @ 15 7/8 (Drawer Backs)
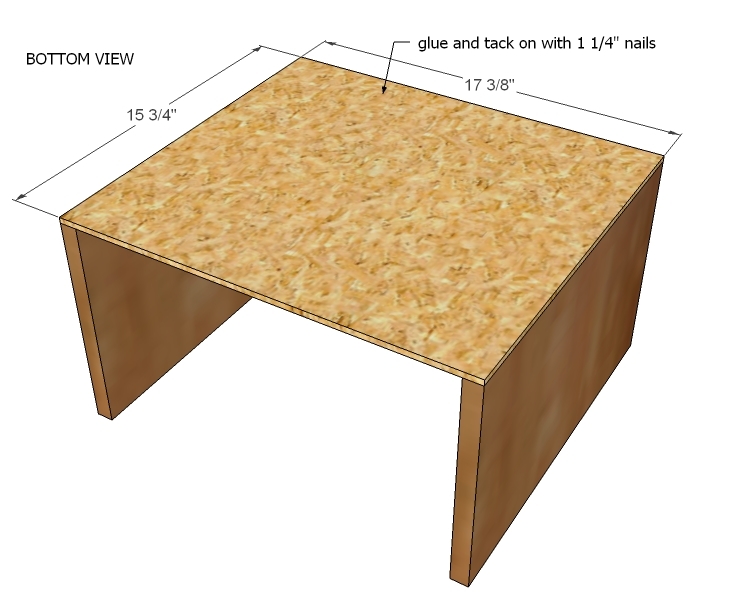
- 4 – 1/4″ Plywood @ 15 3/4″ x 17 3/8″ (Drawer Bottoms)
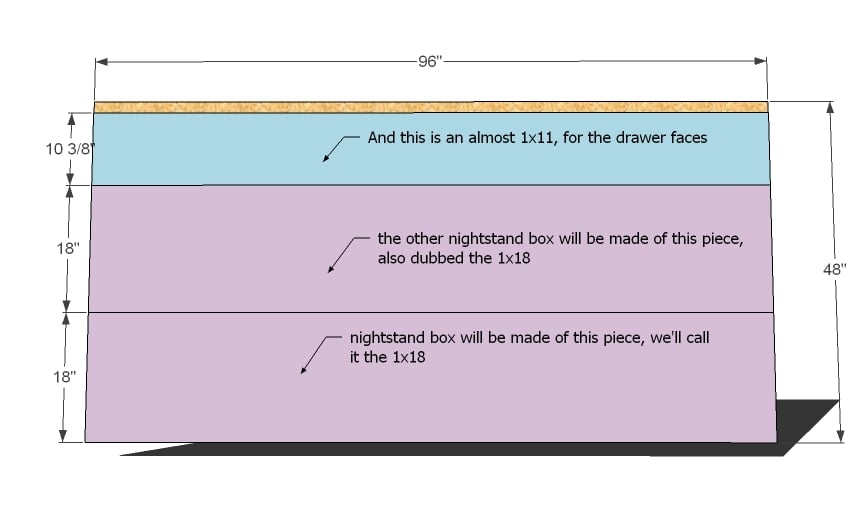
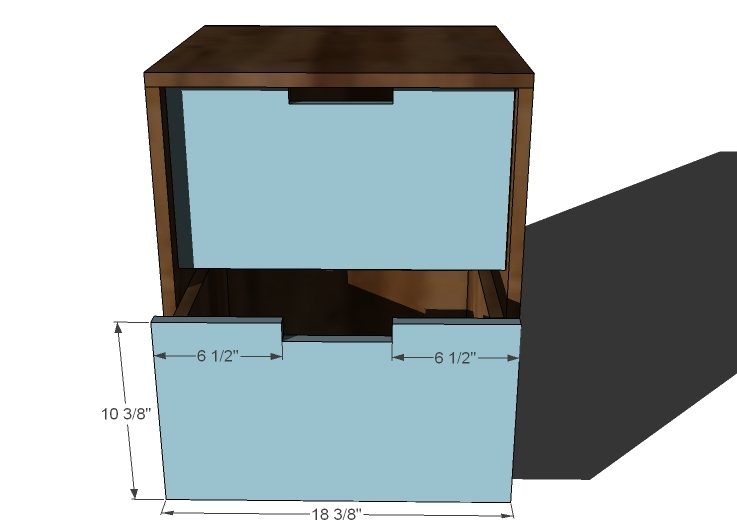
- 4 – 1×11 (see plywood cut layout) @ 18 3/8″ (Drawer Faces)
Instructions
Step 1
Step 4
Step 7
Step 8
Step 9
Cut out the drawer faces as shown above. Mark the insides of the drawer faces 1/2″ in from the sides. Line these marks up with the drawer sides and nail to the drawer sides (or use a pocket hole to screw the face on from the outsides of the sides of the drawer box). Leave a 1/2″ gap on the bottom of the drawer to the bottom of the drawer face.
Step 10
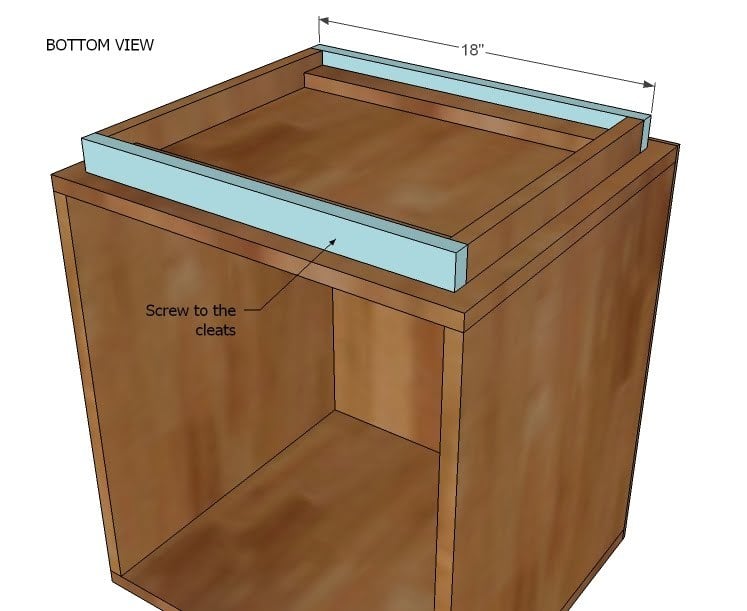
Fill all of your holes with wood filler and let dry. Sand as needed. Vacuum with a soft bristled brush. Prime and paint, or stain as desired. Attach the drawers with the drawer slides to the sides of the nightstand. Attach the bottom drawer first, using the bottom of the nightstand as a guide, then attach the top drawer.





Comments
Mickelle (not verified)
Mon, 06/21/2010 - 19:39
Love it! I've been dying for
Love it! I've been dying for a new bedstand for a while... hope I can talk the hubby into helping me get my feet wet with his powertools.
I think the west elm link is misdirecting, btw.
L. (not verified)
Mon, 06/21/2010 - 22:15
I just started reading your
I just started reading your blog and it's awesome! I was just wondering what software do you use for drawings..?
W!ll!iam (not verified)
Tue, 06/22/2010 - 00:51
would love to know what
would love to know what software you use also, as i live in australia and always need to convert from inchs to mm, and all of our wood is in mm not in 2x1 3x1 4x1 etc. (will need to rework the very nice angle chair as my legs were 42mm^2 instead of 2x2 which sadly made the top which is 18inch^2 not fit the 15inch sides)
Jodi (not verified)
Tue, 06/22/2010 - 02:31
Yes please for the headboard!
Yes please for the headboard! These are amazing. Thanks Anna
Darla (not verified)
Tue, 06/22/2010 - 03:28
Oh wow! I'm in the middle of
Oh wow! I'm in the middle of two other projects (until next week, when it will be three...) so naturally, I want to build these NOW. Is this something that would stand in for a file cabinet? It almost looks even a little bigger.
Lindsey (not verified)
Tue, 06/22/2010 - 04:21
So excited to build these!
So excited to build these! I've been waiting for a nightstand plan I like!
Twinmommy2boys (not verified)
Tue, 06/22/2010 - 07:04
I could NEVER live where you
I could NEVER live where you live. I would die for sure! I like it dark when it's supposed to be dark and light when it's supposed to be light and I don't do freezing cold well. I mean what do you do when it's dark all the time? How would my kids burn off all there extra energy?
With that said love the side tables. I'm currently needing new ones, but these don't fit with my decor.
Jennifer (not verified)
Tue, 06/22/2010 - 07:05
Ana, these are AMAZING!!!
Ana, these are AMAZING!!! Time to call the baby sitter!!
Jane @ The Bor… (not verified)
Tue, 06/22/2010 - 07:19
oh my gosh! I was just
oh my gosh! I was just drawing up my own plans to make a knock-off modern nightstand like I saw in the West Elm catalog. . . it's like you read my mind. :) I'm still going to make my own version, which is slightly different - but if it doesn't work I'll resort to your plans. :) Thanks!
orange sugar (not verified)
Tue, 06/22/2010 - 08:57
Ana has stated previously
Ana has stated previously that she uses google sketchup for her plans.
I see a cutout headboard in the background...is that a future plan?
Allie (not verified)
Tue, 06/22/2010 - 17:34
I am SOOOO excited about
I am SOOOO excited about this! I love modern design and am SO happy to see some more modern pieces on the site! Thanks again Ana for a great design!!!! Keep up the good work cuz we really do appreciate you!
Bedroom Makeov… (not verified)
Fri, 09/03/2010 - 03:59
[...] at West Elm. I
[...] at West Elm. I sketched plans for building it, but then Ana at Knock-Off Wood read my mind, and posted plans for a similar nightstand. We used her instructions, with modifications. It was a hell of a ride, but that’s a [...]
Ana White (not verified)
Fri, 09/03/2010 - 08:55
Your nightstands are
Your nightstands are FABULOUS! Love your room!
Carpentry Cape… (not verified)
Fri, 09/03/2010 - 10:52
[...] fateful day in late
[...] fateful day in late June, armed with our instructions and cut list from Knock-Off Wood, Ryan and I went to Home [...]
diane the hula… (not verified)
Wed, 01/19/2011 - 03:08
Love it! Are plans to add the
Love it! Are plans to add the matching dresser?(I'll cross my fingers)...
BuyViagra
Thu, 11/03/2011 - 00:40
viagra sales france
[b]viagra cialis[/b]
Unintyinoriaf
Thu, 04/12/2012 - 16:46
code avantage center parc
Anglais écologique escapade chauffeur géant, Cible possède essayé 'va' voire vert tandis que le court rapide séparée voyage acheteur projets à costume shopper à la suite de aller à la rencontre leur au vert transporter. Les clients sont encouragés à a demandé à promenade autour du bloc et même spirale au sein de l' 5 important vill lieux que une bonne affaire West tout Cumbria, près de côté de , puis vers costume leur 'air frais-renouvelable ethos » dont ils ont besoin leur propre moyen de transport à développer et, en outre echo écologique problèmes avec participation.
MayonaViand (not verified)
Sun, 06/03/2012 - 17:02
Prada Bags Traffic,Prada Wallets,Prada Placard
We submit the uninjured and reliable products for the customers,please don't hesitate to caste the prada billfold,prada monster and new prada.Prada stock is a very popular blow the whistle on buy of correspondence demanded in the world.
[url=http://www.storepradabagsjp.com/]プラダ バッグ[/url]
[url=http://www.storepradabagsjp.com/]財布 プラダ[/url]
[url=http://www.storepradabagsjp.com/]Prada[/url]
プラダ バッグ : http://www.storepradabagsjp.com/
James (not verified)
Mon, 09/17/2012 - 08:00
Awesome design!
Been looking for something to use as storage for my comic book collection that would look nice in one of our rooms so we can free up the closet in our spare room to make room for baby stuff as that will be the new nursery. This design is perfect, with just a little tweaking to some of the measurements (need to add 1/2 inch to the drawer height to accommodate a bagged and boarded comic book). Width and depth on the drawers are perfect size for two full rows of comics (w/ bags & boards) and one night-stand will knock out two full long-boxes (cardboard comics storage boxes). Thanks for the plans! Your site rocks!
Ranger67
Mon, 04/12/2021 - 14:45
Mistake in plan buy list
I am currently working on these nightstands.--------FYI you need 1 1x2x10 and 1 1x2x8ft, not 2 1x2x8. ( No matter how you cut them, you will be short)