Simple Rolling CPU Cabinet

Difficulty
Beginner Projects
| Print this plan

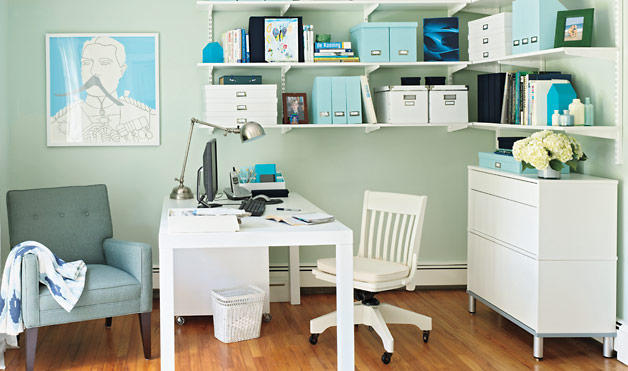
Featured in Woman's Day magazine, this simple CPU Cabinet is easy to build and rolls right under your desk!

To build this cabinet, please reference the full instructions on <a="http://www.womansday.com/Articles/Home/Home-Decorating/Do-It-Yourself-C…">Woman's Day.com</a>

So thrilled to be in Woman's Day for the September 2010 issue!  And my furniture has never looked so good.  That's mine, the simplest piece in the office, tucked under the desk, hiding the CPU!

Here's how you can make your own.  I used 1 24" wide, 8 foot long shelf (check the garage storage section).
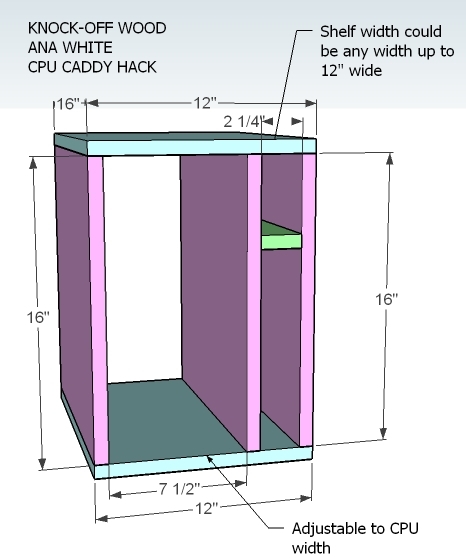
Dimensions
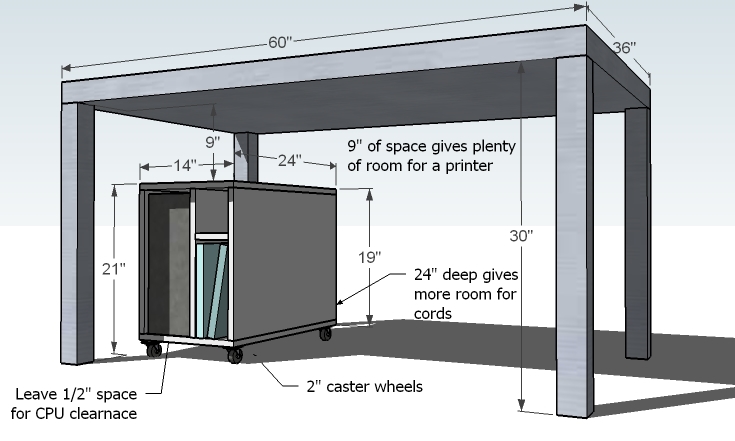
Dimensions shown above.

Preparation

Shopping List

For a shopping list, please reference the article in Woman's Day Magazine here.

Cut List

Tools
Tape Measure
Speed Square
Safety Glasses
Hearing Protection
Drill
Circular Saw
Power Sander

Instructions

Step 1

General diagram.

Comments

QuackMeHard (not verified)

Thu, 07/29/2010 - 07:24

how exciting! is that the piece that you couldn't show us because it was a commission? Or is that something totally different, because... this doesn't look painted (and i remember you said something about painting...)

Ana White (not verified)

Thu, 07/29/2010 - 07:26

Hi, thank you! This piece actually was painted because the magazine was looking for a matte finish. And yes, I couldn't share :( until it was published. But now it's like I get a day off!

LoriD (not verified)

Thu, 07/29/2010 - 07:29

Congratulations on the magazine work! The CPU cabinet - you're right, so simple, but it just never occurred to me to make one!

Kelsey (not verified)

Thu, 07/29/2010 - 07:34

I love how you described your ideal home. That's exactly what I want. Where the stuff you need has a place to go and the stuff you love has a place to shine. Thanks for sharing your extraordinary talent and helping us all to create the home we desire.

And yeah for being published!!

Alicia (not verified)

Thu, 07/29/2010 - 07:49

Congratulations!What an accomplishment! I love how you make all your designs so easy to read and replicate. I just made the little kids picnic table and am in the process of finishing it before I send you the photos...Love all that you do.

Brandy (not verified)

Thu, 07/29/2010 - 08:04

Congrats! This is so exciting!
lifeofperks.blogspot.com

Amanda Brantley (not verified)

Thu, 07/29/2010 - 08:39

You are amazing, this is just the beginning. My dad is a woodworker & has awesome equipment but I live 9 hrs away from him. While visiting last week we made my 1st project-cornhole beanbag game. I thought of you and your site the whole time. It was SO FUN! I wish I lived closer so I could go crazy...

Lee and Beth (not verified)

Thu, 07/29/2010 - 10:39

That's so awesome, Ana! Congrats! My husband and I have taken a break from building to sit back, relax, and enjoy our summer. Can't wait to get back into it. You put the joy of building in us for sure!! :)
Hope you and your family are having a great summer!
Beth.

Sarah @ The Ug… (not verified)

Thu, 07/29/2010 - 10:51

Congrats on getting published in the magazine! That's exciting.

I've been wondering lately if I should paint my black printer station that resides in our guest bedroom, but because it's made from melamine, I didn't know if it would be easy to pull off. I guess, instead, I can always make one! Thanks!

Pam @ diy Desi… (not verified)

Thu, 07/29/2010 - 13:24

Congratulations Ana! Oprah's going to be calling next for sure!

olkid (not verified)

Thu, 07/29/2010 - 13:27

This is exactly what I have been looking for! I need a simple CPU cabinet and I looked at Ikea, Target, the big office stores. I couldn't find anything that was right and what I did find was outrageously priced. I'm building it this weekend!

thegeorgetowncottage (not verified)

Thu, 07/29/2010 - 13:43

Woohoo! How cool to see your name in print. Congrats :)

Jacki (not verified)

Thu, 07/29/2010 - 16:27

congratulations! I got that magazine earlier this week. I didn't realize you made that CPU cover coz I didn't look closer where it's from. Keep up the good work!

Katy (not verified)

Fri, 07/30/2010 - 05:09

Congratulations! Do you have a preview issue? Could you tell me the source of those pale blue storage & magazine boxes? I've been looking for that exact shade of blue in office products.

For that matter, could you do plans to (cheaply) make them out of wood so I could build them from wood & paint them blue? Another thing from very thin wood I want to learn about is drawer dividers- I'd like to customize everything in every drawer to exactly sort what I want it to hold (silverware, socks, purses, jewelry, makeup, sweaters, etc.)

Luke and Katie (not verified)

Fri, 08/13/2010 - 11:05

congrats on being in Woman's Day..I was reading the magazine and noticed your name..I was pretty excited for you!

Frequently Asked Questions

Wood Questions

What kind of wood should I use?
Most of our plans use standard construction lumber like pine or fir. It's affordable, easy to work with, and easy to find. It's also rapidly renewing and biodegradable, so a great eco friendly choice!

Can I use hardwoods instead?
Yes—just keep in mind they're heavier, cost more, and can be tougher on tools and harder to join together and finish. I recommend not tackling a hardwood project until after you have built several softwood projects.

What if my boards are warped?
Choose the straightest boards at the store. You can often work around slight warps by cutting them into shorter pieces.

What wood should I use for outdoor furniture?
Use red-toned or pressure-treated 2x lumber for framing, and cedar or cedar fence pickets for the decking. Outdoor furniture should be built like a deck—your local home center can help recommend the right wood for your climate.

Will my wood move or warp after I build?
Potentially, especially in humid climates. Let your wood acclimate indoors before building. Once acclimated and kept in a stable environment, movement should be minimal. Remember, most houses are built using framing lumber - it's all about keeping moisture down indoors.

Cutting Questions

Do I need a miter saw?
A miter saw is great, creating fast, safe, and precise cuts, even for beginners. But most plans can be built with a circular saw and a straight edge. If using a circular saw to cut, take time to practice, and get good at making cuts, before cutting your project boards.

How do I get clean cuts with a circular saw?
Clamp your board, measure twice, cut slow, and use a sharp blade. This takes practice, so spend some time making cuts. I go through becoming proficient at freehand cutting in my course, it is worth taking if you want to master this skill.

Will the store cut my wood?
Yes—most stores will do rough cuts to help you transport your materials home. But from store to store, the quality of cuts could greatly vary.

Joinery Questions

What screws should I use?
We recommend star-head self tapping screws for framing, most common sizes are 2-1/2", 1-3/4". Pre-drill if close to the edge or you find your wood is splitting.

Do I have to use pocket holes?
Pocket holes are the cheapest, easiest and fastest way to do some joints - like edge to edge or a hidden fastener joint. There are other methods, but these can be time consuming and expensive. We recommend using pocket holes as indicated in plans for best results.

How do I keep things square?
Use a speed square and measure diagonals after each step. Always clamp joints before screwing to keep them tight and flush.

Finishing Questions

Stain or paint before or after building?
A quick sand before and a full finish after gives the best results. Pre-finish if you're doing two-tone or detailed finishes.

What type of finish?
Use oil-based or water-based stain. For paint, cabinet-grade latex or enamel works great. High use surfaces on indoor projects should get a coat of polyurethane, I recommend a Helsman or Spar or other flexible poly that won't crack or peel with wood movement. For exterior projects, use a finish suitable for exterior fences.

How to get a smooth finish?
Start with a well sanded project. Sand between coats (220 grit), wipe clean, and apply light coats with a foam brush or roller.

Plan Questions

Can I change the size?
Many people do, and that's the great thing about building your own furniture! But do keep in mind going bigger might mean more supports are required, and often plans are optimized for minimal material waste.

Are these beginner-friendly?
Yes—plans are written with simple tools and clear steps in mind, with every effort to make plans as simple as possible.

Can I sell what I build?
Absolutely! Just don’t resell or repost the plans themselves.

General Questions

What tools do I really need?
A drill, circular saw, tape measure, square, and a few clamps will get you through most projects.

Do I need a workshop?
Nope! A driveway or small patio is plenty to get started, just make sure you have a level place to work. If you find you are building several projects a year, creating a small workbench is a great way to store tools and have a dedicated workspace.

What if I mess up?
Wood filler, sanding, or flipping boards goes a long way. Mistakes are part of the process!

What can I do to make my projects look more professional?
Start with straight boards, make accurate cuts, clamp all joints, and line up everything neatly. Sand thoroughly, use a neutral finish, and apply it in light coats for a clean look.

I've never built anything before. Where should I start?
Start with a few smaller softwood projects to get hands-on experience. Or if you're tackling a big project, buy a little extra lumber and practice your cuts and joints first. If possible, work with someone who has a bit of experience.

Care & Maintenance

How long will my furniture last?
With good joinery and regular care, your DIY furniture can last for decades. I have pieces in my own home that are over 20 years old and still going strong! One of the best parts about DIY furniture is that it’s easy to repaint, refinish, or repair—so your projects can grow and adapt with you.

How should I care for outdoor furniture?
Lightly pressure wash or hose it down once or twice a year. Tighten screws and reapply finish as needed to protect it—just like a deck or fence. A little upkeep goes a long way in extending the life of your furniture.

How about indoor furniture?
Regularly dust or wipe with a damp cloth. If it starts to look worn, a light sanding and touch-up paint or stain can refresh it in no time. DIY pieces are meant to be durable and fixable—so don’t be afraid to give them some love now and then.

Want to Build with Confidence?

Check out my ebook: 12 Skills to Build Your Own Furniture
It walks you through the core skills every builder needs—measuring, cutting, joinery, and finishing—so you can build beautiful furniture that lasts.

Still Have Questions?

Email us anytime at [email protected] and we’ll be happy to help!