
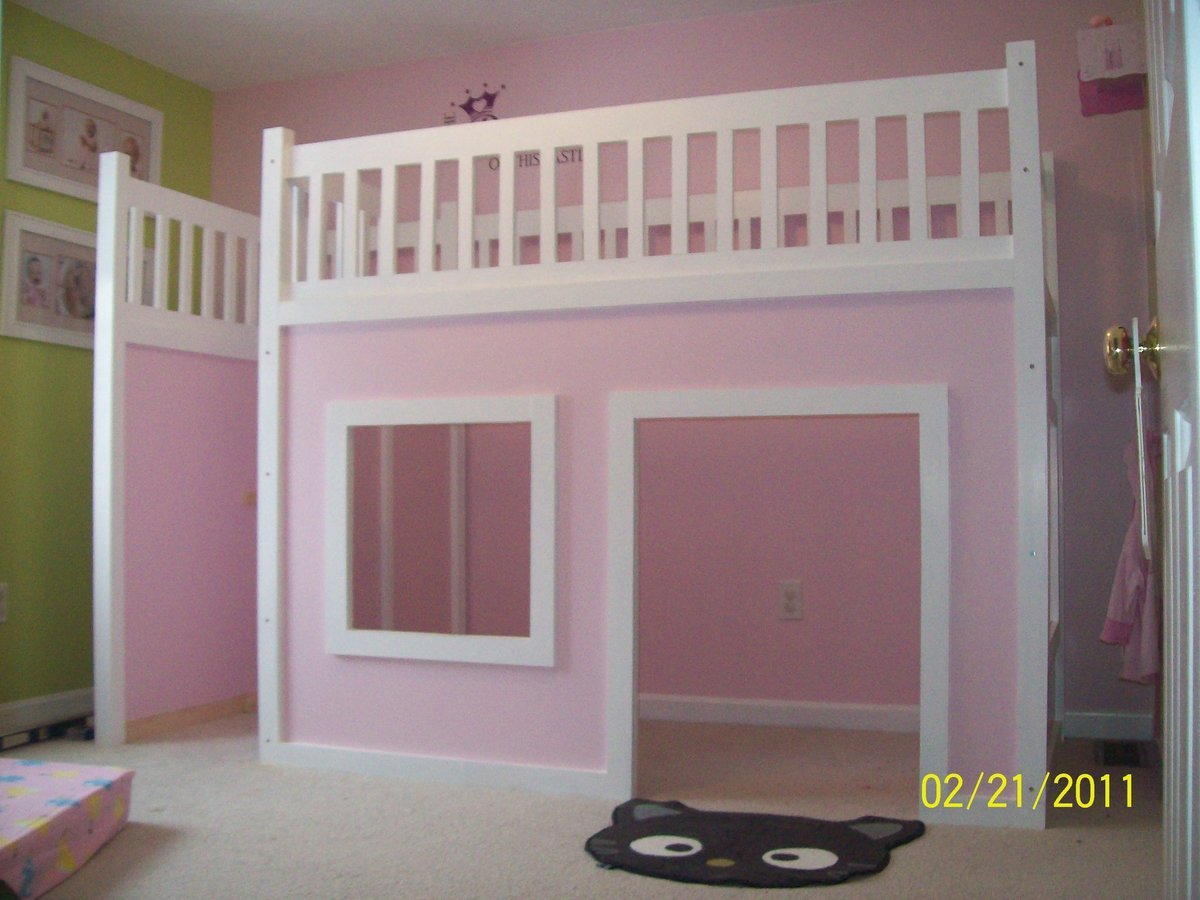

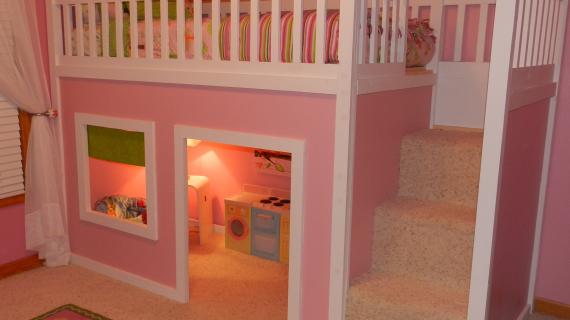
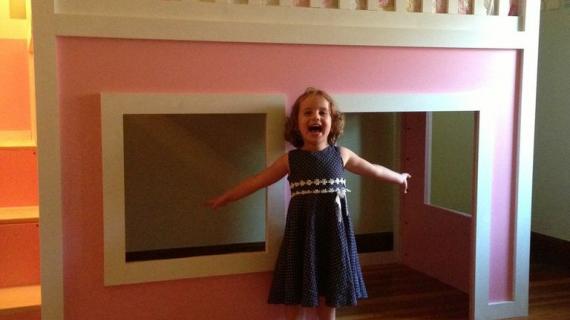
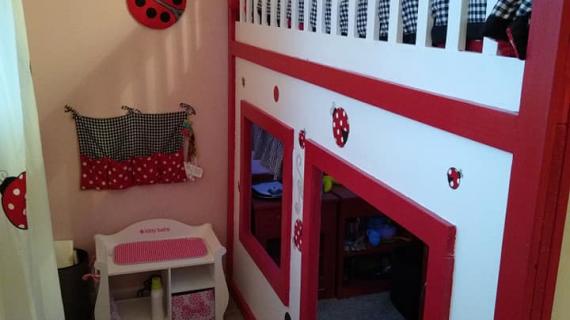
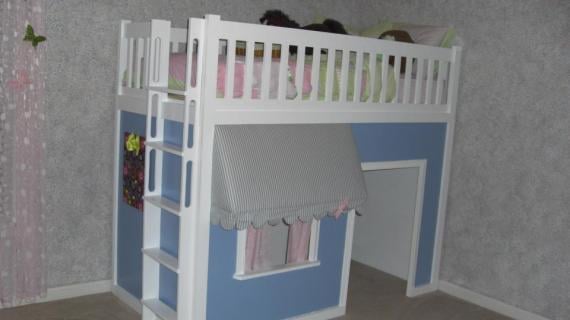
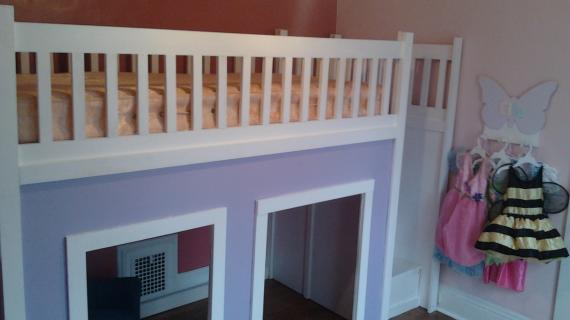
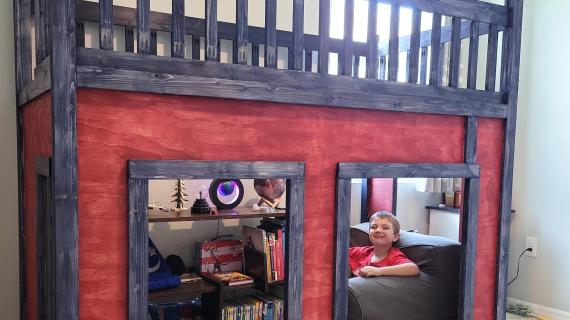
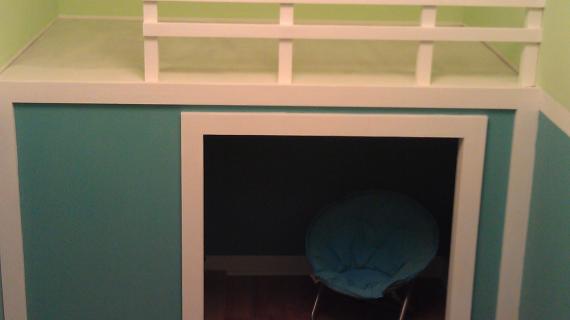
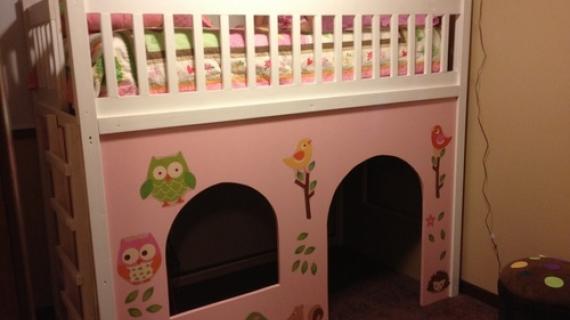
Building a playhouse bed is easier than you think with this straight forward plan. It's a big project, it's going to take patience and persevering, but as so many of our readers have discovered, well worth the hard work! Special thanks to Kimberly for sharing her amazing photos of Princess Katherine's bed.
Preparation
2 sheets of 3/4″ MDF, particle board or plywood (sanded to reduce splinters)
7 – 1x2s, 8′ long
15 – 1x3s, 8′ long (not including 1x3s for mattress slats)
6 – 1x4s, 8′ long
3 – 2×2, 8′ long
1 1/4″ pocket hole screws
2″ self tapping wood screws
1 1/4″ brad nails
2″ brad nails
wood glue
wood filler
Finishing Supplies
53 – 1×2 @ 11 1/2″ (Rails)
4 – 1×4 @ 80″ (Top and Bottoms of Rails)
4 – 1×3 @ 11 1/2″ (End of Rails – Front and Back rails)
1 – 3/4″ Plywood or MDF @ 48″ x 80″ (Front Plywood)
8 – 1×3 @ 68 1/2″ (Legs)
1 – 1×3 @ 75″ (Top Front Trim)
2 – 1×3 @ 36″ (Door Trim)
1 – 1×3 @ 31″ (Door Trim)
1 – 1×3 @ 38″ (Front Trim)
1 – 1×3 @ 6″ (Front Trim)
6 – 1×3 @ 21″ (Window Trim)
2 – 1×3 @ 26″ (Window Trim)
4 – 1×3 @ 2″ (Top Leg Filler Pieces)
2 – 1×3 @ 45 1/2″ (Back Leg Filler Pieces)
1 – 1×3 @ 80″ (Back Base Trim)
2 – 1×4 @ 37 1/2″ (Top and Bottom of Side Rail)
2 – 3/4″ Plywood @ 48″ x 37 1/2″ (Side Plywood)
4 – 1×3 @ 37 1/2″ (End Trim)
2 – 1×3 @ 25 1/2″ (Window Trim)
2 – 1×4 @ 21 3/4″ (Ladder End Rail Top and Bottom)
1 – 1×2 @ 66 1/2″ (Ladder Inside Support)
2 – 1×2 @ 43″ (Ladder Spacer)
2 – 2×2 @ 48″ (Ladder Sides)
5 – 1×2 @ 15 3/4″ (Ladder Rungs)
2 – 1×3 @ 13 1/2″ (Ladder Side Window Trim)
2 – 2×2 @ 75″ (Cleats for the mattress support frame)
1x3s @ 39″ (Mattress Slats, as recommended by the mattress company)


Instructions
Step 1
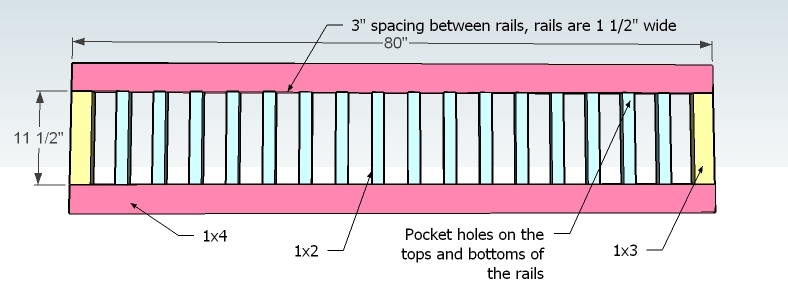
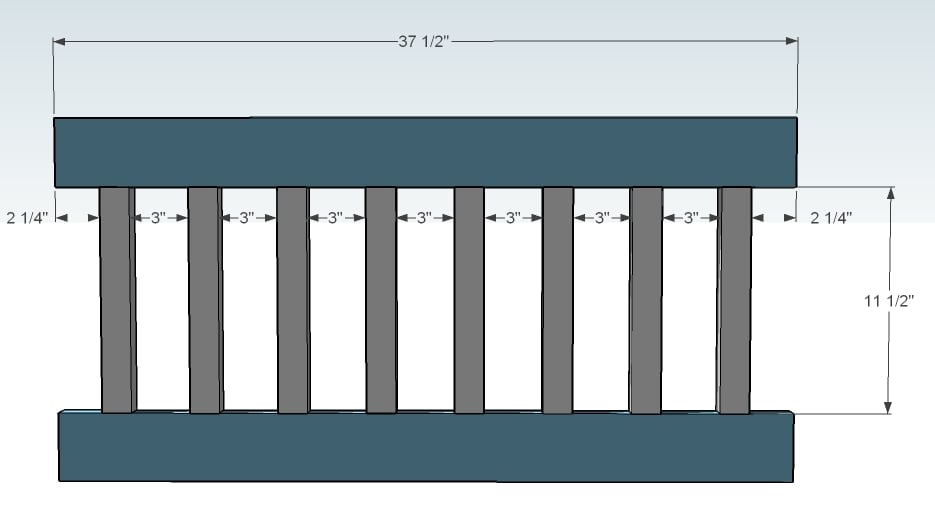
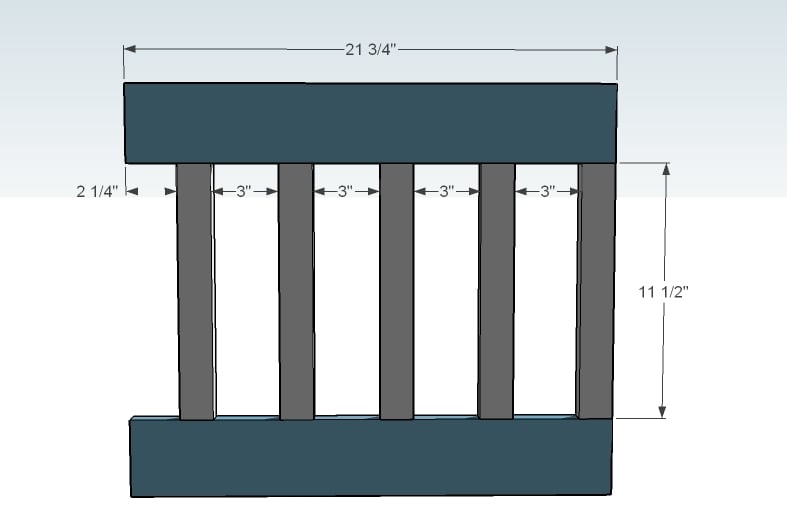
Front and Back Railing
Build two of these – one for the front, and one for the back. Simply drill two pocket holes on both ends of all of the rails (blue) and ends (yellow). Mark the top and bottoms (pink) with 3″ spaces, remembering that a 1×3 is actually 2 1/2″ wide and a 1×2 is actually 1 1/4″ wide. Use glue and 1 1/4″ pocket hole screws to attach the rails to the tops and bottoms, as shown above. Set aside.
Step 2

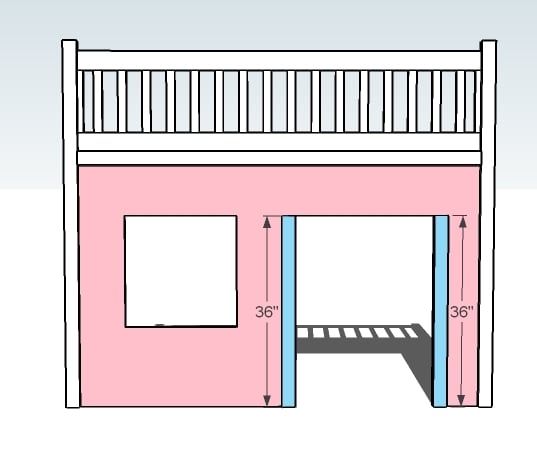
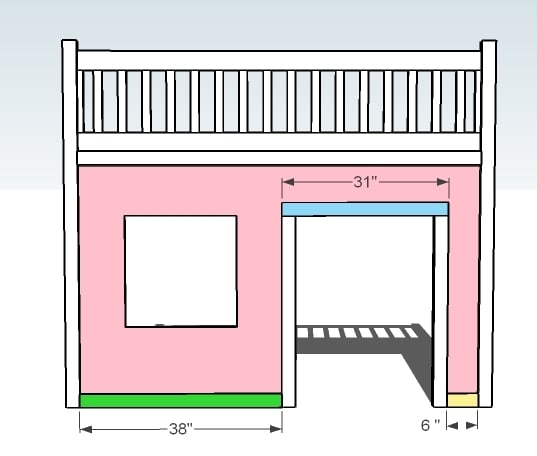
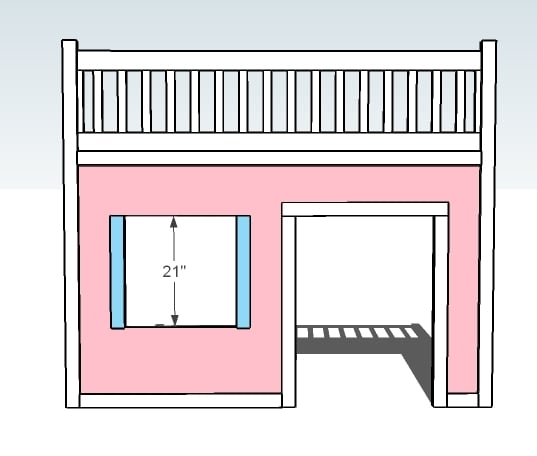
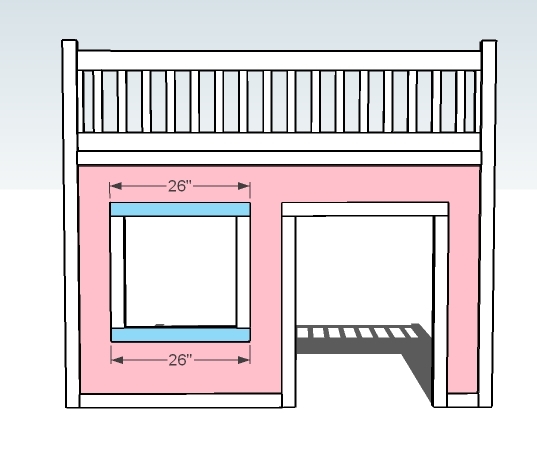
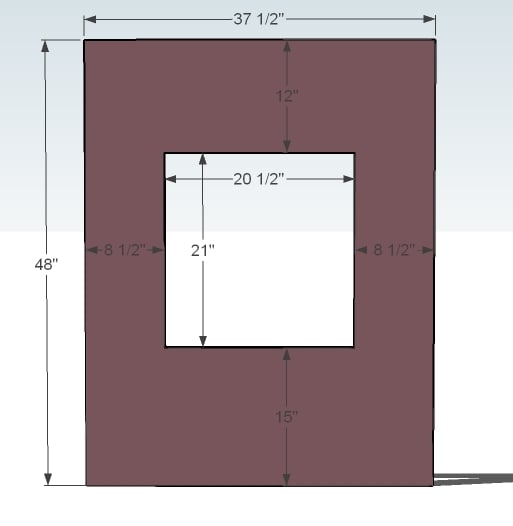
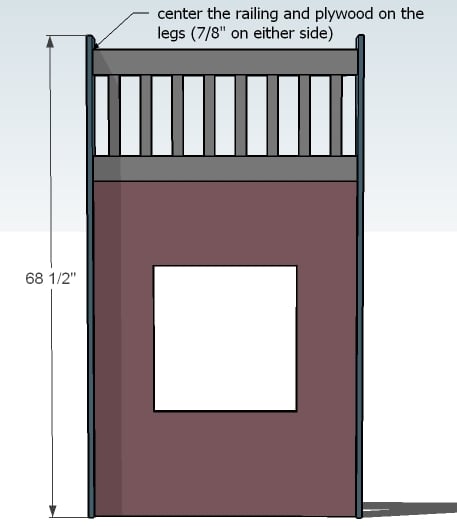
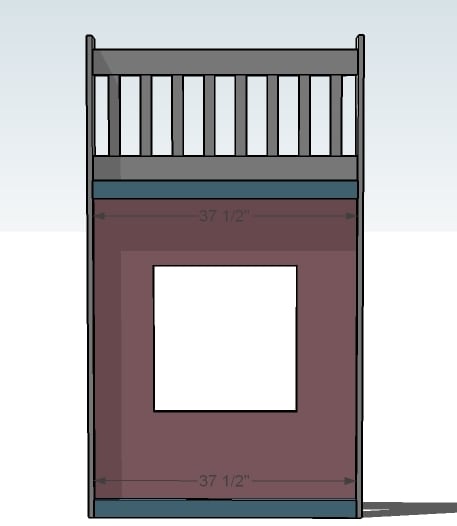
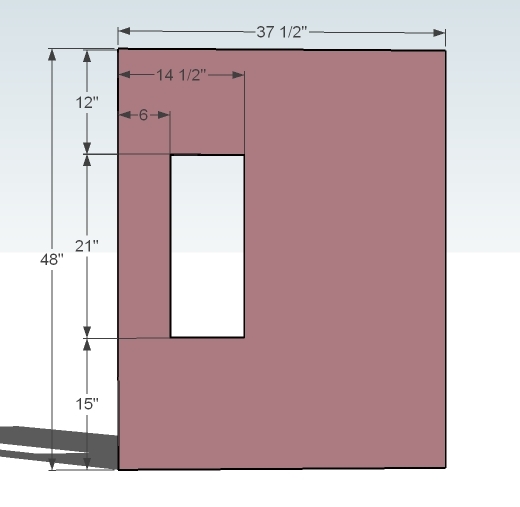
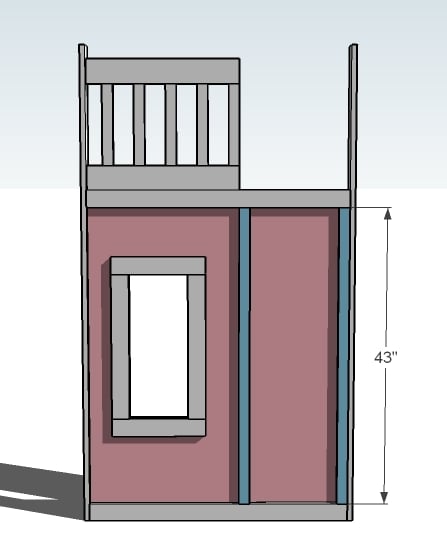
Front Plywood
Mark out your front plywood as shown above. Use a jigsaw to carefully cut out the windows and doors.
Step 3

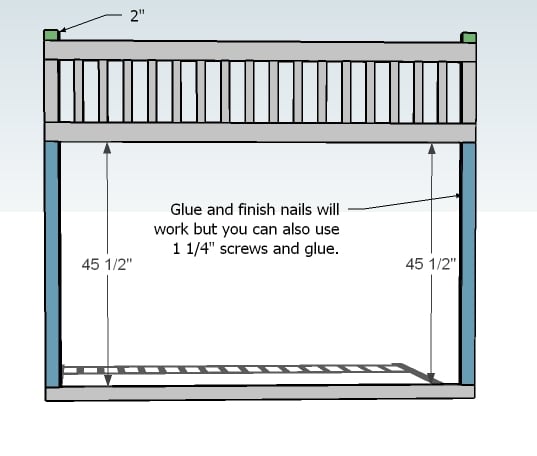
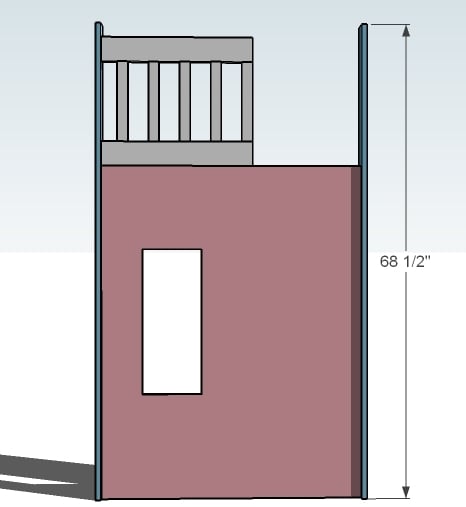
Front Legs
Use 1 1/4″ screws and glue to attach the plywood and the rails to the legs, as shown in the diagram. Keep bottom and outside edge flush.
Step 4
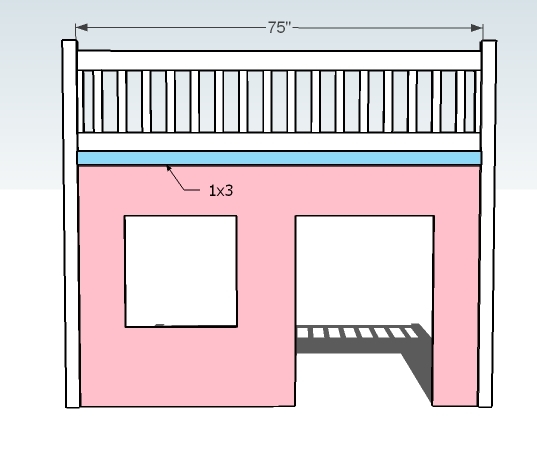
Top Trim
Attach the 1×3 to the front of the bed. Use 1 1/4″ screws and glue,overlapping the rails by 1″, hiding the joint between the railing and the plywood.
Step 5
Step 6
Front Trim
Add the remaining trim, as shown above. Use 1 1/4″ nails and glue.
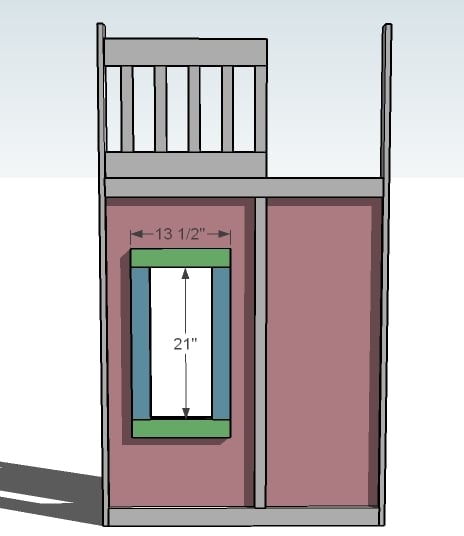
Step 7
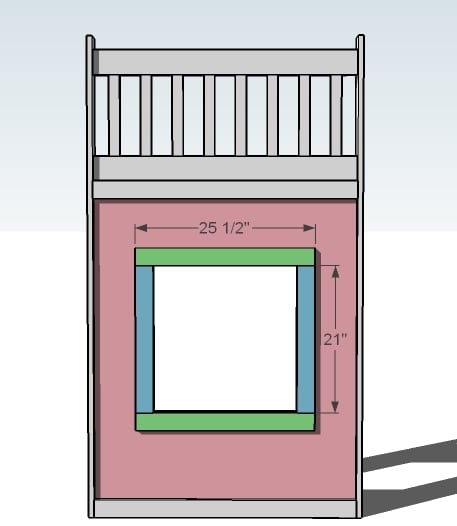
Window Trim
Add the window trim as shown in the diagram. Use 1 1/4″ finish nails or screws and glue.
Step 8
Window Trim
Trim out the window as shown above. You can alternately build your window frame with a Kreg Jig™, and then attach to the plywood front.
Step 9
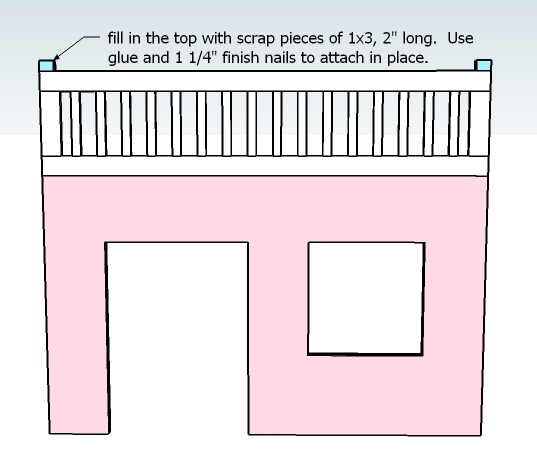
Top Fillers
Add the top pieces to the tops of the legs to fill in the gaps. Avoid overnailing and splitting the wood. Use 1 1/4″ nails and glue.
Click on the page links below for the complete instructions on building the back up next.
Step 10

Legs and Railing
Attach two legs to the railing as shown above (on on each side – you should still have four legs left). Use 1 1/4″ screws and glue. Leave 2″ at the top of the legs. Adjust for square.
Step 11

Back Bottom Trim
Attach with 1 1/4″ screws and glue the back bottom piece as shown above.
Step 12
Back Trim
Fill in the exposed gaps with 1×3 trim boards as shown above. Use 1 1/4″ fasteners and glue.
And now we have two of the wall built! Click on the page links below to see how to build the side walls.
Step 13
Build the Side Railing
Step 14
Legs
Attach the legs to the sides of the plywood and the railing. Your best bet is to use pocket holes, drilled from the plywood, screwing into the legs (same with the railing). Use 1 1/4″ pocket hole screws and glue. Center the plywood and the railing on the legs.
Step 15
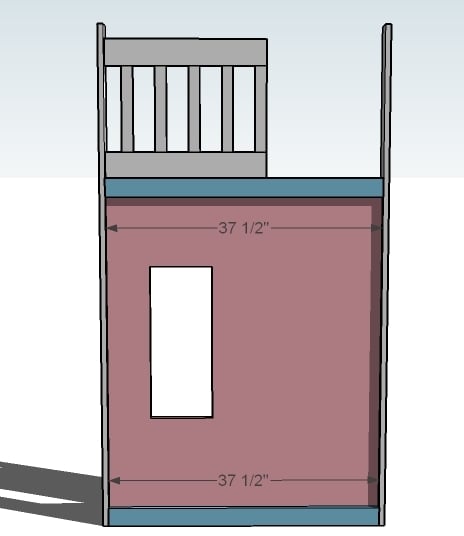
Trim
Attach the trim to both the legs and the plywood,overlapping and attaching to the railing also (as you did the front,overlapping 1″). Use 1 1/4″ screws and glue, 1 1/4″ pocket holes and glue to attach to the legs.
Step 16
Window Trim
The best way to go on window frames is to build them separately with 1 1/4″ pocket hole screws, and then tap on with finish nails and glue. You can alternately attach with 1 1/4″ finish nails and glue.
This completes the end wall without the ladder. Click on NEXT PAGE below to see how to build the ladder end.
Step 17
Ladder End Rail
As you built the other rails, build the ladder end rails as shown above.
Step 18
Ladder End Plywood
Cut your ladder end plywood as shown above, carefully cutting out the window.
Step 19
Legs
As you did with the other sides, add the legs to the plywood and railing. Best option is pocket hole screws (1 1/4″ pocket hole screws) or 2″ screws and glue from the outside.
Step 20
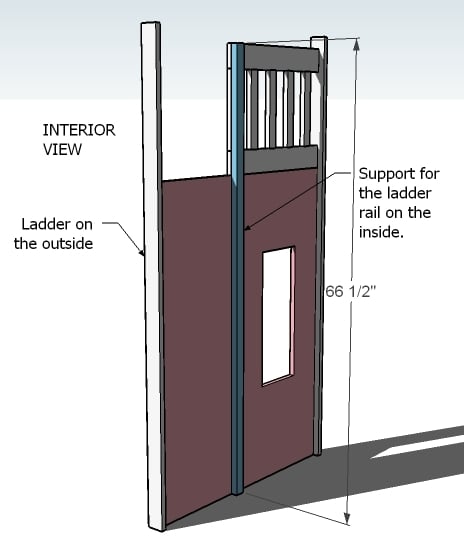
Ladder Railing Support
So I tossed and turned on this one, knowing that little hands are going to be pulling on the top of this railing and knowing it needed to be sturdy. The best bet was to run a support down the entire length of the inside. Use 1 1/4″ screws and glue to attach the 1×2 to the inside as shown above. Notice how it’s flush with the end of the railing?
Step 21
Ladder End Trim
Just like you did the other end, add the trim boards. Use glue and 1 1/4″ screws or nails. Overlap the railing by 1″ to keep the railing in place.
Step 22
Ladder Spacer
You’ll need this as a spot to secure your ladder too. Use 1 1/4″ screws and glue.
Step 23
Window Trim
Best bet? Build the window frame separately with a Kreg Jig, and attach the window to the plywood with finish nails and glue. You can also attach each piece separately.
Step 24
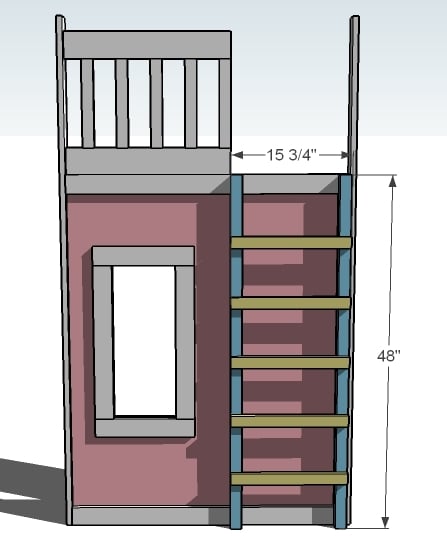
Ladder
Build the ladder with the 2x2s and 1x2s, using 2″ screws and glue. Space the rungs 7″ apart, leaving less room at the top. Screw to the end with 2″ screws and glue.
You have built all four walls! Click on the page links below to see how to assemble the four walls and add the mattress slat
Step 25
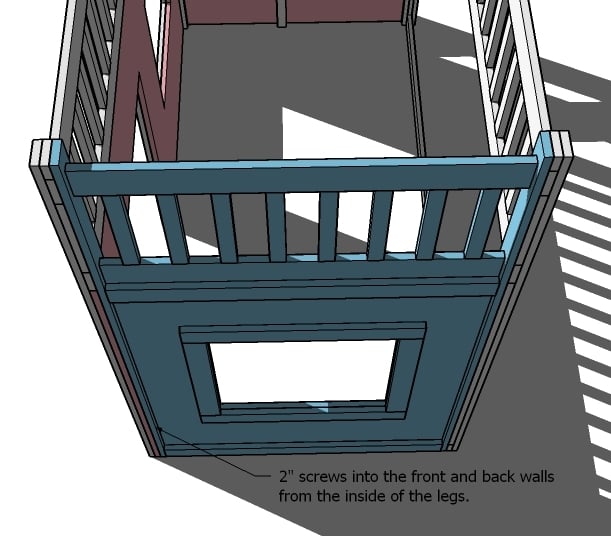
This bed is built in such a manner that you can attach the four walls easily, creating a leg that looks like a solid post. Use 2″ screws from the inside and leave off the glue for easy dis assembly. Adjust the entire playhouse for square.
Step 26
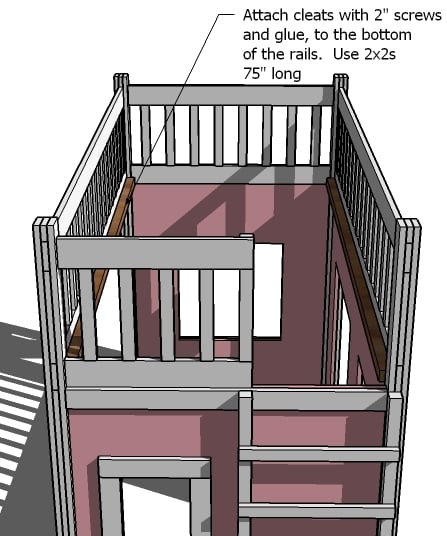
To allow your mattress to “breath” slats are the best way to go. You can purchase metal brackets, or use a 2×2, glued and screwed to the insides of the rails, as shown here.
Step 27
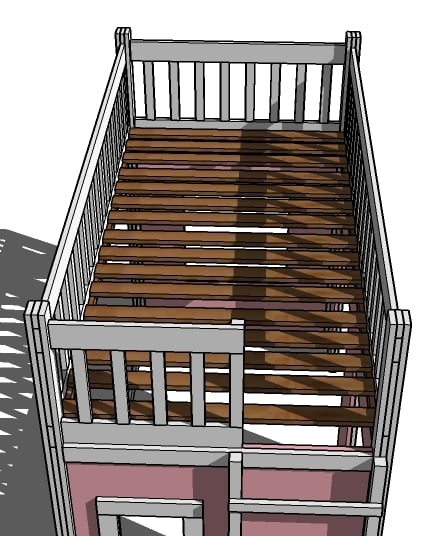
Install slats by laying on the cleat and screwing down. Leave the glue off so you can remove the slats. Place the slats according to your mattress recommendations.

Comments
In reply to Playhouse Loft bed by Katieparker
Abzman
Tue, 07/30/2013 - 00:24
Full size bunk bed
Hi Katie,
Check out my posting, hope this helps. I built one with a Full size on top and single in bottom.
http://ana-white.com/2011/10/custom-playhouse-bunkbed
sstieh
Mon, 09/23/2013 - 05:38
Getting Started
I'm in the process of going over the plans as I would love to build this for my two daughters. I have a question about steps 3 and 4. In step 3 when attaching the legs to the plywood and rails do you screw in from the back to the front or do you counter sink the screws if you go from front to back?
Likewise in step 4 it says to "Attach the 1×3 to the front of the bed. Use 1 1/4″ screws and glue, overlapping the rails by 1″, hiding the joint between the railing and the plywood." How is this done so you can't see the screw heads in the finished product?
In reply to Getting Started by sstieh
Abzman
Mon, 09/23/2013 - 16:05
Steps 3 & 4
Hi,
For step 3, I put the screws in on the inside so they're not visible on outside.
Using the Kregg jig they will be counter sunk. You can purchase plugs and plug all the holes if you desire. But not sure it's needed.
Step 4: I used construction glue in some places including that piece and then finishing nails. So they were not visible. Additionally, I then used screws from the back to pull the piece in.
sstieh
Tue, 09/24/2013 - 09:58
Steps 3 & 4
This is very helpful. Thank you very much for the reply.
hhhmommy3
Mon, 11/18/2013 - 19:50
Full Plans
Could you send me the plans for this bed in a FULL?? Thank you so much!!! :)
hhhmommy3
Mon, 11/18/2013 - 19:50
Full Plans
Could you send me the plans for this bed in a FULL?? Thank you so much!!! :)
In reply to Full Plans by hhhmommy3
Abzman
Tue, 11/19/2013 - 10:47
Plans for FULL size
Unfortunately I did not take the time to document plans for my bad but I marked up my photos with the dimensions. You can click on my username or the image on the right to see my project. In it you'll find two links to the pictures and dimensions.
I hope that helps.
mercy4free
Sat, 08/30/2014 - 14:47
MDF or Plywood?
I am wanting this to last until my 3 year is at least a pre-teen (take the front off eventually). Do you advise using the MDF or plywood? I would think particle board would not last that long. I don't know anything about how durable MDF is. Also, I am a heavy person and of course I will have to get up there from time to time to make the bed or whatever. Suggestions?
teamrae
Sat, 10/25/2014 - 18:46
what to do different
I'm loving the idea of having a loft bed for my daughter. Her space is limited and would love to have more storage. With that said, while these directions are EXTREMELY helpful, I'm not to interested in creating an entire under the bed play area. And the thought of having her that high kinda scares me.
What would I do differently to maintain the sturdiness of the structure if I wanted to create a smaller under area play and add in maybe a small dresser or shelf (without having separate pieces)?
Thanks
LaRae
cdavis326
Wed, 06/10/2015 - 11:30
Has anyone made this bed taller?!?
Has anyone tried to make this bed taller to allow for a taller playhouse area under? Do you think this would be possible? Love this bed but I would like to have more clearance on the bottom. Any advice or thoughts appreciated!
Breezwest
Tue, 09/01/2015 - 11:52
Full size
Can I please get the plan for this bed in the full matteress size. I can't seem to find it under plans.
Thanks!
Breezwest
Tue, 09/01/2015 - 11:53
Full size
Can I please get the plan for this bed in the full matteress size. I can't seem to find it under plans.
Thanks!
Schwartzdog69
Sun, 12/06/2015 - 18:19
Weight limit
Does anyone know what kind of weight limit this has?
MissesErbstösser
Sat, 01/02/2016 - 10:39
Hello from Germany everyone :
Hello from Germany everyone :)
We love love love this Bed!! And we want to build it.But we ot problems to covert the mass in meter.
And we got also problems with the Shopping List.
HOPING FOR HELP!
For what as example is 7 – 1x2s, 8′ long standin for ?
Thank you so much
kate
Theresa V.
Sat, 01/02/2016 - 12:36
@ Kate aus Deutschland
Hallo Kate,
Ein 1x2 steht fuer ein Brett das 1 inch tief x 2 inch breit ist. Als Beispiel 7- 1x2s 8' long bedeuted 7 Bretter, jeweisl 1inch tief, 2 inch breit und 8 foot lang. 1 inch sind 2.54 Zentimeter. 1 Foot ist 12 inches oder 30.48 cm. Ich hoffe das hilft ein bisschen weiter.
Allerdings ist vielleicht auch zu beachten dass die Bretter im Baumarkt nicht wirklich die groesse haben. Ich hab mal eine liste gefunden (Nominal groesse ist wie es genannt wird, Actual ist die eigentliche Groesse und Metric ist was Deutsche Masse cm...):
http://mistupid.com/homeimpr/lumber.htm
the bavarian
Sat, 01/02/2016 - 13:01
@ Kate aus Deutschland
Hallo,
nur noch zur Anmerkung, da evtl. die Frage auftauchen wird:
' steht für foot (Fuß oder Zoll in Deutschland)
" für inch
Schönen Gruß
MissesErbstösser
Sun, 01/03/2016 - 11:15
Vielen Dank
Oh vielen lieben Dank.
Jetzt sind wir schon weentlich weiter. Im Baumarkt waren die Herren leider völlig ahnunglos.
Nur noch eine Frage:
Für was steht 3/4 ?
2 Platten von 3/4 MDF .
Mit lieben Grüßen
Kate
manolo2712
Mon, 06/27/2016 - 23:45
Sketchup plan
Hi Everybody,
My daughter saw this bed and since then every day she asks me to build it :-)
I wondered if there was a place on the website where I could download the sketchup plan ?
Thanks!