
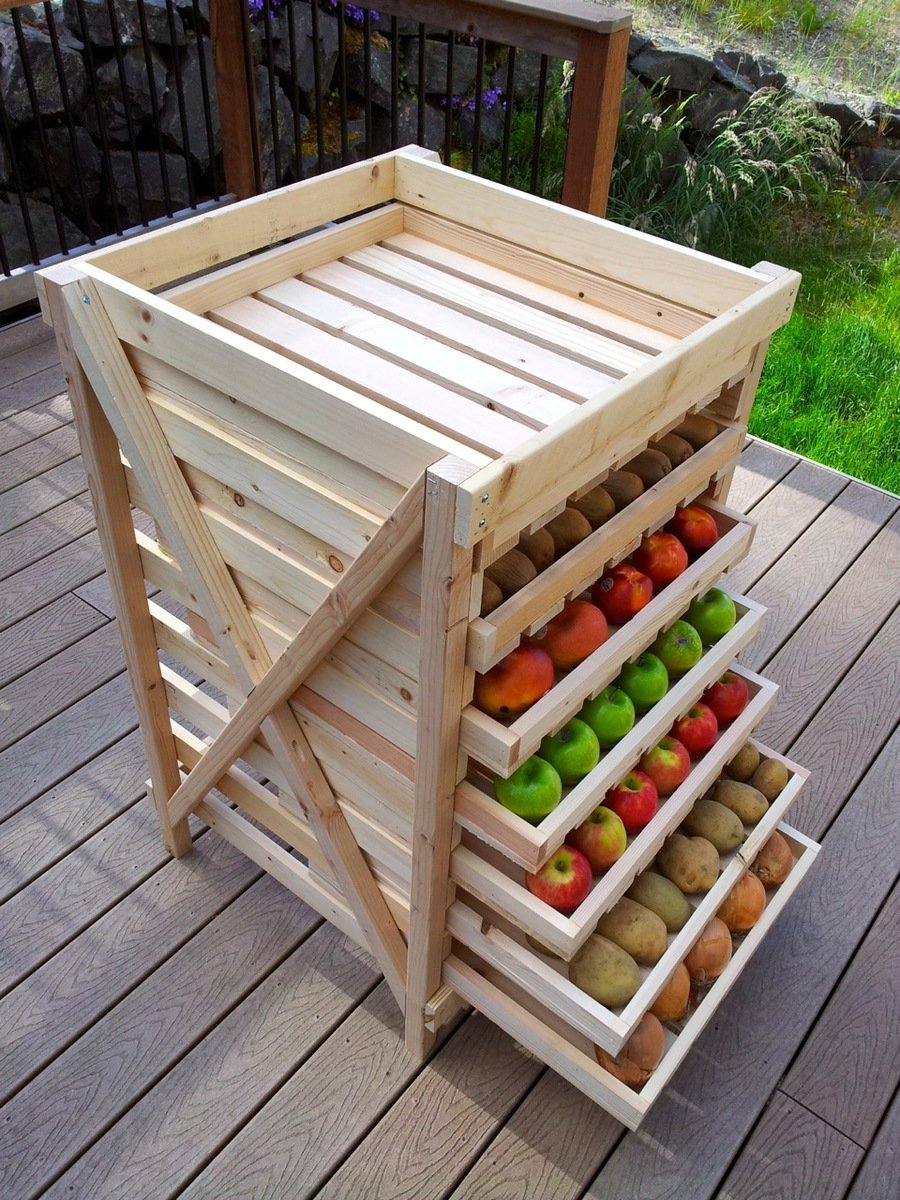

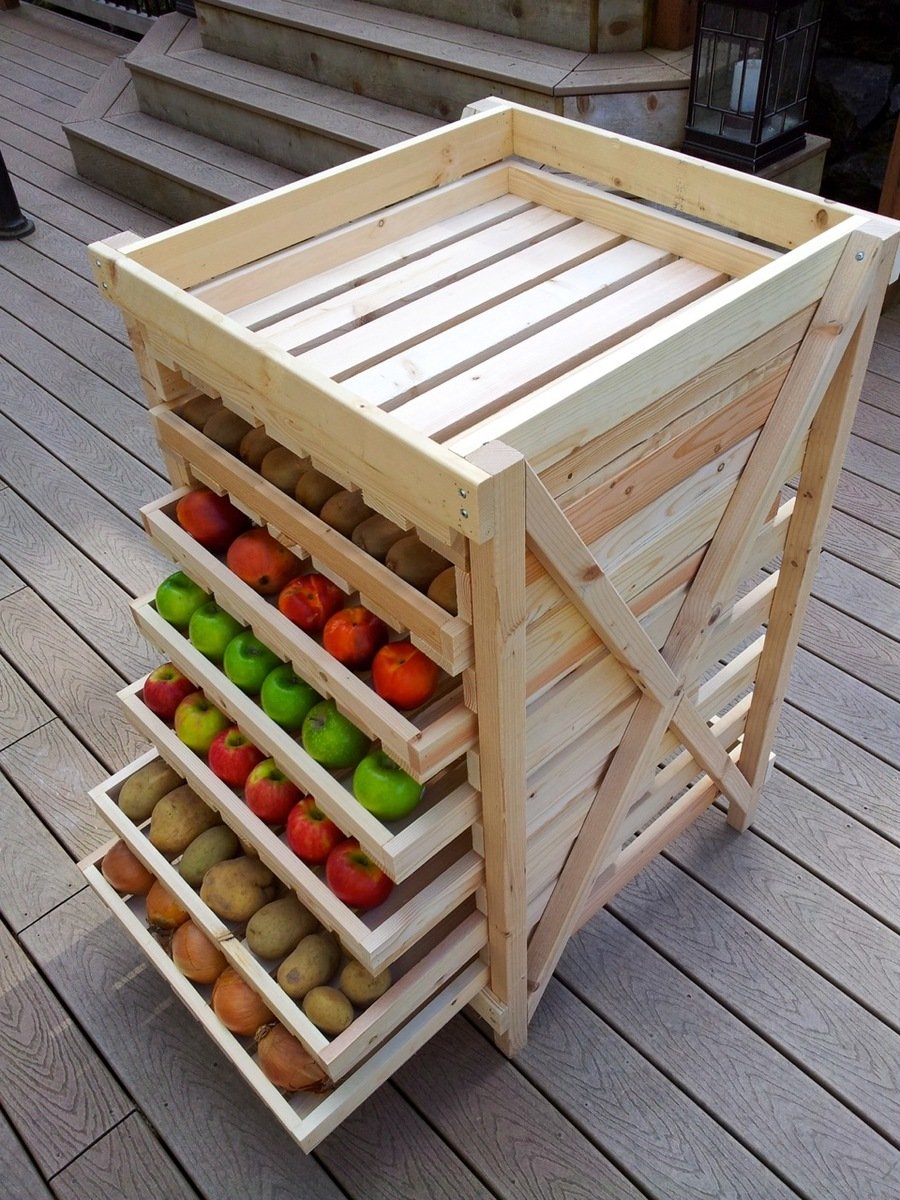
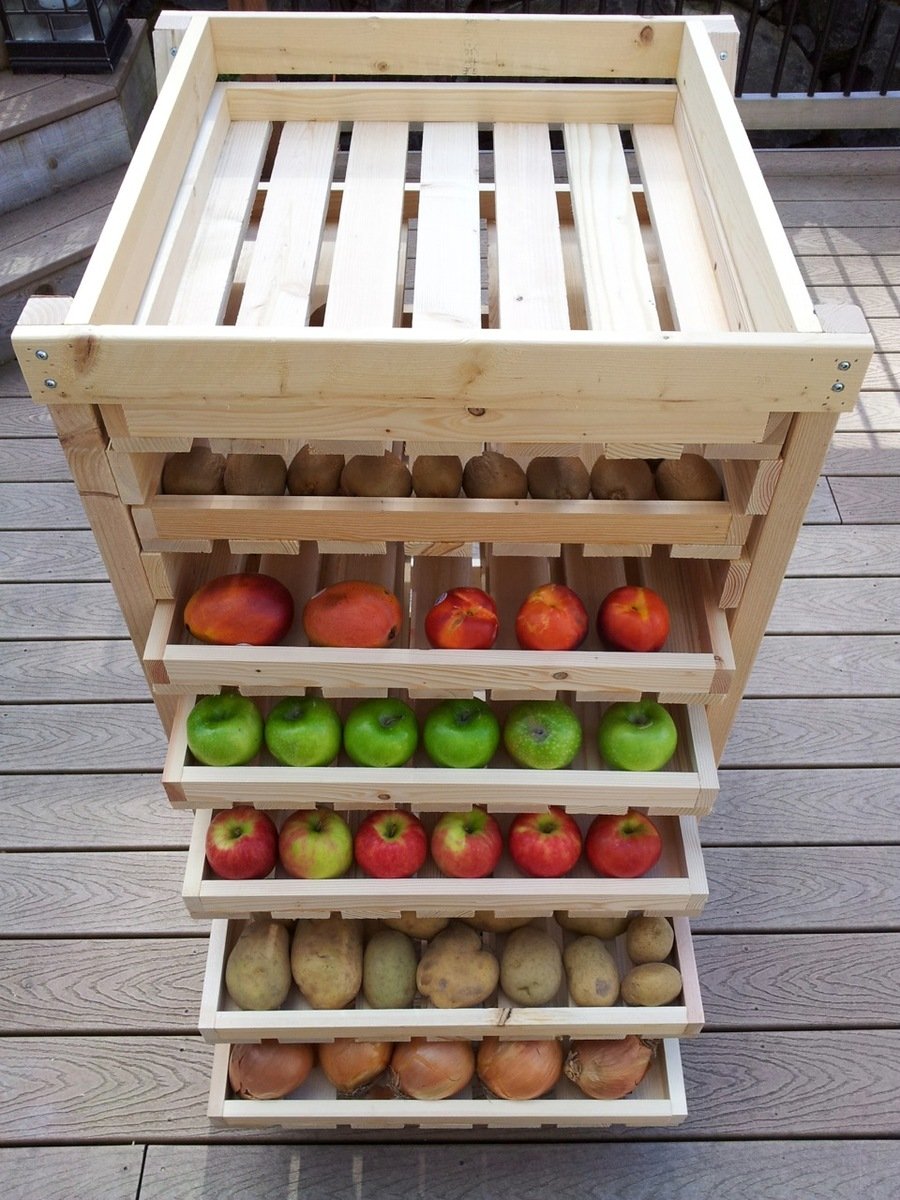
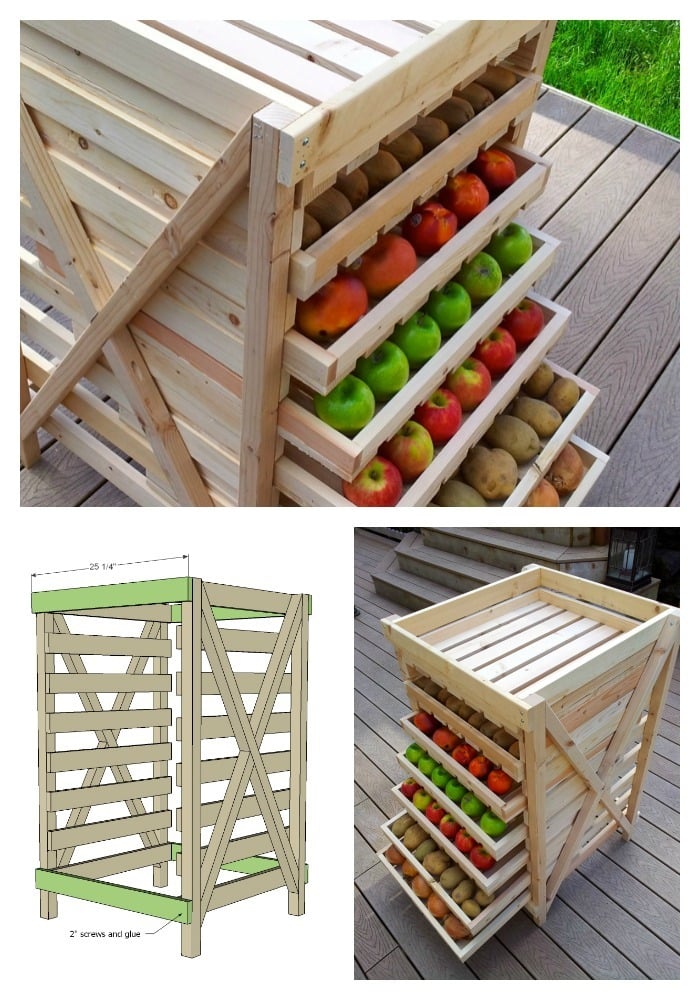
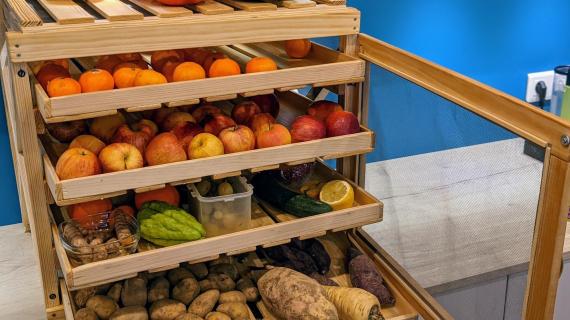
Build a vegetable rack that can be used for produce storage or as a drying rack! Free step by step plans with full diagrams from Ana-White.com


When harvest time comes, you need somewhere to dry all of your produce and store it for the winter. If taken care of properly, you could be enjoying garden fresh carrots and potatoes all winter long.
The problem is food storage can take up quite a bit of room.
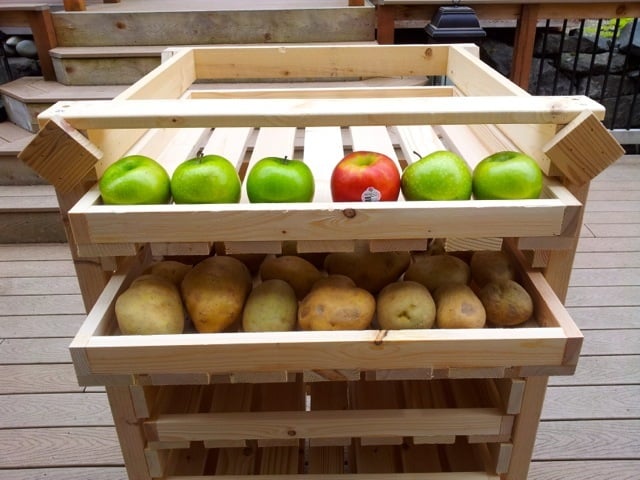
So we came up with this - an easy to build vegetable rack with slide out trays.
Built and photographed by Serena

Preparation
- 4 – 2x2 @ 8 feet long
- 17 – 1x3 @ 8 feet long
- 7 – 1x2 @ 8 feet long
- 1 ¼” and 2” brad nails
- 2” self tapping screws
- Recommend also 2 ½” PH screws
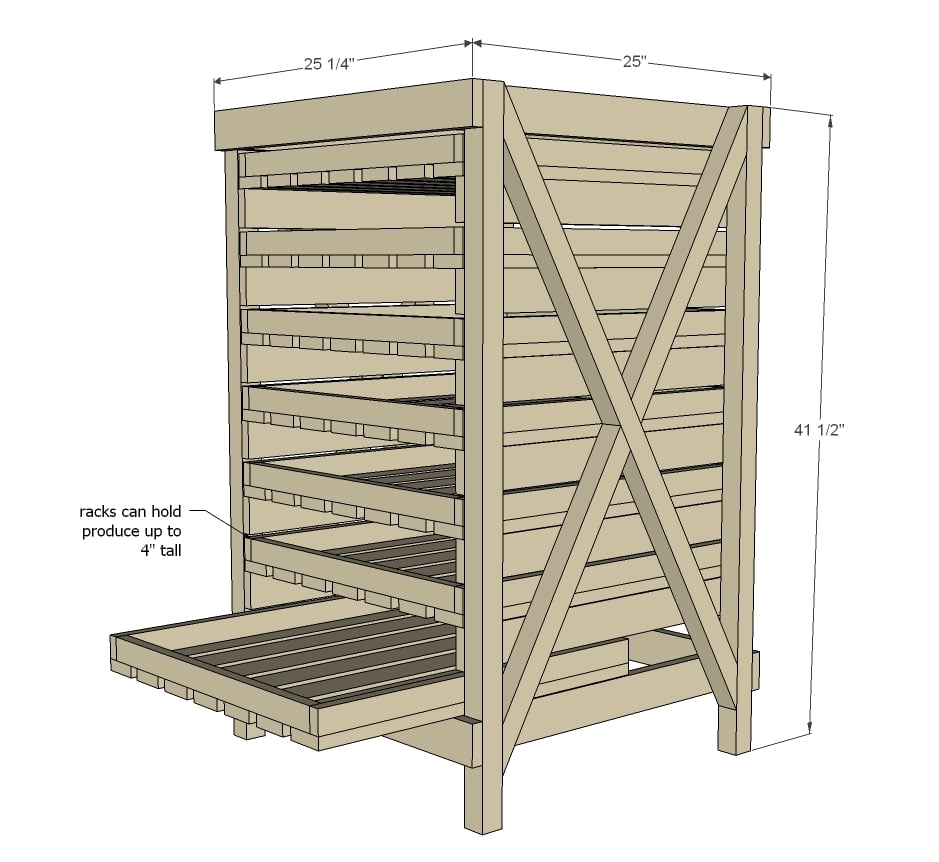
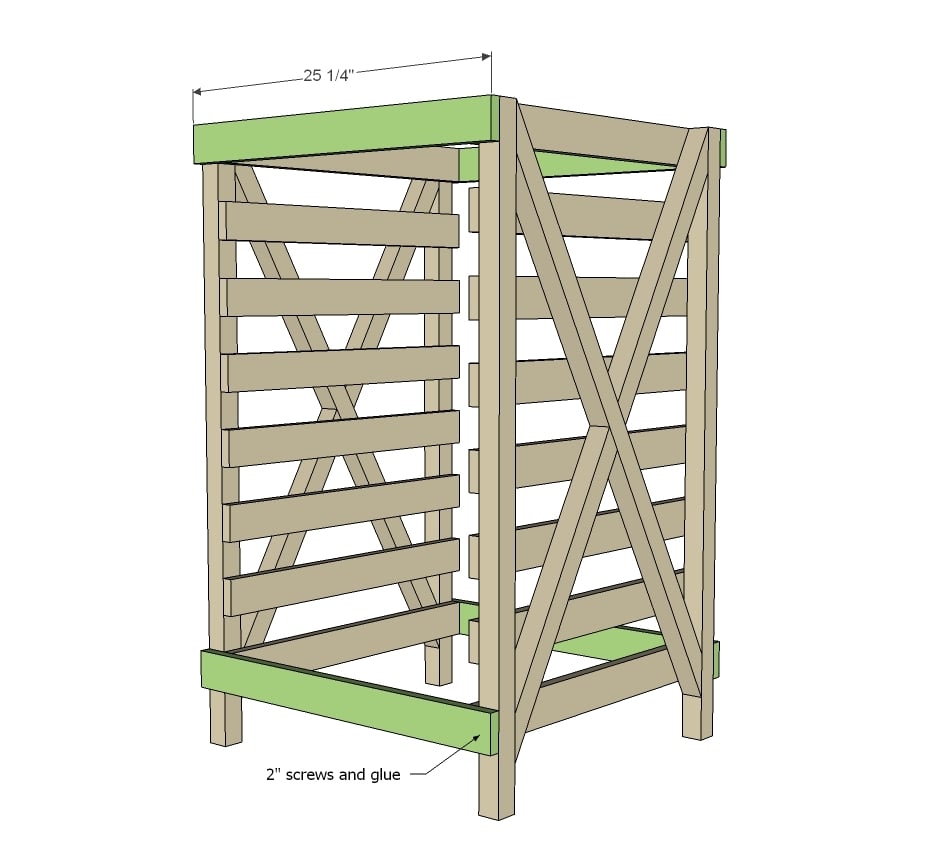
FRAME
- 4 – 2x2 @ 41 ½” (legs)
- 16 – 1x3 @ 23 ½” (side drawer glides)
- 2 – 2x2 @ 41” (LP to SP, both ends cut at 60 degrees off square, ends parallel)
- 4 – 2x2 @ 20 ½” (longest points, one end cut at 60 degrees off square, other at 30 degrees off square, ends are cut in same direction but not parallel)
- 4 – 1x3 @ 25 ¼” (front/back supports)
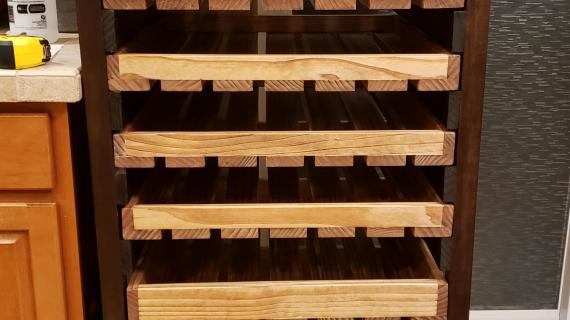
DRAWERS
- 14 – 1x2 @ 23 ½”
- 14 – 1x2 @ 20 ½”
- 49 – 1x3 @ 23 ½”


Please read through the entire plan and all comments before beginning this project. It is also advisable to review the Getting Started Section. Take all necessary precautions to build safely and smartly. Work on a clean level surface, free of imperfections or debris. Always use straight boards. Check for square after each step. Always predrill holes before attaching with screws. Use glue with finish nails for a stronger hold. Wipe excess glue off bare wood for stained projects, as dried glue will not take stain. Be safe, have fun, and ask for help if you need it. Good luck!
Instructions
Step 1
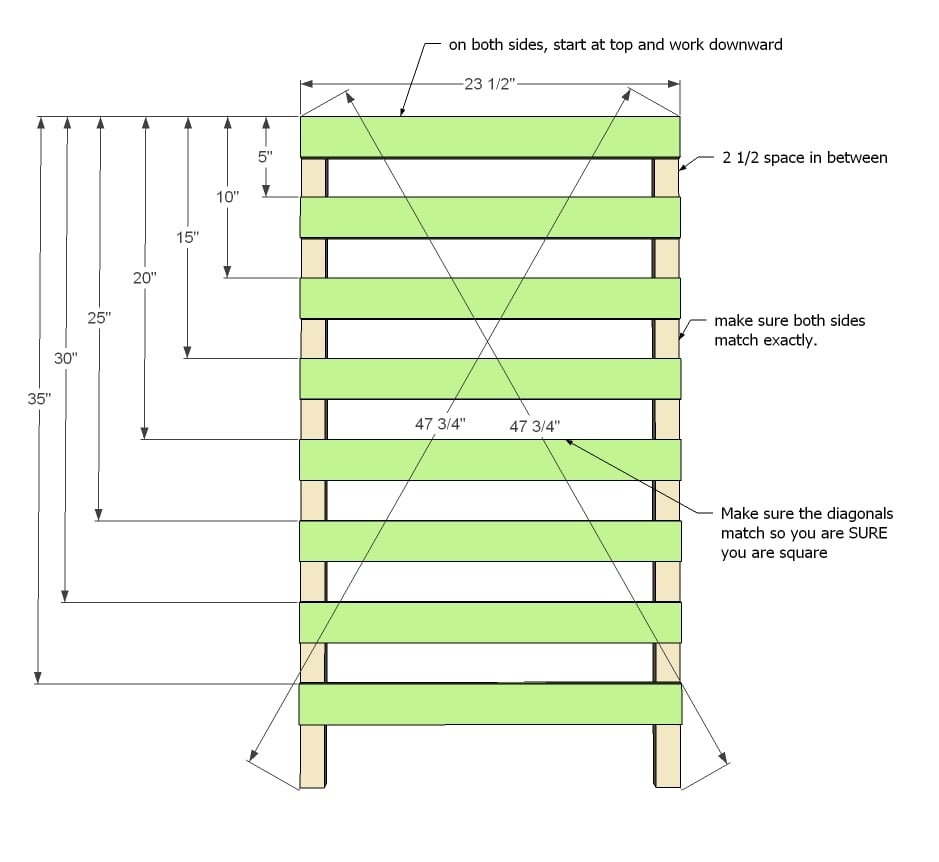
It is very important to make sure that the ends are built identical and square. The side rails will actually serve as drawer guides, so you will want to make sure the guides are attached square too. I recommend first taking all of your 2x2 legs and marking all of them at the same time with the side rail locations. Then you can attach.
You can attach the siderails with 2” brad nails and glue.
Step 2
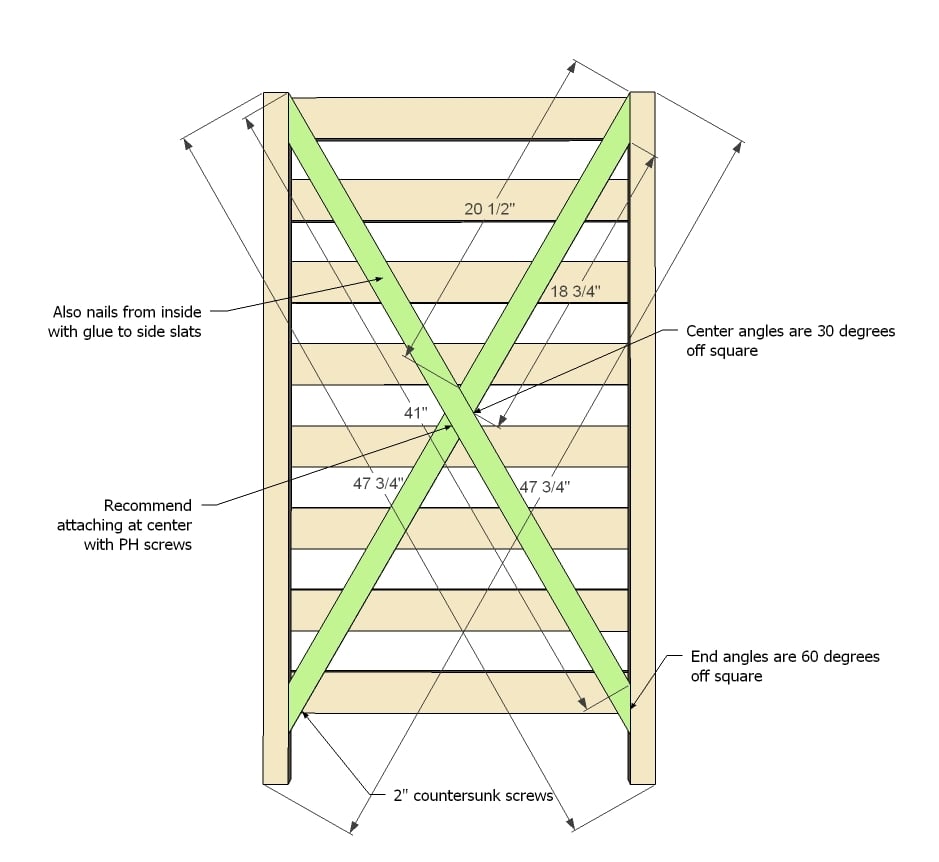
The X braces will add strength to the project and keep it square.
The X braces can be scribed by tracing the angles before and then cutting on your traced lines.
Both braces are NOT required, you can use just one.
Attach from the inside with 1-1/4" brad nails and glue.
Step 3
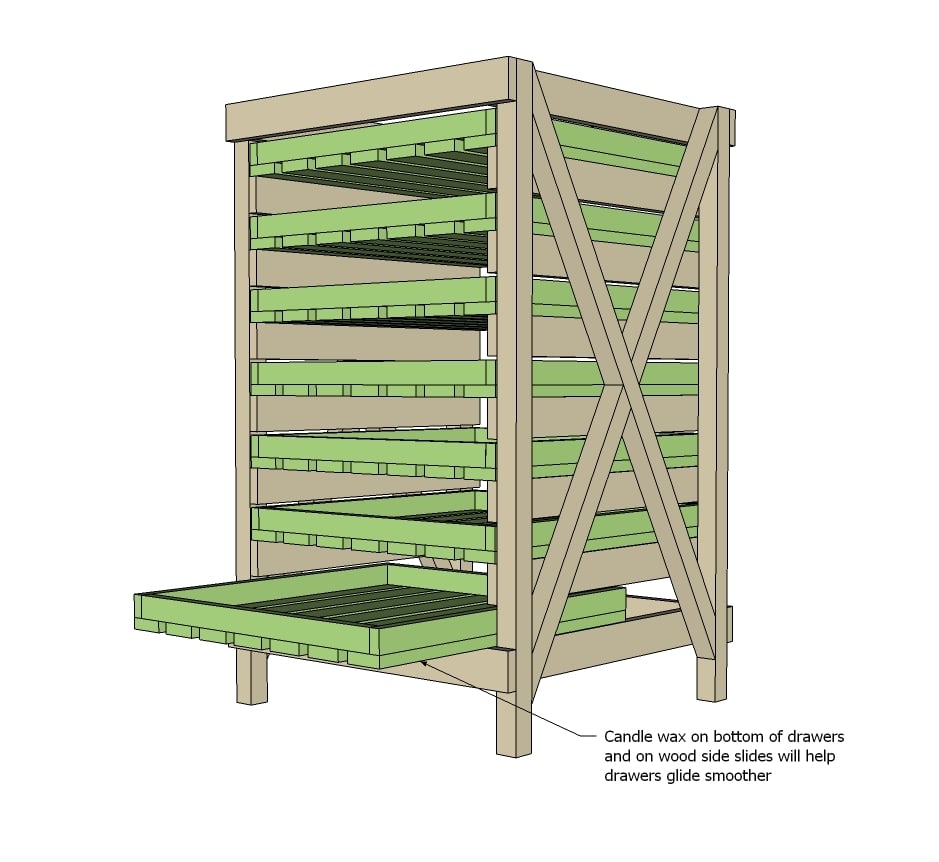
Once both legs are done, all you have to do is add the front/back supports.
Step 4
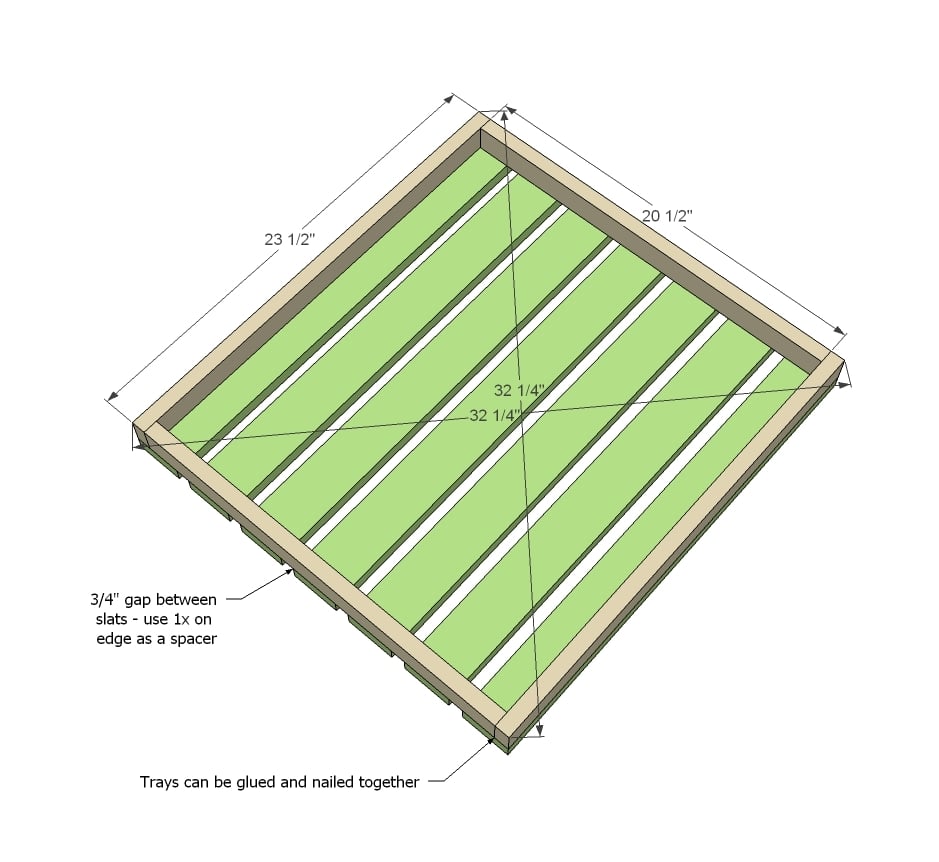
And then build trays. Trays must be built square to slide right.
TIP: Build one tray first and make sure it slide right. Then build remaining trays.
Step 5
Step 6
Serena felt like the original instructions made the top shelf too tight for accessing produce, so we modified to place the front support on top. She blocked the front just for decorative purposes. This makes the top shelf much larger.
It is always recommended to apply a test coat on a hidden area or scrap piece to ensure color evenness and adhesion. Use primer or wood conditioner as needed.


Comments
Chair
Mon, 06/18/2012 - 13:11
Fantastic!!
Sooooo building this, especially for things like onions that need to be kept dry to store well :D
Guest Lucy (not verified)
Mon, 06/18/2012 - 15:17
Food Storage Shelf
Great idea. Questions: Is this for indoor storage? How do you keep the critters out? I'm new to drying food so not sure if this is something I could use but sure seems like a good idea.
wimsy (not verified)
Thu, 06/21/2012 - 09:02
Add window screening
I made a rack similar to this, and I covered top, bottom, back and sides (all except the front of course) with window screening to keep the bugs out. The front has a screen "door" with self-closing hinges that opens to slide the racks out . Works like a charm, and easy to clean.
Cidzz (not verified)
Tue, 09/18/2012 - 07:26
Great Idea! Can you share a
Great Idea! Can you share a picture please.
Cutter (not verified)
Mon, 06/18/2012 - 16:07
Very nice design, Ana. I
Very nice design, Ana. I think I'll have to add this to my summer Project "Honey Do List". I've been trying to decide how I was going to store my root veggies this year, to avoid rot & waist. I think I just found how. Thank's !! :)
Michelle S. (not verified)
Tue, 06/19/2012 - 07:07
Oh my!
I am so in love with this project, that I want to marry it! So great!!!
Anni (not verified)
Tue, 06/19/2012 - 12:44
Looking fwd. of building this
Looking fwd. of building this one with my Hubby, and what a great Idea to keep our Pantry organized. Onions and Potatoes being stored neatly.
Thanks for sharing this on Facebook.
sgilly02 (not verified)
Tue, 06/19/2012 - 17:11
This is sure pretty!
I really like this idea for a pantry, and would just love to have something that would make all the different fruits and veggies look so darned pretty. What a great job!
I have a thought and a question. First, I have onion skins all over my pantry where I store my onions (Maybe I'm just messy!). I might think about adding a solid-bottomed drawer at the very bottom, to catch all the stuff that will fall through the cracks in the upper drawers. That could easily be pulled out and emptied and would save me from having to move the whole thing to clean under it.
And, as I'm probably older than most of you, my info about storing different fruits and veggies might no longer be relevant, but I grew up thinking that you shouldn't store potatoes and onions near each other, and that apples kept with other fruits and veggies would speed up their ripening process. Any thoughts about that? Maybe since this is open storage that wouldn't be a problem (if it ever really was :-) )
Stephanie (not verified)
Wed, 06/20/2012 - 10:08
yep! don't mix 'em!
You are right - onions and potatos don't do well stored together. I'm wondering if apples are also a poor match to either the onions or the potatoes.... guess I'll have to go hit up google for more info!
lianatempera
Thu, 09/06/2012 - 12:59
mixing...
I read somewhere that you should store apples and potatoes together--the apples help keep the potatoes from sprouting. Other than that, I don't know.
StephieSue (not verified)
Fri, 01/18/2013 - 14:18
Okay... First, I love this
Okay... First, I love this rack and I think it's a great idea for prepping the bounties, organizing them for storage over a long winter no matter what climate, and I have a few comments below that could be considered in addition to this beautiful rack.
Definitely no onions should be stored with potatoes, either dried or refridgerated. Cut onions should not be stored with any fruits or veggies or with other refridgerated items unless secured in a zip-tight bag, not tupperware, unless using within 24 hrs.
Onions have a some very beneficial uses, cut and set around in corners of a house during times when the flu or bacterial infections are at their peak season. Onions are absorptive and work kind of like a sponge in absorbing the bacteria, which is true in the fridge too if left unsealed.
Basically while the cut onions have absorbed the "not-such, good stuff", they can make a person sick, and/or also spoil other fruits or veggies stored near them by infecting them too.
My personal suggestion for winter storage of onions is to use a food processor for prep and freeze in sealed packages for later use.
Also, un-cut onions should be stored in a dark, cool environment in a paper bag to allow air-flow, remain dry and never store anywhere near apples, potatoes or squash. Other veggies like carrots, turnips, parsnips etc. would be better stored over the winter using a food dehydrator and stored in glass containers. Not to difficult to rehydrate specific amounts as needed for cooking or making protien shakes or smoothies.
Just my two or twenty cents :-) and what has worked for me for years.
God Bless.
Jay Willis
Mon, 03/25/2013 - 23:05
Onions
Spread the word, this is false, eat your onions and stop wasting them on night stands!!
This onion legend dates at least as far back as the 1500s, when it was believed that distributing raw onions around a residence protected inhabitants from the bubonic plague. This was long before germs were discovered, and the prevalent theory held that contagious diseases were spread by miasma, or "noxious air." The (false) assumption was that onions, whose absorbent qualities had been well known since ancient times, cleansed the air by trapping harmful odors.
http://urbanlegends.about.com/od/medical/a/swine_flu_facts_onions_and_f…
Peter (not verified)
Wed, 06/20/2012 - 08:47
Brilliant idea!
That's a fantastic idea, especially as it means fruit/veg can be spaced out so if one apple/tomato etc goes bad, it won't effect the others.
Guest123 (not verified)
Thu, 06/21/2012 - 13:29
Fill to the back, easy to clean?
I c that some of the trays aren't filled all the way to the back…can you fill it to the back? Or will it not open that far and if u can os this hard to clean?
dananryan
Thu, 06/21/2012 - 18:28
Easy to clean.
Hi, the trays pull out completely from either side, so they are very easy to clean. I only filled them a little to take the pictures. Now that the shelf is in its permanent home, AKA my garage, it is much fuller.
Apples! (not verified)
Fri, 07/13/2012 - 14:24
about storing....apples are
about storing....apples are actually great to store with potatoes...i read an experiment where the results were potatoes with much less sprouting, shriveling,etc..
ProudDadof5 (not verified)
Wed, 07/18/2012 - 17:57
Food Storage Rack
Anybody try sticking canned food in this rack to see if it will clear the drawer above? Measurements look like it will work.
Papoulos (not verified)
Fri, 07/27/2012 - 01:55
Good idea
Hi,
I think it's a very good thing but perhaps you should make that the apple (espacially) didn't touch each other as if one went bad all others in contact will go bad also.
So you should add some delimitation between each piece.
Sorry if there are English errors.
:)
Fitzi (not verified)
Sun, 07/29/2012 - 08:59
I think I will add wheels on
I think I will add wheels on the legs so I can roll it away to clean up any dirt that may drop. Love this idea and will be making it soon. Thanks
Jessica L H Strom (not verified)
Fri, 08/24/2012 - 08:42
Storing Apples with Potatoes
Apples are actually best kept near potatoes. The same gas that they emit that speeds up ripening of other fruits actually slows the ripening of potatoes. :) Pretty cool, huh?
BarryLutz
Mon, 09/03/2012 - 02:13
Thanks for the beautiful post
It is always recommended to apply a test coat on a hidden area or scrap piece to ensure color evenness and adhesion. Use primer or wood conditioner as needed. http://www.genericviagratab.com/
lianatempera
Thu, 09/06/2012 - 13:02
Food Storage Shelf
I LOVE this! Like one reader suggested, a screen on all the sides could be a good addition...As I was looking at it, I thought about putting a bunch of slats on the top as extra surface area--to hold a basket or something.
In reply to Food Storage Shelf by lianatempera
npoirier
Wed, 11/20/2019 - 03:08
Reclaimed pallet vegetable rack
I made this out of reclaimed wood pallets and put slats on top however, the top tray I have to pull out by grabbing it from the bottom of the tray as you can see from the picture (if I can upload one) that the front brace prevents a place to pull the try out. Either I will mount a handle on it or cut out a little curve from it. I used some reclaimed trim boards that we had from out garage project, that’s why they look stained. I do wonder it painting would be better than stain since it will be used for vegetables. Has anyone did either and have comments.
LINDA MCENERNY (not verified)
Tue, 09/11/2012 - 17:48
Food Storage shelves
Really nice project! Similar to what I was considering for storing other types of things, like art supplies in a tower, with slightly wider spacing between the shelves.
One suggestion would be to cut pieces of plastic screening, or the plastic craft mesh sheets into each "drawer" to make cleaning easy - if ever something does get a chance to spoil it is much easier to lift out the screen to wash it without getting the nice wood wet. I do this in my home-made solar dryer.
Samuel Lilleker (not verified)
Mon, 10/15/2012 - 02:52
Want One
I make cider each year and I've been thinking about making one of these! The plans are superb, waxing the shelves to make them slide is something that I had not considered! We normally have a day picking apples then forget all the other things we need like muslin and spacers for the press so by the time we actually get around to doing our first press we've often lost a bunch of apples due to mold! Probably too late to make one for this season but it is now firmly on the to do list :) will probably pop it down in my cellar as it's always arctic which should help preserve the apples!
Eric (not verified)
Thu, 12/27/2012 - 03:35
Would love to have one of these
Would love to make one of these. It can come in handy not only to store foods, but other stuff as well.
http://everydayhealthplan.blogspot.in/
kevin swords (not verified)
Thu, 01/03/2013 - 09:30
this is great
i did everything in the instructions except the phillips head screws i used torx head screws easier to use phillips head likes to strip and i made the top hinged so it can be used as a cleaning table
Phil Jones (not verified)
Sun, 01/06/2013 - 01:23
Love them
I want one now. Those can come in handy for more than one purposes.
http://pleasingpics.com/
danrapson (not verified)
Tue, 01/22/2013 - 06:55
a couple more braces
I would put 'X' braces on the top and bottom, also on the back. This would make sure the shelves stayed in when working them in and out. Nice job and this one is going in my things of what to do until I can plant in the hoophouse! be well;peace...dan
LesleeHenry
Mon, 03/25/2013 - 23:05
Great idea
Can't wait to build this, and being able to remove a shelf for larger winter squash, jicama, etc. is terrific. And yes, keep your onions by themselves, they don't play well with others, just remember they make friends cry :-). Off subject, did you know if you separate your bananas, the whole bunch doesn't ripen together. If you like them green like I do, once they start to yellow, peel & freeze. That way you have bananas for bread or a smoothie anytime & no more waste!!!
philip.mitchell
Mon, 06/24/2013 - 18:05
I made this over the weekend
It works really well, though I made a few modifications:
- The shopping list indicates that you need 14 1x3 boards, but the project actually requires 18
- The frame is too wide as listed. I reduced the four 1x3x25 1/4 boards to just 1x3x25. Otherwise the drawers slopped around way too much and even came off the rails. It's possible that the 2x2 boards are 1/8 inch smaller than when these plans were made.
- I left off the secondary diagonal supports (the shorter ones that intersect the main one). This seemed superfluous when I got it together, plus I cut them too short (measured the wrong distance). The top and bottom drawers twist a lot in their rails, so I will probably attach these pieces vertically to act as drawer guides.
- I attached a 1x3 diagonally across the back between the top and bottom back supports. This solved two problems:
-- There was quite a lot of side to side twist with the original design
-- There was nothing to stop the drawers from going right out the back of the unit. This was mentioned as a feature in an earlier comment, but I didn't think it was a useful one in my situation
Photos and write-up on my blog:
http://discovergreenliving.blogspot.ca/2013/06/food-storage-shelf.html
aztec08091988
Thu, 10/17/2013 - 08:23
storage
Nice food storage, i hope i can make like this one, and i can put my food stuff inside of it. cool! www.azteccontainer.com
drobinson
Tue, 01/21/2014 - 18:33
Food Drying?
I'm totally lost with this post. Looks like a great storage unit, but how is this a food dryer? I've build food dryers before and they generally involve heat and fans. I'm not trying to be difficult here, but would really like to understand. Please help! Also, the post talks about drying food, but then goes on to talk about fresh produce all winter. Which is it? Does something like this keep produce fresh for longer without refrigeration? How?
I'm confused, but willing to listen. Please supply any info you can, I'd love to build one, but I'm just not sure what it does.
javakittie
Mon, 03/02/2015 - 05:41
It's not a dehydrator
When you pick root vegetables (onions, potatoes, carrots, etc) fresh from the ground, they're wet and easily damaged. Drying them is the process of just setting them out in a cool, dry place with good air flow. As the water evaporates from the veggies, their skins toughen up and they become what we know from grocery stores. When you store certain root crops (onions should be stored separately from everything) in racks like these, the constant air flow promotes longer storage. Ever noticed how quickly a bag of onions or potatoes goes bad from the grocery store? If you set them out in a single layer in something like this, you can store those (whole and uncut/undamaged) veggies for months instead of weeks. I don't generally store my apples for any length of time, but it's my understanding they like the same type of conditions for long term storage.
eljay
Fri, 02/14/2014 - 06:31
How to use the food storage box
I also am a beginner in food storage, especially the drying method. I love this box, but am totally clueless on how it's used. Could there be a section on your blog dedicated on the ways to store in this box. Also to keep critters like basement mice out. And what about gnats or fruit flies. How are the fruit and veggies stored and how long. How do you use these dried items if dried whole. How long can they be kept and how to prevent molding, spoiled spots etc.
I have a small veggie bin and do not use it anymore as everything I put in it...onions, potatoes etc. fairly soon go to rot. I know the small screen is not enough now as yours is completely air flow friendly. But, I still do not see how to prevent rotting,spoiling, bugs nor how and what to do with the produce. Thank you for any information!! I am anxious to learn.
javakittie
Mon, 03/02/2015 - 05:52
Putting screening around the
Putting screening around the box would keep animals such as mice out. Fruit flies and gnats are only attracted to overripe/spoiling fruit and veggies, so if you see them around your rack, you would need to go through everything stored to see what's going bad. How long you can store it completely depends on where you put the rack, temperature ranges, humidity levels, etc. A rack kept in a cool, dry basement will keep the produce longer than a rack kept in a toasty warm kitchen. Areas or homes with high humidity will be more prone to earlier spoiling than someone in a much drier area. To help prevent spoiling, go through your produce often to make sure nothing is starting to spoil, and remove any fruits/veg that are starting to go off promptly. Removing the one bad apple (or potato!) will help prevent the other items from going off.
This doesn't dry foods like a dehydrator or anything. When root crops are picked fresh from the ground, they are wet and fairly fragile. They need to be set out in a cool, dry place to dry out and to allow their skins to toughen up. After that has happened, they look like what you know from the grocery stores. Onions fresh from the yard don't have papery skins that crumble, they have to be allowed to dry first.
Your other bin may not be in a very good place. It may be too warm, lack air flow, etc.. Also make sure you don't store onions with anything (they don't play nice with other produce), and that you aren't piling things up on each other. Air flow is key.
sandeemort
Sun, 06/22/2014 - 09:43
Incorrect plans
Hi, I made this today and was short 1 X 3's so couldn't make all of the drawers. The shopping list calls for 14 1 x 3's but really you need 18 1 x 3's. Did Serena have to make any adjustments?
I'm using this for curing my homemade soap!
nananana
Fri, 07/10/2015 - 14:16
quick question
what is the price range to bulid this
swniles
Fri, 07/10/2015 - 19:52
Made this
I made this for my wife and she just loves it. I just made a food safe sealer to put on all the drawers and will put it on the frame as well. I used food grade mineral oil and organic bees wax. I am looking for some plastic sheeting that has little squares in it for linking the shelves so stuff will not fall thru. Love this thing.
Bill Sears
Sun, 08/14/2016 - 18:21
food storage rack
I made this rack and it turned out well. However the dimentions confused me. Is a 1x3 actually 1x3 or is it 3/4 x 2 3/4? Dressed or not? Had to cut many of the pieces more than once. Sent and e-mail after signing up with the question but never gtot a reply, so I just forged on.
[email protected]
homeview
Sat, 09/03/2016 - 17:05
Potatos Hate Apples
Do'nt store potatos & apples together, as apple outgasing will help cause potato rot. Then you will not get length of storage from eather. Best to have 2 storage areas, with potatos in one and apples in another as both enjoy different moisture levels.
vabeachvol69
Thu, 01/10/2019 - 08:08
modifications
How hard would it be to modify this for 12 trays? I would like to use it for curing soap but I either need wider trays, more trays (actually both wouldn't be bad).
thanks!