Eco Food Safe Wood Block Pyramid

Difficulty
Starter Projects
| Print this plan

DIY eco wood blocks! Dyed with food coloring! Plans from ana-white.com

Think it's too late to get a handmade gift under the tree??? 


Eight days cutting it too close?


No way!!!


Since Christmas is next week, Jaime from That's My Letter and I are working together today, Wednesday and Friday to bring you new gift plans that you can make quickly ane inexpensively, as part of our Handmade Holiday gift series!


You can check out all our previous project plans here.


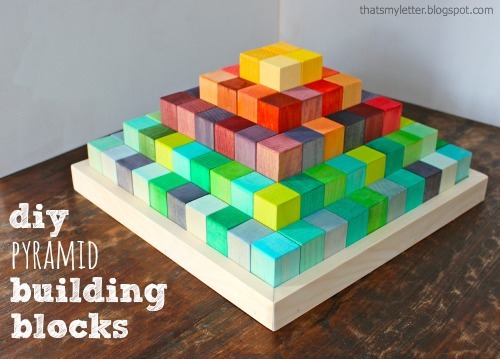
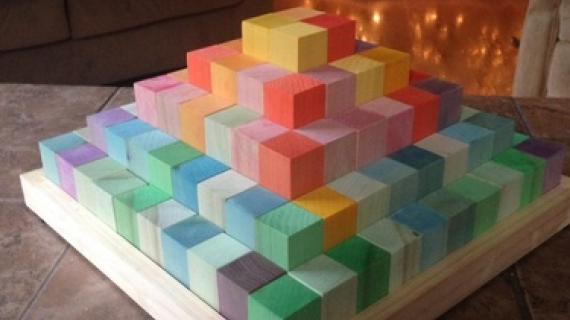
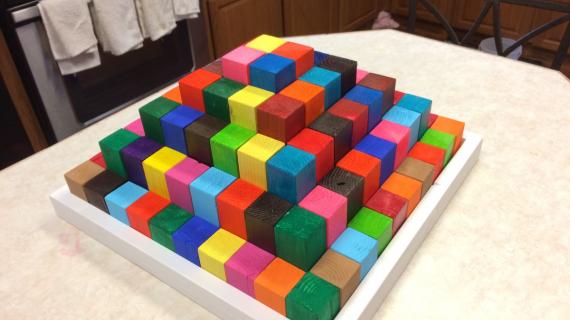
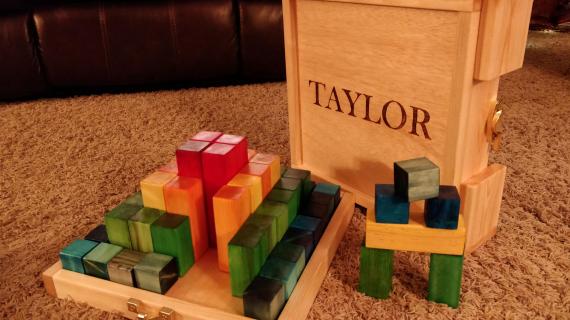
I'm so darn excited about today's project!!!  I know so many little toddlers that would love a beautiful set of eco friendly wood building blocks.  


But they just cost so much, don't they?


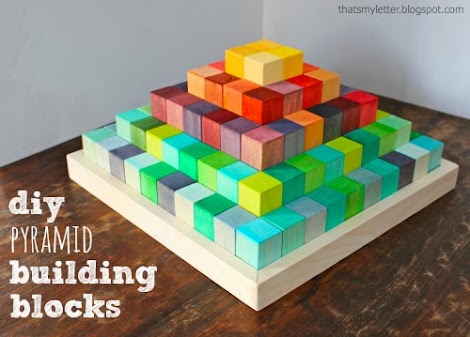
For about $50 (Jaime used select pine - if you don't mind sanding and have access to good 2x2s, this project could cost less than $20) Jaime created this beautiful wood block set.  That's about 75% off from this set from Land of Nod!


And guess what she used to get all those beautiful colors?


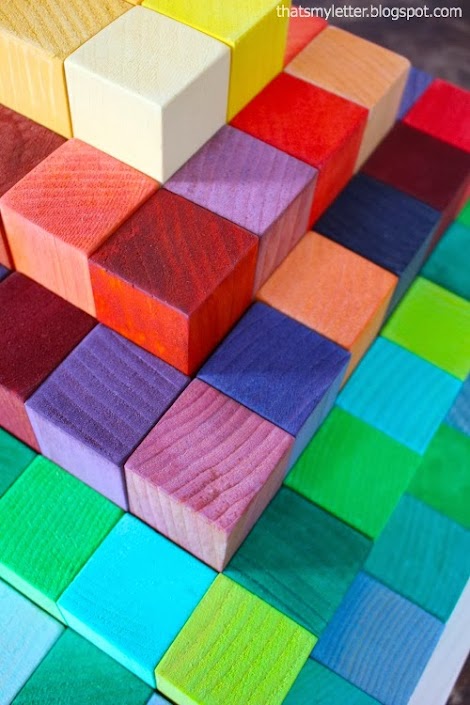
Why, food coloring, of course!


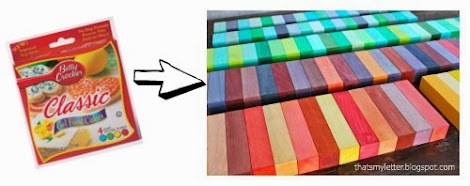
Inexpensive and food safe too!  


We've got plans for you following on how to DIY this eco wood block set.  But please first take a second to read Jaime's building post - she's got lots more pictures and details and time saving building shortcuts that you won't want to miss!


See you back here!


Thank you Jaime!


XO Ana


Dimensions
Dimensions shown above

Preparation

Shopping List

5 - 2x2 @ 8 feet long

1 - 1/2" plywood 16" x 16"

1 - 1x2 @ 8 feet long
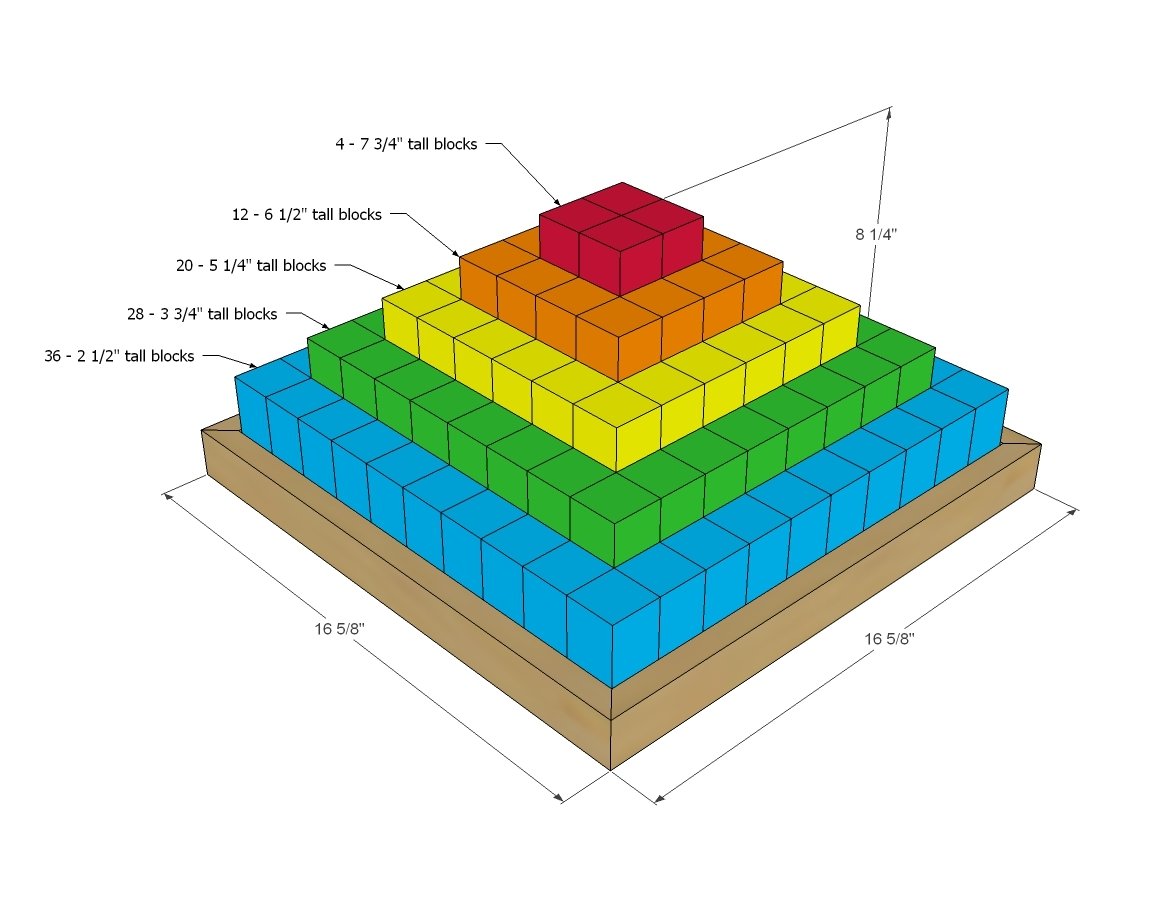
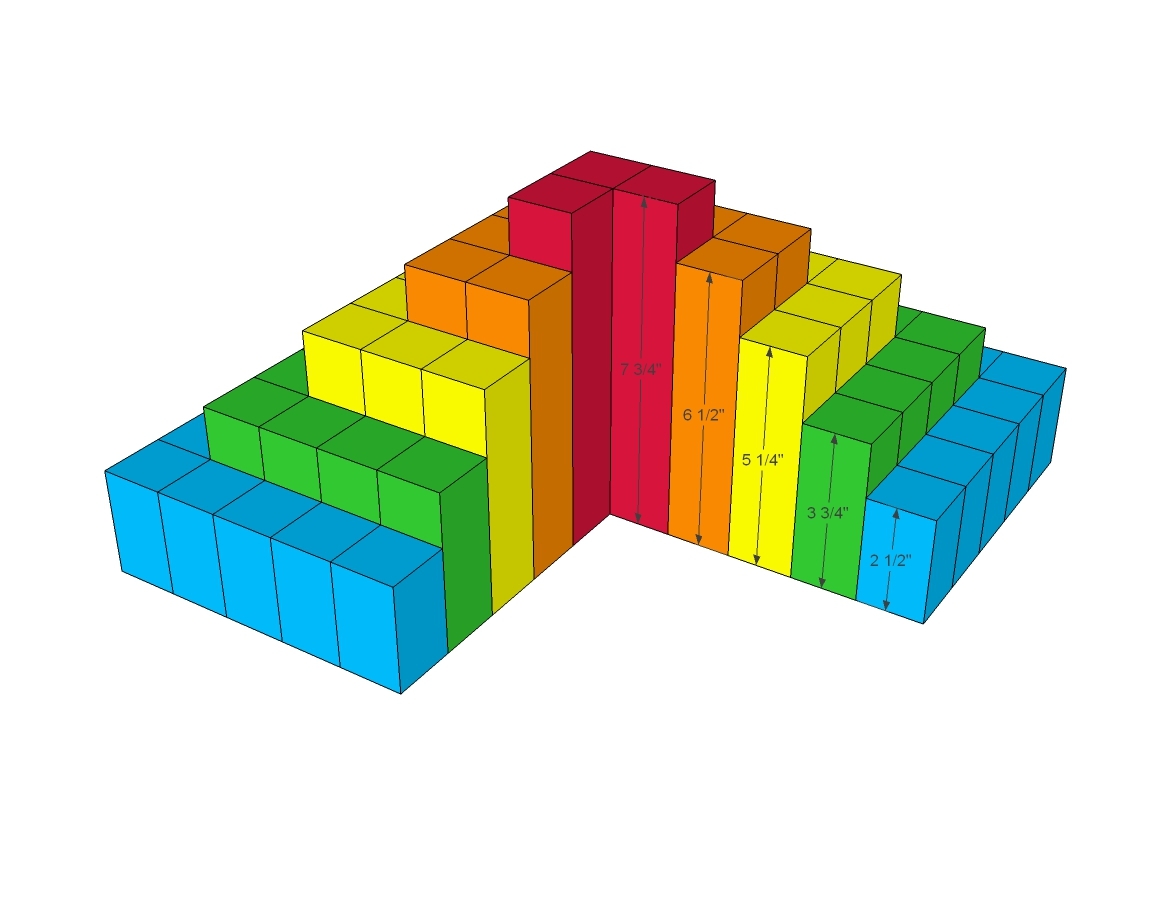
Cut List

4 - 2x2s @ 7 3/4"

12 - 2x2s @ 6 1/2"

20 - 2x2s @ 5 1/4"

28 - 2x2s @ 3 3/4"

36 - 2x2s @ 2 1/2"

Cut tray pieces to fit.

Tools
Tape Measure
Speed Square
Pencil
Safety Glasses
Hearing Protection
Miter Saw
Power Sander
General Instructions

Please read through the entire plan and all comments before beginning this project. It is also advisable to review the Getting Started Section. Take all necessary precautions to build safely and smartly. Work on a clean level surface, free of imperfections or debris. Always use straight boards. Check for square after each step. Always predrill holes before attaching with screws. Use glue with finish nails for a stronger hold. Wipe excess glue off bare wood for stained projects, as dried glue will not take stain. Be safe, have fun, and ask for help if you need it. Good luck!

Instructions

Step 1

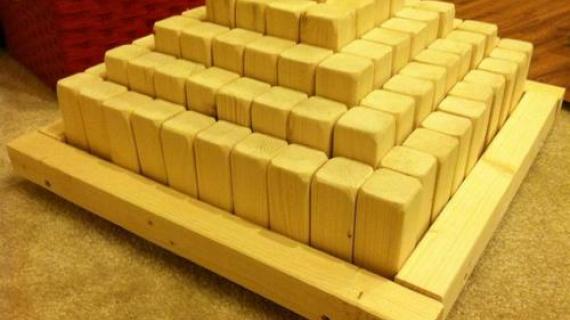
First, sand all your 2x2 boards well - it's much easier to sand a full board than little pieces. Then cut the blocks as directed in the cut list.


TIP: Jaime shares cutting shortcuts here.

Step 2

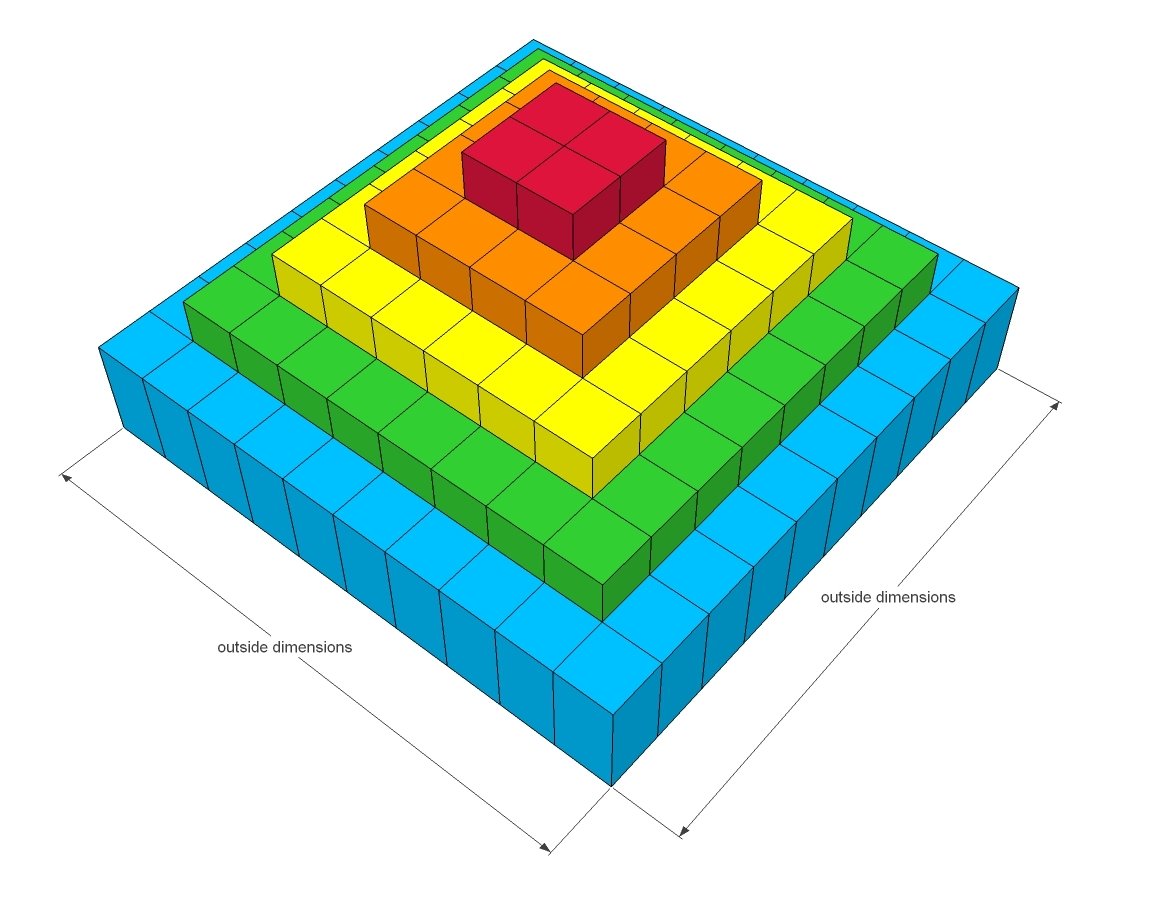
Stack the blocks and measure the outside dimensions.

Step 3

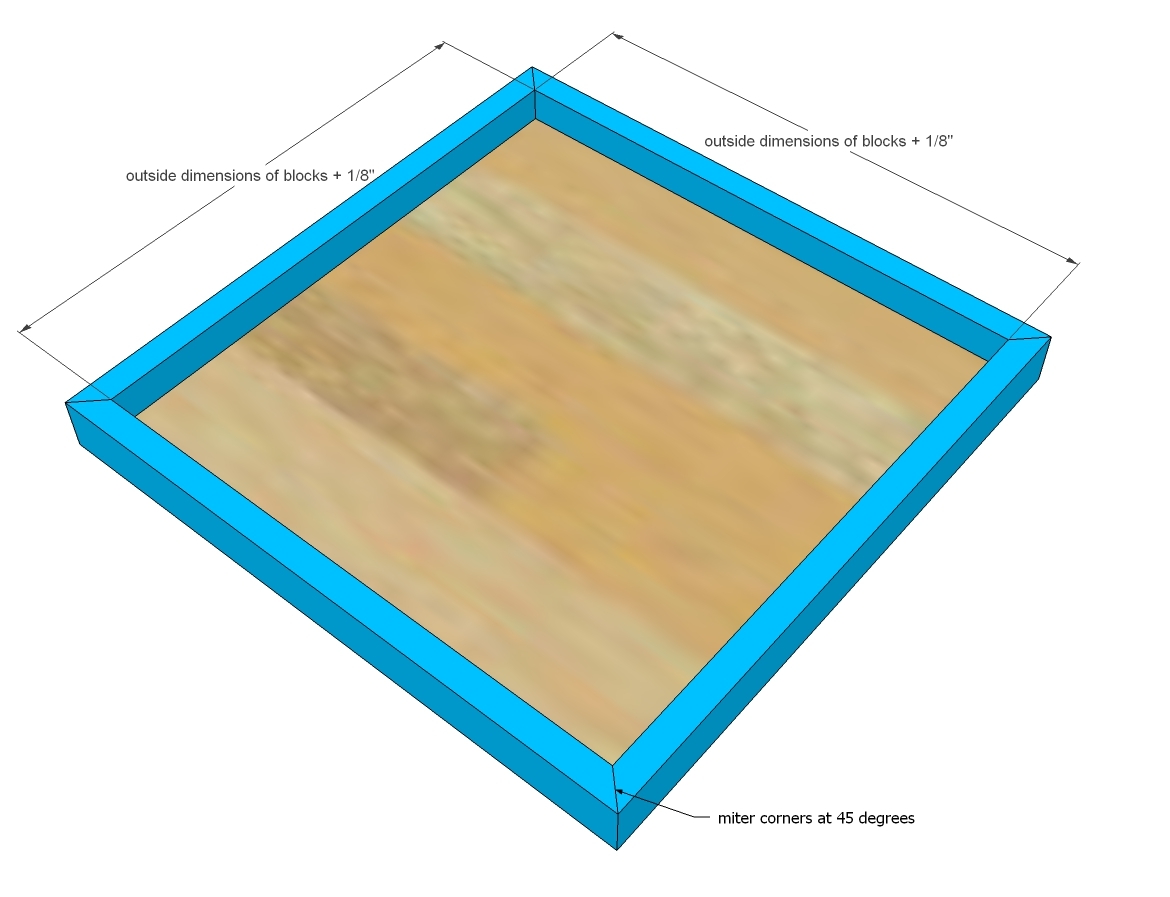
Cut the 1/2" plywood 1/8" larger than the outside dimensions of the blocks so it's easy to fit the blocks in. The cut 1x2s to frame the tray to fit, mitering corners.

Finishing Instructions
Preparation Instructions
Fill all holes with wood filler and let dry. Apply additional coats of wood filler as needed. When wood filler is completely dry, sand the project in the direction of the wood grain with 120 grit sandpaper. Vacuum sanded project to remove sanding residue. Remove all sanding residue on work surfaces as well. Wipe project clean with damp cloth.

It is always recommended to apply a test coat on a hidden area or scrap piece to ensure color evenness and adhesion. Use primer or wood conditioner as needed.

Comments

DecorSanity

Mon, 12/16/2013 - 16:42

Those colors are absolutely gorgeous, it makes my mind spin about what you can do with wood and food dye. Thanks for the plans and tips!

freefromburdens

Tue, 12/17/2013 - 03:47

This is really nice. I already have plans to do mine in different stained colors to sit in the middle of my coffee table. I thought about making it smaller so it doesn't over crowd the table. I know my grand children will have a ball playing with these and driving me crazy. My grands are pass the toddler size so staining them should be safe. I may just do another because my son and his wife are planning another one.
Veronica

Susan_K

Sat, 01/11/2014 - 09:40

Hi, I came across this project and I can't wait to try it!

I wanted to suggest that you might want to top off your non-toxic wood stains with a food-grade Beeswax filler/finish?

I've never really considered making something with plans to put it in my mouth before, but since I hope to share these with littler like-minded builders, I wanted to plan for them.

A quick Google search turned up loads of DIY recipes as well as commercially-available product. Once I have a chance to test one out i'll let you know how it goes!

Darriantryon

Wed, 01/15/2014 - 14:15

Ana will the food coloring come off onto a baby's face if he puts it in his mouth I tried to do this with liquid food coloring just now got it wet and it went everywhere will gel do the same

Kristin_C

Mon, 01/27/2014 - 17:47

Love these blocks! We made them as a gift for my triplet nephews. They are 9 months old, and mouthing them - thus staining their clothes and the floor. Any suggestions on how to better seal them so they can play with it?

Frequently Asked Questions

Wood Questions

What kind of wood should I use?
Most of our plans use standard construction lumber like pine or fir. It's affordable, easy to work with, and easy to find. It's also rapidly renewing and biodegradable, so a great eco friendly choice!

Can I use hardwoods instead?
Yes—just keep in mind they're heavier, cost more, and can be tougher on tools and harder to join together and finish. I recommend not tackling a hardwood project until after you have built several softwood projects.

What if my boards are warped?
Choose the straightest boards at the store. You can often work around slight warps by cutting them into shorter pieces.

What wood should I use for outdoor furniture?
Use red-toned or pressure-treated 2x lumber for framing, and cedar or cedar fence pickets for the decking. Outdoor furniture should be built like a deck—your local home center can help recommend the right wood for your climate.

Will my wood move or warp after I build?
Potentially, especially in humid climates. Let your wood acclimate indoors before building. Once acclimated and kept in a stable environment, movement should be minimal. Remember, most houses are built using framing lumber - it's all about keeping moisture down indoors.

Cutting Questions

Do I need a miter saw?
A miter saw is great, creating fast, safe, and precise cuts, even for beginners. But most plans can be built with a circular saw and a straight edge. If using a circular saw to cut, take time to practice, and get good at making cuts, before cutting your project boards.

How do I get clean cuts with a circular saw?
Clamp your board, measure twice, cut slow, and use a sharp blade. This takes practice, so spend some time making cuts. I go through becoming proficient at freehand cutting in my course, it is worth taking if you want to master this skill.

Will the store cut my wood?
Yes—most stores will do rough cuts to help you transport your materials home. But from store to store, the quality of cuts could greatly vary.

Joinery Questions

What screws should I use?
We recommend star-head self tapping screws for framing, most common sizes are 2-1/2", 1-3/4". Pre-drill if close to the edge or you find your wood is splitting.

Do I have to use pocket holes?
Pocket holes are the cheapest, easiest and fastest way to do some joints - like edge to edge or a hidden fastener joint. There are other methods, but these can be time consuming and expensive. We recommend using pocket holes as indicated in plans for best results.

How do I keep things square?
Use a speed square and measure diagonals after each step. Always clamp joints before screwing to keep them tight and flush.

Finishing Questions

Stain or paint before or after building?
A quick sand before and a full finish after gives the best results. Pre-finish if you're doing two-tone or detailed finishes.

What type of finish?
Use oil-based or water-based stain. For paint, cabinet-grade latex or enamel works great. High use surfaces on indoor projects should get a coat of polyurethane, I recommend a Helsman or Spar or other flexible poly that won't crack or peel with wood movement. For exterior projects, use a finish suitable for exterior fences.

How to get a smooth finish?
Start with a well sanded project. Sand between coats (220 grit), wipe clean, and apply light coats with a foam brush or roller.

Plan Questions

Can I change the size?
Many people do, and that's the great thing about building your own furniture! But do keep in mind going bigger might mean more supports are required, and often plans are optimized for minimal material waste.

Are these beginner-friendly?
Yes—plans are written with simple tools and clear steps in mind, with every effort to make plans as simple as possible.

Can I sell what I build?
Absolutely! Just don’t resell or repost the plans themselves.

General Questions

What tools do I really need?
A drill, circular saw, tape measure, square, and a few clamps will get you through most projects.

Do I need a workshop?
Nope! A driveway or small patio is plenty to get started, just make sure you have a level place to work. If you find you are building several projects a year, creating a small workbench is a great way to store tools and have a dedicated workspace.

What if I mess up?
Wood filler, sanding, or flipping boards goes a long way. Mistakes are part of the process!

What can I do to make my projects look more professional?
Start with straight boards, make accurate cuts, clamp all joints, and line up everything neatly. Sand thoroughly, use a neutral finish, and apply it in light coats for a clean look.

I've never built anything before. Where should I start?
Start with a few smaller softwood projects to get hands-on experience. Or if you're tackling a big project, buy a little extra lumber and practice your cuts and joints first. If possible, work with someone who has a bit of experience.

Care & Maintenance

How long will my furniture last?
With good joinery and regular care, your DIY furniture can last for decades. I have pieces in my own home that are over 20 years old and still going strong! One of the best parts about DIY furniture is that it’s easy to repaint, refinish, or repair—so your projects can grow and adapt with you.

How should I care for outdoor furniture?
Lightly pressure wash or hose it down once or twice a year. Tighten screws and reapply finish as needed to protect it—just like a deck or fence. A little upkeep goes a long way in extending the life of your furniture.

How about indoor furniture?
Regularly dust or wipe with a damp cloth. If it starts to look worn, a light sanding and touch-up paint or stain can refresh it in no time. DIY pieces are meant to be durable and fixable—so don’t be afraid to give them some love now and then.

Want to Build with Confidence?

Check out my ebook: 12 Skills to Build Your Own Furniture
It walks you through the core skills every builder needs—measuring, cutting, joinery, and finishing—so you can build beautiful furniture that lasts.

Still Have Questions?

Email us anytime at [email protected] and we’ll be happy to help!