
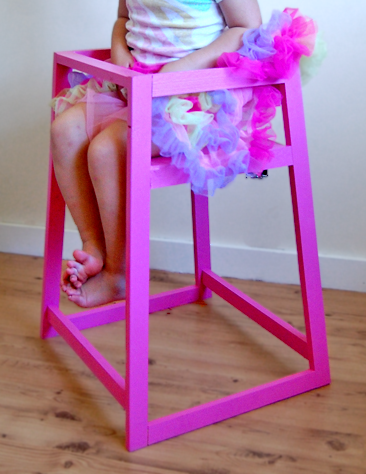

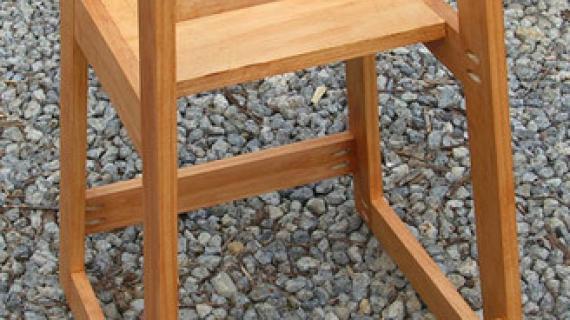
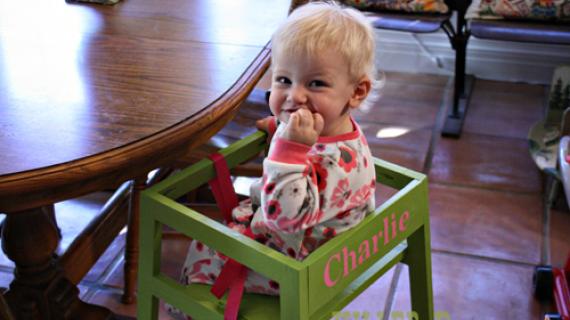
My four year old loves to sit in this chair, we had to remove the front and back supports so that she could fit into it. Cause she still want ot sit in it.
And here is the best part. After building the high chair, I decided that it need a few slight tweaks for you. By making the seat a 1x10 instead of a 1x12, getting chubby legs into the leg holes will be much easier. You can add a strap to keep your child from falling through. Then I brought the bottom supports up so that your toes could fit under them making it easier to pick the chair up and move it. And lastly, I made the entire chair just a tad narrower to fit more compact spaces and to remove unnecessary side room. I love Grace's chair - but yours is going to be even better!
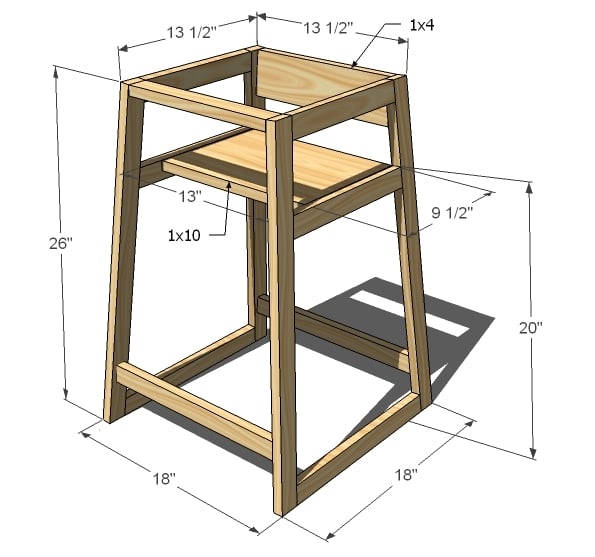
Preparation
3 – 1×2 boards, 8′ long
1 – 1×4 board, 15″ long
1 – 1×10 board, 15″ long (you can substitute 3 – 1x4s joined instead if you don’t have a 1×10 laying around)
4 – 1×2 @ 26 3/16″ (Legs, both ends cut at 5 degrees parallel to each other)
2 – 1×2 @ 15″ (long point to long point, ends cut at 5 degrees NOT parallel to each other, bottom sides)
2 – 1×2 @ 11 3/4″ (long point to long point, ends cut at 5 degrees NOT parallel to each other, middle sides)
2 – 1×2 @ 10 11/16″ (long point to long point, ends cut at 5 degrees NOT parallel to each other, top sides)
2 – 1×2 @ 16″ (long point to long point, ends cut at 5 degrees NOT parallel to each other, bottom supports)
1 – 1×4 @ 12 9/16″ (long point to long point, ends cut at 5 degrees NOT parallel to each other, seat back)
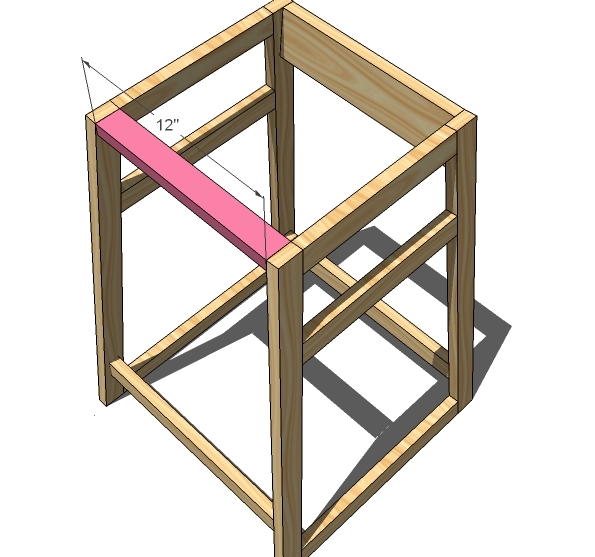
1 – 1×2 @ 12″ (short point to short point, ends beveled at 5 degrees NOT parallel to each other, front)
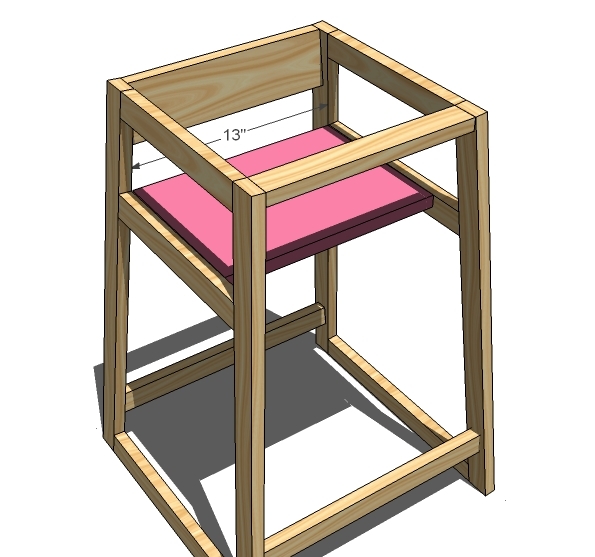
1 – 1×10 @ 13″ (short point to short point, ends beveled at 5 degrees NOT parallel to each other, seat)


Instructions
Step 1

Sides
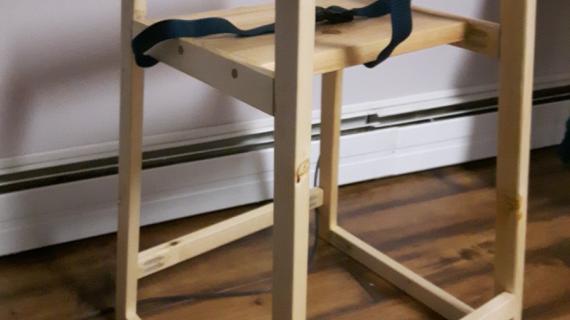
Build the sides as shown above. Drill pocket holes in all the horizontal boards ends, two per end. Mark the sides, clamp, and glue and screw together with 1 1/4″ pocket hole screws.
Step 2
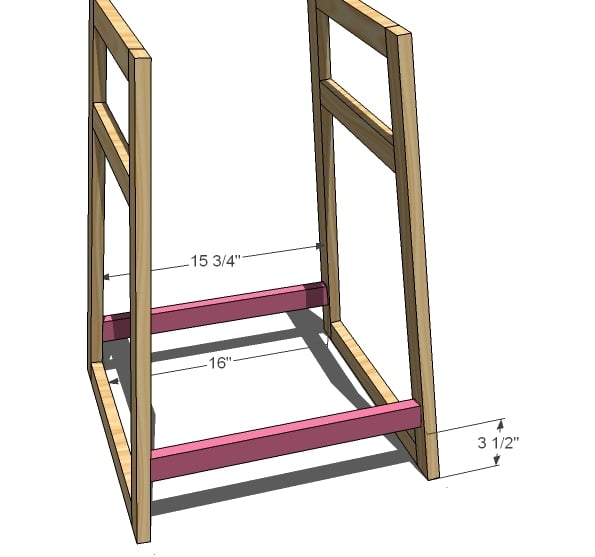
Bottom Supports
Now here is where things get a little tricky. Drill pocket holes on both ends of the bottom supports, two per end. Mark the sides 3 1/2″ up. Then glue, clamp and screw with 1 1/4″ pocket hole screws the bottom supports to the sides. Center the bottom supports on the width of the legs. A right angle clamp would be super handy here, but I don’t have one, and was just fine.
Step 3
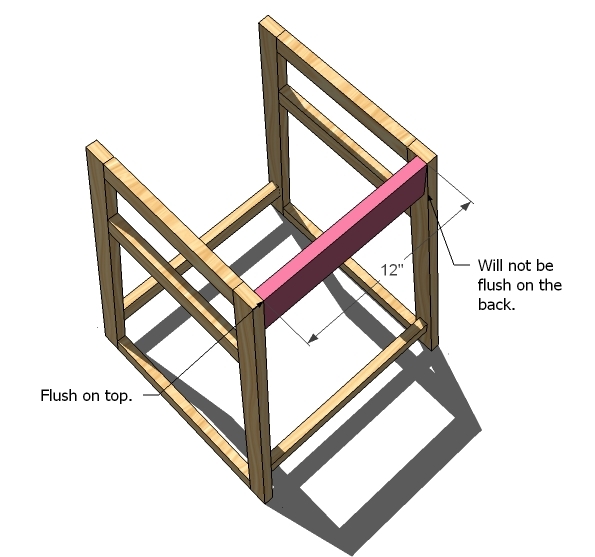
Seat Back
Drill pocket holes in the back of the seat. Attach with glue and 1 1/4″ pocket hole screws.
Step 4
Front
Drill pocket holes on both ends of the front and attach to the tops of the legs with glue and 1 1/4″ pocket hole screws.
Step 5
Step 6
Finishing
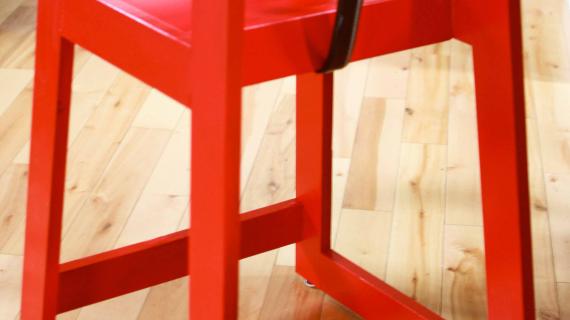
I finished mine by filling pocket holes with wood filler. It took three applications of wood filler to completely fill the holes. Then a thorough sanding with 120 grit sandpaper. Then primer and paint, followed by a spray on top coat. Add a strudy strap to the center and a safety belt (tip – use a dog leash or a belt)


Comments
Heather - Hope… (not verified)
Mon, 10/04/2010 - 17:34
Love it! When someone makes
Love it! When someone makes this, could you *pretty please* test it with a car seat? In restaurants they can flip these upside down and use them to hold an infant car seat, and I'd love to know if this one accommodates the same. My sister in law is having twins and is short on space, so these would be a great gift!
Ana White (not verified)
Mon, 10/04/2010 - 17:59
When my niece stops over,
When my niece stops over, I'll run out and snag her car seat for you :)
Cindy (not verified)
Mon, 10/04/2010 - 18:26
Grace needs a cross bar to
Grace needs a cross bar to rest her feet on. Trust me, at just over 5 ft my feet are always looking for a place to rest as the floor is usually not an option.
Love your blog and your design and plan rendering ability! I too build and remake furniture for our home although most often winging and tweaking the design as I go.
Thanks for all the ideas and for sharing your readers successes!
Kelly (not verified)
Mon, 10/04/2010 - 18:53
Wow! Love this and Grace is
Wow! Love this and Grace is adorable! Just a tip for anyone who might build this and want to add straps, www.strapworks.com has everything you would need to add a strap and clip. They even have pink straping! I order from them all the time for purses and other things I make. I can't wait to make this highchair!
Tania (not verified)
Mon, 10/04/2010 - 22:51
Heather, I thought I would
Heather, I thought I would add my two cents here - I used to work in a restaurant industry for quite a while and we too were flipping those high chairs upside down to accomodate infant seats, however - please be super cautious by doing that!!! The high chair was never designed to hold infant seats - it just conicidently does, and not all models at that. Also, years ago we were (I was mostly affiliated with one of the major "americana dinning" chains) instructed to stop flipping high chairs upside down for the purpose of holding infant car seats for 3 main reasons; one was since the inverted high chair is not stable these things were tipping over (imagine rumbunctious toddler bumping into it). Also - it wasn't sanitary since those restaurant chair legs are filthy! And last, the restaurants thought it just wasn't esthetic to have dirty chairs upside down while people were dinning.
Perhaps we can have Ana design an infant car seat holder with a wide base and all :).
N. (not verified)
Tue, 10/05/2010 - 00:52
Great job! Could you tell me
Great job! Could you tell me what kind of paint you used? I just painted my daughter's desk pink, but I couldn't find the exact shade of pink I had really wanted and settled for a "blossom pink". The pink you used is the shade I've been looking for!!
chrisandpatience (not verified)
Tue, 10/05/2010 - 01:43
I think i have enough lumber
I think i have enough lumber lying around to make this. Going to check when i get home. Might make it this week. Thanks Ana.
Peace,
Patience
Alejandra (not verified)
Tue, 10/05/2010 - 01:53
She is the cutest thing.. so
She is the cutest thing.. so photogenic! :)
Margie (not verified)
Tue, 10/05/2010 - 02:42
My Girls don't need high
My Girls don't need high chairs!! But I want one anyways!!!! :D Great Job!!! Love it! and PINK!! WHAT!!!!! :D
Margie
Jeannie (not verified)
Tue, 10/05/2010 - 02:50
Love the chair, but your
Love the chair, but your adorable daughter steals the show! Seriously..she is beyond cute! I loved her skirt as well, and btw, I bribe my kids with candy all the time:) Your site has been such a blessing for us! Thanks for all you do!!
Stephanie (not verified)
Tue, 10/05/2010 - 04:25
LOL at your comment "I'm a
LOL at your comment "I'm a mom, not a parenting expert."
I seem to be having to use the candy bribe with my 3 y.o. little girl a lot lately! Love the chair and especially the pic of Grace in her precious tutu underneath:-)
Candace (not verified)
Tue, 10/05/2010 - 04:42
I was going to buy one of
I was going to buy one of these this week so I could get rid of my son's bulky high chair. Now I can just make it (or at least try)!!! Thank you!
christina (not verified)
Tue, 10/05/2010 - 04:43
i am new to all of this and
i am new to all of this and have a questions...do you HAVE to have a pocket hole jig?? can you use something else or just screw in the screws?
Jennifer Doherty (not verified)
Tue, 10/05/2010 - 04:45
LOVE LOVE LOVE LOVE LOVE
LOVE LOVE LOVE LOVE LOVE this!!! My little nephew is only 10 months old and this will be perfect for him! SO CUTE!!!!!
Oooh, I totally agree with a footrest cross bar!
cassie (not verified)
Tue, 10/05/2010 - 05:00
Do you think this would be
Do you think this would be sturdy enough if I built it to counter height? Our dining room table is a high one so I'd have to make it taller so the kids could still sit at the table...
twyla (not verified)
Tue, 10/05/2010 - 05:57
I love this idea. It would
I love this idea. It would be great when we have mulitple kids over as guests. Do you know if this is stackable?
Ana White (not verified)
Tue, 10/05/2010 - 06:13
Definitely! But the angles
Definitely! But the angles are going to be tricky. Just start with the top, then add the seat, then measure and cut the bottoms. Some extra supports would be great on the bottom too!
Ana White (not verified)
Tue, 10/05/2010 - 06:29
Twyla, I don't see any reason
Twyla, I don't see any reason why these wouldn't stack. You are so smart! Oh, how fun, a stack of these!
Ana White (not verified)
Tue, 10/05/2010 - 06:32
Just wanted to add that my
Just wanted to add that my original intention was to create a chair inspired by the Stokke high chair. But upon further investigation, that chair required so many accessories to make it what it is. And I have always loved the simple design of a restaurant high chair. I think what many of us love about the Stokke one is the simple design, the option for a bright color, and the square edges - all things we have accomplished with this design.
I'm not saying I still don't want to put together a plan for the Stokke chair, it's just going to take some more thinking, tests, etc. So until then, I hope everyone is happy with this one! Ana
Ana White (not verified)
Tue, 10/05/2010 - 06:35
Christina, it's almost a must
Christina, it's almost a must have in this situation. To build those legs, it would be quite difficult without a pocket hole jig. You could use trim screws countersunk, at least 2 1/2" long, but the strength won't be as good either. Could be done (and we did before there was a pocket hole jig) but I highly encourage purchasing a jig.
Ana White (not verified)
Tue, 10/05/2010 - 06:36
Thank you! She is such a
Thank you! She is such a sport for letting me take her picture!
Ana White (not verified)
Tue, 10/05/2010 - 06:37
Jeannie, thank you! Children
Jeannie, thank you! Children are such a blessing!
Ana White (not verified)
Tue, 10/05/2010 - 06:39
N, I'm not entirely sure what
N, I'm not entirely sure what the color is because someone gave me this can of pink, and there is no label on top. But it's a bubble gum pink color. I use it everywhere! You have just given me a great idea - getting together a set of favorite paint colors.
Bethany (not verified)
Tue, 10/05/2010 - 08:32
And they say SAHM's never
And they say SAHM's never have enough time! Look at you - amazing! :) You have been churning it out lately - I can't stay away from your website! Love it!
megnstuff (not verified)
Tue, 10/05/2010 - 09:34
Ana- Do you think this chair
Ana- Do you think this chair would still be sturdy if I adjusted it to be tall enough for counter height seating? I think these would be a great alternative to my kiddos sitting on our counter stools - much safer too!
Fawn (not verified)
Tue, 10/05/2010 - 10:13
That was my first thought
That was my first thought too. It would be easy to customize I bet!
Beth (not verified)
Tue, 10/05/2010 - 11:00
WAIT, isn't that what candy
WAIT, isn't that what candy was MADE for? lol- I can't wait to build this!
Crystal (not verified)
Tue, 10/05/2010 - 12:00
I would love to make a couple
I would love to make a couple of thes counter height too! I'm with megnstuff they would be alot safer compared to regular barstools.
Melissa (not verified)
Tue, 10/05/2010 - 13:11
Since furring strips are
Since furring strips are mentioned, here's a tip for other projects, so others can learn from my mistake! This tip isn't in reference to this plan, but in reference to plans that call for normal 1 x 2s.
I stocked up on 1" x 2" x 8' and 1" x 3" x 8' furring strips, from two different sources, for a couple of projects (not this one, which calls for them). I didn't end up being able to use them because:
1) They have rounded off edges, so it's difficult to match up edges perfectly
2) They're not necessarily as thick as lumber (example: normal 1 x 2s are can be slightly thicker than furring strip 1 x 2s), so it throws off the measurements
3) I was told in one store that the dimensions vary even by manufacturer. They're used behind wall surfaces, so the companies that make them aren't always careful with the dimensions
I thought I was saving money, but am going to give them to a family friend who may use them as firewood! ;)
Megan (not verified)
Tue, 10/05/2010 - 14:55
These would be great for my
These would be great for my twin boys since we could stack them when they aren't in use. They are too small now (only 6 months), but it won't be long. How would you attach the strap? Do you need special screws? Also could you put a seatbelt type strap in the back to buckle them in and prevent them from standing up?
Ana White (not verified)
Tue, 10/05/2010 - 15:32
Hi Melissa, thanks for making
Hi Melissa, thanks for making note of this. I have had very good experiences with furring strips - possibly even just as beautiful and square as premium lumber. But every once in a while, the bundles are as you describe. What I do is stock up on bundles when I see good lumber. Always inspect your lumber before making a purchase. Ana
Melissa (not verified)
Thu, 10/28/2010 - 17:14
Ok I am posting again..This
Ok I am posting again..This is a cute chair but I am going to hold out for a design like this one! I love this more than the Stokke one!

Kaysie (not verified)
Sat, 11/20/2010 - 06:51
Hey! Love this high chair.
Hey! Love this high chair. You definitely should make plans for a jr chair like they have at IKEA. They are smaller versions of adult chairs that are also taller so that kids can sit up level with the table... just an idea. Great work, love your site!

Susan (not verified)
Sat, 12/11/2010 - 16:54
Thank you so much for this
Thank you so much for this plan - I showed it to my husband because I wanted a counter height high chair for our 2 year old to sit at the kitchen island. He figured out that the legs needed to be 10 inches longer and the side base pieces are 19" long (all dimensions around the seat stay the same), and we added a footrest. He used regular 1 x 2s and we took a 3 point harness and a tray off an old high chair we weren't using (we fitted a grommet into the harness and screwed it into the back cross bar; the tray fits into holes drilled in an extra piece of wood attached to the sides). We also added a second cross bar on the back opposite the footrest so we could store the tray there. We painted it brown to match our other kitchen chairs and coated it with furniture wax to make it easier to clean. Finally I sewed a seat pad out of vinyl fabric (from Joann's) and foam padding.
Obviously, it took us a lot longer to make ours, thus the late response to the post!
(oh, and he used a nail gun instead of a pocket hole jig).


dmceron (not verified)
Mon, 01/03/2011 - 18:25
Love this chair and also the
Love this chair and also the fact that multiple chairs will be able to stack! Do you think that it would be sturdy enough if i left out the top cross bar, sot hat it was more like a raised toddler chair?
Ana White (not verified)
Mon, 01/03/2011 - 22:49
We've taken Grace's off
We've taken Grace's off without issue :)
ashu107
Tue, 04/26/2011 - 14:03
splits
Hi Ana,
Please help me.
I tried making simple stool using using this plan. The strips split each time I try to screw in the picket hole. I am using kreg jig. Drilling pocket holes is fine. I tried using 1 1/4 screws and 1 inch screws. both caused the strips to split.
Thanks
In reply to splits by ashu107
claydowling
Wed, 04/27/2011 - 04:32
Change your joinery technique
Some wood is just fundamentally prone to splitting. It might be worth investing in better stock. At bare minimum, I'd give it a try. Firring strips are pretty low grade stuff, so if that's what you're using pick up some clear 1x2 or 1x3 instead, and try a practice joint.
The chairs the restaurants are using use one of two methods for joining these pieces. The most likely is a dowel tenon, which is easily built with a doweling jig. Any home improvement store will sell them, although you'll have to look, because they don't have the marketing budget of Kreg. It's a fairly strong joint and about as easy as the Kreg jig to build.
The other option, which is stronger yet, is mortise and tenon joinery. It's more involved, but when properly executed it's very strong. This is probably not the joint for the first-timer, but there are plenty of good resources if you want to learn it.
If you use either of these joints, you're going to have to learn how to glue and clamp a joint properly. That also means you'll need to buy clamps. For furniture you generally need pipe or bar clamps. Pipe clamps are just a length of black iron pipe, with a fixture threaded onto one end with a clamp screw mechanism, and a sliding fixture that you snug up close to the other side of your wood. You buy the pipe clamp parts and match them to the length of pipe that you want. It offers great flexibility, because you can have as long a clamp as you need.
ashu107
Wed, 04/27/2011 - 10:25
Dear claydowling, Thanks for
Dear claydowling,
Thanks for the response
1) I will try better wood this weekend.
2) I am already using good clamps
3) I browsed for doweling jig - liked the idea - will use it as well.
Regards.
Sirley Dubon (not verified)
Sun, 02/26/2012 - 16:32
Tripp trapp high chair
Hi Ana! First of all I want to tell you that I'm amazed with your talent and the things you make.. and thanks so much for sharing your projects with us! I would like to know if you have ever heard about the tripp trapp high chair.. If you could show us how to make it I'll be so happy. I have looked online for a diy version of this chair (because it is so expensive and I wouldn't be able to afford it) and found other people asking for a tutorial on how to make one, but there is no tutorial. I think you are the one to make this project and show us how we can do it ourselves!
Milca (not verified)
Fri, 03/02/2012 - 18:36
Just made it over the past two week-ends
Hello Ana! Thanks for posting the plans. I cut the wood last week-end and sanded every piece over the week. This week-end, I started assembling but ran out of screws. So I am waiting until Tuesday for my Lee Valley order to come in. But so far it looks great and my daughter is very excited about getting a new chair (she's two with another on the way we'll need the old high chair for baby). We are also building two harriet higher chair for the older two for their new custom school desk. Your plans are great and easy to follow for a beginning. Thanks a lot :)
P.S. For those wishing to add straps, why not get some screw stud snaps from an upholstery shop and use regular webbing and buckles sold in all fabric stores to make easy to wash straps? the strap could be attached in the back posts as well as under the seat to make a sturdy 3 point style washable harness. That's what we are hoping to do with ours.
Heather M (not verified)
Mon, 09/24/2012 - 20:22
Tripp Trapp Chair request
Thank you for all the fabulous plans you so generously share with all of us! I'd like to join the previous poster in requesting high chair plans similar to the Tripp Trapp chair. It's a really clever design and because it's fully adjustable, you can have one for each young child in the home that will fit them perfectly and grow with them! Well, if we could make one ourselves we could afford to have one for each child! I'd love it if you would consider featuring the plans. Thanks for all you do!
MichaelE (not verified)
Thu, 10/25/2012 - 13:56
stacking chairs
Hi. Nice chair and description. Thank you for sharing it with the world!
Do you know if two of these would stack? I saw plans elsewhere that used a 7 degree slope. I wonder if the greater angle would help or hinder stacking?