


Need an amazing bed on a budget?
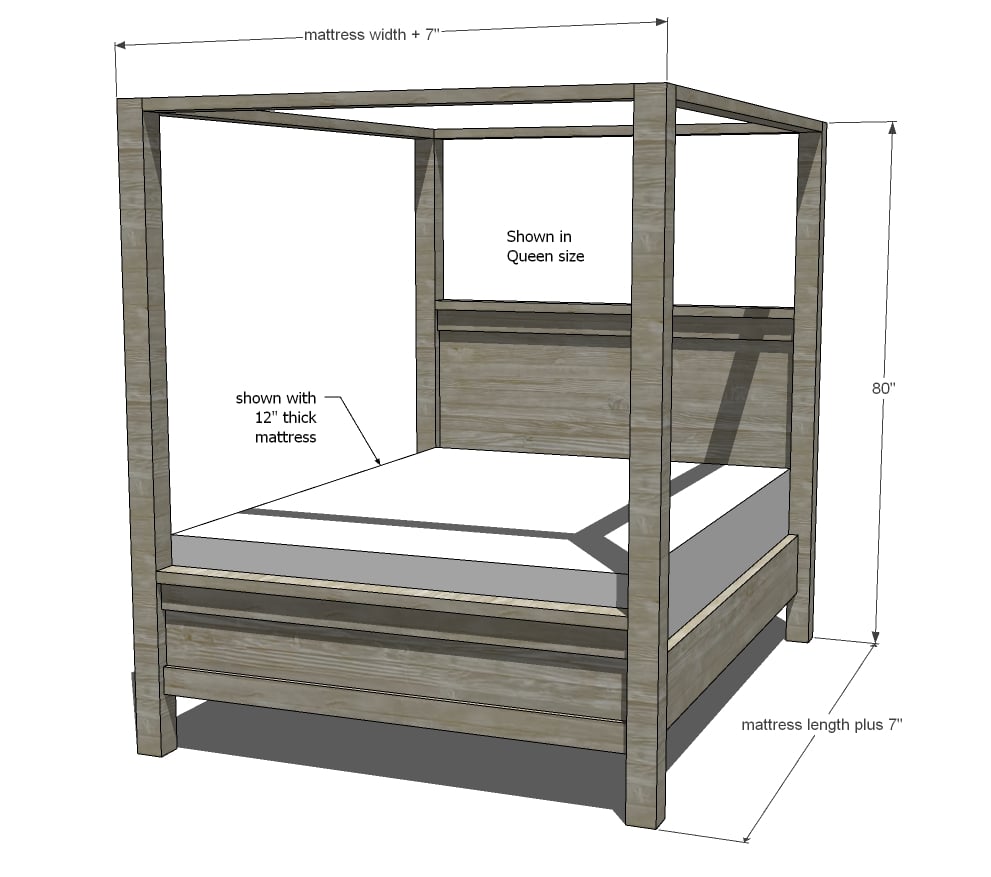
Build your own farmhouse bed frame with canopy with off the shelf building lumber! Our free step by step plans include diagrams, shopping and cut lists for all standard mattress sizes.
Want a bed without a canopy? Check out dozens more easy to build bed frame plans here.
Want to convert your existing Farmhouse Bed into a canopy? We have plans to do that too!
Want a statement making bed?
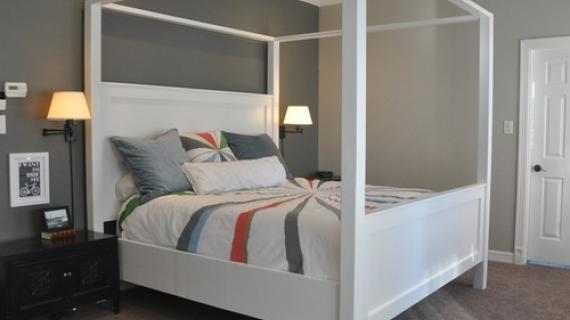
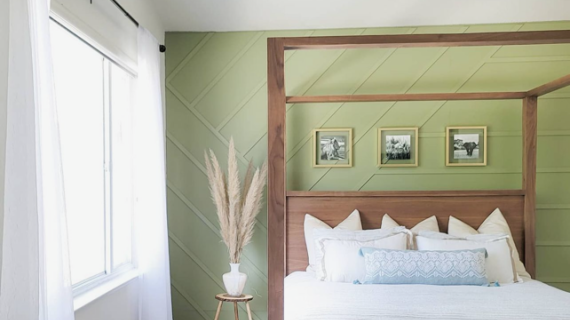
A few years ago I did some episodes for HGTV and needed a show stopper of a bed for a garage turned bedroom makeover. So of course we looked to our farmhouse bed plans - just made it fancier with a canopy. Because everything is fancier with a canopy, right?

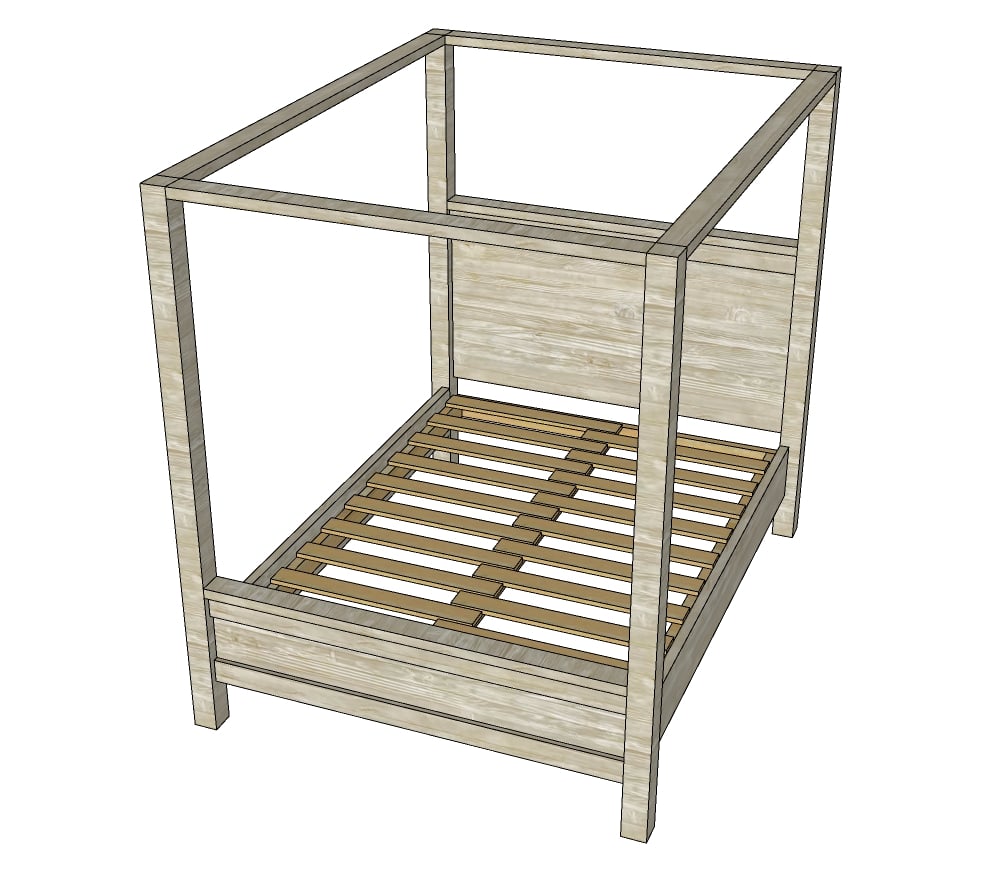
We love the simplicity of this plan! It's not much more to build than a standard farmhouse bed.
Do note we did substitute the planking for a plywood panel - but you can still use planking if that is the look you are going for.
Farmhouse Canopy Bed Plans
This plan has been updated. If you need the old plans, you can find them here.
Preparation
| Board | Twin | Full | Queen | King | Cali King |
|---|---|---|---|---|---|
| 1x4 | 1 @10' | 3 @ 6' | 3 @ 6' | 3 @ 8' | 3 @ 6' |
| 2x4 | 7 @ 8' | 5 @ 12' | 5 @ 12' | 11 @ 8' | 11 @ 8' |
| 2x10 | 2 @ 8' | 2 @ 8' | 2 @ 8' | 2 @ 8' | 2 @ 8' |
| 4x4 | 4 @ 8' | 4 @ 8' | 4 @ 8' | 4 @ 8' | 4 @ 8' |
| 3/4" plywood | 48" x 48" | 48" x 96" | 48" x 96" | 48" x 96" | 48" x 96" |
| 1x4 Slats | 5 @ 8' | 7 @ 8' | 7 @ 8' | 10 @ 8' | 11 @ 6' |
Assumes the following mattress sizes:
- Twin 38" x 75"
- Full 54" x 75"
- Queen 60" x 80"
- King 76" x 80"
- California King 72" x 84"
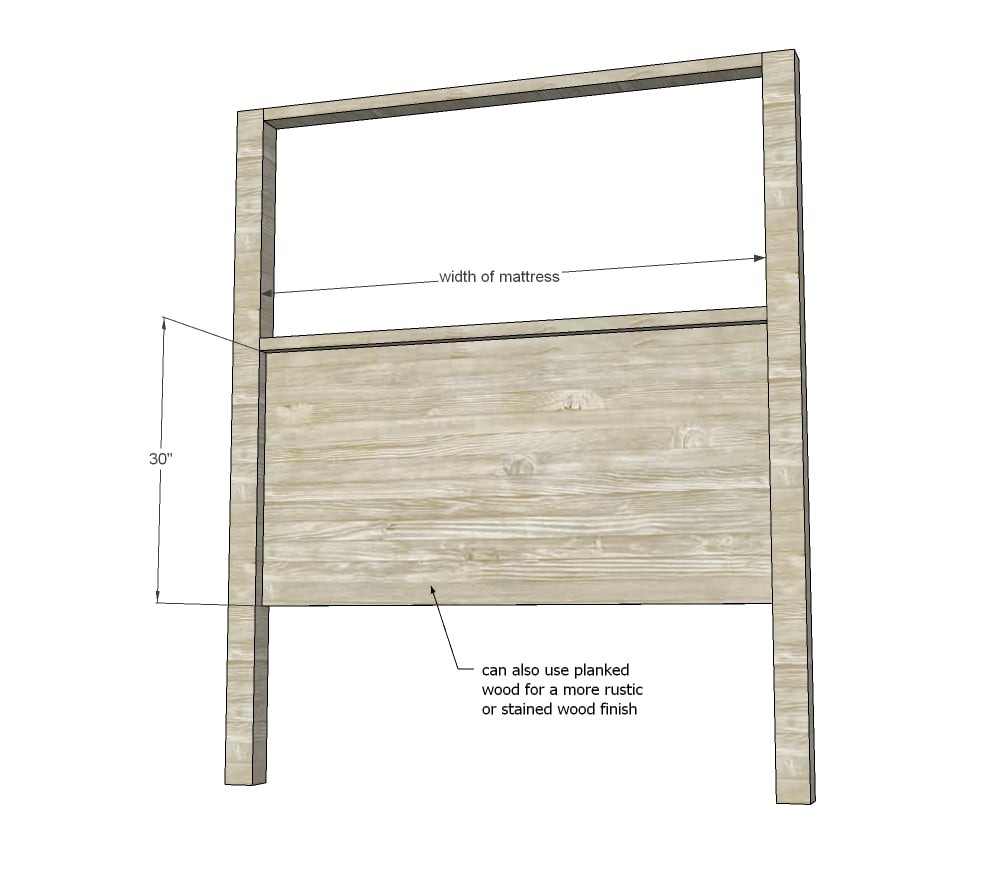
HEADBOARD Cut List
| Board | Twin | Full | Queen | King | Cali King |
| 2 - 4x4 @ | 80" | 80" | 80" | 80" | 80" |
| 2 - 2x4 @ | 38" | 54" | 60" | 76" | 72" |
| 1 - 3/4" plywood @ | 30"x38" | 30"x54" | 30"x60" | 30"x76" | 30"x72" |
| 1 - 1x4 @ | 38" | 54" | 60" | 76" | 72" |
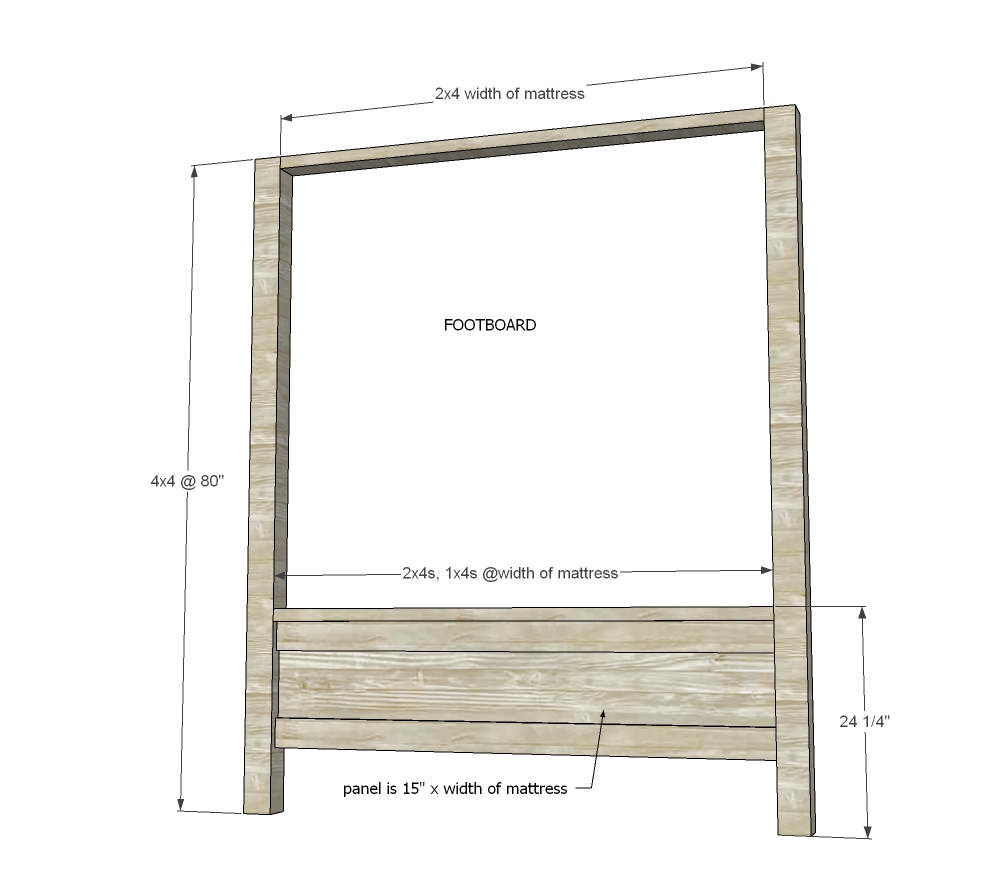
FOOTBOARD Cut List
| Board | Twin | Full | Queen | King | Cali King |
| 2 - 4x4 @ | 80" | 80" | 80" | 80" | 80" |
| 2 - 2x4 @ | 38" | 54" | 60" | 76" | 72" |
| 1 - 3/4" plywood @ | 15"x38" | 15"x54" | 15"x60" | 15"x76" | 15"x72" |
| 2 - 1x4 @ | 38" | 54" | 60" | 76" | 72" |
SIDERAILS Cut List
| Board | Twin | Full | Queen | King | Cali King |
| 2 - 2x10 @ | 75" | 75" | 80" | 80" | 84" |
| 2 - 2x4 @ | 75" | 75" | 80" | 80" | 84" |
SLAT SYSTEM Cut List
| Board | Twin | Full | Queen | King | Cali King |
| 2x4 Cleats | 2 @ 78" | 3 @ 78" | 3 @ 83" | 4 @ 83" | 4 @ 87" |
| 2x4 Center Legs | 2 @ 15" | 4 @ 15" | 4 @ 15" | ||
| 2x4 Top Tie In | 1 @ 38" | 1 @ 54" | 1 @ 60" | 1 @ 76" | 1 @ 72" |
| 1x4 Slats | 10 @ 38" | 21 @ 31" | 21 @ 31" | 10 @ 76" | 11 @ 72" |
Cut boards with a compound miter saw. You can alternately use a circular saw with guide if necessary, but do make sure your cuts are very square.
The plywood panels should be cut with a tablesaw or circular saw.


Instructions
Step 1

Drill two 1-1/2" pocket holes on each end of the 2x4s and attach to the 4x4s with 2-1/2" pocket hole screws.
Step 2
Drill 3/4" pocket holes on the top and sides about 8" apart (but not the bottom) back side of the headboard panel.
Attach with a 1" space behind (and 1-1/2" space in front) to the 4x4 legs. This means the headboard panel is set up from the back edge of your 4x4 legs by 1".
Use 1-1/4" pocket hole screws to attach.
Step 3
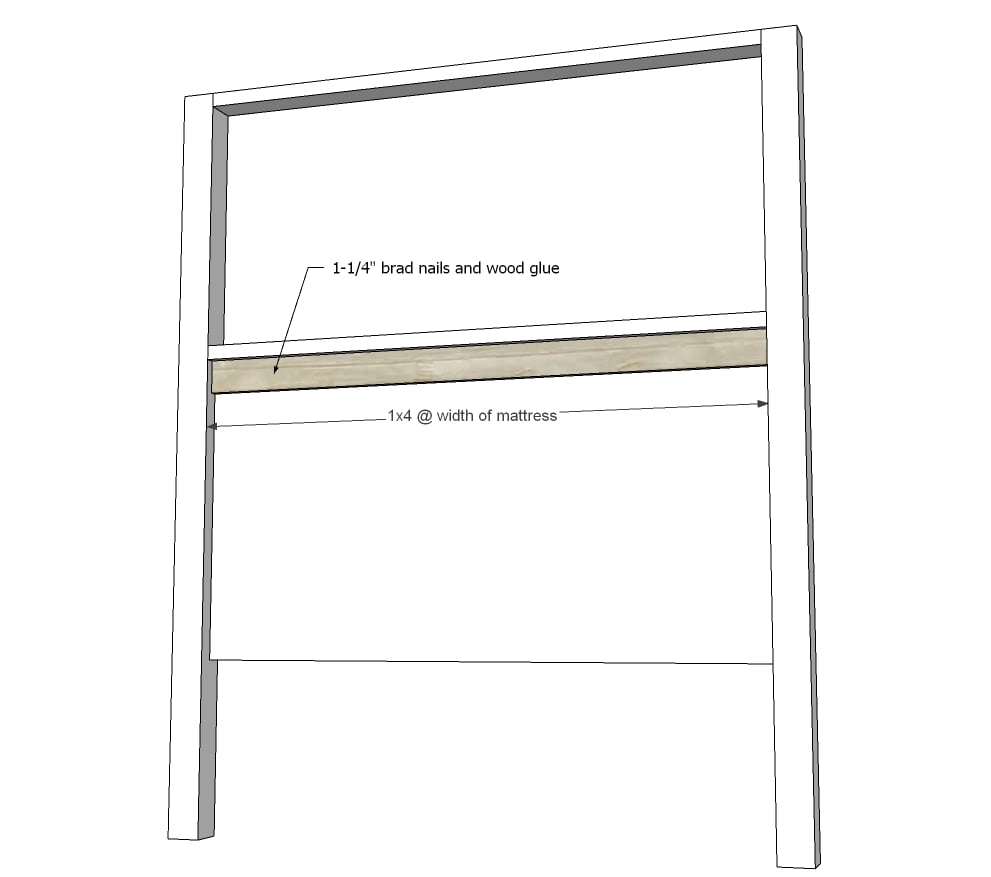
Use 1-1/4" brad nails and glue to attach 1x4 trim piece to top of headboard panel.
Step 4
Repeat steps to build the footboard.
Step 5

Paint or stain the footboard, headboard and the sideboard pieces shown before moving into the room.
Drill two 1-1/2" pocket holes on each end of the top 2x4s.
Drill three 1-1/2" pocket holes on each end of the 2x10 siderails.
Move pieces into the room.
Assemble the bed with 2-1/2" pocket hole screws.
Step 6

Build the center support framing.
The twin size does NOT need any center support.
The queen and full should have one center support (as shown in the diagram)
The kings can have one or two center supports. If you are using 3/4" thick bed slats (see next step) I definitely recommend two center supports.
Step 7
Lay slats inside bed and screw down.
The mattress slats can be split to minimize material waste and also to use up scrap wood. You can use 3/4" plywood strips, any 1x material scraps, etc to fill in the slats. I don't like to leave more than 4" gap in between the slats.
You should check with your mattress recommendations for the best slat system.
Step 8
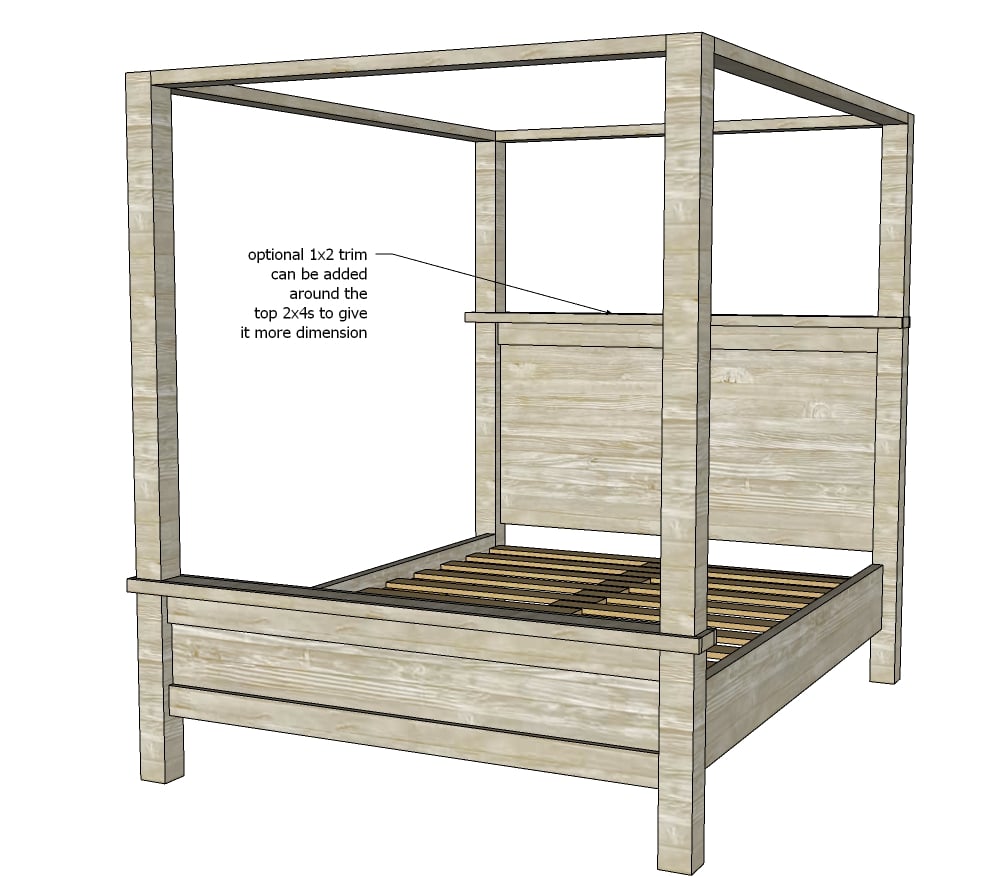
Optional 1x2 trim can be added around the top of the headboard and footboard panels to give the bed more dimensions. I did this with my bed.
It is always recommended to apply a test coat on a hidden area or scrap piece to ensure color evenness and adhesion. Use primer or wood conditioner as needed.

Comments
yurra-bazain
Fri, 07/11/2014 - 19:45
Lovely!
Lovely bed, Ana. :) So happy for you and all the people you'll reach on national television! We're going to have a hand-built revolution, I think. =D (We don't have cable; will the shows broadcast online?)
mebohn
Sat, 07/12/2014 - 19:29
Cable free!
We also do not have cable and am wondering if it will be online at any point. Congrats on the show!!
mebohn
Sat, 07/12/2014 - 19:29
Cable free!
We also do not have cable and am wondering if it will be online at any point. Congrats on the show!!
freefromburdens1
Sun, 07/13/2014 - 14:24
I am loving your show. I
I am loving your show. I really hope it's picked up. I love watching DIY shows because I learn so much. This show pass because, I'm learning so much". Thanks for sharing.
spiceylg
Sun, 07/13/2014 - 14:34
Show
Just watched your show and loved it. The bedroom came out amazing. However, there isn't another show at 5:30 :( . Instead Rehab Addict is on.
balloongal247
Sun, 07/13/2014 - 16:36
5:30 episode
Yeah, I was very disappointed that the second pilot wasn't on. I do love this bed though.
American Girl Ideas
Mon, 07/14/2014 - 08:45
New Show
That was awesome! So happy for you!
Chantal V.
Mon, 10/20/2014 - 09:35
Silly question perhaps... Is
Silly question perhaps... Is this for a double or queen? I would like to make it for a double bed and add curtains on a track or a rod for my son who has sensory issues. Thanks in advance for your reply!
booksnotbombs
Mon, 10/20/2014 - 14:33
It is for a queen.
It is for a queen.
Chantal V.
Mon, 10/20/2014 - 20:14
Oh! :(. My son really likes
Oh! :(. My son really likes it. I am not that great at altering plans for a double. Does anyone have all the measurements for a double using 4x4 posts? Much appreciated for the help!
Charleston Braces
Fri, 11/07/2014 - 07:35
Assembling using bolts instead of screws?
I was wondering if there was a way to make this with bed without using screws since I want to be able to dissassemble and reassemble it a few times over the next few years due to work related moves. I recently made a bunkbed for my boys from Ana's wonderful plans and it can be disasembled and reassembled using bolts and nuts. I worry that unscrewing and screwing will weaken the fastening over time. Or maybe there is a way to do it with hangers or straps? Of course if I could have it all, I would make it so you cannot see the bolts at all!!!
Thanks,
Sal
Charleston Braces
Fri, 11/07/2014 - 07:41
Assembling using bolts instead of screws?
I was wondering if there was a way to make this with bed without using screws since I want to be able to dissassemble and reassemble it a few times over the next few years due to work related moves. I recently made a bunkbed for my boys from Ana's wonderful plans and it can be disasembled and reassembled using bolts and nuts. I worry that unscrewing and screwing will weaken the fastening over time. Or maybe there is a way to do it with hangers or straps? Of course if I could have it all, I would make it so you cannot see the bolts at all!!!
Thanks,
Sal
lawschool_builder
Sat, 11/08/2014 - 20:20
How to Disassemble?
I was also wondering if there is a way to build this piece so that it can be disassembled later when moving? Or is it already capable of being un-screwed easily? Thank you! Also, if anyone has any modification recommendations to avoid the use of a mitre saw I would appreciate it!
-Jacq
KimDRicciotti
Sun, 11/16/2014 - 09:20
Different size plans
Do you have these plans in a double size bed? I would love to build this for my daughter!
Thanks in advance!
joecpa
Wed, 12/10/2014 - 13:20
Full size not queen
The plan appears to be for a full since the interior measurements where the box spring will go are 56" a full size mattress is 54" a queen size mattress is 60" So a queen size box spring will not sit down inside the frame.
Mtwinkoff
Mon, 01/12/2015 - 17:49
Reclaimed wall
I love the bed that you built and also love the wall in the back round And have been wanting to put a wall like that in my house and was wondering how you got all the wood in so many color variations did you use stain or just several different reclaimed woods .If you had any info that can help me I would deeply appreciate it.
ssl4847
Mon, 01/19/2015 - 06:58
saving alaska farmhouse canopy b3d
At the risk of sounding like a boob, can we receive directions utilizing 2 x 4's as well? 3 x 3 are hard to come by where I live and I don't trust myself to make the conversion in my head.
ssl4847
Mon, 01/19/2015 - 06:59
saving alaska farmhouse canopy b3d
Sorry. See what I mean? 4 x 4's. :)
Ana White Admin
Mon, 01/19/2015 - 11:37
4 x 4's
Check under "shopping list" Ana says "you could also use 4x4s, but will need to adjust the rest of the boards to 2x4s and their cut lengths"
timex10
Mon, 03/09/2015 - 20:46
bed
you don't by chance have this plan in a king size. i would like to build it for my wife as an anniversary present.
In reply to bed by timex10
AnthonyAugustLarson
Sat, 03/03/2018 - 10:48
i also need it in king size
Hey timex10, I have been looking for this bed plan with bolts instead fo screws and in king size also. I'm NEW to this kind of thing so hope to find the plans by somoene who is experienced instead of guessing myself. If someone posts it or Mrs. White replies or you find it somehow can you please let me know? I can do the same for you. Thanks, AAL [email protected]
Mr.NiceLady
Mon, 09/28/2020 - 10:36
Well Worth the Time and Effort!
The plans for this bed were spot. On. I added 2x6s for the top side beams to make it more sturdy. I also added extra features that, on another bed bought from a specialty store, would have made the total cost of the bed around $5k. No kidding. I made this one for UNDER $500 including the purchase of a new jig and saw. Can't say how grateful I am to have a very, very sturdy bed and to have saved SO MUCH money. Thank you from the bottom of my kinky heart!!
Miel's Oso