Desktop with Storage Compartments - Build-Your-Own-Desk Collection

Difficulty
Beginner Projects
| Print this plan

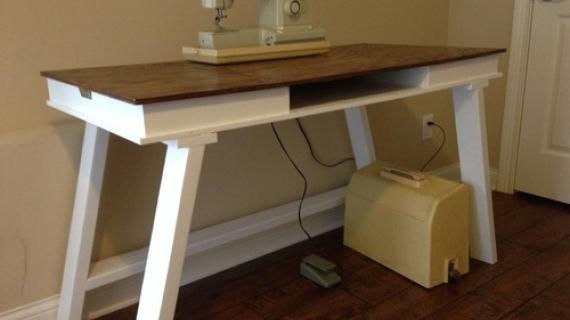
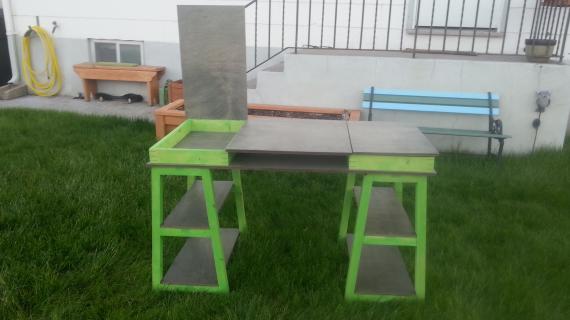
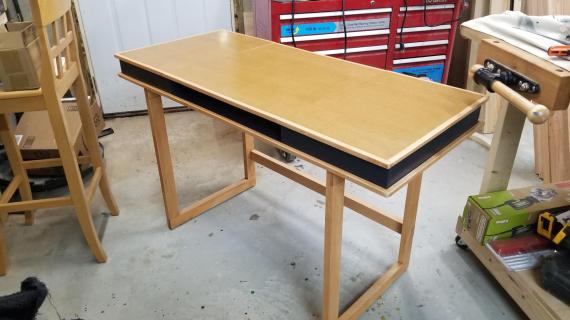
This desktop is easy to make and works great! Add different bases to get the perfect desk! DIY plans by ANA-WHITE.com

Hi everyone!

I've been wanting to put together a set of plans for you to make a custom study desk.  You know, one of those pick-your-desk-and-leg systems.  So you can customize for your style and storage needs.

I'm pretty excited with what we've come up with, and over the next couple of weeks, you'll see lots of different base options to go with this desktop -

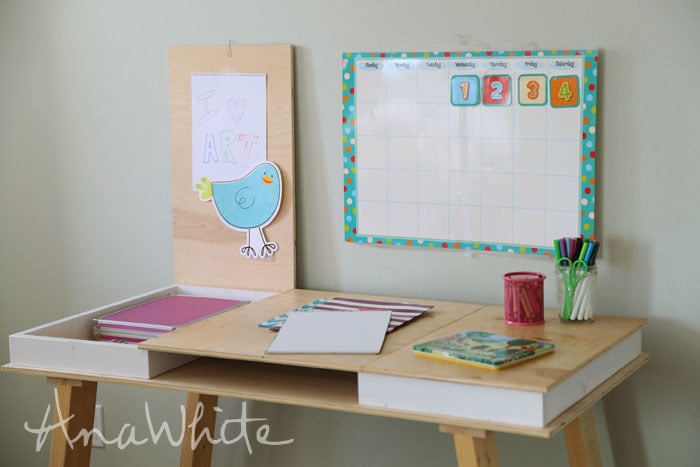
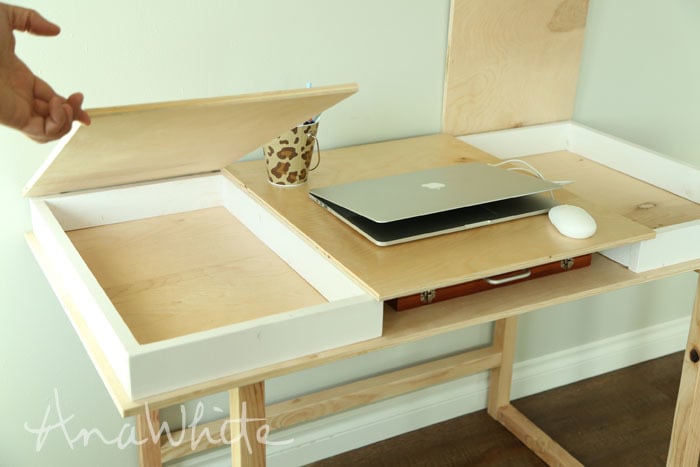
The top of the side compartments flip up for additional storage -

You could easily throw a few dividers in there to keep pencils, papers, coloring supplies - whatever - within easy reach!

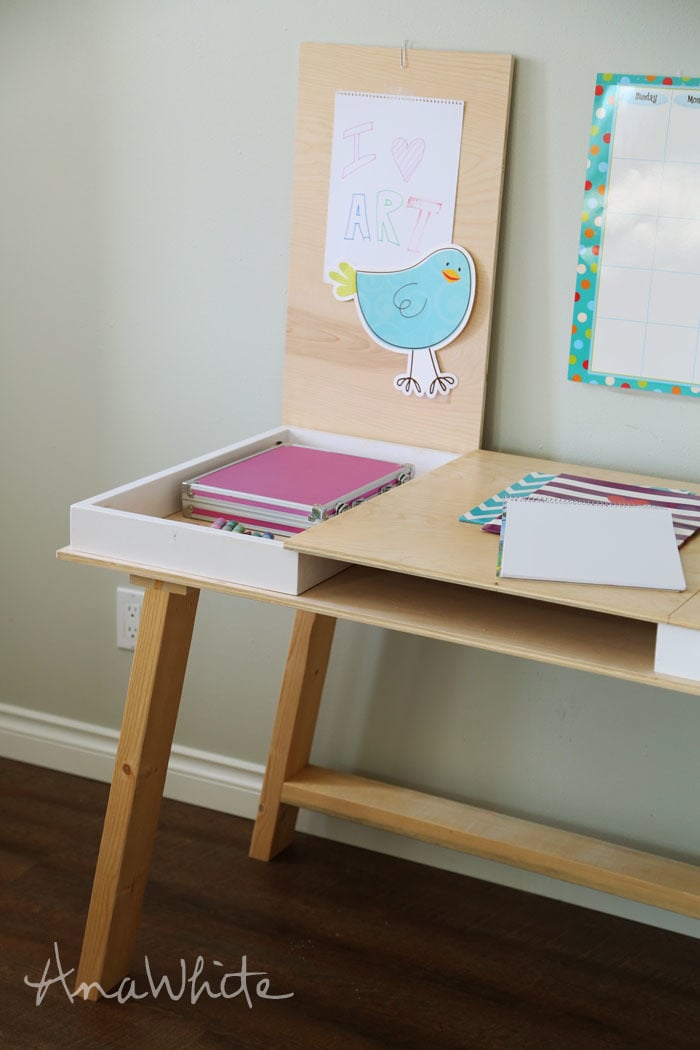
Or add a fun pin board or just paint with chalkboard paint the inside of the flip ups for added functionality.

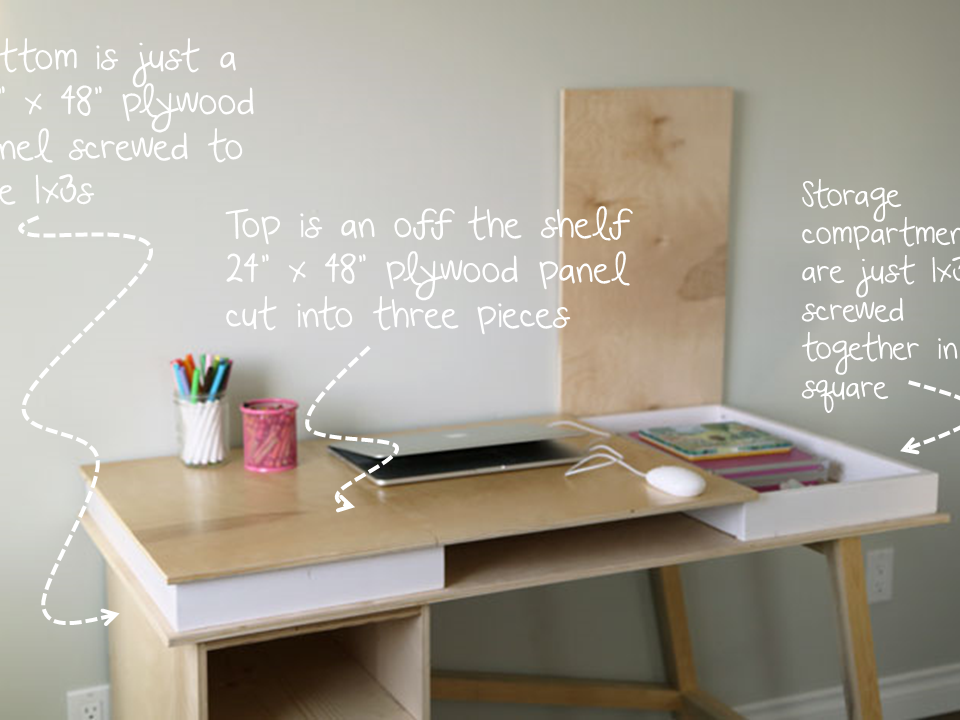
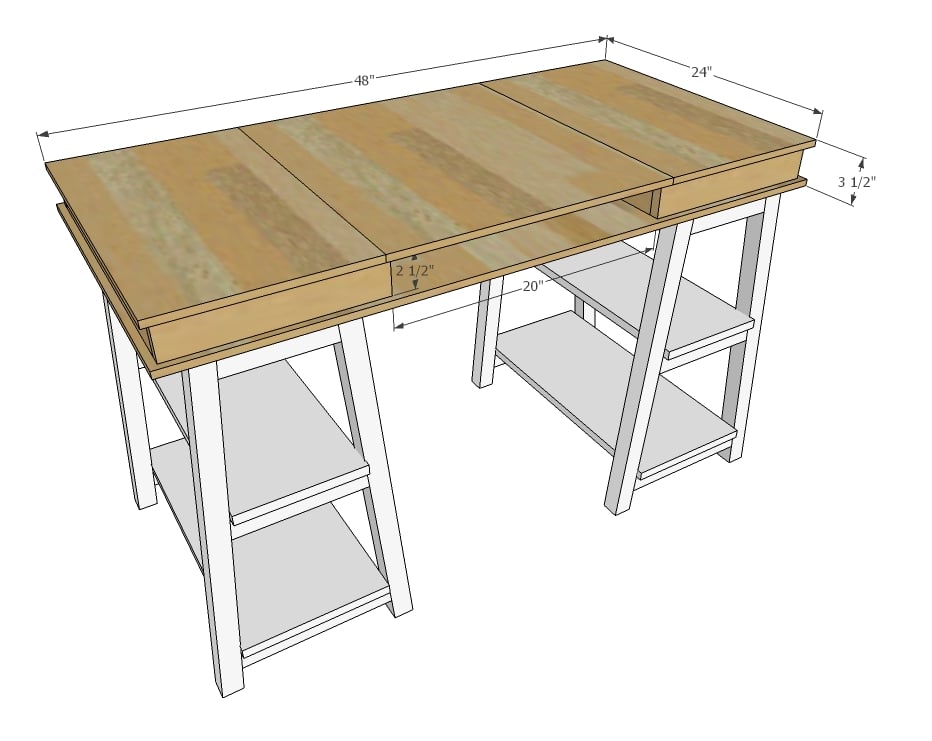
A project this fun also must be fun to make.  You'll be suprised at how quick and easy this desktop is to make.  It's just two 24" x 48" plwyood panels that are available off the shelf with 1x3 frames sandwiched in between.  That's it!

Detailed plans follow, and stay tuned for the different bases!

Have an aweome day and please - share your projects when you are done!  We'd all love to see how you customize yours!

XO Ana


Dimensions
Dimensions shown above

Preparation

Shopping List

2 - 24" x 48" project panels (available off the shelf) - I used 1/2" thick but 3/4" would be fine too (will make your desktop 1/2" thicker though)
2 - 1x3 @ 8 feet long
2 sets of simple butt hinges

Common Materials
1 1/4 inch screws
1 1/4 inch finish nails
120 grit sandpaper
Cut List

4 - 1x3 @ 13-1/2"
4 - 1x3 @ 21-1/2"
1 - 1/2" thick plywood panel @ 24" x48"
1 - 1/2" thick plywood panel @ 24" x 21"
2 - 1/2" thick plywood panels @ 24" x 13-1/2"

Tools
Tape Measure
Speed Square
Pencil
Safety Glasses
Hearing Protection
Kreg Jig
Drill
Circular Saw
Brad Nailer
General Instructions

Please read through the entire plan and all comments before beginning this project. It is also advisable to review the Getting Started Section. Take all necessary precautions to build safely and smartly. Work on a clean level surface, free of imperfections or debris. Always use straight boards. Check for square after each step. Always predrill holes before attaching with screws. Use glue with finish nails for a stronger hold. Wipe excess glue off bare wood for stained projects, as dried glue will not take stain. Be safe, have fun, and ask for help if you need it. Good luck!

Instructions

Step 1

Build two frames out of 1x3s.

Step 2

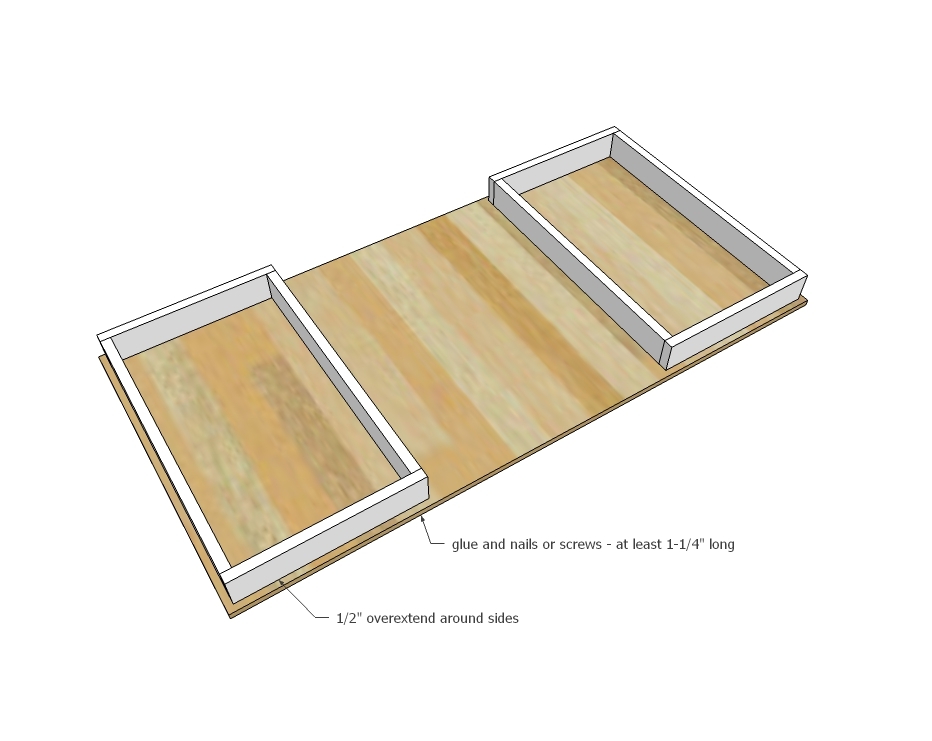
Attach the two frames to the bottom plywood, inset 1/2". TIP: Use 1/2" thick scrap plywood as a spacer to help guide you.

Step 3

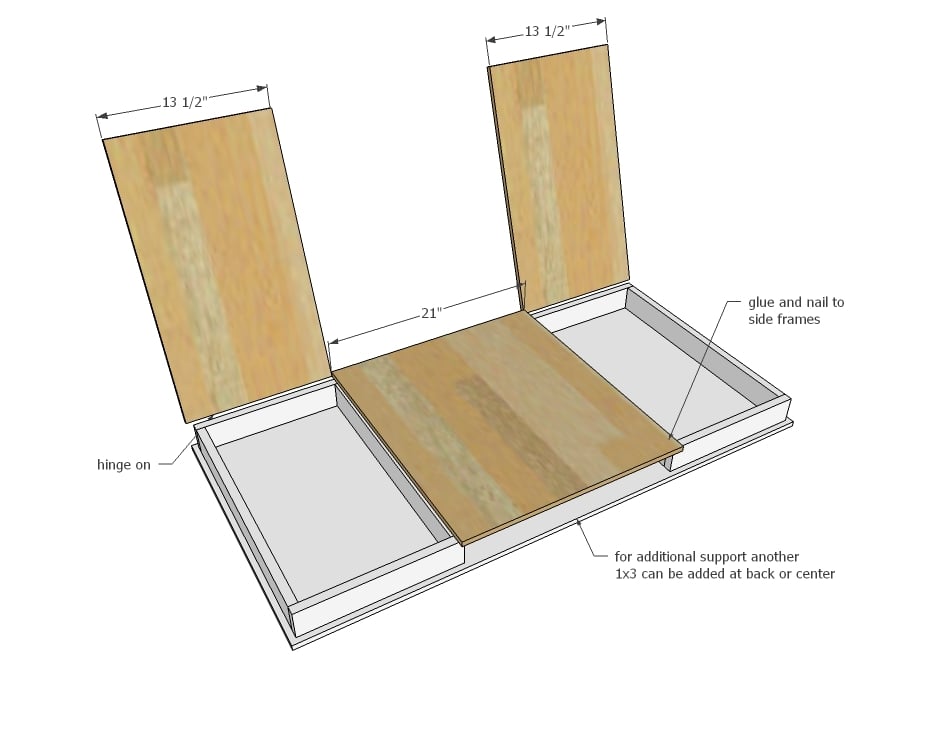
Cut the top panel into three pieces and attach center piece on top of the two 1x3 frames. You can also add additional 1x3s underneath to put a "back" or middle divider under the center panel (IDEA - place a power strip in the back and a 1x3 to divide with holes to create a charging area). Hinge the two side panels on with simple hinges so the hinge pin sticks out the back when closed.

Finishing Instructions
Preparation Instructions
Fill all holes with wood filler and let dry. Apply additional coats of wood filler as needed. When wood filler is completely dry, sand the project in the direction of the wood grain with 120 grit sandpaper. Vacuum sanded project to remove sanding residue. Remove all sanding residue on work surfaces as well. Wipe project clean with damp cloth.

It is always recommended to apply a test coat on a hidden area or scrap piece to ensure color evenness and adhesion. Use primer or wood conditioner as needed.

Comments

Lady Goats

Mon, 01/19/2015 - 13:38

And may be the best way to get storage without drawers that are never closed (at least, that's how it is at my house, anyway!)

Rainbow

Sun, 02/01/2015 - 16:59

Hi everyone! Does someone know how to prevent the "bleeding" nodes of the pine from appearing through water-based paint (other than using oil-based paint)? I live in France, and used something which is supposed to be an alternative to what is called shellac in North America, but it doesn't work evenly... :(

Greggyweggy

Wed, 11/09/2016 - 19:32

having trouble finding hinges that fit.  Maybe I'm not putting in correct place.  Any illustration to show size and placement would sure be appreciated.

Greggyweggy

Wed, 11/09/2016 - 19:32

having trouble finding hinges that fit.  Maybe I'm not putting in correct place.  Any illustration to show size and placement would sure be appreciated.

atomikjaye

Mon, 07/27/2020 - 20:40

Has anyone had problems cutting the measurements in the 24” x 48” plywood? Because of the blade depth I was only able to get a a 13.5in, 13.25in, and 21in piece, and not two 13.5in pieces as the plan called for. Was I supposed to buy 3 plywood pieces instead of just two? I feel like I’ve missed something haha 😅. Either way I’ll use what I have, but wanted to confirm.

Velisus

Fri, 07/31/2020 - 16:57

the blade will always "eat" part of the wood. it's normal, what i did was to cut the 21 piece and then measure the lenght of the left over minus the blade then that by half to get 2 identical pieces, but yes they were not 13.5 as intended either way they work just fine.

MoniqueThomas

Sun, 03/20/2022 - 16:35

This is cute and we would like to try this but where are the plans for the sawhorse legs? This is only the top. I'm confused. Thanks.

Frequently Asked Questions

Wood Questions

What kind of wood should I use?
Most of our plans use standard construction lumber like pine or fir. It's affordable, easy to work with, and easy to find. It's also rapidly renewing and biodegradable, so a great eco friendly choice!

Can I use hardwoods instead?
Yes—just keep in mind they're heavier, cost more, and can be tougher on tools and harder to join together and finish. I recommend not tackling a hardwood project until after you have built several softwood projects.

What if my boards are warped?
Choose the straightest boards at the store. You can often work around slight warps by cutting them into shorter pieces.

What wood should I use for outdoor furniture?
Use red-toned or pressure-treated 2x lumber for framing, and cedar or cedar fence pickets for the decking. Outdoor furniture should be built like a deck—your local home center can help recommend the right wood for your climate.

Will my wood move or warp after I build?
Potentially, especially in humid climates. Let your wood acclimate indoors before building. Once acclimated and kept in a stable environment, movement should be minimal. Remember, most houses are built using framing lumber - it's all about keeping moisture down indoors.

Cutting Questions

Do I need a miter saw?
A miter saw is great, creating fast, safe, and precise cuts, even for beginners. But most plans can be built with a circular saw and a straight edge. If using a circular saw to cut, take time to practice, and get good at making cuts, before cutting your project boards.

How do I get clean cuts with a circular saw?
Clamp your board, measure twice, cut slow, and use a sharp blade. This takes practice, so spend some time making cuts. I go through becoming proficient at freehand cutting in my course, it is worth taking if you want to master this skill.

Will the store cut my wood?
Yes—most stores will do rough cuts to help you transport your materials home. But from store to store, the quality of cuts could greatly vary.

Joinery Questions

What screws should I use?
We recommend star-head self tapping screws for framing, most common sizes are 2-1/2", 1-3/4". Pre-drill if close to the edge or you find your wood is splitting.

Do I have to use pocket holes?
Pocket holes are the cheapest, easiest and fastest way to do some joints - like edge to edge or a hidden fastener joint. There are other methods, but these can be time consuming and expensive. We recommend using pocket holes as indicated in plans for best results.

How do I keep things square?
Use a speed square and measure diagonals after each step. Always clamp joints before screwing to keep them tight and flush.

Finishing Questions

Stain or paint before or after building?
A quick sand before and a full finish after gives the best results. Pre-finish if you're doing two-tone or detailed finishes.

What type of finish?
Use oil-based or water-based stain. For paint, cabinet-grade latex or enamel works great. High use surfaces on indoor projects should get a coat of polyurethane, I recommend a Helsman or Spar or other flexible poly that won't crack or peel with wood movement. For exterior projects, use a finish suitable for exterior fences.

How to get a smooth finish?
Start with a well sanded project. Sand between coats (220 grit), wipe clean, and apply light coats with a foam brush or roller.

Plan Questions

Can I change the size?
Many people do, and that's the great thing about building your own furniture! But do keep in mind going bigger might mean more supports are required, and often plans are optimized for minimal material waste.

Are these beginner-friendly?
Yes—plans are written with simple tools and clear steps in mind, with every effort to make plans as simple as possible.

Can I sell what I build?
Absolutely! Just don’t resell or repost the plans themselves.

General Questions

What tools do I really need?
A drill, circular saw, tape measure, square, and a few clamps will get you through most projects.

Do I need a workshop?
Nope! A driveway or small patio is plenty to get started, just make sure you have a level place to work. If you find you are building several projects a year, creating a small workbench is a great way to store tools and have a dedicated workspace.

What if I mess up?
Wood filler, sanding, or flipping boards goes a long way. Mistakes are part of the process!

What can I do to make my projects look more professional?
Start with straight boards, make accurate cuts, clamp all joints, and line up everything neatly. Sand thoroughly, use a neutral finish, and apply it in light coats for a clean look.

I've never built anything before. Where should I start?
Start with a few smaller softwood projects to get hands-on experience. Or if you're tackling a big project, buy a little extra lumber and practice your cuts and joints first. If possible, work with someone who has a bit of experience.

Care & Maintenance

How long will my furniture last?
With good joinery and regular care, your DIY furniture can last for decades. I have pieces in my own home that are over 20 years old and still going strong! One of the best parts about DIY furniture is that it’s easy to repaint, refinish, or repair—so your projects can grow and adapt with you.

How should I care for outdoor furniture?
Lightly pressure wash or hose it down once or twice a year. Tighten screws and reapply finish as needed to protect it—just like a deck or fence. A little upkeep goes a long way in extending the life of your furniture.

How about indoor furniture?
Regularly dust or wipe with a damp cloth. If it starts to look worn, a light sanding and touch-up paint or stain can refresh it in no time. DIY pieces are meant to be durable and fixable—so don’t be afraid to give them some love now and then.

Want to Build with Confidence?

Check out my ebook: 12 Skills to Build Your Own Furniture
It walks you through the core skills every builder needs—measuring, cutting, joinery, and finishing—so you can build beautiful furniture that lasts.

Still Have Questions?

Email us anytime at [email protected] and we’ll be happy to help!