
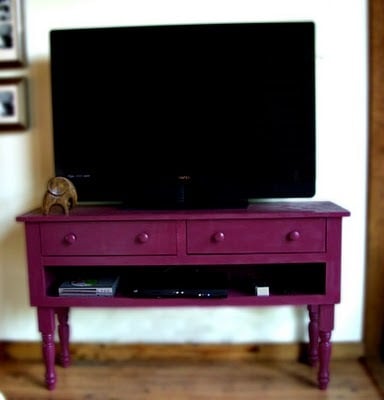

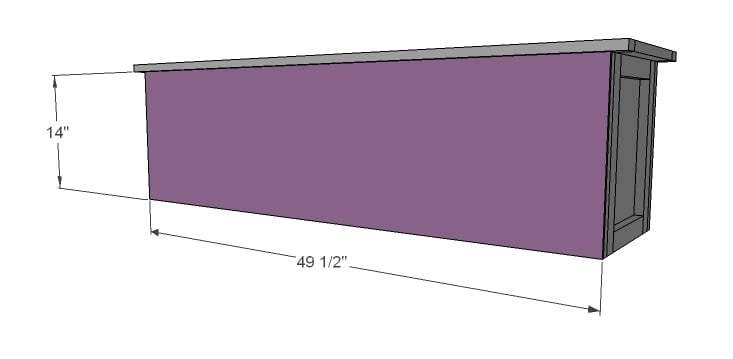
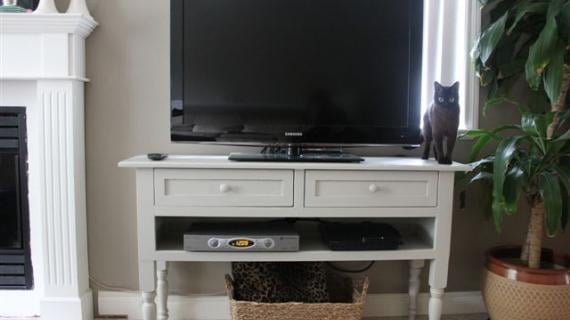
A media console with large controller space, turned legs, and an open bottom perfect for basket or bins. Two large drawers fit for DVDs.
How was your weekend?
Ours was rather regular, overly ordinary.
We cleaned the yard, and I couldn't help myself. Had to take a few photos of our DIY house.
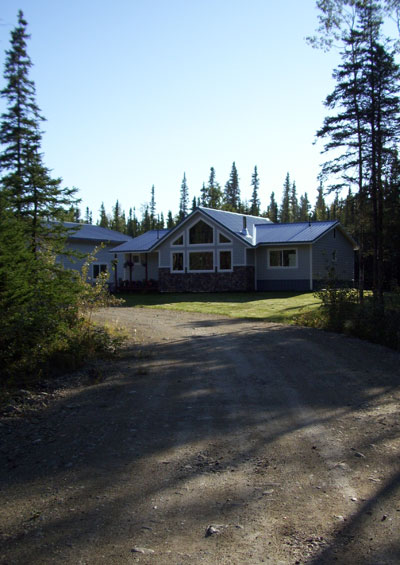
It's small, there's no marble entry and the granite countertops aren't solid slabs, but it's our house, and we built it, and I couldn't be more proud. Every time I drive up in my driveway, I am so thankful for our home.
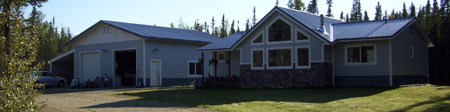
And our garage :) That's where we work on stuff. That's my side of the garage.
And while we were cleaning the yard up for winter (yes, winter is near, the birds are already flying south!) we had some visitors
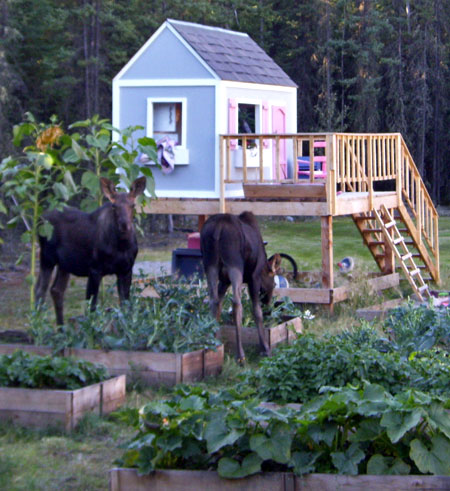
And they helped themselves to my broccoli. I couldn't scare them off. The cow moose was already shy, with a backside peppered with little wounds festering from getting into someone else's garden, and the calves were so hungry.
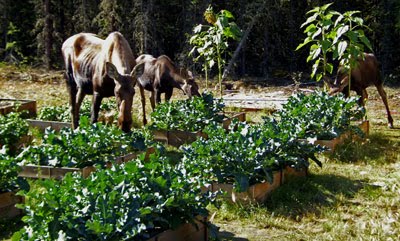
Not to mention mama's ribs were showing. I'm always impressed with the moms of nature. Mother ducks will pretend to be wounded to distract your from their young, a moose will nurse two calves despite ribs showing. We will do anything for the health of your little ones, won't we?
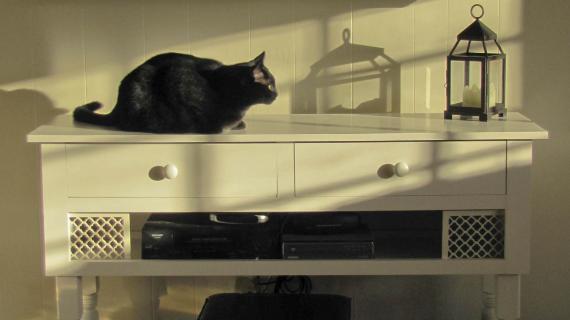
And this weekend, I went for the plum.

What do you think?
I'm seriously in love. The color is called Cranberry Spice by Kilz, in flat. I put two coats of flat on, and then sprayed a top coat (the top coat was not my favorite and gave a blotchy appearance to the top, so I will be redoing that soon).
Don't be afraid of those fancy turned legs. It's basically just a box, with four legs screwed to the bottom. You can attach the legs in many different ways, but I liked using my Kreg Jig to screw the legs on from all four directions. There is absolutely no wobble in my media console.
I used 15 1/4" turned legs, putting me back about $7 a leg, but in my opinion, well worth it! I used MDF and pine for the rest of the media console.
Preparation
1 - 1x12 @ 8 feet long
1 - 1x12 @ 10 feet long
4 - 1x2 @ 8 feet long
1 - 1x3 @ 8 feet long
1 - 1/4" Plywood @ 1/4 Sheet
4 - 15 1/4" Turned Legs Farmhouse Style
See detailed cut list in the PDF.


Please review full instructions in the PDF.
Instructions
Step 1
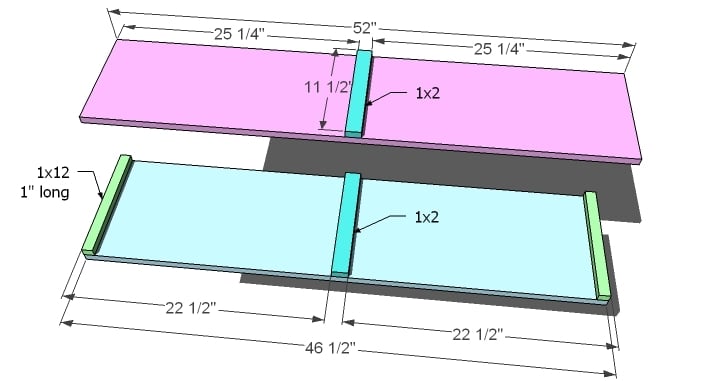
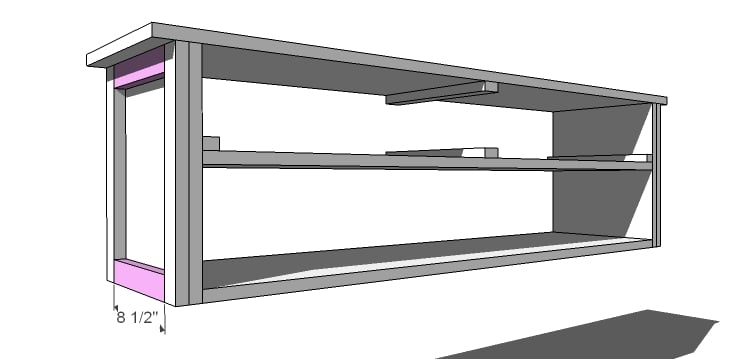
Nail the drawer guides to one of the shelves and the underside of the tops, as shown above. Use 1 1/4″ nails and glue.
Step 2
Along with the boards from the first step and the remaining shelf and sides, build the box using 2″ nails or pocket holes screws and glue.
Step 3
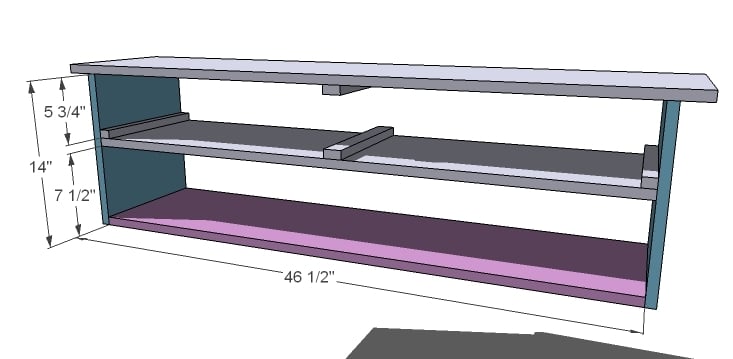
Use 1 1/4″ finish nails and glue to add the side trim
Step 4
A little more trim . . . 1 1/4″ finish nails and glue
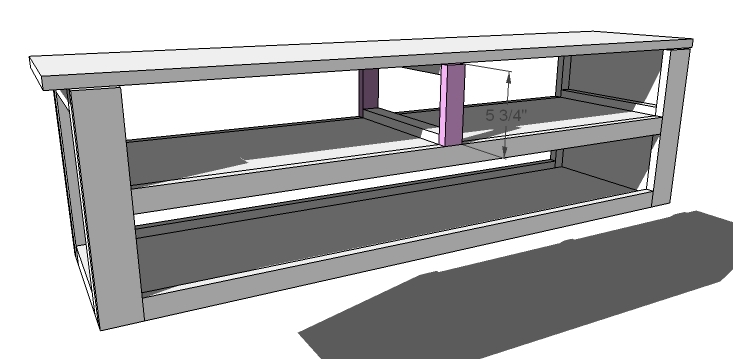
Step 5

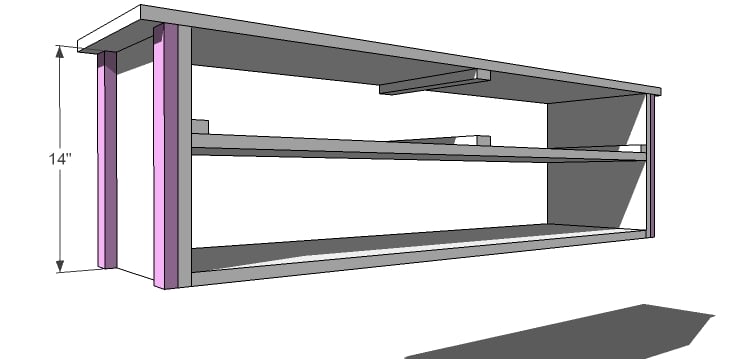
Step 6
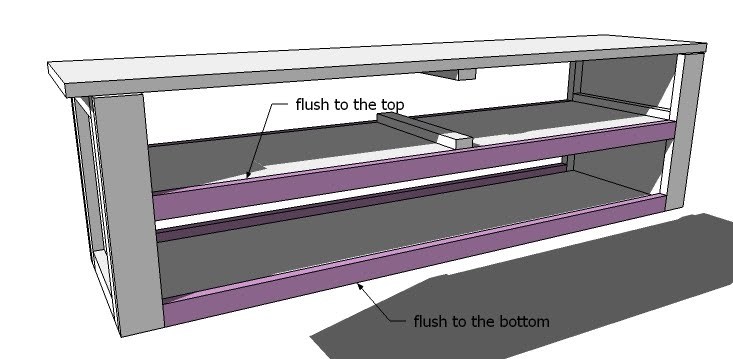
Shelf trim. Keep the top flush to the top, bottom flush to the bottom
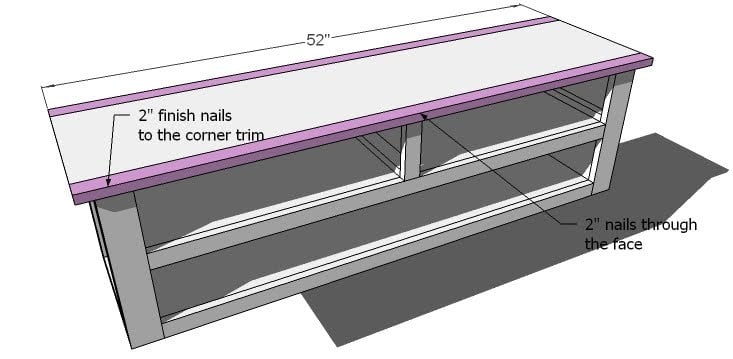
Step 7
Pretty and strong. 2″ finish nails and glue
Step 8
Overhangs can be a little tricky – just use glue and remember to fasten through the face and to the vertical trim pieces
Step 9
The back will make everything so strong. Remember to nail to the trim boards in the center shelf too.
Step 10

If your legs come with an existing screw, you can use that to attach your legs. Mine didn’t – they were on clearance, so I drilled pocket holes with my Kreg Jig™ in all four corners and attached it that way to the console. I inset the legs 1/2″ from the outsides.
Step 11

The drawers are simply 1x12s surrounded by 1x6s. I used pocket holes for added strength and built perfect drawers on the very first try!


Comments
Betsy ~ GAhandygirl (not verified)
Sun, 08/22/2010 - 21:34
This is wonderful! I like the
This is wonderful! I like the use of the legs on this. You can make it as tall or short as you want. Did you plug the Kreg Jig holes on the outside? Just wondering?
Virginia (not verified)
Mon, 08/23/2010 - 01:13
I am beyond excited that you
I am beyond excited that you posted this plan! This is so versatile! And so pretty! Thank you Ana!
Astrid @ The L… (not verified)
Mon, 08/23/2010 - 01:37
I love the plum! It's so
I love the plum! It's so beautiful and cheerful!
And....THANK YOU for posting photos (outside your AK home). I do get homesick for my home state (AK!) so it's extra nice to see photos from there. Gotta love those moose! The only way we finally managed to deter them was with a huge, tall fence. Down in the Lower 48 I got another problem...those darn deer! And raccoons!
I think I'm going to finally get the nerve and build a piece of furniture....hopefully. Pretty nervous about it, though!
--Astrid the Homesick Alaskan
Jeff Branch (not verified)
Mon, 08/23/2010 - 01:47
I see that you know a thing
I see that you know a thing or two about woodworking and is that SketchUp? Nice job
Kristi (not verified)
Mon, 08/23/2010 - 01:57
Oh that poor mama moose! :(
Oh that poor mama moose! :( She's supposed to be getting fat for winter! I wouldn't have been able to scare them off either!
-Kristi
@ Creative Kristi
Tru@TRU TALES FEATS (not verified)
Mon, 08/23/2010 - 02:00
I love the wall of windows on
I love the wall of windows on your house. What did you do for window treatments on it?
Laura (not verified)
Mon, 08/23/2010 - 02:14
Have you ever "knocked-off" a
Have you ever "knocked-off" a crib?? Would love to see you do one!
Rachel (not verified)
Mon, 08/23/2010 - 02:16
I love your little tours
I love your little tours around the property just as much as I love your projects:) Thanks for sharing the wild life and giving us hope for winter...in Texas it is still in the 100s everyday! Wish I was getting ready for winter.
Aimee (not verified)
Mon, 08/23/2010 - 02:19
Beautiful home and such a
Beautiful home and such a pretty color for your media center!! I wouldn't have been able to shoo the moose away either. Poor momma!
Joanna (not verified)
Mon, 08/23/2010 - 02:27
Yes yes YES to the plum!
Yes yes YES to the plum! Gorgeous!!!
MistyMayGrey (not verified)
Mon, 08/23/2010 - 02:28
I LOVE IT!!!that is one sexy
I LOVE IT!!!
that is one sexy tv stand! :)
and what a backyard!
Michelle (not verified)
Mon, 08/23/2010 - 03:22
I love your house. We built
I love your house. We built our own house as well...only took us three years! It is amazing the discounts and sales you can fine over the course of three years. There are things in it that aren't perfect and it isn't anything fancy but we built it with our own sweat, blood and a few tears. I can't imagine moving. Congrats on a building your own home!
ptswimmer (not verified)
Mon, 08/23/2010 - 03:24
Beautiful home! I could not
Beautiful home! I could not help but notice the playhouse in the back that my family is planning on building next month. I noticed that your deck has stairs and we are planning on doing the same. Are there tricks for the stairs we should know before going into the building next month? Thanks so much! We are thankful for your site!
Lauren (not verified)
Mon, 08/23/2010 - 04:08
I think your house is great!
I think your house is great! I have been dreaming for years of building our next house ourselves -- my husband thinks I'm crazy, but I'm hoping he'll come around. :)
I LOVE the color of the media console! So fun!
Lee and Beth (not verified)
Mon, 08/23/2010 - 04:18
Hi Ana! Thanks for sharing
Hi Ana! Thanks for sharing photos of your home. I think it is beautiful!
And I love the color on your media console. Pretty!
Hope you have a great day!
Beth.
Vicky (not verified)
Mon, 08/23/2010 - 04:43
Mama moose made me tear up!
Mama moose made me tear up! It is amazing what we do for your babies! You are very kind sharing your food.
I love your work and your blog!
Meghan (not verified)
Mon, 08/23/2010 - 07:28
i'm totally new to your site,
i'm totally new to your site, but i was wondering if it's possible to turn this piece into a window seat entertainment console. if so how would you finish the bottom? you may have already addressed this somewhere on your blog (or have plans for something similar)...and maybe you wouldn't mind pointing me in the right direction, please? i would really appreciate your thoughts...if you have time;)
Jeanne Lobsinger (not verified)
Mon, 08/23/2010 - 09:34
First of all I love your blog
First of all I love your blog to begin with but now I really love you for showing so much kindenss and compassion to nature. I would have done the same thiing! Oh, and your table is beautiful.
gkey (not verified)
Mon, 08/23/2010 - 09:51
dear Did it, Done it, Doing
dear Did it, Done it, Doing it,
I come over here every now and then to dream and drool. Besides, like i have mentioned in comments before....we spent 3 years in AK back when our first baby girl was born. (Anchorage 1984) Great scenery, great memories of a Great state!
It is all so impressive to me: That you built your home, that you do ALL this stuff, mostly that you are a woman/wife/mom and all that entails, yet feel inclined to share your talent with "the~likes~of~me" on this site.
Thank you over and over. Someday, i hope to start building things. I have learned so much already, but certainly hope this site or at least all the books you are probably going to publish are around for all the help i will need!
love,
The WanabeAna
in
NE
Meg (not verified)
Mon, 08/23/2010 - 16:33
i LOVE that purple!
i LOVE that purple!
The Autocrat: Haley (not verified)
Mon, 08/23/2010 - 18:33
I {heart} the purple!! And I
I {heart} the purple!! And I don't think I would've scared off the moose either.
Michiganhome (not verified)
Sun, 08/29/2010 - 23:58
Dear Ana, I came to your
Dear Ana,
I came to your site from Isabella and Max Rooms yesterday for the first time, and was astounded by what I saw. Didn't have much time to spend then, so came back for more today, and lo and behold, your new site, (which I saw mention of yesterday), is up! Kudos to you on your beautiful new site, and kudos to you on all that other stuff you do! :)
Cheers,
Michiganhome
ana (not verified)
Mon, 08/30/2010 - 08:06
Thank you and welcome!
Thank you and welcome! Thanks for stopping back by!
Sheri W (not verified)
Wed, 09/08/2010 - 09:43
I just had to stop back by
I just had to stop back by and give you a big THANKS from Mama Moose!!!! Not only your talents, but the quality of your character never ceases to amaze me!! It is so refreshing in a sometimes dismal world!! Thanks again!!
Linda (not verified)
Tue, 10/19/2010 - 07:53
I want to turn this plan into
I want to turn this plan into a console table like the one at PB, the tivoli.

Hey, I like th… (not verified)
Fri, 11/19/2010 - 09:24
[...] Media Console: [...]
[...] Media Console: [...]
Julia (not verified)
Tue, 12/07/2010 - 06:31
I'm really excited about this
I'm really excited about this media table. I'd like to make it this weekend. Unfortunately, I can't find a way to download your plans on my computer without paying or uploading something to scribd. Is there a way? Thanks!
shay (not verified)
Wed, 12/22/2010 - 10:46
The instructions for the
The instructions for the drawers are not very detailed...this is my first project and I'm lost at the drawers part. Also, you don't mention anything about the drawer guides in the cutlist(so I just invented something that I thought might work).
How to Build a… (not verified)
Fri, 01/07/2011 - 15:56
[...] organization Put on
[...] organization Put on my TO-DO List Save as PDF Print this PostShare/Bookmark My TV sits on the Turned Leg Media Console and I absolutely love it! One of our readers asked for the matching hutch, so here goes! The [...]
Tim S (not verified)
Mon, 01/10/2011 - 09:27
Hello, I notice your shopping
Hello, I notice your shopping list doesn't include any 1x6 but your cut list shows 1x6 for the drawers. Did you forget to add that or are you ripping the 1x12 on a table saw? Thanks
Ana White (not verified)
Mon, 01/10/2011 - 09:33
Definitely needs 1x6s! Sorry
Definitely needs 1x6s! Sorry bout that, will check on it.
Carrie (not verified)
Mon, 01/17/2011 - 06:31
Hi Ana! I can't seem to
Hi Ana!
I can't seem to print this plan--it keeps sending me over to that scribd site that wants me to pay a monthly subscription to download the plan. Is that what is supposed to happen? I can easily print the blog post, but the actual plan for the console doesn't show up.
Thanks!
Carrie
furniturerocks979 (not verified)
Sun, 02/27/2011 - 15:46
Hi Ana - I am in the process
Hi Ana - I am in the process of building this piece and noticed that the width listed for the 1 x 12 pieces seem to be different than that of standard lumber. I believe anything beyond 1 x 6 goes down 3/4" vs. 1/2", so the finished width will be 14 1/4" vs 14 1/2". This required a few other modifications as a result, like the center trim and the side trim. I am not certain if my assumptions about the standard widths are correct, but this information may be helpful for other folks that are starting out on this piece.
Guest (not verified)
Tue, 06/14/2011 - 12:21
Wrong cut list
You need to check your measurements. Cut list is completely wrong, do not attempt to make this without checking as I did. Wasted money on lumber! Perfect example is drawer bottom, how does 12" fit within sides and bottom? Good idea but someone missed math class.
Guest (not verified)
Wed, 11/16/2011 - 18:32
Turned leg media console
Hello! I absolutely love your site! Just completed the doll bunkbed for my daughter and had so much fun with it. I did have a question about the turned leg media console plan. When I downloaded the pdf the cut list seemed to be missing (or perhaps I'm not looking in the right place). I noticed a few of the reviews stated that there were some errors and I just wanted to check before I got started. I also plan to increase the width to 60 inches. Do you think that would work without compromising the structural integrity of the piece?
Thank You
Astrid Cisneros
Wed, 02/22/2012 - 20:24
Love It All !!!
Anna way awesome that you let this hungry mama moose and calves eat from your garden, and the project is fantastic Thank you for sharing.
RandyE (not verified)
Mon, 04/09/2012 - 10:50
Can't download the plans PDF for this
Has anyone used the most recent cut list with success? Seems like a few users have reported incorrect measurements. Please advise, and thank you!
Randy
Roslyn Francis (not verified)
Mon, 04/23/2012 - 07:46
Hi everyone, I've tried to
Hi everyone,
I've tried to access the PDF link for full cut list etc but with no success. Is the link broken, or am I doing something wrong?