
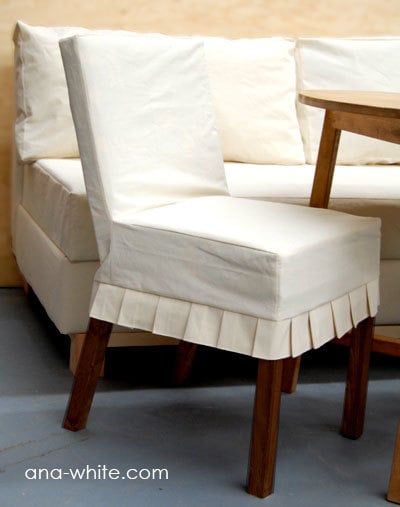

Create slipcovers for parson chairs with french pleats with this sewing pattern.

Yesterday, I got a tweet from @sewfearlessly asking if you can sew, can you build? And my reply is definitely, if you are crafty and can sew, I bet building is going to be easy for you.
But here is the real question: If you can build, does that mean you can sew?
Up until recently, I would have said maybe. Because when you build (at least anything from Adub.com) it's all about straight boards and straight cuts. On the contrary, fabric and patterns aren't always straight. I've struggled with sewing.
But last week, my sister was visiting, and she mentioned she needed a new couch, one that had storage, and one that costed next to nothing. So we built her a couch (I'll be blogging it very soon) and I sewed. But I designed the plan so that all the sewing was point A to point B, straight lines. And guess what? The sewing was not that difficult.
With half a drop cloth leftover and Grace too sick to go to the garage, I decided to use up the scraps to sew a slipcover for my parson chairs. And guess what? You, yes you, can do this.

It's all straight lines. And it's a perfect fit to our parson chair plans.

Don't stress about the knife pleat hem. It's surprisingly easy (and beautiful!).

And the slipcover fits how it should - snug but not tight, tailored but easily removable for washing.

And one more of the table

Cannot wait to move this into my dining room . . .
Want to build your own? The table plans are here and the parson chair plans are here. Couch plans are on their way. And here is the slipcover plans:
Preparation
1 small paint drop cloth, 10mm thickness
white upholstery thread
Parson Chair from these plans
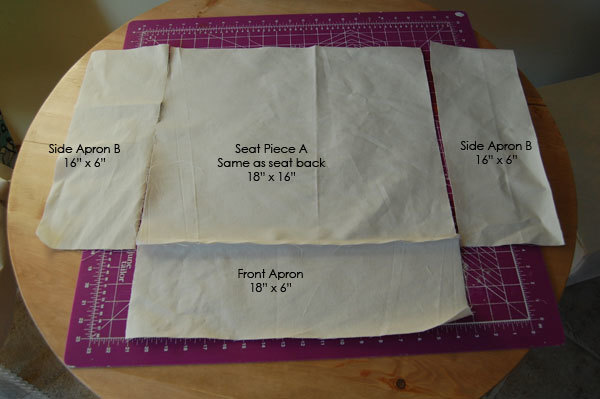
2 – 18″ x 16″ (Pieces A for Seat and Seat Backrest)
1 – 18″ x 6″ (Piece B for Front Apron)
2 – 16″ x 6″ (Pieces C for Side Aprons)
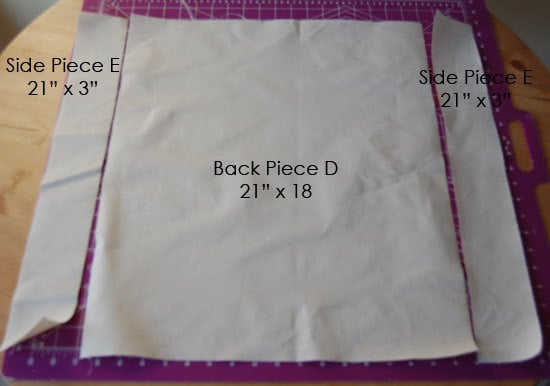
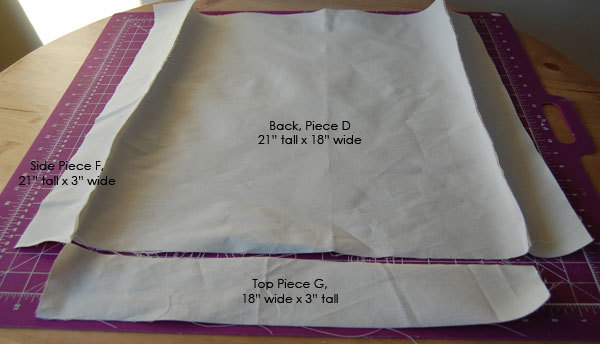
1 – 18″ x 21″ (Piece D for Back)
2 – 21″ x 3″ (Sides)
1 – 18″ x 3″ (Top)
1 – 7″ strip 12 feet long (for knife pleats, spice fabric together to create 12 feet)
Make sure you prewash your drop cloths prior to cutting.
Instructions
Step 1
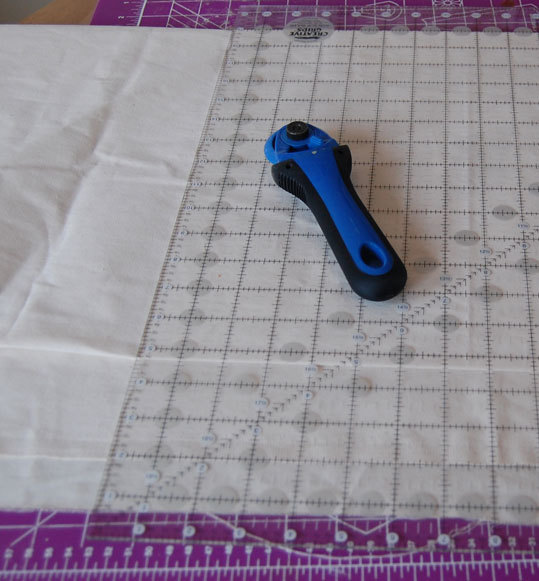
Cut Fabric
Use a quilter’s mat, square and rotary cutter to cut out all the pieces as directed in the cut list. If your fabric has a direction, be careful to cut in the right direction.
Step 2
Sew Seat to Aprons
Start by sewing the front apron to the seat along the front edge, with 1/4″ seams. Then start at the back and sew the side aprons to the seats, stopping 1/4″ from the end of the seat edge, with needle depressed in fabric, rotate the fabric to sew the front apron to the side apron. Repeat on other side.
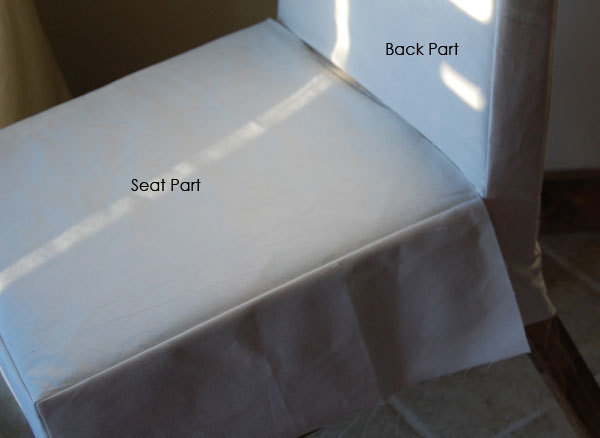
Step 3
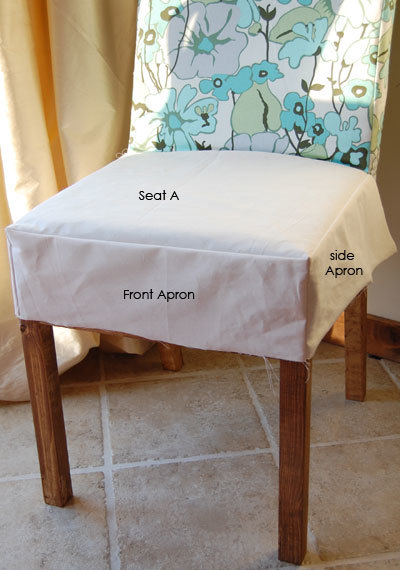
Fit Seat
The seat should look like the above photo if you have done step 1 correctly. Adjust seams as necessary.
Step 4
Back and Sides
Now sew the back (not the seat backrest, but the back back, measuring 21″ long x 18″ wide) to the sides as shown above with 1/4″ seams.
Step 5
Step 6
Fit Back and Seat
If you did step 4 correctly, the back should slide onto the back of the chair like a snug sleeve. Fit to and adjust if necessary. Remove and again, start at the center of the back of the seat and the bottom of the backrest, with right sides together, sew the back to the seat, turning corners to sew the side apron to the side. Repeat on the other side.
Step 7
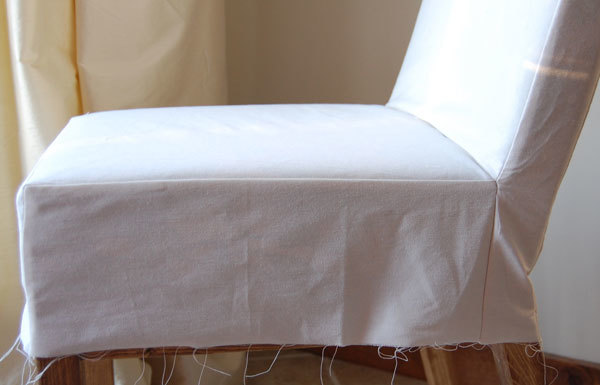
Fit
If you did step 5 correctly, your slipcover should look like the above diagram – a snug fit but not too tight, with all corners lining up, and any differences showing up along the hem and not in the slipcover. You can simply hem the chair at this stage or you can opt for fancy knife pleats.
Step 8
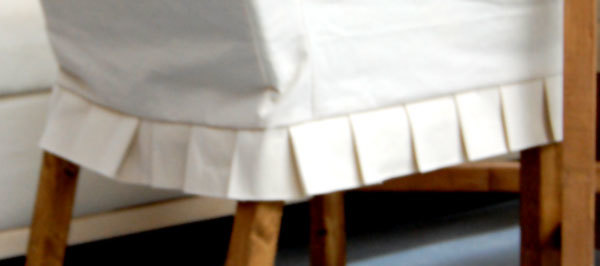
Knife Pleats
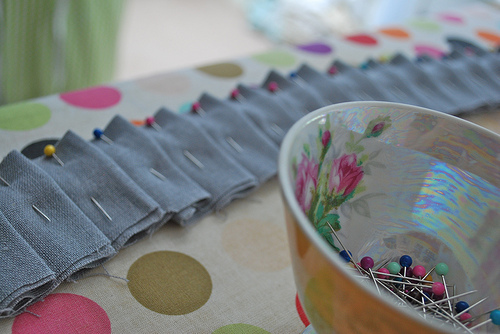
Looks to complicated? Yeah, I thought so too. But consider this – what you see above is my first attempt at knife pleats and I did not have to do any ripping. You can do this! Simply cut your fabric into strips 7″ wide, and sew strips together until you have a piece that is 12 feet long. Then press with a steam iron the entire strip in half lengthwise. Then press the knife pleats into the strip (I eyeballed mine, but you can measure if you want exact knife pleats). Then simply start in the back, pinning right sides of the slipcover to the knife pleat raw edge, all the way around. Sew. And then trim the ends and sew together. It is really really simple. Want a step by step tutorial?
Step 9
Check out Pink and Polka Dot’s tutorial That’s how I learned!
Oh, and you can make the pleats longer for a more formal, longer skirt, or just use a tradditional gathered skirt, but you cannot simply make the aprons longer – won’t work for this chair. Good luck, and here’s to someone going for a really bold floral!

Comments
Toni (not verified)
Wed, 11/10/2010 - 21:52
OMG! I have to make this.
OMG! I have to make this. Ana, you continue to amaze me. I can't wait to start some of these projects. I can't wait for the couch. Oh, and more nightstand plans would be so cool. Thank you, thank you, thank you for all that you do.
Melissa (not verified)
Thu, 11/11/2010 - 01:56
So awesome! They look great!
So awesome! They look great!
Ericka (not verified)
Thu, 11/11/2010 - 02:36
Love, love, love it! Is
Love, love, love it! Is there no end to your talent, Ana?
Estela @ Weekly Bite (not verified)
Thu, 11/11/2010 - 02:49
I love this!! I have a brand
I love this!! I have a brand new sewing that I've had for over a year. I love the idea of sewing but am so intimidated by it. You make it look so easy! Thank you :)
Jodi (not verified)
Thu, 11/11/2010 - 03:01
(p.s. It's
(p.s. It's @sewfearless)
Great work, Ana!! You wouldn't guess you are new to sewing. I love that you used drop cloth as your fabric.:)
My dad has a PhD in MechE and he compares working with farbics with working with pieces of sheet metal. I guess if you have that kind of mind, the material is irrelevevant. :)
If you ever have to sew along the curve it helps to draw your seam line in the fabric just like you might mark your screws in wood working. And If you ever have sewing project questions, let me know. I would be happy to help. I love getting people excited about sewing!
Now to convince my husband of my crazy Cubby System schemes, so I can start building!
Krista (not verified)
Thu, 11/11/2010 - 03:32
You are Superwoman! I don't
You are Superwoman! I don't know whether to love you or hate you. All these things that I dream of doing and stress out over, you make seem like a piece of cake. I'm loving that slipcover and think I can do it - but better build the chair first!
Diana (not verified)
Thu, 11/11/2010 - 03:59
What a cute slipcover and it
What a cute slipcover and it looks relatively easy! Can't wait to see plans for the couch!
Kristi~The Sli… (not verified)
Thu, 11/11/2010 - 04:15
Ana, thanks so much for the
Ana,
thanks so much for the shout out! you're so sweet and those pleats are divine! the chair is adorable! i'm constantly pouring over your site for ideas...just haven't bitten the bullet to build anything yet. hoping for a table saw for christmas!
Tracie (not verified)
Thu, 11/11/2010 - 04:26
I used some of those too to
I used some of those too to cover loveseats---they are really comfy and worn now--love that!

Beth (not verified)
Thu, 11/11/2010 - 04:56
I noticed that you referenced
I noticed that you referenced adub.com in the above post, but when I went there, I don't think it's where I was supposed to be. (" Because when you build (at least anything from Adub.com) it’s all about straight boards and straight cuts. ") Is there possibly a typo? If so, what's the website that you were referring too?
lianatempera (not verified)
Thu, 11/11/2010 - 05:38
Ana, you're amazing. I have
Ana, you're amazing. I have to say that I'm a sewer first, and now I'm almost a builder. I'm almost done with my first big building project, thanks to you. Sewing and building are VERY similar--they're both basically putting puzzles together to make something beautiful and decorative and useful. They're both wonderful on their own, but put the skills together, and WOW, you get something even BETTER than either alone.
Catherine (not verified)
Thu, 11/11/2010 - 05:39
Love this!! I would love to
Love this!! I would love to make enough in time for Thanksgiving.
TheSimplePoppy (not verified)
Thu, 11/11/2010 - 05:51
Building and and pattern
Building and and pattern making are similar, but pattern making is actually far more difficult because wood typically doesn't have boobs you have to fit things over :) Which might explain why building something is pretty nice when you've been used to pattern drafting!
You did an awesome job on those pleats!
Tanjia (not verified)
Thu, 11/11/2010 - 06:00
I really need to get my
I really need to get my painting done so that I can start building/sewing again. And I think I'm going to buy stock in paint drop cloths!
Shelley Davis (not verified)
Thu, 11/11/2010 - 06:36
Is there anything you can't
Is there anything you can't do? You are awesome. Thanks for the wonderful tutorial.
Ana White (not verified)
Thu, 11/11/2010 - 06:45
Thank you! Much easier to
Thank you! Much easier to sew without boobs LOL!
Ana White (not verified)
Thu, 11/11/2010 - 06:46
Definitely can be done!
Definitely can be done!
Ana White (not verified)
Thu, 11/11/2010 - 06:47
I could not agree with you
I could not agree with you more. Being able to sew and build takes everything to a new level, and its definitely the same skills. I would almost argue sewing can be more difficult.
Ana White (not verified)
Thu, 11/11/2010 - 06:53
I'm just getting lazy beth
I'm just getting lazy beth :) adub as in A-W as in Ana-White.com :)
Ana White (not verified)
Thu, 11/11/2010 - 06:56
Thanks Jodi!
Thanks Jodi!
HammerTime (not verified)
Thu, 11/11/2010 - 07:31
Oh Ana, I just fall more in
Oh Ana, I just fall more in love with you every day. (In a perfectly healthy, non-stalker-ish way, of course!) Thank you, these are so adorable!
Jenn Hoff (not verified)
Thu, 11/11/2010 - 08:18
Oh my gosh these are
Oh my gosh these are BEAUTIFUL. I love them. I bet I can modify it to get a cushion in there, too.
Cari J (not verified)
Thu, 11/11/2010 - 08:36
This might be the solution to
This might be the solution to the problem I have with my dining room chairs, they have big gaps in between the slats on the back where food is constantly accumulating and I can't get it out! It might also save the finish on my chairs as it is getting destroyed!
Celestra (not verified)
Thu, 11/11/2010 - 08:57
Love the pleat on the
Love the pleat on the slipcover, so cute without being too fussy looking. Btw cannot wait for you to post the plans for the sofa. 10 year old sofa+ lounging hubby+ 2 kiddos+ 2 dogs= I need a new (cheap!) sofa or two : )
Stefanye Thurmond (not verified)
Thu, 11/11/2010 - 10:14
Ana, you continue to amazing
Ana, you continue to amazing me! Your site is a constant source of inspiration. I'm so glad you're willing to do this. Your time and efforts are much appreciated.
Paula (not verified)
Thu, 11/11/2010 - 12:52
A couch! you don't know how
A couch! you don't know how excited this makes me. I've been dreaming all day of a chaise style couch/futon thing I can cuddle with my kids on and read books. We don't all fit on the couch comfortably.
Stephanie (not verified)
Thu, 11/11/2010 - 15:30
Did you pre-wash the fabric
Did you pre-wash the fabric before cutting?
Ana White (not verified)
Thu, 11/11/2010 - 20:58
Yes, always prewash. Thanks
Yes, always prewash. Thanks for pointing this out.
Ana White (not verified)
Thu, 11/11/2010 - 22:37
Thank you Stephanie!
Thank you Stephanie!
Shawn (not verified)
Fri, 11/12/2010 - 02:09
Can't wait to see the couch,
Can't wait to see the couch, love all your projects Ana!!!
merideth (not verified)
Sat, 11/13/2010 - 14:16
they make golf difficult,
they make golf difficult, too! :)
beth (not verified)
Sun, 11/14/2010 - 04:24
Ana!! That is just beautiful!
Ana!! That is just beautiful! I love all of it. The chairs, the table, and the slipcovers. You really are Superwoman!!! :)
audra (not verified)
Fri, 12/10/2010 - 04:58
Lurve these, u rock gurl!!!!
Lurve these, u rock gurl!!!! I had a question, i want to make these, but i want them longer, like to cover legs, what would you suggest? Or should i say how would i go about it?Thanks so much
priscilla (not verified)
Mon, 02/07/2011 - 06:29
Anna, Beautiful! I'm
Anna,
Beautiful! I'm going to try to make the slip cover this week!
How many yards would you say for one chair?
Thanks!
ups (not verified)
Fri, 03/04/2011 - 05:28
Hi Ana, First of all, thank
Hi Ana,
First of all, thank you for sharing your wonderful projects. You did a very good job explainning and the pictures are very helpful. Second, I have dinning room chairs that the back rest is not a regtangle. It is a slanting (quite a bit) back. The back of the chair's dimensions are witdth =17"(top) x 14 1/2" and 20" tall and about 1/2 thick. Do you have any suggestions of how to come about this? I can't you your pattern because I can't put it on. I hope it does make sense to you. Thank you in advance.
Guest (not verified)
Wed, 08/31/2011 - 13:53
slipcover with pleats
Saw this wonderful slipcover and had to share a little about this great pleating tool I have been using. It's called the quick pleater and you can find it at http://www.sewityourselfslipcovers.com You can pleat a full skirt in under 15 minutes.
Check it out,
Claudia
http://.homefashionsu.com
Amydq
Sun, 05/15/2016 - 19:01
HELP in Step 2
I need help. I'm attempting to make these for my breakfast area, but having trouble. I sewed the front to the seat and I'm stuck when you sew the seams together that go over the legs of the chair. The directions make it sound like once you rotate the fabric you make a straight line, but it didn't work for me. I don't think that I sewed the right sides together.