Counter Height Farmhouse Table for Four

counter height farmhouse table
Difficulty
Beginner Projects
| Print this plan

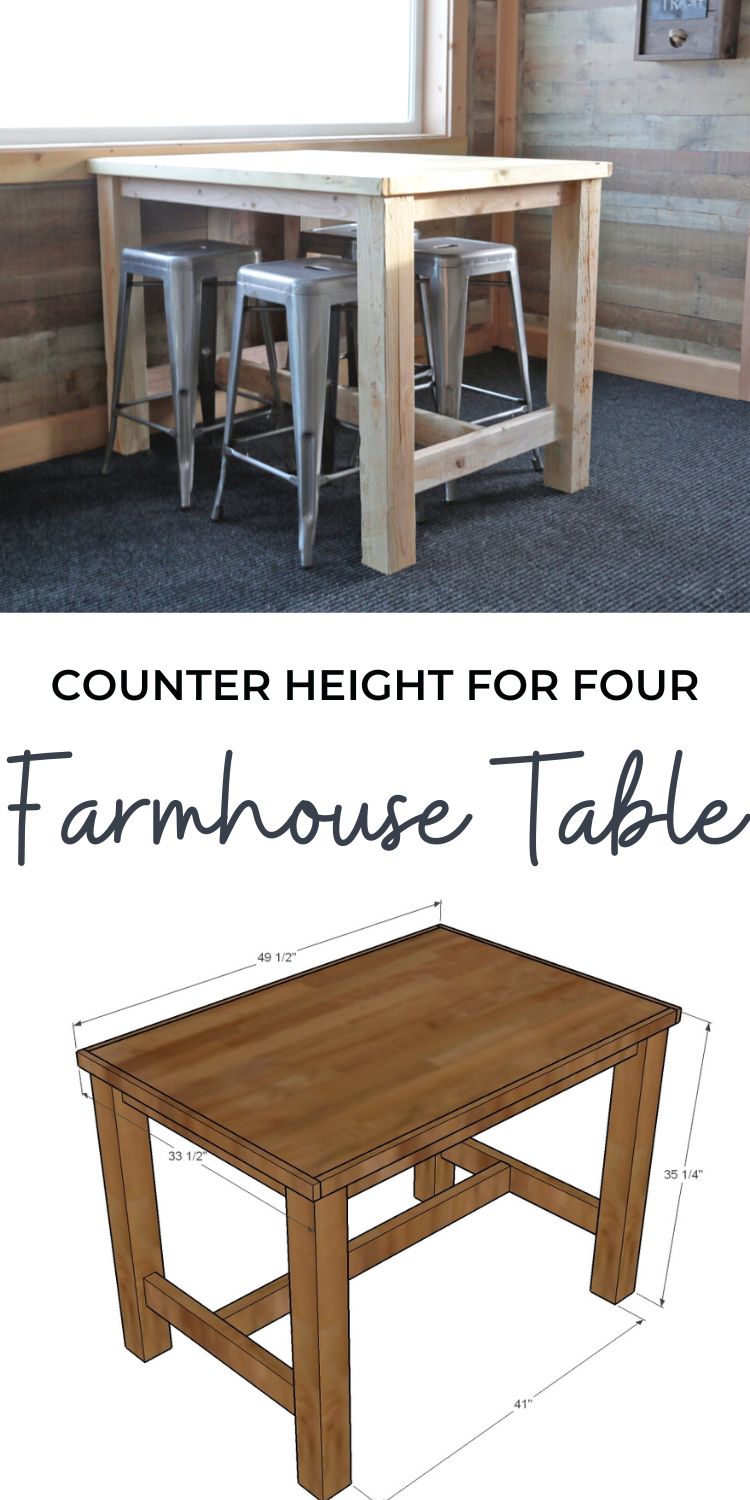
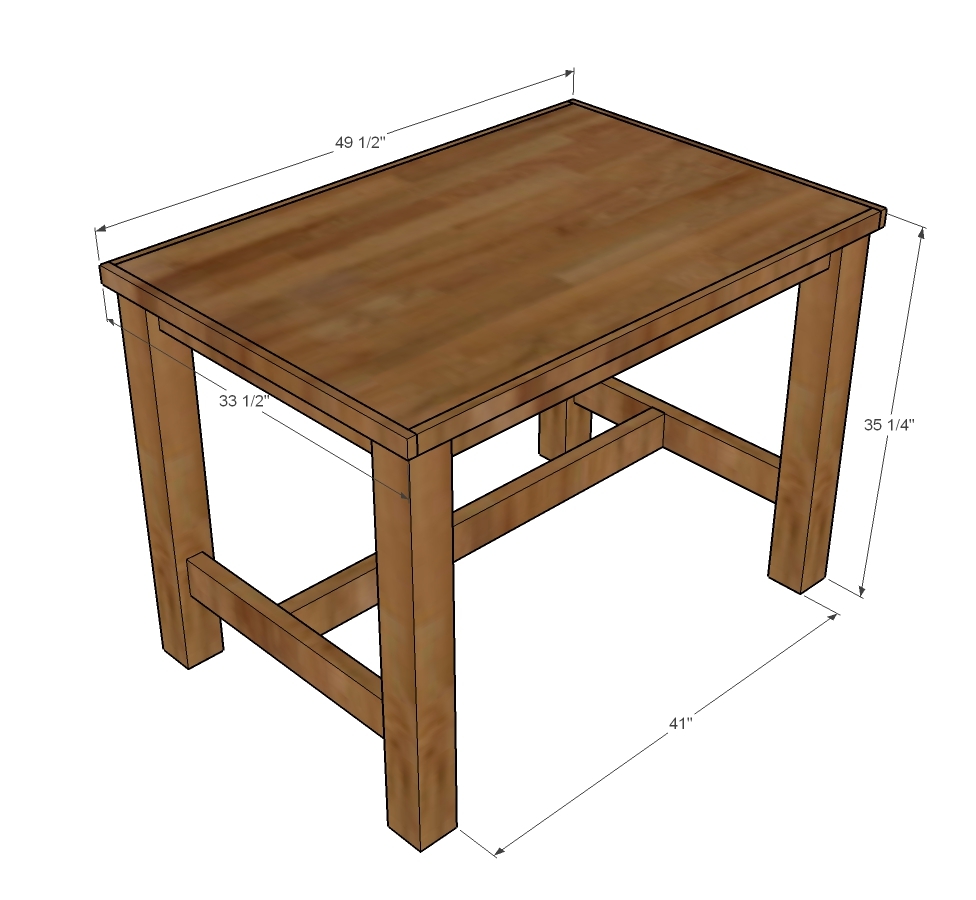
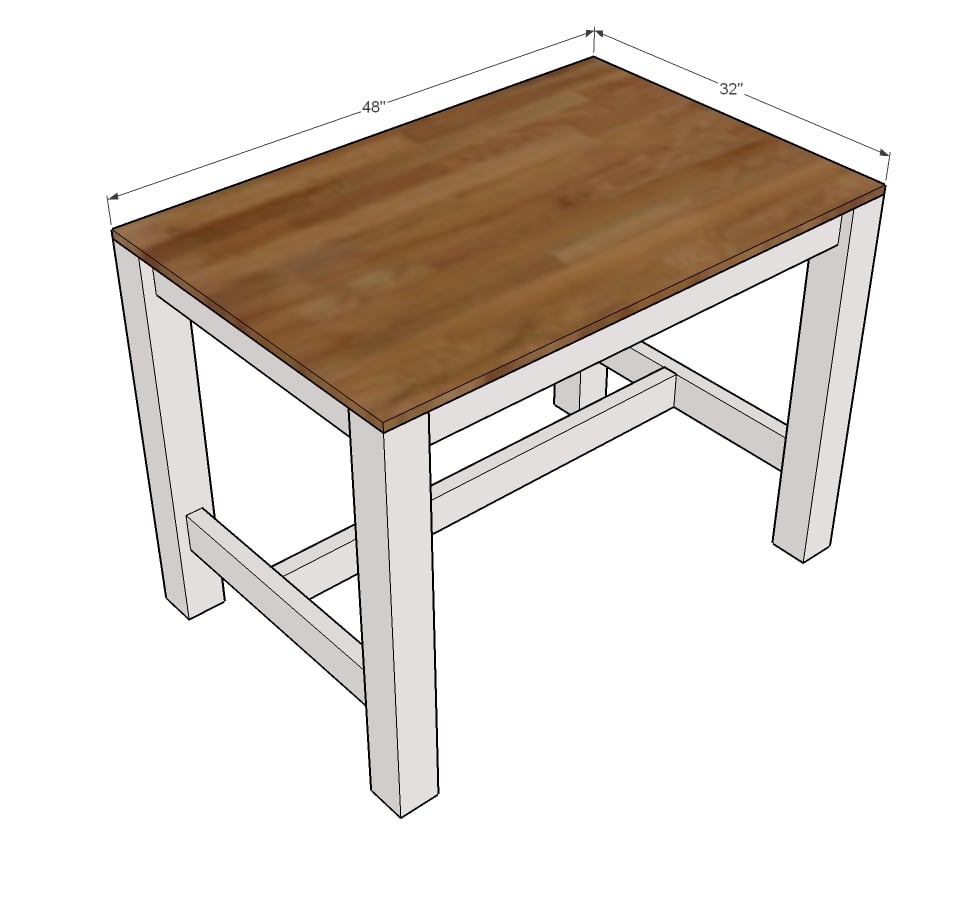
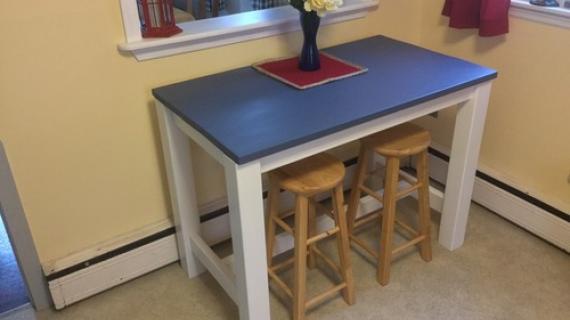
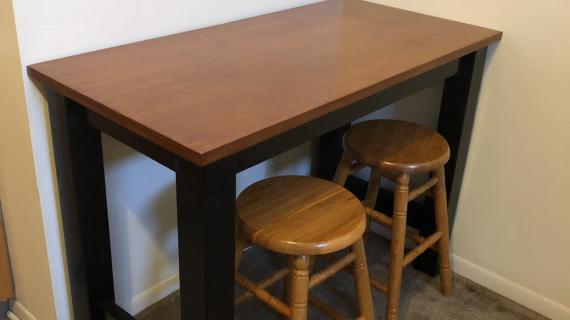
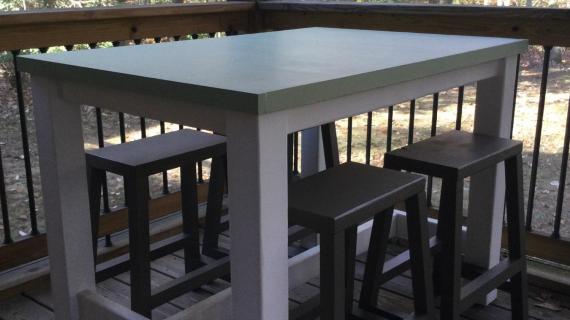
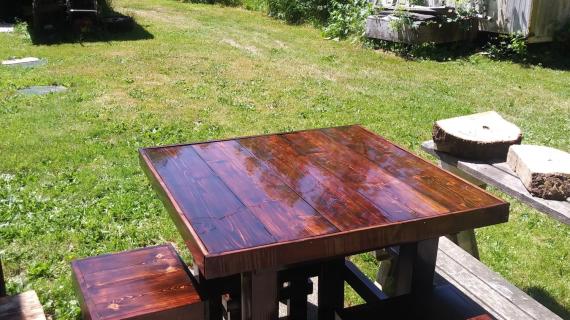
DIY Farmhouse Style Table Counter height with seating for four - free plans by ANA-WHITE.com

counter height farm table

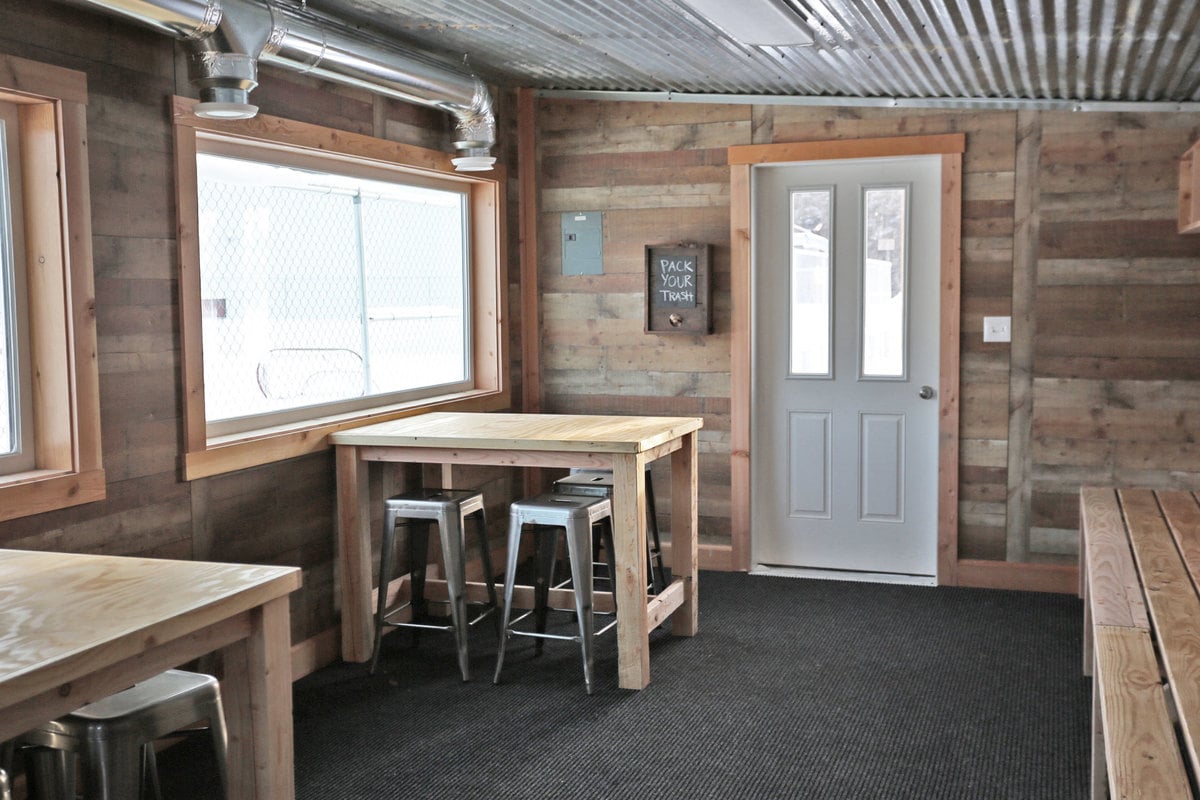
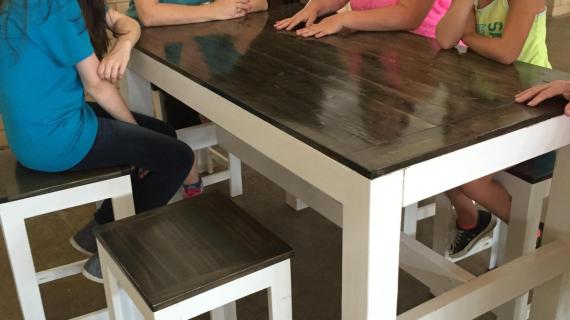
We just finished up a fun little project for our community!  It's a ice skating warming hut nicknamed "The Skate Shack".  It's placed right next to the rink, so skaters can come inside, put their gear on, go skate, come back in and warm up, keep skating, and so on.  We are so excited about this addition to our community and grateful that we have this facility to use now.

This is a volunteer effort and there may not be maintenance or janitorial services provided by our local government, so we finished the interior of the skate shack with this in mind.  Nothing painted white that will need touch up, and lots of very durable consturction wood that can take a beating (or look "weathered" and more beautiful as it's used).  

The furnishings especially I wanted to be very durable, and designed to age well.  You know, like an old picnic table that just gets more beautiful each time it's used.

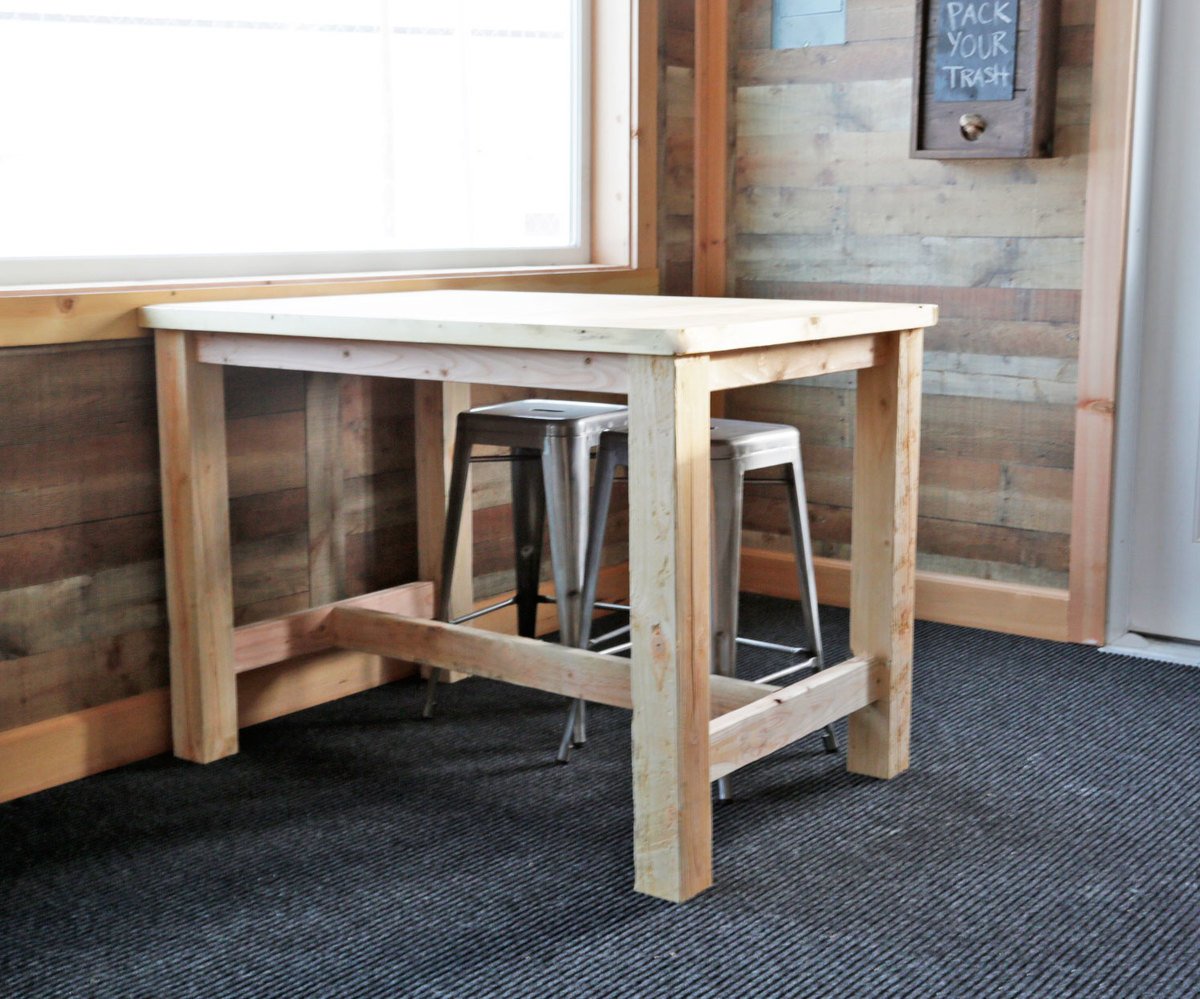
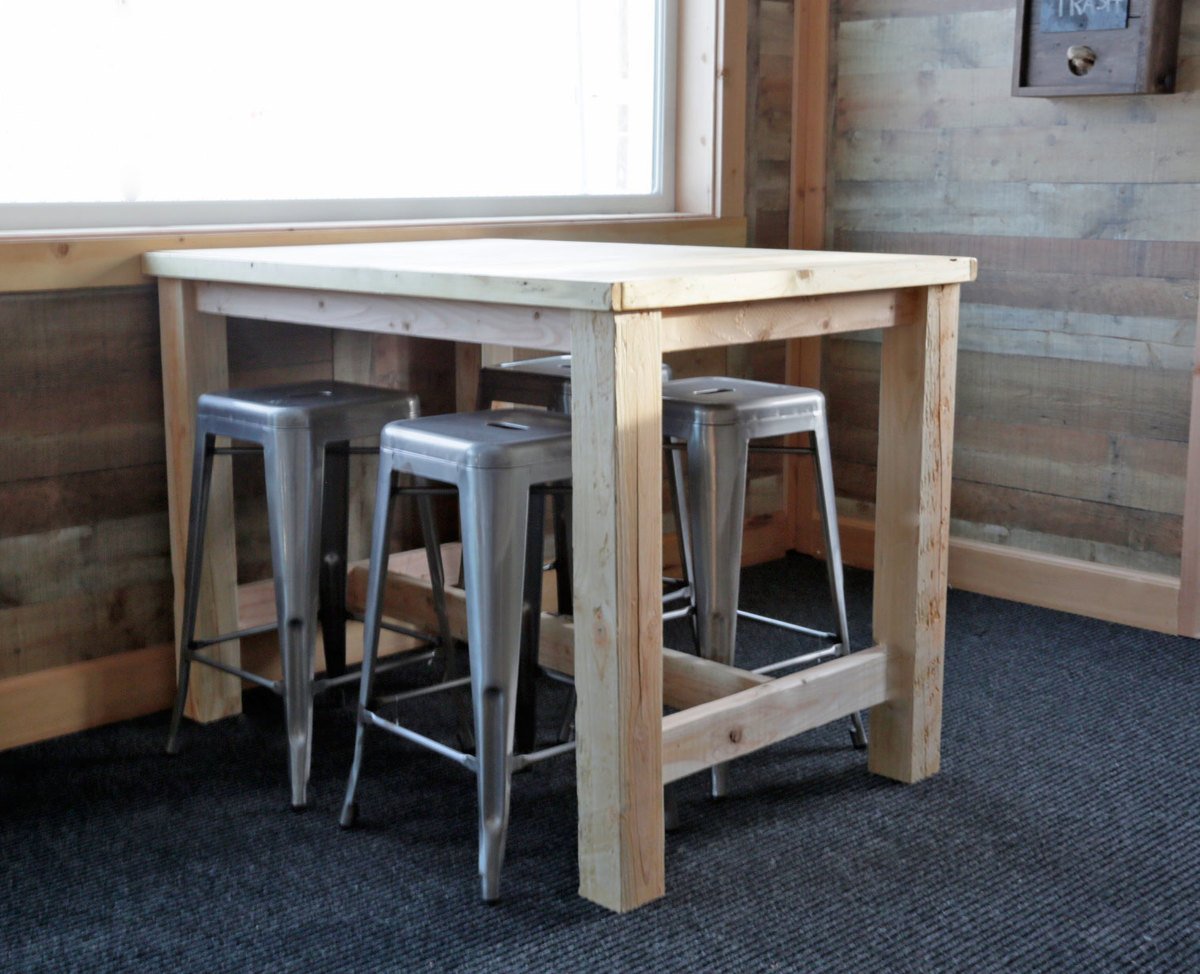
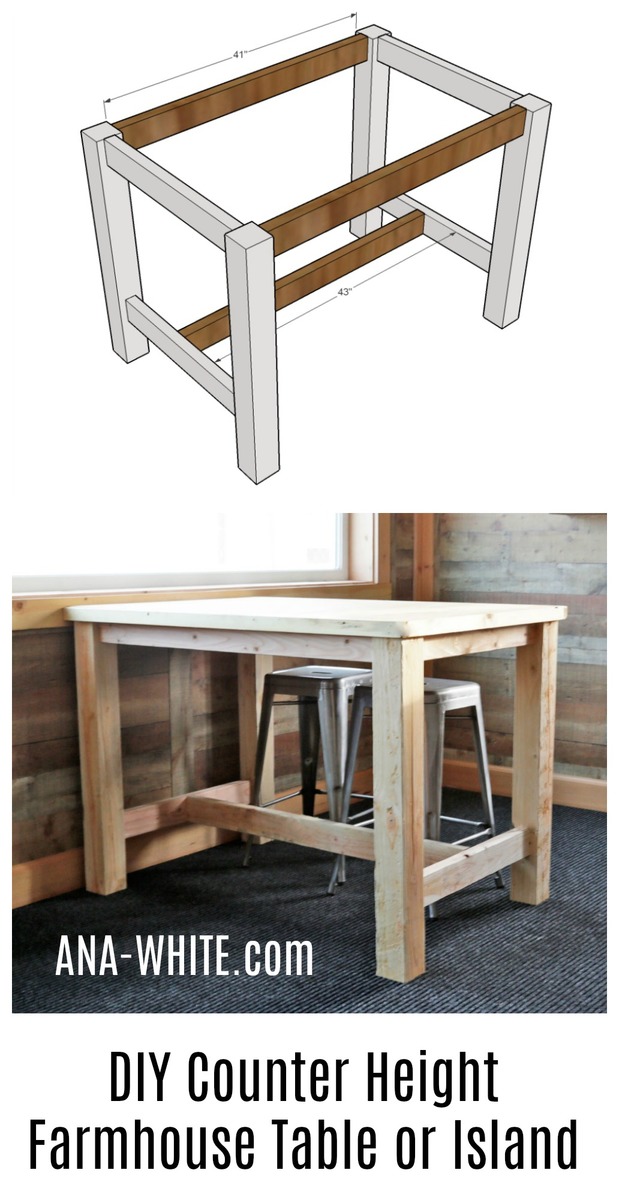
For the table seating, we built these counter height tables made of 4x4s and 2x4s.  The tops are 3/4" thick plywood.  

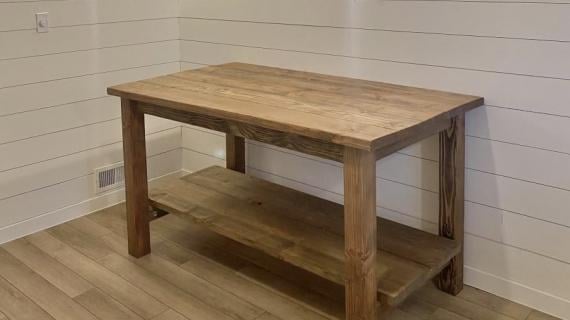
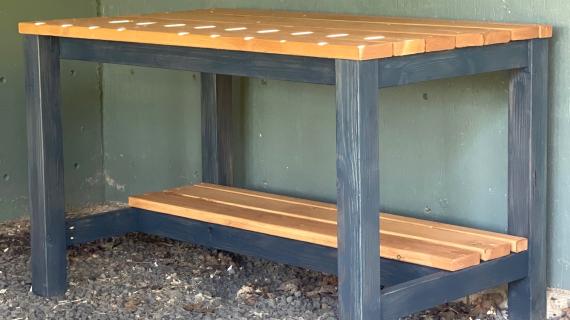
I love how they turned out, and the size is just right.  I could also see these counter height tables being used as a kitchen island or even a project table (especially with the smooth plywood top).  

Speaking of sizing, we made the tops 48" x 32" - so you can get three tabletops out of one sheet of plywood.  But of course, you can alter the size - just consider that 3/4" plywood max span is about 3 feet for shelving/furniture, so if you go bigger, you may need to throw some 2x4 supports between the aprons - but no biggie!

The free plans follow, please do share if you build, we love seeing your projects!

XO Ana

PS - You can watch our video series on build The Skate Shack here.

Pin For Later!

Counter Height Farmhouse Table for Four

Dimensions
counter height farm table
Dimensions shown above, suitable for 24" or "counter height" stools

Preparation

Shopping List
  • 2 - 4x4 @ 6 feet long
  • 3 - 2x4 @ 8 feet long
  • 2 - 1x2 @ 8 feet long
  • 1 - 3/4" plywood @ 48" x 32"
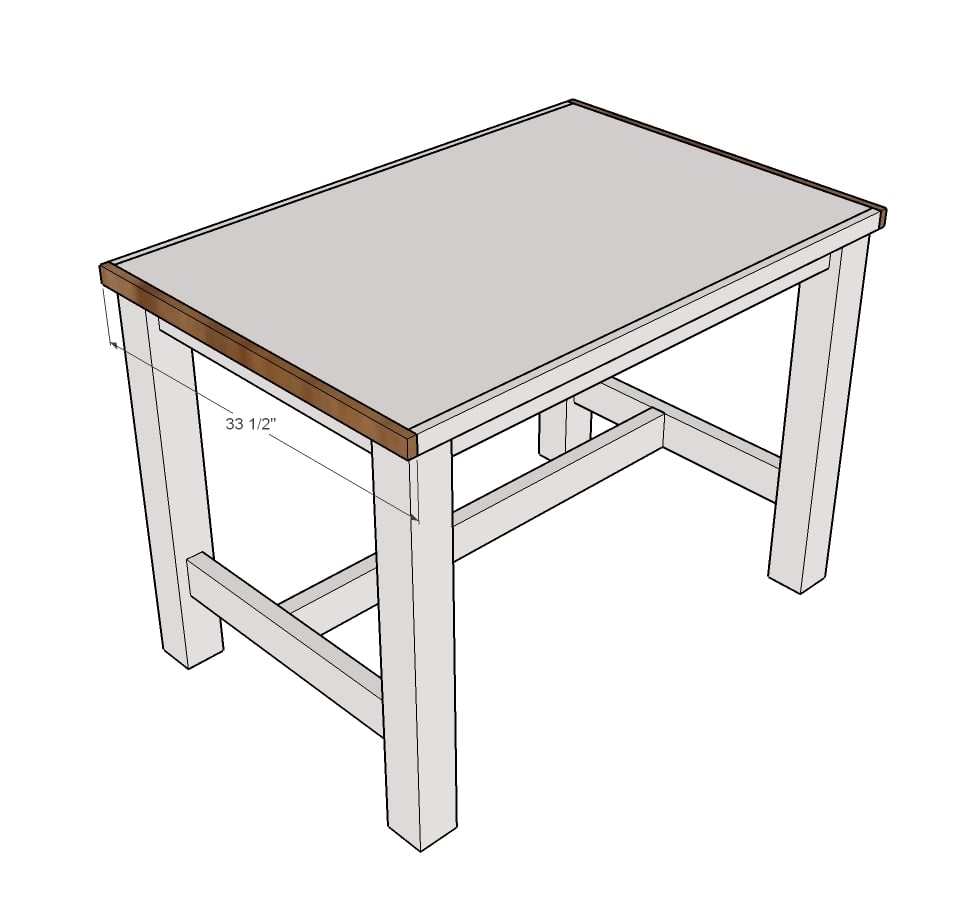
Common Materials
3 inch screws
1 1/4 inch finish nails
2 inch finish nails
120 grit sandpaper
Cut List
  • 4 - 4x4 @ 34-1/2"
  • 4 - 2x4 @ 25"
  • 2 - 2x4 @ 41"
  • 1 - 2x4 @ 43"
  • 1 - plywood panel @ 48" x 32"
  • 2 - 1x2 @ 48"
  • 2 - 1x2 @ 33-1/2" - cut these guys to fit
Tools
Tape Measure
Speed Square
Pencil
Safety Glasses
Hearing Protection
Kreg Jig
Drill
Circular Saw
Brad Nailer
Power Sander
Drill Bit Set
General Instructions


For long term durability and more professional results, I recommend using a pocket hole joinery system for wood joints.  Here is a video with tips for using a pocket hole jig:

Instructions

Step 1

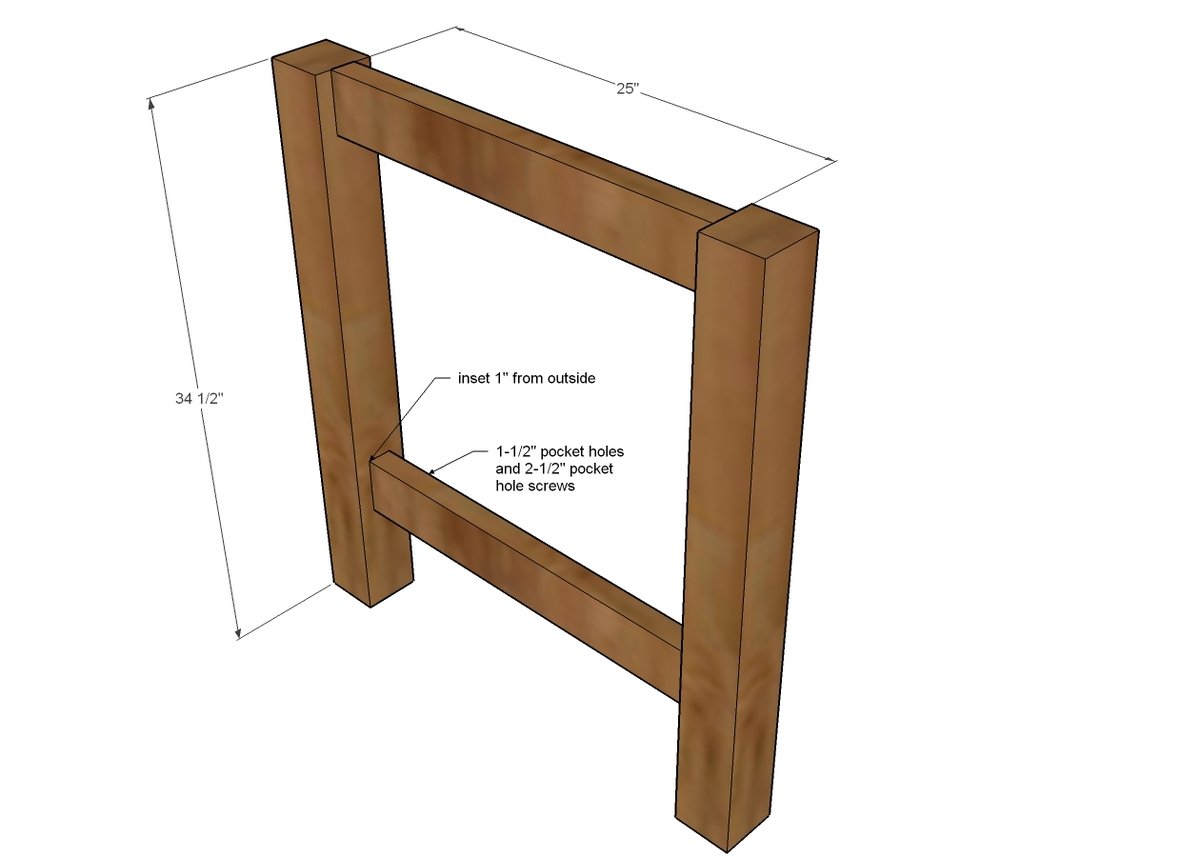
Drill two 1-1/2" pocket holes on each end of the 25" long 2x4s.

Attach to the 4x4 legs, inset 1".

I placed mine with a 6" clearance underneath the bottom 2x4.

Build two.

Step 2

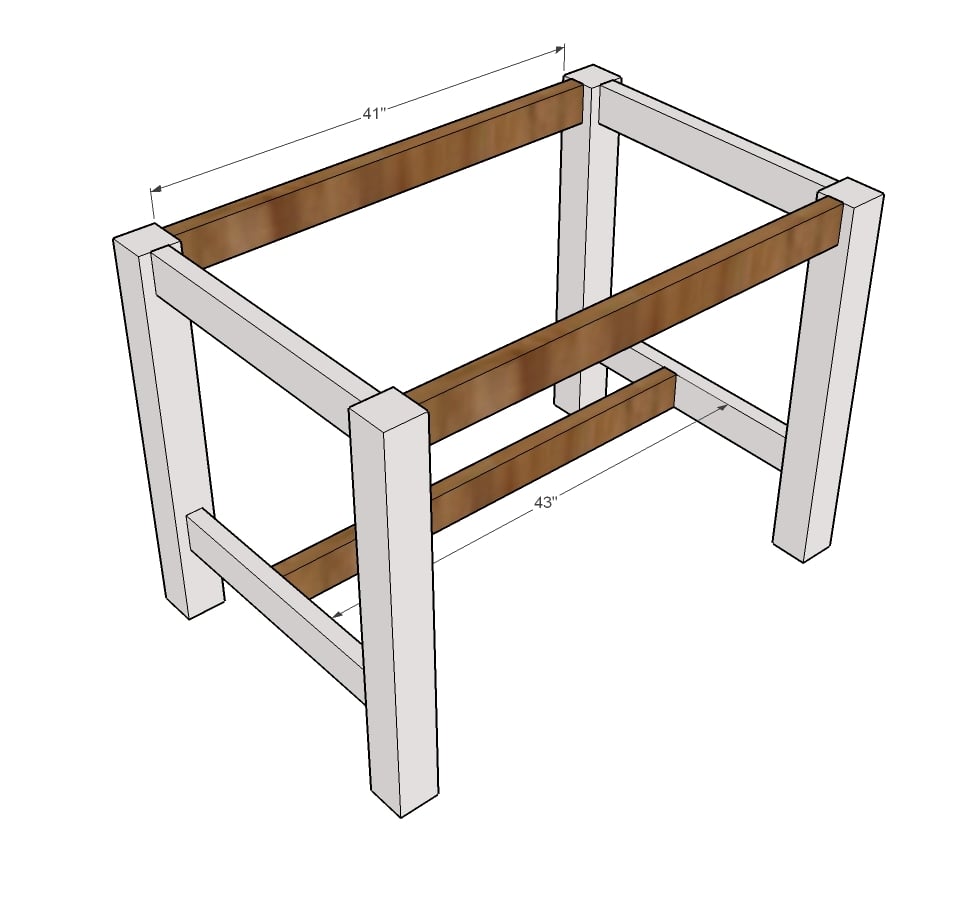
Drill two 1-1/2" pocket holes on each end of the 41" long 2x4s.  Attach at top of leg sets, inset 1".

You can repeat for middle bottom 2x4 or use 3" self tapping screws instead of pocket holes.  Center bottom stretcher.

Step 3

Apply glue to top edge and nail plywood panel to legs and aprons with 2" nails.

Step 4

Apply glue to long edges of plywood and top 3/4" of 4x4 legs.  Nail on 48" 1x2s to plywood and 4x4 leg tops.

Step 5

Measure and cut the remaining 1x2 trim pieces for the ends of the table.  Attach with 1-1/4" brad nails and glue.

Comments

Beth knigge-Johns

Wed, 02/21/2018 - 06:24

Hi Ana, I am new to this but you have inspired me. I have built a few stools that are 30 inches high.  Could I use these plans but make the legs 39.5 and put the bottom stretcher across the front.I am wanting to make it about 24" wide. I am wanting to make kinda a desk type bar for 2. I need the stools to push completely under (they don't have backs) THANKS YOUR A ROCK STAR!

Sue Hill

Sat, 03/24/2018 - 08:13

I don't see any reason why the 39 inch height would be a problem. I'm in the process of making one that's 26 x 48  (36" height) and it seems very strong, so the 24" width would work fine.  I put the bottom stretcher in the middle but it could easily have gone just on one side. I wanted to be able to put stools on both sides if I pulled it out. I'm going to post my "brag build" when I'm finished, I'm sanding & painting the base this morning.

In reply to by firejake1033

Brian Famous

Fri, 09/07/2018 - 04:50

a standard dining table height is about 30”. This table is 35.5”, which means you need your legs to be 5.5” shorter than what is shown in theses plans.  These plans have 34.5” legs, minus 5.5” means you need to cut your legs to 29” if you want to reduce the height to standard dining table height.

hillaryb

Mon, 09/09/2019 - 06:30

Would you be able to easily explain how to close in one side and add cabinets or shelving? This looks perfect for my space, but definitely also needing additional storage.

karenlouder

Wed, 09/18/2019 - 18:07

Would I. Be able to use a different top and if so what would I use as I would like it to look more like a farmhouse table

brytbraap

Mon, 03/09/2020 - 09:33

I'm having a hard time reconciling the plan size to the tables in your YouTube video. The skate shack tables look smaller than 32x48. Am I crazy? :P

Frequently Asked Questions

Wood Questions

What kind of wood should I use?
Most of our plans use standard construction lumber like pine or fir. It's affordable, easy to work with, and easy to find. It's also rapidly renewing and biodegradable, so a great eco friendly choice!

Can I use hardwoods instead?
Yes—just keep in mind they're heavier, cost more, and can be tougher on tools and harder to join together and finish. I recommend not tackling a hardwood project until after you have built several softwood projects.

What if my boards are warped?
Choose the straightest boards at the store. You can often work around slight warps by cutting them into shorter pieces.

What wood should I use for outdoor furniture?
Use red-toned or pressure-treated 2x lumber for framing, and cedar or cedar fence pickets for the decking. Outdoor furniture should be built like a deck—your local home center can help recommend the right wood for your climate.

Will my wood move or warp after I build?
Potentially, especially in humid climates. Let your wood acclimate indoors before building. Once acclimated and kept in a stable environment, movement should be minimal. Remember, most houses are built using framing lumber - it's all about keeping moisture down indoors.

Cutting Questions

Do I need a miter saw?
A miter saw is great, creating fast, safe, and precise cuts, even for beginners. But most plans can be built with a circular saw and a straight edge. If using a circular saw to cut, take time to practice, and get good at making cuts, before cutting your project boards.

How do I get clean cuts with a circular saw?
Clamp your board, measure twice, cut slow, and use a sharp blade. This takes practice, so spend some time making cuts. I go through becoming proficient at freehand cutting in my course, it is worth taking if you want to master this skill.

Will the store cut my wood?
Yes—most stores will do rough cuts to help you transport your materials home. But from store to store, the quality of cuts could greatly vary.

Joinery Questions

What screws should I use?
We recommend star-head self tapping screws for framing, most common sizes are 2-1/2", 1-3/4". Pre-drill if close to the edge or you find your wood is splitting.

Do I have to use pocket holes?
Pocket holes are the cheapest, easiest and fastest way to do some joints - like edge to edge or a hidden fastener joint. There are other methods, but these can be time consuming and expensive. We recommend using pocket holes as indicated in plans for best results.

How do I keep things square?
Use a speed square and measure diagonals after each step. Always clamp joints before screwing to keep them tight and flush.

Finishing Questions

Stain or paint before or after building?
A quick sand before and a full finish after gives the best results. Pre-finish if you're doing two-tone or detailed finishes.

What type of finish?
Use oil-based or water-based stain. For paint, cabinet-grade latex or enamel works great. High use surfaces on indoor projects should get a coat of polyurethane, I recommend a Helsman or Spar or other flexible poly that won't crack or peel with wood movement. For exterior projects, use a finish suitable for exterior fences.

How to get a smooth finish?
Start with a well sanded project. Sand between coats (220 grit), wipe clean, and apply light coats with a foam brush or roller.

Plan Questions

Can I change the size?
Many people do, and that's the great thing about building your own furniture! But do keep in mind going bigger might mean more supports are required, and often plans are optimized for minimal material waste.

Are these beginner-friendly?
Yes—plans are written with simple tools and clear steps in mind, with every effort to make plans as simple as possible.

Can I sell what I build?
Absolutely! Just don’t resell or repost the plans themselves.

General Questions

What tools do I really need?
A drill, circular saw, tape measure, square, and a few clamps will get you through most projects.

Do I need a workshop?
Nope! A driveway or small patio is plenty to get started, just make sure you have a level place to work. If you find you are building several projects a year, creating a small workbench is a great way to store tools and have a dedicated workspace.

What if I mess up?
Wood filler, sanding, or flipping boards goes a long way. Mistakes are part of the process!

What can I do to make my projects look more professional?
Start with straight boards, make accurate cuts, clamp all joints, and line up everything neatly. Sand thoroughly, use a neutral finish, and apply it in light coats for a clean look.

I've never built anything before. Where should I start?
Start with a few smaller softwood projects to get hands-on experience. Or if you're tackling a big project, buy a little extra lumber and practice your cuts and joints first. If possible, work with someone who has a bit of experience.

Care & Maintenance

How long will my furniture last?
With good joinery and regular care, your DIY furniture can last for decades. I have pieces in my own home that are over 20 years old and still going strong! One of the best parts about DIY furniture is that it’s easy to repaint, refinish, or repair—so your projects can grow and adapt with you.

How should I care for outdoor furniture?
Lightly pressure wash or hose it down once or twice a year. Tighten screws and reapply finish as needed to protect it—just like a deck or fence. A little upkeep goes a long way in extending the life of your furniture.

How about indoor furniture?
Regularly dust or wipe with a damp cloth. If it starts to look worn, a light sanding and touch-up paint or stain can refresh it in no time. DIY pieces are meant to be durable and fixable—so don’t be afraid to give them some love now and then.

Want to Build with Confidence?

Check out my ebook: 12 Skills to Build Your Own Furniture
It walks you through the core skills every builder needs—measuring, cutting, joinery, and finishing—so you can build beautiful furniture that lasts.

Still Have Questions?

Email us anytime at [email protected] and we’ll be happy to help!