
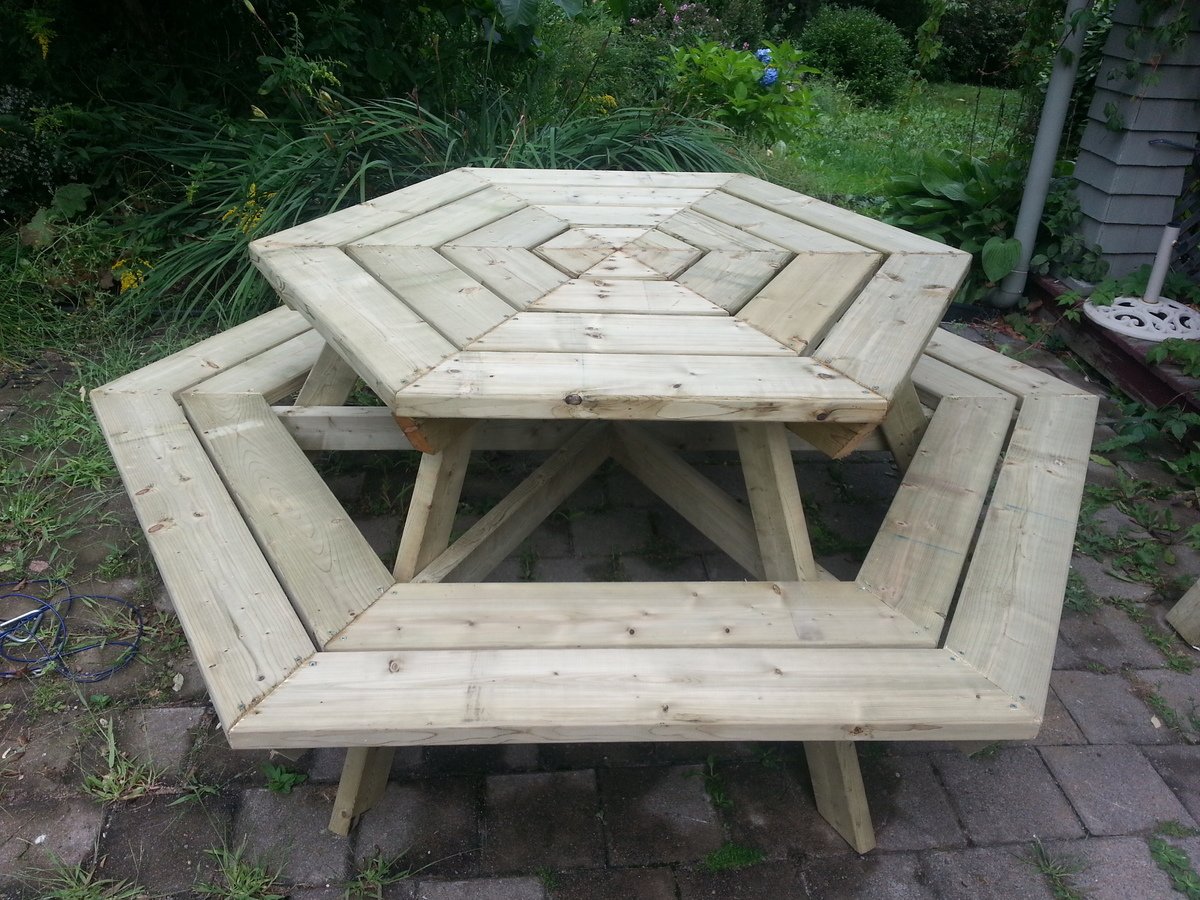

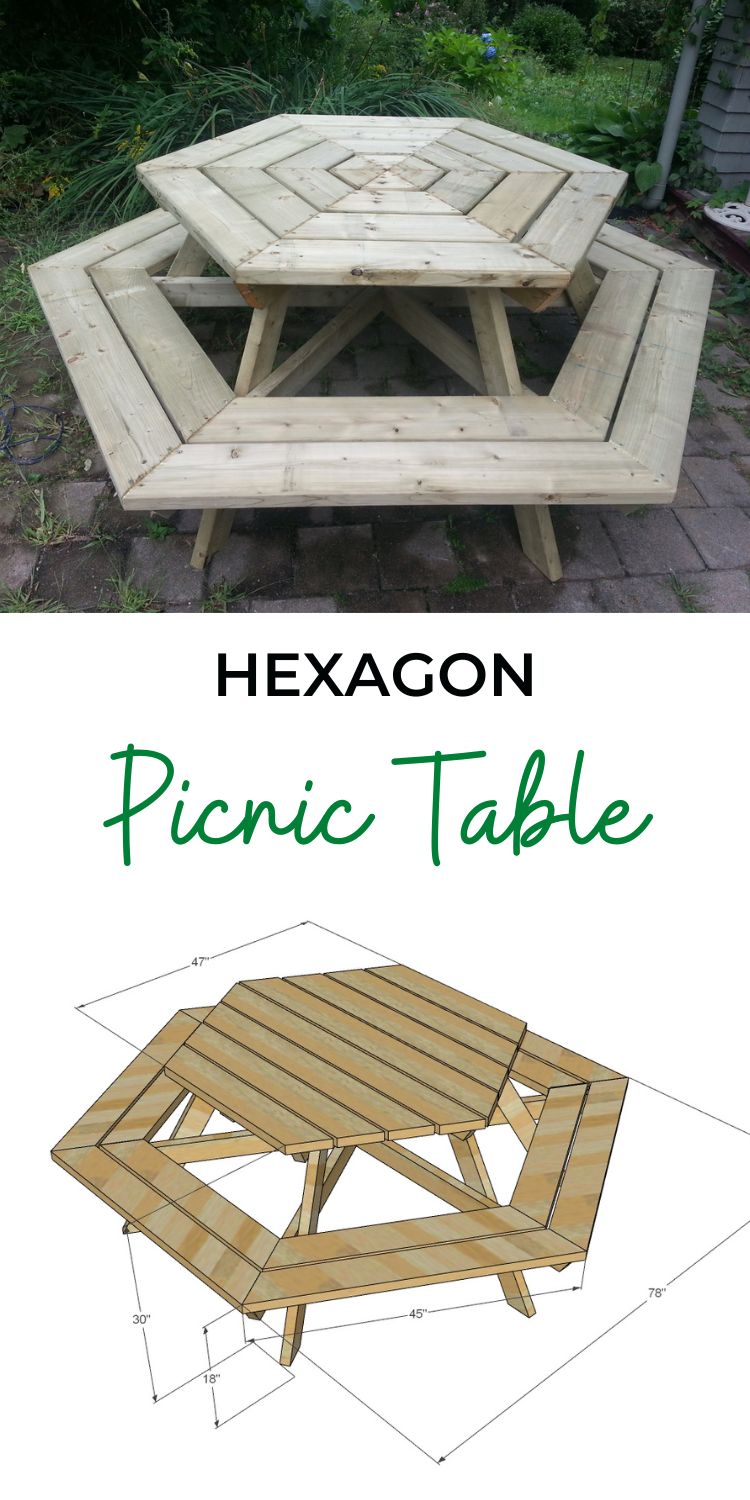
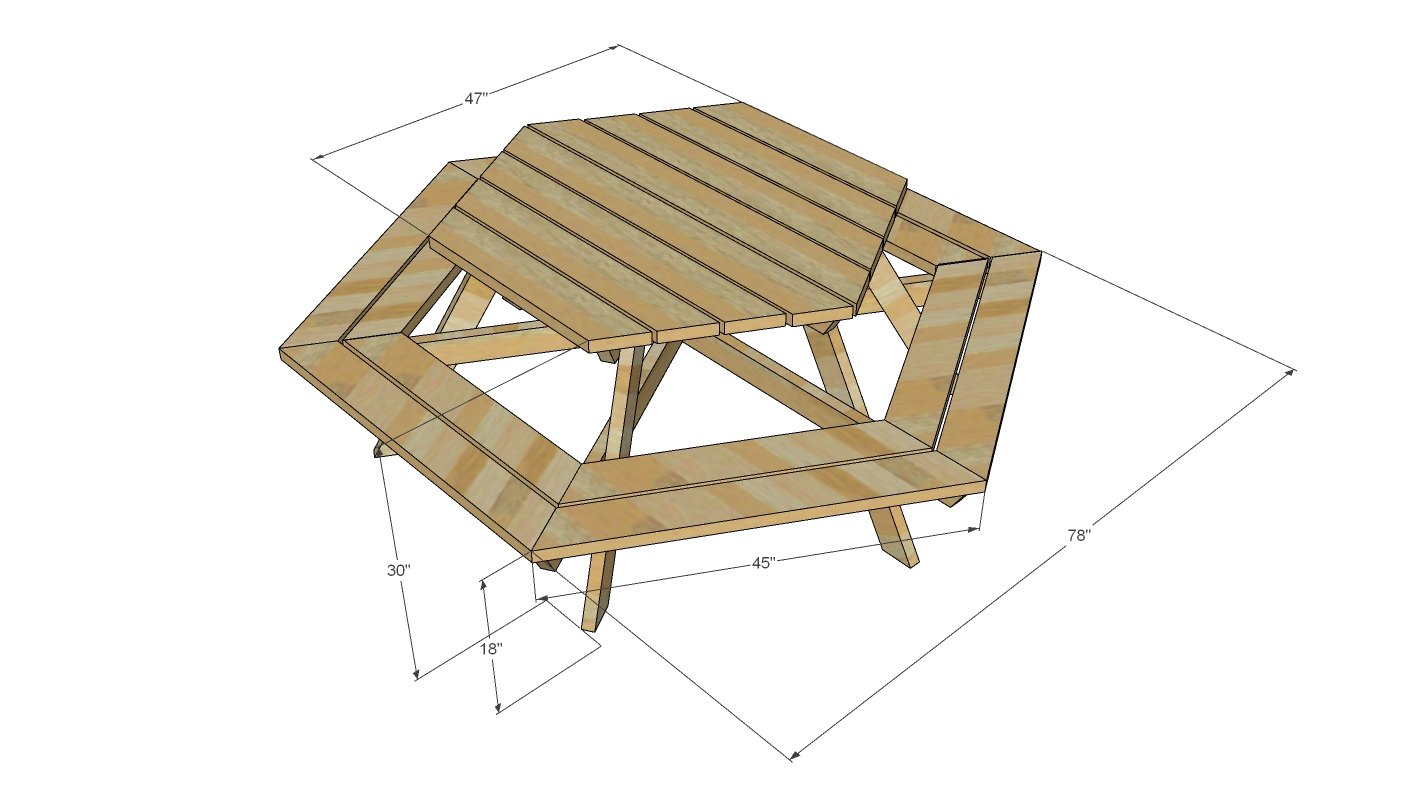
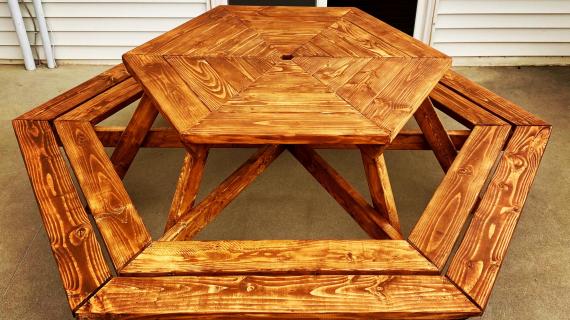
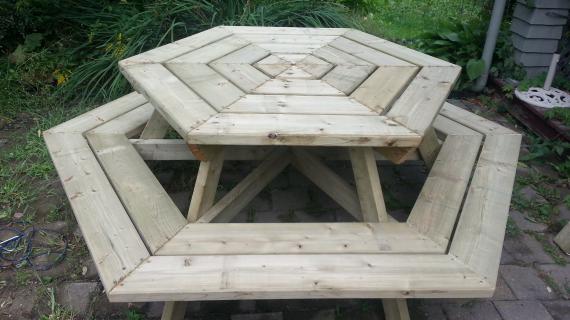
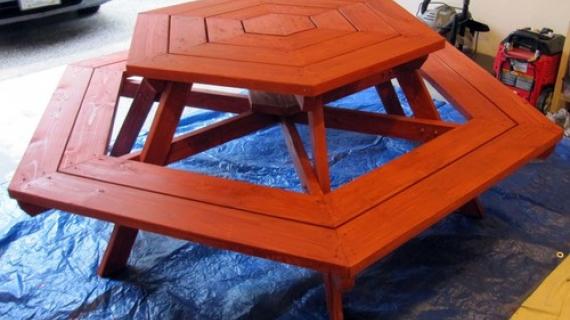
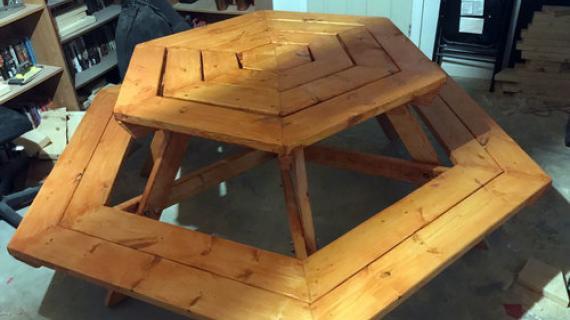
Free plans to build a hexagon shaped picnic table. Features six large bench seats and hexagon top, updating the casual classic into a more user-friendly backyard fav!
Pin For Later!

Preparation
6 - 2x4 @ 8 feet long
10 - 2x6 @ 8 feet long
150 - 2-1/2" to 3" long self tapping exterior screws, can be "deck screws" or "general construction screws"
Frame
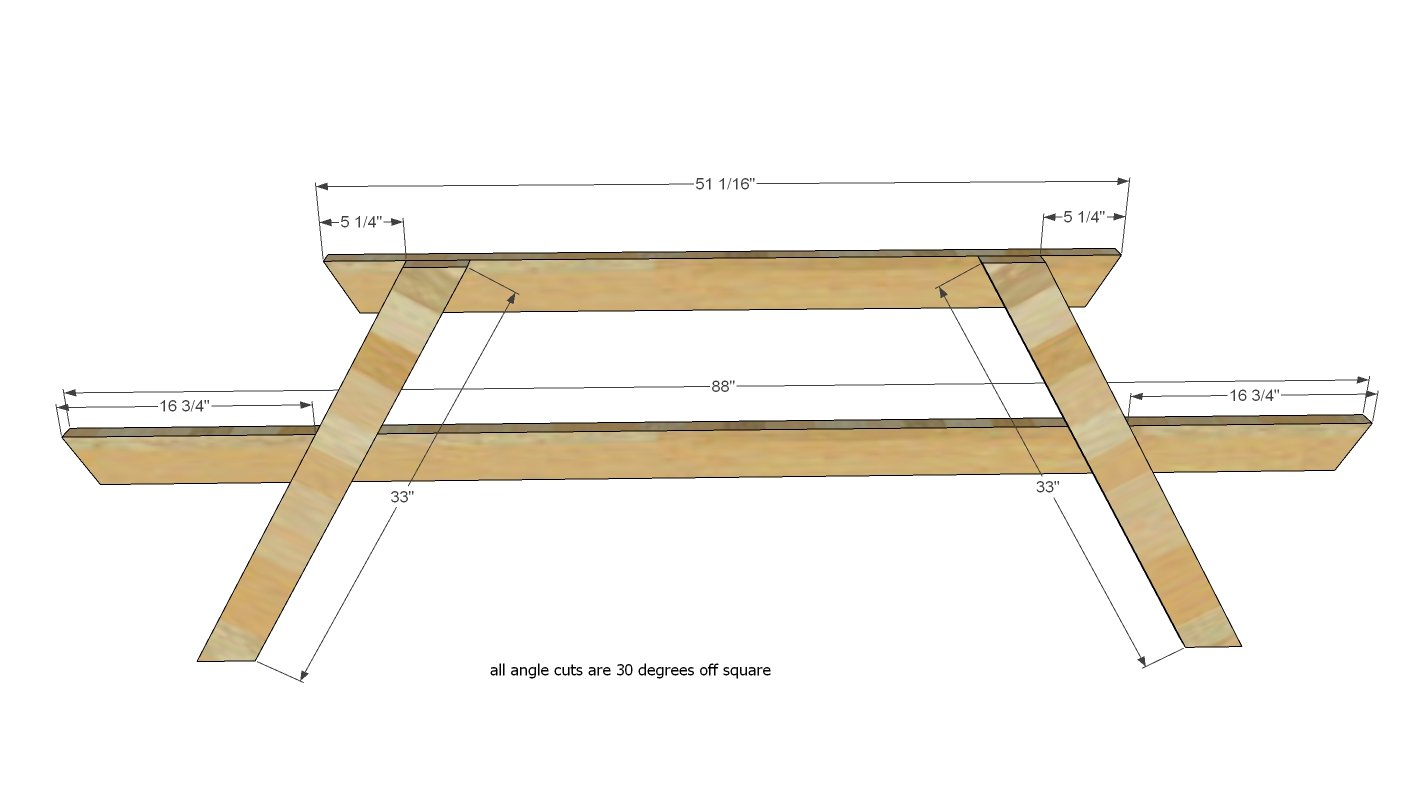
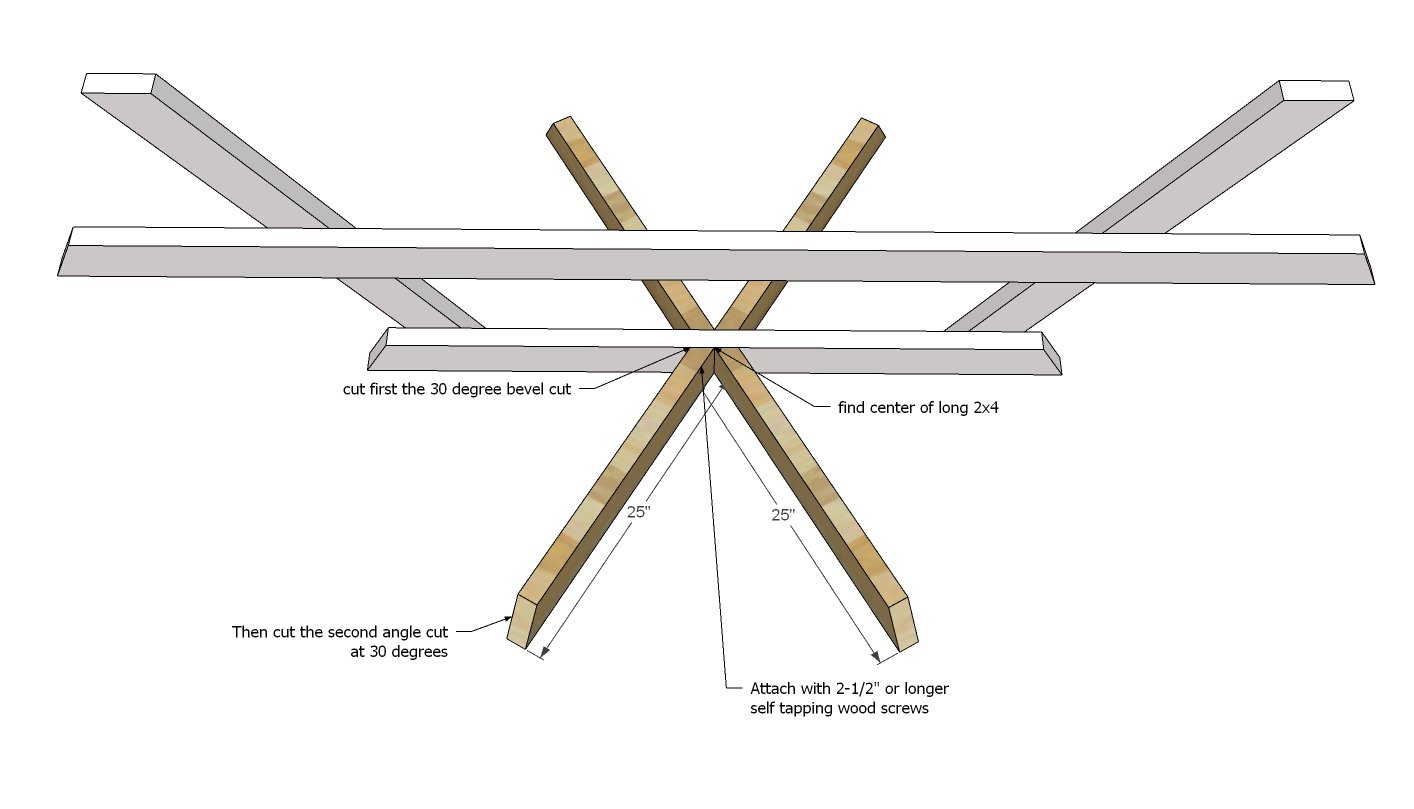
- 1 - 2x4 @ 51" - both ends cut at 30 degrees off square, ends NOT parallel, long point to long point measurement (main frame, top)
- 1 - 2x4 @ 88" - both ends cut at 30 degrees off square, ends NOT parallel, long point to long point measurement (main frame, seat)
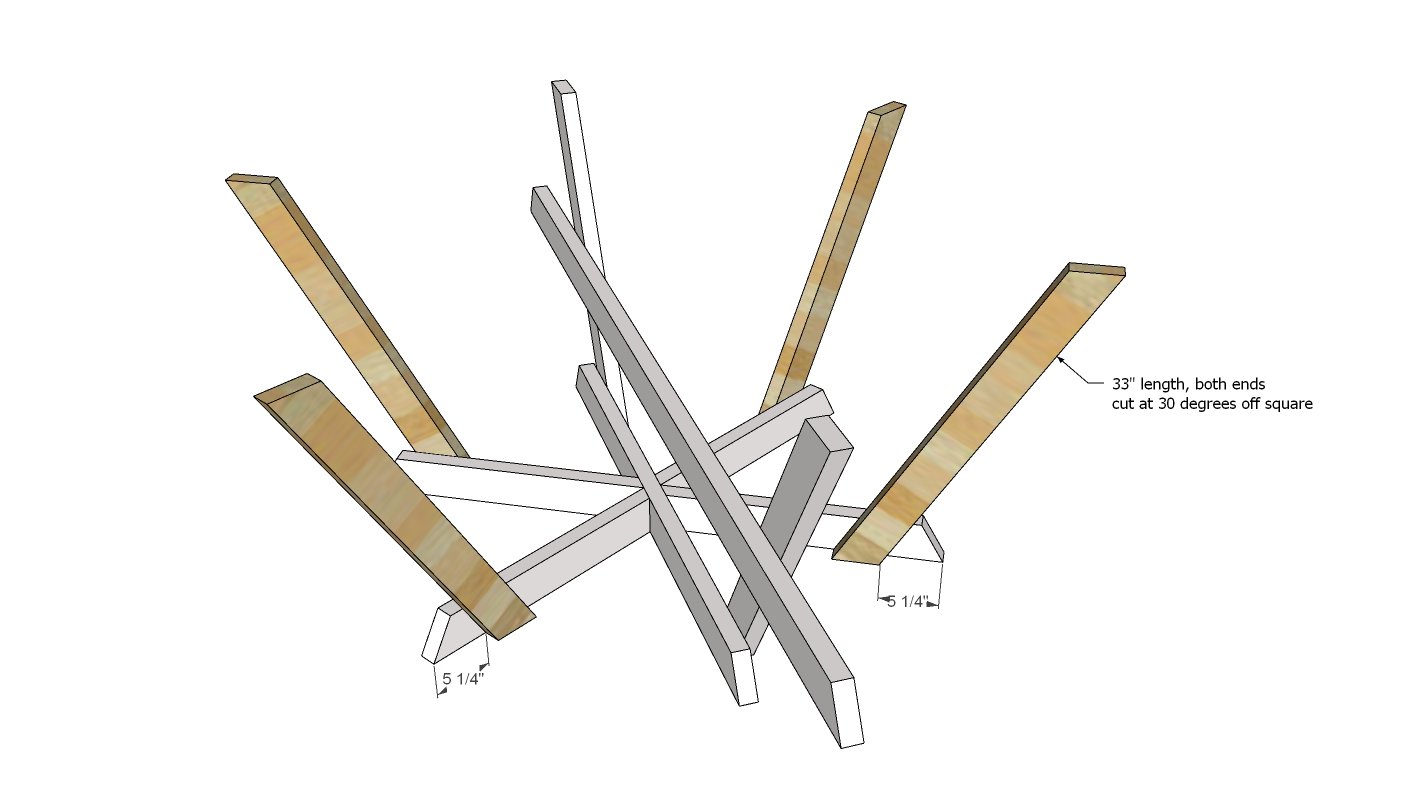
- 6 - 2x4 @ 33" - both ends cut at 30 degrees off square, end are parallel, long point to short point measurement (legs)
- 4 - 2x4 @ 25" - one end cut at 30 degree BEVEL, long point measurement (top frame secondary supports)
- 4 - 2x4 @ 43-3/8" - one end cut at 30 degree BEVEL, long point measurement (seat frame secondary supports)
Seat Boards
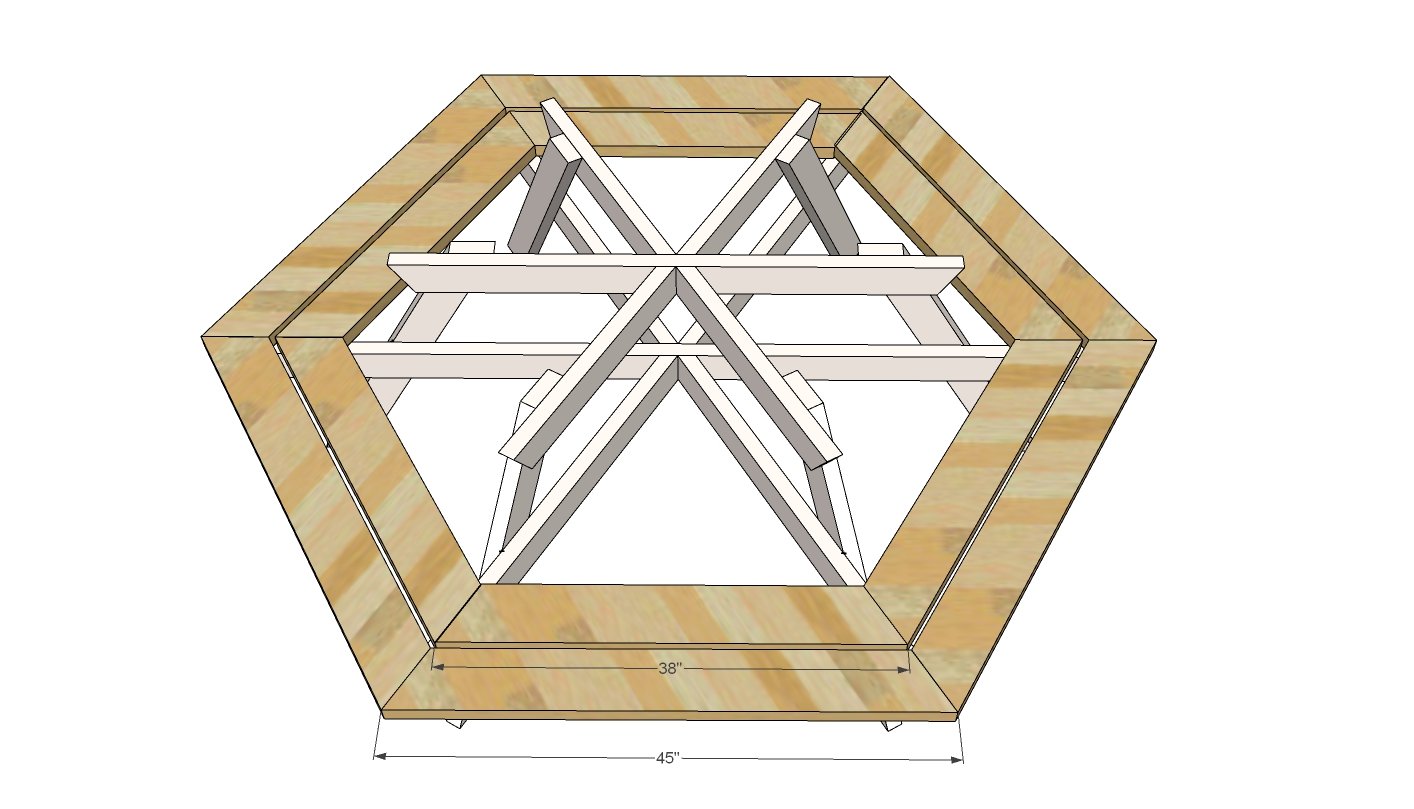
- 6 - 2x6 @ 45" - both ends cut at 30 degrees off square, ends NOT parallel, long point to long point measurement (seat boards)
- 6 - 2x6 @ 38" - both ends cut at 30 degrees off square, ends NOT parallel, long point to long point measurement (seat boards)
Tabletop
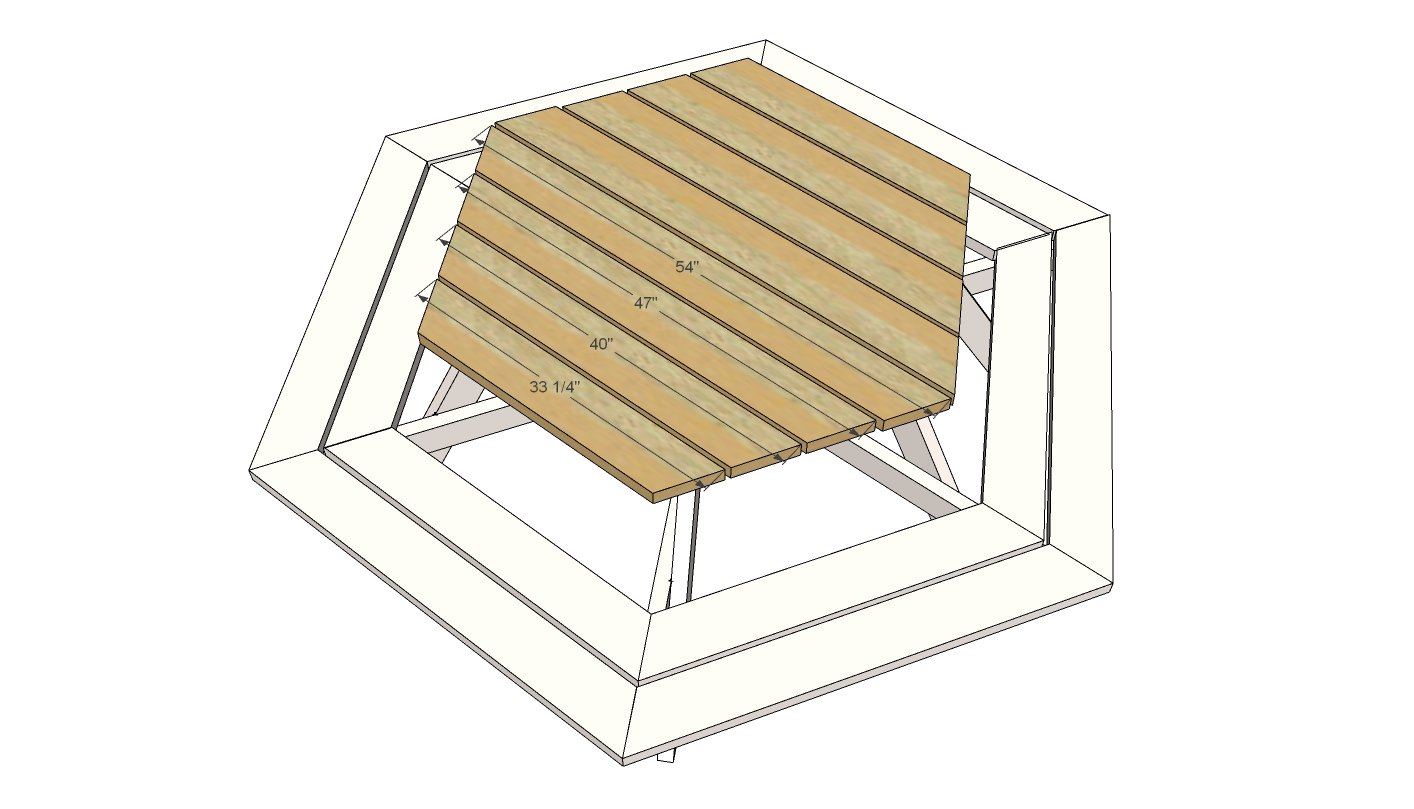
- 2 - 2x6 @ 54" - both ends cut at 30 degrees off square, ends NOT parallel, long point to long point measurement (tabletop)
- 2 - 2x6 @ 47" - both ends cut at 30 degrees off square, ends NOT parallel, long point to long point measurement (tabletop)
- 2 - 2x6 @ 40" - both ends cut at 30 degrees off square, ends NOT parallel, long point to long point measurement (tabletop)
- 2 - 2x6 @ 33-1/4" - both ends cut at 30 degrees off square, ends NOT parallel, long point to long point measurement (tabletop)
Cut the longer boards first to conserve wood


Instructions
Step 1
On a flat level surface, carefully layout the first section of the picnic table. It can help to have two people at this stage.
Attach at all joints with three 2-1/2" self tapping wood screws.
Step 2
First, cut the table supports according to the cut list. Then, keeping the same overall length, cut the outside end back at a 30 degree angle.
Attach centered on the main frame with the 2-1/2" screws, two screws per joint.
Step 3
Attach remaining legs with 2-1/2" self tapping wood screws, three screws per joint.
Step 4
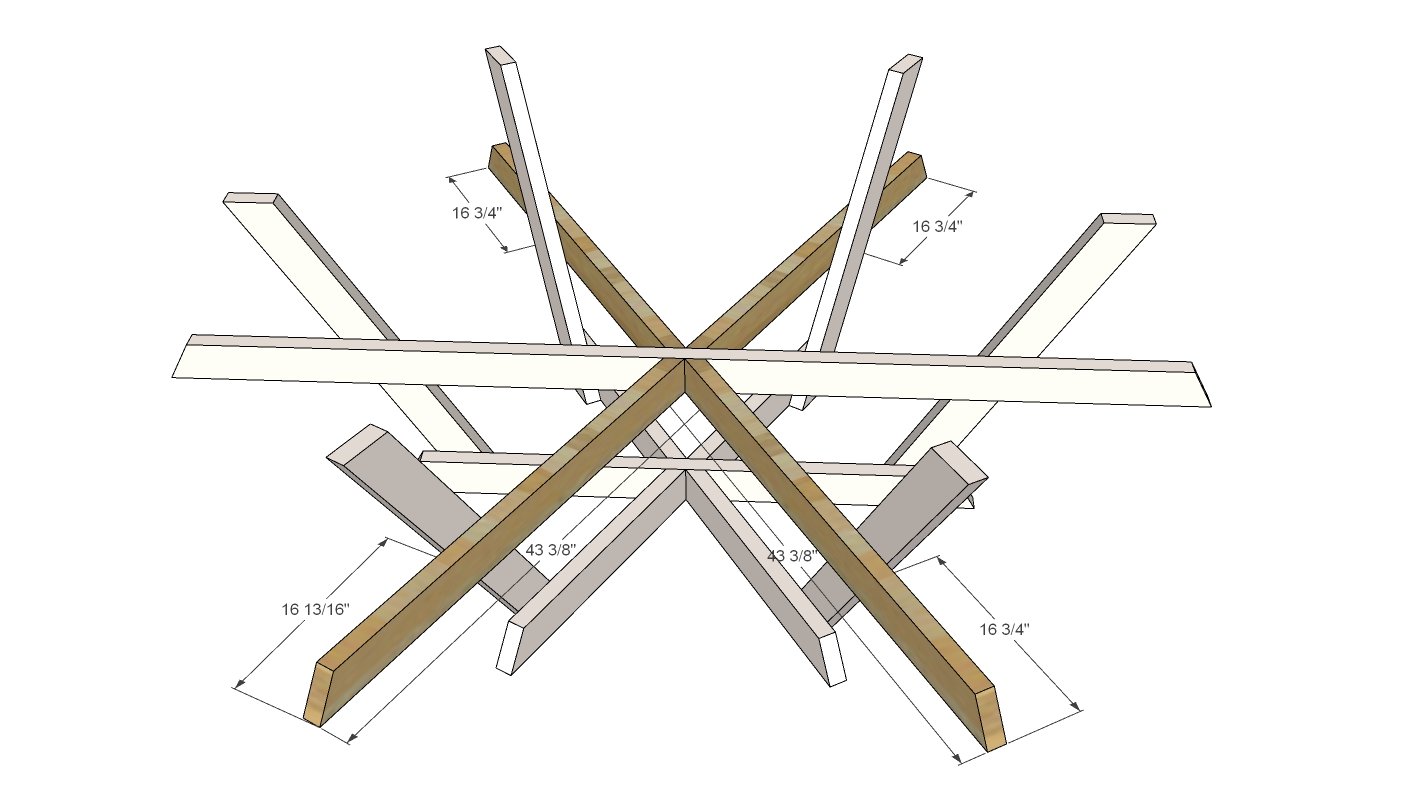
Cut the seat frame board ends as directed in the cut list. Then, keeping the same overall length, cut the outside end back at a 30 degree off square angle.
Attach to the center of the main frame and to the legs.
TIP: Cut a 2x4 13" long and use it as a spacer to hold up your board while attaching to maintain the correct distance.
Step 5
Flip the project over.
Cut seat boards and lay outside seat boards in place. Make sure all the angles line up with the seat boards joining in the middle of the frame boards.
Attach with two screws per joint.
Step 6
Attach the tabletop boards on top, starting at the center and working outward, with a 1/2" gap in between.
It is always recommended to apply a test coat on a hidden area or scrap piece to ensure color evenness and adhesion. Use primer or wood conditioner as needed.

Comments
Ana White
Mon, 03/14/2011 - 00:29
Octagon Table
Also put together the plans for the eight sides, 8 foot wide table, if anyone is interested, give a holler and I'll put the plans together for you.
Guest (not verified)
Mon, 03/14/2011 - 15:19
WOULD LOVE THE OCTAGONAL PLANS TOO!
Hi Ana - Love your plans and really digging the new site! :) I would love your plans for the 8-ft octagonal table as we have quite a large family and really need a bigger table. Thanks. Ashley - TX
Ranee @ Arabia… (not verified)
Mon, 03/14/2011 - 16:49
Larger Octagon Table
We are so interested in that! We will be doing a campout in our yard with our (and some friends) homeschooled children this summer and this would be a great project for them to help with and use.
Guest (not verified)
Tue, 07/26/2011 - 09:34
Octogon Table
We would also love the plans for the octagon, but would like to build it around a tree. Do you have plans for that? Thank you so much. Cheryl
Mrs. Brimmer
Sun, 09/28/2014 - 21:57
Smaller dimensions
Ana,
I am a preschool teacher and I would love to have either a hexagonal or octagonal (or both) shaped picnic table in my classrooms garden area. Can you send plans for both tables? The ages of the children are 3-6. I loved the plans that I saw on your website for the adult sized table and saw where many others asked about plans for a child sized version. I can't wait to see the child-sized plans. Would it be possible to have a hole in the center for an umbrella?"
Thanx Debra Brimmer
(An excited Montessori teacher in San Antonio, Texas)
benoitleblanc73
Fri, 05/01/2020 - 04:58
Octagon Picnic Table Plan please...
Dear Ana,
thank you so much for your beautiful website and clear plans...
Could you please send me the plans for the eight sides, 8 foot wide Octagon Table? I would like to make this table soon...
thank you very much!
Benoit Leblanc: [email protected]
michelle.gonzalez
Fri, 06/12/2020 - 08:22
We have a large family and…
We have a large family and would love the 8' plans. Is there a children's table anywhere? With 13 grandchildren, it would be nice to have a matching table. :)
Guest (not verified)
Mon, 03/14/2011 - 01:11
Octagonal Table
I would like the plans to the octagonal table... Thank you.
Guest (not verified)
Mon, 03/14/2011 - 05:15
Perfect!
I cannot wait to put this together this summer! It will be perfect for our huge barbecues and bonfires we do in the summer and fall.
whitney_smith
Mon, 03/14/2011 - 05:34
Love this!
I really like this. I would really like to be able to have an umbrella hole in the center. If I framed for that in the center, would it still be sturdy enough? Hmm.. Something to think about.
In reply to Love this! by whitney_smith
Ana White
Mon, 03/14/2011 - 10:33
Yes!
Whitney, I also considered this when I was designing this plan. If you think about it, when you sit on the bench, it actually will cause the center supports to push UP and not sag down. And your weight is directly on the legs, not on the supports. So if you were to make all of the supports the same as the smaller supports (for each the top and bottom), this would leave a hole in the center. You would need to provide adequate joining of all the boards as well, with either a brace, a plywood gusset on the top and bottom, or metal brackets.
cakelady
Mon, 03/14/2011 - 05:47
Hexagonal Picnic Table
I like the idea but would prefer separate benches. Would that effect the sturdyness and could the legs be done so they don't stick out to trip someone with detached benches?
Sarah (not verified)
Mon, 03/14/2011 - 07:13
Love it!
Love the picnic table.. just had me thinking.. I want to build some benches for our fire pit!! :)
Kim (not verified)
Mon, 03/14/2011 - 07:31
Love it, but what are the dimensions?
I think I'm going to attempt this after we move, but is this big enough for adults? or is it more kid sized? -Kim
In reply to Love it, but what are the dimensions? by Kim (not verified)
Ana White
Mon, 03/14/2011 - 11:12
Adult Size
Kim this is an adult sized table, but what a fab idea - to do a kid sized one!
Kim (not verified)
Mon, 03/14/2011 - 14:52
kid sized
This is what I had for the kids, but something bigger for the between years would be great. http://www.google.com/products/catalog?hl=en&ds=pr&sugexp=gsisc&pq=play…
Lynn (not verified)
Mon, 03/14/2011 - 07:48
Picnic Table
I am so happy to see this. My only concern is that the new images are hard to read for the measurements. May be different if printed out, but I love the new site!
Lynn (not verified)
Mon, 03/14/2011 - 07:50
I just checked in the printer
I just checked in the printer friendly version and the numbers are clear as day! Awesome!
EmandLesTX
Mon, 03/14/2011 - 08:03
Drawing plans?!
I looove this table... and I'm curious....Is there a special program you use to draw out the plans? I love avery's house and since we have a herd (4 dogs and 3 cats) I have dreamed every night for a week on how to turn it into a five cubbie(crate) bench) with a hinged top for easy access to feed/water and on one end the cat box. (with a hidden flap to keep the dogs OUT but let the dogs in :-)
In reply to Drawing plans?! by EmandLesTX
Ana White
Mon, 03/14/2011 - 11:14
Google Sketchup
Hi, I use Google Sketchup. It's free, and I actually have a tutorial on the old site that should be moved over very soon. I encourage you to give it a go, it's easy to use, and it's always better to build for your specific needs!
James Reeves (not verified)
Mon, 03/14/2011 - 08:25
Ana, l as well would like plans for the 8 ft Octagon table cool
Ana, once again you are awesome in your excellent designing.
I have wanted a table like this for years and years but not in my limited budget and feared trying to make it is awesome.
I want to make this table, but also want to make the 8 ft Octagon table please send me detailed plans thanks so much.
Ana, l need to know is it better to use a wood conditioner or a primer and 1 or more coats of conditioner if this is better?
Thanks so much Ana
James, Ontario, Canada
Jason (not verified)
Mon, 03/14/2011 - 10:12
James, Wood Conditioner and
James,
Wood Conditioner and Primer are used for different things and one isn't better than the other.
Wood Conditioner: used when applying stain to raw wood (usually soft wood - pine, spruce, etc, but can also be used on hard woods (oak, etc). The purpose of the wood conditioner is to penetrate the pores of the wood and establish a barrier to limit how deep the stain (which is applied after the wood conditioner (follow instructions on the conditioner can) can penetrate. The problem with soft woods is that the pore structure of the wood varies greatly and applying stain without the conditioner results in what is often a blotchy appearance. The number of coats isn't important as the second coat won't accomplish much - it is more important to follow the instructions on the can for how soon after applying the conditioner should the stain be applied. That is where the 'second coat' may come in to play if you can't get the stain applied quick enough to all surfaces.
Primer: used when applying paint to raw wood (soft or hard does not come into play here). This is often a white colored special paint that also seals the wood, bit also forms a secure bonding surface for the paint top coat (finish colour). There are 2 typical types (latex (water based) and alkyd (oil based) and the benefits and drawbacks of each is better left for a google search if you want more info. They both do basically the same thing.
Susan (not verified)
Mon, 03/14/2011 - 14:14
Table
Love this, Ana...great for summertime!
deanna_g
Mon, 03/14/2011 - 14:39
I need a big one AND a little one!
I definitely want to see this in a children's size, as well! I'll porbably end up building a couple of the big ones and at least one small one. We live on a farm and have several BIG cookouts/bonfires/hayrides through the year and these would serve us so much better than card tables! I've always wanted one but don't want to shell out the $400+ for one! Thank you! Muah!
Michelle (not verified)
Mon, 03/14/2011 - 18:52
LOVE IT! 8 foot plans would be GREAT!
My in-laws have a table like this that they bought YEARS ago...and we are always using it--especially with all the grandkids!--when we do cookouts or play time at grandma and grandpa's! I have always dreamed of having one but knew that they were too expensive! THANK YOU for sharing these plans! An 8 foot table plan would be WONDERFUL!
Guest (not verified)
Mon, 03/14/2011 - 20:23
Hexagon dream
I have had a dream for a couple of months now! I would love to build a raised playhouse similar to your rectangular one, but a hexagon with a deck area all around. Something that could be built around a tree trunk or free standing. Then a small version of this table could be put underneath as a shaded picnic area.
I have 4 kids, two boys 8 & 10 and two girls 3 & 6. I would love something more unisex and jungle inspired to accomodate all of them. I picture planting climbing vines up the supports and over the top! What adventures we could have!
However, I have no experience drawing plans, estimating costs, etc. I realize this is probably an even bigger undertaking than I imagine, but, if you ever felt inspired to take on some plans like this, I would be so thrilled.
silverfam
Fri, 03/18/2011 - 19:49
PERFECT!
With a family of six and extras EVERYDAY we will need the octagon one. And a kids one would be great
Eric (not verified)
Fri, 03/18/2011 - 21:18
Love It
This is exactly what I've been looking for and I can build it for much less than purchasing it somewhere. Simple plans and simple tools with a little time, effort and patience and viola!!! Can't wait buy the material and get started! Thank you so much for having the site available.
Guest (not verified)
Thu, 04/21/2011 - 08:37
Would like larger plans.
Hi, love the design. Could I get the larger plans from you? Looking at building in the next couple of weeks.
Thanks
Alex
constantia
Thu, 04/28/2011 - 13:44
Kid Size
I know this comment has been made but I was hoping there is an update. Can this be converted to a smaller kid size version? I am designing my backyard to have a designated area for my 3 year old and I would love this to go along with the sandbox also featured on this website.
Bron05
Wed, 06/29/2011 - 06:48
Treated or untreated
I am wondering if using treated wood would make any difference. I will be leaving this table exposed to the elements all year long and I get alot of tree limbs and random debris during storms. I know it won't be "pretty" but practical is my goal. Any reason I should not use treated?
Millie (not verified)
Wed, 04/18/2012 - 17:31
Octagon, please
My son needs plans for this for his Eagle project. Thanks so much!
Millie
Millie (not verified)
Wed, 04/18/2012 - 17:34
Octagon, please
My son would like to do the octagonal one as part of his Eagle project.
Thanks so much!
Millie
Kenneth (not verified)
Wed, 05/30/2012 - 21:54
use treated lumber
Bron5 Treated lumber is an excellent choice for this table for finishing and maintance go to sites that tell you how to protect a deck
You can pretty much cover it in the winter it should last you for years with proper maintance
Yassmin (not verified)
Wed, 08/29/2012 - 02:32
Hey, great plans, but do you
Hey, great plans, but do you have an estimate of how much this may cost? Thank you!
JessicaR
Wed, 08/29/2012 - 09:09
If you have a Lowes or Home
If you have a Lowes or Home Depot in your area, go to their website, pick your local store and they should have the prices for what you need. You could also call your local hardware or lumber store and ask for a price quote.
ruppertj8
Wed, 04/03/2013 - 11:24
leg dimensions and umbrella modification
I love the design and directions are fairly easy to follow.
I would suggest increasing the distance between the seat and top a 3-4 inches. Also, the leg dimensions need to be increased a bit (or at least have a better description) as the 33 inches should probably be 35-36 inches as the over-all length (33 would be the length if it was a 90 degree cut.
I cut a 6x6 into a hexagon and mounted the six support boards to it. Then I cut a 1.5" hole in the center so I could mount a umbrella in the middle.
Derek
Wed, 06/12/2013 - 13:31
Hexagon Picnic Table
Hi Anna
I am going to try and build this but the link to the pdf plans does not work.
Could you let me know when it is fixed please?
Thanks
Phil O'Connell…
Wed, 07/10/2013 - 17:59
Missing pdf file
The pdf links for this hexagon table seems to be broken still - any chance of a fix in the near future?
Gkeniston
Wed, 08/21/2013 - 13:17
Modified design
Ana,
I build the hexagon table, but I replaced all of the legs and seat supports with 2x6 lumber instead of the suggested 2x4. Much stronger with no flex. It doesn't add that much more to the overall weight or cost either. I also modified the design to accept an umbrella. Thanks for posting your plan so clearly labeled. It really made modifying it to meet my need simple.
--Garrett
lollie n jadey babes
Sun, 10/06/2013 - 03:18
send me plans please :)
send me plans please :)
alafave
Thu, 01/23/2014 - 13:21
Picnic Table
Trying to download the PDF for the hexagon picnic table and I get an error. Any help?
Migeravt71
Mon, 04/27/2015 - 08:48
Finished size?
Just wondering if anyone could tell me the finished size across. The Octagon one I know is 8', but this set of plans seems to be missing that info, unless I have just missed it?
Familytreeclimber
Wed, 07/01/2015 - 13:29
PDF won't download
I've tried several times to download the PDF version of these plans, but keep getting an error message. I've downloaded a couple other plans the same way without any problems!
In reply to PDF won't download by Familytreeclimber
Ana White
Thu, 07/02/2015 - 13:00
Here's the printer friendly
Here's the printer friendly version for now.
http://ana-white.com/print/646
Thanks for your patience with the site!
tino yanez
Sat, 03/03/2018 - 08:24
Your projects are very nice
Your projects are very nice
jw2433
Thu, 05/28/2020 - 15:37
Some thoughts after making the table.
I did the simpler top version and I'm pretty satisfied. I made two alterations though..I paired the two long middle pieces together while gapping the others. It definitely gives it a symmetrical look. I also took 2x2's and gave with non-parrallel 30 degree cuts and put them all around the outer edge between the supports at 2" deep. This really gave a finished look and provided extra support for the longer boards. I fid the 1/2" gap but if I did it again I'd probably do a 1/4" gap.
I also added supports around the center in between the frame at 7" out from the center with non-parallel 30 degree bevel cuts on the ends.
I took some more 2x2 and made 12 - 10" supports with 30 degree non-parallel cuts to go under the seats at the outer edge where i attached them parallel to the frame.
I also suggest possibly doing 1 double bevel cut on the seat and tabletop supports for each side so that everything aligns symmetrically.
mondrin
Mon, 06/08/2020 - 12:10
weight of table?
does anyone know about how much the finished table weighs? Is like to make this table for my back yard but would have to move it on its side (through gate) once competed