
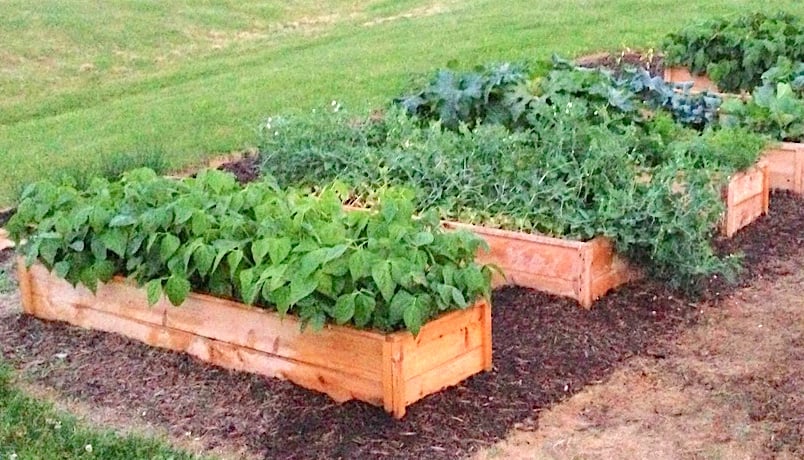

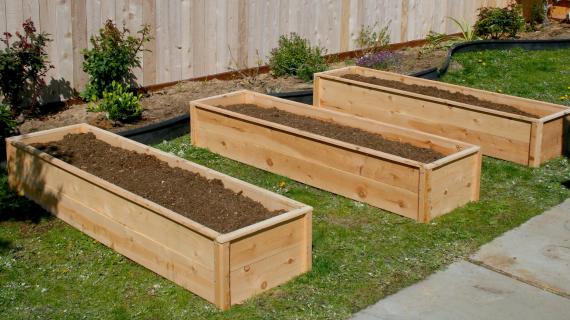
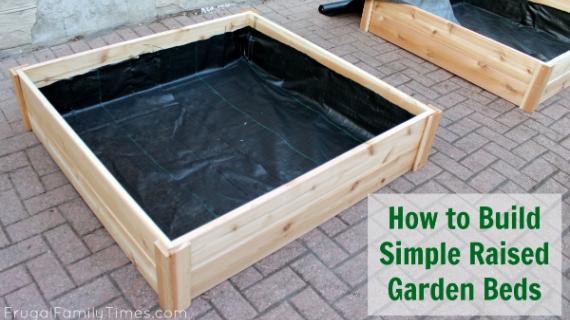
Easy and inexpensive DIY cedar rasied garden beds with free plans by Ana-White.com! Uses cedar fence pickets to keep costs low and basic tools. Beginner friendly.
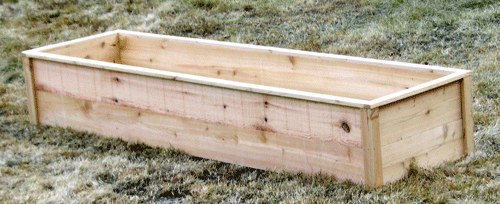
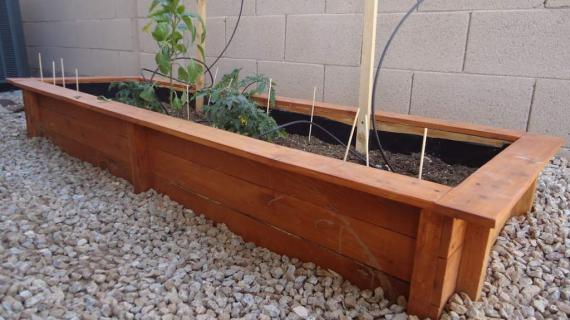
This plan is for a 6 foot long by 1-1/2 foot wide garden bed, suitable for a single row of plants. You can find the double width plans here.
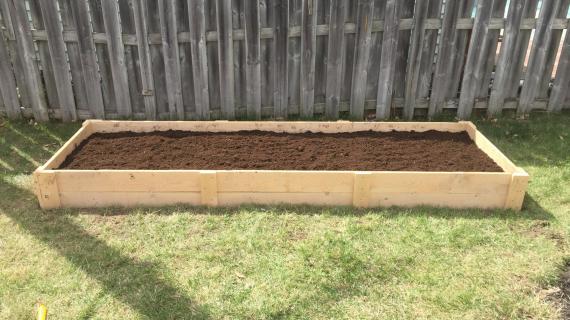
Photo by JESSICA9777
Why Raised Garden Boxes?
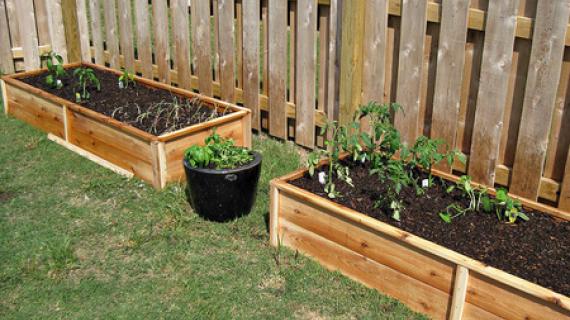
We love raised garden boxes because it's less to weed, brings your working height upward, and uses less soil. It's also great for soil drainage, preventing soil compaction, and keeping unwanted pests out.
We love that raised beds warm up earlier in the spring (so you can plant earlier).
How Much Do Raised Garden Beds Cost?
The downside of raised garden beds is they can be expensive - in the hundreds of dollars depending on the size. Multiply that by an entire garden worth of raised beds and the cost just becomes prohibitive.
The Secret: Use Cedar Fence Pickets
For a planter, you want to use natural wood because treated lumber releases odors and chemical that you don't want mixed in with your food. And cedar naturally resists rot and insects, so a great choice for planters. But standard cedar boards can be expensive.
Cedar fence pickets are made of real cedar and are designed to last and last in the exterior elements. They cost less than $2 for a 1x6 board, 6 feet long - just a fraction of the cost of a standard cedar board.
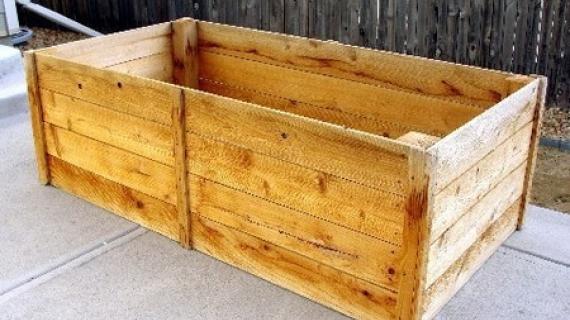
I used six boards to build this cedar raised bed, and spent righyt at 10 dollars in lumber (the screws will add a little to the cost)
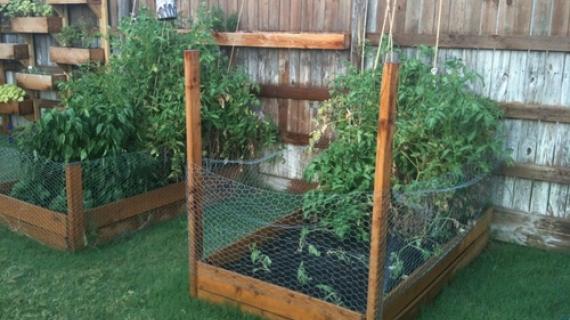
This exact cedar planter has lasted over ten years without any issues. We have been very happy with this project and are planning on building more for our garden at our new house.
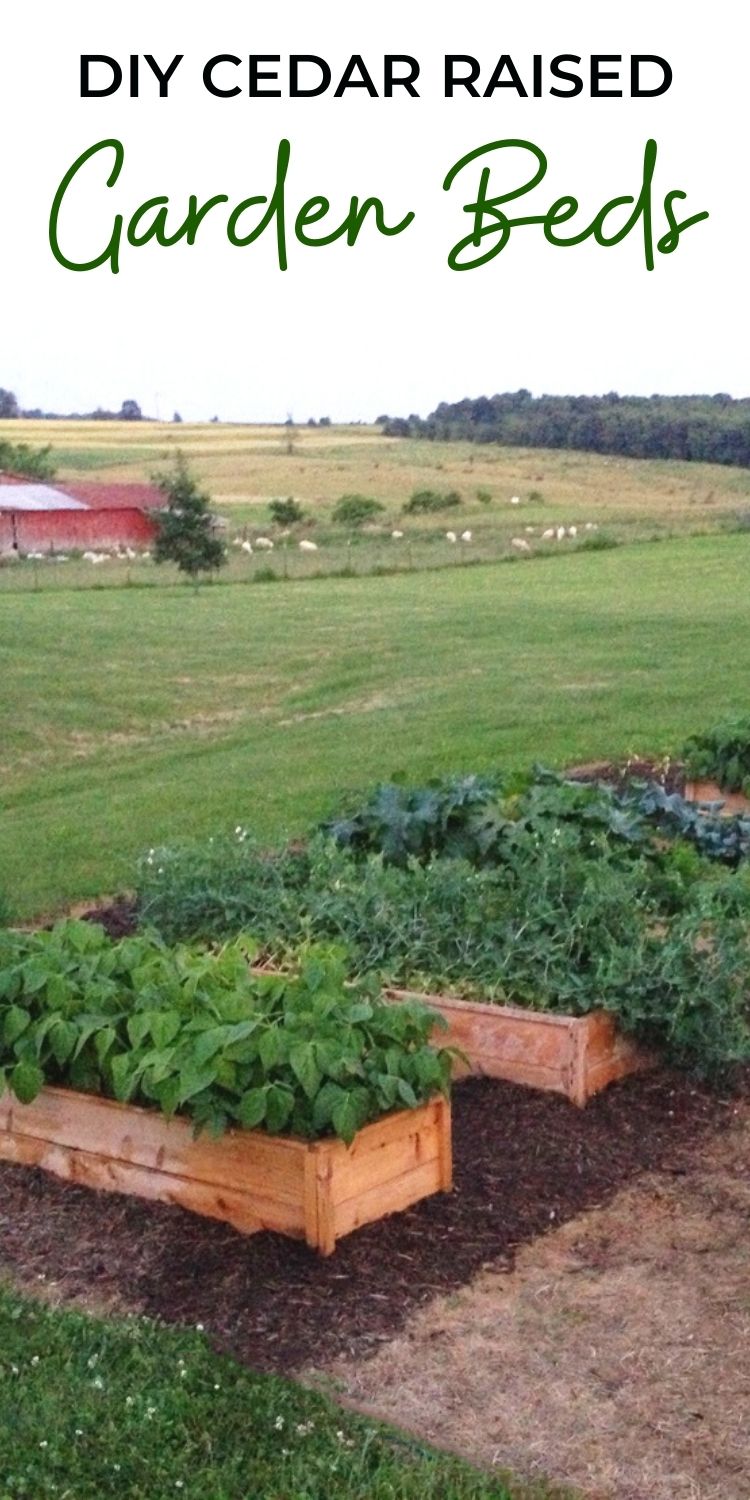
Pin For Later!
Preparation
6 Cedar Fence Pickets
1x2 Cedar boards for corners (if you don't have a tablesaw)
1″ Screws
2″ Screws
Wood Glue
Finishing Supplies
Garden stakes or concrete stakes (we used a couple of stakes on each bed just to keep the bottoms in place)
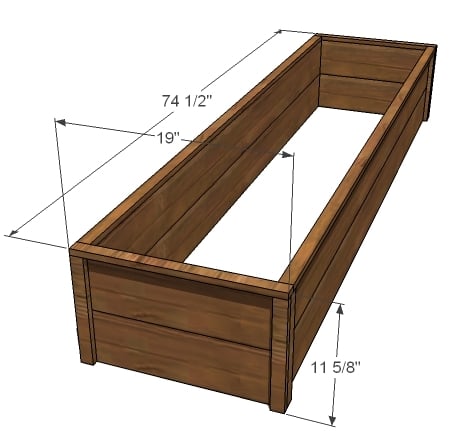
4 – 1×6 Fence Pickets @ 72″ (Side Panels, you can trim the dog ear off and work with a 71″ Fence post)
8 – 1×2 Fence Pickets @ 11″ (Corner Posts)
4 – 1×6 Fence Pickets @ 17 3/4″ (End Panels)
Optional Top Trim - CUT TO FIT
2 – 1×2 Fence Pickets @ 72″ (Top Trim, I used the non-dogeared ones from the center of the cuts)
2 – 1×2 Fence Pickets @ 19″ (Top Trim, Ends)
Considerations for Size Modifications
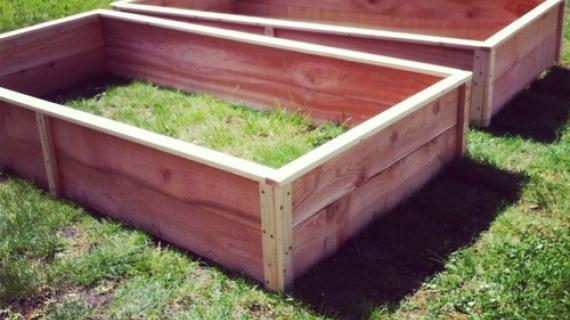
If you alter the dimensions of the cedar beds, work with your materials to make sure you have the least waste (and more cedar beds!) For example, make your end panels a fence picket cut in half for a 6 foot by 3 foot garden bed.


Instructions
Step 1

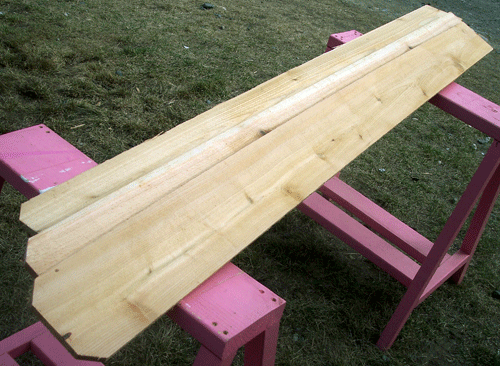
Optional: Rip your Corner Posts
I’ve done the math, and by ripping one fence post into 4 – 1 1/4″ wide strips, you are saving quite a bit of money (well, that is, if you intend to build a garden full of planters). So set your tablesaw to 1 1/4″ and rip one of the fence posts to 1 1/4″ wide, as shown above.
Or Use 1x2 Cedar Boards
If you don’t have a table saw, you can use 1×2 cedar boards.
Step 2
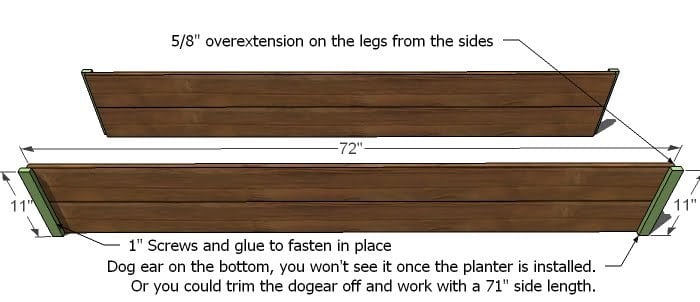
Side Panels
Use your 1″ screws and glue to put together your side panels as shown above. The post will overextend the sides by 5/8″ as shown above.
I also used my Kreg Jig™ to join the boards together in the center (optional) or you can use a 1x2 in the center.
Step 3
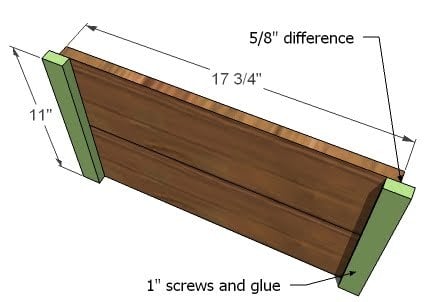
End Panels
Build your end panels exactly like your side panels.
Step 4

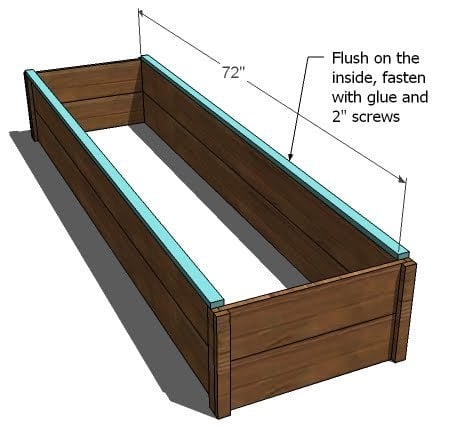
Assembling the Panels
The panels should fit together like a puzzle. Fasten with 2″ screws and glue. Check for square.
Step 5
OPTIONAL: Measure and cut your top trim to fit. Attach to the top.


Comments
Okay (not verified)
Thu, 05/13/2010 - 22:28
i plan to build this raised
i plan to build this raised beds, but it will cost much more than yours.Turkey is expensive :(
Nick P (not verified)
Mon, 04/16/2012 - 04:34
Re: timber boards
I would like to suggest that re-using timber from commercial pallets could brig the cost almost to minimum. For example recently I had couple of pallets from a friend of mine owning a warehouse....took them apart and used the timber planks to set them on the walls of my bedrooms just as a feature walls. I would strongly recommend the reclaimed pallets not only because they cost nothing - it simply makes your project greener;)
Regards from London,
Nick P
Tina_R (not verified)
Sat, 04/21/2012 - 21:31
Recycled pallet wood
FYI
I can't remember off hand but there are two types of pallet wood. The one is processed is not food grade. Thus the wood should only be used for flower planters.
I know I saw this somewhere on the web... the noxious processing could cause major health issues if you grow veggies and fruit in planters made from the processed wood.
Candace Willard (not verified)
Mon, 01/07/2013 - 11:08
I was wondering if this plan
I was wondering if this plan would work with pallets?
Karla (not verified)
Thu, 05/13/2010 - 22:29
These are great! I may have
These are great! I may have to build a couple, they'd be perfect out front of my house. But I'm jealous. Where did you see the bear?? Brown or black? I just traveled the Rich on Tuesday evening, no bear. Just a couple swans, and a couple moose. Thanks for the inspiration!
Michelle (not verified)
Thu, 05/13/2010 - 23:26
rats! unavailable at any
rats! unavailable at any Lowe's in my area, according to the website. :( Guess I'll have to check out the local stores in person to see if I can find something close in price.
So...while you're on a garden kick, got any ideas for a potting bench? ;)
Carrie (not verified)
Fri, 05/14/2010 - 00:23
Just wondering what type of
Just wondering what type of screws do you use. Is there a different type for outdoor so they don't rust? Thanks for the plans.
Frank Heidinger (not verified)
Fri, 04/08/2011 - 08:57
Rust proof screws
Galvenized or stainless steel screws are what you want. They are not cheap.
GuestRoger Boss (not verified)
Wed, 10/10/2012 - 19:13
Rustproof Screws
I bought a whole box of deck screws from Home Depot for $5.99
Virginia (not verified)
Fri, 05/14/2010 - 00:52
Hey, I'd love to know how YOU
Hey, I'd love to know how YOU finish screw holes when you plan to leave stuff in its natural finish? I have heard of saving the sawdust, mixing with white glue, and packing it back it... but I'm just not that careful with my sawdust!
crf (not verified)
Tue, 03/20/2012 - 19:05
screw hole filler
I have used the sawdust and wood glue for alot of yerars and it works great
Guest (not verified)
Mon, 04/09/2012 - 14:37
Finishing screw holes:
Use a plug cutter and a matching countersink bit.
Photon (not verified)
Fri, 05/14/2010 - 02:04
Could you please clarify the
Could you please clarify the reason for the 5/8"-inch overhang for the uprights on the ends and sides?
Thanks for another great idea on material!
Mary (not verified)
Fri, 05/14/2010 - 02:11
not available in my area
not available in my area either :(
The overhang is so that they meet up at the corners to be a combination of decorative and functional to help keep the boards together. Of course this is my assumption, but it seems totally logical!
Mary (not verified)
Fri, 05/14/2010 - 02:13
oh for screws, definitely use
oh for screws, definitely use outdoor screws- they are slightly more expensive, but are rust free. I use deckmate screws- they are around $7/lb but come with a special star bit that makes screwing them in a cinch! No slipping or stripping!
Leslie (not verified)
Fri, 05/14/2010 - 02:48
OK, don't laugh but, when I
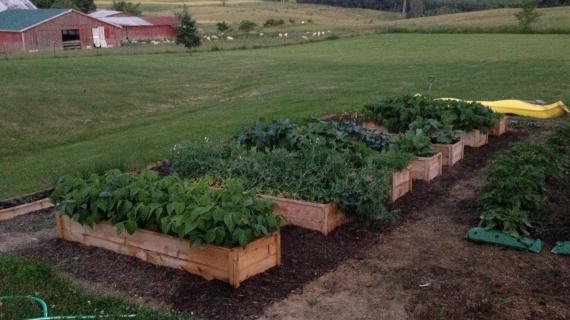
OK, don't laugh but, when I saw all those planters lined up with names on them, it kinda looked like coffins! Good grief!
Anyhow, this is a PERFECT project for me this year. I want so badly to plant some veggies on the farm but am not quite sure where the final garden spot is going to be. In the meantime, I'm gonna build me some of these babies.
Thanks, Ana! Once again, you're rocking it! Have a super weekend!
Christine (not verified)
Fri, 05/14/2010 - 03:01
I think we will be trying
I think we will be trying these. I was trying to find a more inexpensive way to build a planter out front of the house and I think this is a perfect answer. If we get a chance this weekend we will certainly post pics! Thank you!
can it be sere… (not verified)
Fri, 05/14/2010 - 03:28
Thank you so much for all
Thank you so much for all your great plans.. I work at "blue" and cannot keep up with all the great projects.. i built the sawhorse table the toddler picnic table now im onto the simple outdoor dining table and benches, the raised planter beds are next and i was hoping for a simple square planter box for the front of the house. Keep up the fabulous work i enjoy waiting for your posts on a day to day basis
Mychelle (not verified)
Fri, 05/14/2010 - 04:21
Ok, I can't believe how
Ok, I can't believe how timely this is. I have been trying to work on some raised beds, but it has been so rainy and cold here that I am never able to get outside to work. I'm so excited! We are supposed to have decent weather this weekend, and I really want to make these. I was wondering though, if any of the outdoor furniture plans could be easily adapted to utilize these Cedar posts. They are $2.47 at my "Blue" but I think this could make a great outdoor table and bench set. These would probably require more sanding for furniture. How much difference in esthetics would the 1x6 make from the 1x4's? It would be wonderful to have cedar furniture for so cheap.
pixilated2 (not verified)
Fri, 05/14/2010 - 05:08
Michelle mentioned a potting
Michelle mentioned a potting bench... I second that, I would love your take on a potting bench! Everything else you do is perfect, so why not a potting bench!!! Thanks! ":<>
Jennifer (not verified)
Fri, 05/14/2010 - 05:14
ROTFL at Leslie! Coffins! I
ROTFL at Leslie! Coffins! I just snorted coffee everywhere when I read that!
HAHAHAHAHAHAHAHAHAHA!
Awesome plans Ana! I JUST built raised beds last month using fir because cedar was triple the cost. Bummer! I would have much preferred cedar! :)
Viola (not verified)
Fri, 05/14/2010 - 05:59
Ana I love the size of these.
Ana I love the size of these. You will have to post pics of yours finished and set up with plants. These are going to be perfect for me also. Maybe I can get mine built next week. Hopefully this last snow storm is our last for the season.
Homemade Quilt… (not verified)
Fri, 05/14/2010 - 07:27
Lovely Idea...I would like
Lovely Idea...I would like this a lot. Trish
Sue (not verified)
Fri, 05/14/2010 - 07:54
i'm LOVING this idea! thanks
i'm LOVING this idea! thanks for the plans. i looked on blue's website & found these...
http://www.lowes.com/pd_60825-70740-054699062412_5002559_?productId=318…
wow...that's a huge url! anyhow, is that the same thing you used?
thanks!
Sue (not verified)
Fri, 05/14/2010 - 07:57
one more question...what does
one more question...what does it mean to "rip" the corner posts? is this just cutting them into strips? can you do it with a miter saw?
thanks!
Amy (not verified)
Fri, 05/14/2010 - 08:31
"ripping" is cutting a board
"ripping" is cutting a board along it's length. I can't see how you could do this with a miter saw. even a circular saw would require bracing and getting a straight edge. If you don't have a table saw I would spend a bit extra lumber you don't have to rip for those pieces.
Jennifer (not verified)
Fri, 05/14/2010 - 09:00
Or... on a QUIET evening, a
Or... on a QUIET evening, a blue or orange employee might rip them for you in the store. :) At orange, the first two cuts are free.
Ana White (not verified)
Fri, 05/14/2010 - 09:14
I used these
I used these http://www.lowes.com/ProductDisplay?partNumber=5447-43656-17168&langId=…
They were almost marked down 50%!!! That's huge on building materials.
Leslie (not verified)
Fri, 05/14/2010 - 10:24
Hi Ana!Looking at the cut
Hi Ana!
Looking at the cut list, you have 2 1x6's at 72 inches. For some reason, I'm looking at the pictures and it looks like each side used two boards so wouldn't that be FOUR boards at 72 inches? I could be making this up, though. I've been painting all day and I'm tired.......
gracefulvintage (not verified)
Sat, 05/15/2010 - 15:19
I'm definitely going to build
I'm definitely going to build these!
When you get a chance.... I'd LOVE to see a plan for potting bench with an upper shelf for small pots and large bottom shelf to store larger pots and supplies. I have scrap wood that I'd like to use and need a place to work and store stuff.
Renee (not verified)
Sun, 05/16/2010 - 21:09
Awesome! Thanks for
Awesome! Thanks for sharing... Can't wait to make this!
Gwyn (not verified)
Tue, 05/18/2010 - 04:42
Greetings from Juneau,
Greetings from Juneau, Alaska!
Your blog is wonderful. We made our raised beds out of cinder blocks. Would you believe that cedar was more expensive 10 years ago. Now that we have Home Depot, I'm off to check out the scrap ben. Cedar fence boards would work great for making flower boxes too. I can't wait to get started.
Keep up the great work!
thorman (not verified)
Tue, 06/01/2010 - 12:07
Loved this plan! Made one
Loved this plan! Made one raised bed for myself and a modified small one for my 7 year old daughter who loves to garden. Instead of ripping a board (don't have the right saw to do that) I used a pack of 24" stakes and cut them down to size. Thank you so much for making a garden bed design so affordable. ~ Sue
Tara (not verified)
Mon, 06/07/2010 - 15:21
Could these be painted or
Could these be painted or stained? Or is that not recommended for growing vegetables in it? I really want to make this, but we don't have any equipment. Just a hammer and screwdriver. Are the saws necessary? Could I just have the store cut them?
Ana White (not verified)
Mon, 06/07/2010 - 16:14
Tara, see here on how I'm
Tara, see here on how I'm building 28 planters today. It's a little less refined looking in the end but simplified. You could ask your local home improvement store to cut the boards and then use a hammer nails and glue to put the beds together. The link is here http://sphotos.ak.fbcdn.net/hphotos-ak-ash1/hs529.ash1/31051_3940360166…
As far as painting or staining, I would just maybe do the outsides or use an organic paint or stain so your food doesn't get contaminated.
Good luck with your building projects.
Amanda2760 (not verified)
Wed, 06/09/2010 - 10:06
I am working on making one of
I am working on making one of these planters. I cut the dog ears off of mine to make it eaiser to get the boards flush. But after I did this I had to adjust some of the other measurements. I made the 17 3/4 inch sides 17 1/4 in order to get enough out of the shorter boards.
I also cut the corner posts at 12 inches not 11 so that it was as long as the 2 6 inch boards.
Will post pictures when they are finished!
Diana (Ladybug… (not verified)
Fri, 06/11/2010 - 19:44
Hey, Ana, finally blogged
Hey, Ana, finally blogged about my beds here: http://holesinmyshinyveneer.blogspot.com/2010/05/raised-garden-beds-la-….
I didn't include anything technical that would help anyone, though -- sorry! I did my corners a bit different-- used cedar 2 x 2 balusters on the inside. I also made supports with leftover picket pieces that I screwed on the inside to keep those long sides straight.
Thank you for my first project! I can use a chop saw unassisted now!
Rustic Cedar (not verified)
Thu, 09/09/2010 - 02:52
[...] How to Build Big Cedar
[...] How to Build Big Cedar Raised Beds for $10 — Ana White UPDATE: Here's those cedar beds I built for $10 bucks each . just before the moose ate the entire garden I can't rave enough about these beds, my garden was amazing and super low maintenance. BUILD THESE. [...]
holleigh (not verified)
Sat, 10/30/2010 - 20:41
Hi Ana, I am sooo obsessed
Hi Ana,
I am sooo obsessed with your website.
I wasn't sure where I could email you this information.
In case you are interested, I tried downloading the PDF plans for your $10 raised planter beds above, but an error was thrown.
Love love love Knock-off Wood!
santhony (not verified)
Mon, 01/17/2011 - 18:42
Those poor Moose look
Those poor Moose look starved! I hope that your hard work at least went to helping them out!
I'll be looking this up again in a few months once our snow goes away...
britta (not verified)
Sun, 01/23/2011 - 12:50
Ana - I thave a deer problem.
Ana - I thave a deer problem. I want to build raised beds...but want you to figure out some sort of attractive cover to put over the top to keep the animals out! I envision some sort of frame with a screen "door" that swings up and open so that you can still access the plants when you need to.
Tsu Dho Nimh
Fri, 04/08/2011 - 06:54
You want a "hoop house".
You want a "hoop house". Arches made of PVC or conduit, covered with chickenwire, hinged on one side of the arch so you can lift it out of the way.
http://mikesupsanddowns.blogspot.com/2010/09/low-hoop-house-build.html
Guest (not verified)
Sat, 04/09/2011 - 10:26
Cover for raised bed
I too have deer and vole problems but found this raised bed design that has an easy fix. Check it out: http://www.sunset.com/garden/backyard-projects/ultimate-raised-bed-how-…
In reply to Ana - I thave a deer problem. by britta (not verified)
smasumur
Wed, 04/27/2011 - 12:09
I, too, have got a deer problem
And a raccoon problem, as well. I'm thinking of one box with a screen door on top. I'll try to post plans once I actually draw them up. I figured with a $20 screen door from Blue (http://tinyurl.com/3pvavoe) at a 25 degree angle, you need to make one long edge about 15 1/4" taller than the other and the overall box would be 80 1/2" long (door size) and about 32 5/8" wide. That's all based on my rather old recollection of trigonometry. Hinge the door on the taller long edge and open it up to tend to your plants. Cover the screen with plastic and use it to grow in late winter/early early spring.
The other box I'll put 6' long fence stakes (http://tinyurl.com/3lufv24) in the corners and hang mesh netting around it. That way I can have taller climbing plants (beans, tomatoes) in the box. I figured with the narrow width of the box (maybe 4' max) the deer will be unlikely to want to jump in. Raccoons I'm hoping won't try to climb the netting.
Does that sound sane? Anyone else have any ideas?
LenaLoo (not verified)
Mon, 02/14/2011 - 07:16
Hey Ana! Thanks for this
Hey Ana! Thanks for this plan! It is officially the first thing on my "real" build list (because the first thing on the build list in my head is a boyish play kitchen for my 14 month old). Just wanted to let you know the PDF isn't up for some reason. I like to save them just in case :).
Guest (not verified)
Thu, 04/07/2011 - 16:36
cedar plank planters
I have rthritis and would like to have these on legs raised for working about 3-4 ft high...any suggestions on how to adapt?
Guest (not verified)
Thu, 04/07/2011 - 21:50
Try her toy box plans! We
Try her toy box plans! We made it (and use it as a toy box) and it would be perfect. Considerably smaller than this, but it's a start! Good luck!
Tsu Dho Nimh
Fri, 04/08/2011 - 06:49
Raised planting table
Make a table of cedar (narrow farmhouse table with shorter legs), and build a bottomless box on the top. Line with landscape fabric and fill with lightweight potting soil.
OR: Build a tall box, filling it in with cement blocks as you add the sides, then line with landscape fabric and fill with dirt. The blocks keep you from spending a fortune on potting soil.
OR: Stack bales of straw (wheat straw or oat straw, not hay) to the height you want, cover with several layers of newspaper, and top it with 6-8 inches of potting soil.
Eventually the straw will decompose, but it's a commonly used elevated planting bed for leafy greens ans other shallow-rooted plants.
Nate (not verified)
Mon, 04/11/2011 - 14:07
Build Strong
Dirt is HEAVY, especially when wet! You'll have to add a ton of legs and most likely center supports as well if you plan on making the planter span any significant length. I wouldn't go more than 2' without a support.
Guest (not verified)
Thu, 04/28/2011 - 17:05
My mom has arthritis so she
My mom has arthritis so she has her box gardens sitting on saw horses.