


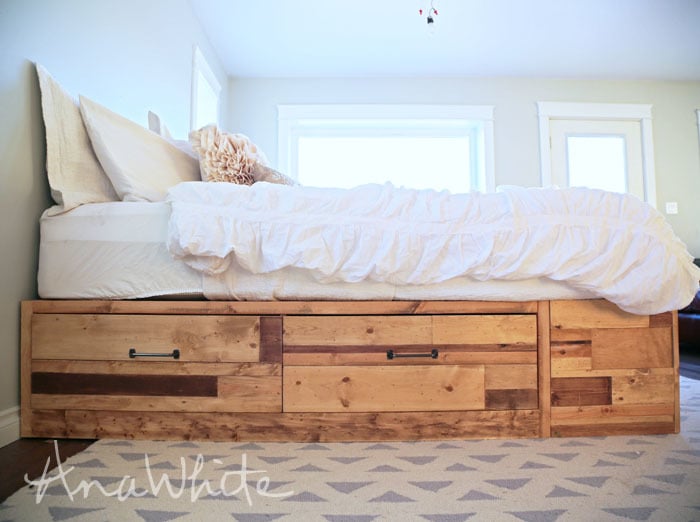
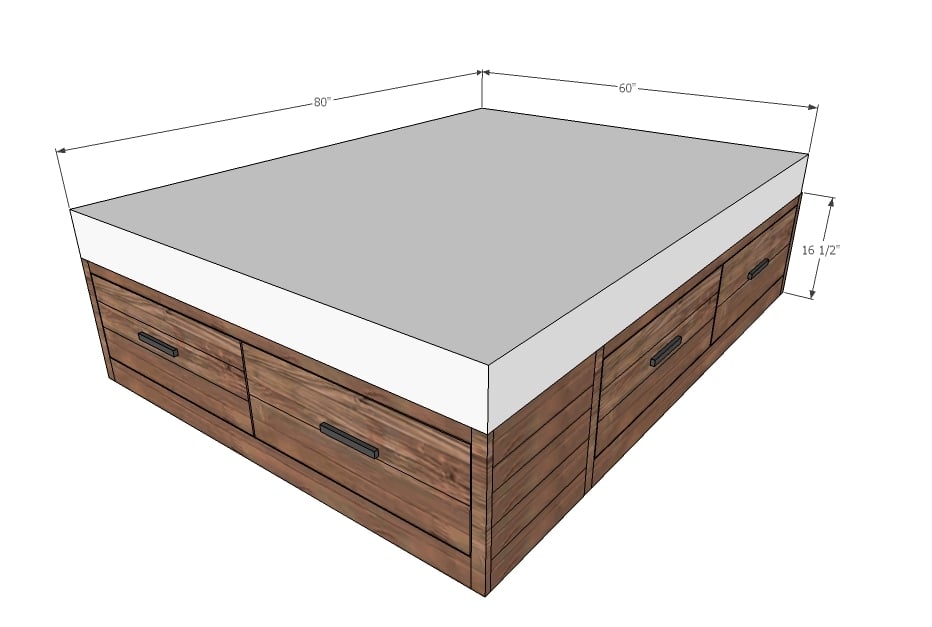
DIY Storage bed with drawers, covered in scrap wood pieces. You can use pallet wood or any scrap wood, or use regular drawer faces for a more refined finish.
This plan is also available in a King version.


Boy oh boy do I ever have a treat for you today!!!
It's been terrible keeping this one for you - but I really wanted to share this project during March, while we have the #GetBuilding2015 #ScrapWorkLove social media share and inspire contest going on!
Here's a project that might just make you save every single little scrap piece of wood!

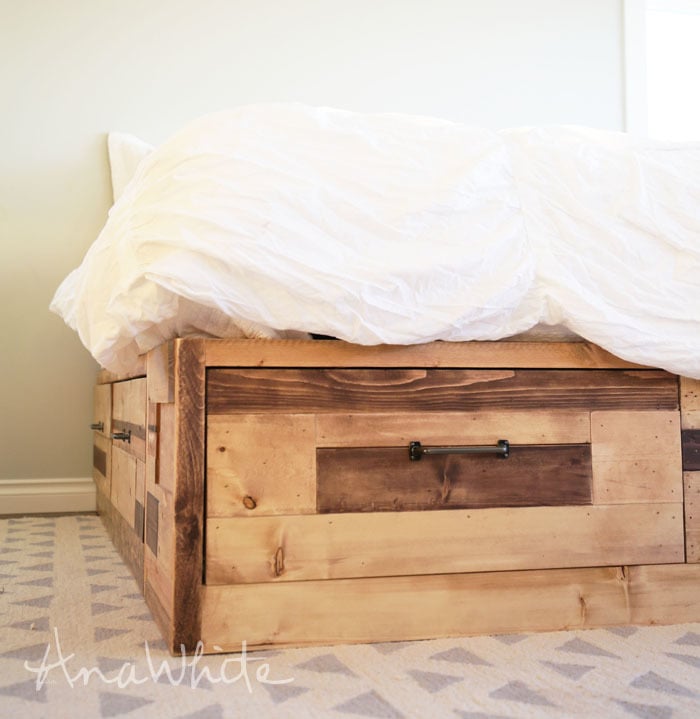
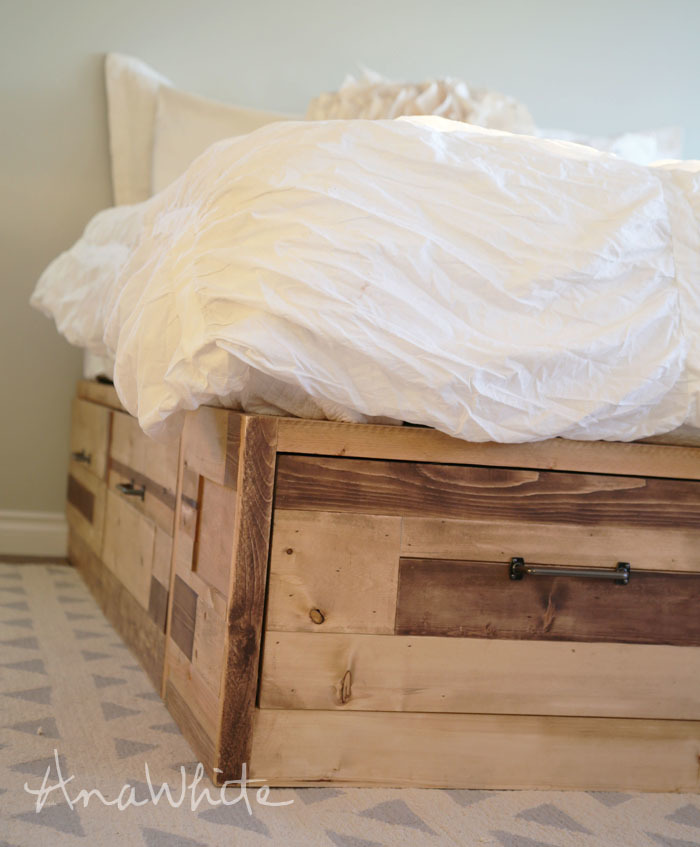
This amazing bed was actually built by my friend Brandy.
Brandy had some time off from work this winter, and asked me to help her build a storage bed with drawers.
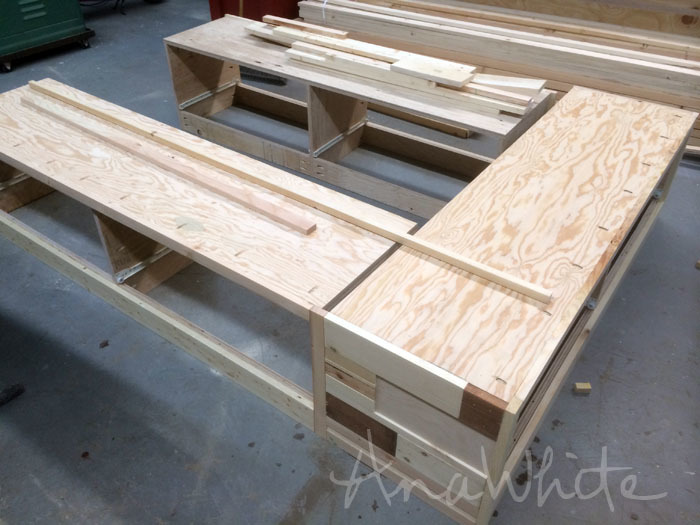
So I drew up a really simple plan, with just plywood boxes covered in wood face frames and trim.
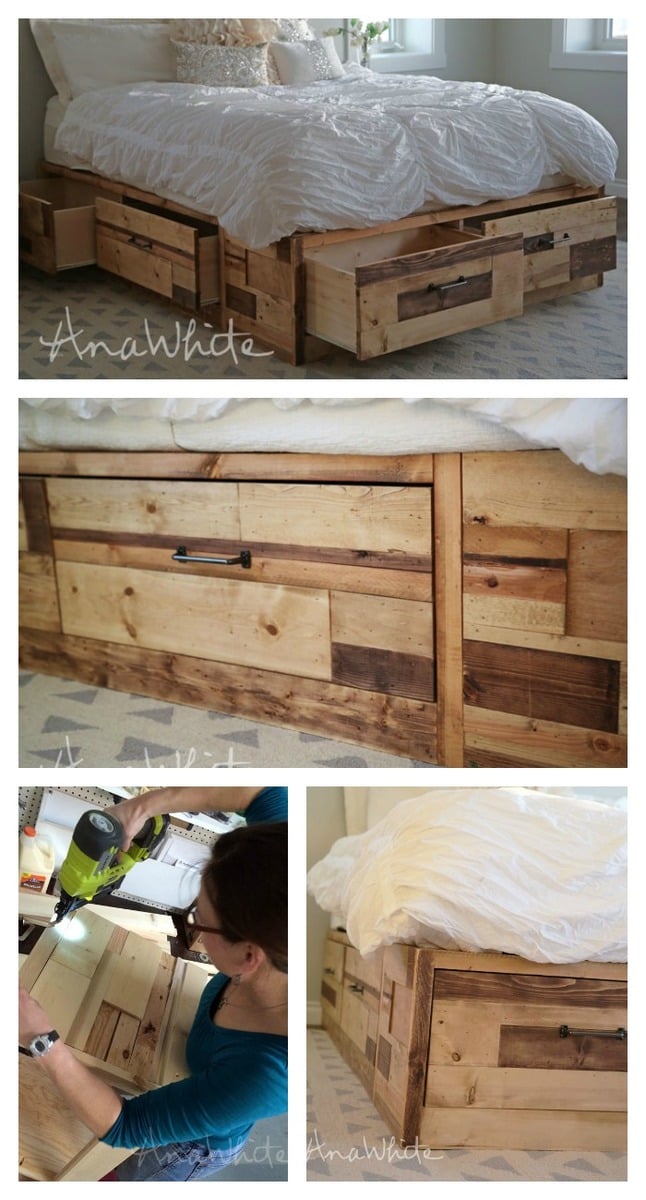
But when it came time to cover up that plywood and those drawer faces, Brandy and I came up with the idea of using scrap wood, kinda like "siding" on the bed.
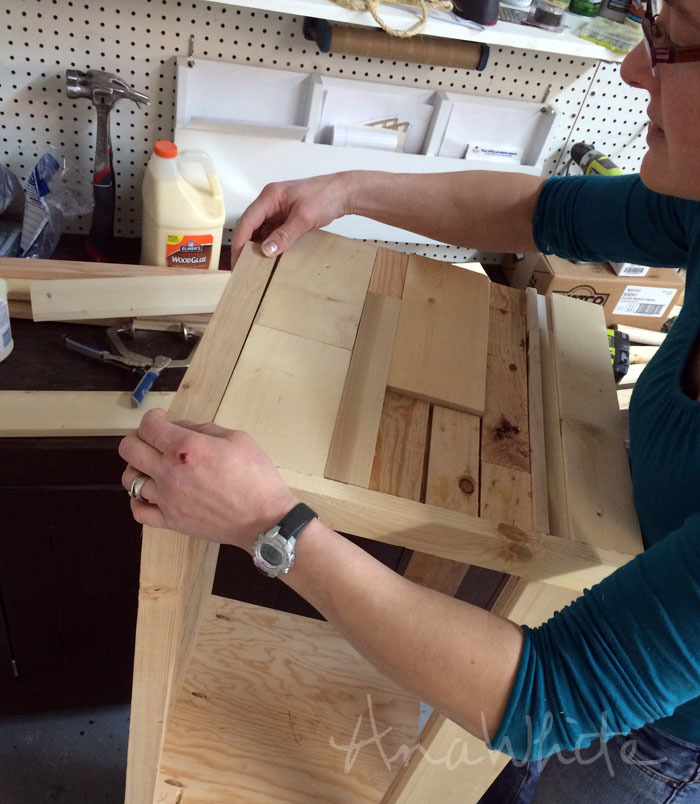
Brandy took scrap wood frm my scrap wood bin and fit them together on the side panels. I love how she used different depths and types of wood - just whatever was there, and whatever could fit.
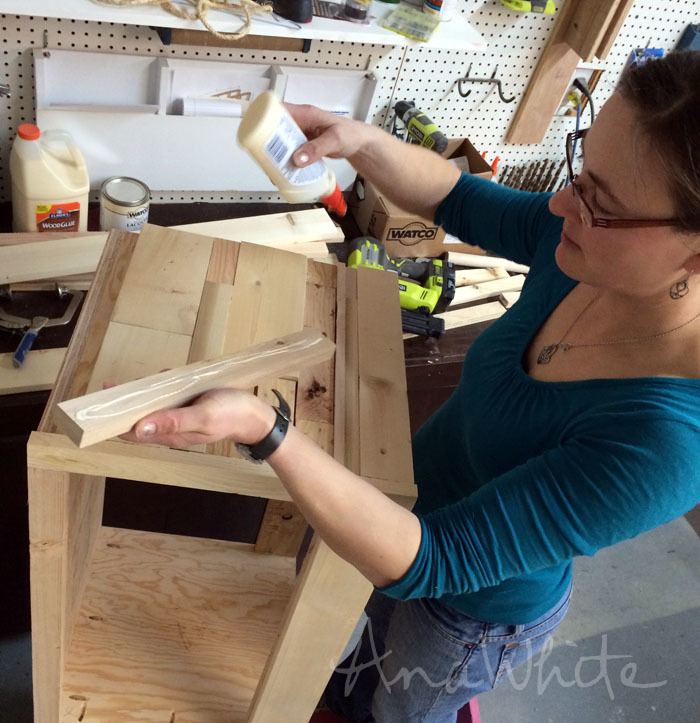
Once all the pieces were fit in place, she then glued each piece,
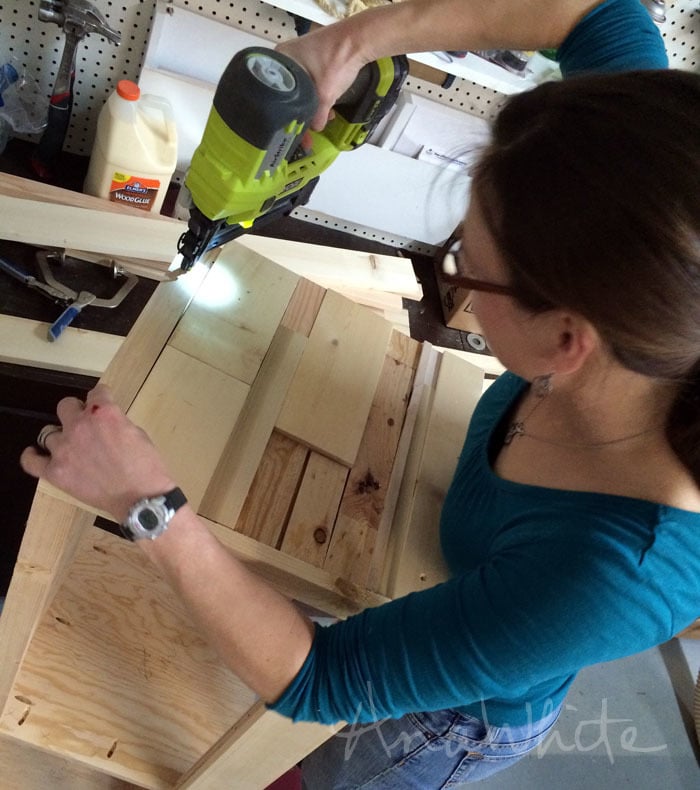
And then nailed the pieces on to the side panels of the bed.
This was the first panel Brandy did. We both LOVED it so much, we decided to do the drawers too!
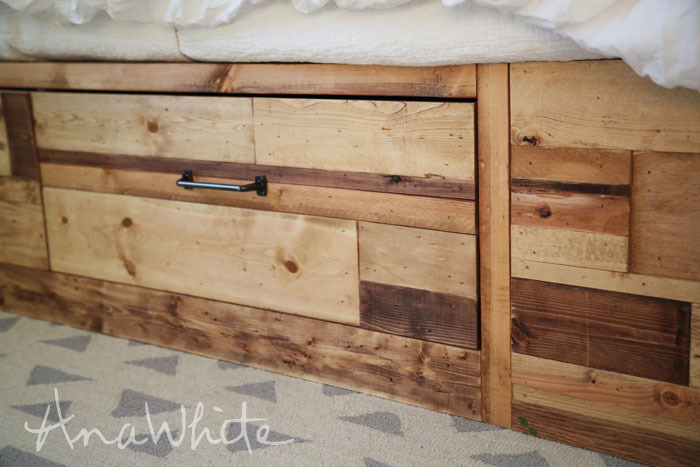
After coating the ENTIRE bed with a coat of light stain (try Rustoleum Golden Oak), Brandy when over select pieces with a slightly darker stain (try Rustoleum Early American or Light Walnut), and then a few more in an even darker stain (try Rustoleum Dark Walnut or Kona).
Isn't it breathtaking?
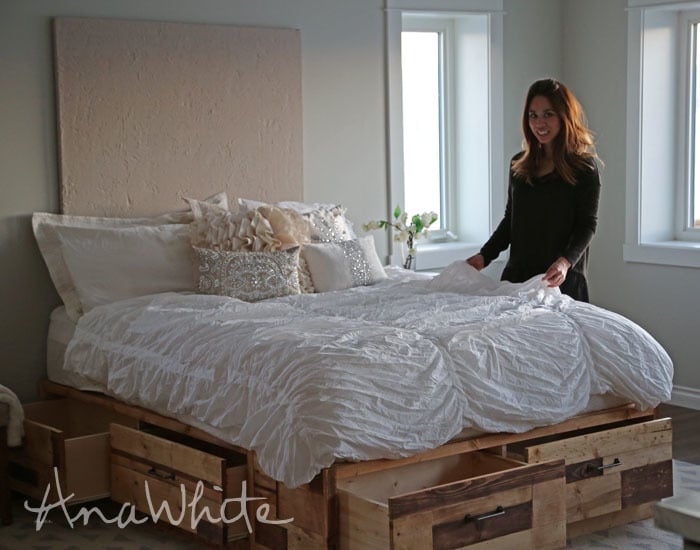
I actually asked Brandy if she would sell her bed to me. I sure did.
It is that crazy beautiful. I was having a hard time parting with it.

Even the little children running around the house playing while we were photographing the bed all came over to admire it. They ooohed and ahed, even as young as five years old, able to appreciate how beautiful this bed is!

And while Brandy wouldn't sell this bed to me, I am quite honored that she let me help her build it and I got to be part of such an amazing piece.
Scrap wood. Who would have thought?
The plans follow (if this is the homepage, click READ MORE below). We can't wait to see how you make your bed, so please share if you build!
XO Ana
Preparation
You will need to add pallet or scrap wood for the "siding" - drawer faces can also be 1x12s
- 2 full sheets of 3/4" plywood ripped into strips
- 15-3/4" wide (very important that all rips are the exact same width)
- 1 full sheet of 1/4" plywood (rip into strips 15-3/4" wide for drawer bottoms)
- 11 - 1x4 @ 8 feet long
- 4 - 1x3 @ 8 feet long (for slats)
- 4 - 1x2 @ 8 feet long
- 2 - 1x8 @ 8 feet long (for drawer boxes)*
- 3 - 1x8 @ 10 feet long (for drawer boxes)*
- 6 - 16" Euro Drawer Slides (the white bottom corner mount ones)
- 6 knobs or handles
*Drawer boxes could also be made of plywood ripped into strips 7-3/4" wide (1/2" or 3/4") (could save money and would be more structurally sound and square than pine boards
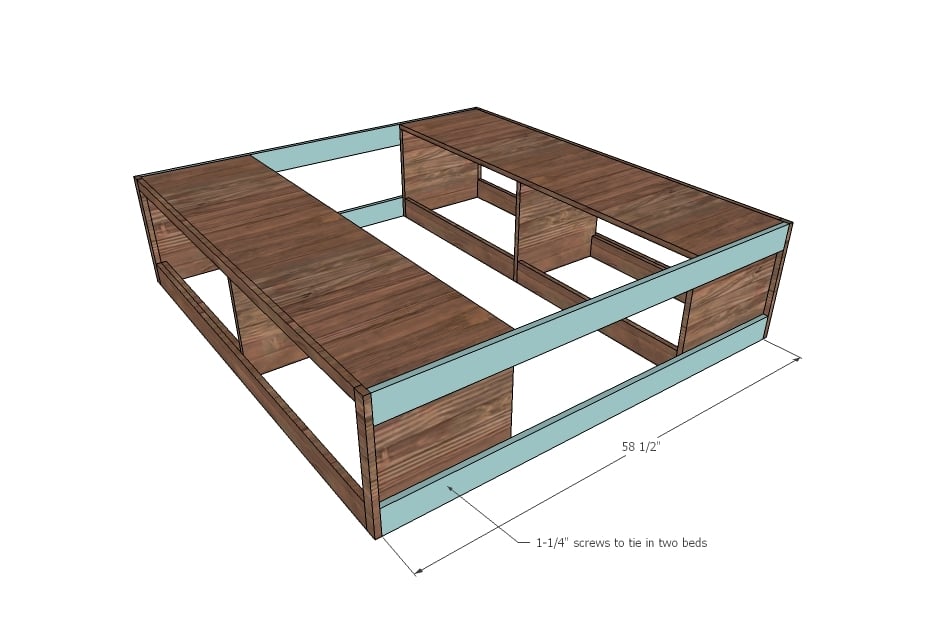
END BENCH (for building 1 bench)
- 1 - 3/4" plywood @ 15-3/4" x 58-1/2""
- 3 - 3/4" plywood @ 15-3/4" x 15-3/4"
- 4 - 1x4 @ 28-1/8"
- 2 - 1x2 @ 16-1/2"
- 1 - 1x2 @ 57"
- 1 - 1x4 @ 57"
End Bench Drawers - Cut to fit opening and drawer slides
- 4 - 1x8 @ 15-3/4"
- 4 - 1x8 @ 25-5/8"
- 2 - 1/4" plywood @ 15-3/4" x 27-1/8"
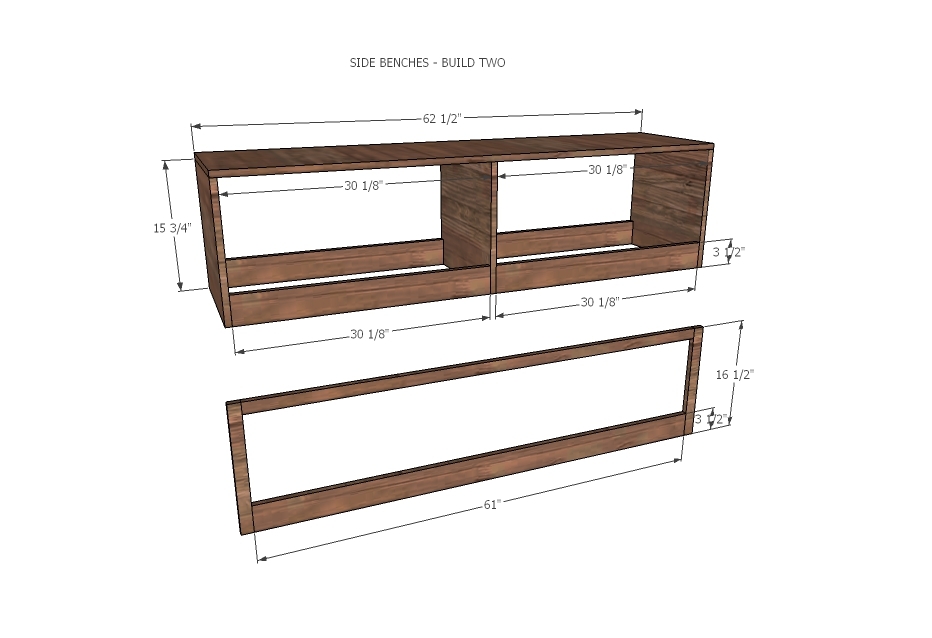
SIDE BENCHES (for building 2 benches)
- 2 - 3/4" plywood @ 15-3/4" x 62-1/2""
- 6 - 3/4" plywood @ 15-3/4" x 15-3/4"
- 8 - 1x4 @ 30-1/8"
- 4 - 1x2 @ 16-1/2"
- 2 - 1x2 @ 61"
- 2 - 1x4 @ 61"
Side Bench Drawers - Cut to fit opening and drawer slides
- 8 - 1x8 @ 15-3/4"
- 8 - 1x8 @ 27-5/8"
- 4 - 1/4" plywood @ 15-3/4" x 29-1/8"
TIE-IN PIECES
- 4 - 1x4s or 1x3s @ 58-1/2"
- 2 - 1x4s or 1x3s @ 62-1/2"
- 12 - 1x3s @ 26-1/2" (can be any scrap wood or plywood)


Please read through the entire plan and all comments before beginning this project. It is also advisable to review the Getting Started Section. Take all necessary precautions to build safely and smartly. Work on a clean level surface, free of imperfections or debris. Always use straight boards. Check for square after each step. Always predrill holes before attaching with screws. Use glue with finish nails for a stronger hold. Wipe excess glue off bare wood for stained projects, as dried glue will not take stain. Be safe, have fun, and ask for help if you need it. Good luck!
Instructions
Step 1
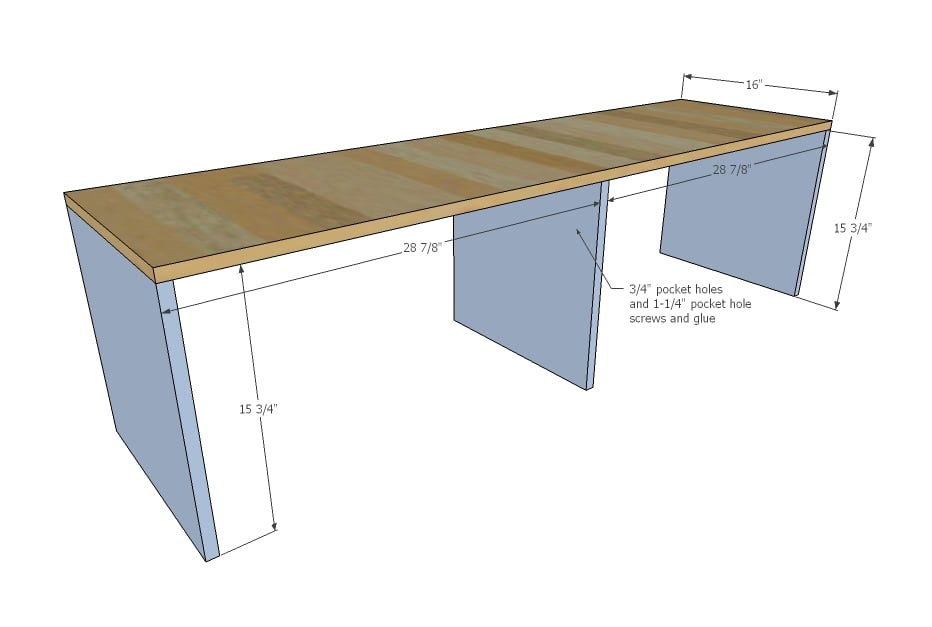
END BENCH (BUILD ONE) - Attach the side panels and middle panel to the top plywood piece. Make sure that center piece is exactly centered (we used the 1x4 pieces from the next step as guides). Attach with pocket holes. We also drilled 3/4" pocket holes facing forward on the end panels (outside) and top panel (on top) for attach the face frame in later steps. Remember that the entire bed gets "sided" so place pocket holes on the outsides.
Step 2
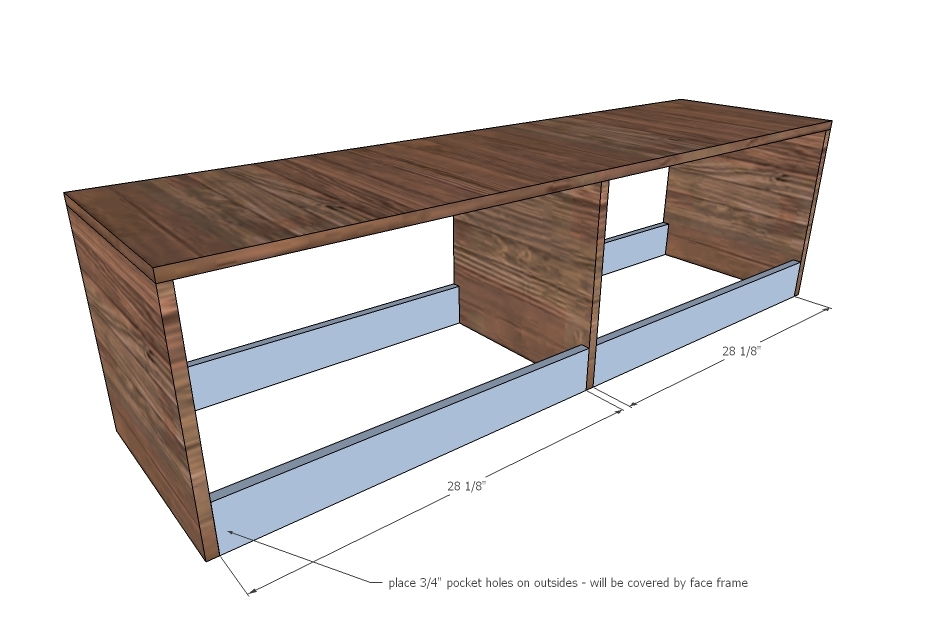
END BENCH (BUILD ONE) - Tie in the bottoms of the bench with 1x4s. Keep pocket holes on outside for easy attaching and more strength.
Step 3
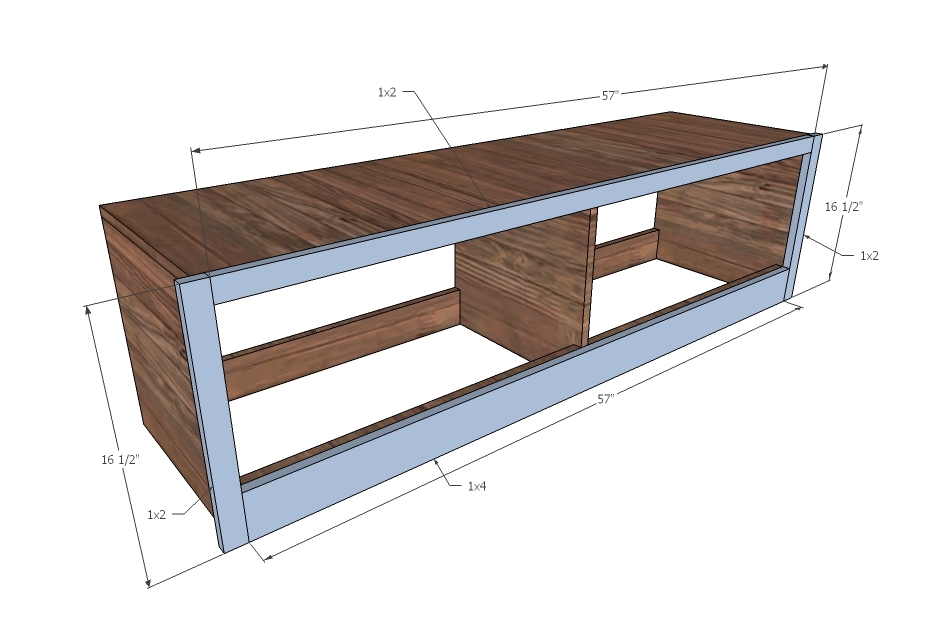
END BENCH (BUILD ONE) - Build the face frame separately, then attach the completed face frame to the bench. Insides will be flush on the sides, top will be flush to top, bottom 1x4 boards will match up. Use the pocket holes you drilled in earlier steps to attach at the top and sides. Nail to the bottom 1x4 board with 1-1/4" nails and glue.
Step 4
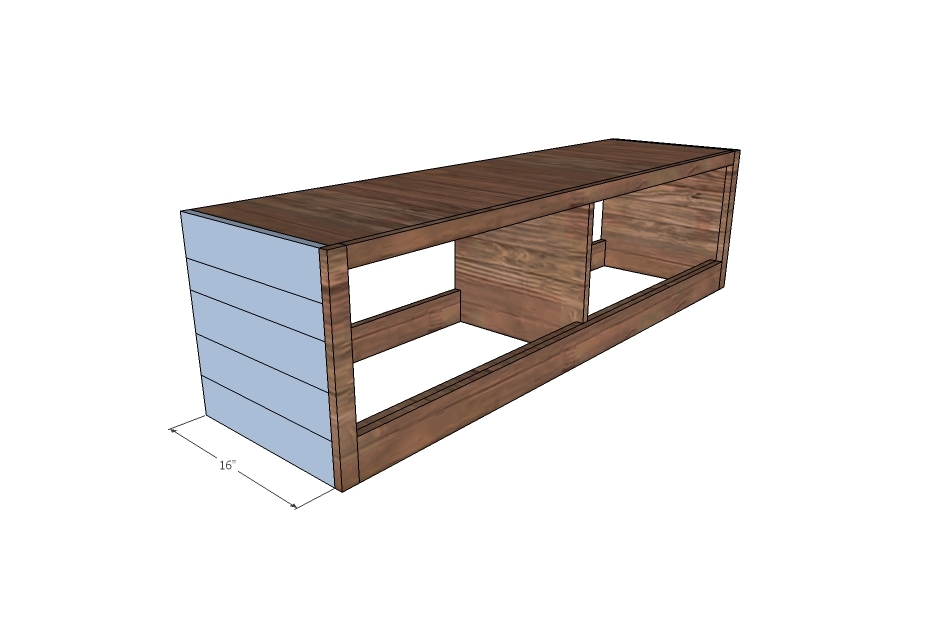
END BENCH (BUILD ONE) - Cover the end panel of the bench in wood boards. We used scrap wood but any wood can be used here. Nail and glue on.
Step 5
Step 6

Tie in the two side benches with 1x4s or 1x3s (we actually used scrap strips of plywood - anything will work here, these boards are just to keep the two benches lined up. We actually did this in the room after finishing the entire bed in the garage and then carrying all the pieces into the room for final assembly.
Step 7
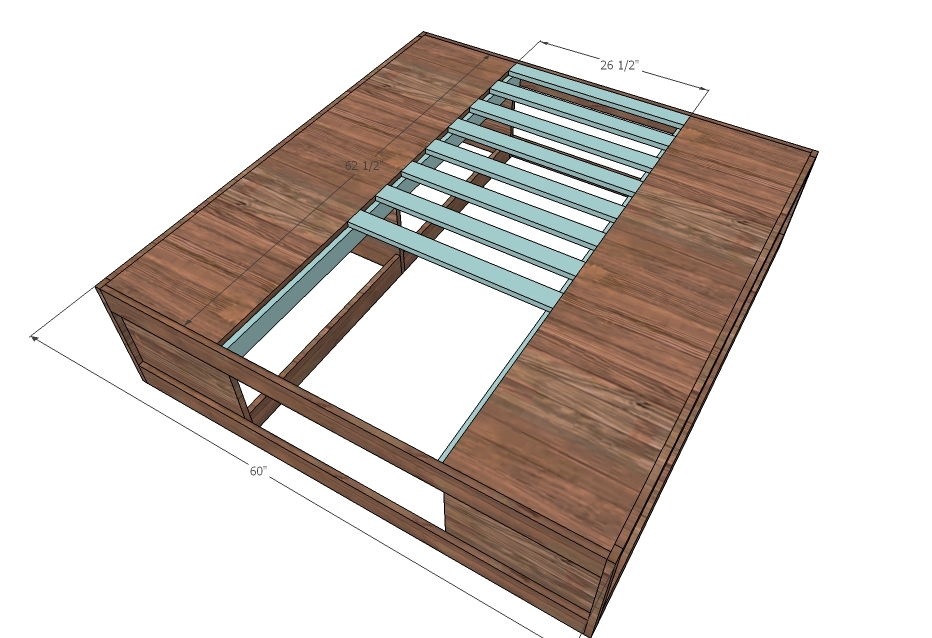
The slats will rest on top of boards tied into the backs of the side benches. Consult your mattress for recommendation on slat spacing. We actually burned up lots of random sized scraps for the slat system.
Step 8

There's alot of drawers, so this is where much of the time and money was spent. We also built our drawers out of 1x10s so the front face would be easy to nail scraps too but that is an added cost. The measurements given are for the perfect build - make sure you measure each and every opening, and build to fit your drawer slides and openings. I actually number each drawer box and custom make to fit each opening.
I build drawers by placing 3/4" pocket holes on outsides of front and back and attach with 1-1/4" pocket hole screws. The pocket holes then get covered up by the drawer face.
Step 9
Install drawers inset 3/4" from face frame (or flush with front edge of plywood). To make installing drawers easier, I cut a spacer block and rest the drawer slides on top -
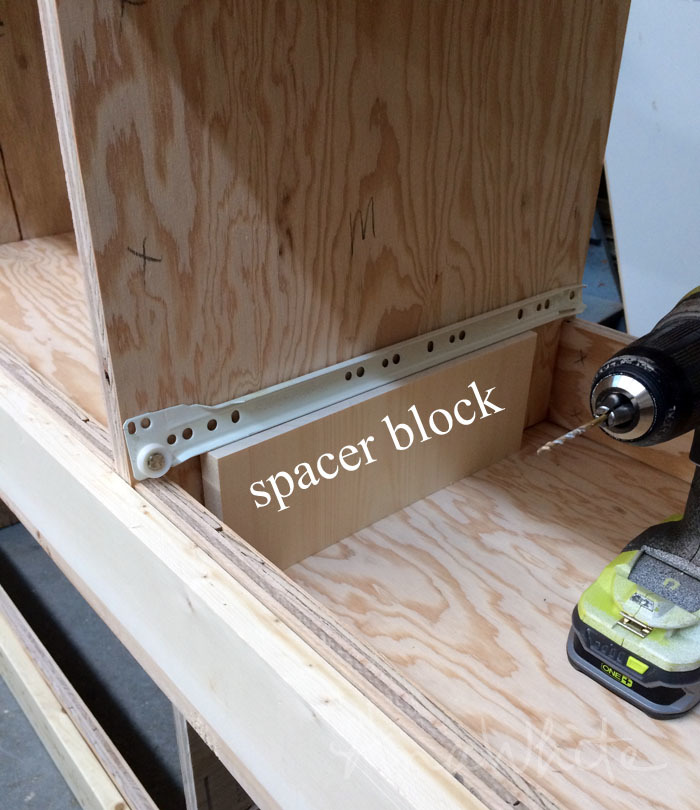
That way I knew all my drawer slides were installed at the same height, and it took alot of measuring and marking out of the build process.
Step 10
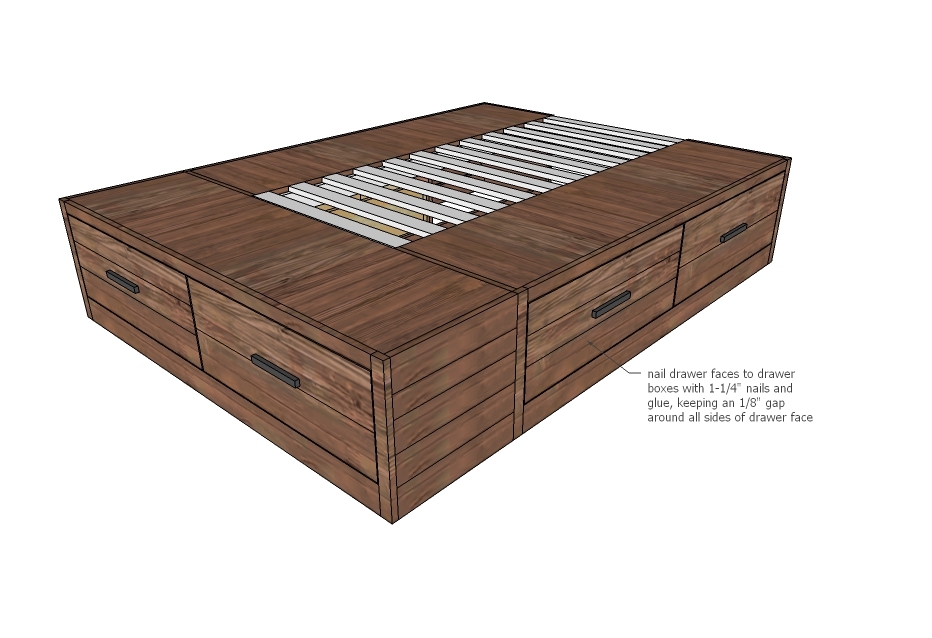
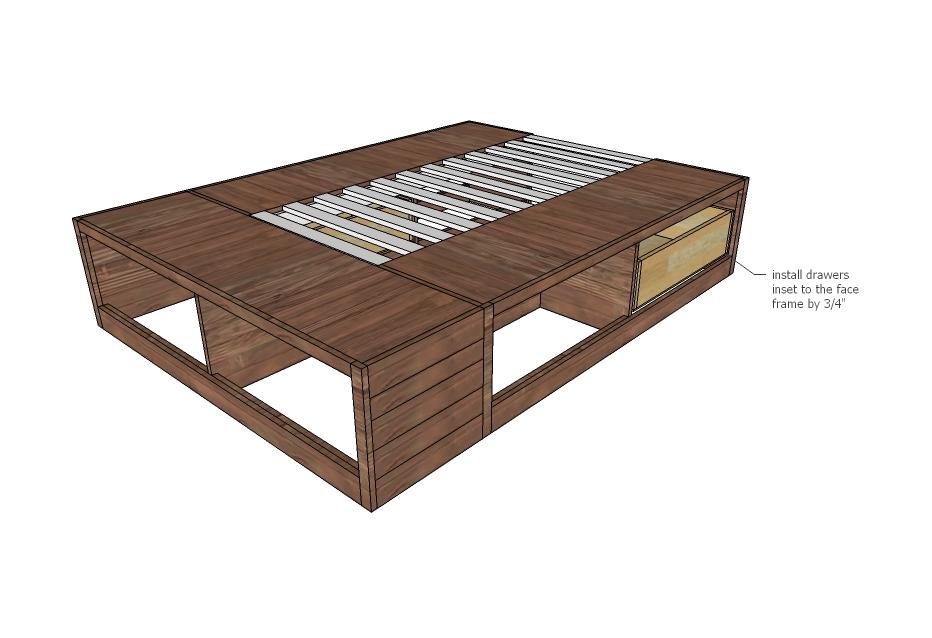
Finally, attach drawer faces to drawer boxes. The drawer slides will have some play, so make sure you attach with the drawer sitting upright (as pictured in the diagram). The openings are sized for 1x12s if you wanted to go that route. Leave about 1/8" gap around all sides of the drawers.
It is always recommended to apply a test coat on a hidden area or scrap piece to ensure color evenness and adhesion. Use primer or wood conditioner as needed.

Comments
Tsu Dho Nimh
Wed, 03/11/2015 - 13:34
Stain first, build later.
If you are doing a "scrappy" project like this, stain a bunch of boards first in various colors, then apply them.
It's way easier than staining later, trying to be tidy.
In reply to Stain first, build later. by Tsu Dho Nimh
Ana White
Thu, 03/12/2015 - 09:23
Hi Tsu!!! Thanks, what a
Hi Tsu!!! Thanks, what a great idea! Thanks for the tip! Ana
Lost Upon A Time
Thu, 03/12/2015 - 07:34
Love it!
This is beautiful! I may have to change all my bedroom plans now. :) The ruggedness of the bed contrasts the lovely bedding beautifully. This is a versatile piece. Well done!
In reply to Love it! by Lost Upon A Time
Ana White
Thu, 03/12/2015 - 09:22
Thank you! Brandy did an
Thank you! Brandy did an amazing job on the scrap wood - it really took this bed over the top! So glad you like it, if you build, would love to see yours too! Ana
largemouth
Thu, 03/12/2015 - 07:57
Two Questions???
First I love the idea behind this using the scrap and then the different stain colors.
My first question concerns the connection of the End Bench and the Side Benches...how do you connect these? You mentioned they are built then carried seperatly to the room and put in place but do you attach them at all and if so where or how?
Last Question: Do you happen to have any measurments or help for doing this bed in King size?
Thanks for all you do!
In reply to Two Questions??? by largemouth
Ana White
Thu, 03/12/2015 - 09:21
Hi, thank you! You can
Hi, thank you! You can easily attach the end bench to the side benches with a few couple of screws from the side benches into the back of the end bench, but we found it wasn't necessary - once the bed was on top, it wasn't going anywhere (but Brandy has carpet too).
For a king, it depends on the type of king. For a standard king (76 wide x 80 deep) only the end bench needs to be modified (since both a queen and standard king are 80" deep). Simply make the end bench 16"longer than the queen. Drawers will be 8" wider than the queen which is reaching max span for drawers so make sure you use a more substantial bottom on those drawers.
If there's enough interest, I would be happy to put together king plans for you.
Thanks so much for reading! Ana
choggart
Thu, 05/28/2015 - 12:16
King Size Plans
Hi Ana, I love this! I would be very interested in king sized plans as well! Thanks!
TaylorCrawford
Wed, 07/22/2015 - 07:39
I would be very interested in
I would be very interested in the king size plans for this bed! Could you post it or email it to me? Thanks!
Keri.mcgehee
Tue, 06/21/2016 - 16:30
king Size
I would love to get the measurements for a king! This is really awesome.I have never done any wood work and would love to give this a try!
In reply to king Size by Keri.mcgehee
Ana White
Mon, 06/27/2016 - 09:00
http://www.ana-white.com/2015
http://www.ana-white.com/2015/03/free_plans/brandy-scrap-wood-storage-b…
zoeormsby
Thu, 03/12/2015 - 10:14
Pulls?
Could you share a link for the pulls? Thanks!
thedoad
Wed, 03/18/2015 - 14:20
King Plans
Awesome plans! I second the request for a King version! Great job as always!
bbowers3
Fri, 03/20/2015 - 19:02
Cali King
Can I get the dimensions for this for a Cali King bed? Please!! Thanks!!
Shyam Sundar Naik
Tue, 04/14/2015 - 03:29
Disassembleing the bed cot in case of changing houses.
My heartiest thanks to both Ana and Brandy for sharing their ideas in building a storage bed using various scraps.
Can I know as to how the cut will be dissembled and if it is possible at which points/portions?. I am planing to build one bed cut according to this plan. But, in my case, being government{transferable job) servant, I am supposed to be transferred to different places for which I need to relocate my all furniture accordingly. I solicit your help in this regard.
TaylorCrawford
Wed, 07/22/2015 - 07:10
King size measurements
Hi! I love this bed idea and my fiancé and I are in the process of buying a house and we want to build this bed but we are buying a king size bed! Is there any way you could email me the measurements and info on how to do this in a king size? Thank you!!
lindsee
Sun, 08/23/2015 - 09:43
twin and king sized plans
Would love plans for a twin and king size plans for this bed. Could you please post or email to me. Want to build for my son. Thank you
Kindaclever1
Fri, 01/01/2016 - 18:02
How about some matching night stands for this one?
Hey Ana, please consider doing some night stand plans for this project. This project is to perfect to not receive a matching night stand.
llangan
Mon, 03/14/2016 - 08:20
Drawers
Is there a step by step for the drawer slides? Are these on the bottom of the drawers or the sides?
I can't wait to start this project!
SarahB907
Tue, 03/22/2016 - 07:22
Measurements for a Full size bed
I am so in love with this!! I am headed to the Home Depot this morning so id love to price this for my Full size bed.
SarahB907
Tue, 03/22/2016 - 07:22
Measurements for a Full size bed
I am so in love with this!! I am headed to the Home Depot this morning so id love to price this for my Full size bed.
iyhyari
Fri, 04/15/2016 - 01:22
Full size plan
This is great, is there any way of getting a full size plan. I would love to do this for my sons room!!
reikidancer
Fri, 09/30/2016 - 06:08
Full size bed with feet?
Hi Anna,
I love your plans! Do you have plans for a full size version of this bed? Also, if I wanted to raise it up off the floor a little, to provide essentially a "toe kick" (yes, I stub my toes a lot on furniture), would I modify the plans to have plywood bottoms and then just add scrap wood "feet" to give me a few inched of toe "relief"?
Thanks,
Lisa
CruiseB
Mon, 12/19/2016 - 16:14
Box Springs
Do you need a box springs with this, or does the mattress go right on top of the frame?
daryl.woerz
Wed, 03/22/2017 - 05:22
Drawer bottoms
I am new to woodworking and really like your simple and straightforward plans. I am working on the Brandy scrap wood bed and just want to be sure I do it right. Could you tell me how are the drawer bottoms to be attached? Thanks and keep up the good work.
meustice
Wed, 08/21/2019 - 14:31
Full size plans
Wondering what would be the simplest way to convert these plans to a full size? Thank you and it is very beautiful.