

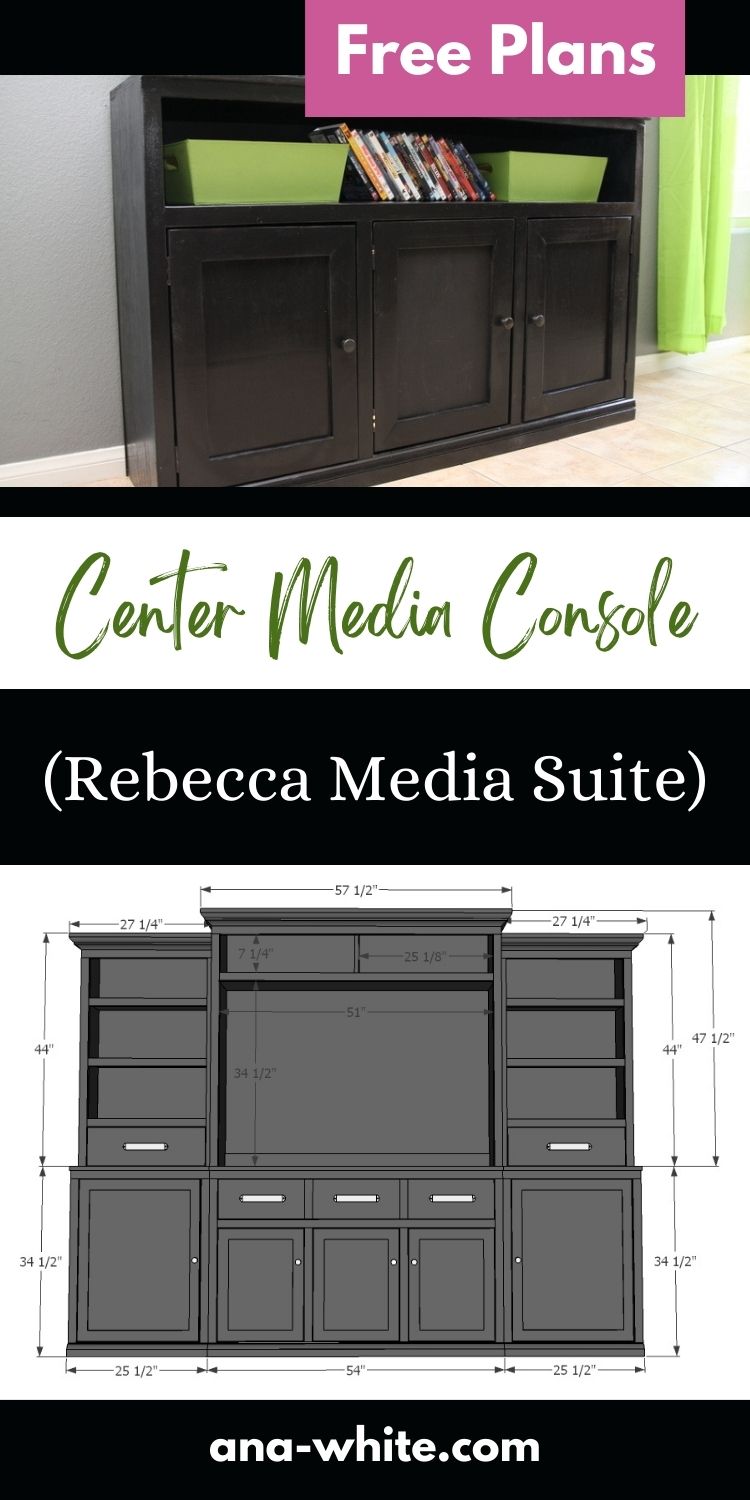
Build your own media wall! You can customize to fit your needs and space easily.
This plan is for the center entertainment console piece. This collection includes everything you need to build an entire media wall.

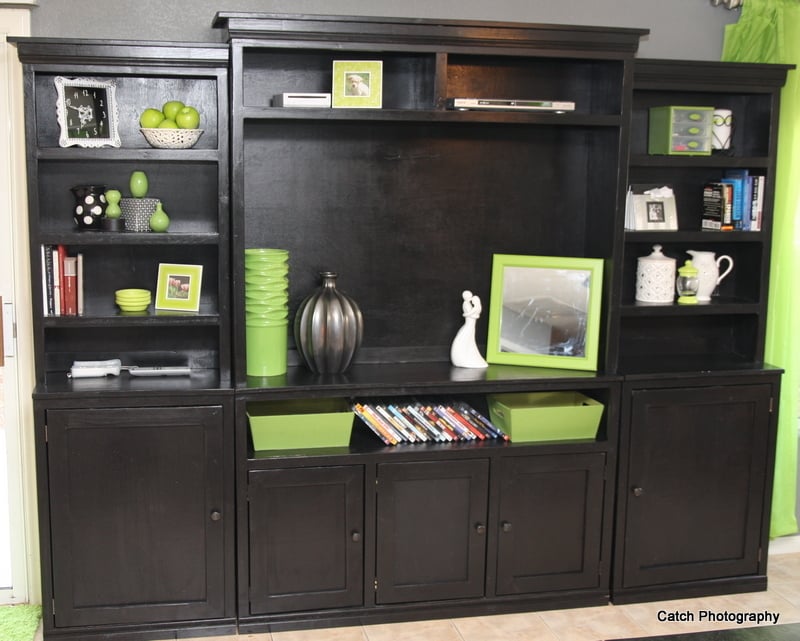
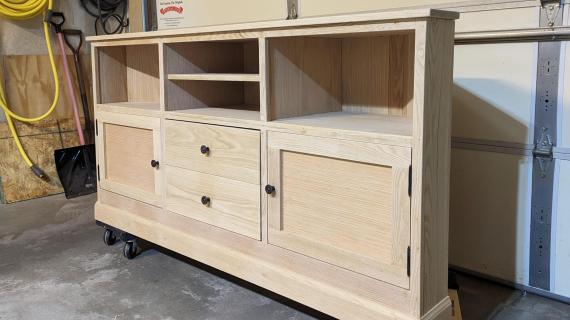
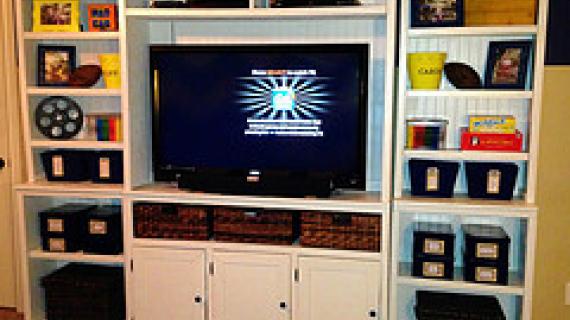
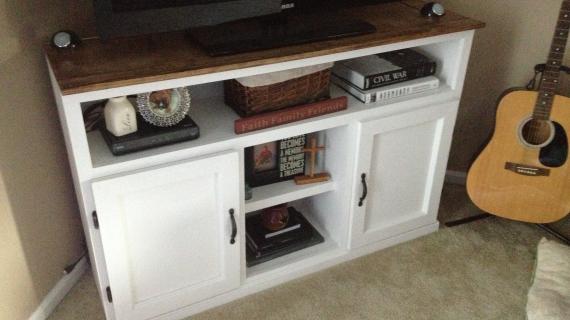
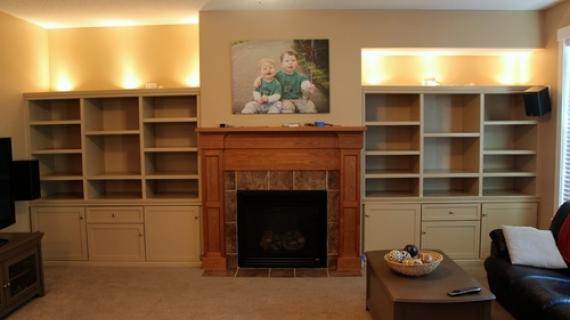
This media suite was built in collaboration with one of our readers, Rebecca:
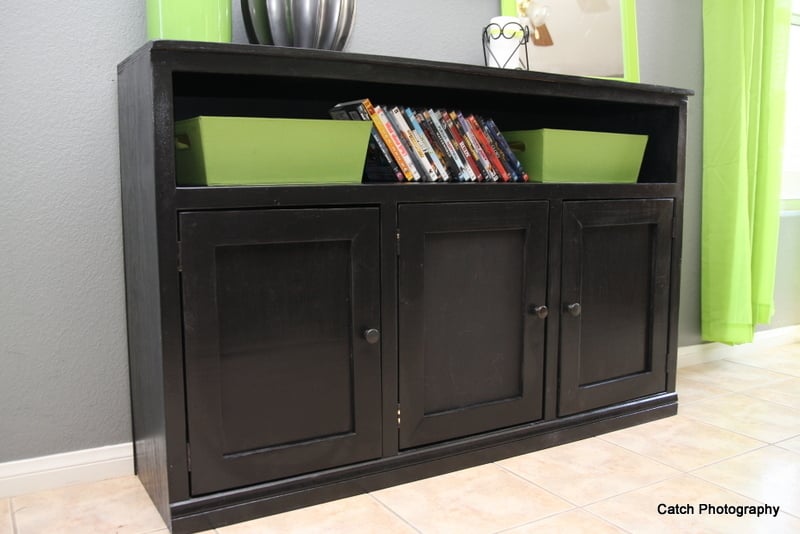
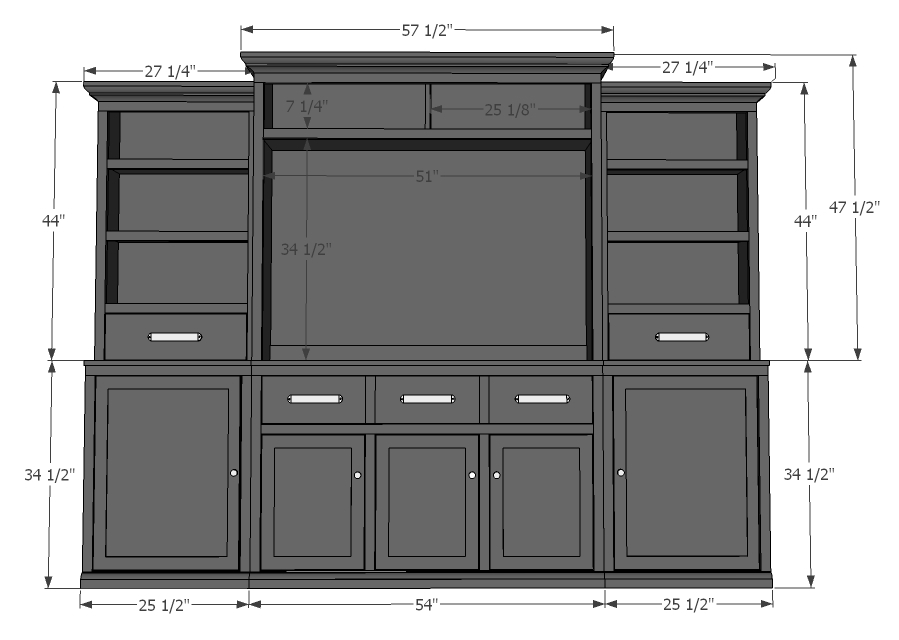
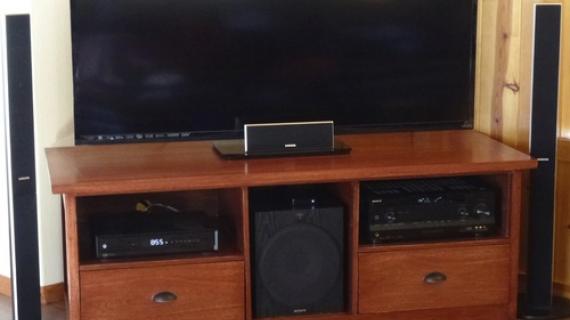
This is the starting base console piece. Ana and I purposely designed it to be quite narrow for a flat screen. I have a more narrow living room space and didn't want something protruding very far out. Right now it is actually in my dining room till I get that nice TV, so it struck me how nice this could be as a buffet or console table in a space as well.
The entire unit is massive (8 1/2 feet long and almost 8 feet tall) do if you don't have room for all of that then just this base piece is a great place to start while still getting tons of storage. Also, cutting this piece at a depth of only 12 inches made it possible to build this entire project for just under $300 including paint and hardware! That is a much better price than the $4000 or so this would cost to get it from Pottery Barn.
I am all about that.
This is a big project. It took me about 7 weeks with two small ones at home, being 6 months pregnant, out of town twice, my toddler that decided he was ready to potty train, and being sick at least once I am sure in that time! So I am beyond grateful for Ana's patience and for such an awesome community here that knows exactly what all that "LIFE" is like! This is completely doable though thanks to Ana's plans!
Thank you so much Rebecca! I hope you stop over and check out lots more photos, tips and more specific tips on Rebecca's blog as well.
You can build all the pieces in this media suite.
Pin For Later!
Preparation
- 1 sheet 3/4" plywood
- 1 sheet 1/4" plywood
- 5- 8ft 1x2's
- 3- 8ft 1x3's
- 54" base molding
3/4" Plywood
- 1 @ 11 3/4" x 54"
- 2 @ 11 3/4" x 33 3/4"
- 2 @ 11 3/4" x 52 1/2"
- 2 @ 11 3/4" x 21 3/4"
- 1 @ 7 3/4" x 50 3/4"
1/4" plywood
- 3 @ 11 3/4" x 16 1/2" (These are your inset door fronts) you might want to measure and cut specifically for what you need especially if you are not insetting your doors into their frames.
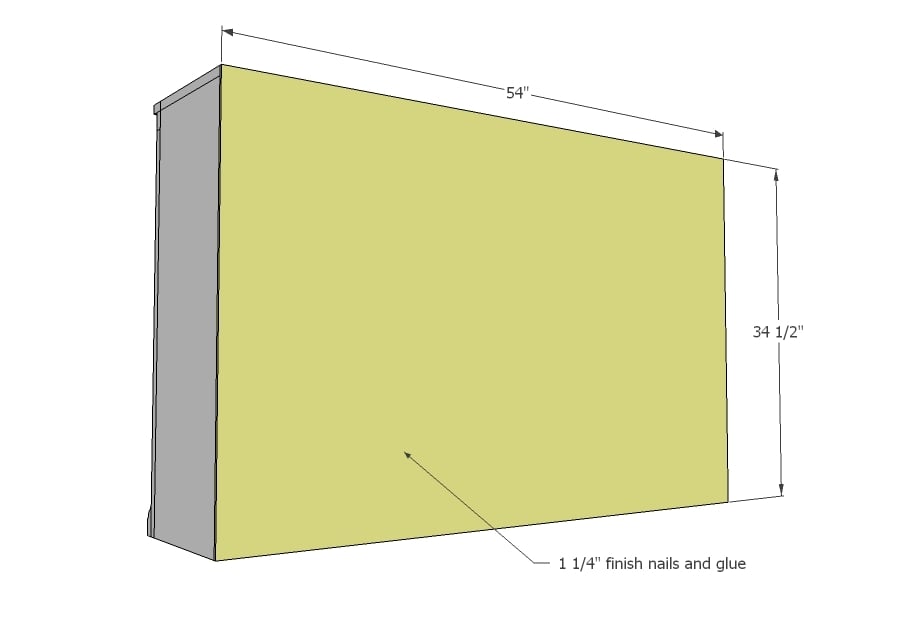
- 1 @ 34 1/2" x x54"
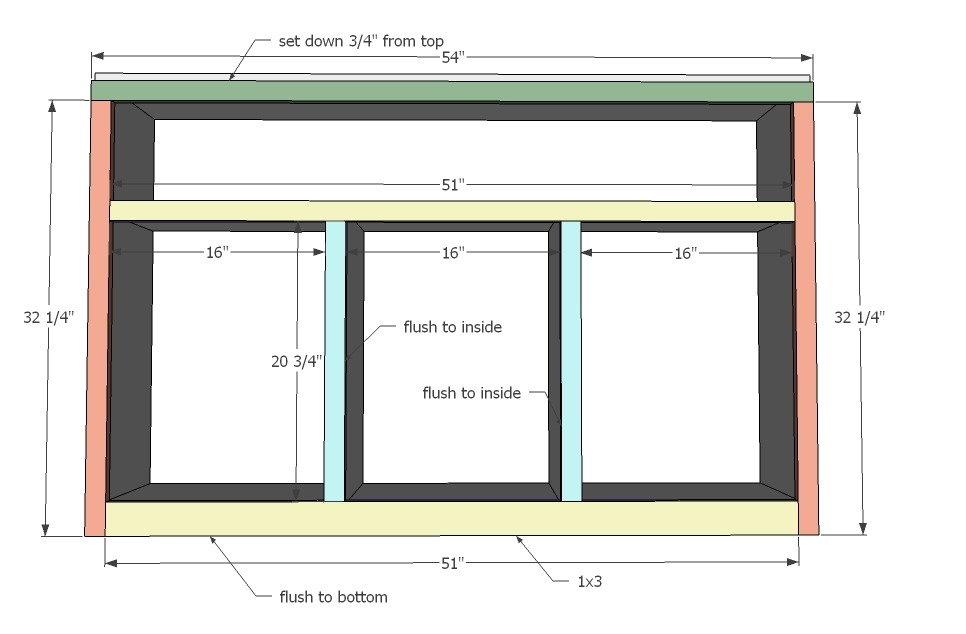
1x2's
- 2 @ 52 1/2"
- 2 @ 32 1/4"
- 2 @ 54"
- 2 @ 20 3/4"
- 1 @ 51" 1x3's
- 1 @ 51"
- 6 @ 20 1/2" (These are for your door frames cut on a miter. This will be a different measurement if you are doing butt joint doors)
- 6 @ 10 3/4" (These are for your door frames cut on a miter. This will be a different measurement if you are doing butt joint doors)
- 2" base molding
- 1 @ 54"
- Rip 3/4" plywood first into strips 11-3/4" wide by 8 feet long. You can have your home improvement store do this for you, just make certain that the widths are exactly the same.
- This cut list, does not include shelves for in the cupboards. If you want to add them, you will need to purchase an additional 1x12x8ft board and cut them at 17 12"


Please read through the entire plan and all comments before beginning this project. It is also advisable to review the Getting Started Section. Take all necessary precautions to build safely and smartly. Work on a clean level surface, free of imperfections or debris. Always use straight boards. Check for square after each step. Always predrill holes before attaching with screws. Use glue with finish nails for a stronger hold. Wipe excess glue off bare wood for stained projects, as dried glue will not take stain. Be safe, have fun, and ask for help if you need it. Good luck!
Instructions
Step 1
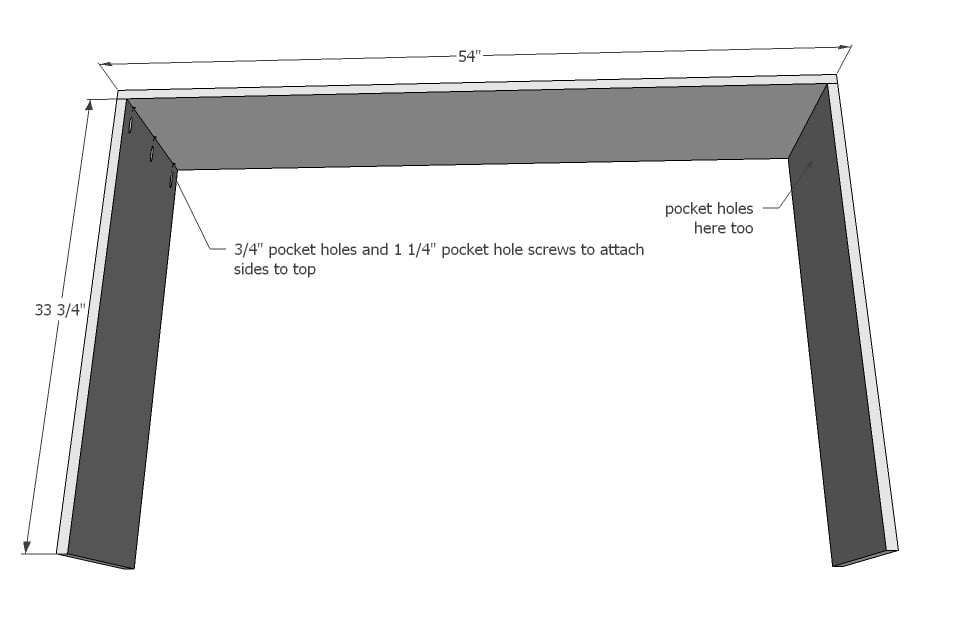
Easy step - just start by attaching sides to top.
Step 2
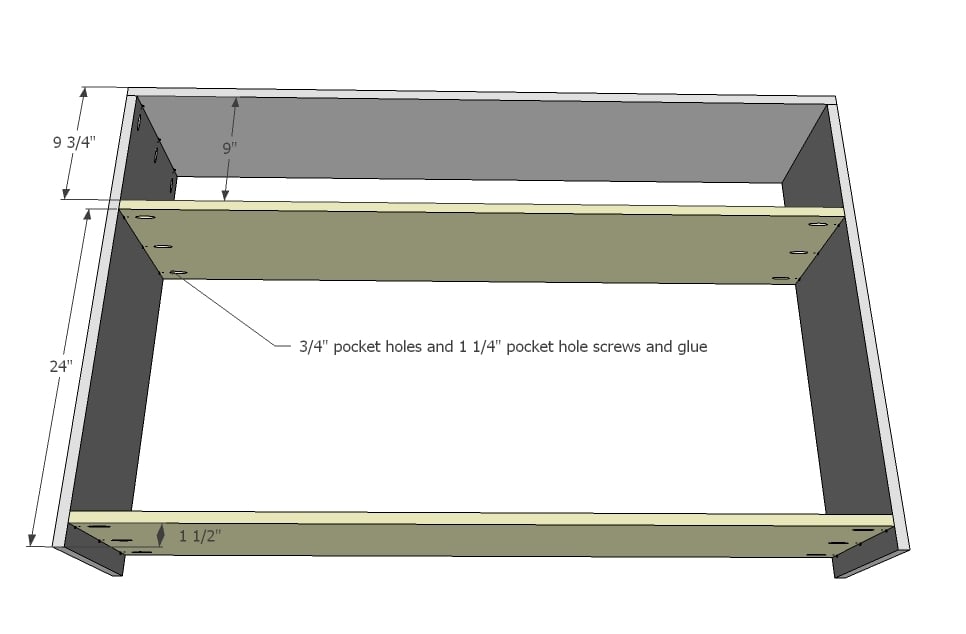
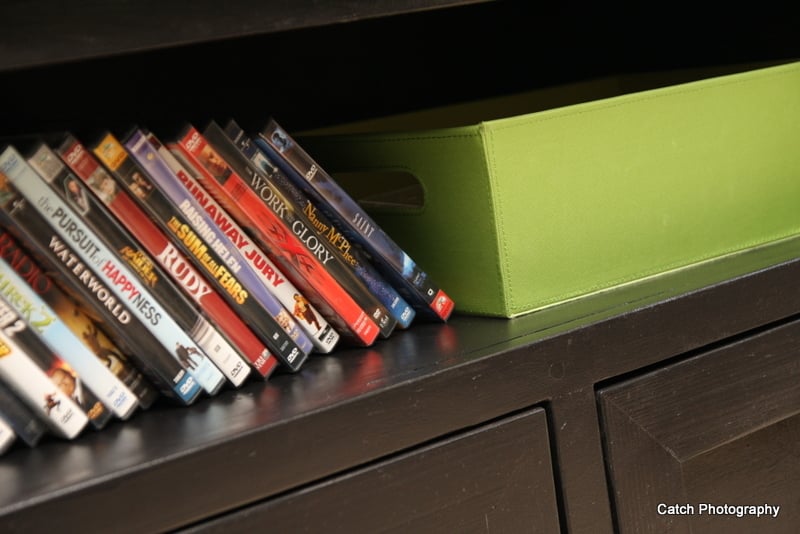
Now the shelves.
Step 3
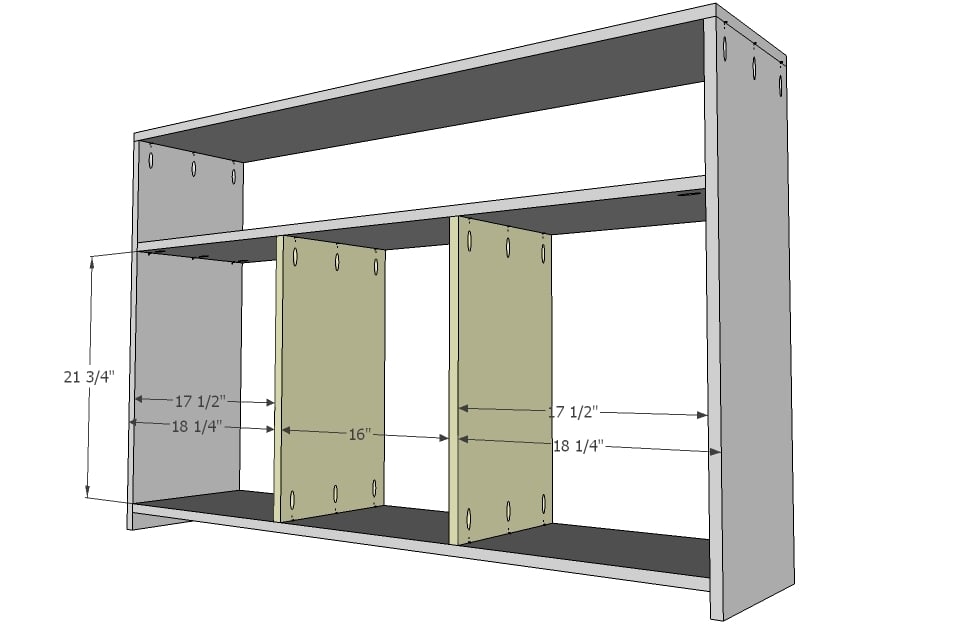
Now add the dividers between the shelves.
Step 4
These are to provide support for the bottom shelf.
Step 5
Step 6
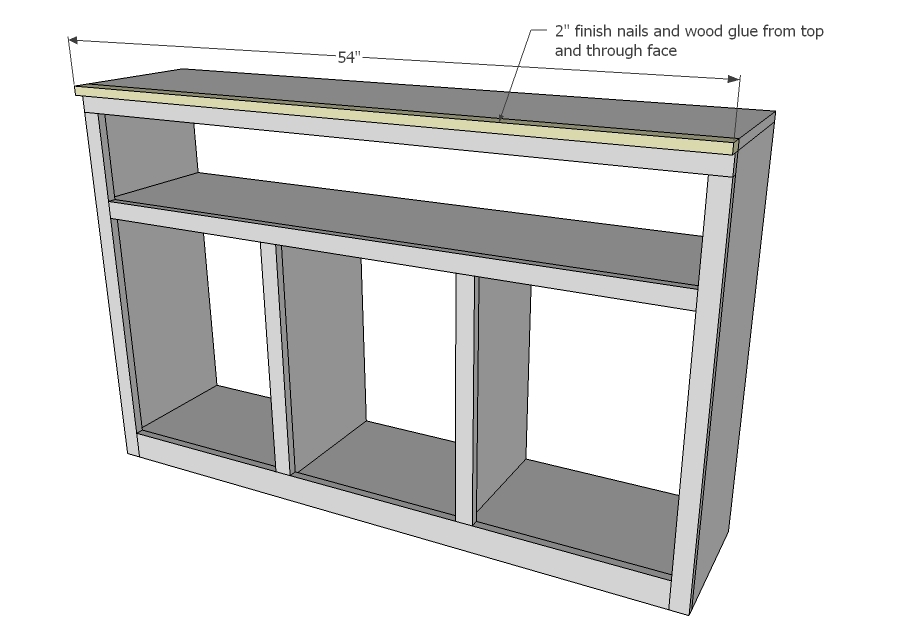
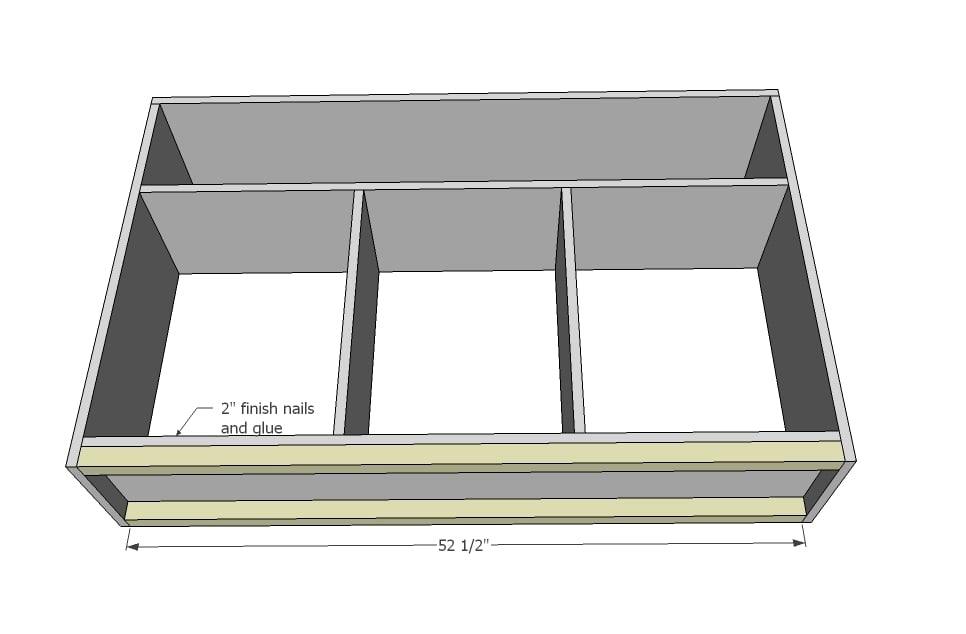
Now the front edge trim ...
Step 7
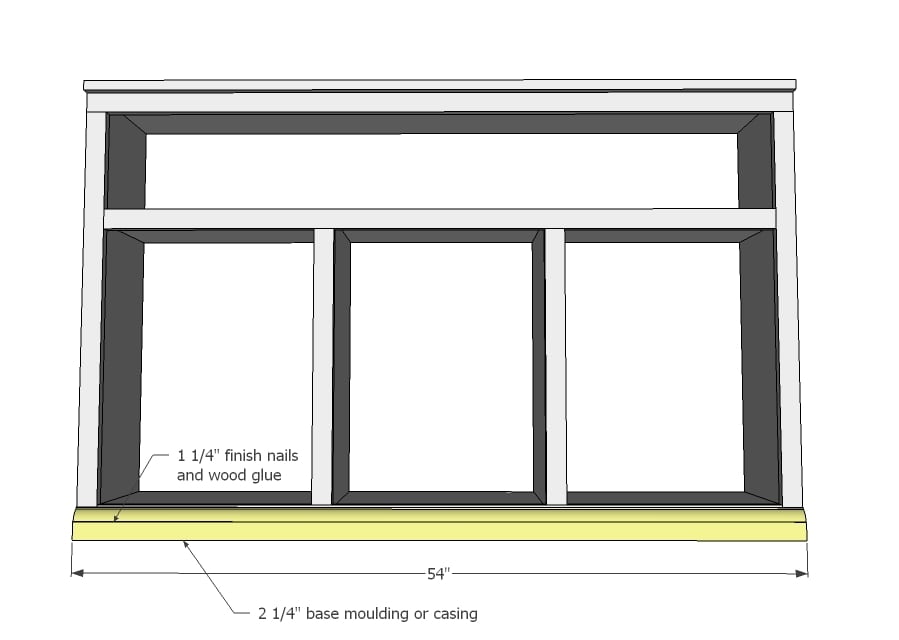
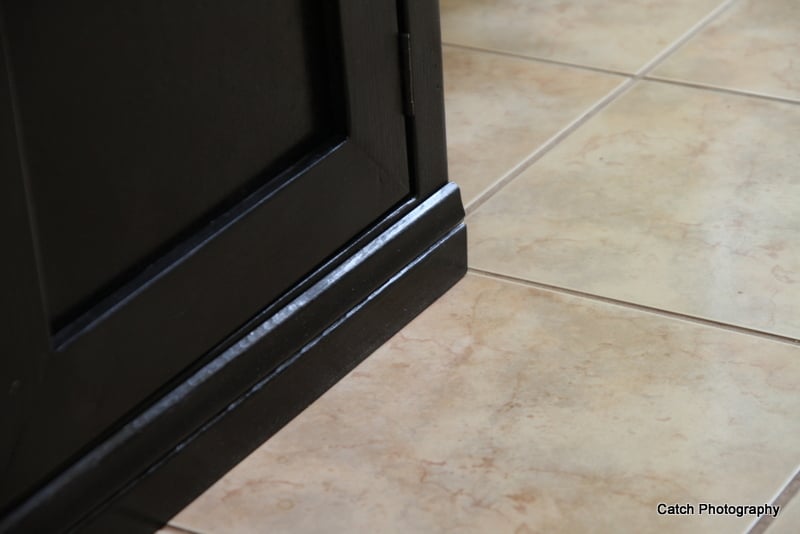
And the bottom moulding gets nailed on.
Step 8
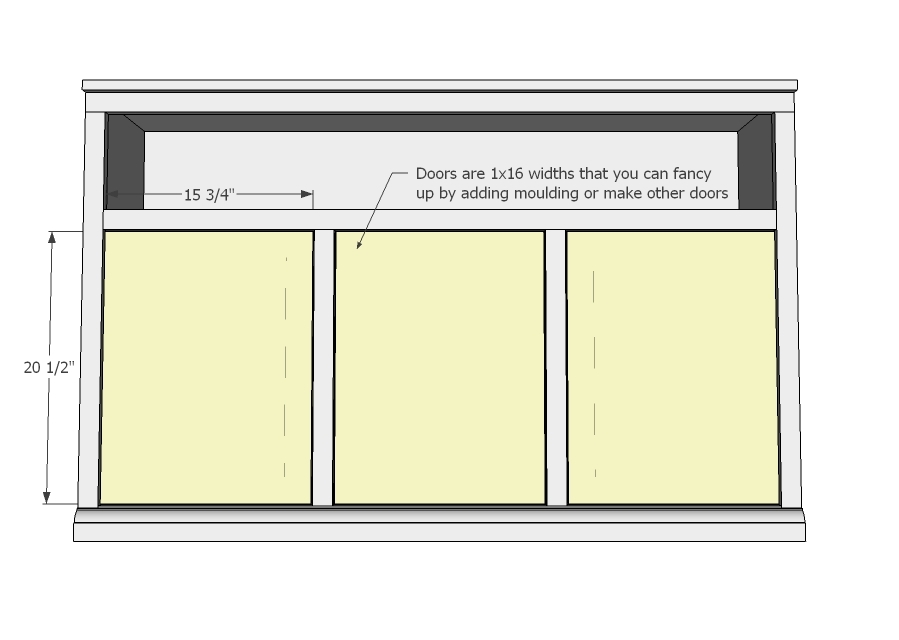
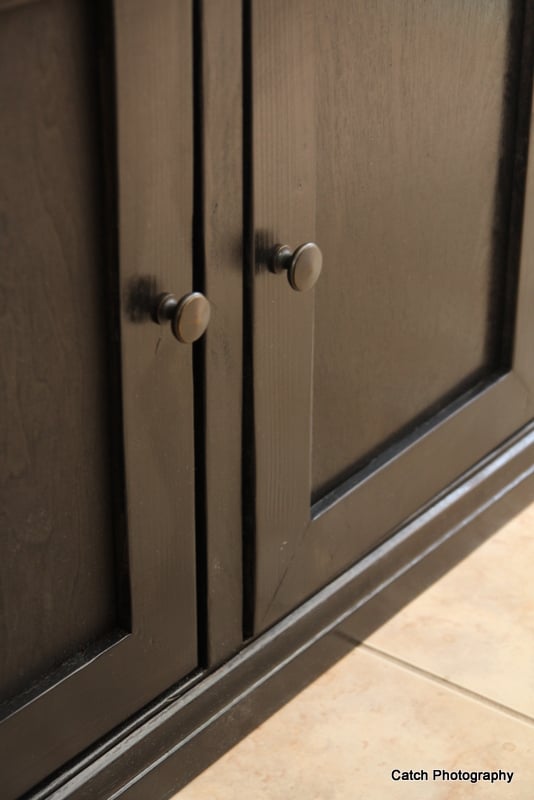
And finally the doors. Rebecca is going to put together a post on doors later this week, so check back for that.
Step 9

This piece is a fake drawer front and opens with hinges. I did some miss-measuring in my face frame so the piece I cut did not fit when I went to assemble it. I could have fixed it, but had these boxes already that fit perfectly so decided to leave it off.
Step 10
And add the back. I always like to add the back last so I can work on hinges and such from the back.
It is always recommended to apply a test coat on a hidden area or scrap piece to ensure color evenness and adhesion. Use primer or wood conditioner as needed.


Comments
whitney_smith
Tue, 04/17/2012 - 05:35
Great work Rebecca!
The whole things looks fantastic! I wish I needed this!
Daisies and Crazies
Tue, 04/17/2012 - 09:29
Yes!
Oooo! This might be The One! I'm excited to see all the plans. I may need to take some vacation time for a long weekend...
Thanks.
JerseyGirl80 (not verified)
Tue, 04/17/2012 - 11:00
Finish?
Hey this looks great! Can you tell me what finish you used on this? I plan on making Ana's dog crate and this is the exact color I need to match the rest of my living room furniture. Most of the stains I've seen look either too red or too black. This looks perfect!
Thanks in advance :)
redhead_61
Tue, 04/17/2012 - 11:59
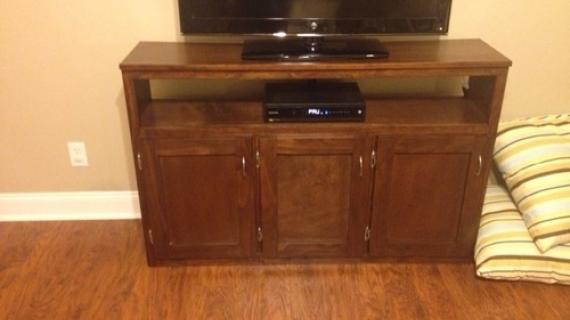
Painted
This is actually painted with Behr Ultra- Beluga in Satin. It does have a poly semi gloss coat on it though.
Tara Garrison (not verified)
Wed, 04/18/2012 - 19:28
We Can't wait for the doors!
MY husband just built one of these for me, and we are anxiously awaiting the door plans! We are building three to go across as the base of my built in bookshelves. I love the look and we are now deciding on the finish! I will post the finished project!
THANK YOU!
Laura Fama
Mon, 04/23/2012 - 08:03
Beautiful piece!
This is gorgeous!! But it's not deep enough to hold my 300 disc CD player, which is 18" deep. Would it be too hard to modify the plans to accommodate this? It would just mean changing the 11 3/4" measurements to say 20"? While I'm at it, Would it be too difficult to add a fourth door, maybe lengthen the unit??... which would be carried over to the hutch piece too... I'm a big symmetry person. Maybe I'd just leave the middle door off...??
Btw I pinned this the other day and got over 50 re-pins on it!!!! It's beautiful !! I hope it's this nice in white!!!
Milca (not verified)
Tue, 04/24/2012 - 18:18
exactly the depth i needed!
This is awesome! We have a wall mounted flat screen but needed a small console for the 3d glasses and the remotes, etc. Thanks Ana!
AJ (not verified)
Wed, 08/29/2012 - 16:47
Dividers for between shelves
I want to build this with just two cabinet doors that open and no dividers. Are they needed for support? I essentially just want it to open into a big space 54" w for stacking games and stuff.
Would that alteration work?
Laurelin Andrade (not verified)
Sun, 11/25/2012 - 12:03
Dimensions Question
My husband and I are getting ready to build this and are in the process of reworking the cut list to make it deeper (15 inches to accommodate records). I'm it so clear on the 1x2s that frame the front. They would appear to leave a 3/4 inch overhang around the inside. Is this the case? Does that get annoying?
Laurelin Andrade (not verified)
Sun, 11/25/2012 - 12:06
Dimensions Question
My husband and I are getting ready to build this and are in the process of reworking the cut list to make it deeper (15 inches to accommodate records). I'm not so clear on the 1x2s that frame the front. They would appear to leave a 3/4 inch overhang around the inside. Is this the case? Does that get annoying?
harrison4803
Thu, 07/21/2016 - 12:46
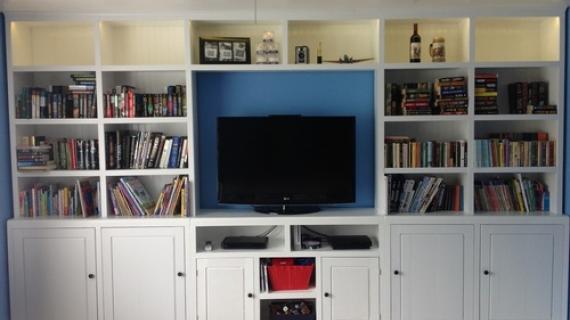
Our Finished Media Center Project
We finally finished our entire Media Center. We used 5, 4'x8', 3/4" Oak Plywood and 200' of 1-1/2, 3-12 and 4-1/2" Oak Plywood Trim. We connected everything with 1-1/4" Kreg Screws and a few 1-1/4" finish nails.
harrison4803
Thu, 07/21/2016 - 12:48
Media Center
We finally finished our entire Media Center, using Anna & Rebecca's design. We used 5, 4'x8', 3/4" Oak Plywood and 200' of 1-1/2, 3-12 and 4-1/2" Oak Plywood Trim. We connected everything with 1-1/4" Kreg Screws and a few 1-1/4" finish nails.
harrison4803
Thu, 07/21/2016 - 12:50
Media Center
See our YouTube Video here:
https://www.youtube.com/watch?v=W413q3LMzX0
djgerz
Sun, 02/28/2021 - 17:32
Rebecca Media Suite
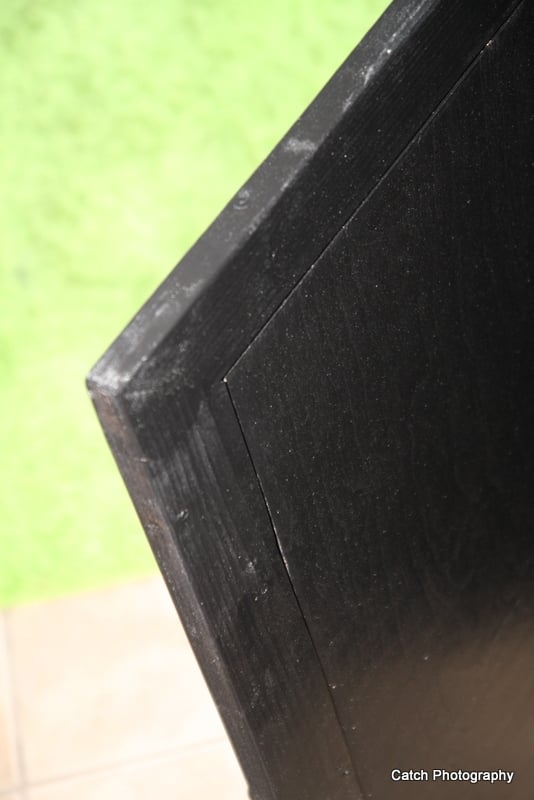
From the plans it appears there are exposed plywood edges? Is there trim I'm not seeing?