

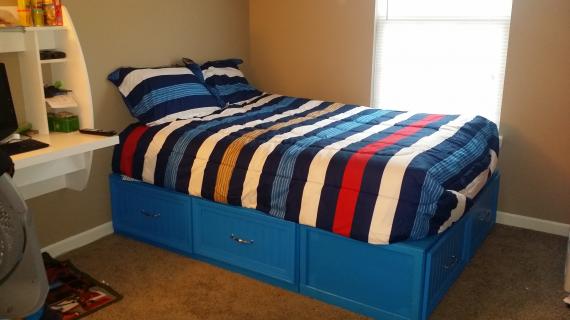
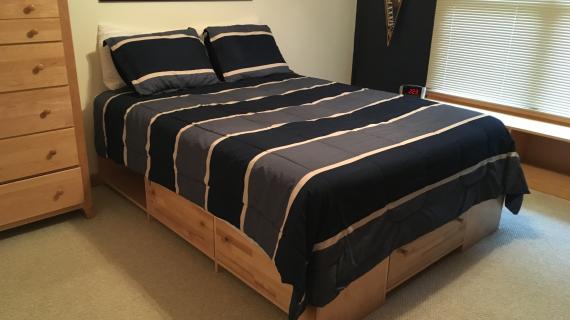
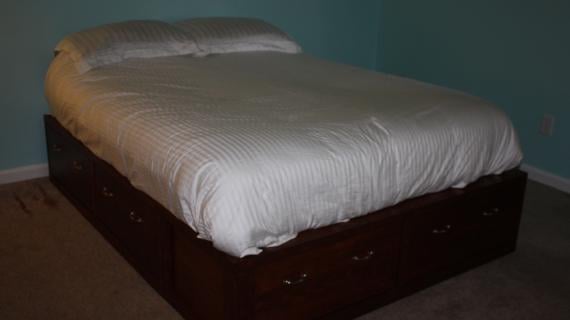
It's simple to build a storage bed! Just build three benches. Our free plans show you exactly how.
This plan is also available in a Standard King version.
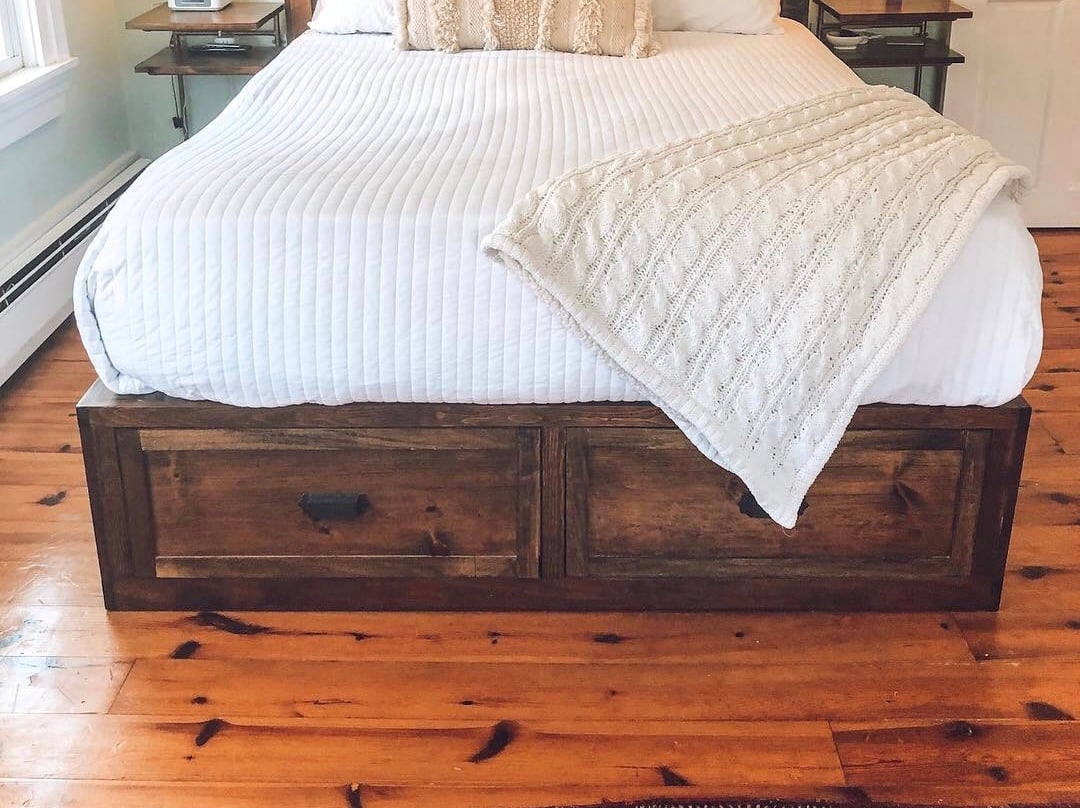
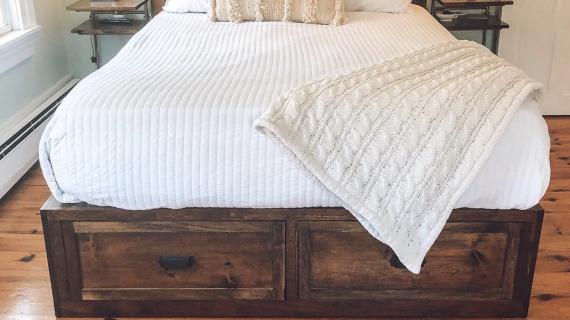
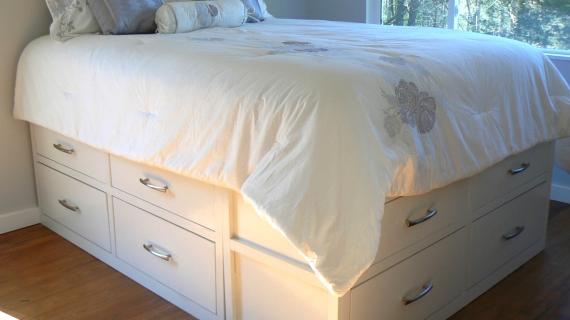
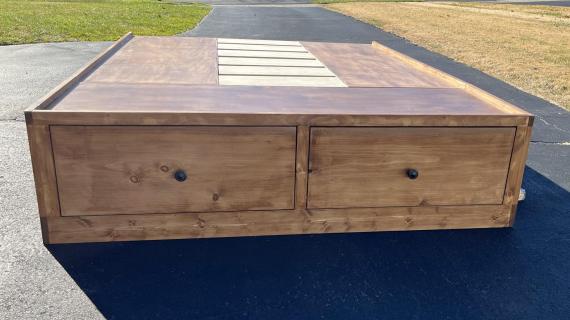
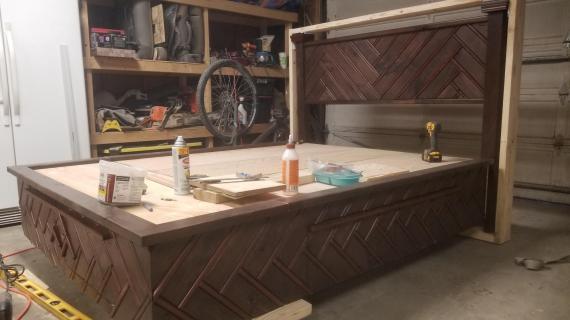
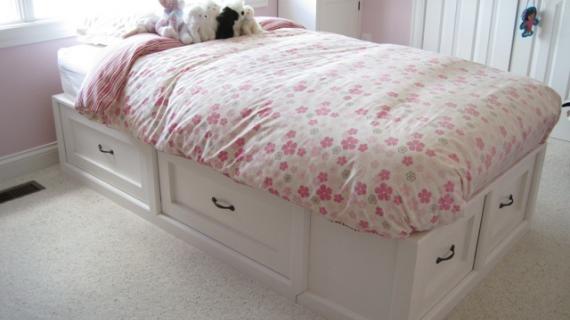
Reader submitted photo by One Delightful Home
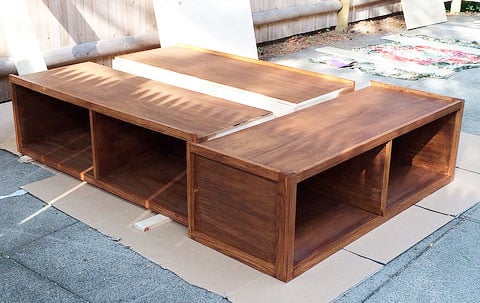
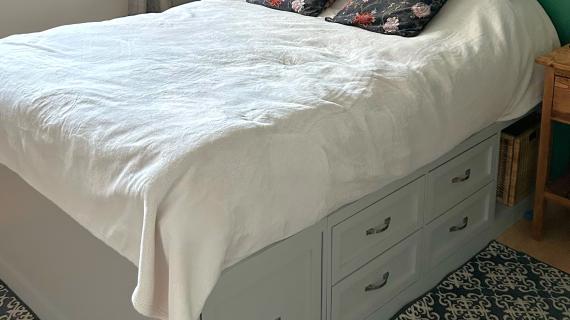
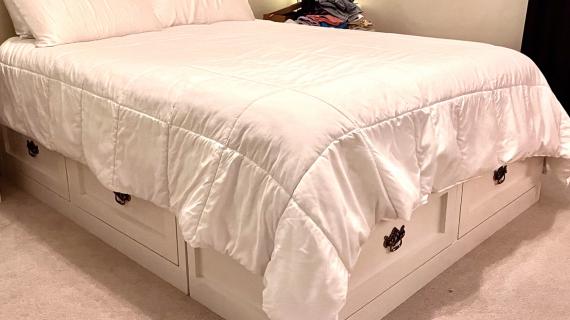
We love this simple to build storage bed! It's simply three benches that are easy to move into the room. The cubbies are nice and deep and oversized, perfect for baskets or bins.
This is an updated plan. The old plans are still available here.
Pin For Later!

Preparation
- 3 - 4x8 Sheets of 3/4" Cabinet Grade Plywood, MDF or AC Plywood*
- 1 - 4x8 Sheet of 1/4" thick plywood
- 4 - 1x2 @ 8 feet long
- 3 - 1x4 @ 8 feet long
*For a stained finish, cabinet grade plywood is recommended. For a painted finish you can use MDF (not fun to work with but inexpensive) or AC Plywood (will need more sanding but also less expensive)
OPTIONAL DRAWERS SHOPPING LIST
- 3 - 1x4 @ 8 feet long
- 6 - 1x6 @ 8 feet long
- 1 - sheet of 1/4" thick plywood
- 6 - 18" drawer slides
- 2 - 1x12 @ 8 feet long
Carcasses
- 3 - 3/4" plywood @ 19-3/4" x 60"
- 9 - 3/4" plywood @ 19-3/4" x 14-3/4"
- 6 - 3/4" plywood @ 19-3/4" x 28-7/8"
- 3 - 1/4" plywood @ 15-1/2" x 60"
Face Frames
- 3 - 1x2 @ 60"
- 3 - 1x4 @ 60"
- 9 - 1x2 @ 11-1/4"
End Bench
- 2 - 1x4 @ 20-3/4"
- 2 - 1x2 @ 20-3/4"
- 4 - 1x2 @ 11-1/4"
Center Support
- 2 - Scrap plywood strip @ 60" x ~7-1/2"
- Scrap plywood pieces 20" long
OPTIONAL DRAWERS - Should be built to fit openings and drawer slides
- 12 - 1x4 @ 18" - drawer slide cleats
- 12 - 1x6 @ 18" - drawer box sides
- 12 - 1x6 @ ~24-7/8" - drawer box front and back - ADJUST TO FIT YOUR OPENINGS AND DRAWER SLIDES
- 6 - 1/4" plywood @ 18" x ~26-3/8" - drawer bottoms - cut to fit the drawer bottom
- 6 - 1x12 @ 27-1/2" - Drawer Faces
For three sheets of 3/4" plywood:
- Rip lengthwise into 6 strips, 8 feet long by 19-3/4" wide
- From these strips, first cut the 60" long pieces
- From scraps, cut remaining pieces
- There will be three scraps, 8 feet long by about 7-1/2" wide. Save this scrap piece and use as the cleat at the back of the side benches
For the 1/4" plywood
- Cut 60" x 48" piece
- From this piece, rip into three pieces, 60" x 15-1/2"
For the trim and face frame pieces, a compound miter saw is recommended for nice cuts.


When fastening, you can use 2" nails or 2" screws, unless otherwise directed. Always use glue. Remember, you need to make 3 benches.
Instructions
Step 1
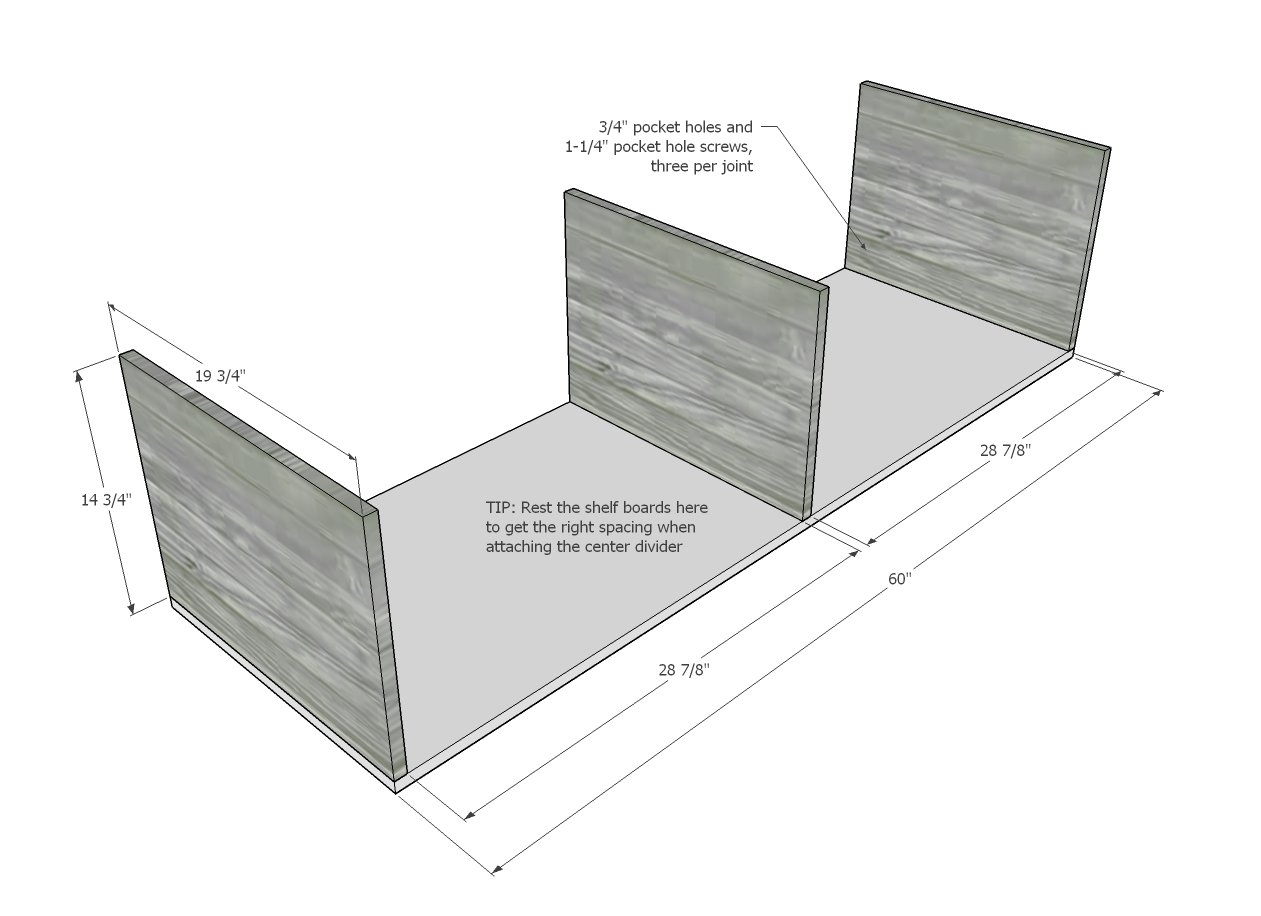
Attach the bench ends and divider to the bench top with 3/4" pocket holes and 1-1/4" pocket hole screws. Pocket holes should be placed about an inch from each edge and centered, three per joint is plenty.
TIP: Use the shelf boards (attached in next step) as a spacer to guide placing the divider perfectly centered.
BUILD THREE BENCHES.
Step 2
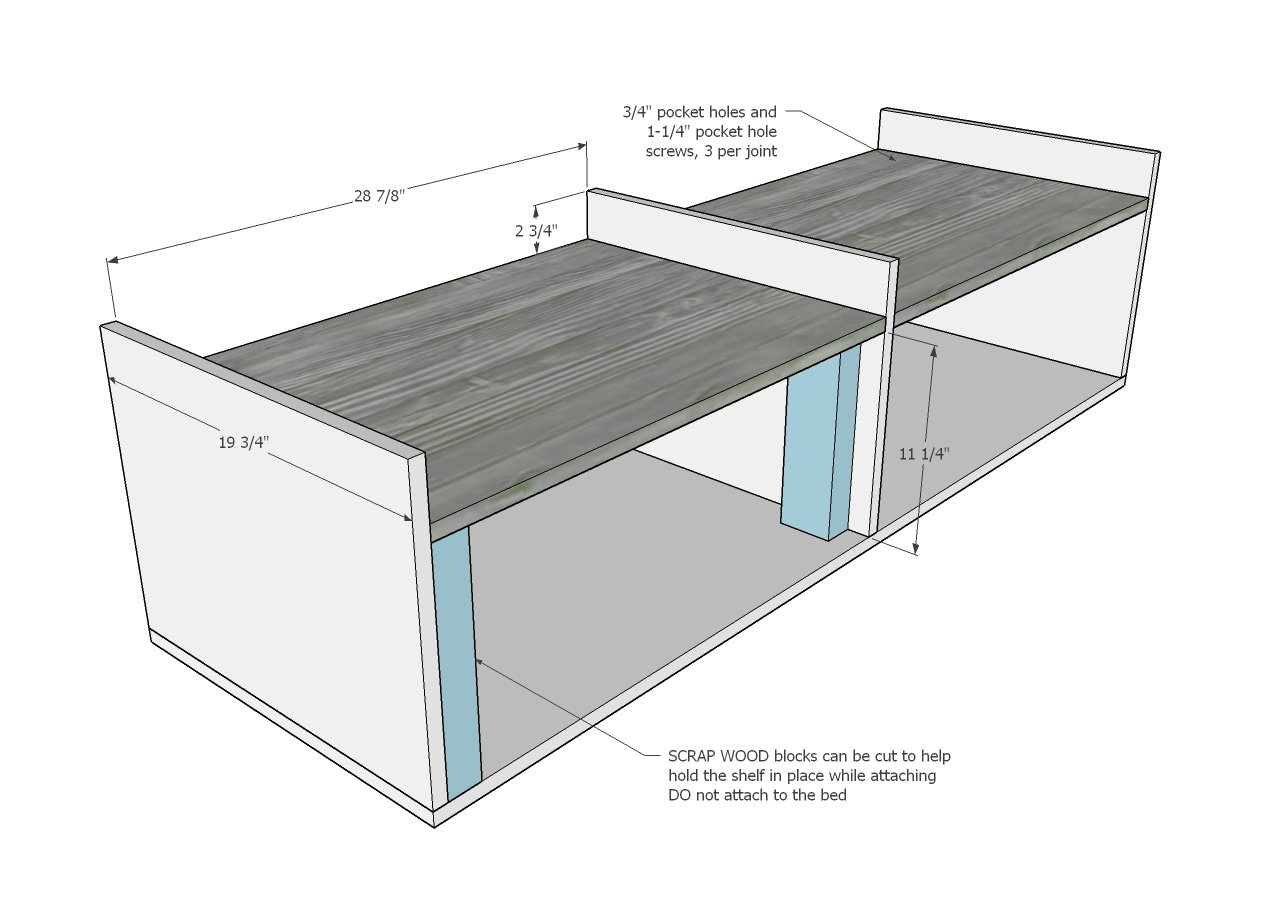
Drill 3/4" pocket holes on each end of the shelves.
Attach to the sides and dividers.
Scrap wood blocks can be cut to help with assembly as shown in diagram.
CONTINUE FOR ALL THREE BENCHES
Step 3
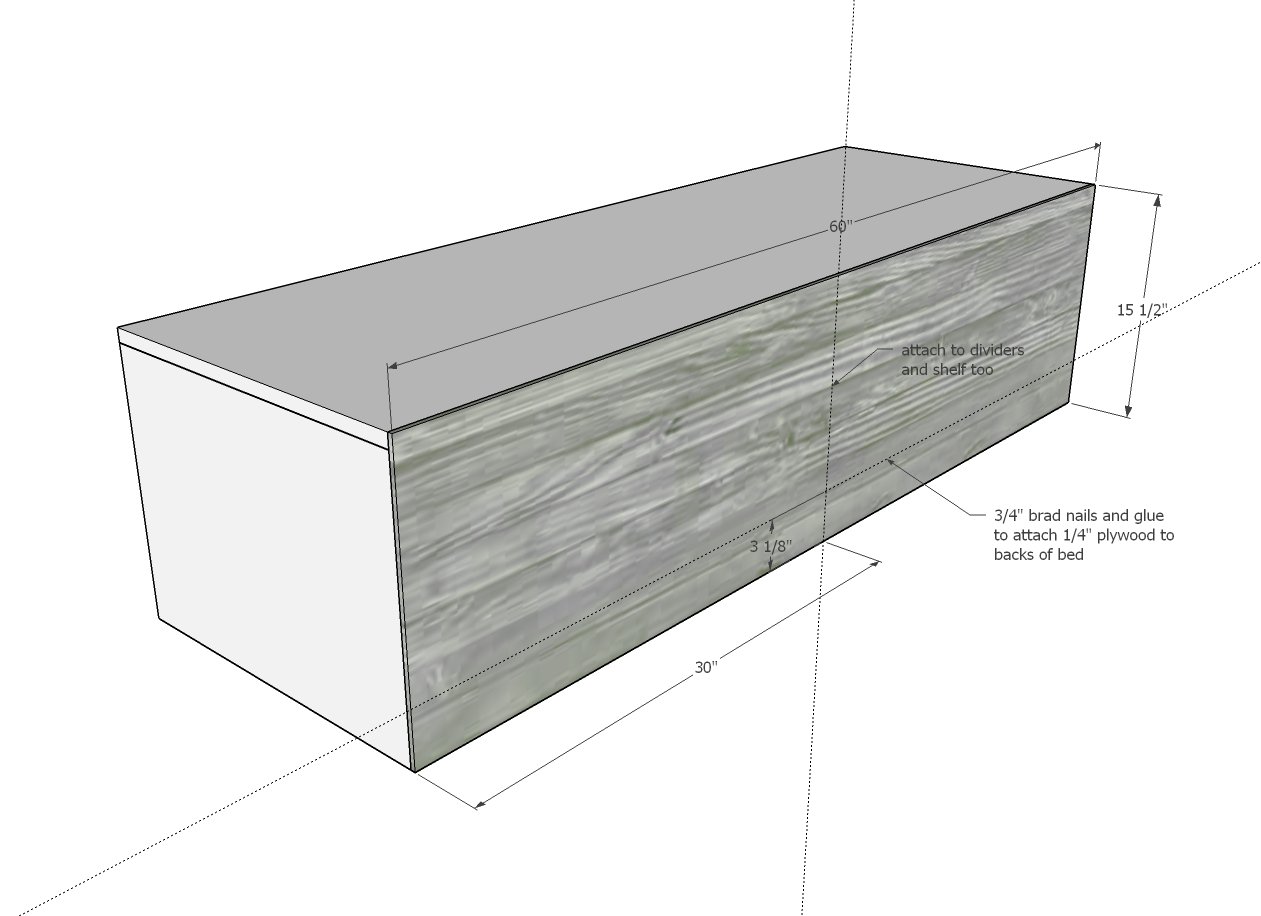
Nail and glue 1/4" plywood backs to all three benches.
CONTINUE FOR ALL THREE BENCHES
Step 4
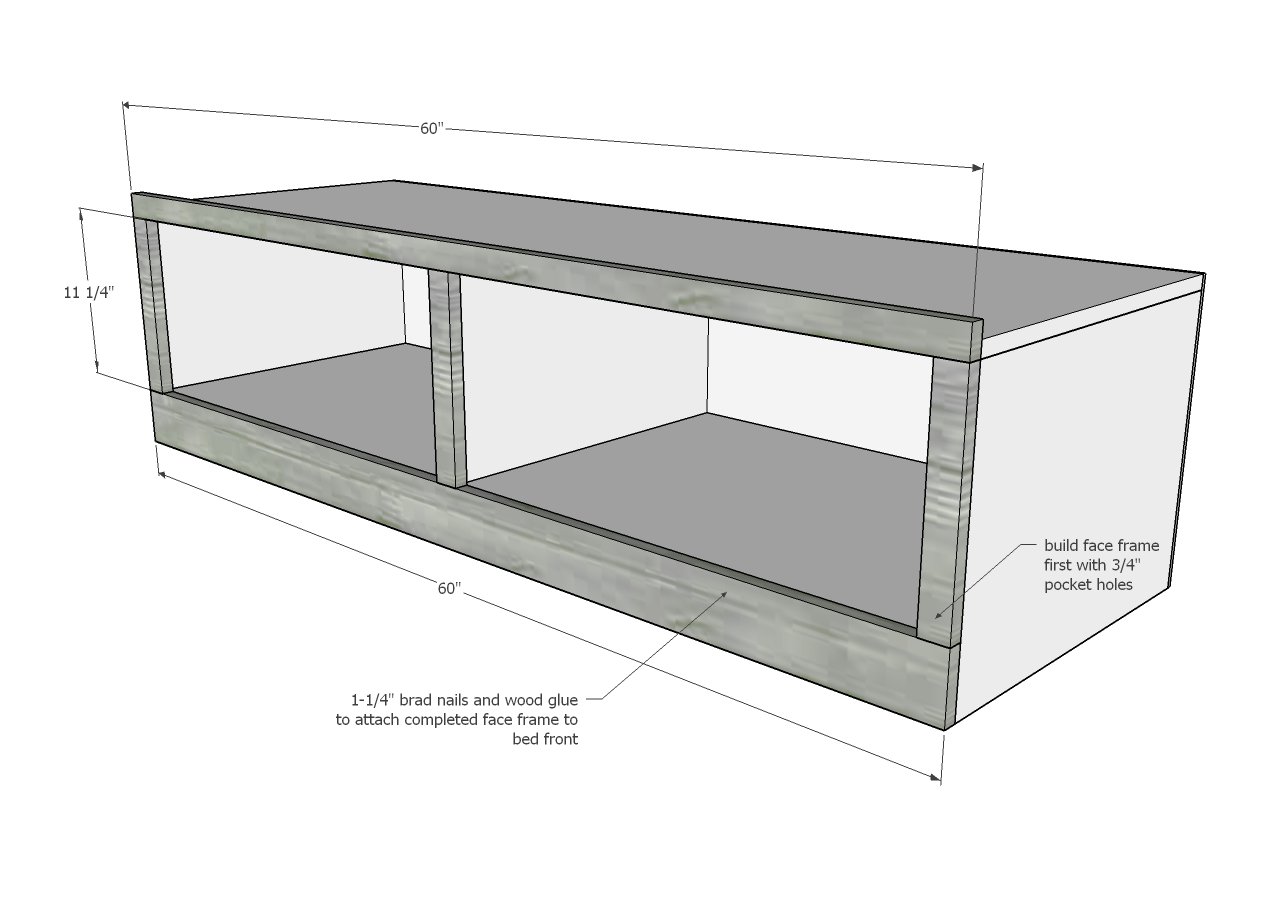
Cut the 1x boards with a miter saw. Build face frames on a flat workbench.
Nail completed face frames to all three benches.
Step 5

END BENCH ONLY
For just the end bench, build two face frames to trim out ends. Nail and glue to the ends of the end bench only.
Step 6
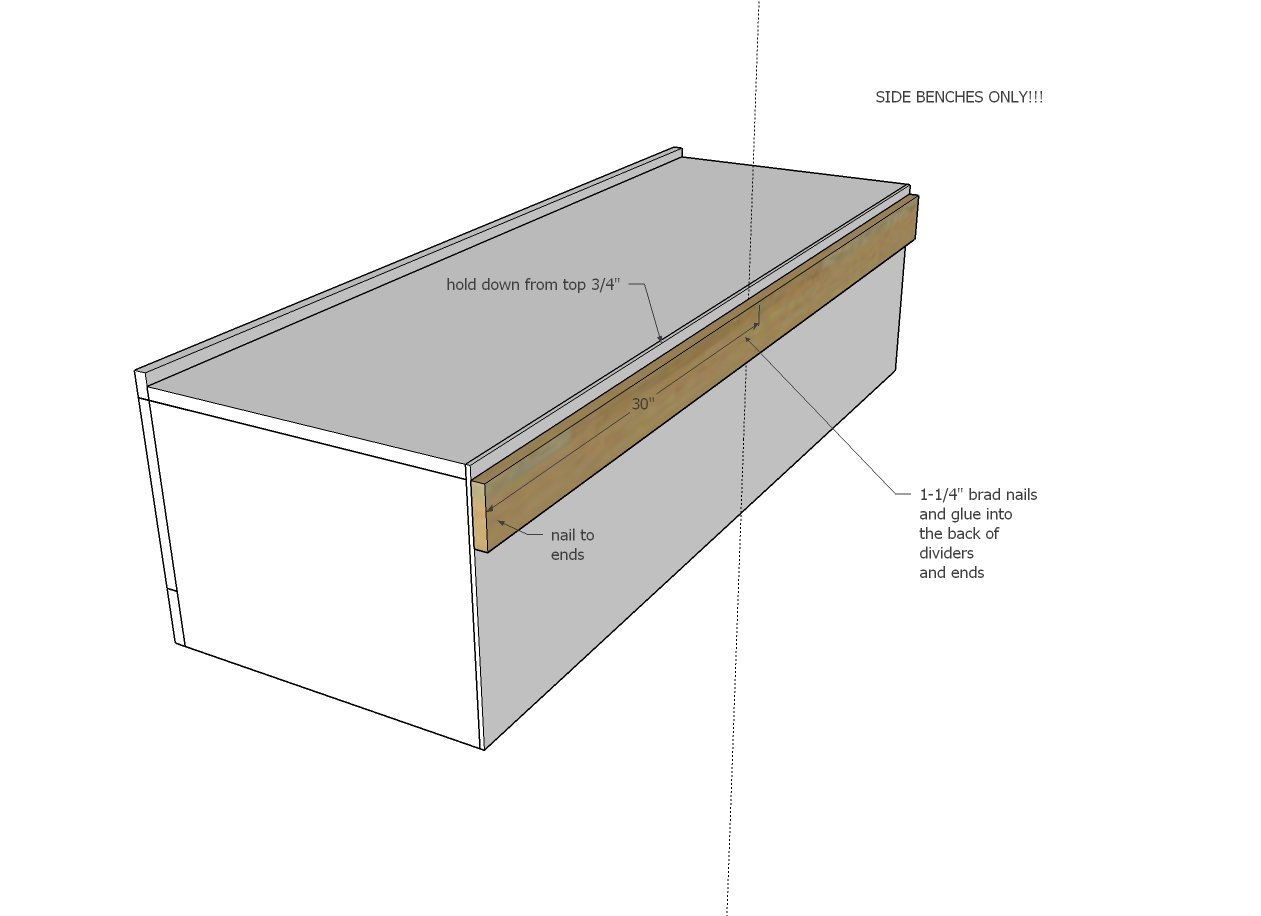
SIDE BENCHES ONLY
Attach 1x4 cleat to the back of the SIDE BENCHES ONLY, held down 3/4" from top of bed. Nail into the divider and end backs with glue.
Step 7
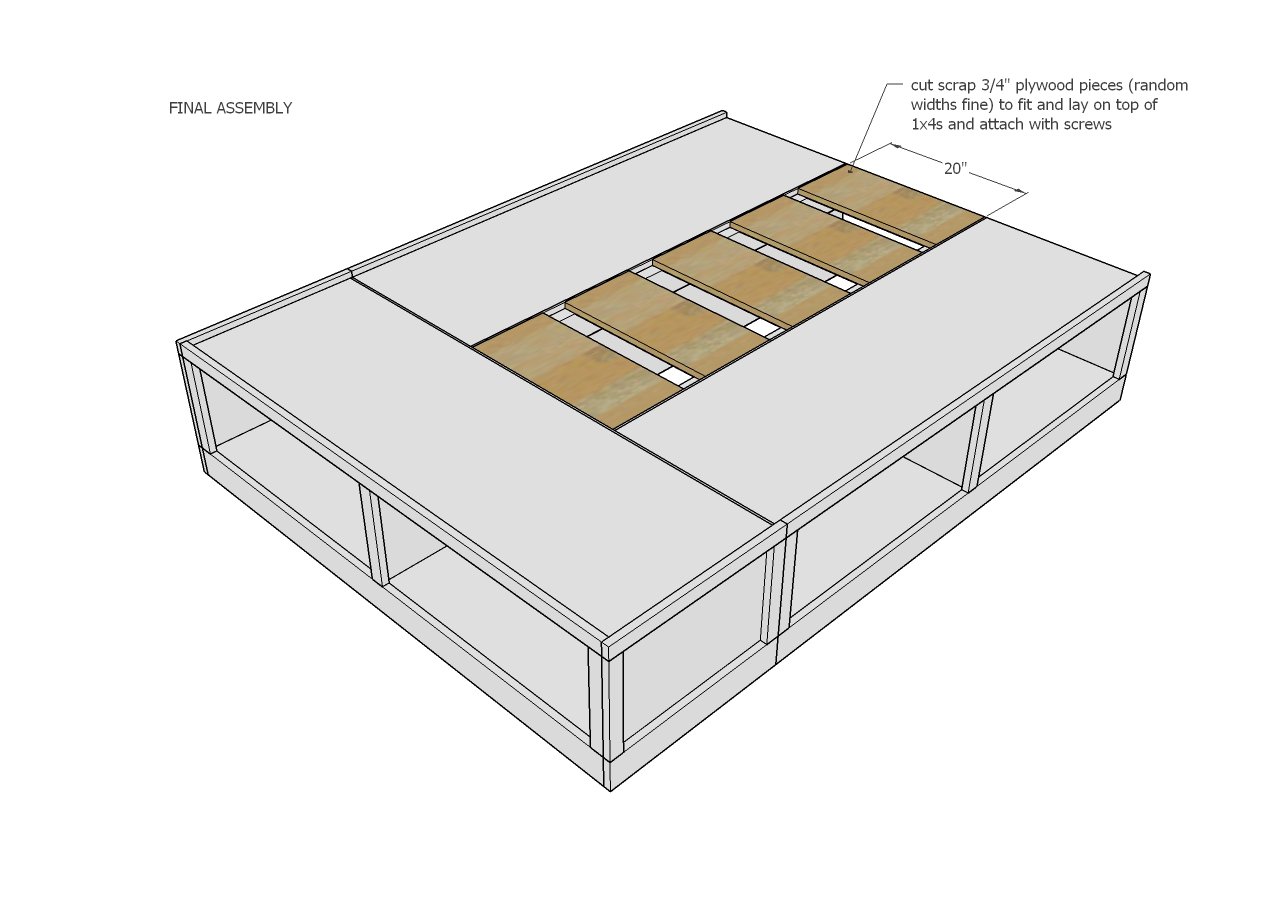
Arrange the three benches in room.
You can screw together if desired.
Lay scrap wood plywood (can be random sized) in the opening in the center of the bed. We recommend screwing down (so it's easy to disassemble the bed at a later time). You can use 1-1/4" pocket hole screws, 1-1/2" self tapping screws would be less expensive.
Step 8
OPTIONAL DRAWERS
Draw a line on 1x4s, 1" up from bottom edge of 1x4.
Attach drawer slides to the 1x4, with front edge of drawer slide cabinet member flush with front edge of 1x4.
The holes in the center of the drawer slide should line up with your pencil mark, 1" up from bottom edge of 1x4 - so you know your slides are being installed level.
Remember that the opposing drawer slide needs to be installed in mirror.
Set the 1x4s inside the cubbies and nail to the sides of the cubbies with 1-1/4" brad nails. The front edge should be lined up with the front edge of your plywood carcasses.
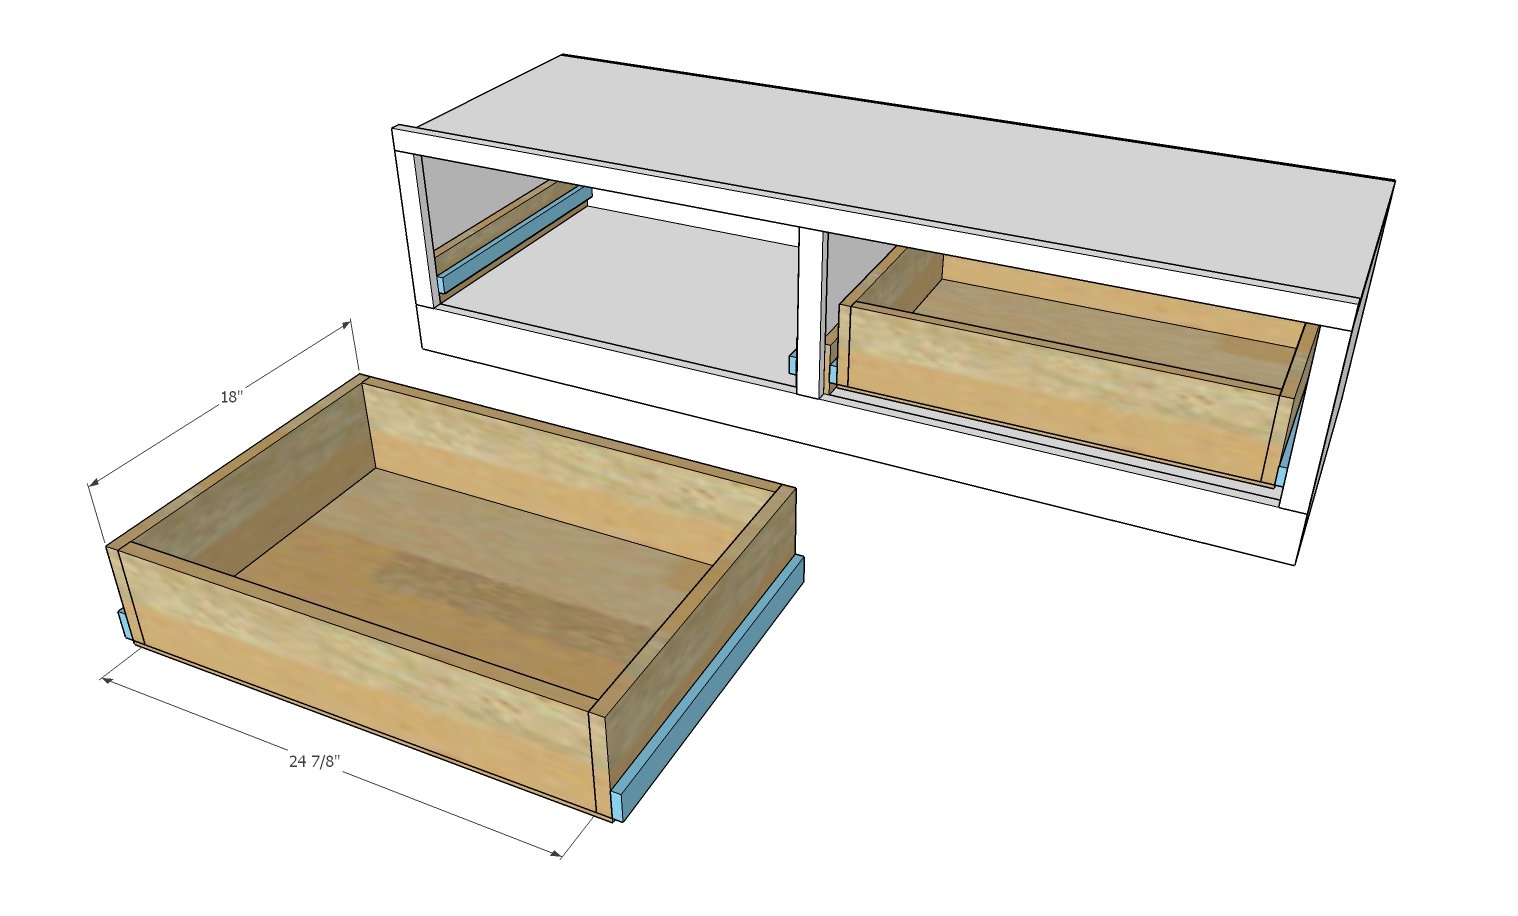
Build the drawer boxes from 1x6s as shown. The sides should always be 18" to match your drawer slides. The fronts and backs may need to be altered in length to fit your openings and your drawer slides.
Build the boxes with 3/4" pocket holes on the outsides and 1-1/4" pocket hole screws.
Nail 1/4" plywood to bottom of drawer box with glue and 3/4" brad nails.
Install the drawer member slides on the drawer boxes.
Fit drawers inside the drawer slides.
Step 9
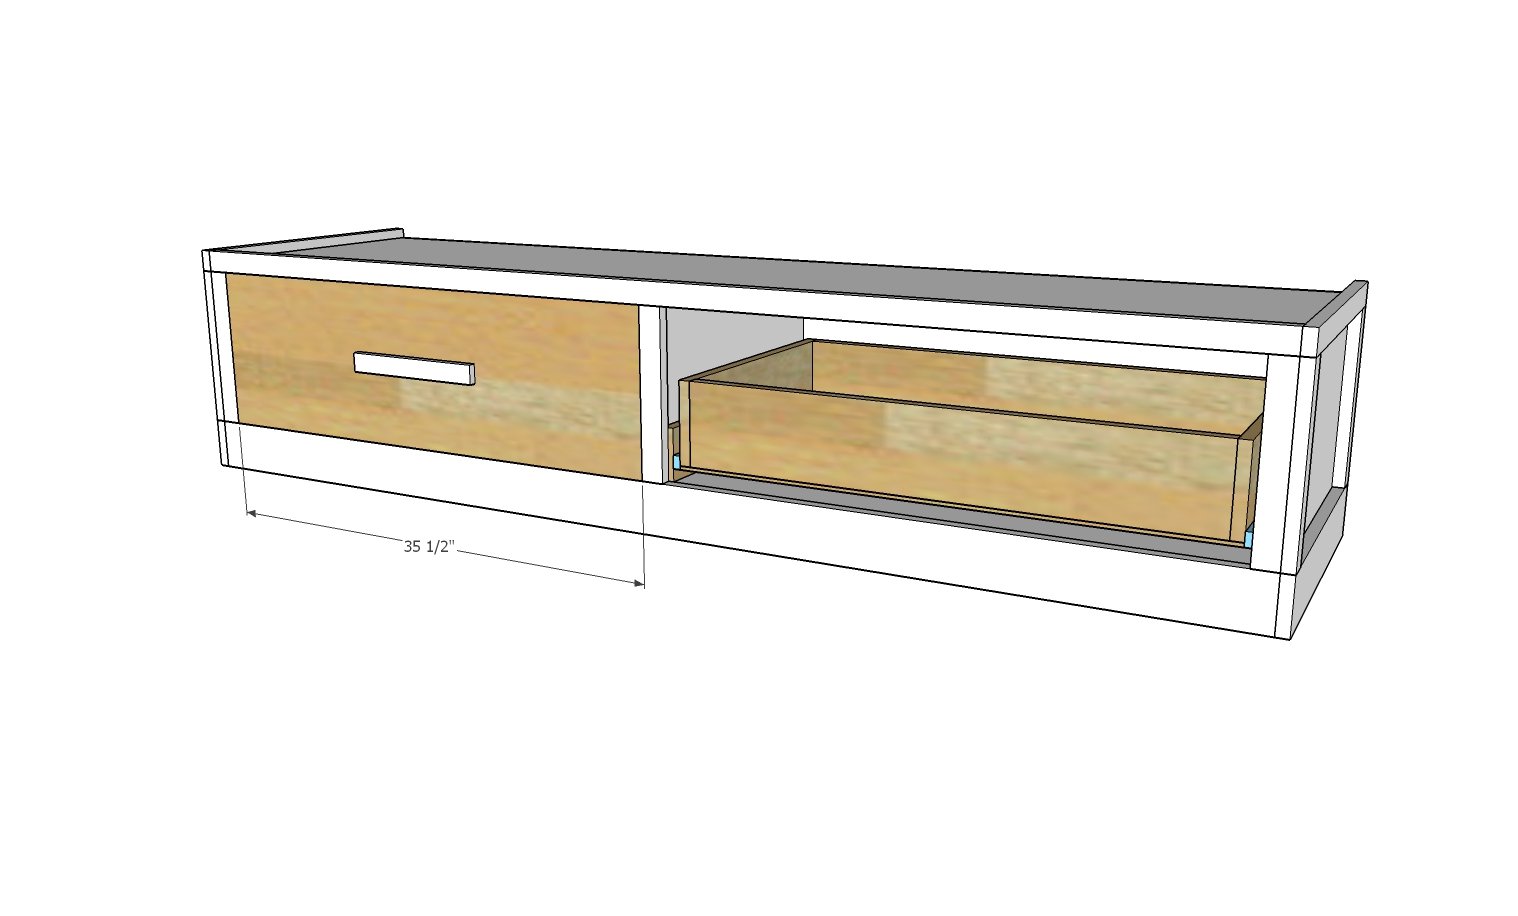
Measure and cut the drawer faces to fit.
You may need to cut the drawer down in size with a table saw.
Nail drawer face in a few places to front of drawer box with even gap around all four sides. Avoid nailing where hardware will be placed.
Remove drawer and further secure with 1-1/4" screws (you can use pocket hole screws) from inside of drawer. Avoid screws where hardware will be placed.

Comments
Ana White (not verified)
Sat, 11/14/2009 - 12:44
Doesn't a box spring cost
Doesn't a box spring cost $200? Or a bed skirt?
Guest (not verified)
Fri, 05/13/2011 - 07:08
i think the point is that
i think the point is that they want storage under the bed....
ferestre interioare (not verified)
Wed, 10/10/2012 - 11:02
Reply to comment | Ana White
Aw, this was a very good post. Taking a few minutes
and actual effort to produce a superb article but what can
I say I put things off a lot and don't seem to get nearly anything done.
Ana White (not verified)
Sat, 11/14/2009 - 15:36
I'm really in trouble now!
I'm really in trouble now! My sister has been looking at my site and asked if we could build a Stratton Bed together for her. I might be building this too . . . !
In reply to I'm really in trouble now! by Ana White (not verified)
diy_lover
Sun, 08/07/2016 - 18:36
Height/Double
If you don't mind me asking I wanted to make two to make it taller. Do I make two separate frames and stack them or is there another easier way?
In reply to I'm really in trouble now! by Ana White (not verified)
diy_lover
Sun, 08/07/2016 - 18:43
Height/Double
Wanting it taller and doubling the storage, do I make two separate frames and stack them or is there another way? If I stack them how do I keep them stuck together to they don't move apart?
Anonymous (not verified)
Tue, 11/24/2009 - 23:54
Has anyone built this plan?
Has anyone built this plan? Just curious how it worked out. Thanks so much, Eileen K.
Jim Ulm
Tue, 11/30/2021 - 07:09
I have, and it's a great…
I have, and it's a great plan. overall, it's an easy build, very sturdy, but it is a bit heavy. Easily recommend it.
Ana White (not verified)
Fri, 12/11/2009 - 09:21
For those of you building
For those of you building this bed - I've done some research on the Pottery Barn Stratton bed, and many people have complained that it can create mildew under the mattress because the mattress sits on the benches. I am sure this is true for most captain beds. Might be wise to pick up a rug pad (very cheap) to add a small air gap. That is what Pottery Barn recommends.
mrspeldo
Tue, 03/29/2011 - 15:50
Mildew issues
When I built this bed over a year ago, I went to a local furniture store and the sales lady told me that she has never heard of a mildew problem on mattresses used on platform beds. They sell platform beds at their store and haven't had any complaints. So I didn't buy a rug pad and I haven't had any problems with mildew or mold yet...
Kevin L. Nault (not verified)
Tue, 06/14/2011 - 21:52
Mildew Issues
It depends where you live – I used to live in Juneau, AK, where everything mildewed, and now live in Albuquerque, NM, where it's almost unheard of.
MommaP (not verified)
Fri, 12/18/2009 - 04:26
I am soooo excited! I LOVE
I am soooo excited! I LOVE this bed plan! Wed don't have a box spring for our bed and I've been looking for a good platform bed but they're so spendy. This is perfect and budget friendly! My parents have decided for Christmas to help us buy the wood and build this bed for me! I'm very excited for Christmas so I can have this bed. I'll post pics and let you know how the build goes. This will be the first thing I've helped build since shop class in HS. It's been a LONG time! Thanks again for the plans, Ana. :)
Primary Work at Home (not verified)
Sun, 12/20/2009 - 04:23
I am looking for this design
I am looking for this design and your post is very helpful. This is a perfect guide. Thank you for sharing this one.
kristen (not verified)
Tue, 12/22/2009 - 17:48
what size bed is this for? i
what size bed is this for? i am looking for a king...you might have mentioned it but in excitement might have missed it! :)
Anonymous (not verified)
Sun, 12/27/2009 - 14:53
For years I've used a similar
For years I've used a similar concept...... the drawers and frame from a water bed! Not as nicely finished as these, but it kept the mattress off the floor and provided extra storage.
John B (not verified)
Wed, 12/30/2009 - 09:36
Great plans! Looking forward
Great plans! Looking forward to looking at your other plans.
Minor error in cut list... Part M should be 60 inches not 20.
Will sat I find the center section a bit amusing. strong enough to drive trucks over. If this was part of a home floor, it would have only the two long beams and only a cross piece at each end. Your design will out last the house it is in (grin).
Thanks for posting them as free plans!
LCOMBS
Sat, 06/13/2020 - 07:56
Part M
What/where is part M?
Ana White (not verified)
Wed, 12/30/2009 - 10:42
Hi John, Thanks for catching
Hi John, Thanks for catching that! You are the first out of some 30,000. I will fix this right away.
If you are doing it yourself, you might as well be doing it right, right? Of course, you could just build the spacer as you say.
Glad to have you on my blog!
Ana
MommaP (not verified)
Fri, 01/01/2010 - 12:22
In the plans on step 4 it
In the plans on step 4 it calls for a board 58 1/2 x 19 1/4" but it's not on the diagram for cutting the plywood?? Are you just missing this part? or am I reading the plans wrong?
Ana White (not verified)
Fri, 01/01/2010 - 14:37
You are totally right - there
You are totally right - there needs to be 2 more of D, the bottom shelf of the bench. To save you plywood, what I would do is on the last piece of plywood, cut 2 of these out (instead of the piece for the top of the spacer, 20" x 60").
Go ahead and build all the benches as stated in the plans. Build the spacer frame. Then from your scraps, cut 2 pieces of plywood to fit on top of the spacer. Just make sure that the splice in the plywood is centered on one of the spacer joists. (each piece will be approximately 20" x 30"). As you can see from previous comments, the spacer is overbuilt as it is, and does not need a full sheet of 3/4" plywood.
When I get a free second, I will modify the cutting layout to show this.
Thanks for catching this!
Ana
Anonymous (not verified)
Fri, 01/08/2010 - 09:10
Ana,I have just found your
Ana,
I have just found your site and am looking forward to trying many projects! I would love to make a full size stratton bed for my 10 year old son. Would it be possible to modify that plan??
Here's hoping,
Laura
Ana White (not verified)
Sun, 01/10/2010 - 10:17
FULL SIZE STRATTON BEDPottery
FULL SIZE STRATTON BED
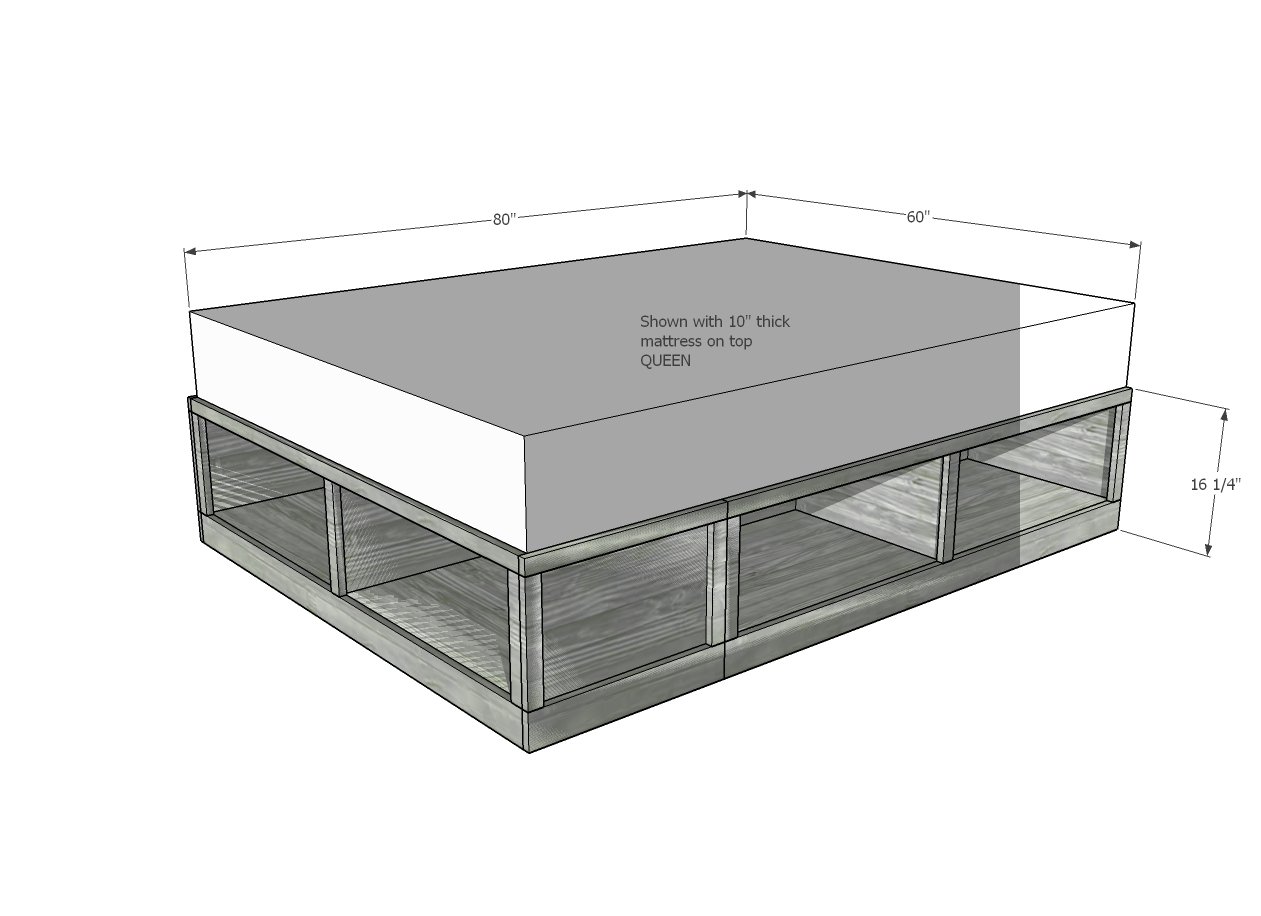
Pottery Barn does not make a full size stratton bed. In fact, they call this bed (knocked off in this plan) a Full/Queen.
A queen measures 60x80. The platform for this bed is 60x80.
A full measures 54x75. This would mean about 3" of the top would show around the mattress. It meets the standards of those purchasing this bed for a full size, so I most likely will not modify this plan in the immediate future to fit exactly to a full size.
Anonymous (not verified)
Thu, 01/14/2010 - 19:29
I will not acquiesce in on
I will not acquiesce in on it. I regard as polite post. Expressly the designation attracted me to study the intact story.
MikeM (not verified)
Sun, 01/31/2010 - 14:56
Ana, Great Site! Just made
Ana, Great Site! Just made all of the cuts, but realized that your list is short a 1X3 as 3 are needed for 3 - 60". Additionally, I had an extra 2X4 and an extra 1X2. I will be assembling tomorrow as I'm one of those people that doesn't stop until it is complete. Thanks for all your hard work on the site and plans.
Blue & White Wear (not verified)
Fri, 02/12/2010 - 16:41
This is awesome! Thanks for
This is awesome! Thanks for sharing this! Now I need to find someone to build it for me!
Joy (not verified)
Sun, 02/14/2010 - 06:34
Our family downsized to a
Our family downsized to a much smaller home a few months ago and none of our furniture fits in the new space - including our big sleigh bed! This is exactly what we want to buy - but now my husband and brother can build it for a lot less! Brilliant! When we build it this spring, I'll send you pics.
Nikki (not verified)
Mon, 02/15/2010 - 13:50
Ok, I am soooo excited to
Ok, I am soooo excited to have found these plans. My husband and I have been talking about building a bed just like this for some time now because I am too cheap to fork out the money for some boards of wood but since neither my husband nor myself have any woodworking experience he has been resistance to start our first project with something this big. Your plans have giving both of us the confidence to try and tackle this long awaited project. Thank you so very much. We are going to start tomorrow!! I will let you know how it turns out. Yay!
Anonymous (not verified)
Sun, 02/21/2010 - 07:58
Dear Ana, I just love this
Dear Ana, I just love this bed! Thank you very much for sharing your plans, I think I'll be able to build something like that for myself. Only... I'm afraid the mattress may slide off the benches. Shouldn't I add some sort of skirting (sorry, I don't know how to name the thing in the furniture-makers' lingo) around the top? If so what is the best way to fasten it to the benches? Mary
Laurie (not verified)
Thu, 02/25/2010 - 08:27
I love this bed! I'm going
I love this bed! I'm going to modify it to fit exactly a double sized mattress...my son's room is small and his Ikea Hopen bed is just too big. I love the drawers, I may be able to get away with not having a dresser in the room, which will save space too!
Ana White (not verified)
Thu, 02/25/2010 - 09:35
Pottery Barn recommends using
Pottery Barn recommends using a standard rug pad to keep the mattress in place and also to create a moisture barrier to fight mildew.
Anonymous (not verified)
Mon, 03/01/2010 - 17:44
For mildew control, why not
For mildew control, why not drill lots of small holes in the platform to allow for air flow and no extra cost.
Anonymous (not verified)
Fri, 03/12/2010 - 09:21
I love this site--now in my
I love this site--now in my favorites! I have been way too cheap to buy furniture and have been drawing up plans for several things these last few months. This bed is exactly what I wanted to build my daughter because her room is too small for a dresser. Now I am ready to jump right in. Thanks!!
Dart (not verified)
Sat, 03/13/2010 - 20:30
Do you have a king size plan
Do you have a king size plan for this? Would a king size work for this design?
Ryan (not verified)
Sat, 03/20/2010 - 10:47
Ana,Is there a way to
Ana,
Is there a way to download or print this plan?
-Ryan
PS. Loving your site, by the way. Can't wait to furnish our house with handmade furniture!
Hellga (not verified)
Sat, 03/20/2010 - 18:43
Ryan:
Ryan: http://knockoffwood.blogspot.com/2010/02/how-to-print-plans.html shows you how to print the plans off very nicely :D
micanders (not verified)
Thu, 03/25/2010 - 16:32
I LOVE this bed, but would
I LOVE this bed, but would need it in king size. Do you have modified plans in that size yet?
aaisha (not verified)
Wed, 03/31/2010 - 16:13
Hi Ana,My husband found you
Hi Ana,
My husband found you online and now I'm hooked. :) Many people have asked about this bed in a king size, I was also curious to know those building instructions as well. Where can I find those instructions? Thanks. :)
aaisha (not verified)
Wed, 03/31/2010 - 18:46
Ok, I found them. :)
Ok, I found them. :)
Erinyay (not verified)
Wed, 04/07/2010 - 11:56
THANK YOU! I finally made the
THANK YOU! I finally made the bed- we loooooove it! I also solved the riddle of finding baskets that fit by just hanging little curtains inthe cubbies.
Thanks so much!
http://erinyay.com/make/furniture/i-made-the-bed/
Kim (not verified)
Thu, 04/22/2010 - 10:30
OMG - I love your site and i
OMG - I love your site and i love it even more now because of this set of plans. I have ADORED this bed from PB but refused to pay the price. Now I'm so looking forward to building this with my husband.
Question though...I see multiple comments asking if there are measurements possible for a king-size bed...and then someone said in the comments that they found it...but I cannot find where it mentions King-Size. Can someone please help?
Ana - You rock! Thank you for creating this blog! :)
dmatison (not verified)
Sat, 04/24/2010 - 19:29
have been trying to get my
have been trying to get my husband to build this bed for 5 years.. now i may actually get it done! question though, what are some places that people have had luck finding the baskets? -im having some trouble that.
Emy (not verified)
Tue, 04/27/2010 - 16:11
Ana, what an incredible
Ana, what an incredible site!!
For the life of me though, I can't find plans for a king-sized bed. Help!! Please!!
Kim (not verified)
Mon, 05/03/2010 - 14:52
I got help on the Knock-Off
I got help on the Knock-Off Wood facebook page for the plans to change this from queen to king.
Here are the links for those that are interested: http://www.knock-offwood.com/2010/01/plan-how-to-modify-queen-sized-str…
and for the headboard here http://www.knock-offwood.com/2010/02/plans-king-size-framed-upholstered…
Studio614 (not verified)
Tue, 05/25/2010 - 06:44
My husband and I have been
My husband and I have been eyeing a bed for 2 years that is almost identical to this one, but it is priced at $1500! I just sent him a link to this and cannot WAIT to build it ourselves! Thank you so much for your hard work and willingness to share!
jennifersmith222 (not verified)
Tue, 06/01/2010 - 09:32
My husband just built this
My husband just built this for me for Mother's Day. It was fun to do together and looks great! I got baskets from www.thebasketlady.com for $40 each. It was the underbed basket, jumbo size. Slightly lower than PB's baskets (8in vs 11in) but a better fit in width and depth. The Basket Lady has coupon codes on facebook. Whole thing with baskets was undr $500! Thanks very much for the plans!
JMMiller (not verified)
Sun, 06/13/2010 - 11:54
Anyone know where I can find
Anyone know where I can find the correct sized baskets (25.5" wide x 17" deep x 11" high)? I can't even find them on PB.
Nancy (not verified)
Mon, 06/28/2010 - 20:29
To trim this, has anyone ever
To trim this, has anyone ever used a nicer molding other than the standard trim?
Stephen (not verified)
Mon, 07/05/2010 - 17:26
I'll be building this for my
I'll be building this for my oldest son - 13. The for my middle son, 11 I need to adjust to a California King. Are you able to help adjust the measurements for a California King? I'll also to the dressers and headboards.
I'll let you know how they go. ;-)
C. (not verified)
Mon, 07/12/2010 - 10:16
Hi Ana, Great plans, but I
Hi Ana,
Great plans, but I have a quick question. I was thinking about buying 3 1 cube x 5 cube benches from IKEA and using those as my base, with either a spacer in the middle or a piece of plywood on top to act as the platform. Do you have any thoughts on the viability of this?
Your opinion would be greatly appreciated!
Thanks,
Christine
Ana White (not verified)
Mon, 07/12/2010 - 22:02
Christine, of course! Try
Christine, of course! Try something like this plan http://www.knock-offwood.com/2010/05/furniture-plans-full-size-storage-…